 06-24-2012, 02:37 PM
|
#31
|
|
Junior Member
|
|
Join Date: May 2012
Location: Greensboro, NC
Posts: 12
|
|
|
Junior Member
Join Date: May 2012
Location: Greensboro, NC
Posts: 12
|
Quote:
Originally Posted by lcchik

It is late saturday night after spending the day disconnecting the engine on my 2001 SR5 4wd.
Everything is disconnected but we are stuck at our final step...disconnecting the bellhousing from the engine. I have read and reread this thread and am still unclear....how does one get to those bolts? We have plenty of extensions, but still unsure of the access point. Via the wheelwell? Removing the cross bar doesn't seem to allow enough room.
We are resuming the torment tomorrow AM. Thanks in advance for any advice.
|
Passengers side ones I did all from underneath with a lot of extensions and a universal joint or wobbly sockets. even the highest one you can get to, it's just a biatch to reach them
Drivers side was a combination of through the wheel well and underneath with every wrench and socket/extension/universal joint combo I had. They go back in a lot easier than they come out--just make sure to blue loctite them
|

|
 Reply With Quote Reply With Quote
|
|
07-05-2012, 10:44 AM
|
#32
|
 |
Senior Member
|
|
Join Date: Feb 2011
Location: Philadelphia, PA
Posts: 3,921
|
|
|
Senior Member
Join Date: Feb 2011
Location: Philadelphia, PA
Posts: 3,921
|
This is a great write up. I'll be tackling this job soon as I decided to drop a used motor in my '00 and yank the one I started to do the top end rebuild on out.
For those of you that did this job at home, few questions:
1.) Roughly how long did it take you to pull the motor?
2.) Did you already have an engine crane or did you rent one? If so, where from?
I'm leaving next Saturday to go to OBX for a week with the wifey. (Much needed vacation.) Trying to figure out if I should attempt this before I go or not.
Thanks,
PBR
|
|
|
Reply With Quote
|
|
07-05-2012, 11:51 AM
|
#33
|
 |
Senior Member
|
|
Join Date: Oct 2010
Location: Raleigh, North Carolina
Posts: 3,262
|
|
|
Senior Member
Join Date: Oct 2010
Location: Raleigh, North Carolina
Posts: 3,262
|
It took me about an hour to pull it, maybe a little more or little less.
I had bought a crane from Harbor Freight for $100 many moons ago.
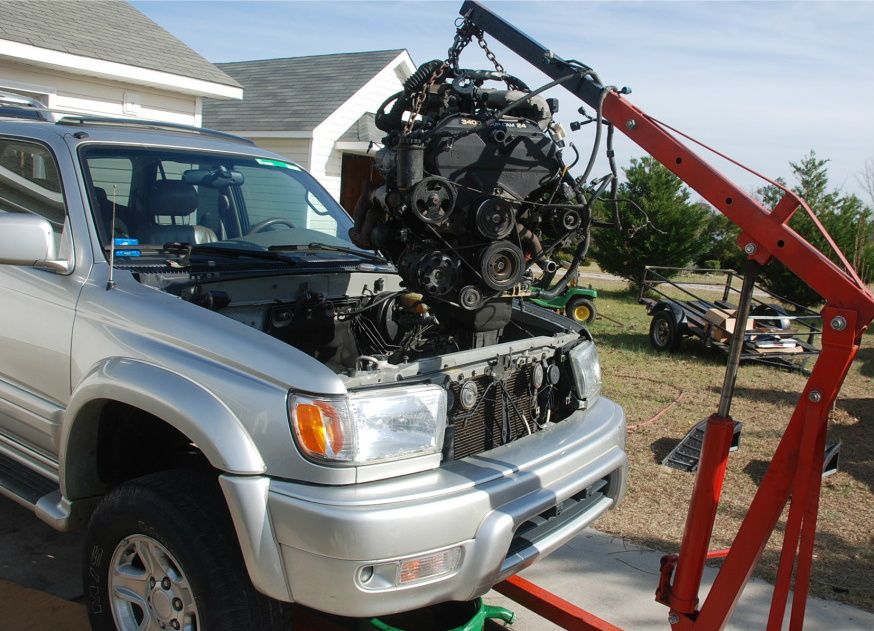
Mind you that there was no rust or corrosion on any of my bolts. My exhaust manifold bolts were perfect and I left everything on the engine. I unplugged the wire harness from the body, pulled the radiator and I removed my hood.
BTW, I have used the crane countless times and it has paid for itself 10 times over.
__________________
1999 Limited 4runner in Silver - 9th and 10th Injected TRD Supercharged 4.7 2UZ-FE swap - AISIN Manual hub lockers - Retrofitted E-locker - Downey Off road Coilovers & adjustable Pan Hard Bar - Whelen PA - 2" Personally made Body Lift - Eclipse Navigation Radio - Spider Trax - Custom Hidden Winch - Triple Electric Fans - Running boards off then back on again - Ghetto Cold Air Intake - Sequoia Brakes - V8 Badge (for extra horse power)
2002 SR5 Tacoma Extended Cab also in Silver On 37's and Guns for sale
|
|
|
Reply With Quote
|
|
07-05-2012, 12:18 PM
|
#34
|
|
Senior Member
|
|
Join Date: Feb 2011
Location: Philadelphia, PA
Posts: 3,921
|
|
|
Senior Member
Join Date: Feb 2011
Location: Philadelphia, PA
Posts: 3,921
|
I'm so glad you're back! Thanks man. Any tips for getting to the bell housing bolts?
|
|
|
Reply With Quote
|
|
07-05-2012, 04:25 PM
|
#35
|
|
Junior Member
|
|
Join Date: May 2012
Location: Greensboro, NC
Posts: 12
|
|
|
Junior Member
Join Date: May 2012
Location: Greensboro, NC
Posts: 12
|
Quote:
Originally Posted by PitbullRescuer
This is a great write up. I'll be tackling this job soon as I decided to drop a used motor in my '00 and yank the one I started to do the top end rebuild on out.
For those of you that did this job at home, few questions:
1.) Roughly how long did it take you to pull the motor?
2.) Did you already have an engine crane or did you rent one? If so, where from?
I'm leaving next Saturday to go to OBX for a week with the wifey. (Much needed vacation.) Trying to figure out if I should attempt this before I go or not.
Thanks,
PBR
|
It took me about 1.5 days of work to get it out and about the same putting it back in. I could probably do it in a day if I had to do it again.
Already had a hoist
and got it out in an hour? really?
|
|
|
Reply With Quote
|
|
07-05-2012, 04:41 PM
|
#36
|
|
Senior Member
|
|
Join Date: Oct 2010
Location: Raleigh, North Carolina
Posts: 3,262
|
|
|
Senior Member
Join Date: Oct 2010
Location: Raleigh, North Carolina
Posts: 3,262
|
Yep. The dude that bought my motor was sitting there waiting for me to get out and load it into his 2nd Gen 4runner.
Bell housing bolts. I used a long extenstion with a universal socket. Worked like a champ.

While i was under the 4runner, i removed the wire harness to the transmission and transfer case, torque converter bolts, exhaust manifold bolt and ADD harness.
__________________
1999 Limited 4runner in Silver - 9th and 10th Injected TRD Supercharged 4.7 2UZ-FE swap - AISIN Manual hub lockers - Retrofitted E-locker - Downey Off road Coilovers & adjustable Pan Hard Bar - Whelen PA - 2" Personally made Body Lift - Eclipse Navigation Radio - Spider Trax - Custom Hidden Winch - Triple Electric Fans - Running boards off then back on again - Ghetto Cold Air Intake - Sequoia Brakes - V8 Badge (for extra horse power)
2002 SR5 Tacoma Extended Cab also in Silver On 37's and Guns for sale
|
|
|
Reply With Quote
|
|
07-05-2012, 04:43 PM
|
#37
|
|
Junior Member
|
|
Join Date: May 2012
Location: Greensboro, NC
Posts: 12
|
|
|
Junior Member
Join Date: May 2012
Location: Greensboro, NC
Posts: 12
|
I think I wasted a few hours trying to get all the transmission wiring harness connectors off. I finally said screw it and just pulled the intake off and took the whole wiring harness off the engine.
Yeah I ordered some impact swivel sockets after taking it out, just to help putting it back together. Pretty sure I would have saved a few hours if I had had them when it was coming out.
|
|
|
Reply With Quote
|
|
08-16-2012, 01:09 PM
|
#38
|
|
Member
|
|
Join Date: Jul 2011
Location: Marysville, WA
Posts: 34
|
|
|
Member
Join Date: Jul 2011
Location: Marysville, WA
Posts: 34
|
Quote:
Originally Posted by jmt2404
Thanks guys. I thought Ild put out some effort since I couldnt find a write up on it when I first removed my engine. Its not the best but its something. I'm sure I missed some steps but it will give people a little clue into what it takes to do a job like this.
|
yes this is the only thing i've found on 3.4 engine removal. So im ready to rip mine out, everything's loose but I cant seem to get the tranny to break free. Trying to pull motor and leave tranny, any suggestions? Is the dam thing spot welded in there or what?
|
|
|
Reply With Quote
|
|
08-28-2012, 01:23 PM
|
#39
|
|
Junior Member
|
|
Join Date: Aug 2012
Posts: 2
|
|
|
Junior Member
Join Date: Aug 2012
Posts: 2
|
Registered to say Awesome thread! Pulled out my tired ol 3.4 and installed a reman from oregon engines last week. Just finished yesterday and she's purring beautifully! This was my first auto engine R+R and this thread, basic hand tools, and an engine lift was all I needed. Took about 5 days because as I was dismantling the old engine I cleaned and repainted everything I could. Also took apart and or cleaned everything (IAC, MAF, TB, etc). Threw in a new radiator, hoses to and from tranny and radiator, starter, T belt, oil and water pump, ALL SEALS, and external tranny cooler. The engine is pretty much brand new and runs great. Idle is a little high around 1300, but I'll put a couple miles on her and see if she settles down.
|
|
|
Reply With Quote
|
|
08-28-2012, 01:55 PM
|
#40
|
|
Member
|
|
Join Date: Aug 2012
Location: Toronto, Canada
Age: 36
Posts: 323
|
|
|
Member
Join Date: Aug 2012
Location: Toronto, Canada
Age: 36
Posts: 323
|
Good job, but why didnt you just disconnect the harness from the ECU and pull it out the firewall? It's a much easier way....
|
|
|
Reply With Quote
|
|
08-28-2012, 03:23 PM
|
#41
|
|
Senior Member
|
|
Join Date: Feb 2011
Location: Philadelphia, PA
Posts: 3,921
|
|
|
Senior Member
Join Date: Feb 2011
Location: Philadelphia, PA
Posts: 3,921
|
I got stuck at pulling the bolts for the inspection plate to get to the fly wheel bolts. Haven't had time to get back in there.
|
|
|
Reply With Quote
|
|
08-31-2012, 08:53 PM
|
#42
|
|
Junior Member
|
|
Join Date: Aug 2012
Posts: 2
|
|
|
Junior Member
Join Date: Aug 2012
Posts: 2
|
Quote:
Originally Posted by PitbullRescuer
I got stuck at pulling the bolts for the inspection plate to get to the fly wheel bolts. Haven't had time to get back in there.
|
The upper driver side bolt was a pita! Ended up using 2 universals to snake around and get it. When I was installing it I found you can reach your arm up and around and get at it from the back, unless you have some Gorilla forearms. Good luck!
|
|
|
Reply With Quote
|
|
03-02-2014, 02:16 PM
|
#44
|
 |
Member
|
|
Join Date: Apr 2012
Location: Vernon, BC, Canada
Posts: 879
Real Name: Doug
|
|
|
Member
Join Date: Apr 2012
Location: Vernon, BC, Canada
Posts: 879
Real Name: Doug
|
Starting my engine replacement soon...
[QUOTE=agloukhoff;1164472]Got my engine out today - frankly armed with 2 universal sockets and wobbly extensions, the bell housing bolts are very easy.
These are the tools I got specifically for the job and they worked out great:
Amazon.com: Ampro A5591 7 Piece 1/2-Inch Drive Flex Impact Socket Set: Home Improvement
Amazon.com: Sunex 2300 1/2-Inch Drive Universal Joint Impact Socket: Home Improvement
Sunex 2504 1/2-Inch Wobble Drive Extensions Impact Set,4 Piece - Amazon.com
My JDM engine should be here in a week or so, so I want to get all of the tools etc. together I'll need to do the job! I think I'm going to buy the flexible sockets... everyone that tackled the tranny bolts says it'll make life easier.... I dare say I'll need all the help I can get! Did anyone try and detach the AC compressor and leave it in, when they pulled the engine, or am I just asking for a bunch of aggravation....? Any feedback would be appreciated!!
__________________
1998 SR5 3.4L V6 Auto... Pretty much bone stock...aside from the Tundra brakes, OME880 and OME906's in back all with Rancho 9000XL adjustable shocks ... "Livin' the dream in the Canadian Okanagan!"
Electronics/Telecommunications Engineering Technologist
|
|
|
Reply With Quote
|
|
03-02-2014, 04:02 PM
|
#45
|
|
Member
|
|
Join Date: Nov 2012
Location: Haddon Heights, NJ
Posts: 182
|
|
|
Member
Join Date: Nov 2012
Location: Haddon Heights, NJ
Posts: 182
|
[QUOTE=poleclimber63;1636783]
Quote:
Originally Posted by agloukhoff
|
Leave the compressor in..... Did this swap not two months ago....
|
|
|
Reply With Quote
|
 Posting Rules
|
You may not post new threads
You may not post replies
You may not post attachments
You may not edit your posts
HTML code is On
|
|
|
|


 Linear Mode


