Home Menu

Site Navigation


User Tag List

Reply
 
Thread Tools Rate Thread Display Modes
Old 02-25-2018, 04:19 PM #1
1biker's Avatar
1biker 1biker is offline
Member
 
Join Date: Nov 2017
Location: Issaquah, WA
Posts: 82
Real Name: Justin
1biker is on a distinguished road
1biker 1biker is offline
Member
1biker's Avatar
 
Join Date: Nov 2017
Location: Issaquah, WA
Posts: 82
Real Name: Justin
1biker is on a distinguished road
1biker’s ’97 SR5 Timeline and Journey

This won’t be a “Build Thread” in the typical sense, but more of a way to document a journey, both in terms of the vehicle and where the vehicle takes us. I don't really have an end goal for this truck. It will be an evolution.

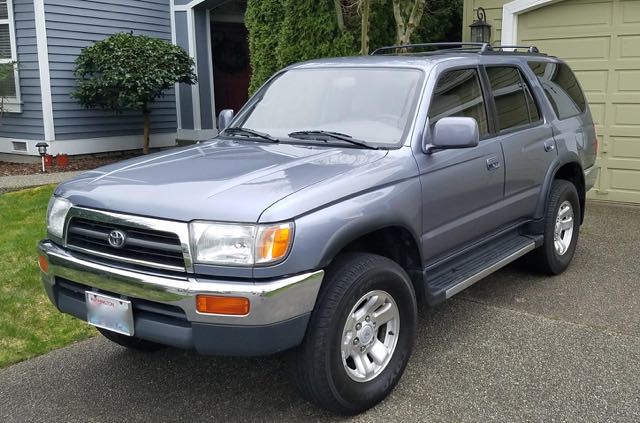
I purchased this 1997 SR5, 4x4, V6, Auto on March 20, 2017 with 72,403 miles. This truck was completely stock outside of a Sony Mini-disc deck and CD changer and aftermarket security system. I am the third owner of this PNW T4R. First owner owned the vehicle from new until late-2016 where it was traded in on a newer Inifiniti at a local high end used dealer. Second owner was the General Manager of said dealership. He purchased the vehicle from the dealership to give to his daughter for her first vehicle, with one contingency, she had to get good grades to get the 4Runner. Luckily for me, she didn't and he posted it on Craigslist.

When I purchased the vehicle I was looking for a new/used vehicle to support our outdoor lifestyle, lots of mountain biking, skiing, camping and hiking. I wasn't specifically looking for a T4R. Friends had owned them throughout the years and I always loved the look of the 3rd Gen's. I knew what they were incredibly reliable and a solid platform for whatever you wanted them to be. A friend of mine was helping me look for vehicles when he stumbled across the ad. As soon as I saw it, I knew that a 3rd Gen was the perfect next vehicle, and this one was a rare, very low mileage, unmolested and clean example. She was mine, let the infatuation and spending begin!

This forum has been an incredible community to be a part of. Makes owning this great truck even better! Thank you all!

As bought:
As Bought


Current:
20181018_170657

List of Mods, all completed by myself:

72,500mi - WeatherTech Floormats and Hood Defector
72,800mi - 199mm TBU upgrade with Stainless Steel Brake Lines
72,800mi - B&M External Transmission Radiator added
77,041mi - Riverside Seat Foams replaced - OEM
79,215mi - Rigid Industries Foglights
79,905mi - Rear Cargo Auxiliary Dome Lights added
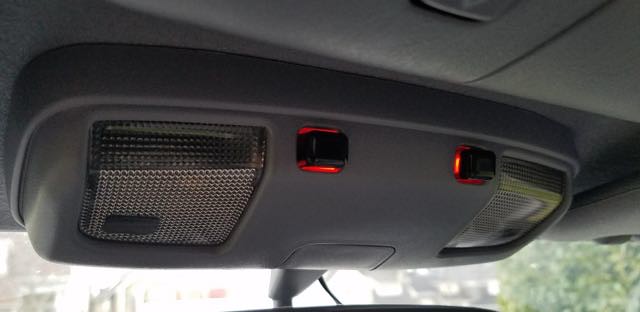
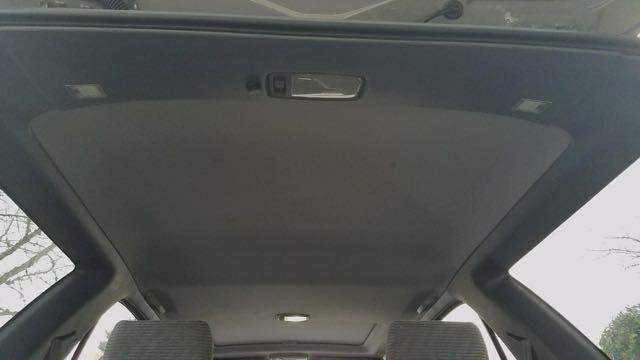
79,951mi - White LEDs added to Front Dome Lights so they light up when doors open, Added Red LEDs behind Front Dome Switches for easy locating with dark cabin
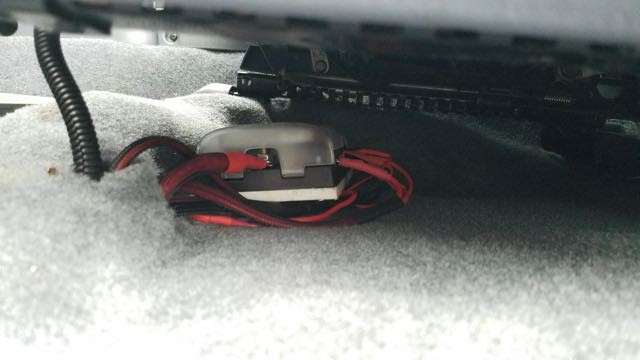
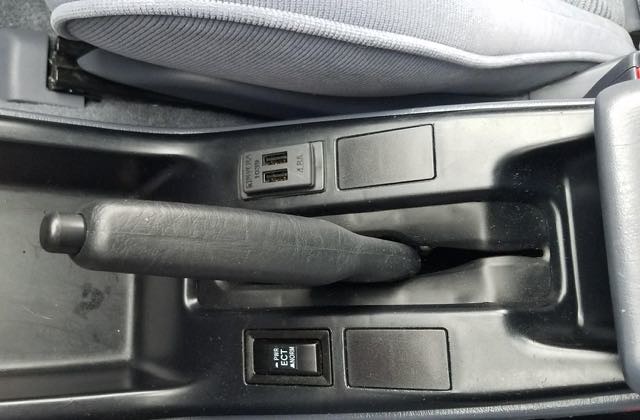
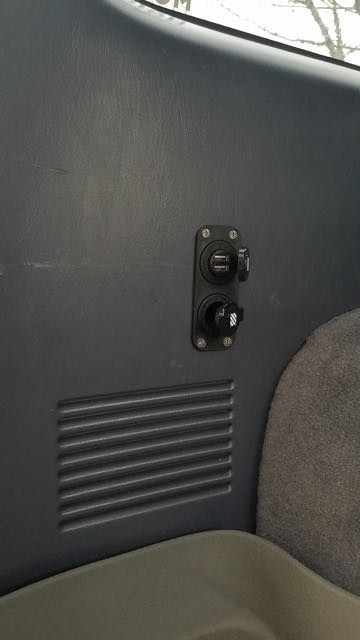
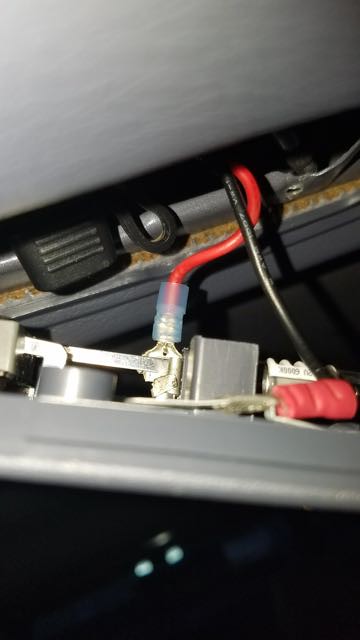
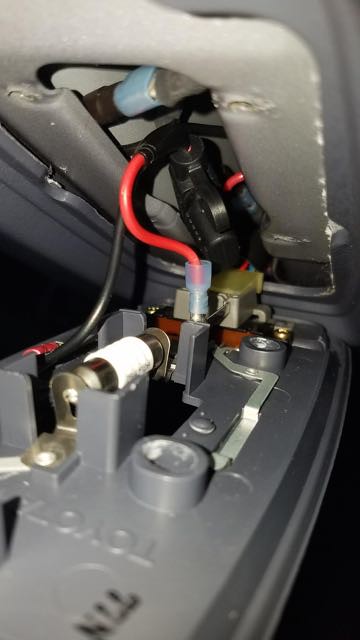
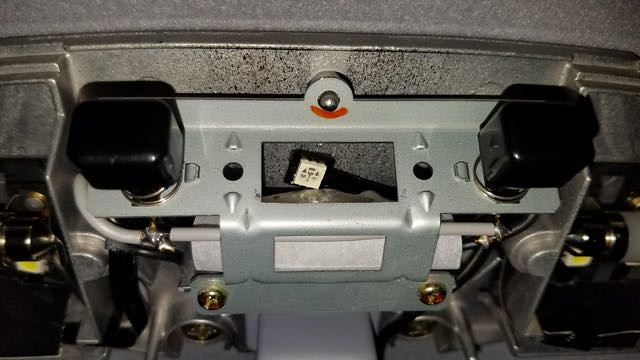
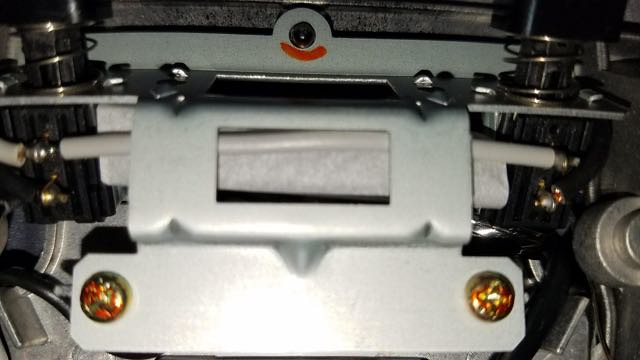
80,656mi - Installed Blue Sea Auxiliary Fuse Box, USB Power at Center Console, 12V and USB Power ran to Rear Cargo, relocated Rear Window Switch to Dash
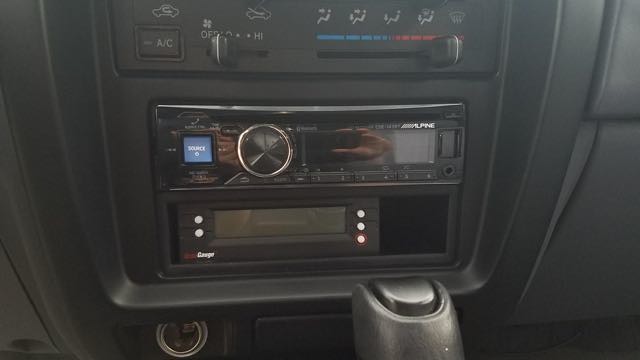
81,005mi - Alpine Headunit and Amp, ScanGauge2
81,835mi - SRQ Fab HID Headlights and Corner Markers


List of Maintenance, all completed by myself:

Brakes, Suspension, Tires and Driveline:

72,354mi - Bridgestone Duelers 265/70R16
72,800mi - 199mm TBU upgrade. RockAuto, should have gone OEM, Calipers rusted instantly.
72,858mi - Front and Rear Diff, Transfer Case and AT Fluid changed.
73,058mi - Front Shocks and Mounts replaced - all OEM. Power Steering Fluid Changed.
73,198mi - Rear Shocks and Mounts replaced - all OEM.
73,198mi - Driveline U-Joints and Slip Yokes greased
73,938mi - Front Sway Bar and Steering Rack Bushings replaced. Energy Suspension blacks
74,532mi - Huge Job! Rear Axle Seals, Bearings and all necessary seals - all OEM. Rear Shoes Replaced - all OEM. Added Stainless Steel Brake Line. Rear Sway Bar Bushings replaced - Energy Suspension blacks. Rear Diff breather and Fluid changed. OTRE and LBJs replaced - all OEM.
79,983mi - Front Sway Bar Links replaced - OEM. Steering Rack Bearing, Spring, Cap and Locknut replaced - all OEM.
84,094mi - UBJs replaced - OEM

Engine Mechanical:

72,858mi - New Spark Plugs, Plug Wires and Fuel Filter - all OEM. Throttle body and MAF cleaned.
73,938mi - Huge Job! Timing Belt and Valve Cover Seals. Timing Belt, Water Pump, Thermostat, Idler Pulley, Tensioner, Tensioner Pulley, Oil Dipstick O-Ring, Crank and Cam Seals, Valve Cover Gaskets, Spark Plug tube seals, Cam Plugs and Half Moons, Upper and Lower Intake manifold Gaskets, Upper and Lower Radiator hoses, Oil Cooler O-Ring and Washer, Oil Cooler coolant lines, PS, ALT and AC Belts replaced - all OEM. Coolant flushed - Toyota Red.
75,534mi - Up and Downstream 02 Sensors replaced - Denso.
77,041mi - Radiator and Alternator replaced - both OEM.

Huge shout out to all the members here that make their trucks their own, do their own wrenching and share their experiences. I really want to thank @mtbtim for all his videos and how-to's, habanero for her all writes ups and mods and BigFishAllDay for detailing all his adventures. Large amounts of time and care goes into their postings, thanks to them for setting incredible examples!
__________________
1997 SR5 V6 4x4 Auto Lavender Steel Metallic - SS 1.2 Classic | 199mm TBU | SRQ Fab HID | Rigid Fogs | Underseat Blue Sea Fuse Panel | Rocky Mountain Racks Antero EXT | 265/75R16 KO2 | Multiple Interior lighting/power distribution mods | Purchased March 2017 with 72k miles
1biker’s ’97 SR5 Timeline and Journey

Last edited by 1biker; 01-12-2019 at 12:27 PM.
1biker is offline   Reply With QuoteReply With Quote
Old 02-25-2018, 04:22 PM #2
1biker's Avatar
1biker 1biker is offline
Member
 
Join Date: Nov 2017
Location: Issaquah, WA
Posts: 82
Real Name: Justin
1biker is on a distinguished road
1biker 1biker is offline
Member
1biker's Avatar
 
Join Date: Nov 2017
Location: Issaquah, WA
Posts: 82
Real Name: Justin
1biker is on a distinguished road
Small Mods

Magnet Mod
Hate your key fob swinging around? I simply attached a Neodymiuim magnet behind the lower cover in the area of the fob. The battery in my fob is attracted to the magnet and no longer flops around. Simple, cheap and effective.
key_fob

Backlight Front Map Light Switches
Added Red LEDs that are tied to Ignition On (always lite) behind Front Map Light Switches. No more hunting for the switches in the dark.
Backlit Dome Switches

Rear Cargo Lights
Added two LED Lights into the Rear Cargo Panel, these lights are on their own Switch but are tied to the function of the stock Cargo Dome Light operation. I had to try numerous models of lights to find the right set that I could sneak just right into the existing cutouts in the body sheetmetal, without any modifications .
Cargo Lights2
Cargo Lights1

Auxiliary Fuse Box under Driver's Seat
Blue Sea

Center Console Switches: USB Power added, Rear Window moved to Dash
CenterConsole

Rear Cargo Power
West Marine USB and12V Combo Power Socket
Rear Cargo Power

Obligatory ScanGaugeII
ScanGauge
__________________
1997 SR5 V6 4x4 Auto Lavender Steel Metallic - SS 1.2 Classic | 199mm TBU | SRQ Fab HID | Rigid Fogs | Underseat Blue Sea Fuse Panel | Rocky Mountain Racks Antero EXT | 265/75R16 KO2 | Multiple Interior lighting/power distribution mods | Purchased March 2017 with 72k miles
1biker’s ’97 SR5 Timeline and Journey

Last edited by 1biker; 01-12-2019 at 12:28 PM.
1biker is offline   Reply With QuoteReply With Quote
Old 02-25-2018, 04:55 PM #3
Lamer's Avatar
Lamer Lamer is offline
Member
 
Join Date: Jan 2012
Location: Houston, TX
Age: 35
Posts: 498
Real Name: Jake
Lamer will become famous soon enough Lamer will become famous soon enough
Lamer Lamer is offline
Member
Lamer's Avatar
 
Join Date: Jan 2012
Location: Houston, TX
Age: 35
Posts: 498
Real Name: Jake
Lamer will become famous soon enough Lamer will become famous soon enough
that's a very good list of work and maintenance done. looks very clean. nicely done. keep up the good work.
__________________
https://i.imgur.com/WQdryKXm.jpg
The Sequel - 1996 4Runner SR5 - Houston, TX
The Original - 2001 4runner SR5 - SOLD
Etsy Page - Custom Pinstriping and Sign Making
@8LinePinstripe: Instagram
Lamer is offline   Reply With QuoteReply With Quote
Old 02-25-2018, 10:34 PM #4
1biker's Avatar
1biker 1biker is offline
Member
 
Join Date: Nov 2017
Location: Issaquah, WA
Posts: 82
Real Name: Justin
1biker is on a distinguished road
1biker 1biker is offline
Member
1biker's Avatar
 
Join Date: Nov 2017
Location: Issaquah, WA
Posts: 82
Real Name: Justin
1biker is on a distinguished road
Quote:
Originally Posted by Lamer View Post
that's a very good list of work and maintenance done. looks very clean. nicely done. keep up the good work.
Thanks! I've been stalking your thread for the past month or so, appears we are doing a lot of the same items! Next up for me is Upper and Lower Control Arm Bushings and UBJs. Did you remove your Spindle Assy from the vehicle when pressing out the original UBJ or just rotated it enough to get necessary clearance to press it out?

Congrats on the valve cover job. That was a satisfying job for me. Found the valve train on mine to be a little sludgier/varnishy than I was hoping for though. Oh well, nothing some long trips, frequent oil changes and quality oil won't fix over time. Your's looks great!
__________________
1997 SR5 V6 4x4 Auto Lavender Steel Metallic - SS 1.2 Classic | 199mm TBU | SRQ Fab HID | Rigid Fogs | Underseat Blue Sea Fuse Panel | Rocky Mountain Racks Antero EXT | 265/75R16 KO2 | Multiple Interior lighting/power distribution mods | Purchased March 2017 with 72k miles
1biker’s ’97 SR5 Timeline and Journey
1biker is offline   Reply With QuoteReply With Quote
Old 02-25-2018, 10:59 PM #5
Lamer's Avatar
Lamer Lamer is offline
Member
 
Join Date: Jan 2012
Location: Houston, TX
Age: 35
Posts: 498
Real Name: Jake
Lamer will become famous soon enough Lamer will become famous soon enough
Lamer Lamer is offline
Member
Lamer's Avatar
 
Join Date: Jan 2012
Location: Houston, TX
Age: 35
Posts: 498
Real Name: Jake
Lamer will become famous soon enough Lamer will become famous soon enough
Quote:
Originally Posted by 1biker View Post
Did you remove your Spindle Assy from the vehicle when pressing out the original UBJ or just rotated it enough to get necessary clearance to press it out?
thanks man, appreciate the shoutout!

so the quick story with my UBJ is as follows: I got the old one out while the spindle was attached via the CV axle and LBJ. (old UBJ came out very easily). spent 3 hrs trying to press the new one in with the service kit rented from Autozone. I just couldnt get the new UBJ lined up straight as the press was slightly bent (problem with renting well used equipment) . I ended up putting the old UBJ back in and going to a local shop and had them do it. they had an amazing small hydraulic press that self-aligned and pressed it in like butter, all while the spindle was still on the truck.

do you have any info on your rear cargo lights? I like that alot
__________________
https://i.imgur.com/WQdryKXm.jpg
The Sequel - 1996 4Runner SR5 - Houston, TX
The Original - 2001 4runner SR5 - SOLD
Etsy Page - Custom Pinstriping and Sign Making
@8LinePinstripe: Instagram
Lamer is offline   Reply With QuoteReply With Quote
Old 02-25-2018, 11:58 PM #6
1biker's Avatar
1biker 1biker is offline
Member
 
Join Date: Nov 2017
Location: Issaquah, WA
Posts: 82
Real Name: Justin
1biker is on a distinguished road
1biker 1biker is offline
Member
1biker's Avatar
 
Join Date: Nov 2017
Location: Issaquah, WA
Posts: 82
Real Name: Justin
1biker is on a distinguished road
Quote:
Originally Posted by Lamer View Post
they had an amazing small hydraulic press that self-aligned and pressed it in like butter, all while the spindle was still on the truck.

do you have any info on your rear cargo lights? I like that alot
That sounds like a nice tool to have...in my dreams! Since I'm going to be doing the whole enchilada I've been thinking just remove the Spindle Assy and use my hydraulic press on the UBJ but then again that means I need to remove the axle nut and muck with the CV. Haven't touched those so it's at least an opportunity to get familiar those and their design/construction. Decisions.

Regarding the lights, here are the ones I bought. I modified a couple spade terminals and tapped on to the Dome Light "leads" that exist as part of the Dome Light circuit, the sheetmetal "traces" are nearly identical width to the Spades. The hot lead goes into a 2.5A fuse then into the two-pole Switch and then to the lights. I am pleased with the mod and will eventually go back and improve the execution/connection. My Front Map Lights are wired in the same manner. All my interior dome circuit lights are LED so the current demands are very low, I had no concerns about tapping into the Dome Lights in the manner I did.
Cargo Lights5
Cargo Lights4
Cargo Lights3
__________________
1997 SR5 V6 4x4 Auto Lavender Steel Metallic - SS 1.2 Classic | 199mm TBU | SRQ Fab HID | Rigid Fogs | Underseat Blue Sea Fuse Panel | Rocky Mountain Racks Antero EXT | 265/75R16 KO2 | Multiple Interior lighting/power distribution mods | Purchased March 2017 with 72k miles
1biker’s ’97 SR5 Timeline and Journey

Last edited by 1biker; 01-12-2019 at 12:30 PM.
1biker is offline   Reply With QuoteReply With Quote
Old 02-26-2018, 01:16 AM #7
Silver.T4R's Avatar
Silver.T4R Silver.T4R is offline
Member
 
Join Date: Jun 2017
Location: Portland, OR
Posts: 116
Silver.T4R is on a distinguished road
Silver.T4R Silver.T4R is offline
Member
Silver.T4R's Avatar
 
Join Date: Jun 2017
Location: Portland, OR
Posts: 116
Silver.T4R is on a distinguished road
Digging this build and the clean and functional mods. Never seen the dome lights done in LEDS before and definately want to try this on my rig. Looking forward to seeing where this one goes!
Silver.T4R is offline   Reply With QuoteReply With Quote
Old 02-26-2018, 04:54 PM #8
Lamer's Avatar
Lamer Lamer is offline
Member
 
Join Date: Jan 2012
Location: Houston, TX
Age: 35
Posts: 498
Real Name: Jake
Lamer will become famous soon enough Lamer will become famous soon enough
Lamer Lamer is offline
Member
Lamer's Avatar
 
Join Date: Jan 2012
Location: Houston, TX
Age: 35
Posts: 498
Real Name: Jake
Lamer will become famous soon enough Lamer will become famous soon enough
Quote:
Originally Posted by 1biker View Post
... I need to remove the axle nut and muck with the CV. Haven't touched those so it's at least an opportunity to get familiar those and their design/construction.
do this! great learning experience, and you will save yourself SOOO much hassle.

thanks for the link, pictures would be awesome! I plan on doing this.
__________________
https://i.imgur.com/WQdryKXm.jpg
The Sequel - 1996 4Runner SR5 - Houston, TX
The Original - 2001 4runner SR5 - SOLD
Etsy Page - Custom Pinstriping and Sign Making
@8LinePinstripe: Instagram
Lamer is offline   Reply With QuoteReply With Quote
Old 02-27-2018, 01:14 AM #9
1biker's Avatar
1biker 1biker is offline
Member
 
Join Date: Nov 2017
Location: Issaquah, WA
Posts: 82
Real Name: Justin
1biker is on a distinguished road
1biker 1biker is offline
Member
1biker's Avatar
 
Join Date: Nov 2017
Location: Issaquah, WA
Posts: 82
Real Name: Justin
1biker is on a distinguished road
Added pictures to the original post. Let me know if you have any questions. The light output is huge. I original didn't have them on their own Switch, just straight tied into the Dome Circuit. They were too bright to see every time a door was opened, so I put them on their own Switch.
__________________
1997 SR5 V6 4x4 Auto Lavender Steel Metallic - SS 1.2 Classic | 199mm TBU | SRQ Fab HID | Rigid Fogs | Underseat Blue Sea Fuse Panel | Rocky Mountain Racks Antero EXT | 265/75R16 KO2 | Multiple Interior lighting/power distribution mods | Purchased March 2017 with 72k miles
1biker’s ’97 SR5 Timeline and Journey
1biker is offline   Reply With QuoteReply With Quote
Old 02-27-2018, 01:41 AM #10
infamousRNR's Avatar
infamousRNR infamousRNR is offline
Senior Member
 
Join Date: Dec 2013
Location: SF Bay Area California
Posts: 2,763
infamousRNR is a glorious beacon of light infamousRNR is a glorious beacon of light infamousRNR is a glorious beacon of light infamousRNR is a glorious beacon of light infamousRNR is a glorious beacon of light infamousRNR is a glorious beacon of light
infamousRNR infamousRNR is offline
Senior Member
infamousRNR's Avatar
 
Join Date: Dec 2013
Location: SF Bay Area California
Posts: 2,763
infamousRNR is a glorious beacon of light infamousRNR is a glorious beacon of light infamousRNR is a glorious beacon of light infamousRNR is a glorious beacon of light infamousRNR is a glorious beacon of light infamousRNR is a glorious beacon of light
I’m digging the utilitarian mods! Especially the magnet one. Good stuff!
__________________
1998 Desert Dune Toyota 4runner Limited 4x4 w/ factory e-locker
2000 BLACK Toyota 4runner Limited 4x4 w/ factory e-locker Build Thread
2002 Thundercloud Metalic Toyota 4runner Limited 4x4
Build Thread
infamousRNR is offline   Reply With QuoteReply With Quote
Old 02-27-2018, 10:34 AM #11
Lamer's Avatar
Lamer Lamer is offline
Member
 
Join Date: Jan 2012
Location: Houston, TX
Age: 35
Posts: 498
Real Name: Jake
Lamer will become famous soon enough Lamer will become famous soon enough
Lamer Lamer is offline
Member
Lamer's Avatar
 
Join Date: Jan 2012
Location: Houston, TX
Age: 35
Posts: 498
Real Name: Jake
Lamer will become famous soon enough Lamer will become famous soon enough
Quote:
Originally Posted by 1biker View Post
Added pictures to the original post. Let me know if you have any questions. The light output is huge. I original didn't have them on their own Switch, just straight tied into the Dome Circuit. They were too bright to see every time a door was opened, so I put them on their own Switch.
ya man those are great! thanks. im on the prowl for LEDs that arent quite as bright
__________________
https://i.imgur.com/WQdryKXm.jpg
The Sequel - 1996 4Runner SR5 - Houston, TX
The Original - 2001 4runner SR5 - SOLD
Etsy Page - Custom Pinstriping and Sign Making
@8LinePinstripe: Instagram
Lamer is offline   Reply With QuoteReply With Quote
Old 02-27-2018, 10:19 PM #12
1biker's Avatar
1biker 1biker is offline
Member
 
Join Date: Nov 2017
Location: Issaquah, WA
Posts: 82
Real Name: Justin
1biker is on a distinguished road
1biker 1biker is offline
Member
1biker's Avatar
 
Join Date: Nov 2017
Location: Issaquah, WA
Posts: 82
Real Name: Justin
1biker is on a distinguished road
Thanks for the kind comments guys.

@infamousrnr - My mods are centering around being functional for how I currently use the vehicle. I would love to go crazy with bumpers and a lift etc (because they look sick!) but at the moment I wouldn't be using them, so they would just kill my mpgs and wallet. I'm getting the itch to build a cargo solution, I have some cool ideas I haven't seen on other peoples builds, like hidden pullout/popout tables or tool storage. Probably wait until summer for that project though.
__________________
1997 SR5 V6 4x4 Auto Lavender Steel Metallic - SS 1.2 Classic | 199mm TBU | SRQ Fab HID | Rigid Fogs | Underseat Blue Sea Fuse Panel | Rocky Mountain Racks Antero EXT | 265/75R16 KO2 | Multiple Interior lighting/power distribution mods | Purchased March 2017 with 72k miles
1biker’s ’97 SR5 Timeline and Journey
1biker is offline   Reply With QuoteReply With Quote
Old 02-28-2018, 01:29 AM #13
307Vintage 307Vintage is offline
Member
 
Join Date: Jan 2018
Location: Star Valley Wyoming
Posts: 47
Real Name: Clint
307Vintage is on a distinguished road
307Vintage 307Vintage is offline
Member
 
Join Date: Jan 2018
Location: Star Valley Wyoming
Posts: 47
Real Name: Clint
307Vintage is on a distinguished road
Any chance of more detailed info on the map light switch back lighting. I dig those!
307Vintage is offline   Reply With QuoteReply With Quote
Old 02-28-2018, 10:33 PM #14
1biker's Avatar
1biker 1biker is offline
Member
 
Join Date: Nov 2017
Location: Issaquah, WA
Posts: 82
Real Name: Justin
1biker is on a distinguished road
1biker 1biker is offline
Member
1biker's Avatar
 
Join Date: Nov 2017
Location: Issaquah, WA
Posts: 82
Real Name: Justin
1biker is on a distinguished road
Quote:
Originally Posted by 307Vintage View Post
Any chance of more detailed info on the map light switch back lighting. I dig those!
Little back story first. When I installed my Auxiliary Fuse Panel I ran a hot lead up to the rear view mirror area to power my V1 radar detector, future auto dimming mirror and for backlighting the Map Light Switches. My Auxiliary Fuse Panel is tied to ignition on. Thats why the Map Light Switches are always on, I didn't tie them to headlight or dimmer etc, unnecessary complication IMO.

These are the LEDs I used, one single Red for backlighting the Map Lights, two White each side in the Map Lights (barely visible as the yellow circle just beyond the Map Light Bulb in the 1st pic) that are tied to my dome circuit, in the same manner I detailed earlier for the Rear Cargo Lights. Pretty basic wiring from that point on. As you can see in the pics I used a piece of wax paper to act as a pseudo diffuser as the single Red LED is very bright and was too much when driving in the dark. Without having that additional hot lead present you would have to tap into sunroof power etc. Let me know if you have any other questions.
Backlit Dome Switches2
Backlit Dome Switches3
__________________
1997 SR5 V6 4x4 Auto Lavender Steel Metallic - SS 1.2 Classic | 199mm TBU | SRQ Fab HID | Rigid Fogs | Underseat Blue Sea Fuse Panel | Rocky Mountain Racks Antero EXT | 265/75R16 KO2 | Multiple Interior lighting/power distribution mods | Purchased March 2017 with 72k miles
1biker’s ’97 SR5 Timeline and Journey

Last edited by 1biker; 01-12-2019 at 12:32 PM.
1biker is offline   Reply With QuoteReply With Quote
Old 03-01-2018, 12:40 AM #15
307Vintage 307Vintage is offline
Member
 
Join Date: Jan 2018
Location: Star Valley Wyoming
Posts: 47
Real Name: Clint
307Vintage is on a distinguished road
307Vintage 307Vintage is offline
Member
 
Join Date: Jan 2018
Location: Star Valley Wyoming
Posts: 47
Real Name: Clint
307Vintage is on a distinguished road
That’s great. Thanks.
307Vintage is offline   Reply With QuoteReply With Quote
Reply


Posting Rules
You may not post new threads
You may not post replies
You may not post attachments
You may not edit your posts

BB code is On
Smilies are On
[IMG] code is On
HTML code is On

Forum Jump

Similar Threads
Thread Thread Starter Forum Replies Last Post
Hi all you 3rg Genners, about to start my T4R journey frm88 3rd gen T4Rs 39 09-17-2016 04:15 PM
The Journey Begins trailrazer 4th Gen T4Rs 14 11-04-2012 12:12 AM
The beginning of my journey... JimmySox New Members 1 09-08-2011 10:45 PM
My little timeline, and a few ?'s AleksV 3rd gen T4Rs 27 03-04-2009 04:11 PM
my journey jwyshrek 4th Gen T4Rs 10 04-26-2007 10:07 PM

Powered by vBadvanced CMPS v3.2.2

All times are GMT -4. The time now is 10:32 AM.

Powered by vBulletin® Version 3.8.11
Copyright ©2000 - 2024, vBulletin Solutions Inc.
Search Engine Optimisation provided by DragonByte SEO (Pro) - vBulletin Mods & Addons Copyright © 2024 DragonByte Technologies Ltd.
Feedback Buttons provided by Advanced Post Thanks / Like (Lite) - vBulletin Mods & Addons Copyright © 2024 DragonByte Technologies Ltd.
User Alert System provided by Advanced User Tagging (Lite) - vBulletin Mods & Addons Copyright © 2024 DragonByte Technologies Ltd.
***This site is an unofficial Toyota site, and is not officially endorsed, supported, authorized by or affiliated with Toyota. All company, product, or service names references in this web site are used for identification purposes only and may be trademarks of their respective owners. The Toyota name, marks, designs and logos, as well as Toyota model names, are registered trademarks of Toyota Motor Corporation***Ad Management plugin by RedTyger
 
Copyright © 2020