 10-10-2012, 07:19 PM
|
#151
|
 |
Senior Member
|
|
Join Date: Jan 2012
Location: Bel Air, Maryland
Posts: 1,093
|
|
|
Senior Member
Join Date: Jan 2012
Location: Bel Air, Maryland
Posts: 1,093
|
Quote:
Originally Posted by Qjake

Friggin awesome!! 
Lean? Really?? I didn't think so but then again I didn't put many miles on before going to Icon  |
"Lean" seems harsh after driving it more today, it's just a good solid mix of being slightly stiffer but still comfortable.
__________________
2010 T4R LTD - Loaded
My Build Thread
Last edited by jangoforhire; 10-10-2012 at 07:35 PM.
|

|
 Reply With Quote Reply With Quote
|
|
10-14-2012, 07:14 PM
|
#152
|
|
Senior Member
|
|
Join Date: Jan 2012
Location: Bel Air, Maryland
Posts: 1,093
|
|
|
Senior Member
Join Date: Jan 2012
Location: Bel Air, Maryland
Posts: 1,093
|
Just a few pictures from the weekend.
Climbing the Overlook trail:


Back at camp:


I followed the fearless Joneseyyy and did a few of the coves trials. Just wanted to break things in a bit. Everything went very well and the truck took everything I threw at it without a problem at all. The best part was feeling how solid the truck felt on dirt, rocks, and pavement. It doesn't matter what you drive this thing on, it takes it like a champ!
__________________
2010 T4R LTD - Loaded
My Build Thread
|
|
|
Reply With Quote
|
|
10-14-2012, 07:28 PM
|
#153
|
 |
Member
|
|
Join Date: Apr 2010
Location: NC
Posts: 882
|
|
|
Member
Join Date: Apr 2010
Location: NC
Posts: 882
|
Quote:
Originally Posted by jangoforhire
Just a few pictures from the weekend.
Climbing the Overlook trail:
Back at camp:
I followed the fearless Joneseyyy and did a few of the coves trials. Just wanted to break things in a bit. Everything went very well and the truck took everything I threw at it without a problem at all. The best part was feeling how solid the truck felt on dirt, rocks, and pavement. It doesn't matter what you drive this thing on, it takes it like a champ! |
Truck LOOKS GREAT and jealous of your tent!
|
|
|
Reply With Quote
|
|
10-14-2012, 07:36 PM
|
#154
|
|
Senior Member
|
|
Join Date: Jan 2012
Location: Bel Air, Maryland
Posts: 1,093
|
|
|
Senior Member
Join Date: Jan 2012
Location: Bel Air, Maryland
Posts: 1,093
|
Quote:
Originally Posted by MeBe4running
Truck LOOKS GREAT and jealous of your tent!
|
Thanks! I've had the tent for a year or two and it still takes me to long to set up
Just means a need to get out camping more...
__________________
2010 T4R LTD - Loaded
My Build Thread
|
|
|
Reply With Quote
|
|
10-25-2012, 05:45 PM
|
#155
|
|
Senior Member
|
|
Join Date: Jan 2012
Location: Bel Air, Maryland
Posts: 1,093
|
|
|
Senior Member
Join Date: Jan 2012
Location: Bel Air, Maryland
Posts: 1,093
|
So I just realized I completely forgot to add any pictures of the ARB twin install.
So heres just a bit of info about how that went (some of this is double posted in other threads, but I just like keeping everything central).
The bracket lets the compressor sit very firmly in the rear passenger opening of the engine compartment. It is connected at 3 points and is definitely not going to move. The addition of the manifold tank extends the bracket a bit, but still keeps everything localized, and easy to work on.
You can see the ARB locker solenoid installed and wired, but I haven't run the air line for that yet.
I also still have the outlet for a second solenoid if I ever decide to add a front locker as well.
Here are a bunch of shots:


 REAR CONTROL PANEL:
PANEL:
REAR CONTROL PANEL:
PANEL:
The panel itself underwent some design changes once I realized what was actually physically possible given the space constraints of the rear wheel well.
The gauge is very deep so this needed to be placed as far backward as possible to allow for the most room. All in all it is still a very tight fit.
Here is a picture of my final design.

Here is the .fpd file that contains that design. (feel free to do whatever you want with it!)
Front Panel Design File
Gauge:
I got mine from GlowShift because I had dealt with them in the past and had no issues. Also their color shift gauges give you good options to match the interior lighting. This (pictured below) is the exact one that I got. One of the color is very close to the interior orange. But I like having the dial backlit white to give some contrast to the red gauge needle. It looks good.
 Air Lines:
This was hit or miss. I ended up getting two of these (pictured below).

They have the tubing and quick connect that I used. But there is a lot to account for here. The air pressure gauge is 1/8" Male NPT. So you either have to convert that to 1/4" NPT or get a 1/8" NPT push connector. You also have to get a splitter from the compressor to go to your gauge and quick connect. You can do this with a t-fitting and a lot of adapters. But I stumbled upon this (pictured below).

and it made my life SO much easier. It splits the high pressure plastic tubing that comes in that Viair kit or with an ARB locker, (this is 1/4" tubing by the way). to two outputs.
Also that company (Parker) is the best. They sell all the air connections you will ever need on Amazon and it's all Prime, which means 2.99 next day shipping. And I couldn't find these little compression fit adapters and other little known fittings at any local store. Any you will be needing a LOT of little obscure fittings when doing a full OBA setup like this.
__________________
2010 T4R LTD - Loaded
My Build Thread
Last edited by jangoforhire; 10-25-2012 at 05:50 PM.
|
|
|
Reply With Quote
|
|
10-26-2012, 09:29 AM
|
#156
|
 |
Member
|
|
Join Date: May 2012
Location: Milwaukee WI
Age: 34
Posts: 107
|
|
|
Member
Join Date: May 2012
Location: Milwaukee WI
Age: 34
Posts: 107
|
how do you have the balls to just start tearing up a brand new 40,000 dollar truck. i wouldnt go near my 4runner with a screw driver at the least to remove the licence plate I couldnt imagine dremeling the hell out of it!!!! 
|
|
|
Reply With Quote
|
|
10-26-2012, 09:59 AM
|
#157
|
|
Senior Member
|
|
Join Date: Jan 2010
Location: Central FL
Posts: 1,325
|
|
|
Senior Member
Join Date: Jan 2010
Location: Central FL
Posts: 1,325
|
Screwdriver? Dremel? Ask Antman what can be done with a his Hole Saw! 
Be Safe.
__________________
2010 Salsa Red SR5, Black Power Leather Seats, Sliding Rear Cargo Deck, Luggage Rack Cross Bars, Black Pin Stripes, Black Body Side Moldings, Front and Rear 120v outlets, Husky Floor and Cargo Mats, Wade Window Vents, Autovent Shade Bug deflector II, Modified Trailer Electrical Connection, Rear View Camera, Michelin LTX M/S2 285/70/17, Load Range D, OEM Hood Insulator. Blacked out front emblem, front, rear and side chrome strips, Blacked out and modified rear emblem, luggage rack and black OEM door handles.
|
|
|
Reply With Quote
|
|
10-26-2012, 10:36 AM
|
#158
|
|
Senior Member
|
|
Join Date: Jan 2012
Location: Bel Air, Maryland
Posts: 1,093
|
|
|
Senior Member
Join Date: Jan 2012
Location: Bel Air, Maryland
Posts: 1,093
|
Quote:
Originally Posted by YOTALUVR
how do you have the balls to just start tearing up a brand new 40,000 dollar truck. i wouldnt go near my 4runner with a screw driver at the least to remove the licence plate I couldnt imagine dremeling the hell out of it!!!! |
Well, I'm experienced enough with my tools to trust that I will do a good job. I never add anything if I know it won't look stock or better. I'm a big aesthetics guy so I put a lot of time into finding a way to make things look how I want.
Also I put in a lot of time and research before every actual cut or hole I put in my truck (just like anyone should). It's better to do it once and take a while to do it right then to do it quickly but make mistakes.
My general philosophy behind this build is to improve the function while making it look as good as it can get. And to do everything right the first time.
__________________
2010 T4R LTD - Loaded
My Build Thread
|
|
|
Reply With Quote
|
|
11-03-2012, 02:27 PM
|
#159
|
|
Senior Member
|
|
Join Date: Jan 2012
Location: Bel Air, Maryland
Posts: 1,093
|
|
|
Senior Member
Join Date: Jan 2012
Location: Bel Air, Maryland
Posts: 1,093
|
__________________
2010 T4R LTD - Loaded
My Build Thread
|
|
|
Reply With Quote
|
|
11-03-2012, 04:52 PM
|
#160
|
 |
Member
|
|
Join Date: Aug 2011
Location: Beverly Hills, FL and Maryland
Posts: 391
|
|
|
Member
Join Date: Aug 2011
Location: Beverly Hills, FL and Maryland
Posts: 391
|
nice, wish I had a farm to take photos of my 4runner  How did you get that different font for some of the photos in the right hand corner? was it done by the camera or some sort of app?
__________________
Build ThreadMagnetic Grey SR5, 35%tint,Mud Guards,Dashcam, Heated Seats, Quick-Release on-board Charger, WT floor mats, Silver Star , Alpine iLX-207 and, cargo cover, Bilstein [email protected], NFAB Steps
|
|
|
Reply With Quote
|
|
11-03-2012, 05:40 PM
|
#161
|
|
Senior Member
|
|
Join Date: Jan 2012
Location: Bel Air, Maryland
Posts: 1,093
|
|
|
Senior Member
Join Date: Jan 2012
Location: Bel Air, Maryland
Posts: 1,093
|
Quote:
Originally Posted by axxman
nice, wish I had a farm to take photos of my 4runner How did you get that different font for some of the photos in the right hand corner? was it done by the camera or some sort of app? |
It's an app called CameraBag2 (on the mac App Store) and it's just a frame called "cut" that gives it the brown uneven border and those numbers. It's a great app for throwing some quick fixes on pictures.
__________________
2010 T4R LTD - Loaded
My Build Thread
|
|
|
Reply With Quote
|
|
11-07-2012, 01:53 PM
|
#162
|
 |
Member
|
|
Join Date: Aug 2011
Location: us
Posts: 538
|
|
|
Member
Join Date: Aug 2011
Location: us
Posts: 538
|
Jango,
Electrical looks great. I have been researching how to implement similar system and have a few questions.
1) Do you think there might be room to install 2 rows of switches rather than one long one on the driver dash? Maybe a row of 4 and 3? This photo edit has the layout of (2) equal size rows, but the lower row is too long. So I am hoping a row of (4) and a row of (3) might work.

I know the inset for the blank plug would be between the rows, but I think that could be addressed.

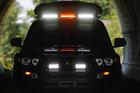
My goal would be seven switches. An "ACTIVATE PANEL" switch that controls all of the switches in the two rows, then FRONT BUMPER LIGHTS switch, FRONT ROOF LIGHTS switch, REAR ROOF LIGHTS switch. And in a second row, separate control of RIGHT SIDE ROOF, LEFT SIDE ROOF, and a ROCK LIGHTS switch.
2) I have a platform in the cargo area and will probably have drawers at some point, so don't want to have the switches in the rear cargo area. (This question may show my wiring idiocy, but it will be revealed at some point, so....) Would the Wiring diagram be the exact same if the rear switches were simply removed from the diagram or would any changes be desired or required? 
3) Just my luck, the wired wagon guy has stopped selling the relay fuse blocks. So it is either a blue sea option, or I have found this alternate source, dirt bound offroad. It seems to be pretty much the same product as the wired wagon block. Aux Relay / Fuse Panel*|*DirtBound Offroad However, the information on the dirt bound site is, lacking..., so I am not sure if it is ready to go. Someone in this thread indicates it comes with fuses and relays. Neater way of organising 12v feeds for non factory mods - NAXJA Forums -::- North American XJ Association What do you think it would take to get it ready to go? Also, the shipping on the dirt bound site seems excessive, seems to be charging per item rather than grouping, so I am not sure I'll go this route.
4) Can you post some shots of the "boring" under hood connections of your IBS install? I have not really seen any good pics of a complete and clean installation. I assume you are running the pass side battery as the secondary, and driver as primary. So you would have all the fuse blocks connected to the pass side battery and would have a winch, if installed, attached to the primary driver side battery per the IBS instructions. I just want to get a visual of how you did this since the fuse blocks are located on the drivers side.
Last edited by Mick1; 11-07-2012 at 01:59 PM.
|
|
|
Reply With Quote
|
|
11-07-2012, 11:25 PM
|
#163
|
|
Senior Member
|
|
Join Date: Jan 2012
Location: Bel Air, Maryland
Posts: 1,093
|
|
|
Senior Member
Join Date: Jan 2012
Location: Bel Air, Maryland
Posts: 1,093
|
Quote:
Originally Posted by Mick1
Jango,
Electrical looks great. I have been researching how to implement similar system and have a few questions.
1) Do you think there might be room to install 2 rows of switches rather than one long one on the driver dash? Maybe a row of 4 and 3? This photo edit has the layout of (2) equal size rows, but the lower row is too long. So I am hoping a row of (4) and a row of (3) might work.
I know the inset for the blank plug would be between the rows, but I think that could be addressed.
My goal would be seven switches. An "ACTIVATE PANEL" switch that controls all of the switches in the two rows, then FRONT BUMPER LIGHTS switch, FRONT ROOF LIGHTS switch, REAR ROOF LIGHTS switch. And in a second row, separate control of RIGHT SIDE ROOF, LEFT SIDE ROOF, and a ROCK LIGHTS switch.
2) I have a platform in the cargo area and will probably have drawers at some point, so don't want to have the switches in the rear cargo area. (This question may show my wiring idiocy, but it will be revealed at some point, so....) Would the Wiring diagram be the exact same if the rear switches were simply removed from the diagram or would any changes be desired or required?
3) Just my luck, the wired wagon guy has stopped selling the relay fuse blocks. So it is either a blue sea option, or I have found this alternate source, dirt bound offroad. It seems to be pretty much the same product as the wired wagon block. Aux Relay / Fuse Panel*|*DirtBound Offroad However, the information on the dirt bound site is, lacking..., so I am not sure if it is ready to go. Someone in this thread indicates it comes with fuses and relays. Neater way of organising 12v feeds for non factory mods - NAXJA Forums -::- North American XJ Association What do you think it would take to get it ready to go? Also, the shipping on the dirt bound site seems excessive, seems to be charging per item rather than grouping, so I am not sure I'll go this route.
4) Can you post some shots of the "boring" under hood connections of your IBS install? I have not really seen any good pics of a complete and clean installation. I assume you are running the pass side battery as the secondary, and driver as primary. So you would have all the fuse blocks connected to the pass side battery and would have a winch, if installed, attached to the primary driver side battery per the IBS instructions. I just want to get a visual of how you did this since the fuse blocks are located on the drivers side. |
1) I think there SHOULD be room, check Okki and Adio3x's build. I know they have switches mounted in the same place and it might give you some more info. I think one of them might even have exactly what you are talking about. I can't say for certain though. Easiest way to check for sure would be to just pop off that panel and check for yourself. If you are doing all this wiring yourself you need to learn sooner or later how to get that panel on and off quickly! I even drove around with it removed for a few days while I was doing all my work. EDIT: I was right, here is a link to adio3x's switches. Adio3x's Build/Pic thread.
2) In short, yes. I still had the photoshop file from my diagram, so I edited it real quick. You REALLY only need one fuse/relay box. I am only using one right now.
I just have the second one for in for the future. In my original wire diagram I showed the 3 prong (this is the one that is "hot" when the switch is on) from the "activate switch" going back to the fuse box, triping the relay, and then sending the hot wire from the tripped relay to supply power to the other switches. This is WAY overkill, so I left it out when I wired mine. I edited it out in the wiring diagram I re-did for you, the changed wire is shown in orange.
None of these switches are switching any load. They are all just switching relays, so we only need to supply the small voltage that the relays require to be switched. This is why you don't have to worry about sending a lot of voltage to the "input" (prong 2) of the switch.
Here is the diagram I changed for you: (I didn't bother changing the labels for the lights, but you should get the idea here. This should be exactly what you need).
Custom wire diagram without rear panel.
3) That seems very expensive... It is the exact same fusebox's as wired wagon was selling. He just did all the work for you. The clips for the fuses and relays were already installed, and the entire box was all pre-wired. Also it came with that mounting stand listed below the main box in that link. See if you can find this somewhere else because I am pretty sure I didn't pay more than $95 each for the wired wagon pre-made fuse/relay boxes. Those clips are usually not to bad to install, you push them in and the click and you're good to go. The tedious part is attaching the wires to them, you need a crimper and heat shrink and patience. But it's not a bad project if you don't mind wiring. I'm sure it includes diagrams for wiring it, but if not I can help you out. It's not to difficult at all once you understand what's going on in those boxes.
4) I will take shots of the wire routing this weekend for you. It's not too difficult. There is one loomed wire going from passenger to driver side already so I just used the same path and zip tied to the factory wire every foot or so. It's getting very full there now, with the dual battery cables, wiring for the 2 fuse boxes, and air lines running across the back of the engine compartment. The nice thing about it though is once you wire in the fuse boxes you shouldn't have to run anything back to the passenger side anymore. Also my dual battery wiring is attached to the top posts of my yellow top (which is in the aux battery) and all the accessories are wired to the side posts. Keeps things looking a bit neater. Also all my wiring runs under the air box, I din't like the look of going over the top or off to the side.
Hope that helped. Let me know if you have any other questions!
__________________
2010 T4R LTD - Loaded
My Build Thread
Last edited by jangoforhire; 11-08-2012 at 12:19 AM.
|
|
|
Reply With Quote
|
|
11-08-2012, 09:27 PM
|
#164
|
|
Senior Member
|
|
Join Date: Jan 2012
Location: Bel Air, Maryland
Posts: 1,093
|
|
|
Senior Member
Join Date: Jan 2012
Location: Bel Air, Maryland
Posts: 1,093
|
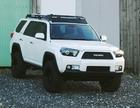
Needed to get out of the city for a while today so I tracked down some dirt roads! They are surprisingly hard to come by (that I am allowed to drive on at least). Nevertheless I found a nice 5 mile trail not to far from me that is mostly dirt and had a few stream crossings. Nothing technical whatsoever. Which is probably better considering I was out there alone. But still, a stock could have done this backwards. But it was still fun to get off the pavement!

This one is right after one of the simple water crossings.

__________________
2010 T4R LTD - Loaded
My Build Thread
|
|
|
Reply With Quote
|
|
11-08-2012, 10:53 PM
|
#165
|
|
Junior Member
|
|
Join Date: Jan 2012
Location: SoCal
Posts: 17
|
|
|
Junior Member
Join Date: Jan 2012
Location: SoCal
Posts: 17
|
Relay Box
Quote:
Originally Posted by jangoforhire
3) That seems very expensive... It is the exact same fusebox's as wired wagon was selling. He just did all the work for you. The clips for the fuses and relays were already installed, and the entire box was all pre-wired. Also it came with that mounting stand listed below the main box in that link. See if you can find this somewhere else because I am pretty sure I didn't pay more than $95 each for the wired wagon pre-made fuse/relay boxes. Those clips are usually not to bad to install, you push them in and the click and you're good to go. The tedious part is attaching the wires to them, you need a crimper and heat shrink and patience. But it's not a bad project if you don't mind wiring. I'm sure it includes diagrams for wiring it, but if not I can help you out. It's not to difficult at all once you understand what's going on in those boxes.
|
I have one of WiredWagon's boxes but want to add a second. I've been looking at Waytek Wiring. They have the boxes and all the fuses, relays, connectors and plugs. I haven't done the price comparison but all the piece parts are fairly inexpensive.
__________________
2011 Black Trail | Rocky Road Sliders | Cobra 75 | Gobi Stealth | Satoshi
Last edited by macntatsch; 11-08-2012 at 10:56 PM.
|
|
|
Reply With Quote
|
 Posting Rules
|
You may not post new threads
You may not post replies
You may not post attachments
You may not edit your posts
HTML code is On
|
|
|
|


 Linear Mode


