 06-08-2012, 07:54 PM
|
#1
|
|
Member
|
|
Join Date: Dec 2011
Location: Michigan
Posts: 79
|
|
|
Member
Join Date: Dec 2011
Location: Michigan
Posts: 79
|
Budbuilt sliders install - quick questions
I am trying to install some BB sliders on my TE, and I need some quick help from those that have done this:
1. How many bolts did you use per side? Bud sent 15 but I dont see how I could use that many.
2. On the passenger side, there is that bracket with the kdss line. Does the whole bracket come outside the slider? The bracket appears to have a notch that clips into the frame, so I cant tell. Does the slider go between the two parts of this bracket?
Note: this job is a pita solo. Hard to position the slider just so, and get the bolts to start threading correctly.
__________________
2012 4Runner Trail / Salsa Red / KDSS / Entune / BFG All Terrains / BudBuilt Bump-Out Sliders / WeatherTech / Canvasback / Pilot Antenna / Console Vault / Clearbra
|

|
 Reply With Quote Reply With Quote
|
|
06-08-2012, 08:20 PM
|
#2
|
 |
Senior Member
|
|
Join Date: Aug 2011
Posts: 1,763
|
|
|
Senior Member
Join Date: Aug 2011
Posts: 1,763
|
Brackets for the KDSS, brake lines, and gas tank skid should be reattached to the sliders (brakes and gas tank skid for sure, i dont have kdss)
__________________
2017 Crewmax / 1794 / TRD Off-Road / 4x4 / 5.7 / 5100's / AAL / TRD Pro Duals / 275-70 Duratracs
Hampshire, Yorkshire, and Duroc Hogs / Rockwood 2280BH / and Kioti CK2610 in tow
 Rest in Peace SeattleMike
 |
|
|
Reply With Quote
|
|
06-08-2012, 09:36 PM
|
#3
|
|
Member
|
|
Join Date: Dec 2011
Location: Michigan
Posts: 79
|
|
|
Member
Join Date: Dec 2011
Location: Michigan
Posts: 79
|
Passenger side is up fine, although i could only find use for 9 bolts. I had to use one of the longer BB bolts to reattach the kdss line bracket; the stock one was too short.
More issues on the drivers side. My brake lines are too tight against the frame to get the sliders in there. And in the front how to you work around those hard (brake?) lines? Thoughts?
__________________
2012 4Runner Trail / Salsa Red / KDSS / Entune / BFG All Terrains / BudBuilt Bump-Out Sliders / WeatherTech / Canvasback / Pilot Antenna / Console Vault / Clearbra
|
|
|
Reply With Quote
|
|
06-08-2012, 10:31 PM
|
#4
|
 |
Member
|
|
Join Date: Aug 2011
Location: us
Posts: 538
|
|
|
Member
Join Date: Aug 2011
Location: us
Posts: 538
|
Its been awhile since I did it.
I think it was:
pry bar
and balls
look at the pictures of my install in the link in my sig. that may help you. I had an install write up on the 120 forum also.
|
|
|
Reply With Quote
|
|
06-08-2012, 10:45 PM
|
#5
|
 |
Member
|
|
Join Date: Apr 2012
Location: The Windy City
Posts: 36
|
|
|
Member
Join Date: Apr 2012
Location: The Windy City
Posts: 36
|
Glad someone started this topic. I was part of the mass batch that Bud just sent out and I was going to start working on it today until I saw how many things I had to unbolt on the driver side on my TE with KDSS.
I was just unsure what needs to be unbolted. The pass side is seems easy enough. Going to wait for a friend help tomorrow and hopefully get it done within a few hours.
Thanks ahead of the time for all the responses.
__________________
2012 Trail Magnetic Grey, KDSS, Nav/Entune, WeatherTech Digifit, Kicker Sub under driver seat, Alpine Type R audio, BMW stubby antenna, Budbuilt Full treads sliders, TRD CAI, Borla Cat Back, BFG TKO.
|
|
|
Reply With Quote
|
|
06-09-2012, 12:03 AM
|
#6
|
 |
Senior Member
|
|
Join Date: Nov 2010
Location: Mesa, AZ
Posts: 1,377
Real Name: Dave
|
|
|
Senior Member
Join Date: Nov 2010
Location: Mesa, AZ
Posts: 1,377
Real Name: Dave
|
You won't use all of the hardware he provides. Simply line-up the holes on the slider mounts as best you can with those on the frame and then put a bolt and washer into each hole on the frame that's threaded. Don't forget the bottom holes, too. All mounting brackets that are on the frame now need to be bolted on to the outside of the slider attachment points if they're in the way.
__________________
A human being should be able to change a diaper, plan an invasion, butcher a hog, conn a ship, design a building, write a sonnet, balance accounts, build a wall, set a bone, comfort the dying, take orders, give orders, cooperate, act alone, solve equations, analyze a new problem, pitch manure, program a computer, cook a tasty meal, fight efficiently, die gallantly. Specialization is for insects.
|
|
|
Reply With Quote
|
|
06-09-2012, 12:42 AM
|
#7
|
|
Member
|
|
Join Date: Dec 2011
Location: Michigan
Posts: 79
|
|
|
Member
Join Date: Dec 2011
Location: Michigan
Posts: 79
|
Quote:
Originally Posted by mentalblock

Glad someone started this topic. I was part of the mass batch that Bud just sent out and I was going to start working on it today until I saw how many things I had to unbolt on the driver side on my TE with KDSS.
|
Yes, the passenger side is pretty easy. There's just the one KDSS line to move out of the way. I think I used 9 bolts in total on the passenger side.
The brackets for all of the lines have little lips on them that grab into a hole in the frame. I bent those back with pliers. I also changed out most of the original bolts for the longer BB ones, since I had extras.
The drivers side is tough. Take the gas skid down, then unbolt everything else off of the side of the frame. The hard part is going to be getting the slider up around the hard lines in the front, where they angle under the frame. I finally got mine by laying the back end down, and a using bunch of force. Then put the front on a jack stand. Next start to bring the back up, but you'll need a long flathead screwdriver to pry the lines away from the frame while you lift the slider up against the frame.
Finally, it's best to get everything bolted up, and check the way it all lies before you tighten up the bolts for good. For the washers to lay flat around the welds, you might need to push it up or back a bit.
- - - - - -
Well, mine are up now. Only remaining issues are that two of my rear bottom bolts, that go thru the gas skid and then the slider, don't seem to want to thread straight. I tried some different bolts, but none of them will tighten up level. Maybe the holes weren't drilled straight?
Also one of the brackets on the hard lines got mangled during the prying and lifting, and doesn't want to go back together. There's not much room to work in there, so I might just replace that with a new one.
__________________
2012 4Runner Trail / Salsa Red / KDSS / Entune / BFG All Terrains / BudBuilt Bump-Out Sliders / WeatherTech / Canvasback / Pilot Antenna / Console Vault / Clearbra
|
|
|
Reply With Quote
|
|
06-09-2012, 02:07 PM
|
#8
|
|
Member
|
|
Join Date: Apr 2012
Location: The Windy City
Posts: 36
|
|
|
Member
Join Date: Apr 2012
Location: The Windy City
Posts: 36
|
Quote:
Originally Posted by Quetico
The brackets for all of the lines have little lips on them that grab into a hole in the frame. I bent those back with pliers. I also changed out most of the original bolts for the longer BB ones, since I had extras.
The drivers side is tough. Take the gas skid down, then unbolt everything else off of the side of the frame. The hard part is going to be getting the slider up around the hard lines in the front, where they angle under the frame. I finally got mine by laying the back end down, and a using bunch of force. Then put the front on a jack stand. Next start to bring the back up, but you'll need a long flathead screwdriver to pry the lines away from the frame while you lift the slider up against the frame.
Finally, it's best to get everything bolted up, and check the way it all lies before you tighten up the bolts for good. For the washers to lay flat around the welds, you might need to push it up or back a bit.
|
So I tried to install the sliders this morning. I got all the bolts unbolted on the driver side and the lines would not come loose. It seems like they are almost glued on. I didn't want to keep on prying them and having them break all together. I am going to try to take it to my buddies shop and get the truck lifted and see if I can get them on that way. 
__________________
2012 Trail Magnetic Grey, KDSS, Nav/Entune, WeatherTech Digifit, Kicker Sub under driver seat, Alpine Type R audio, BMW stubby antenna, Budbuilt Full treads sliders, TRD CAI, Borla Cat Back, BFG TKO.
|
|
|
Reply With Quote
|
|
06-09-2012, 07:40 PM
|
#9
|
|
Member
|
|
Join Date: Dec 2011
Location: Michigan
Posts: 79
|
|
|
Member
Join Date: Dec 2011
Location: Michigan
Posts: 79
|
Quote:
Originally Posted by mentalblock
So I tried to install the sliders this morning. I got all the bolts unbolted on the driver side and the lines would not come loose. It seems like they are almost glued on. I didn't want to keep on prying them and having them break all together. I am going to try to take it to my buddies shop and get the truck lifted and see if I can get them on that way. |
Those hard lines do not come off. Thats why the job is such a pita. You have to work the slider on over/around them.
I mentioned it above, but try to lift just the front and work the plate behind those lines. You'll need someone else to lift the back, once you get the front over. Good luck!
__________________
2012 4Runner Trail / Salsa Red / KDSS / Entune / BFG All Terrains / BudBuilt Bump-Out Sliders / WeatherTech / Canvasback / Pilot Antenna / Console Vault / Clearbra
|
|
|
Reply With Quote
|
|
02-15-2014, 03:25 PM
|
#10
|
|
Member
|
|
Join Date: Oct 2012
Location: Colorado
Posts: 128
|
|
|
Member
Join Date: Oct 2012
Location: Colorado
Posts: 128
|
 Passenger side bolt PITA worst spot ever

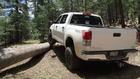
Having a little difficulty getting to this top left bolt near the XRES line on the passenger side. All others are loosened and ready to go save for this little bugger.
Shout out to
@ Antman
for excellent advice as usual in regards to trimming the rocker panels!!! You rock and I owe you many 

I can get a socket on the bolt, but not the wrench on the socket!


Thanks in advance all you cool cats rock as usual!!!
__________________
2010 4Runner Limited ---> 2016 4Runner Limited 
Last edited by pobando; 02-15-2014 at 03:26 PM.
Reason: mispelled word
|
|
|
Reply With Quote
|
|
02-15-2014, 03:44 PM
|
#11
|
 |
Elite Member
|
|
Join Date: Feb 2011
Location: Maryland
Age: 54
Posts: 6,876
Real Name: Jeff
|
|
|
Elite Member
Join Date: Feb 2011
Location: Maryland
Age: 54
Posts: 6,876
Real Name: Jeff
|
Quote:
Originally Posted by pobando
Having a little difficulty getting to this top left bolt near the XRES line on the passenger side. All others are loosened and ready to go save for this little bugger.
Shout out to
@ Antman
for excellent advice as usual in regards to trimming the rocker panels!!! You rock and I owe you many
I can get a socket on the bolt, but not the wrench on the socket!
Thanks in advance all you cool cats rock as usual!!!
|
Just throw a box wrench behind there to break it loose. You only need to turn it a little and then you can turn it out by hand...
Glad the rockers worked out BTW.
__________________
HERE FISHY FISHY FISHY!
|
|
|
Reply With Quote
|
|
02-15-2014, 03:52 PM
|
#12
|
|
Member
|
|
Join Date: Mar 2013
Location: NJ
Posts: 374
|
|
|
Member
Join Date: Mar 2013
Location: NJ
Posts: 374
|
Quote:
Originally Posted by pobando
Having a little difficulty getting to this top left bolt near the XRES line on the passenger side. All others are loosened and ready to go save for this little bugger.
Shout out to
@ Antman
for excellent advice as usual in regards to trimming the rocker panels!!! You rock and I owe you many
I can get a socket on the bolt, but not the wrench on the socket!
Thanks in advance all you cool cats rock as usual!!!
|
Hard to tell from the pics how much clearance you really have to work with.... but maybe a swivel head ratcheting wrench to be able to swing out the body/grip?
|
|
|
Reply With Quote
|
 Posting Rules
|
You may not post new threads
You may not post replies
You may not post attachments
You may not edit your posts
HTML code is On
|
|
|
|


 Linear Mode


