 02-22-2012, 04:12 AM
|
#361
|
 |
Elite Member
|
|
Join Date: Feb 2011
Location: Maryland
Age: 54
Posts: 6,876
Real Name: Jeff
|
|
|
Elite Member
Join Date: Feb 2011
Location: Maryland
Age: 54
Posts: 6,876
Real Name: Jeff
|
Quote:
Originally Posted by Kraeken

This has to be real, it casts a shadow! I challenge any forensics lab to prove this fake.
|
Well Kraeken, you were warned(threatened actually)!
I can promise you that when (IF!) I come up to NY to install YOUR sub, it may not turn out so well...Damn NY'ers!
__________________
HERE FISHY FISHY FISHY!
Last edited by Antman; 03-12-2012 at 08:59 AM.
|

|
 Reply With Quote Reply With Quote
|
|
02-22-2012, 09:49 AM
|
#362
|
|
Senior Member
|
|
Join Date: Aug 2010
Location: Carmel, IN
Posts: 2,765
|
|
|
Senior Member
Join Date: Aug 2010
Location: Carmel, IN
Posts: 2,765
|
Quote:
Originally Posted by Antman
Well Kraeken, you were warned(threatened actually)!
I can promise you that when (IF!) I come up to NY to install YOUR sub, it may not turn out so well...Damn NY'ers!
|
Next Antman Mod: A dashboard mounted dildo interface to operate NY based subs.. I'm guessing the volume is regulated by the .... vigorousness of the manipulation of the dildo shaped controller....
Hey Kraeken.. I hope for your sake he leaves out the "30 second active/15 minute recovery period" mod on that! **LMAO**

Okki
__________________
Okki's Build Thread - 2010 Limited: Shrockworks Rock Rails & Full Skids, Gobi Rack, OPT7 LED Roof LIGHT Bar, Rigid E-Series Bumper Light Bar, Hella Horns, Auxiliary Fuse Box, Cobra ST75, TRD Rims, Discoverer ATP LT265/70R17, Rotopax, ARB Twin Compressor, Cargo Area Pressure Gauge and Chuck, Icon billet trailing- and A-arms, Dobinsons Shocks/Coils, Fumuto Oil Valve, Northstar Group 31M, CBI Front & Rear Bumpers !!!
========================================
 Any time...Anywhere.. My cat can take you.
|
|
|
Reply With Quote
|
|
02-22-2012, 11:03 AM
|
#363
|
 |
Member
|
|
Join Date: Feb 2010
Location: Arlington, VA
Posts: 938
|
|
|
Member
Join Date: Feb 2010
Location: Arlington, VA
Posts: 938
|
Great minds think alike Jeff - I mounted my sub controller knob in the EXACT same position...I will post up a pic. Dremeling out that switch blank was such a pain in the a$$ to fit that chip in there too...you have to wonder why they use so much plastic for just a switch blank.
__________________
::2010 Trail Edition:: ICON Front Coilovers w/Remote Resi's and CDC - ICON Tubular UCAs, ICON Rear Ext-Travel Shocks w/Remote Resi's and CDC - MT Long Travel Springs and Lower Links, 285/70 Goodyear Duratracs, Bronze Countersteer Offroad Type X, CBI Rear Bumper w/Tire Carrier, Shrockworks Sliders and full skids, Pioneer Z120BT, Rockford Fosgate Speakers and Amps, aFe Intake, Aux Battery set up, Roofrack by drabbits, SoCalTrail Behind the Grill Light Bracket
|
|
|
Reply With Quote
|
|
02-22-2012, 11:28 AM
|
#364
|
|
Elite Member
|
|
Join Date: Feb 2011
Location: Maryland
Age: 54
Posts: 6,876
Real Name: Jeff
|
|
|
Elite Member
Join Date: Feb 2011
Location: Maryland
Age: 54
Posts: 6,876
Real Name: Jeff
|
Quote:
Originally Posted by 4ShoreRunner
Great minds think alike Jeff - I mounted my sub controller knob in the EXACT same position...I will post up a pic. Dremeling out that switch blank was such a pain in the a$$ to fit that chip in there too...you have to wonder why they use so much plastic for just a switch blank.
|
Ha! For those switch blanks it's easier to use a small Exacto knife. Heat the tip with a torch and it cuts/melts through the plastic with almost no effort. There is alot of plastic in there though!
__________________
HERE FISHY FISHY FISHY!
|
|
|
Reply With Quote
|
|
02-22-2012, 12:32 PM
|
#365
|
 |
Member
|
|
Join Date: Oct 2010
Location: So Cal
Posts: 629
|
|
|
Member
Join Date: Oct 2010
Location: So Cal
Posts: 629
|
Ever thought about sound dampening?
I helped out a friend over the weekend sound dampen his car. In the process of researching for myself. I think Harper is the only one who has done it so far.
__________________
2011 4RAWRner Magnetic Gray | Trail Edition
the Mods - ICON S-2 LR + MT Links | Matte Black Hood | FN Six Shooter Graphite Gunmetallic | 285/70/17 Duratrac | 30% Tint | Shockworkz Sliders | Hybrid Conversion | AFE Intake | 20" Light bar lower grill + a bunch of lights all around | low - Blacked out FX-R IV Apollo HID 4300k | High - Sylvania Ultra | LED Interior | Back up camera switch | Camelback Metalgear Roof Rack - DC Power 270 Alternator
|
|
|
Reply With Quote
|
|
02-24-2012, 11:46 PM
|
#366
|
 |
Member
|
|
Join Date: Feb 2009
Location: NYC
Age: 51
Posts: 546
|
|
|
Member
Join Date: Feb 2009
Location: NYC
Age: 51
Posts: 546
|
Using Antman's advice, I installed my subwoofer today. It works great! It makes a world of difference.
Mind you, I'm not an electrical person, but here are my lessons learned:
1- Make sure you place the wires where they're supposed to end up, ie., in the dash. I had half the thing wired when I realized the wires were sitting in my lap. Dammit.
2- But even before you run all your wires, make sure the item you bought is going to fit where you plan on putting it! After I had everything wired up, and gave it a test run, I went to put it under the seat, and it didn't fit. Dammit. After some fiddling around, I made it work, but lesson learned.
I'm not really this dumb, its just an off day I guess...
__________________
2011 Trail Edition Magnetic Gray- some stuff added on, some stuff taken away...
|
|
|
Reply With Quote
|
|
02-25-2012, 08:50 AM
|
#367
|
|
Senior Member
|
|
Join Date: Jan 2010
Location: Central FL
Posts: 1,325
|
|
|
Senior Member
Join Date: Jan 2010
Location: Central FL
Posts: 1,325
|
Kraeken, it's always good to be reminded of the basics every once in a while.
Thank you. Be safe.
__________________
2010 Salsa Red SR5, Black Power Leather Seats, Sliding Rear Cargo Deck, Luggage Rack Cross Bars, Black Pin Stripes, Black Body Side Moldings, Front and Rear 120v outlets, Husky Floor and Cargo Mats, Wade Window Vents, Autovent Shade Bug deflector II, Modified Trailer Electrical Connection, Rear View Camera, Michelin LTX M/S2 285/70/17, Load Range D, OEM Hood Insulator. Blacked out front emblem, front, rear and side chrome strips, Blacked out and modified rear emblem, luggage rack and black OEM door handles.
|
|
|
Reply With Quote
|
|
03-05-2012, 03:51 PM
|
#368
|
|
Elite Member
|
|
Join Date: Feb 2011
Location: Maryland
Age: 54
Posts: 6,876
Real Name: Jeff
|
|
|
Elite Member
Join Date: Feb 2011
Location: Maryland
Age: 54
Posts: 6,876
Real Name: Jeff
|
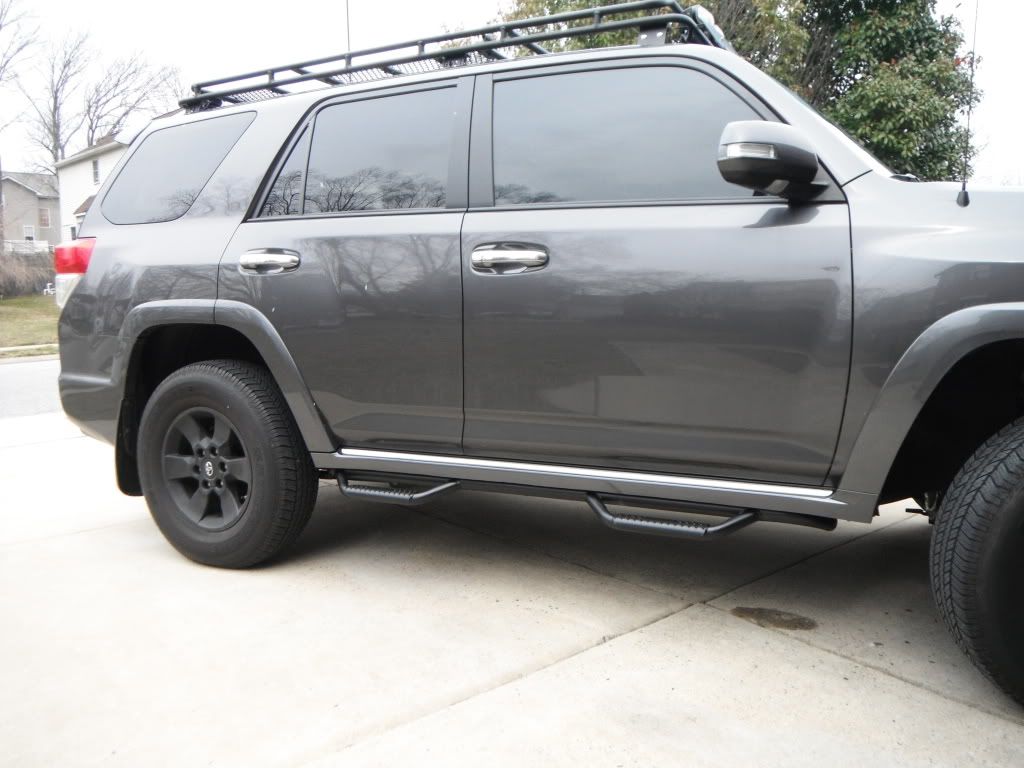
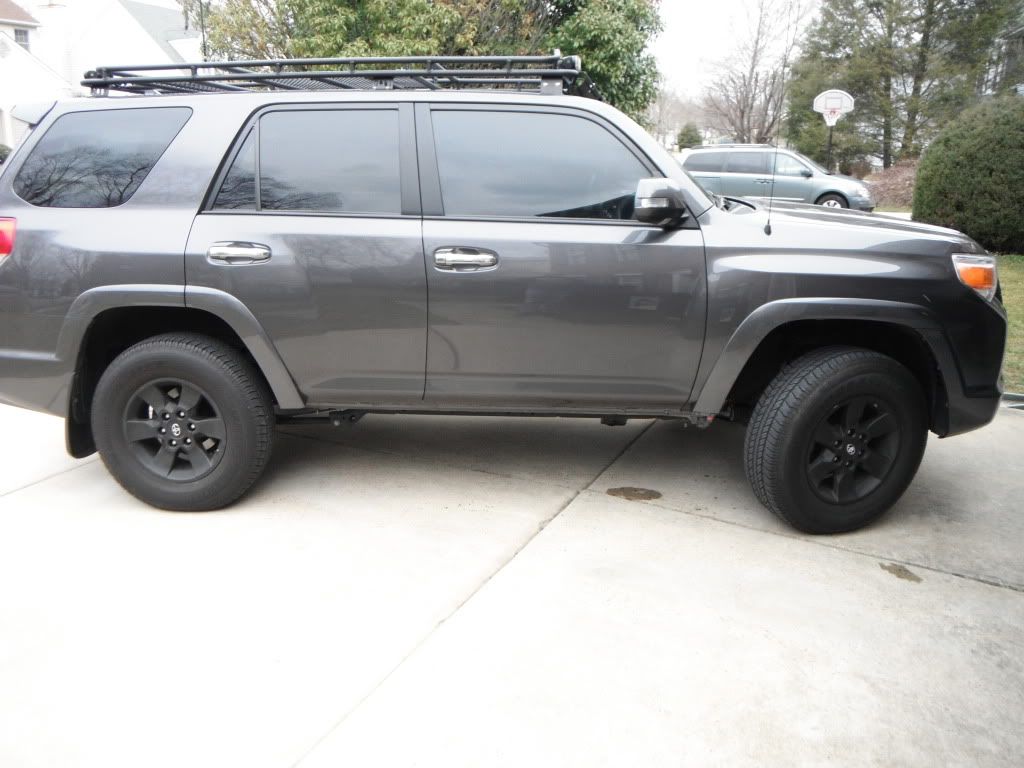
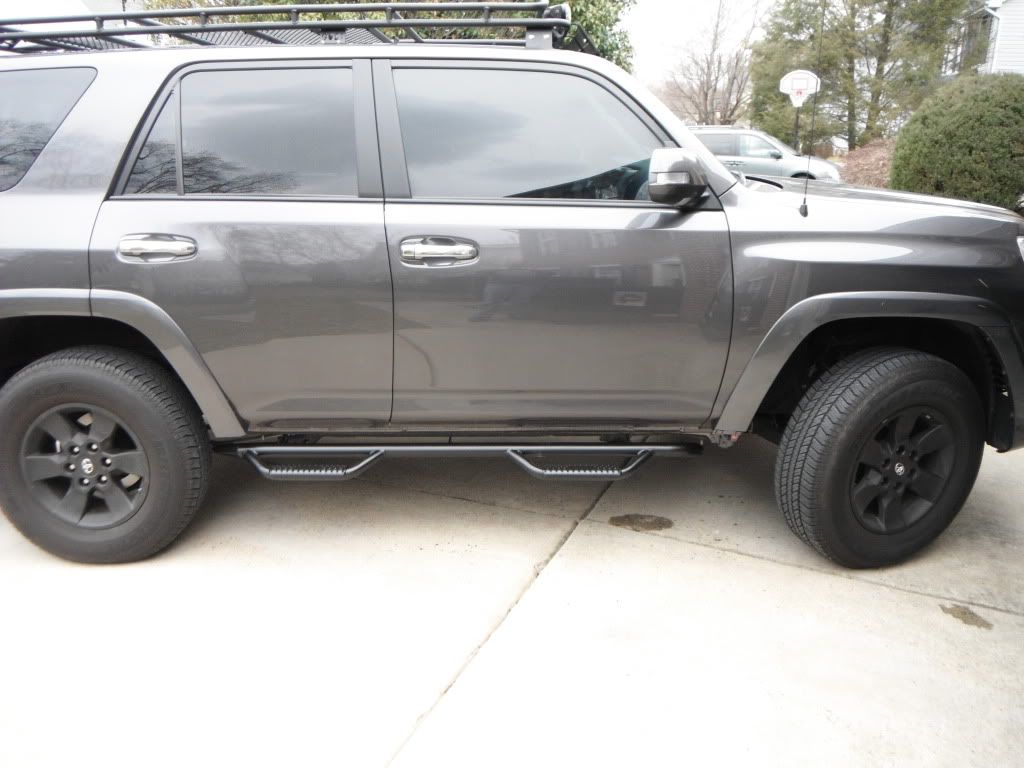
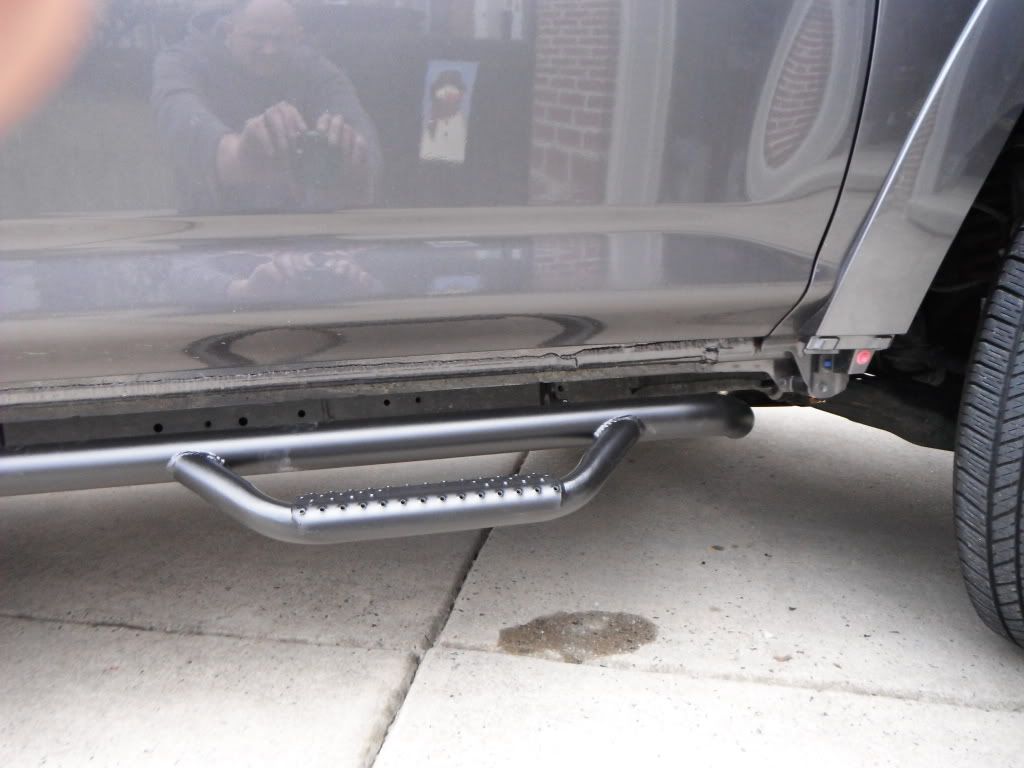
N-Fab side step install- Rocker panel trimmed: HOW-TO
Kraeken sold me his extra set of N-Fab bars for a crackin' deal (bad pun, I know) and I installed them today. Many members here on T4R have installed these and either cut the rockers, fabbed spacers, or painted the exposed area where the rockers were removed. After reviewing all the threads ( I know how to use search) I still had some questions, and honestly it scared the heck out of me to think of cutting these rocker panels up! But, what the hell, I did it anyway.
I figured I would post a quick writeup for those on the fence...
Some background on the N-fabs. They are marketed as "TE Only", because the SR5/LE rocker panels get in the way. The spacers that are available from RiDE are nice, but the steps hang way too low for my tastes. I decided to mount them directly to the vehicle, and cut the rocker panel for a more finished look. They tuck up nicely under the doors. These steps are very high quality, and strong. They are NOT rockrails, but hey, if I ever decide to go offroad, 5 bolts per side and they are off...
On to the install:
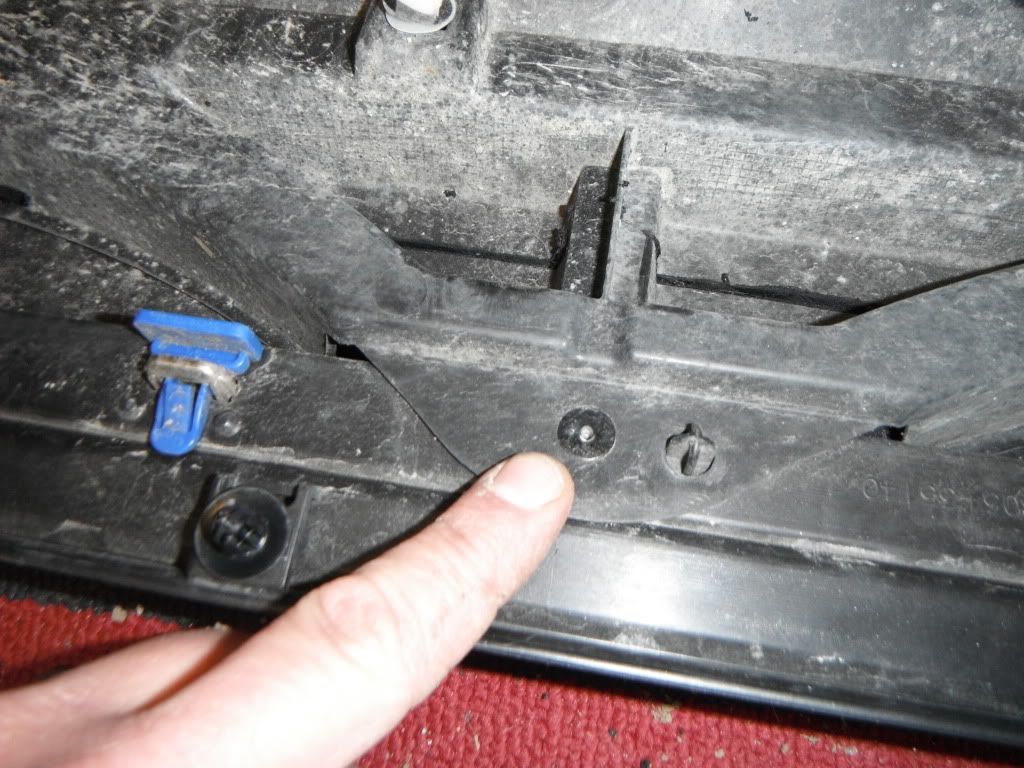
First you gotta take off the rocker. Remove the hardware you see in the front wheelwell in this picture: 3- 10mm bolts, a phillips screw, and a pop-pin. The rear wheelwell has 1-10mm bolt to remove.
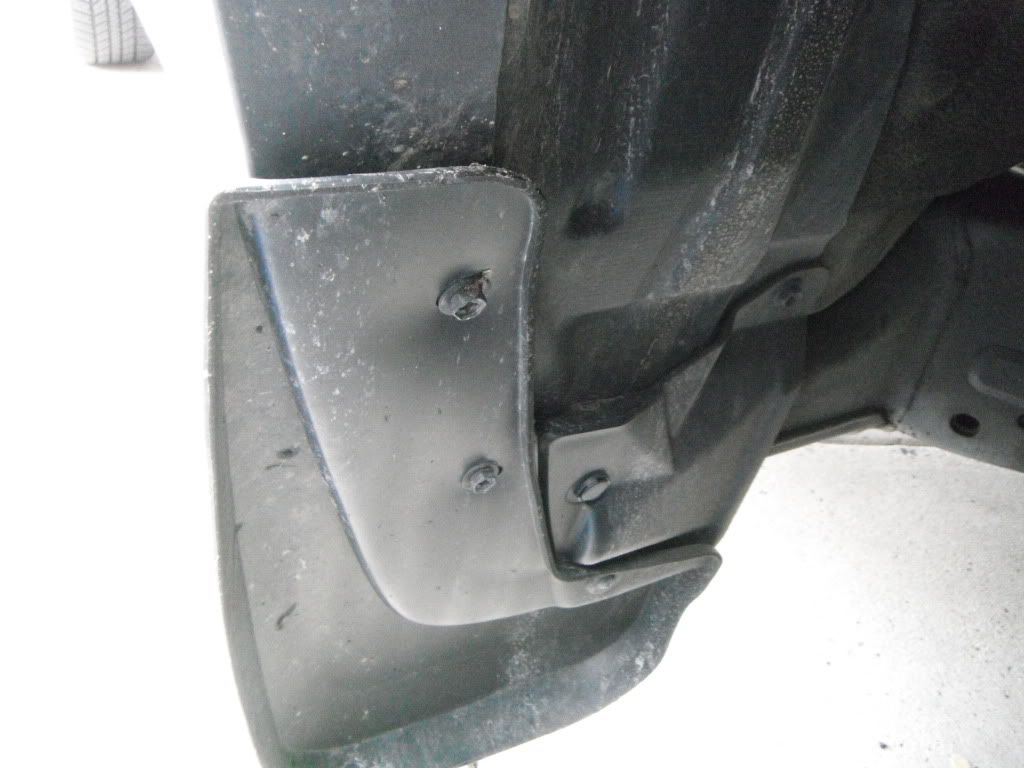
There are 2- stainless screws- one behind each door. Remove them.
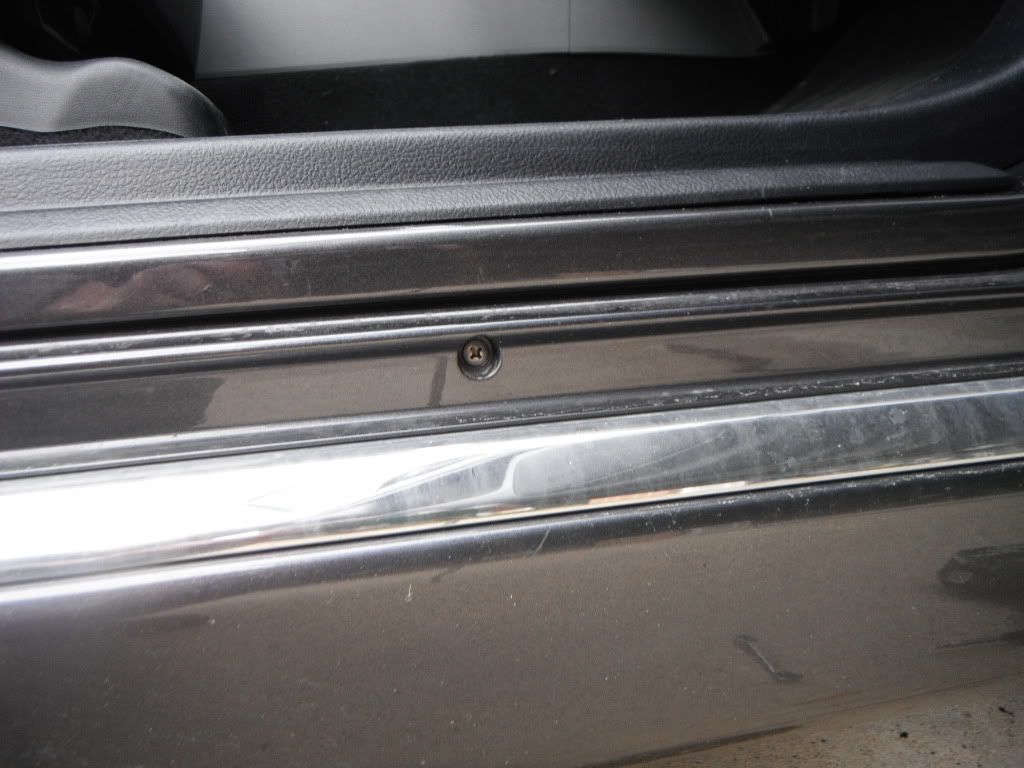
There are 6 of these 13mm bolts under the door sills, on each side. Remove them.
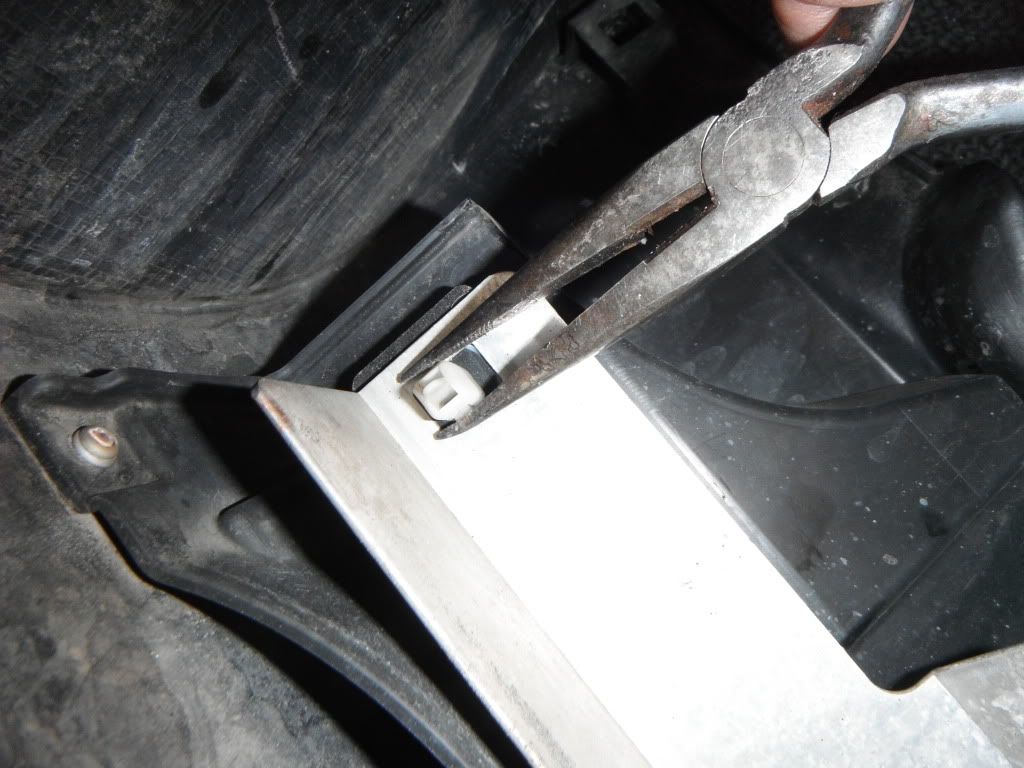
Now you can pull your rocker off... Notice the ugly pink clip, and the unfinished area under the front fender. Yuk.
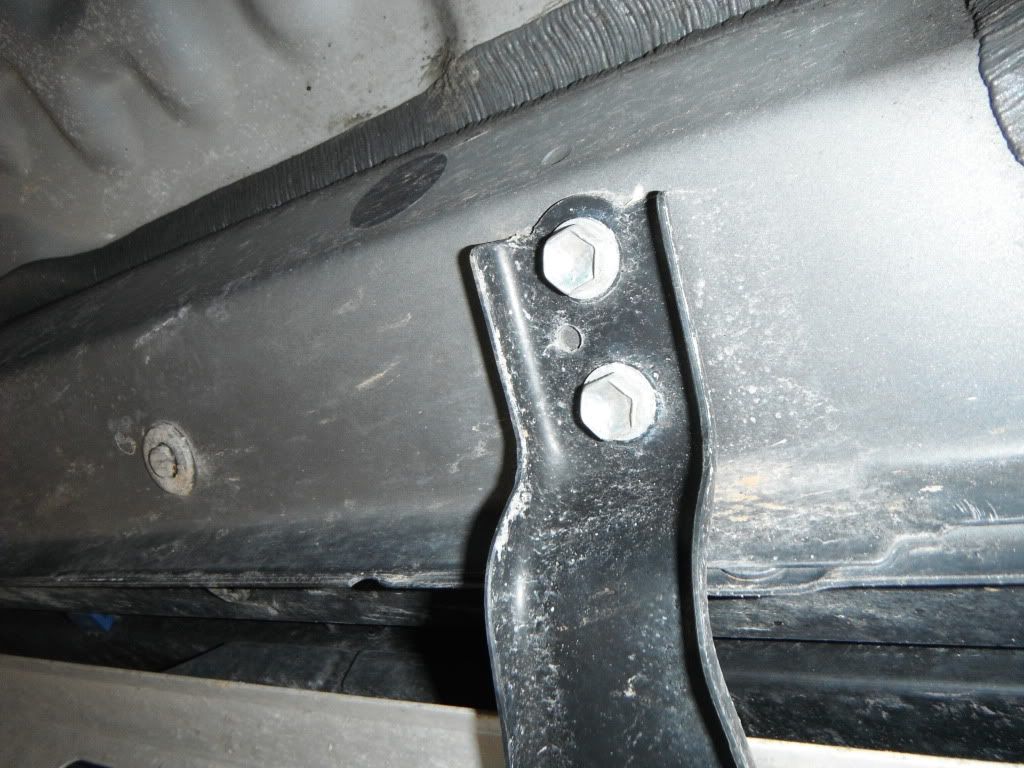
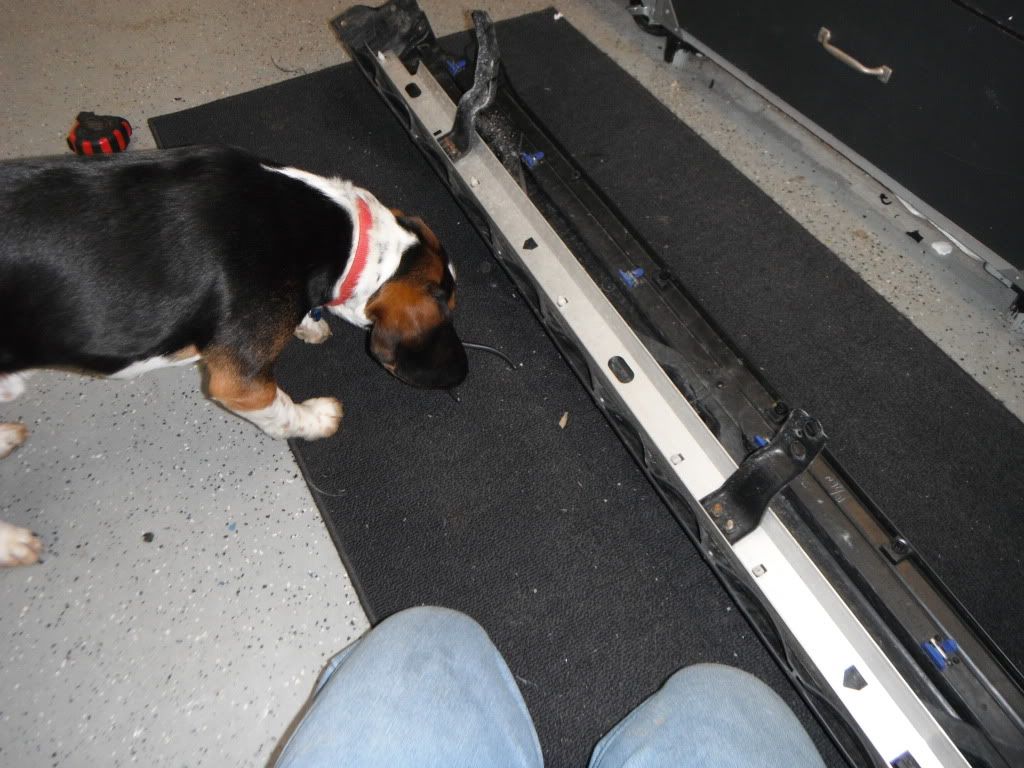
This is the back side of the panel being inspected by Eddie...
Eddie told me to remove the aluminum brace, so I did. Eddie rules! Crimp these white clips and lift up on the brace as you go.
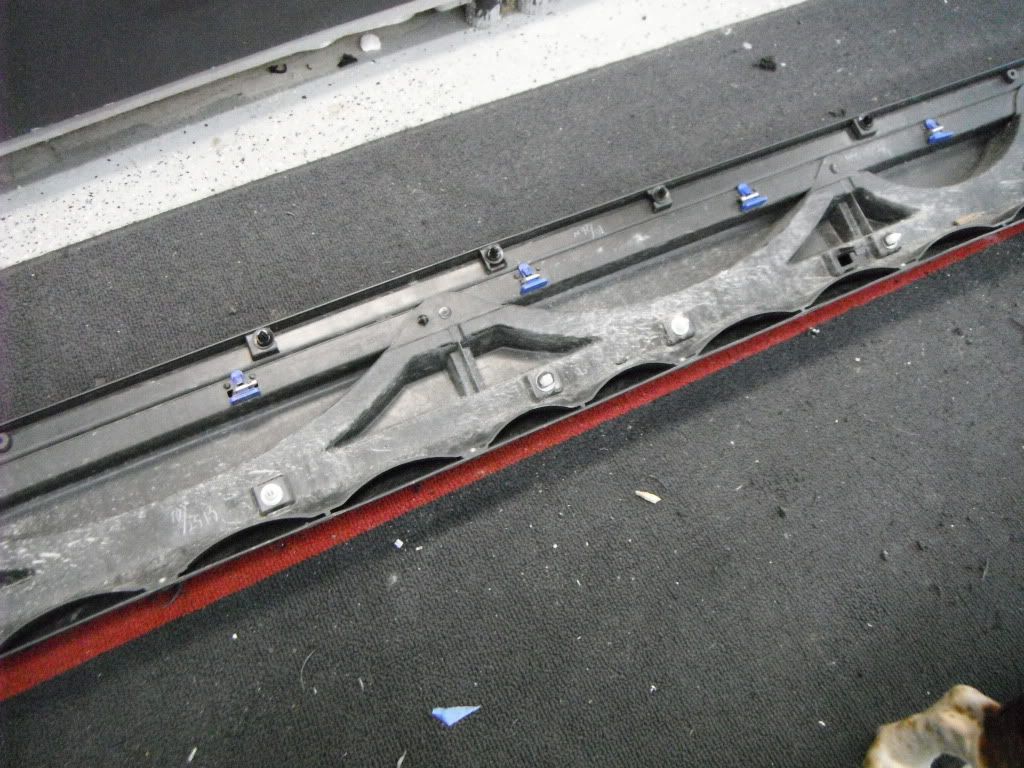
The plastic bracing will stay in place- for now. It will be MUCH easier cutting the rocker with the bracing intact.
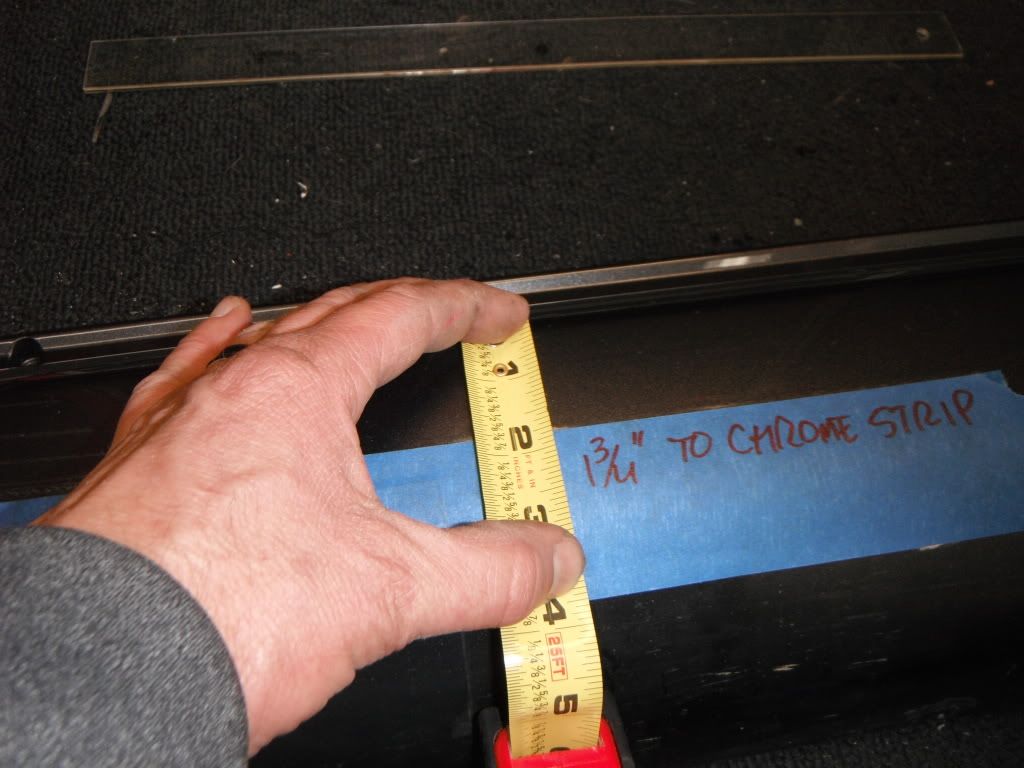
Time to measure. I found that 1-3/4" from the chrome strip is just about right. The end of the tape measure fits in the slot next to the chrome trim piece for an easy measurement. Note: The chrome trim angles upwards slightly on each end, so measure carefully. Make sure it's even by taping it up and viewing it from a distance...
Lay down another piece of tape about 1/16" from the first to protect your paint.
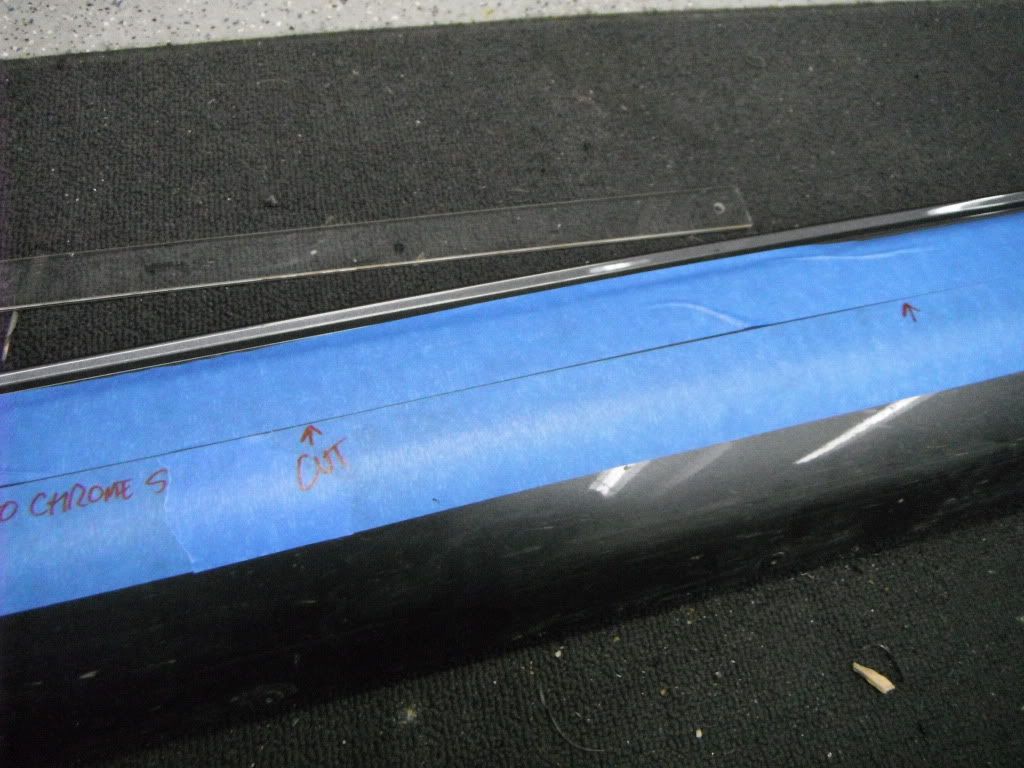
"Say hello to my little friend!!" Makita angle grinder+metal grinding wheel.
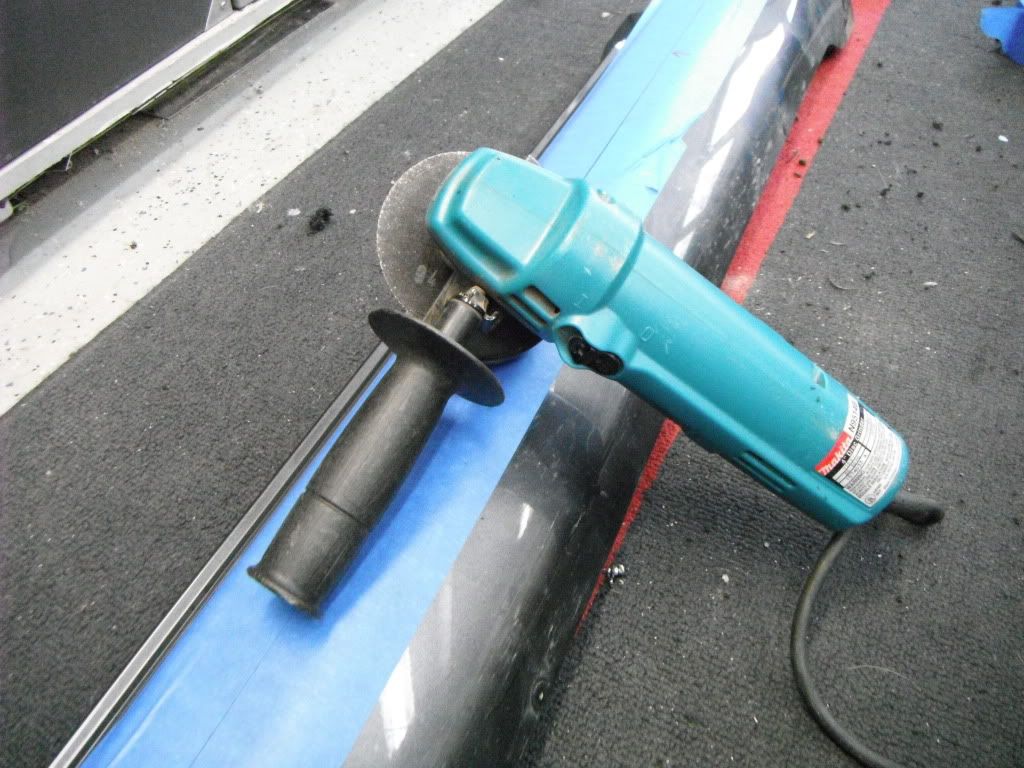
Take a deep breath, and carefully cut between the lines. Some of the plastic will melt, that's OK. It'll trim up nice and clean later. Once you cut the side, you will need to cut the ends as well. Take your time and make everything square and true...
The 2 halves won't separate due to these aluminum rivets holding the bracing in place. I used the grinder to "erase" the rivet heads- 4 on each side. Now you have 2 halves...
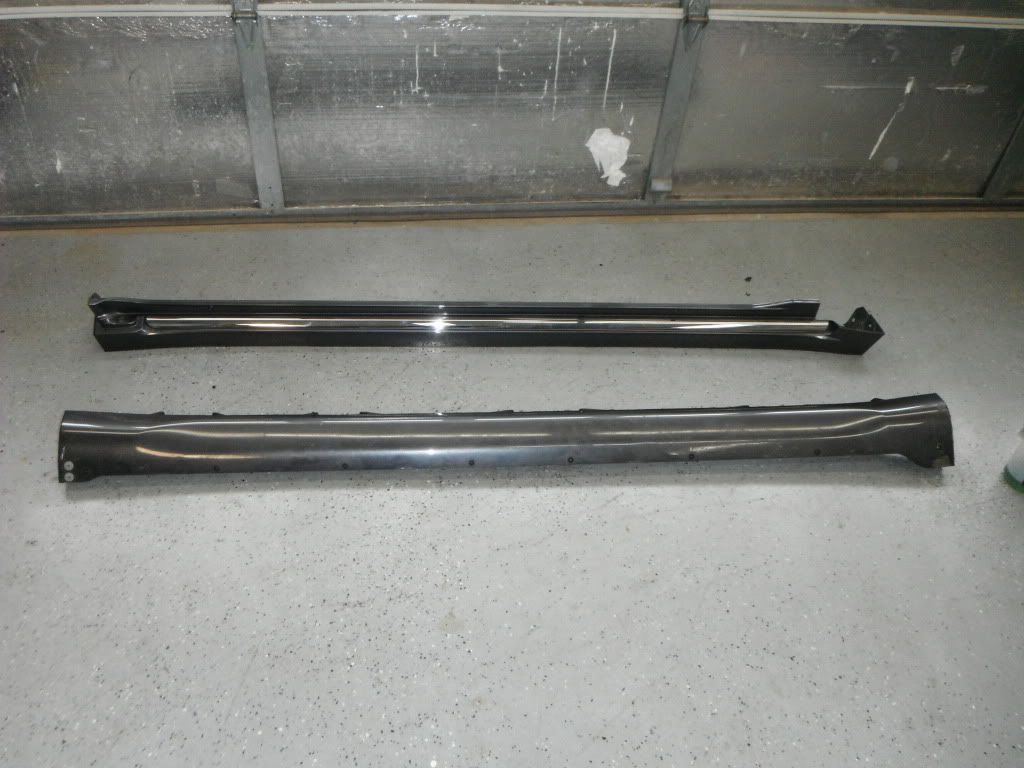
After grinding, the edges of the panel will have some melted plastic stuck to it. That's normal...
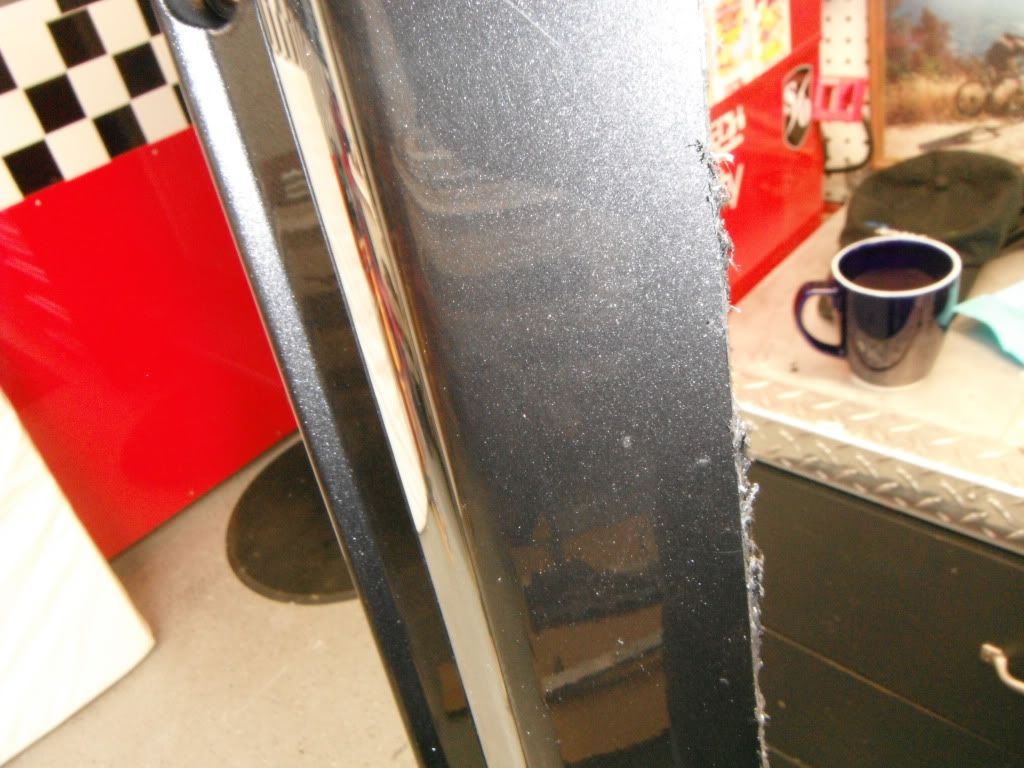 Carefully
 trim the back and the edge with a box cutter. DO NOT use a lot of pressure or you will dig into the "good" plastic. Rub the cut with your fingers. It will look perfect with a little work.
I also cut these trim pieces for a more finished look. They install in the front wheelwell. After pushing your rockers back on, hold this piece in place and mark both ends with a sharpie. Hit it with the grinder.
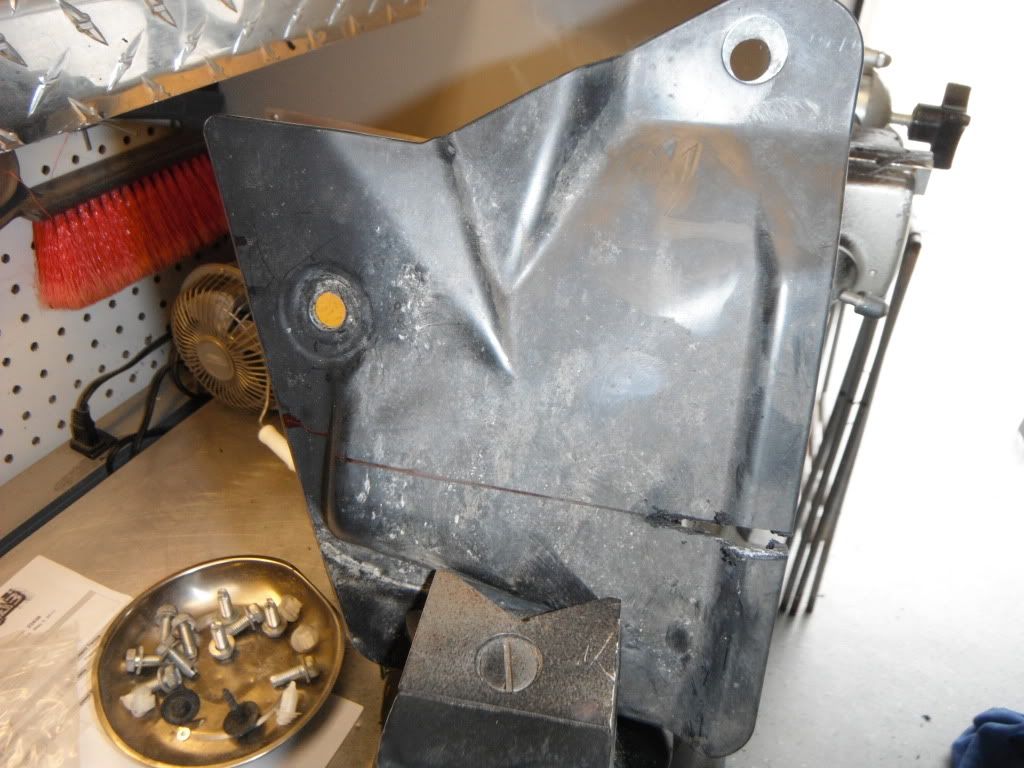
The rocker snaps back on.
Re-install the hardware in the wheelwells, and the screws behind each door. No more aluminum brace needed (it is still stout).
WITHOUT ROCKER:
 WITH
WITH ROCKER:
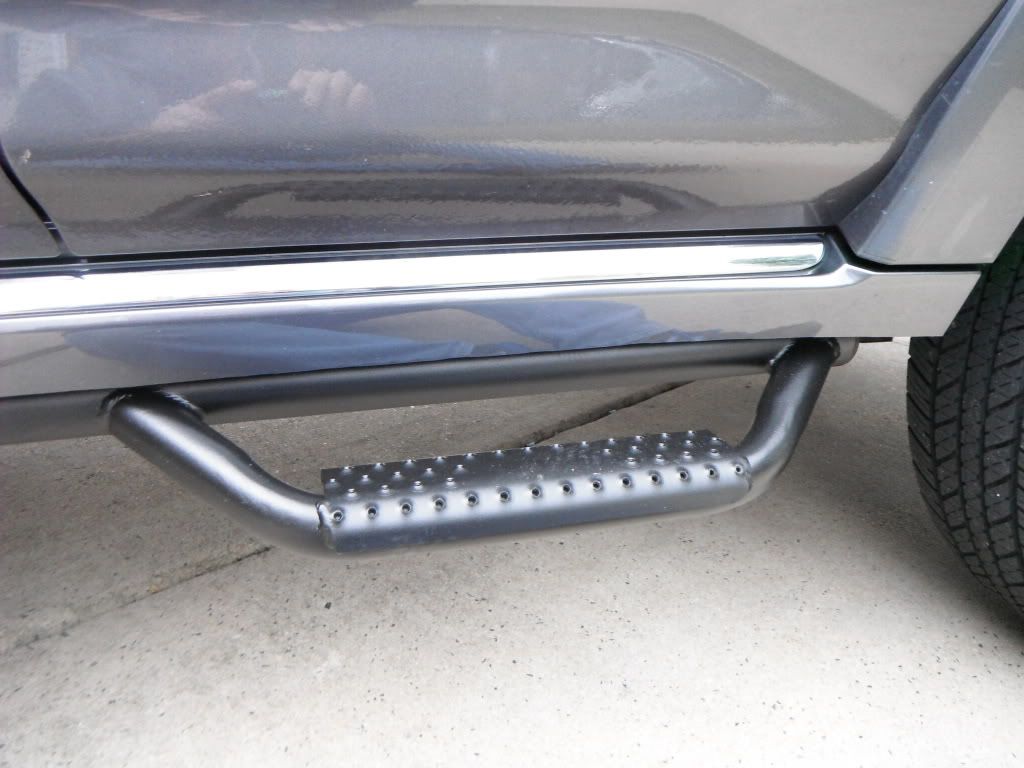
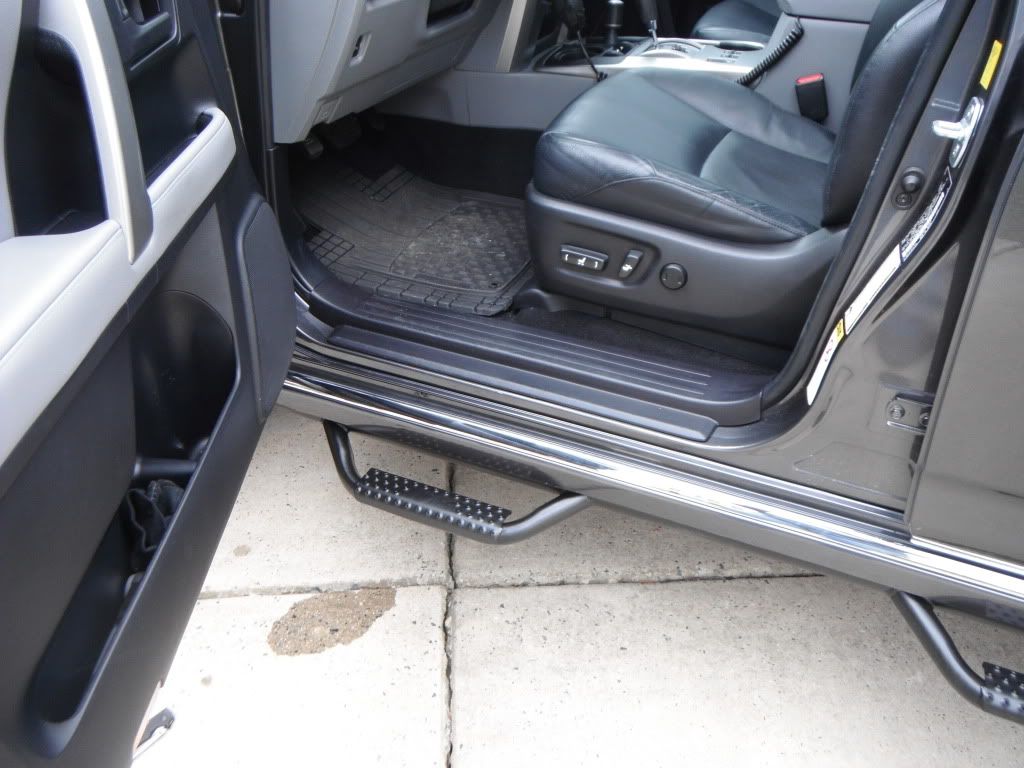
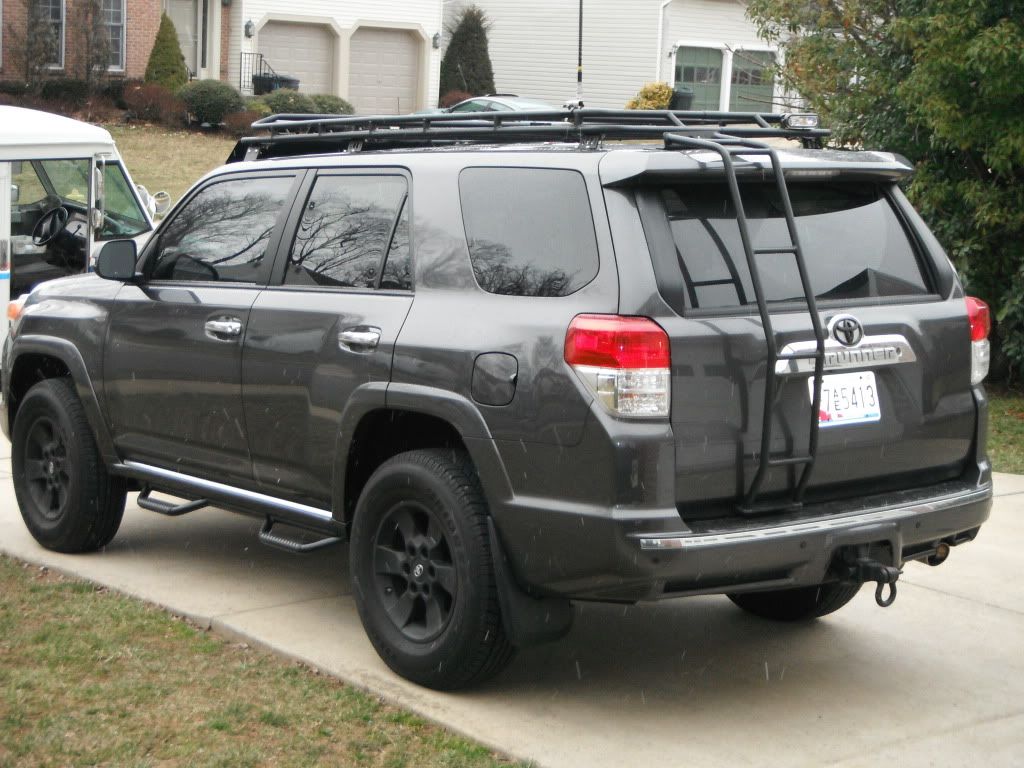
I Love 'em!!!
Happy Modding- ANTMAN
__________________
HERE FISHY FISHY FISHY!
Last edited by Antman; 03-10-2012 at 06:00 PM.
|
|
|
Reply With Quote
|
|
03-05-2012, 03:59 PM
|
#369
|
 |
Senior Member
|
|
Join Date: Jan 2006
Location: Bucks County, PA
Posts: 3,601
Real Name: Dave
|
|
|
Senior Member
Join Date: Jan 2006
Location: Bucks County, PA
Posts: 3,601
Real Name: Dave
|
Looks factory so I approve. But, where are the LED lights? 
__________________
Them Be Me Mods - 2011 Black Limited / Trail Mutt
|
|
|
Reply With Quote
|
|
03-05-2012, 04:13 PM
|
#370
|
|
Senior Member
|
|
Join Date: Aug 2010
Location: Carmel, IN
Posts: 2,765
|
|
|
Senior Member
Join Date: Aug 2010
Location: Carmel, IN
Posts: 2,765
|
Quote:
Originally Posted by Kraeken
Using Antman's advice, I installed my subwoofer today. It works great! It makes a world of difference.
Mind you, I'm not an electrical person, but here are my lessons learned:
1- Make sure you place the wires where they're supposed to end up, ie., in the dash. I had half the thing wired when I realized the wires were sitting in my lap. Dammit.
2- But even before you run all your wires, make sure the item you bought is going to fit where you plan on putting it! After I had everything wired up, and gave it a test run, I went to put it under the seat, and it didn't fit. Dammit. After some fiddling around, I made it work, but lesson learned.
I'm not really this dumb, its just an off day I guess...
|
Welcome to the club! LOL
Okki
__________________
Okki's Build Thread - 2010 Limited: Shrockworks Rock Rails & Full Skids, Gobi Rack, OPT7 LED Roof LIGHT Bar, Rigid E-Series Bumper Light Bar, Hella Horns, Auxiliary Fuse Box, Cobra ST75, TRD Rims, Discoverer ATP LT265/70R17, Rotopax, ARB Twin Compressor, Cargo Area Pressure Gauge and Chuck, Icon billet trailing- and A-arms, Dobinsons Shocks/Coils, Fumuto Oil Valve, Northstar Group 31M, CBI Front & Rear Bumpers !!!
========================================
Any time...Anywhere.. My cat can take you.
|
|
|
Reply With Quote
|
|
03-05-2012, 06:17 PM
|
#371
|
 |
Member
|
|
Join Date: Feb 2010
Location: mammoth lakes, CA
Posts: 629
|
|
|
Member
Join Date: Feb 2010
Location: mammoth lakes, CA
Posts: 629
|
Very nice rocker trim How-to, thanks. Looks great.
__________________
Couple Yotas
Iluv4xToys!
|
|
|
Reply With Quote
|
|
03-05-2012, 06:59 PM
|
#372
|
|
Member
|
|
Join Date: Feb 2009
Location: NYC
Age: 51
Posts: 546
|
|
|
Member
Join Date: Feb 2009
Location: NYC
Age: 51
Posts: 546
|
That looks really good!
__________________
2011 Trail Edition Magnetic Gray- some stuff added on, some stuff taken away...
|
|
|
Reply With Quote
|
|
03-05-2012, 07:52 PM
|
#373
|
|
Member
|
|
Join Date: Nov 2010
Location: Southeast FL
Posts: 576
|
|
|
Member
Join Date: Nov 2010
Location: Southeast FL
Posts: 576
|
Angle grinders are our friends. Great job and that rocker-ectomy.
|
|
|
Reply With Quote
|
|
03-05-2012, 08:00 PM
|
#374
|
 |
Senior Member
|
|
Join Date: Apr 2007
Location: Boulder, CO
Posts: 1,201
|
|
|
Senior Member
Join Date: Apr 2007
Location: Boulder, CO
Posts: 1,201
|
I normally don't like larger pieces of chrome on SUVs but that looks mighty fine!!!
Good job Antman.
__________________
This space for rent.
|
|
|
Reply With Quote
|
|
03-05-2012, 08:10 PM
|
#375
|
 |
Super Moderator
|
|
Join Date: Jan 2004
Location: New Jersey
Age: 37
Posts: 4,814
|
|
|
Super Moderator
Join Date: Jan 2004
Location: New Jersey
Age: 37
Posts: 4,814
|
Kraeken, I deleted that pic you posted. This is a family site so please keep it G!
__________________
Mark
2005 4Runner Limited 4X4 V8 since 6/15/05 Titanium Silver with Grey Leather
Nav, XREAS, Adjustable Ride Height, Sunroof, Side Curtain Airbags, Rear Spoiler, Double Deck Cargo, Chrome Exhuast Tip, Bug Shield, All Weather Mats, Driver Side Assist Handle, Audiovox Remote Starter, 2006 Skid Plate, LED lighting- interior and running boards, USA-Spec PA-15
Click For Pictures of My Current 2005 Limited, Detailed LED Conversion Instructions, Click For Pictures of My Retired 2003 Sport
|
|
|
Reply With Quote
|
 Posting Rules
|
You may not post new threads
You may not post replies
You may not post attachments
You may not edit your posts
HTML code is On
|
|
|
|


 Linear Mode


