 09-25-2012, 10:19 PM
|
#76
|
 |
Senior Member
|
|
Join Date: Sep 2011
Location: So Cal
Posts: 1,076
|
|
|
Senior Member
Join Date: Sep 2011
Location: So Cal
Posts: 1,076
|
I'm gonna steal your Swiffer roof waxing technique. Genius!
__________________
~~~2011 4Runner Trail Edition w/KDSS~~~
Icon - Vision-X - Rigid - Gobi - Hi Lift - V-Leds - Bud Built - Shrockworks - Husky Liner - Viair - Odyssey - Total Chaos - Cobra - Hankook - Firestick - Contura - Intelligent Battery System - CDT - AFE - Yaesu - Line-X - ARB - MY BUILD THREAD! 
|

|
 Reply With Quote Reply With Quote
|
|
09-26-2012, 08:58 AM
|
#77
|
|
Senior Member
|
|
Join Date: Aug 2010
Location: Carmel, IN
Posts: 2,765
|
|
|
Senior Member
Join Date: Aug 2010
Location: Carmel, IN
Posts: 2,765
|
Quote:
Originally Posted by BigStickKenobi

Okki,
Sorry for the delayed response. Was out of town on business and had zero internet except iPhone. Thanks for digging up the pics, I truly appreciate it. Looks like it's going to be center console then like everyone else.
Thanks and again and your rig looks awesome!
|
Thanks! Glad to save you some time figuring out the location.
Quote:
Originally Posted by SOcalTRAIL
I'm gonna steal your Swiffer roof waxing technique. Genius!
|
Inspired by Harper7 on an Antman budget... it's a forum effort 
__________________
Okki's Build Thread - 2010 Limited: Shrockworks Rock Rails & Full Skids, Gobi Rack, OPT7 LED Roof LIGHT Bar, Rigid E-Series Bumper Light Bar, Hella Horns, Auxiliary Fuse Box, Cobra ST75, TRD Rims, Discoverer ATP LT265/70R17, Rotopax, ARB Twin Compressor, Cargo Area Pressure Gauge and Chuck, Icon billet trailing- and A-arms, Dobinsons Shocks/Coils, Fumuto Oil Valve, Northstar Group 31M, CBI Front & Rear Bumpers !!!
========================================
 Any time...Anywhere.. My cat can take you.
|
|
|
Reply With Quote
|
|
01-05-2013, 08:47 PM
|
#78
|
|
Senior Member
|
|
Join Date: Aug 2010
Location: Carmel, IN
Posts: 2,765
|
|
|
Senior Member
Join Date: Aug 2010
Location: Carmel, IN
Posts: 2,765
|
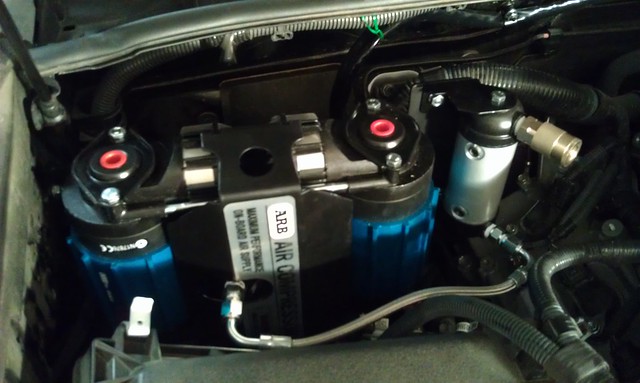
ARB Twin Compressor Installation 1/3
ARB Twin Compressor under hood.
ARB twin compressor (CKMTA12) and Manifold (171503) $ 479.00 ToyotaTRDParts.com
Bracket $ 285.00 Agile Automotive
Hardware kit $ 12.85 Agile Automotive
829-12059168, 12059168, CABLE CAVITY PLUG $ 0.55 Mouser.com
829-12084200, 12084200-L, FMALE 150 SERIES TIN $ 0.95 Mouser.com
829-15324974, 15324974, MP CABLE SEAL BLUE $ 0.24 Mouser.com
829-12052845, 12052845, SECONDARY LOCK $ 0.35 Mouser.com
829-12110293, 12110293, 3P FM BLACK CON ASSY $ 1.53 Mouser.com
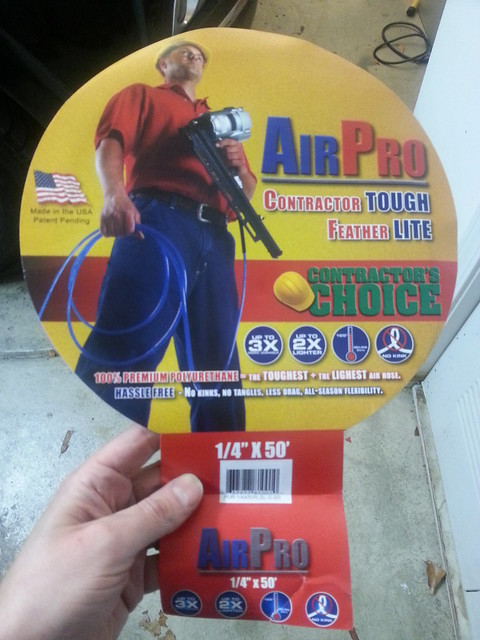
Air Pro PUR-14X050 1/4-inch by 50 Polyurethane 250 PSI Air Hose $ 27.44 Amazon.com
Ampro A2570 5 Piece Air Coupler Set Brass, Milton Type $ 7.52 Amazon.com
Total $ 815.43
THE REASON AND THE PARTS
I wanted a compressor that would let me air up the tires after playing on the trail and be able to run some light air tools to make it easier to change a tire should the need arise. The 100% duty cycle ARB twin compressor seemed to fit the bill just right without the express need for a tank (although I will be adding one eventually).
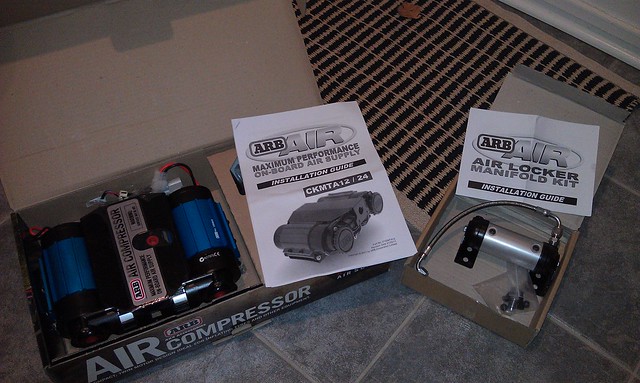
I ordered the compressor and the manifold from ToyotaTRDparts.com and the service was great as usual. With Jangoforhire having the same compressor and a good experience with Agile Auto, I explored obtaining the same bracket.
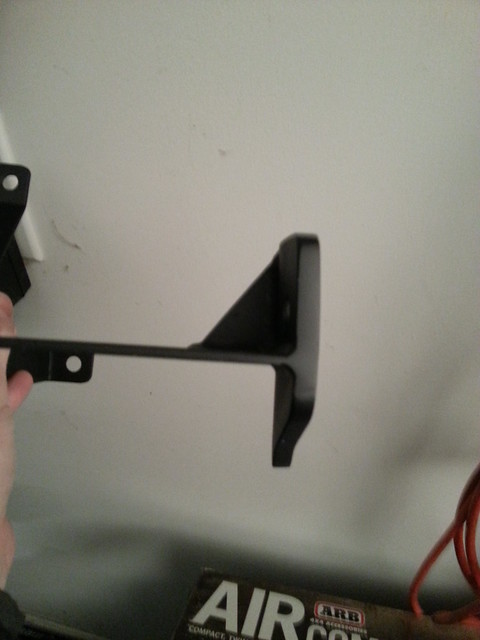
THE BRACKET
The bracket as designed by Agile Auto ties into the top of the wheel well in two places and the inner fender. It provides mounting holes for both the compressor and the manifold, using all mounting holes. The image below shows the front of the bracket. The compressor and manifold attach on this side.
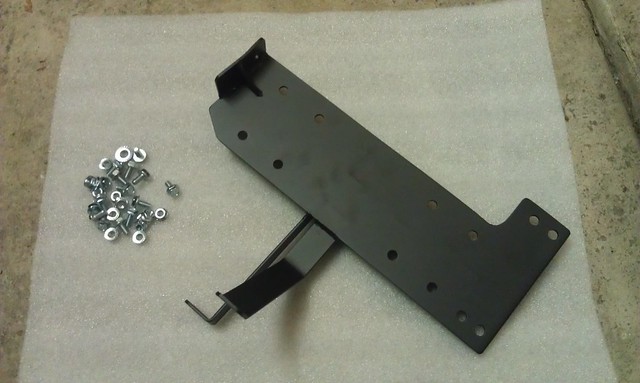
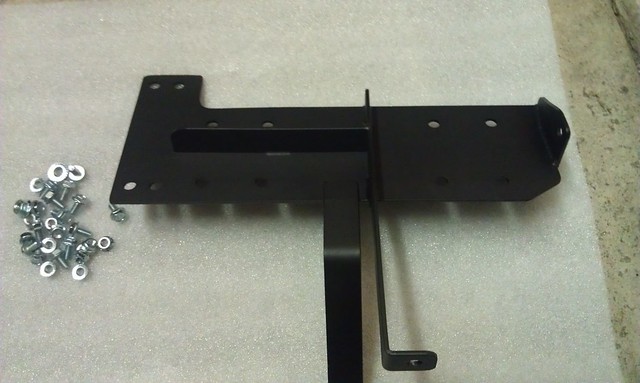
The back of the bracket is reinforced in order to reduce flexing of the bracket.
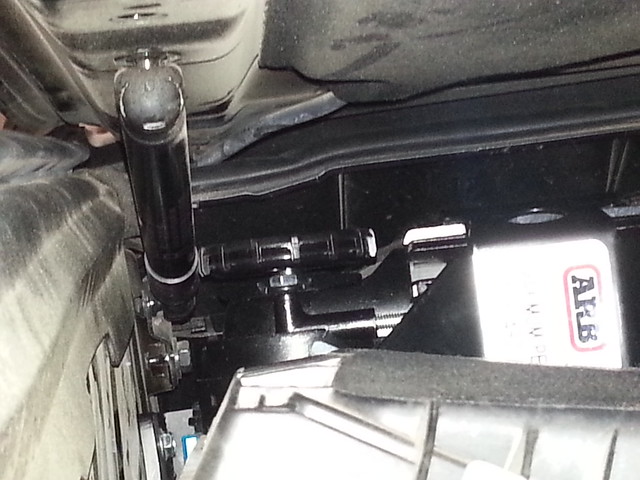
The bracket uses two existing mounting points on the wheel well. One is unuser and the other simple needs the nut removed and reinstalled once the bracket is put in place. You need to install the bracket before you attach the compressor. If you install the compressor first, you will not be able to get the bolt in that attaches the bracket to the inner fender (the front bolt). There are 2 bolts that attach the bracket to the fender.
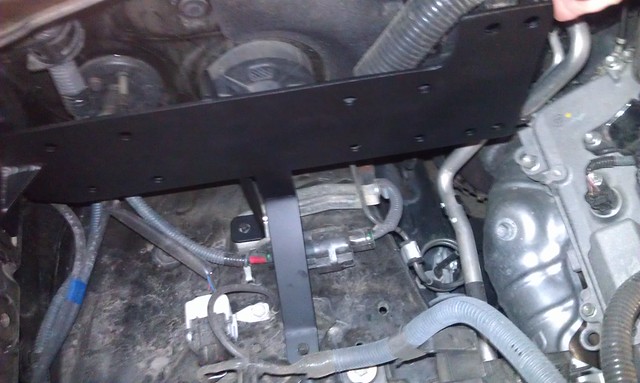
Once the bracket is bolted in securely, you can install the compressor and manifold. Install the compressor first. Since the compressor is fairly heavy and hard to handle, lift it in place and attach it with the top-inboard screw. This one is easiest to get to and will give you a fulcrum to guide the compressor when you add the top-fender bolt second. Once you have the top two bolts in, it’s easy to add the remaining 6. Once the compressor is fully secured, install the manifold.
With the manifold kit you received a braided hose to connect the manifold to the compressor. Make sure you use a single revolution of Teflon tape to make sure the connection is as air tight as possible.
__________________
Okki's Build Thread - 2010 Limited: Shrockworks Rock Rails & Full Skids, Gobi Rack, OPT7 LED Roof LIGHT Bar, Rigid E-Series Bumper Light Bar, Hella Horns, Auxiliary Fuse Box, Cobra ST75, TRD Rims, Discoverer ATP LT265/70R17, Rotopax, ARB Twin Compressor, Cargo Area Pressure Gauge and Chuck, Icon billet trailing- and A-arms, Dobinsons Shocks/Coils, Fumuto Oil Valve, Northstar Group 31M, CBI Front & Rear Bumpers !!!
========================================
Any time...Anywhere.. My cat can take you.
Last edited by Okki; 01-05-2013 at 08:54 PM.
|
|
|
Reply With Quote
|
|
01-05-2013, 08:47 PM
|
#79
|
|
Senior Member
|
|
Join Date: Aug 2010
Location: Carmel, IN
Posts: 2,765
|
|
|
Senior Member
Join Date: Aug 2010
Location: Carmel, IN
Posts: 2,765
|
ARB Twin Compressor Installation 2/3
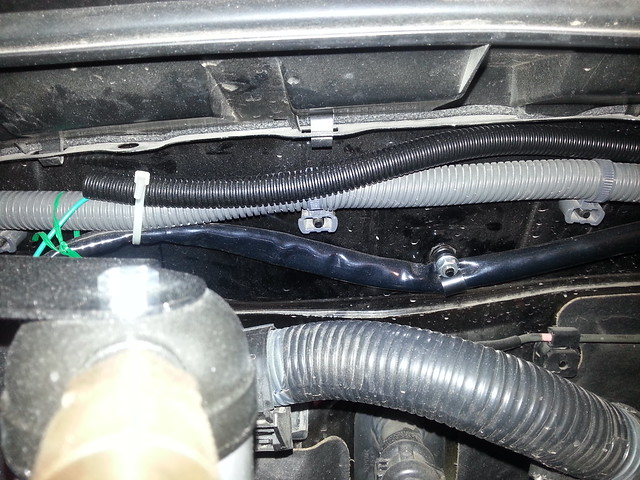
ELECTRICAL CONNECTIONS: POWER
With the compressor installed the next order of business is getting power to the unit. Using the provided harness, I connected the big connector and ran the wire loom along the firewall. You can either connect the terminals directly to the appropriate battery terminal, but since I wanted to have it be accessory switched, I connected it up to the solenoid that I already have installed for my auxiliary fuse panel. NOTE : I have since removed the solenoid and the compressor leads are connected directly to the battery.
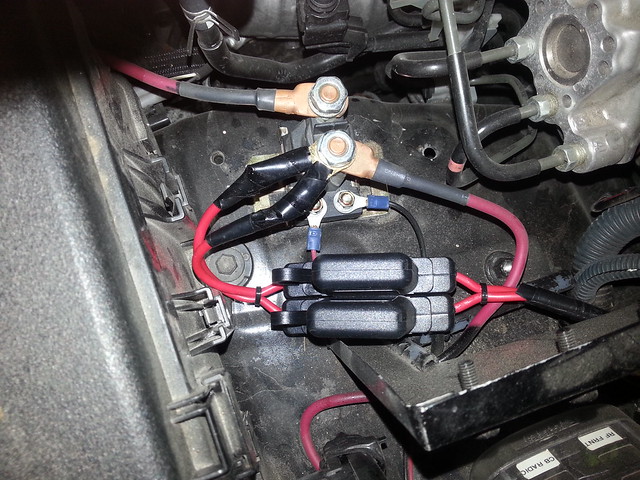
Both cables have an inline fuse. Each cable powers one of the two compressors. The ground wire I have hooked up at the battery (not visible in pictures).
ELECTRICAL CONNECTIONS: SWITCH
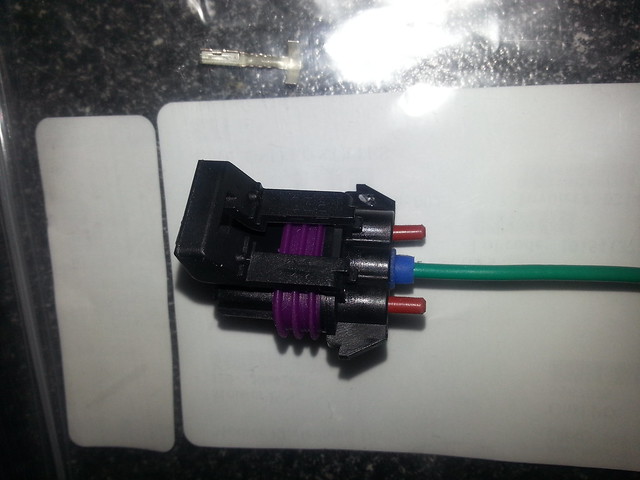
In order to switch the compressor on and off, ARB provides a nice wiring loom. However, since I already wired all my switches, I did not want to pull new wires and replace what I already have. So after a little detective work, I found out that Delphi automotive makes the water proof connector that controls the switch. ARB told me that the black wire in the loom is just there to provide a ground for the switch, so I really only needed to hook up the green power wire since my switch is already grounded. As mentioned earlier, the compressor is grounded via the power loom.
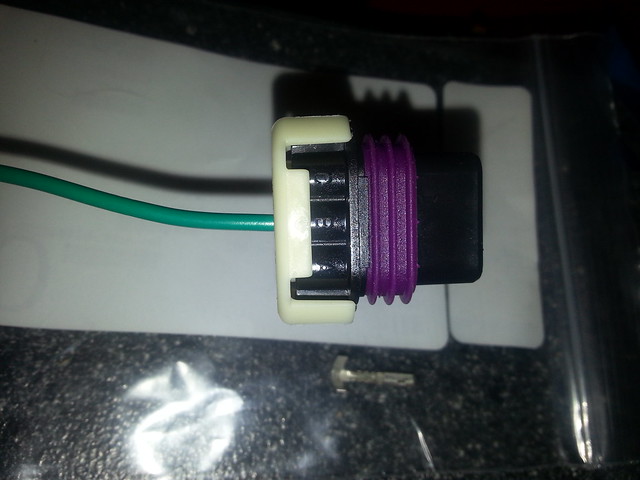
The brown stubs are plugs for the unused holes in the connector. The white collar seals the connections in the unit.
I ran some cable sleeve to protect the switch wire. It is not big enough to also cover the power cables, but since they are already covered in a wrap, I simply used some cable ties on existing studs on the firewall to route and secure it.
__________________
Okki's Build Thread - 2010 Limited: Shrockworks Rock Rails & Full Skids, Gobi Rack, OPT7 LED Roof LIGHT Bar, Rigid E-Series Bumper Light Bar, Hella Horns, Auxiliary Fuse Box, Cobra ST75, TRD Rims, Discoverer ATP LT265/70R17, Rotopax, ARB Twin Compressor, Cargo Area Pressure Gauge and Chuck, Icon billet trailing- and A-arms, Dobinsons Shocks/Coils, Fumuto Oil Valve, Northstar Group 31M, CBI Front & Rear Bumpers !!!
========================================
Any time...Anywhere.. My cat can take you.
Last edited by Okki; 09-23-2016 at 08:57 AM.
|
|
|
Reply With Quote
|
|
01-05-2013, 08:48 PM
|
#80
|
|
Senior Member
|
|
Join Date: Aug 2010
Location: Carmel, IN
Posts: 2,765
|
|
|
Senior Member
Join Date: Aug 2010
Location: Carmel, IN
Posts: 2,765
|
ARB Twin Compressor Installation 3/3
THE PROBLEM
For those of you with a keen sense of observation, you noticed that the thickness of the metal that makes contact with the fender is different in several pictures. The first copy of the bracket I received did not provide enough clearance for the hood gas-strut to come down without making contact with the compressor air filter.
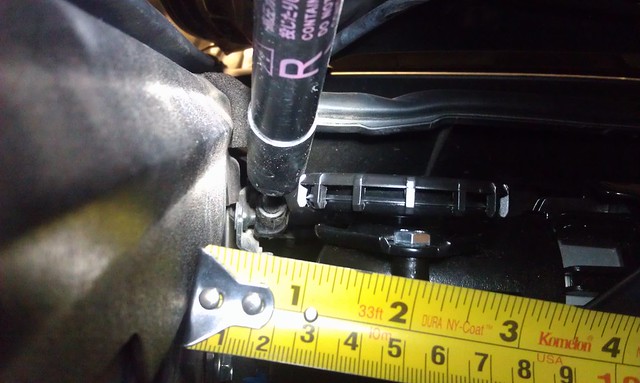
In order to fix this problem properly, the back plate would have to be a little wider and allow for more space between the first set of mounting holes and the fender. The discrepancy was about 0.5 inch in order to allow free movement and some clearance.
Unfortunately, the way Agile Automotive “fixed” the problem was by simply replacing the piece of metal that connects to the fender wall with a slightly thicker piece of metal.
While the basic design that Agile Automotive came up with is good, unfortunately I’m not too thrilled with their fix for the initial mistake that was made in construction. The strut does not make contact with the air filter, but there isn’t enough room to fit a business card between the two either.
I’ll add a piece of sheet nylon or something similar as a spacer between the bracket and the fender liner at some point in the near future in order to provide some extra clearance, but for the time being the compressor is running like a charm.
The next compressor related project is to move the air chuck to the rear of the truck.
AIR HOSE
I got the AirPro hose from Amazon. This 50ft hose I initially got in order to relocate the air chuck to the rear of the truck, but I’m really liking it, so I’m ordering a second one for that purpose and will continue to use this one to run the inflator, air tools, etc.
__________________
Okki's Build Thread - 2010 Limited: Shrockworks Rock Rails & Full Skids, Gobi Rack, OPT7 LED Roof LIGHT Bar, Rigid E-Series Bumper Light Bar, Hella Horns, Auxiliary Fuse Box, Cobra ST75, TRD Rims, Discoverer ATP LT265/70R17, Rotopax, ARB Twin Compressor, Cargo Area Pressure Gauge and Chuck, Icon billet trailing- and A-arms, Dobinsons Shocks/Coils, Fumuto Oil Valve, Northstar Group 31M, CBI Front & Rear Bumpers !!!
========================================
Any time...Anywhere.. My cat can take you.
Last edited by Okki; 01-05-2013 at 09:00 PM.
|
|
|
Reply With Quote
|
|
01-08-2013, 10:56 PM
|
#81
|
|
Senior Member
|
|
Join Date: Aug 2010
Location: Carmel, IN
Posts: 2,765
|
|
|
Senior Member
Join Date: Aug 2010
Location: Carmel, IN
Posts: 2,765
|
Replacement Wiper Blades
Replacement Wiper Blades
Michelin Stealth $ 25 Walmart
Driver side wiper blade size: 24
Passenger side wiper blade size: 20
THE CHOICE
When the OEM wiper blades got worn out I initially purchased a set of Rainex Latitude wiper blades. I've used them on our R32 and love them for that application. On the 4Runner they look very weird and unfinished in my mind (the plastic mounting point sticks up well beyond the top of the wiper arm).
The next option was the Michelin Stealth.
THE WINNER
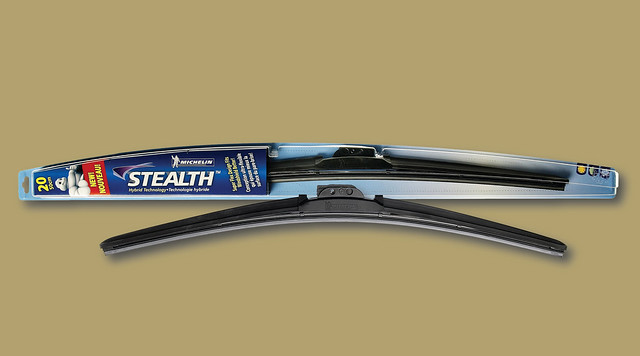
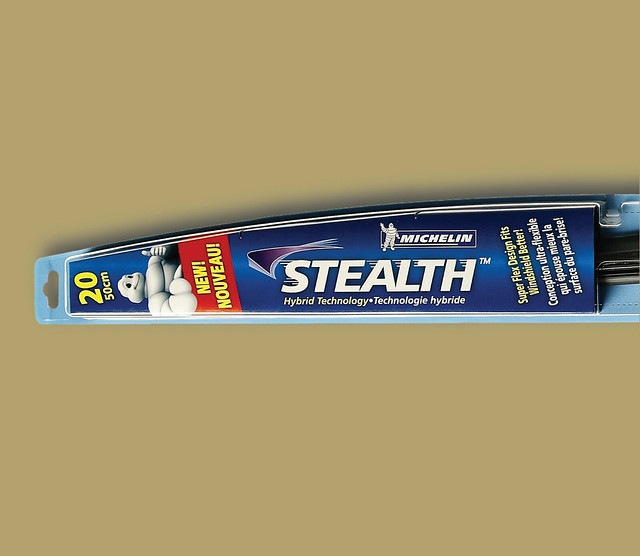
They simply snap onto the loop on the end of the wiper arm. It does take a fair bit of force before they snap and lock in, but the instructions in the packaging is pretty clear and straight forward on how to do it.
Installation time, 5 minutes. So far they have worked well in both rain and snow blizzard.
Okki
UPDATE 1/10/2015:
After almost exactly 2 years I'm replacing my wiper blades. The passenger side is not too bad, but the driver side is streaking beyond acceptable levels. Considering we've had 2 harsh winters (1 still in progress) here in Indiana and they have also been baked out west, I've been pretty happy with the performance of these wiper blades.
__________________
Okki's Build Thread - 2010 Limited: Shrockworks Rock Rails & Full Skids, Gobi Rack, OPT7 LED Roof LIGHT Bar, Rigid E-Series Bumper Light Bar, Hella Horns, Auxiliary Fuse Box, Cobra ST75, TRD Rims, Discoverer ATP LT265/70R17, Rotopax, ARB Twin Compressor, Cargo Area Pressure Gauge and Chuck, Icon billet trailing- and A-arms, Dobinsons Shocks/Coils, Fumuto Oil Valve, Northstar Group 31M, CBI Front & Rear Bumpers !!!
========================================
Any time...Anywhere.. My cat can take you.
Last edited by Okki; 01-10-2015 at 04:45 PM.
Reason: Update Report
|
|
|
Reply With Quote
|
|
01-09-2013, 06:10 PM
|
#82
|
 |
Senior Member
|
|
Join Date: Aug 2010
Location: Mississauga, ON
Posts: 1,162
|
|
|
Senior Member
Join Date: Aug 2010
Location: Mississauga, ON
Posts: 1,162
|
Thanks for sharing, now I know what I'll replace wiper blades with, just need to remember this when time comes.
__________________
2022 4Runner TRD Off Road, Lunar Rock
Goodyear Wrangler Duratracs
|
|
|
Reply With Quote
|
|
01-09-2013, 06:49 PM
|
#83
|
 |
Member
|
|
Join Date: Aug 2012
Location: San Jose, CA
Posts: 101
|
|
|
Member
Join Date: Aug 2012
Location: San Jose, CA
Posts: 101
|
I have tried all the brands mentioned. They all worked quite well, but Bosch has some that I thought were a step above IMHO. I don't remember what I paid for them, but they were a bit on the expensive side as far as wipers go.
|
|
|
Reply With Quote
|
|
01-13-2013, 02:27 PM
|
#84
|
|
Senior Member
|
|
Join Date: Aug 2010
Location: Carmel, IN
Posts: 2,765
|
|
|
Senior Member
Join Date: Aug 2010
Location: Carmel, IN
Posts: 2,765
|
Quote:
Originally Posted by JayG
I have tried all the brands mentioned. They all worked quite well, but Bosch has some that I thought were a step above IMHO. I don't remember what I paid for them, but they were a bit on the expensive side as far as wipers go.
|
Hi Jay, I think the OEM blades are Bosch. They are about $5 more per blade. I think the Michelins are a good "budget" option. I'll post an update in a few month .
__________________
Okki's Build Thread - 2010 Limited: Shrockworks Rock Rails & Full Skids, Gobi Rack, OPT7 LED Roof LIGHT Bar, Rigid E-Series Bumper Light Bar, Hella Horns, Auxiliary Fuse Box, Cobra ST75, TRD Rims, Discoverer ATP LT265/70R17, Rotopax, ARB Twin Compressor, Cargo Area Pressure Gauge and Chuck, Icon billet trailing- and A-arms, Dobinsons Shocks/Coils, Fumuto Oil Valve, Northstar Group 31M, CBI Front & Rear Bumpers !!!
========================================
Any time...Anywhere.. My cat can take you.
Last edited by Okki; 01-27-2013 at 06:22 PM.
|
|
|
Reply With Quote
|
|
02-14-2013, 10:42 AM
|
#85
|
|
Member
|
|
Join Date: Jan 2013
Location: Northern California
Posts: 96
|
|
|
Member
Join Date: Jan 2013
Location: Northern California
Posts: 96
|
Quote:
Originally Posted by Okki
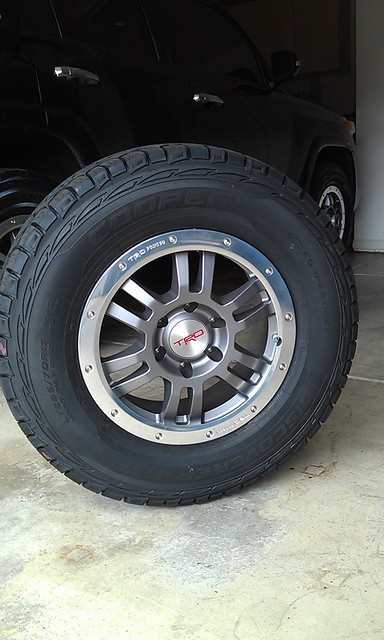
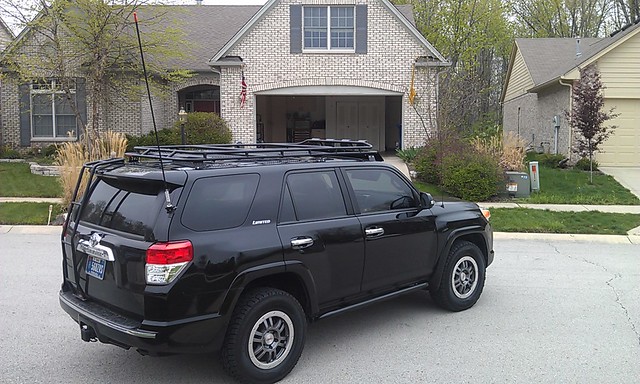
17INCH RIMS & TIRES
TRD forged 17" rims (PTR45-35010) $1,650.00 5 rims toyotatrdpart.com
Wheel Installation Kit 12mm Conical (PTR27-89100) $150.00 toyotatrdpart.com
Shipping $60.00 toyotatrdpart.com
Cooper Tire Discoverer ATP $1,343.53 Discount Tire
Sold OEM rims and tires $(1,175.00) [Private sale]
Total $2,028.53
Current Pressure: 40PSI
Torque Specs: 82ft/lbs (112N-m) - Do NOT use an Impact Gun. Air ratchets are OK.
Tire Details:
121/118S
Load Range: E
LT265/70 R17
Specs:
1 ply nylon
2 plies steel
2 plies polyester
Sidewall:
2 plies polyester

|
Okki,
I really dig the TRD wheels. I might have to take a page out of your build 
Do you have any pictures of the wheels/tires from the rear?
|
|
|
Reply With Quote
|
|
02-14-2013, 12:38 PM
|
#86
|
|
Senior Member
|
|
Join Date: Aug 2010
Location: Carmel, IN
Posts: 2,765
|
|
|
Senior Member
Join Date: Aug 2010
Location: Carmel, IN
Posts: 2,765
|
Quote:
Originally Posted by T4Argh
Do you have any pictures of the wheels/tires from the rear?
|
That's the best I've got at the moment, but let me know if you need a more straight back view and I'll take some over the weekend.
Okki
__________________
Okki's Build Thread - 2010 Limited: Shrockworks Rock Rails & Full Skids, Gobi Rack, OPT7 LED Roof LIGHT Bar, Rigid E-Series Bumper Light Bar, Hella Horns, Auxiliary Fuse Box, Cobra ST75, TRD Rims, Discoverer ATP LT265/70R17, Rotopax, ARB Twin Compressor, Cargo Area Pressure Gauge and Chuck, Icon billet trailing- and A-arms, Dobinsons Shocks/Coils, Fumuto Oil Valve, Northstar Group 31M, CBI Front & Rear Bumpers !!!
========================================
Any time...Anywhere.. My cat can take you.
|
|
|
Reply With Quote
|
|
02-25-2013, 06:24 PM
|
#87
|
|
Senior Member
|
|
Join Date: Aug 2010
Location: Carmel, IN
Posts: 2,765
|
|
|
Senior Member
Join Date: Aug 2010
Location: Carmel, IN
Posts: 2,765
|
Replacing The Key Fob Battery
#1. Release Key by pressing down on the release panel on the side (it has a key insignia on the lever)
#2. Remove key by pulling chain with release panel open at the same time.
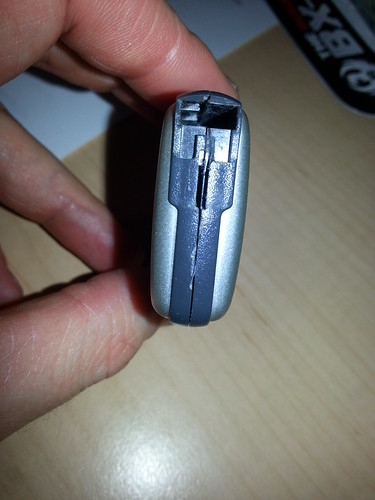
#3. Use flat pry tool (the end of the key works great) to separate sides of fob.
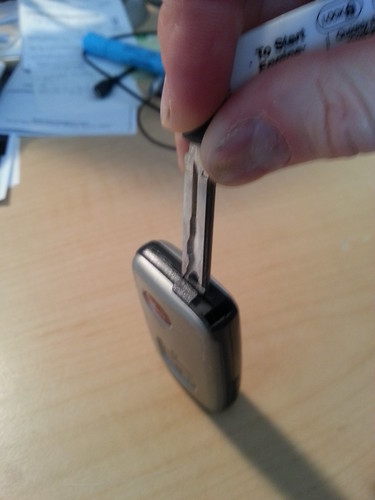

#4. Remove old battery.
#5 Replace with new battery (3V CR1632) in 2010 4Runner LTD.

#6. Snap sides back together.
#7. Reinsert key.
__________________
Okki's Build Thread - 2010 Limited: Shrockworks Rock Rails & Full Skids, Gobi Rack, OPT7 LED Roof LIGHT Bar, Rigid E-Series Bumper Light Bar, Hella Horns, Auxiliary Fuse Box, Cobra ST75, TRD Rims, Discoverer ATP LT265/70R17, Rotopax, ARB Twin Compressor, Cargo Area Pressure Gauge and Chuck, Icon billet trailing- and A-arms, Dobinsons Shocks/Coils, Fumuto Oil Valve, Northstar Group 31M, CBI Front & Rear Bumpers !!!
========================================
Any time...Anywhere.. My cat can take you.
Last edited by Okki; 02-25-2013 at 06:39 PM.
|
|
|
Reply With Quote
|
|
03-19-2013, 06:52 PM
|
#88
|
|
Senior Member
|
|
Join Date: Aug 2010
Location: Carmel, IN
Posts: 2,765
|
|
|
Senior Member
Join Date: Aug 2010
Location: Carmel, IN
Posts: 2,765
|
Roof Mounted Hi-Lift Extreme 1/3
Hi-Lift w/ Mount
GT4HILT: GOBI Toyota 4Runner Hi-Lift Attachment $ 140.95 EAD Offroad
Highlift base $ 59.50 Off-Road Base (ORB) Amazon
XT485: 48" Hi-Lift Extreme $ 100.94 Hi-Lift
Total $ 301.39
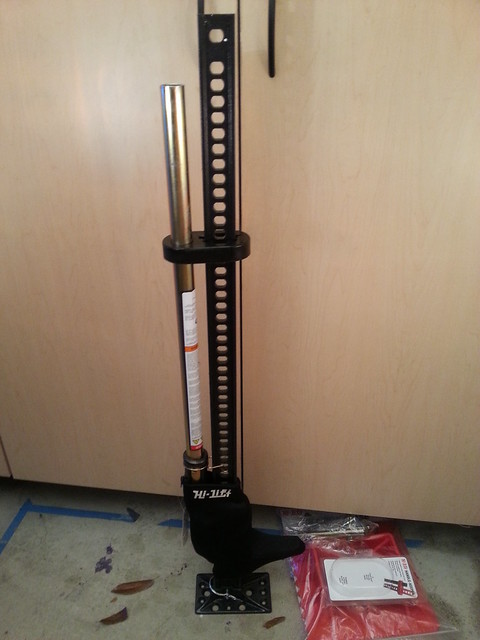
Once you start considering lifting your vehicle,or taking it offroad into situations where you may not have a normal surface under the truck, youll quickly discover the need for a Hi-Lift. For precisely that those two reasons I added a Hi-Lift Extreme to my truck. I also added an offroad base and SBE Square adapter to my recovery bag. The video below shows the Hi-Lift jacking up the truck by the slider, using the SBE adapter.
ACCESSORIES:
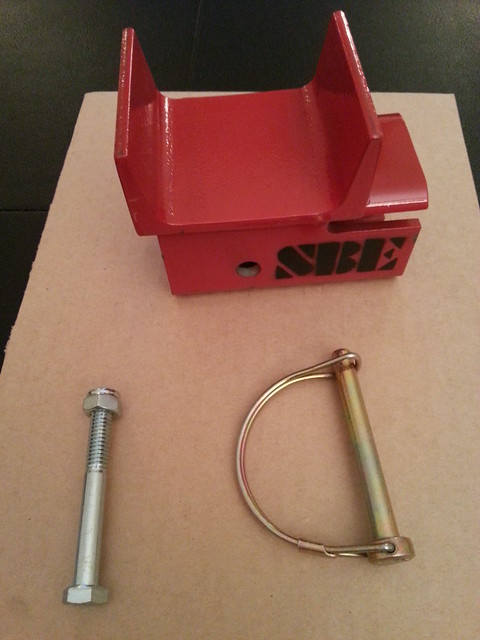
SBE Adapter:
I added the SBE Square adapter to my revocery bag to be used with the Hi-lift. This is a hi-Lift specific accessory that allows the user to get a more secured hold of the vehicle they are lifting. A square (pictured), round and V-shaped adapter are offered by SBE. In all cases, the adapter is slid over the left arm and secured with either a locking pin, or bolt.
 Hi-Lift handle retainer:
I got the Hi-Lift handle retainer to secure the handle and while it does what it needs to do; I will probably switch to the DayStar handle retainer in the near future. The DayStar version is a more minimalistic design and because its not a fits all makes and models design is a more secure and tightly fitting design.
Hi-Lift neoprene zip cover:
The neoprene cover I got is the small cover that only covers the carrier. There is a larger version that covers the whole Hi-Lift, but it does not appear to allow for the unit to be secured to a roofrack by the holes in the beam. This cover may be more suitable if you are storing the jack inside the vehicle.
__________________
Okki's Build Thread - 2010 Limited: Shrockworks Rock Rails & Full Skids, Gobi Rack, OPT7 LED Roof LIGHT Bar, Rigid E-Series Bumper Light Bar, Hella Horns, Auxiliary Fuse Box, Cobra ST75, TRD Rims, Discoverer ATP LT265/70R17, Rotopax, ARB Twin Compressor, Cargo Area Pressure Gauge and Chuck, Icon billet trailing- and A-arms, Dobinsons Shocks/Coils, Fumuto Oil Valve, Northstar Group 31M, CBI Front & Rear Bumpers !!!
========================================
Any time...Anywhere.. My cat can take you.
Last edited by Okki; 03-19-2013 at 10:04 PM.
|
|
|
Reply With Quote
|
|
03-19-2013, 06:53 PM
|
#89
|
|
Senior Member
|
|
Join Date: Aug 2010
Location: Carmel, IN
Posts: 2,765
|
|
|
Senior Member
Join Date: Aug 2010
Location: Carmel, IN
Posts: 2,765
|
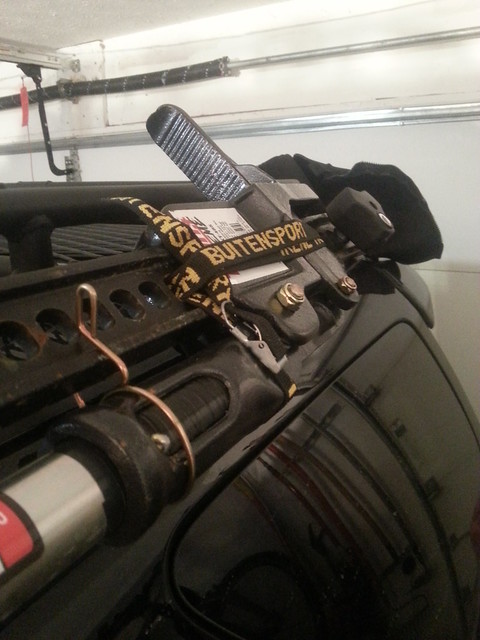
Roof Mounted Hi-Lift Extreme 2/3
MOUNTING THE HIGH-LIGT TO THE GOBI RACK:
I went through various configurations of mounting the Hi-Lift until I found a manner in which it was suitably secured and minimized noise inside the truck. In order to determine the spacing of the Gobi attachment brackets, I attached them to the Hi-Lift before mounting the entire assembly to the roof rack.
In order to get the best results I attached the first bracket just above the rubber handle retainer. The second bracket I positioned just BELOW the Hi-Lift carrier. In the picture below I still had it above the carrier.

After some trial and error I positioned both the handle retainer and the carrier in between the two brackets and this did two things:
1) The carrier cannot be removed of the main beam.
2) Possibly reduced noise created by the main beam flexing when driving over pot-holes/rough surface.
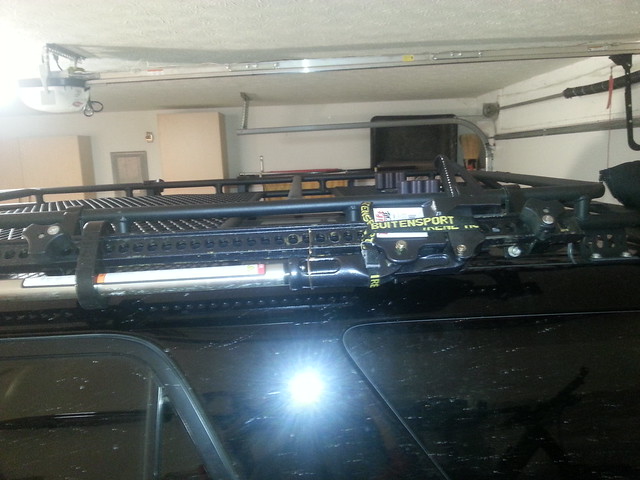
As visible in the image above, I also removed the lift base from the Hi-Lift.
RATTLES AND NOISES:
When I first mounted the Hi-Lift to the Gobi, it sounded like a had a stack of sheetmetal banging around in the back of the truck. There are several things I did to remedy the issue(s).
Noise 1: whistling from the handle.
The driving at higher speeds and with certain relative wind directions, the handle whistles. This is easily fixed by plugging the end with a rubber stopper that can be had from your local hardware store for about $1.-
 Noise 2: carrier and handle rattling on the main beam.
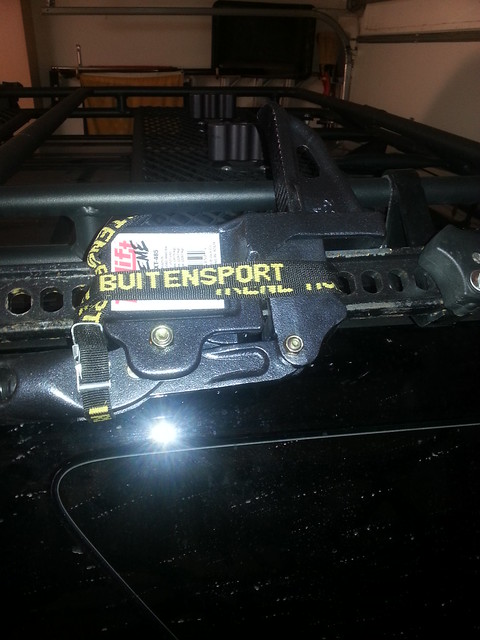
The Hi-Lift is built to be mud covered and elements exposed and still work when you need it. This means that the clearances are large and thus things rattle when jarred as you drive on rought surfaces or hit a pothole. After trying several different ways of tying the carrier down I found the following manner both efficient and easily implementable, regardless of how dirty your Hi-Lift is.
Feed a nylon strap with a clamp on one end (or a figure-8 buckle) through the main beam, just above the carrier. With the length of my strap I was able to loop twice around the carrier. After the second loop I wrapped once around the handle in order to keep it from rattling on the fulcrum pin. I then secured the strap through the clamp and pulled the remainder under the looped sections to keep it out of the way.
Note: you could achieve similar results by using zip-ties, but I wanted something that I could reuse on the trail and zip-ties seemed to be a less desirable option in that case since I would likely have to cut them off to release the carrier and thus bring spare zip-ties to replace them.
 Noise 3: handle-carrier insert.
The handle that inserts into the carrier has a good bit of clearance that allows it to rattle at the top of the insert. Start by pulling the cotter-pin and remove the handle from the carrier. Take note how far it sits into the carrier. Grab some electrical tape and wind the handle with one layer of electrical tape (50% overlapping per wind). Feel for the indentation where the hole is for the cotter-pin and punch through the tape with the tip of a pocket knife or small screwdriver to open it up again.
Next reinsert the handle into the carrier and push the cotter pin back in place. The handle should fit snugly now within the carrier insert.
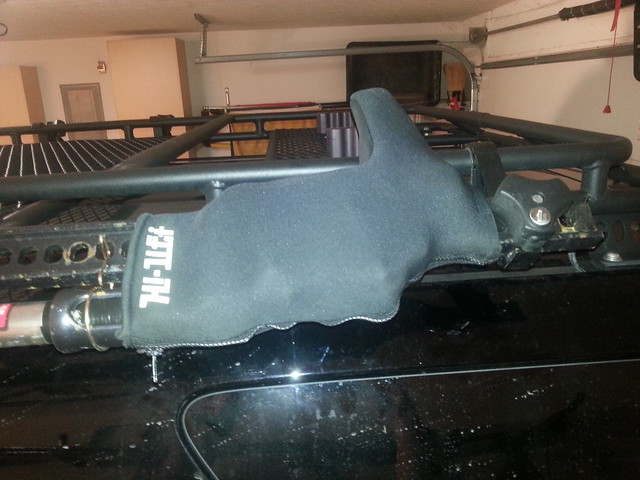
 Neoprene cover:
Finally I use a neoprene cover to keep the carrier covered and protected from the elements. This also protects the nylon strap from weather exposure and from flapping in the wind.
 Noise 4: The flat base rattling:
The base of the hi-Lift is attached with only retaining pin. I had some electrical tape wrapped around the bottom of the beam to dampen any movement, but nothing stopped it from rattling. With the base removed and stored in my recovery bag, the noise generated by this part was eliminated.
__________________
Okki's Build Thread - 2010 Limited: Shrockworks Rock Rails & Full Skids, Gobi Rack, OPT7 LED Roof LIGHT Bar, Rigid E-Series Bumper Light Bar, Hella Horns, Auxiliary Fuse Box, Cobra ST75, TRD Rims, Discoverer ATP LT265/70R17, Rotopax, ARB Twin Compressor, Cargo Area Pressure Gauge and Chuck, Icon billet trailing- and A-arms, Dobinsons Shocks/Coils, Fumuto Oil Valve, Northstar Group 31M, CBI Front & Rear Bumpers !!!
========================================
Any time...Anywhere.. My cat can take you.
Last edited by Okki; 03-19-2013 at 10:05 PM.
|
|
|
Reply With Quote
|
|
03-19-2013, 06:53 PM
|
#90
|
|
Senior Member
|
|
Join Date: Aug 2010
Location: Carmel, IN
Posts: 2,765
|
|
|
Senior Member
Join Date: Aug 2010
Location: Carmel, IN
Posts: 2,765
|
Roof Mounted Hi-Lift Extreme 3/3
FAILED FIXES:
My first thought to keep the carrier from rattling along the beam was to use the clearance between the carrier and the beam and insert some sort of rubber stop to keep the two from making contact. I picked up some 3/8 radiator hose at my local hardware store and cut a stepped section out of it.
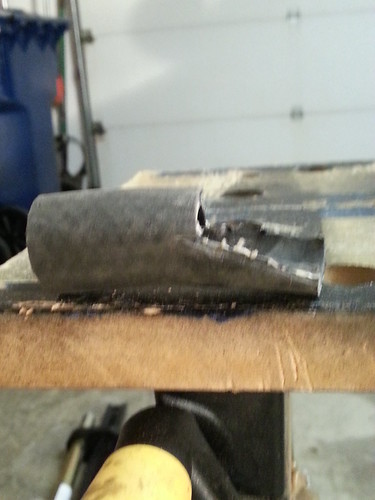
The next version skipped the step and was simply an angled cut.
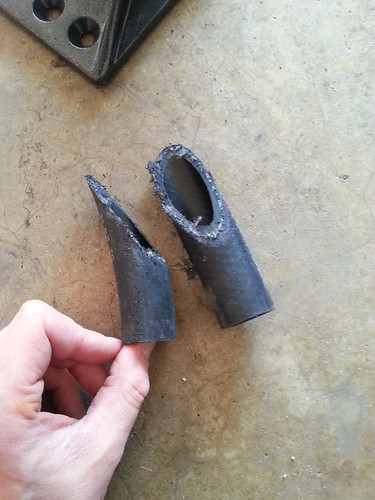
In both cases I pressed the sections as tight as possible in between the carrier and the beam. Even after compressing the inserts under a weight, they would never fit far enough in between the two parts to properly function. Either they were to thin and the carrier would still contact the beam, or to thick and not fit in far enough to make a difference. Fortunately there wasnt a lot of money involved in this experiment.
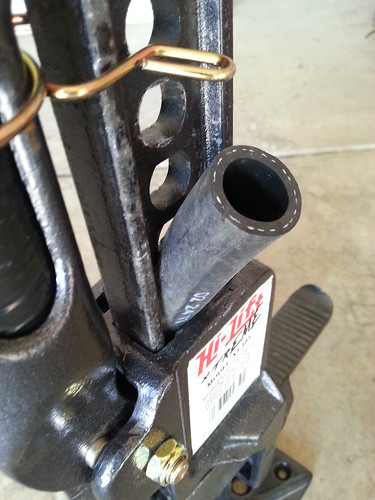
Okki
__________________
Okki's Build Thread - 2010 Limited: Shrockworks Rock Rails & Full Skids, Gobi Rack, OPT7 LED Roof LIGHT Bar, Rigid E-Series Bumper Light Bar, Hella Horns, Auxiliary Fuse Box, Cobra ST75, TRD Rims, Discoverer ATP LT265/70R17, Rotopax, ARB Twin Compressor, Cargo Area Pressure Gauge and Chuck, Icon billet trailing- and A-arms, Dobinsons Shocks/Coils, Fumuto Oil Valve, Northstar Group 31M, CBI Front & Rear Bumpers !!!
========================================
Any time...Anywhere.. My cat can take you.
Last edited by Okki; 03-19-2013 at 10:06 PM.
|
|
|
Reply With Quote
|
 Posting Rules
|
You may not post new threads
You may not post replies
You may not post attachments
You may not edit your posts
HTML code is On
|
|
|
|


 Linear Mode


