 09-04-2016, 06:57 PM
|
#226
|
|
Senior Member
|
|
Join Date: Aug 2010
Location: Carmel, IN
Posts: 2,765
|
|
|
Senior Member
Join Date: Aug 2010
Location: Carmel, IN
Posts: 2,765
|
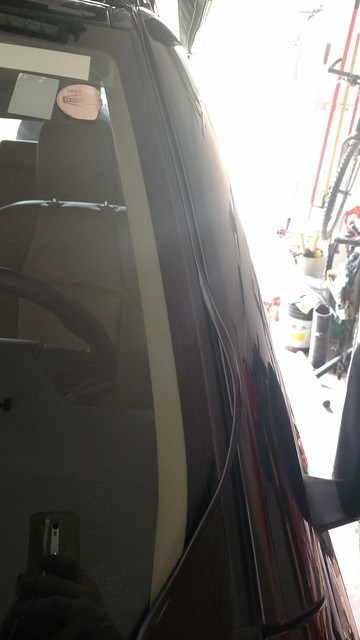
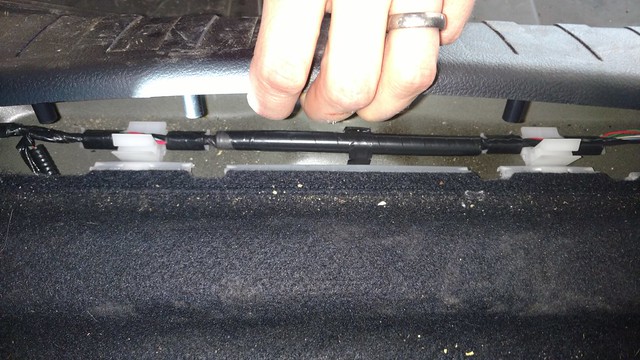
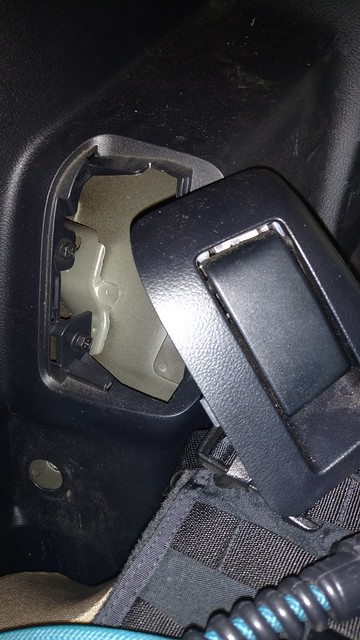
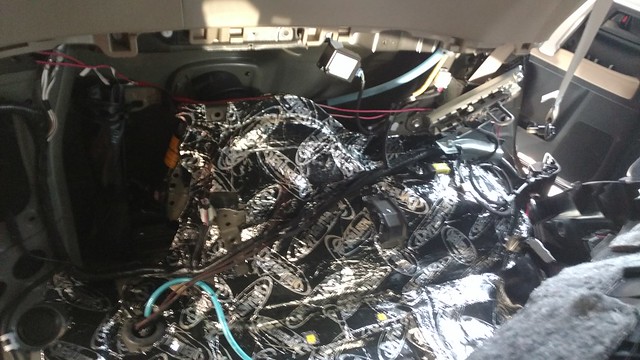
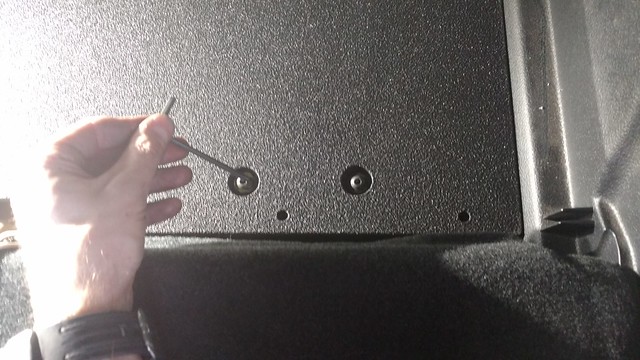
Roof Power along the A-Pillar
It's been brought up a number of times, but there seem to have been very few pictures on the subject, so here are a few.
My roof power was having some issues (more on that later) so I ran a temporary power and ground line from the driver side roof down into the engine bay.
This is a bit of an
@ Antman
picture, but you can see the wire coming out of the rain gutter and turning left towards the OPT7 lightbar plug. (The Deutsch connector you see is for the permanent power solution that failed).
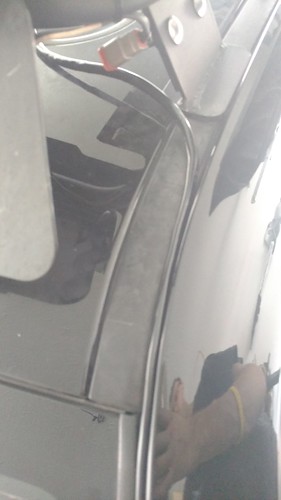
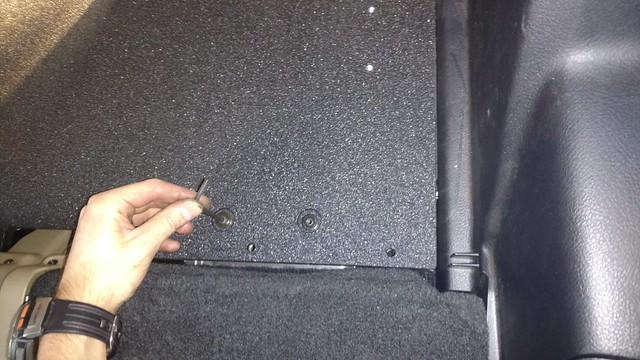
I used the fully loomed wiring that came with the OPT7 lightbar and cut a section to length to use for this project. The rubberized loom they use blends seamlessly with the window trim channel. Just slowly work the wire into the channel. Do not to pull the trim out and away from the windshield. There is no need and that may actually allow water into the A-Pillar when you exit at the top at the roof rain channel with your wire.
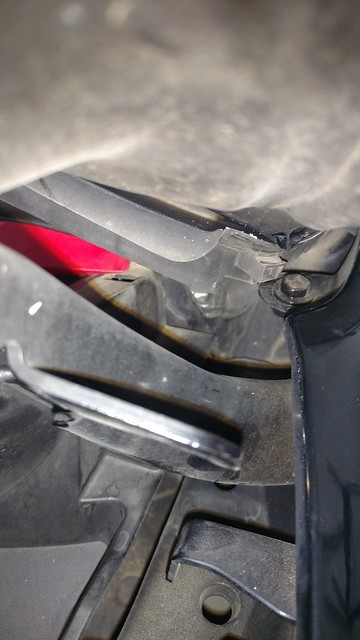
At the base of the windshield, pop out the corner trim piece. There are two clips on the engine side, and on the fender side there is a protrusion that needs to slide out of a hole. You can now run your wire into the engine bay and hook it up to your power and ground.
Hopefully this helps. Let me know if more pictures are needed.
Okki
__________________
Okki's Build Thread - 2010 Limited: Shrockworks Rock Rails & Full Skids, Gobi Rack, OPT7 LED Roof LIGHT Bar, Rigid E-Series Bumper Light Bar, Hella Horns, Auxiliary Fuse Box, Cobra ST75, TRD Rims, Discoverer ATP LT265/70R17, Rotopax, ARB Twin Compressor, Cargo Area Pressure Gauge and Chuck, Icon billet trailing- and A-arms, Dobinsons Shocks/Coils, Fumuto Oil Valve, Northstar Group 31M, CBI Front & Rear Bumpers !!!
========================================
 Any time...Anywhere.. My cat can take you.
|

|
 Reply With Quote Reply With Quote
|
|
09-05-2016, 02:33 PM
|
#227
|
|
Senior Member
|
|
Join Date: Aug 2010
Location: Carmel, IN
Posts: 2,765
|
|
|
Senior Member
Join Date: Aug 2010
Location: Carmel, IN
Posts: 2,765
|
Core Support/Bash Plate
After installing the CBI bumper on my truck, the RCI bash-plate that filled the gap between the OEM bumper and the Shrockworks Skids was no longer needed.
However, the bottom radiator core support was in plain view and subject to more water/snow/mud/etc. So I wanted to add some protection and clean up the look.
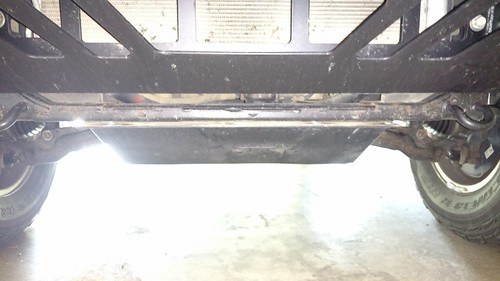
For about $21 at my local Lowes I picked up some Aluminum angle of 1/8" x 2" x 4ft.
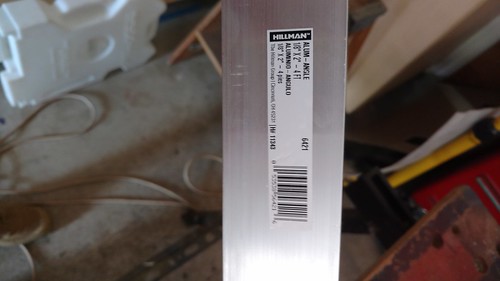
I measured to size and trimmed the angle at 28 inches. I loosened the Shrockworks skid plate and used a Sharpy to mark the bolt holes. Keep in mind not all holes are the same size; there are 2 different sizes!

A couple coats of primer and black paint to match the body color and voila!
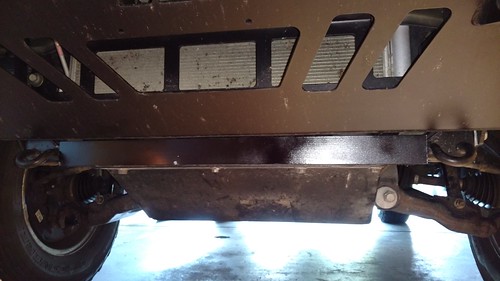
The finished piece fits like a glove and looks much nicer.
__________________
Okki's Build Thread - 2010 Limited: Shrockworks Rock Rails & Full Skids, Gobi Rack, OPT7 LED Roof LIGHT Bar, Rigid E-Series Bumper Light Bar, Hella Horns, Auxiliary Fuse Box, Cobra ST75, TRD Rims, Discoverer ATP LT265/70R17, Rotopax, ARB Twin Compressor, Cargo Area Pressure Gauge and Chuck, Icon billet trailing- and A-arms, Dobinsons Shocks/Coils, Fumuto Oil Valve, Northstar Group 31M, CBI Front & Rear Bumpers !!!
========================================
Any time...Anywhere.. My cat can take you.
Last edited by Okki; 09-08-2016 at 10:47 AM.
|
|
|
Reply With Quote
|
|
09-05-2016, 03:48 PM
|
#228
|
|
Senior Member
|
|
Join Date: Aug 2010
Location: Carmel, IN
Posts: 2,765
|
|
|
Senior Member
Join Date: Aug 2010
Location: Carmel, IN
Posts: 2,765
|
Alignment Explained
Since I had some questions about suspension geometry myself, I did some digging and video viewing. Time to get schooled 
Steering Axis Inclination - Explained
https://www.youtube.com/watch?v=IUcZ63unEyU
Camber - Explained
https://www.youtube.com/watch?annota...&v=jSFmUmVWBp0
Toe-in and Toe-out - Explained
https://www.youtube.com/watch?annota...&v=83_GTZeuF6M
Caster - Explained
https://www.youtube.com/watch?v=Gh7gWJAvOvs
And if you like it all summarized in a nice Indian-British accent:
Steering Geometry - Camber , Caster , King pin inclination , toe in , toe out
https://www.youtube.com/watch?v=e8GyZReUdQw
__________________
Okki's Build Thread - 2010 Limited: Shrockworks Rock Rails & Full Skids, Gobi Rack, OPT7 LED Roof LIGHT Bar, Rigid E-Series Bumper Light Bar, Hella Horns, Auxiliary Fuse Box, Cobra ST75, TRD Rims, Discoverer ATP LT265/70R17, Rotopax, ARB Twin Compressor, Cargo Area Pressure Gauge and Chuck, Icon billet trailing- and A-arms, Dobinsons Shocks/Coils, Fumuto Oil Valve, Northstar Group 31M, CBI Front & Rear Bumpers !!!
========================================
Any time...Anywhere.. My cat can take you.
|
|
|
Reply With Quote
|
|
09-19-2016, 10:39 AM
|
#229
|
|
Member
|
|
Join Date: Jul 2016
Location: Corpus Christi, TX
Posts: 51
|
|
|
Member
Join Date: Jul 2016
Location: Corpus Christi, TX
Posts: 51
|
Where did you run the ground wire into? I'm pretty new to the electrical part of car mods. I see the part attached to the frae but where does the other end wire into? Thanks
|
|
|
Reply With Quote
|
|
09-19-2016, 02:22 PM
|
#230
|
|
Senior Member
|
|
Join Date: Aug 2010
Location: Carmel, IN
Posts: 2,765
|
|
|
Senior Member
Join Date: Aug 2010
Location: Carmel, IN
Posts: 2,765
|
Quote:
Originally Posted by theteleguy

Where did you run the ground wire into? I'm pretty new to the electrical part of car mods. I see the part attached to the frae but where does the other end wire into? Thanks
|
The roof lights are powered by an auxiliary fuse panel. I can get power and ground from there. You can also use an inline fuse for the power line and connect to the battery.
Ground can either go straight to the battery negative terminal, or to the ground point on the driver side fender.
Hopefully this helps.
Okki
__________________
Okki's Build Thread - 2010 Limited: Shrockworks Rock Rails & Full Skids, Gobi Rack, OPT7 LED Roof LIGHT Bar, Rigid E-Series Bumper Light Bar, Hella Horns, Auxiliary Fuse Box, Cobra ST75, TRD Rims, Discoverer ATP LT265/70R17, Rotopax, ARB Twin Compressor, Cargo Area Pressure Gauge and Chuck, Icon billet trailing- and A-arms, Dobinsons Shocks/Coils, Fumuto Oil Valve, Northstar Group 31M, CBI Front & Rear Bumpers !!!
========================================
Any time...Anywhere.. My cat can take you.
Last edited by Okki; 08-25-2018 at 02:32 PM.
|
|
|
Reply With Quote
|
|
11-15-2016, 09:38 PM
|
#231
|
|
Senior Member
|
|
Join Date: Aug 2010
Location: Carmel, IN
Posts: 2,765
|
|
|
Senior Member
Join Date: Aug 2010
Location: Carmel, IN
Posts: 2,765
|
Order placed for a Goose Gear floor! Now to order some Dynamat as well and I've got a Xmas holiday project!  
Okki
__________________
Okki's Build Thread - 2010 Limited: Shrockworks Rock Rails & Full Skids, Gobi Rack, OPT7 LED Roof LIGHT Bar, Rigid E-Series Bumper Light Bar, Hella Horns, Auxiliary Fuse Box, Cobra ST75, TRD Rims, Discoverer ATP LT265/70R17, Rotopax, ARB Twin Compressor, Cargo Area Pressure Gauge and Chuck, Icon billet trailing- and A-arms, Dobinsons Shocks/Coils, Fumuto Oil Valve, Northstar Group 31M, CBI Front & Rear Bumpers !!!
========================================
Any time...Anywhere.. My cat can take you.
|
|
|
Reply With Quote
|
|
01-21-2017, 10:33 PM
|
#232
|
|
Member
|
|
Join Date: May 2016
Location: Hawaii, The Big Island
Posts: 73
|
|
|
Member
Join Date: May 2016
Location: Hawaii, The Big Island
Posts: 73
|
Your build thread is an inspiration. I just ran an air line to the rear compartment of my 4th gen based on your posts. I haven't got the nice pressure gauge and chuck yet (just a loose air fitting) but it'll happen one of these days. Thanks for putting this all out there.
|
|
|
Reply With Quote
|
|
01-25-2017, 10:08 PM
|
#233
|
|
Senior Member
|
|
Join Date: Aug 2010
Location: Carmel, IN
Posts: 2,765
|
|
|
Senior Member
Join Date: Aug 2010
Location: Carmel, IN
Posts: 2,765
|
I installed Dynamat and a Goose Gear floor over the weekend, so now I have a Sliding Tray that needs a new home.
http://www.toyota-4runner.org/sale-t...ml#post2591194
Let me know if you have any interest!
Okki
__________________
Okki's Build Thread - 2010 Limited: Shrockworks Rock Rails & Full Skids, Gobi Rack, OPT7 LED Roof LIGHT Bar, Rigid E-Series Bumper Light Bar, Hella Horns, Auxiliary Fuse Box, Cobra ST75, TRD Rims, Discoverer ATP LT265/70R17, Rotopax, ARB Twin Compressor, Cargo Area Pressure Gauge and Chuck, Icon billet trailing- and A-arms, Dobinsons Shocks/Coils, Fumuto Oil Valve, Northstar Group 31M, CBI Front & Rear Bumpers !!!
========================================
Any time...Anywhere.. My cat can take you.
|
|
|
Reply With Quote
|
|
01-26-2017, 12:12 AM
|
#234
|
 |
Member
|
|
Join Date: Apr 2013
Location: Puerto Rico
Age: 48
Posts: 184
Real Name: Omar
|
|
|
Member
Join Date: Apr 2013
Location: Puerto Rico
Age: 48
Posts: 184
Real Name: Omar
|
Quote:
Originally Posted by Okki
|
Pics of the new setup or it didn't happened!!!
__________________
2020 TRD Pro Army Green. Mostly stock.
|
|
|
Reply With Quote
|
|
01-26-2017, 09:01 AM
|
#235
|
|
Senior Member
|
|
Join Date: Aug 2010
Location: Carmel, IN
Posts: 2,765
|
|
|
Senior Member
Join Date: Aug 2010
Location: Carmel, IN
Posts: 2,765
|
Quote:
Originally Posted by omaguz
Pics of the new setup or it didn't happened!!!
|
Hoping to have full write up in this thread before the weekend is over 
Okki
__________________
Okki's Build Thread - 2010 Limited: Shrockworks Rock Rails & Full Skids, Gobi Rack, OPT7 LED Roof LIGHT Bar, Rigid E-Series Bumper Light Bar, Hella Horns, Auxiliary Fuse Box, Cobra ST75, TRD Rims, Discoverer ATP LT265/70R17, Rotopax, ARB Twin Compressor, Cargo Area Pressure Gauge and Chuck, Icon billet trailing- and A-arms, Dobinsons Shocks/Coils, Fumuto Oil Valve, Northstar Group 31M, CBI Front & Rear Bumpers !!!
========================================
Any time...Anywhere.. My cat can take you.
|
|
|
Reply With Quote
|
|
01-26-2017, 10:39 AM
|
#236
|
 |
Member
|
|
Join Date: Apr 2015
Location: Bay Area, CA
Posts: 336
|
|
|
Member
Join Date: Apr 2015
Location: Bay Area, CA
Posts: 336
|
Quote:
Originally Posted by Okki
Hoping to have full write up in this thread before the weekend is over
Okki |
I tried to find this info online and in this forum, but is the goose gear plate birch wood covered in Line-X? or is it made of some other material?
Thanks! Hoping to address my cargo issues soon!
__________________
2015 4R TE w/ KDSS, Mag Gray, King coilovers, King shocks, Timbrens, Dobinsons 749V progressive coils, Dirt King UCAs, Full Rokmen rear arms and panhard, OPOR Sliders, Hefty Front aluminum bumper, rear C4 dual swingout bumper, Warn VR10000S, HeftyFab full skids, AVS Aero, Interior LED's, XenonDepot HID w/ Phillips 4300k, ARB twin compressor, Rear-diff Breather mod, TRD Pro front, Dometic 50, Frontrunner Slimline II Full, TrekBoxx System Alpha, Trekboxx sleep platform, BlueSea, and BajaDesigns lights (LP9's, S8 20", Squadron Pro's, S2's), McQueen Fiberglass Fenders...and a hatchet! 35" Falken Wildpeak MT01's wrapped around SCS Ray 10s, BORA 1" wheel spacers. ECGS 4.88's.
|
|
|
Reply With Quote
|
|
01-26-2017, 11:57 AM
|
#237
|
|
Senior Member
|
|
Join Date: Aug 2010
Location: Carmel, IN
Posts: 2,765
|
|
|
Senior Member
Join Date: Aug 2010
Location: Carmel, IN
Posts: 2,765
|
Quote:
Originally Posted by 4Running303
I tried to find this info online and in this forum, but is the goose gear plate birch wood covered in Line-X? or is it made of some other material?
Thanks! Hoping to address my cargo issues soon!
|
Not sure on the specific wood species, but it looks like birch. I've got pics of the front and back of the unit before it got installed. It's a very nice product.
The top and sides are coated with a line-X type product.
Only question I had about it is why they didn't use the thick bolts in the back like they did at the front of the unit (it uses 4 smaller ones instead), but I'm very happy with the product and the finished installation.
Thanks and have a great day!
Okki
__________________
Okki's Build Thread - 2010 Limited: Shrockworks Rock Rails & Full Skids, Gobi Rack, OPT7 LED Roof LIGHT Bar, Rigid E-Series Bumper Light Bar, Hella Horns, Auxiliary Fuse Box, Cobra ST75, TRD Rims, Discoverer ATP LT265/70R17, Rotopax, ARB Twin Compressor, Cargo Area Pressure Gauge and Chuck, Icon billet trailing- and A-arms, Dobinsons Shocks/Coils, Fumuto Oil Valve, Northstar Group 31M, CBI Front & Rear Bumpers !!!
========================================
Any time...Anywhere.. My cat can take you.
Last edited by Okki; 01-26-2017 at 11:59 AM.
|
|
|
Reply With Quote
|
|
01-29-2017, 08:35 PM
|
#238
|
|
Senior Member
|
|
Join Date: Aug 2010
Location: Carmel, IN
Posts: 2,765
|
|
|
Senior Member
Join Date: Aug 2010
Location: Carmel, IN
Posts: 2,765
|
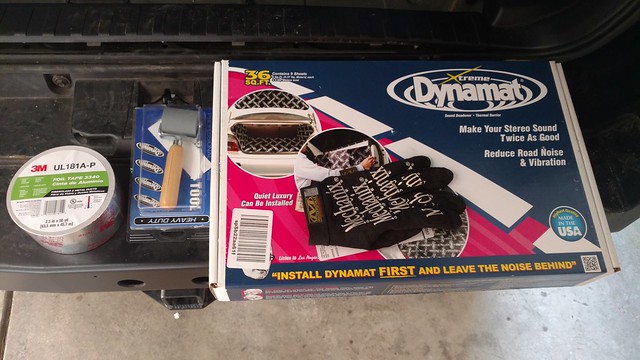
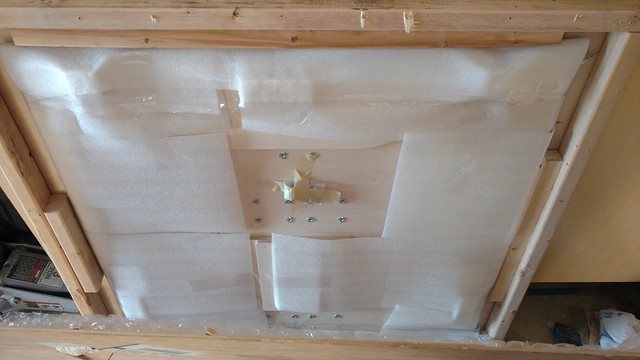
Sliding Tray Removal, Dynamat Installation, Goose Gear Floor 1/3
Dynamat and Good Gear Floor Installation (Sliding Tray Removal)
Goose Gear Floor: $520
BLACK 10455 - Dynamat Xtreme 36ft Bulk Pack: $163
Tools:
Metric 10 socket (long)
Metric 12 socket (long and short)
Metric 14 socket (long and short)
Hex screwdriver
Trim Removal Tools
Scissors
Dynamat Roller
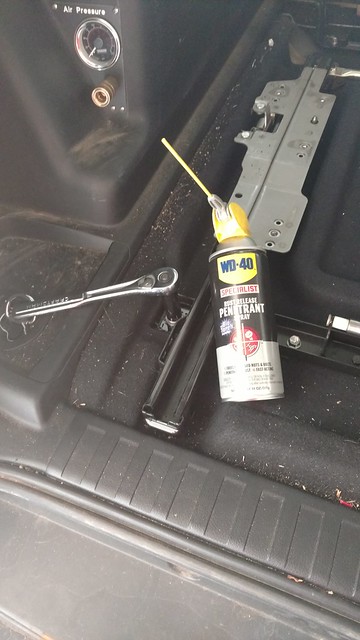
SLIDING TRAY REMOVAL:
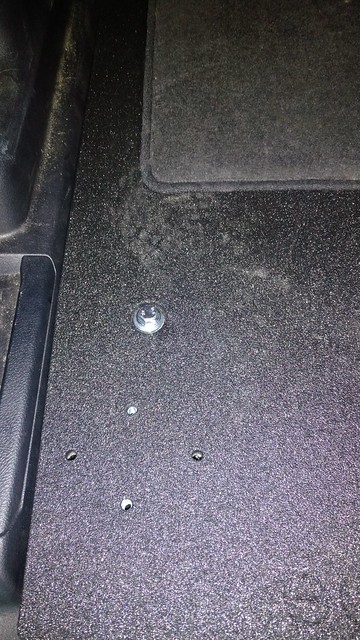
The sliding tray removes fairly quick and easily. First remove the 2 cover panels with a trim removal tool. There is a clip on one side and it hooks into the tray on the other side.
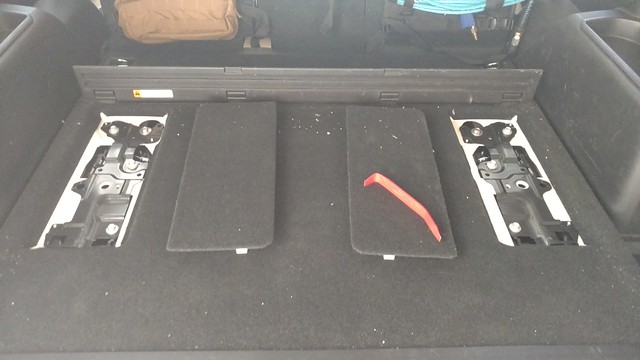
With the panes off, you can now remove the 4 bolts that hold the deck to the sliding assembly.
With the deck out of the way you can slide the guides towards the back in order to gain access to the bolts that secure the track to the body.
There are 2 bolts; one on either side of the track.
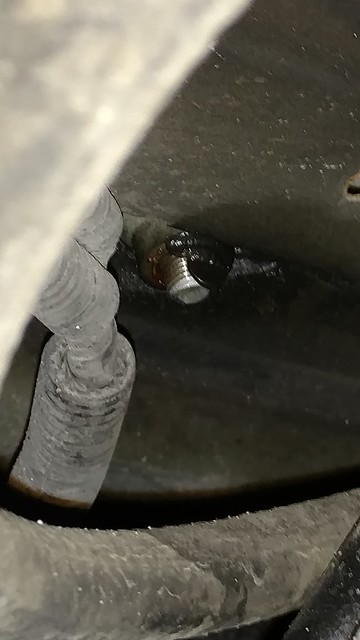
These bolts actually extend through the body and the bottom end is exposed to the outside and thus likely rusted. I sprayed some WD40 Blue Torch to help things loosen up.
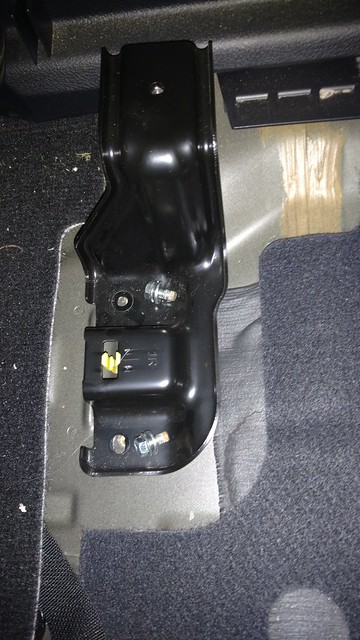
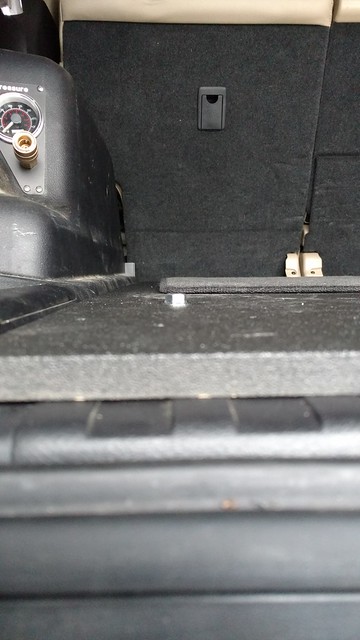
The bolts at the back of the track are harder to get to unless you remove the “hidden storage”. Since it has to come out anyway, this is as good a time as any to do so.
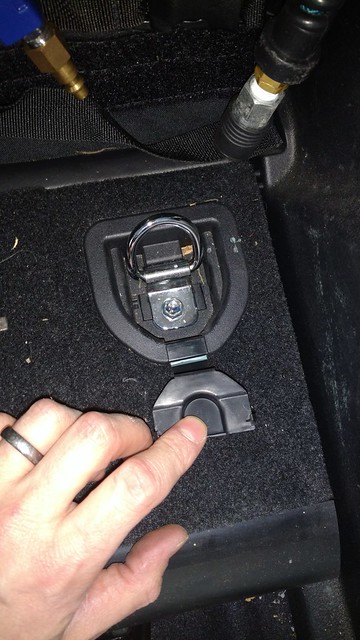
Use a screwdriver to pop open the cover that hides the bolt that secures the D-ring (and the whole storage unit) to the brackets that are found underneath the storage unit.
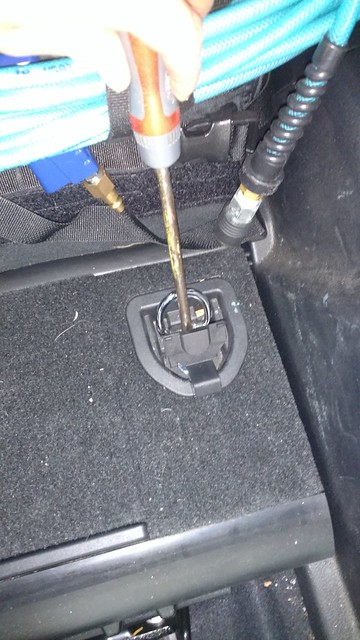
Use a Metric 10 socket to remove the D-Ring bolt. It doesn’t actually come out, but you can tell when it is not longer holding things in place. Pop the whole plastic piece with the D-Ring out. Do this on both the passenger and driver side.
Grab the back end of the hidden storage and pull up and towards the lift gate. The whole unit will come out.
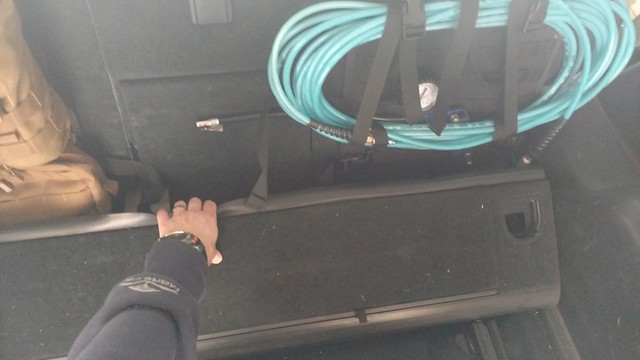
Remove the 2 bolts in each bracket and remove the brackets from the vehicle.
At this point you should be able to remove the remaining bolts that secure the sliding track to the body and pull the whole track-unit out in one piece.
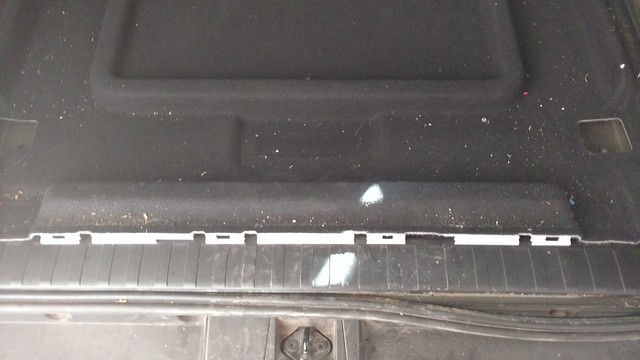
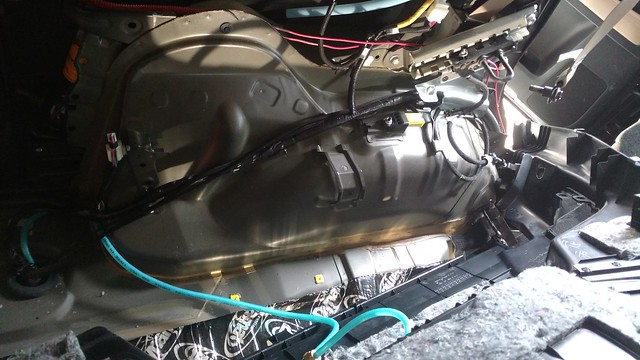
Before you remove the carpet, pull up the trim along the bottom edge of the hatch. It pulls straight up. Just take it easy not to kill too many of the clips. The carpet has clips on the edge, and if you don’t remove the trim, you’ll simply have a harder time getting the carpet out.
__________________
Okki's Build Thread - 2010 Limited: Shrockworks Rock Rails & Full Skids, Gobi Rack, OPT7 LED Roof LIGHT Bar, Rigid E-Series Bumper Light Bar, Hella Horns, Auxiliary Fuse Box, Cobra ST75, TRD Rims, Discoverer ATP LT265/70R17, Rotopax, ARB Twin Compressor, Cargo Area Pressure Gauge and Chuck, Icon billet trailing- and A-arms, Dobinsons Shocks/Coils, Fumuto Oil Valve, Northstar Group 31M, CBI Front & Rear Bumpers !!!
========================================
Any time...Anywhere.. My cat can take you.
Last edited by Okki; 01-29-2017 at 08:46 PM.
|
|
|
Reply With Quote
|
|
01-29-2017, 08:36 PM
|
#239
|
|
Senior Member
|
|
Join Date: Aug 2010
Location: Carmel, IN
Posts: 2,765
|
|
|
Senior Member
Join Date: Aug 2010
Location: Carmel, IN
Posts: 2,765
|
Sliding Tray Removal, Dynamat Installation, Goose Gear Floor 2/3
INSTALLING DYNAMAT:
I bought the little Dynamat Roller tool. Its not the cheapest one, but I got my moneys worth out of it using both the roller, and the back of the handle to push the Dynamat into place. I also use a thick/flat trim removal tool for some of the harder to reach spots. I bought a role of seam tape, but saw no reason to use it. Its still in the original packaging on my work bench.
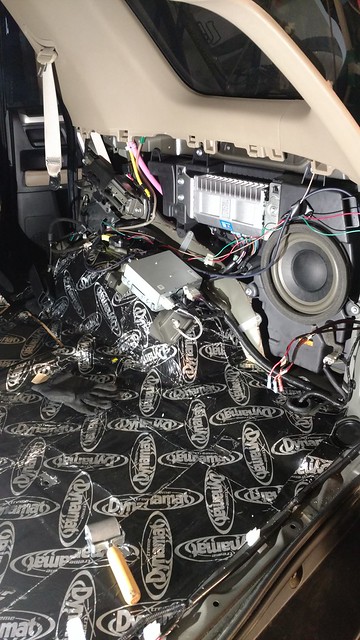
Removing the bottom trim is fairly easy, with the exception of the seat backs. I used the post from
@ RysiuM
here:
How to removie the interior plastic cover over the left rear wheel
The seatback angle adjuster panel comes off by sliding it off towards the inside of the vehicle. There are 2 Philips-head screws behind it.
Remove the 2 screws and keep an eye on the adjuster. Youll need to feed it through the hole as you remove the panel.
The seatbacks remove by removing a bolt at the inboard side of the seat (Pay attention that you dont remove the center seatbelt bracket; you dont need to in order to remove the seatback.). On the outboard side, there is a bolt under the seatback carpet. Give a good tug on the edge of the carpet and it will pop off (its hinged about 8 inches up). Remove the corner bolt that holds the seatback to the body mounted rotating bracket.
There is an annoying metal hook that interlocks the seat back and the bracket. It takes some fiddling, but you can angle and pull away the whole seatback at this time.
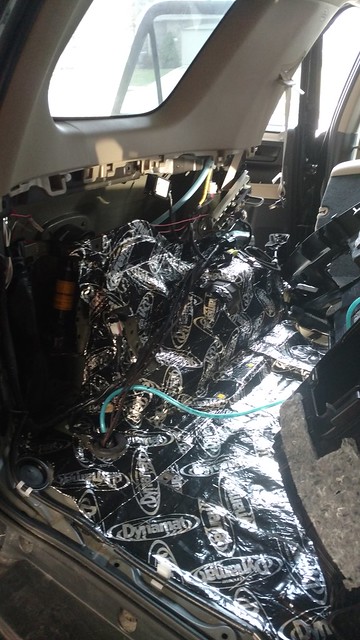
I had started installing the Dynamat before removing the side trim. I disconnected the lead to the sensor in the center of the cargo area so I wouldnt damage it by stepping on it constantly. (in this image you can see the left side of the 60 split having been released. You can also see the trim removal tool I used as part of the Dynamat install.)
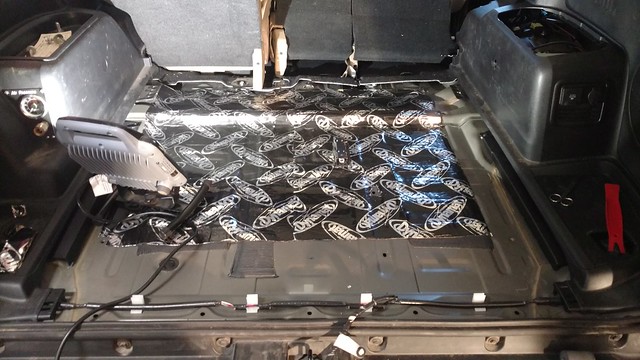
Passenger side wheel well covered in Dynamat (this turned out to be the easy side).
All the way down to the sill plate. That way I dont have to remove the rear trim when I finish up putting Dynamat in the passenger compartment.
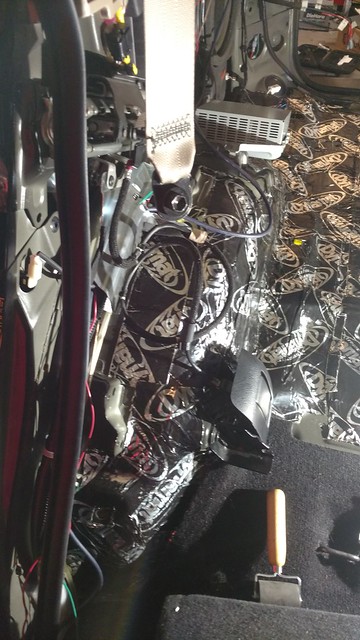
And passenger side done.
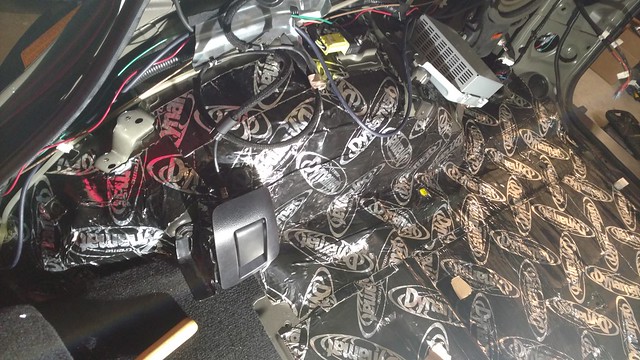
The bottom trim removal for the driver side is the same as the passenger side. When all removed it looks something like this.
Aaaaaaaand covered in Dynamat. I used a small pair of scissors with a pointy blade to cut the Dynamat. I was also able to use it to cut out some small sections where I realized I had covered mounting holes that needed to be reused. I also saved all the trimmings in order to fill in little gaps and awkward spaces.
With all the Dynamat in place, the Goose Gear floor could be installed. The Dynamat work took me about 3~4 hours on 2 days (about 8 total).
__________________
Okki's Build Thread - 2010 Limited: Shrockworks Rock Rails & Full Skids, Gobi Rack, OPT7 LED Roof LIGHT Bar, Rigid E-Series Bumper Light Bar, Hella Horns, Auxiliary Fuse Box, Cobra ST75, TRD Rims, Discoverer ATP LT265/70R17, Rotopax, ARB Twin Compressor, Cargo Area Pressure Gauge and Chuck, Icon billet trailing- and A-arms, Dobinsons Shocks/Coils, Fumuto Oil Valve, Northstar Group 31M, CBI Front & Rear Bumpers !!!
========================================
Any time...Anywhere.. My cat can take you.
|
|
|
Reply With Quote
|
|
01-29-2017, 08:36 PM
|
#240
|
|
Senior Member
|
|
Join Date: Aug 2010
Location: Carmel, IN
Posts: 2,765
|
|
|
Senior Member
Join Date: Aug 2010
Location: Carmel, IN
Posts: 2,765
|
Sliding Tray Removal, Dynamat Installation, Goose Gear Floor 3/3
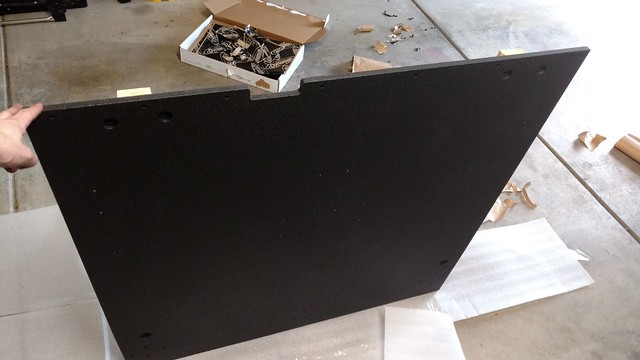
GOOSE GEAR FLOOR:
Brian and the crew were very helpful on the phone and worked with me to schedule my delivery when I actually was in town (we delayed it). They also did an amazing job at packaging and crating this thing up. The crate was damaged (looked like a forklift punched it), but everything on the inside was in great shape with not a scratch on it. Goose Gear was aware of the shipping damage and had already committed to taking care of things if there was damage, so more kudos there (even though it turned out not to be needed).
The craftsmanship on the floor is very nice.
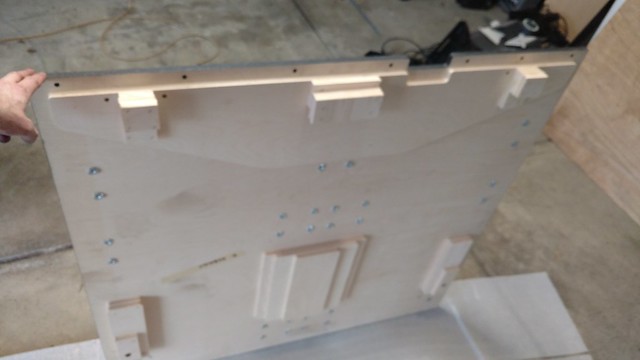
I did provide feedback to Goose Gear that some instructions (and all required hardware) would have been nice. Brian said that it was a hot contested topic around the shop, but the advice to reuse the bolts from the slide is useless. Those bolts are about 3x to short. The notched side goes towards the seat backs.
The missing hardware is the 2 large bolts that hold the floor in place towards the hatch. I got what you see below, but will say that it sticks out above the floor surface at the moment. Not sure if that becomes an issue when my fridge slide shows up, but if so I’ll deal with it at that time.
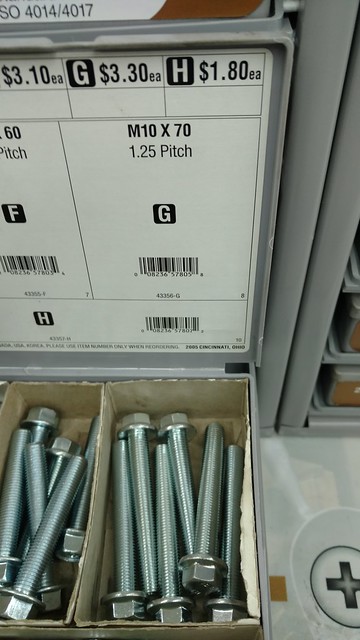

Align the holes for the main bolts and get the threads started. These bolts will be exposed on the underside of the body. Use some thread compound on these bolts.
The bag with included hex-head bolts is for the rear of the deck. There are 2 bolts that will be used on each side (driver/passenger).
Snug everything up and you are DONE!

I’m very happy with the final product in that it gives me a very secure platform on which to mount my fridge and it also give me more usable height in the cargo area AND depth.
I’ll likely reuse the D-Rings from the hidden storage compartment to provide some tie-down points in the back, to use with my spider net.
Okki
Edit:
@ LawnDart
, Do the bolts near the hatch on your install stick out above the floor? What did you end up using?
__________________
Okki's Build Thread - 2010 Limited: Shrockworks Rock Rails & Full Skids, Gobi Rack, OPT7 LED Roof LIGHT Bar, Rigid E-Series Bumper Light Bar, Hella Horns, Auxiliary Fuse Box, Cobra ST75, TRD Rims, Discoverer ATP LT265/70R17, Rotopax, ARB Twin Compressor, Cargo Area Pressure Gauge and Chuck, Icon billet trailing- and A-arms, Dobinsons Shocks/Coils, Fumuto Oil Valve, Northstar Group 31M, CBI Front & Rear Bumpers !!!
========================================
Any time...Anywhere.. My cat can take you.
Last edited by Okki; 01-29-2017 at 08:52 PM.
|
|
|
Reply With Quote
|
 Posting Rules
|
You may not post new threads
You may not post replies
You may not post attachments
You may not edit your posts
HTML code is On
|
|
|
|


 Linear Mode


