 09-25-2011, 11:00 AM
|
#1
|
|
Junior Member
|
|
Join Date: Sep 2011
Location: Minneapolis
Posts: 5
|
|
|
Junior Member
Join Date: Sep 2011
Location: Minneapolis
Posts: 5
|
5th Gen 2011 4Runner SR5 Mudflap/splash guard install instructions
So I bought the toyota mudguards from on online outfit and they came with the notorious "visit toyota information system" to get install instructions. I didn't get those, I couldn't find them online, but I figured it out so I thought I'd post for those who are or will be in the same boat.
My 2011 does have the factory running boards (many forums I've read said they can't be used with those) and with a simple adjustment the toyota mud guards can fit with running boards.
Rear mud guards (it's obviously duplicated L to R so I'll describe one side):
-Put mud guard up to fender well to get an idea of the plastic clips you will have to remove.
-Using a flat head screwdriver, pop the three off the fender liner. Save at least one as a good one because you'll need it later
-The bottom clip that holds the fender liner to the bottom of the rear fender is a different style clip and a pain. I had to use a crow bar between the fender and liner and just muscle it out. Maybe there is an easier way. Mine worked and I didn't damage the fender.
-For the rear MG you will use the hardware bag with the most metal clips (3 per side)
-Pull the fender liner away and place these metal clips on the plastic fender where you pulled the 3 plastic clips out (the horizontal surface)
-Put the MG in place and fasten the supplied screws (3 per side) through the MG and into those metal clips. You will need to push the MG into place as it is a tight fit
-Re-using one of the 3 plastic clips taken from the fender liner, insert that into the bottom hole of the MG and push the center to secure. The original one doesn't fit with the MG
Front MG with the Running boards:
The front is actually easier than the back.
-Loosen all the hardware on the running boards connecting them to the bracket. Slide them about 3-4 inches rearward so you have working room
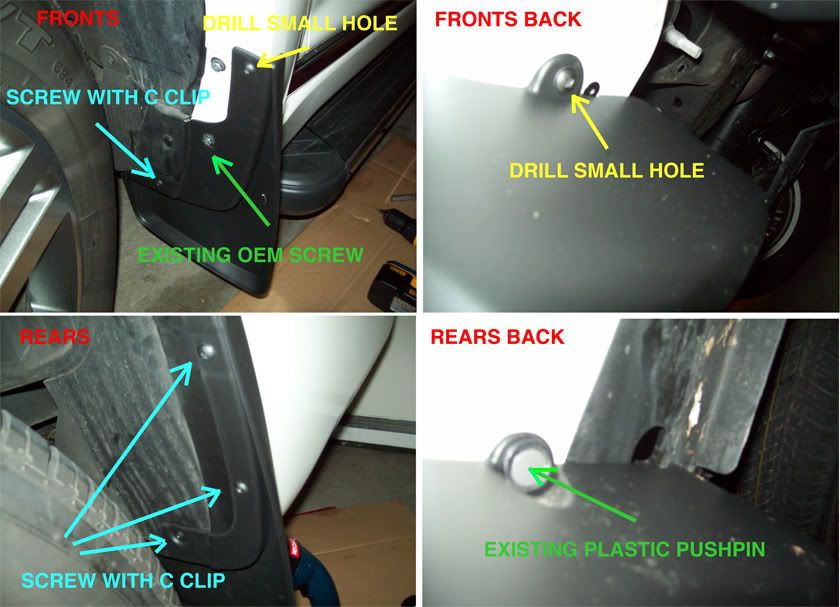
-Put the MG up to the fender and identify the 2 factory locations that align with the MG (1 screw and 1 plastic clip)
-Using a flat headed screw driver remove the plastic clip (just like the rear)
-Using a socket or screw driver, remove the one factory screw
-The front will use the hardware bag that has 6 screws and 2 metal clips
-Install 1 metal clip per side over the hole where you took the 1 plastic clip out
-Put the MG in place and thread the factory screw back in and 1 of the provided screws into the metal clip
-Select an appropriate drill bit (I used 7/64). Carefully drill into the fender using the two open holes in the MG (top and bottom).
-Thread the two remaining screws into those holes in the plastic fender, being careful on how tight you go so you don't strip them out.
-MG's done now time to tighten the running boards.
-Slide the running board back until it just touches the front MG
-Tighten the hardware on the brackets
-Done. You will have 1/2"-3/4" of running board now protruding into the rear wheel well, but to be honest it's so small you can barely notice.
|

|
 Reply With Quote Reply With Quote
|
|
09-25-2011, 07:10 PM
|
#2
|
 |
Junior Member
|
|
Join Date: Jul 2011
Location: on loan to Ontario, Canada, originally from Seattle, WA
Posts: 22
|
|
|
Junior Member
Join Date: Jul 2011
Location: on loan to Ontario, Canada, originally from Seattle, WA
Posts: 22
|
Nice write up! Installed a set on my Ltd. BP today. Did everything but loosening the running boards. The only thing I didn't like about install was having to drill holes. I've put a set on a Honda and Acura and no drilling required. It could'a been very do able w/ out the drilling IMO. Still glad I have them tho. Btw, posted some pics in my photo album.
__________________
 2011 4Runner Ltd BP
~ 2006 Acura TSX
~ 2004 Kawasaki ZZR600
|
|
|
Reply With Quote
|
|
09-25-2011, 10:45 PM
|
#3
|
|
Member
|
|
Join Date: Aug 2011
Location: The Tuke, Arizona
Posts: 90
|
|
|
Member
Join Date: Aug 2011
Location: The Tuke, Arizona
Posts: 90
|
Thanks for the write-up. I ordered some earlier this afternoon......
|
|
|
Reply With Quote
|
|
09-25-2011, 10:58 PM
|
#4
|
|
Junior Member
|
|
Join Date: Sep 2011
Location: Holmes Beach, FL
Posts: 3
|
|
|
Junior Member
Join Date: Sep 2011
Location: Holmes Beach, FL
Posts: 3
|
Did this today as well. Super easy. Left an inch or two between running board and front guard. I think it looks much better and gives me something to look at besides the narrow tires!
Dealer wanted to charge me $175. Took me maybe 30 min tops.
|
|
|
Reply With Quote
|
|
09-26-2011, 12:28 AM
|
#5
|
 |
Member
|
|
Join Date: Jul 2011
Location: Tampa, FL
Posts: 49
|
|
|
Member
Join Date: Jul 2011
Location: Tampa, FL
Posts: 49
|
I put 4 oem flaps on with oem boards, had to cut the boards 1 inch off each side to fit, looks good!!
Search my posts to see pics, cant get them to upload now.. 
|
|
|
Reply With Quote
|
|
09-26-2011, 11:48 PM
|
#6
|
|
Member
|
|
Join Date: Oct 2010
Location: Vancouver BC
Posts: 126
|
|
|
Member
Join Date: Oct 2010
Location: Vancouver BC
Posts: 126
|
Did this last year,, does Toyota still deny the mudflaps with the OEM running boards? 
Toyota PDF mudflap install link..
http://www.trdsparks.com/install/PT769-89110inst.pdf
..
__________________
2010 Blizzard Pearl Limited
|
|
|
Reply With Quote
|
|
09-27-2011, 12:20 AM
|
#7
|
|
Junior Member
|
|
Join Date: Sep 2011
Location: Minneapolis
Posts: 5
|
|
|
Junior Member
Join Date: Sep 2011
Location: Minneapolis
Posts: 5
|
I need to expand my searching capabilities
So I had done a search on google and yahoo trying to find the info on the mud guard install. I found this forum after I was done and posted my install instructions. I should have started with this forum especially since the pictures and instructions were posted already.
I am curious why those posts didn't come up in my google search. The whole reason I found T4R.org is that a post about mudguards not working with factory running boards kept coming up. Maybe it was my search criteria.
Anyway lesson learned, I'll start here next time.
Thanks to you all for the feedback and comments. I am just getting my 4runner ready for winter and added a complete set of Weathertech floor mats (1st and 2nd row). They fit perfect as usual. I was pleasantly surprised on how snug the second row fit. I've seen other Weathertech 2nd row mats that were really loose and moved around on the floor when you stepped into the truck.
|
|
|
Reply With Quote
|
|
09-27-2011, 08:38 AM
|
#8
|
|
Member
|
|
Join Date: Oct 2010
Location: Vancouver BC
Posts: 126
|
|
|
Member
Join Date: Oct 2010
Location: Vancouver BC
Posts: 126
|
Quote:
Originally Posted by dna4engr

So I had done a search on google and yahoo trying to find the info on the mud guard install. I found this forum after I was done and posted my install instructions. I should have started with this forum especially since the pictures and instructions were posted already.
I am curious why those posts didn't come up in my google search. The whole reason I found T4R.org is that a post about mudguards not working with factory running boards kept coming up. Maybe it was my search criteria.
|
It is buried in the thread,, really the OEM mudflaps "install" links should be stickied in the mods thread..
http://www.toyota-4runner.org/5th-ge...ick-links.html
__________________
2010 Blizzard Pearl Limited
|
|
|
Reply With Quote
|
|
09-27-2011, 08:43 AM
|
#9
|
 |
Senior Member
|
|
Join Date: Jan 2006
Location: Bucks County, PA
Posts: 3,601
Real Name: Dave
|
|
|
Senior Member
Join Date: Jan 2006
Location: Bucks County, PA
Posts: 3,601
Real Name: Dave
|
Quote:
Originally Posted by terminator
|
As should so many other great mods that are buried within threads. Its a shame really since there is so much gold here.
Anyways, I have read more than a few times about others needing to cut their OEM boards to get the mud flaps on???? I installed on a 2011 Limited using the above pictures with NO CUTTING REQUIRED.
|
|
|
Reply With Quote
|
|
09-27-2011, 11:55 AM
|
#10
|
 |
Member
|
|
Join Date: Apr 2011
Location: This is not a Song, It's an Outburst: Or, The Establishment Blues; Sixto Diaz Rodriguez
Posts: 300
|
|
|
Member
Join Date: Apr 2011
Location: This is not a Song, It's an Outburst: Or, The Establishment Blues; Sixto Diaz Rodriguez
Posts: 300
|
I ordered mine, they came from Toyota of Dallas. What stunned me is I decided to stop at the Toyota dealership in Slidell, La, and ask about installation, I was knocked off my feet, when they told me they would install at no cost  . Job well done  .
And yes, no cutting required on my 2011 Limited.
|
|
|
Reply With Quote
|
|
12-11-2011, 04:51 PM
|
#11
|
 |
Junior Member
|
|
Join Date: Nov 2011
Location: Dallas, TX
Posts: 17
|
|
|
Junior Member
Join Date: Nov 2011
Location: Dallas, TX
Posts: 17
|
Helpful write-up...
Installed mine today. Took less than 40 minutes. On the front simply turning the wheels to the extreme R/L allowed for easier installation. For the rear a socket with a phillips bit made it a breeze to tighten the screws (some one in another post suggested removing the rear wheels in order to get the screws into place -- just too laborious).

|
|
|
Reply With Quote
|
|
06-06-2012, 06:18 PM
|
#12
|
 |
Member
|
|
Join Date: May 2012
Posts: 39
|
|
|
Member
Join Date: May 2012
Posts: 39
|
Am I correct in that it appears the Husky Liners DO NOT require any drilling? Disappointed the OEM ones I ordered apparently do require an additional hole.
|
|
|
Reply With Quote
|
|
06-06-2012, 06:26 PM
|
#13
|
 |
Senior Member
|
|
Join Date: Feb 2012
Location: highlands Ranch CO
Posts: 1,136
|
|
|
Senior Member
Join Date: Feb 2012
Location: highlands Ranch CO
Posts: 1,136
|
installed mine today, 20 minutes for all 4. no drilling, screws tap their own treads looks great IMO,I didn`t touch running boards, flaps fits fine without it.
|
|
|
Reply With Quote
|
|
06-06-2012, 06:30 PM
|
#14
|
|
Member
|
|
Join Date: Oct 2010
Location: Vancouver BC
Posts: 126
|
|
|
Member
Join Date: Oct 2010
Location: Vancouver BC
Posts: 126
|
Quote:
Originally Posted by GoHerd
Am I correct in that it appears the Husky Liners DO NOT require any drilling? Disappointed the OEM ones I ordered apparently do require an additional hole.
|
OEM flaps, no biggie small hole in plastic fronts only at top, but I bet double sided body tape would hold the one spot where the (drilled hole) screw goes.
It is very firm with all the other screws in.. drilling not necessary if you use tape at top back of front flap. Depends how hard you are on the truck.
__________________
2010 Blizzard Pearl Limited
|
|
|
Reply With Quote
|
|
10-03-2012, 01:54 PM
|
#15
|
|
Junior Member
|
|
Join Date: Oct 2012
Location: IL
Posts: 1
|
|
|
Junior Member
Join Date: Oct 2012
Location: IL
Posts: 1
|
Thanks!
I ordered my 2013 blizzard pearl limited, and was very disappointed that they still will NOT let you combine running boards & mudguards...This thread helps out greatly! So I am guessing I would be better off ordering the Husky?
|
|
|
Reply With Quote
|
 Posting Rules
|
You may not post new threads
You may not post replies
You may not post attachments
You may not edit your posts
HTML code is On
|
|
|
|


 Linear Mode


