 03-11-2008, 09:28 PM
|
#1
|
 |
Member
|
|
Join Date: Mar 2008
Location: Littleton, CO
Posts: 431
|
|
|
Member
Join Date: Mar 2008
Location: Littleton, CO
Posts: 431
|
 Scion T1807 install in 3rd gen '99 Limited (pic heavy)
After tons of research on what others before me had done to fix their ailing CD player on the 3rd gen 4runner, I picked up a Scion T1807 head unit off of ebay for dirt cheap (~$32 shipped). I don’t have an ipod, but a SanDisk Sansa instead, so the ipod controllability through the HU wasn’t an important factor in my choice of HU. I would have liked to have had the color changing screen capability, but that can be dealt with in other ways.
After digging through tons of threads on multiple forums (here, YotaTech, Scionlife, IH8mud, spyderchat, and others I can’t recall), I couldn’t find any write-up by someone who had put a Scion HU into a 3rd gen 4Runner. There were a few who said they had done it, but no real details.
I have learned a lot from this forum, and here is my chance to give back. So, here it is!
NOTE - The Aux input section of this write-up should work on all other Scion HU’s with Aux input capability. T1806, and T1808 are others I know of; T1804 and T1805 were previously listed as capable, and they do NOT have this feature. Sorry to those I might have mislead!!!
I wanted to use the Aux input capability of the stereo without having to spend to ~$50 on the different ready-made cables out there. I have a few Belkin audio cables I’ve purchased at Wal-Mart for other things, and I have been happy with them. They’re inexpensive, well-made, have gold plated contacts, and SHIELDED! The last part is important if you don’t want to inherit noise into your system. The 1/8” mini-plug to RCA cable was a great match for this application, as it is 7’ long, and has two separately DOUBLE shielded wires inside of the silicone sheath. All that for less than $5; hard to beat!

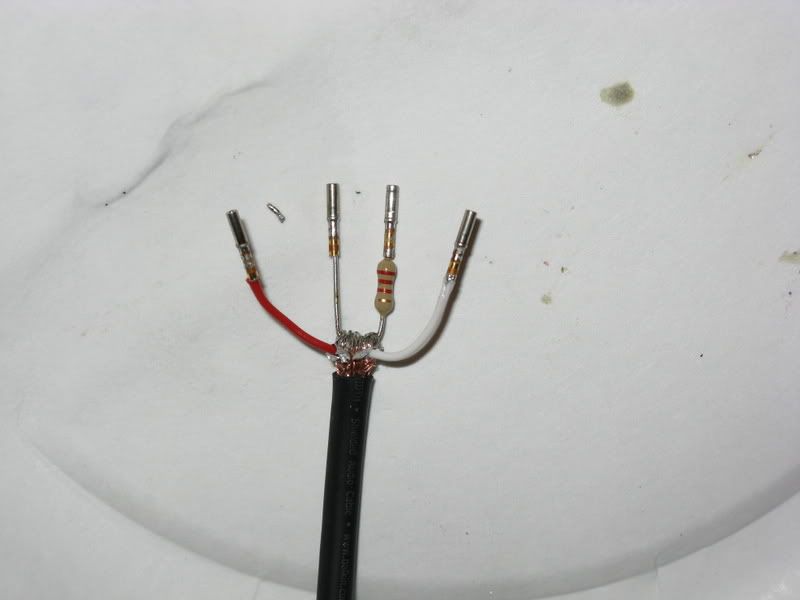
The first thing I did was to cut the RCA ends off a little above the Y split in the cable. I then cut about 1” off of the black sheathing to expose the two wires. The braided outside copper jacket will be used as the ground terminal, and the two jacketed wires (one white, one red) inside of the braid are our positive L and R inputs. There is a Mylar shield inside of the copper braid which needs to be removed also. The white wire is for Left, and the Red wire is for Right (to remember, Red and Right both begin with R). My research found that a 2.2k Ohm resistor was needed to tell the stereo that the Aux input was available for use. I purchased a 5 pack of 5% 1/4 watt resistors at my local Radio Shack for only $1.
Item # 271-1325 at Radio Shack.
Here is a factory diagram of the plugs that go in to the back of the stereo. (shamelessly stolen from another forum, but I can’t recall where!)
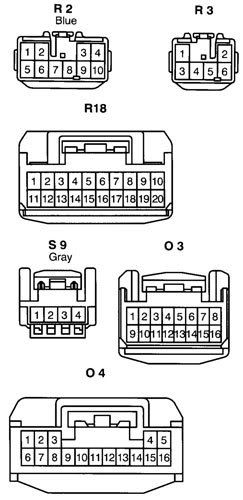
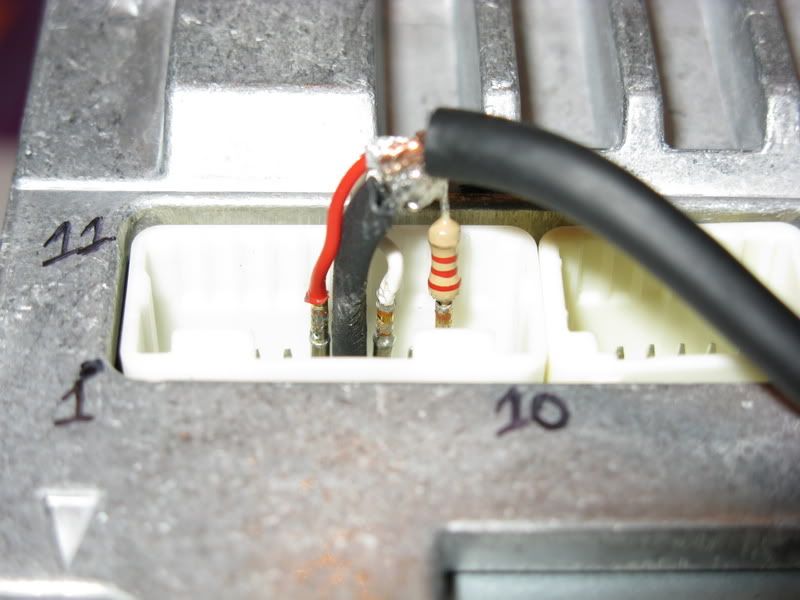
Plugs R2 and R3 are the ones used to connect the stereo to the vehicle (note – R2 was not blue in my rig, and R3 is for the rear speakers). Next is the wiring diagram for the Scion stereo, and note it mentions which plugs are used for each connection.
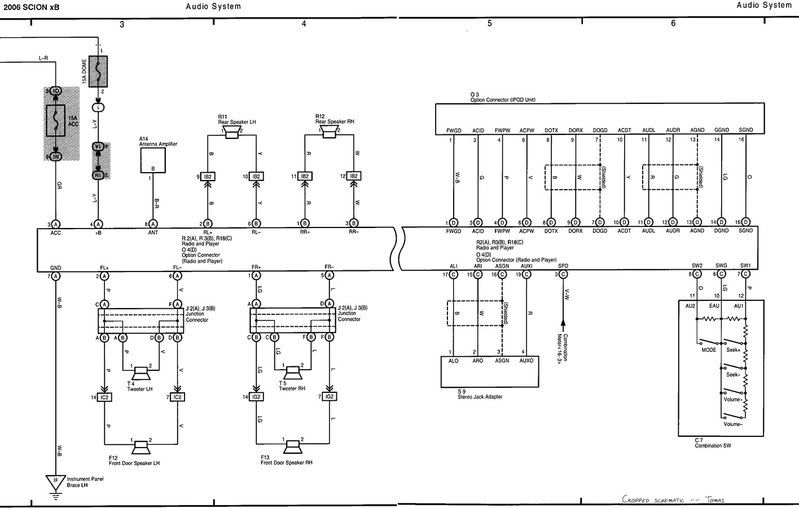
(again, shamelessly stolen from another forum, but I can’t remember which one!) We will be using the socket on the back of the stereo for R18 to hook up the Aux cable. Since the plug diagram shows the plug as you would be looking into it, and the receptacles on the stereo are upside down, the pin numbering for R18 on the back of the stereo is the same as the diagram except the top and bottom rows are flip-flopped (you’ll see how I numbered the corners on the back of the stereo in a later pic).
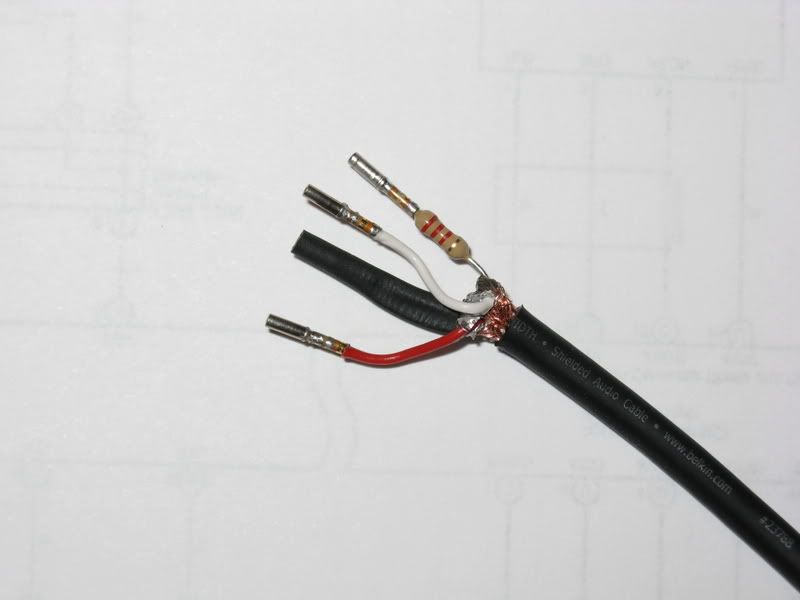
The 2.2k Ohm resistor will be wired between the ground (ASGN, pin 16) and the aux input detector (AUXI, pin 19) pins. Since I didn’t buy the factory harness that plugs into the back of the stereo, I needed to either hard wire the cable into the stereo (which is what I had planned to do), or find some pin sockets to use. Upon opening up the stereo for inspection, the pins I needed to use are the ones located on the underside of the 90 degree bend in the connector, so it was next to impossible to get at them without de-soldering the harness connector from the circuit board.
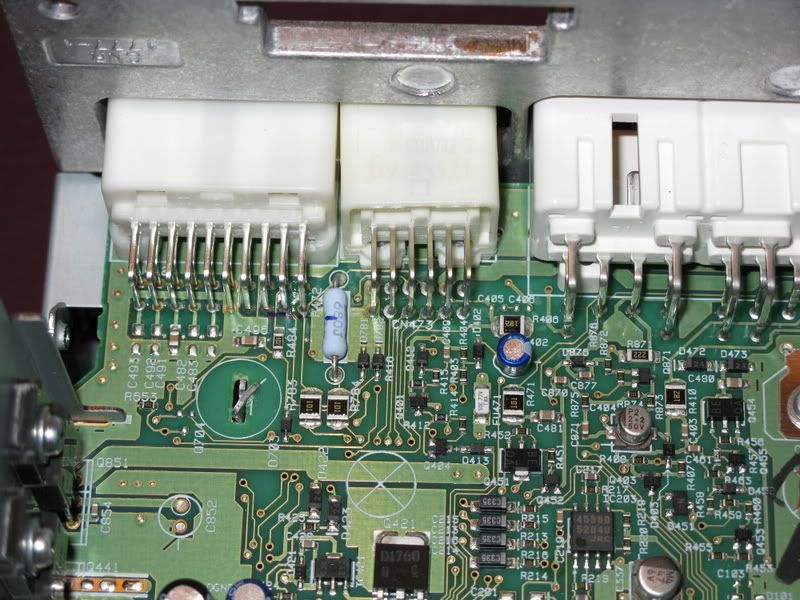
I had some Cannon plug pin sockets lying around from a past project, and they happened to fit the pins on the back of the stereo quite nicely (and tightly too), so I decided to use them (they’re good enough for fighter jets, so I’m sure they’re good enough for this! ;-))
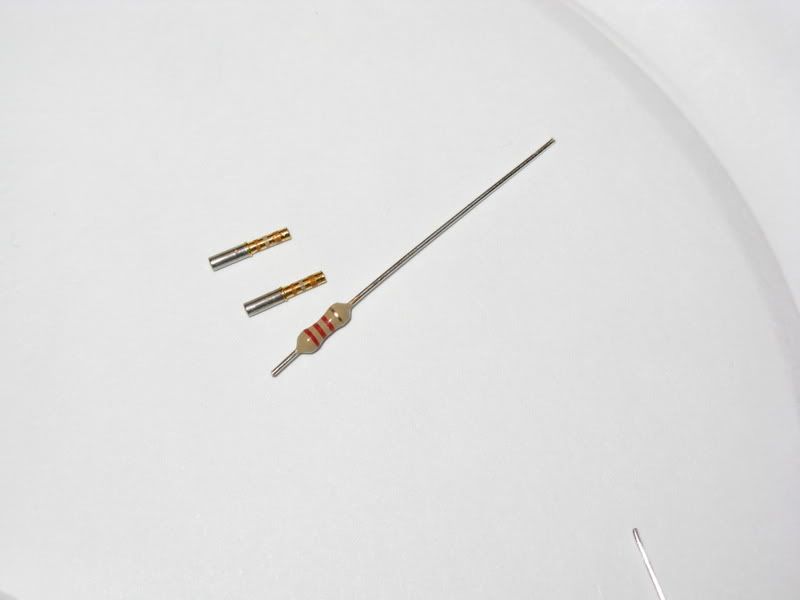
I soldered the shortened resistor lead right into one of the pin sockets, and soldered the other lead for the ground connection into a pin socket as well. That way I could bend the leads into a U shape and then solder the mass of copper braid a little more easily. One thing to be VERY careful of here is that the jacketing used in this cable melts pretty easily, more than most I’ve worked with. Don’t get it too hot, just enough to melt the solder, and don’t keep the heat on it for too long either. I wasn’t happy with the outcome the first time I tried because the black outside jacket melted into the copper braid, so I cut it all off and started over. Here is a picture of the pin sockets all soldered on.
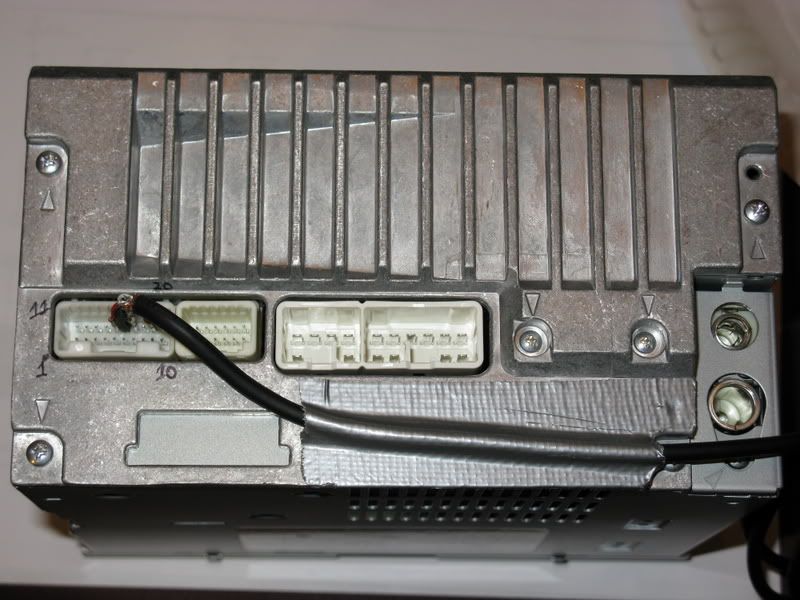
Once complete, I put some heat shrink tubing over the ground lead, since it is mostly exposed bare metal, and since it will be in between the two positive leads when everything is all plugged in. Finally, I used some good ‘ole Duct Tape for a cable strain relief on the back of the stereo (what mod isn’t complete without a little Duct Tape?).
Last edited by CO_FlyFisher; 11-22-2010 at 03:17 PM.
Reason: Re-did the post after new software pooched it.
|

|
 Reply With Quote Reply With Quote
|
|
03-11-2008, 09:30 PM
|
#2
|
|
Member
|
|
Join Date: Mar 2008
Location: Littleton, CO
Posts: 431
|
|
|
Member
Join Date: Mar 2008
Location: Littleton, CO
Posts: 431
|
Too many images, continued from above:
The next step was to install the stereo in the 4Runner. I thought that the stereo would fit into the factory opening with only a little trimming, but somehow I managed to miss a post with these critical dimensions. The opening on my ’99 Limited is only 6 15/16” wide, but the face of the stereo is 7 13/16” wide. This means that the stereo is 7/16” wider than the opening on both sides!!! That’s almost an inch total! IT DOESN’T FIT!!!  I wasn’t too happy at this point, but decided to proceed a little further and see what could be done.
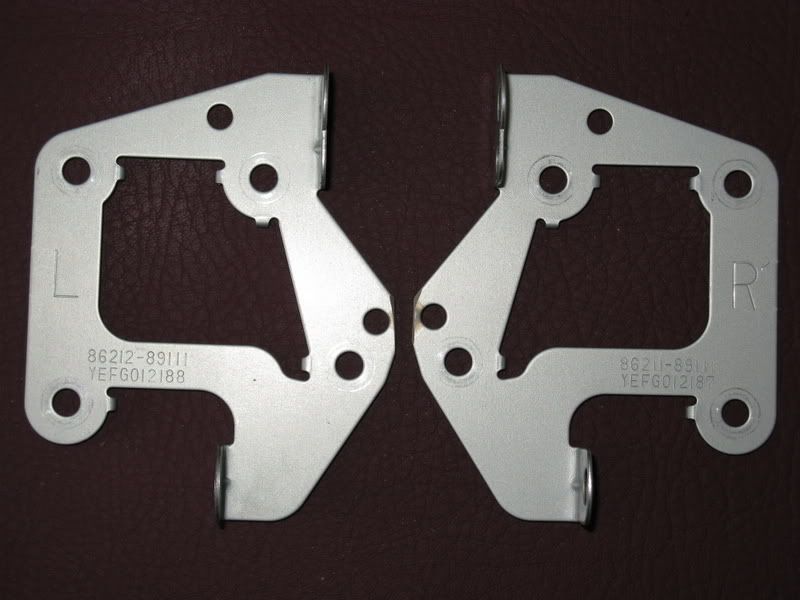
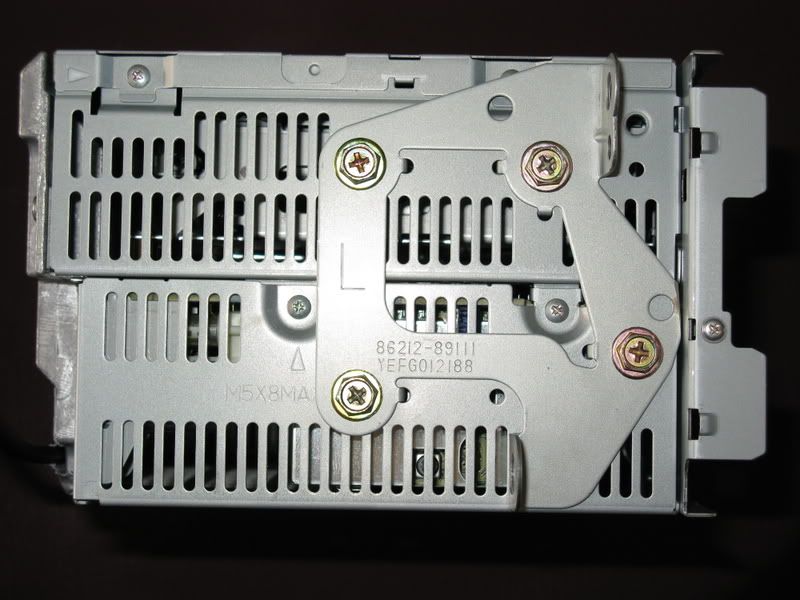
First thing to do is take the mounting brackets off of the old factory stereo and put them on the Scion stereo. Mine didn’t quite fit because there was a round protrusion at the front which interfered with the Scion stereo frame. Not much needed to be removed, so I touched it to the bench grinder to make it fit.
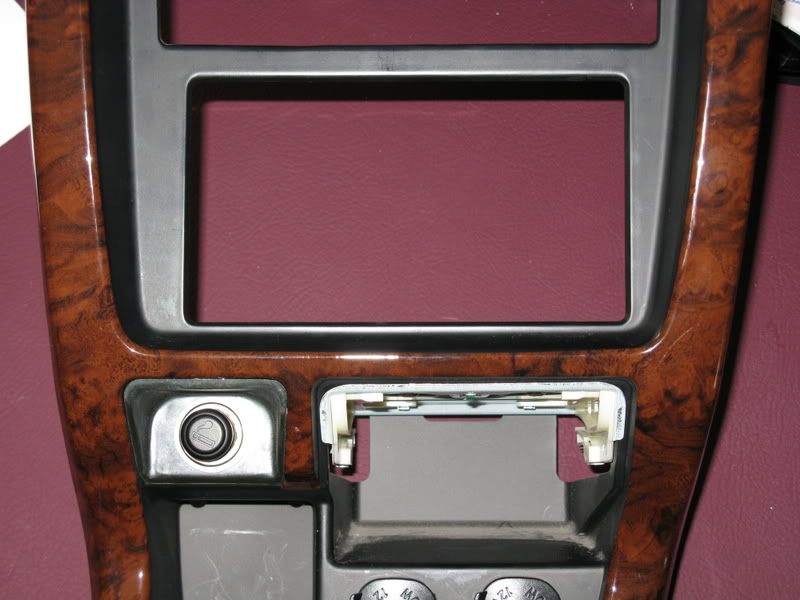
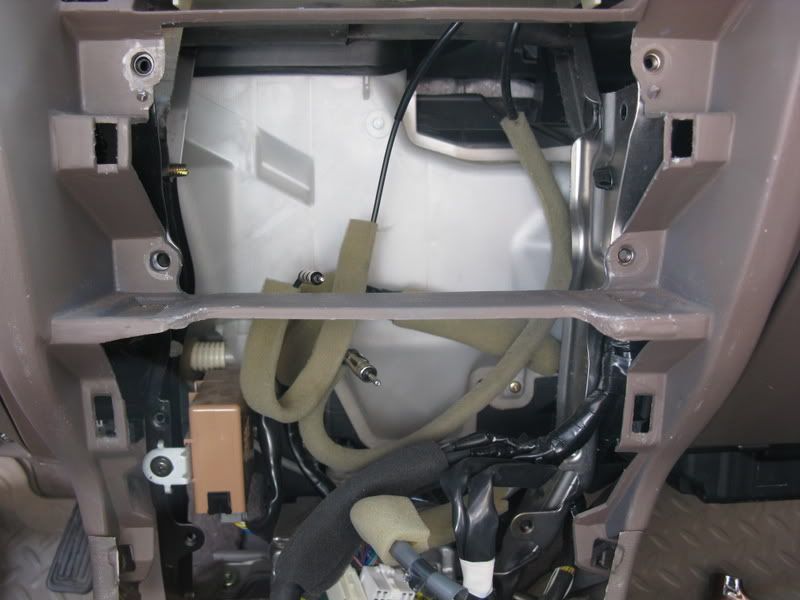
Next, the center dash panel needs to be removed, which involves pulling the cup holder off, then the trim around the shift levers, then finally the dash panel. They all snap in/out, so no tools are involved here other than your bare hands (there are write-ups on how to do this elsewhere, so I won’t cover it).
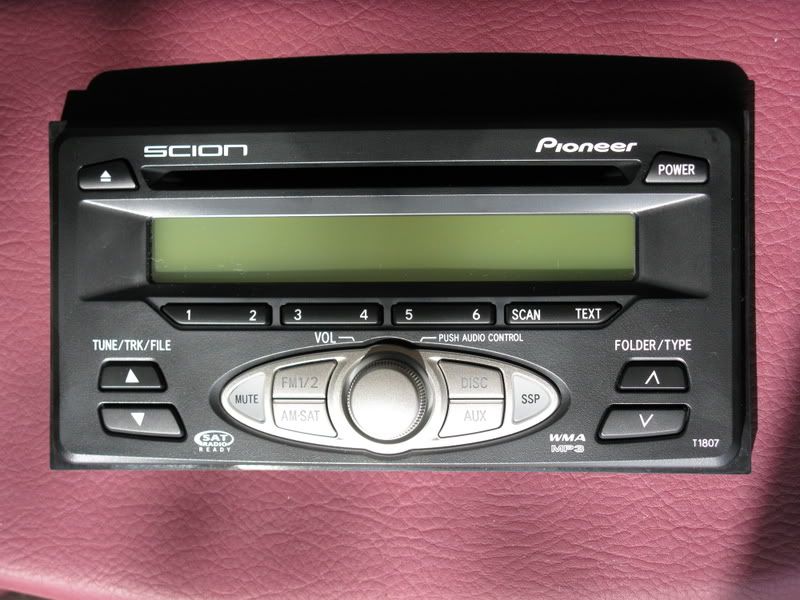
I check fit the stereo face to the dash panel, and it was pretty obvious it wasn’t going to fit very well (note the Eject and Power buttons are wider than the opening).

I unscrewed the 4 screws holding the factory stereo in place, unplugged the wiring harness coming from the external amplifier, unplugged the two antenna inputs, and removed the stereo. Next, I unscrewed the two screws holding the external amp in place, unplugged the two harnesses, and removed it as well. Here is what you end up with:
Next, I installed the Scion stereo into the opening (without it’s face attached) to check fitment. No problems here.
However, the square base of the plastic stereo face is even wider than the part that is supposed to protrude through the dash trim bezel, and it wouldn’t fit between the two dash clip openings, so I needed to trim something. I was leery of trimming the plastic on the dash, afraid that the dash panel mounting clips would no longer hold in place without the plastic surrounding them. Luckily, I was able to trim off part of the stereo face where it interfered with the dash without any ill effects. There was nothing in that area of the face plate, so nothing was really lost. The part I removed was about an inch long, about right next to the LCD. It is easy to see what needs to come off with the stereo in hand. I only trimmed the flat, square part off until it was flush with the rounded part of the face that protrudes through the dash. Trim off the approximate parts I have outlined in blue. Check fit the stereo face on the dash to see what exactly needs to be removed before cutting.
All I can say about trimming the plastic on the stereo face is go slowly, taking the time to be careful. I used a Dremel cut-off wheel to get it close, then a file to finish it off nicely. Unfortunately, the picture of the finished cut is the one I forgot to take – sorry. :dumb:
Once the stereo was mounted into the 4Runner, I could check fitment with the dash trim bezel. Upon initial inspection, I could see that there was some thin “ribbing” made of plastic on the back of the dash trim panel that would need to come off before anything else.
I used some wide, flat jawed pliers and bent the ribbing in toward the opening and it sheared right off. I had to cut it from the top and bottom pieces, and trim some of the lower supports off of the sides with dikes.
Last edited by CO_FlyFisher; 07-14-2009 at 03:23 PM.
Reason: Re-did the post after new software pooched it.
|
|
|
Reply With Quote
|
|
03-11-2008, 09:34 PM
|
#3
|
|
Member
|
|
Join Date: Mar 2008
Location: Littleton, CO
Posts: 431
|
|
|
Member
Join Date: Mar 2008
Location: Littleton, CO
Posts: 431
|
Again. too many images, continued from above:
From there, I was actually able to get the dash trim almost completely locked into place over the stereo (it was sitting about 1/8 too far out). At this point, Im thinking to myself, Maybe I wont have to trim so much of the dash trim bezel. I sat there looking at it for awhile trying to figure out what to do next. The first thing is that the buttons were interfering with the dash trim bezel and making room for those would give me about another 1/32 of clearance. Figuring that if I had to trim the whole bezel anyway, I might as well try to clear the buttons first and see how it looked. I made a rough outline of the buttons on the bezel piece with a Sharpie, and then carefully trimmed openings for those with a file. There is a ridge of plastic right around the backside of the bezel edge that is about 1/4 wide. Here, the bezel is about 1/8 thick total. The next thing I did was to thin down the plastic near the edge of the bezel on the back. I used a file and carefully removed about half of the total thickness. After doing these two things, the dash trim bezel actually fit into place over the new stereo head unit!!!  It sits about 1/32 proud from the surface of the rest of the dash, but it does lock into place and you cant see the crack unless youre looking right at it from the side, which wont be happening very often. At this point, I decided to leave well enough alone, and called it good. Since the plastic used in this dash panel is a medium brown color and not black, I touched up the visible areas I cut (stereo button cut-outs) and the backside a little with a black Sharpie, let it dry, then buffed with a napkin. Repeat 2x 3x, and it matches pretty well; at least well enough you cant tell the difference without getting pretty close up.
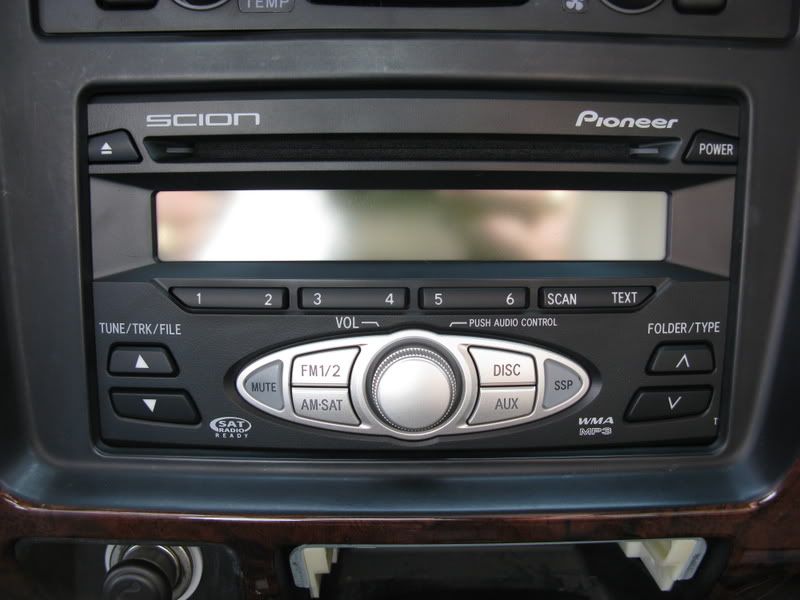
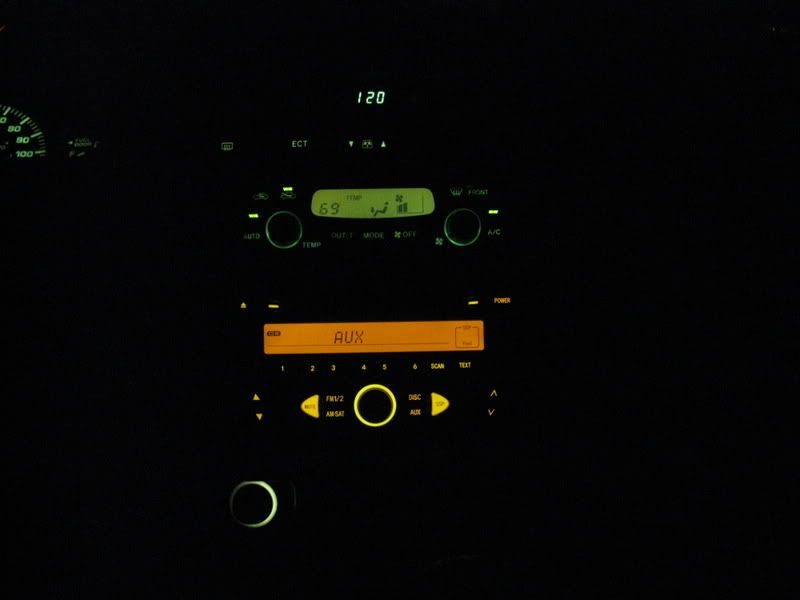
The final product turned out pretty well, and I decided the button cut-outs looked ok; at least better than trimming the whole sides of the bezel would probably look. You can see the cable for the Aux input sticking out from under the ashtray. I can roll the cable up and stick it under there out of sight when it is not in use.
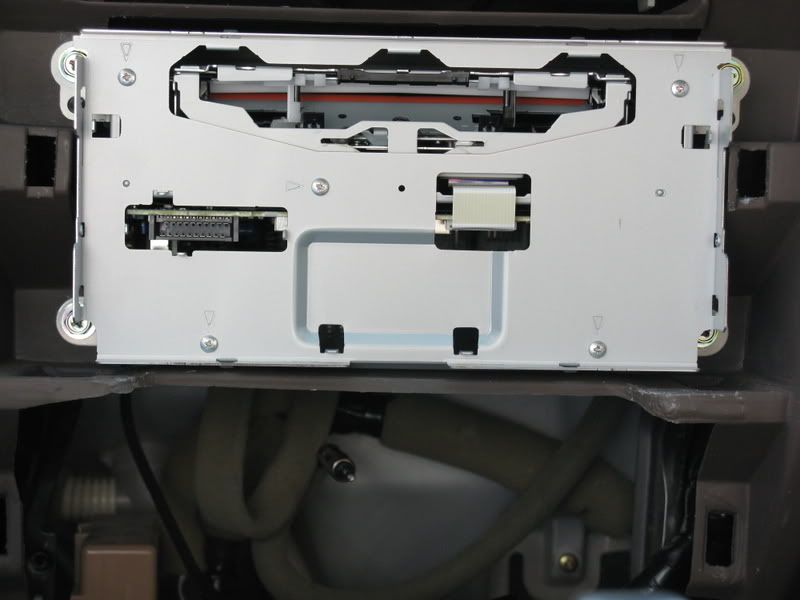
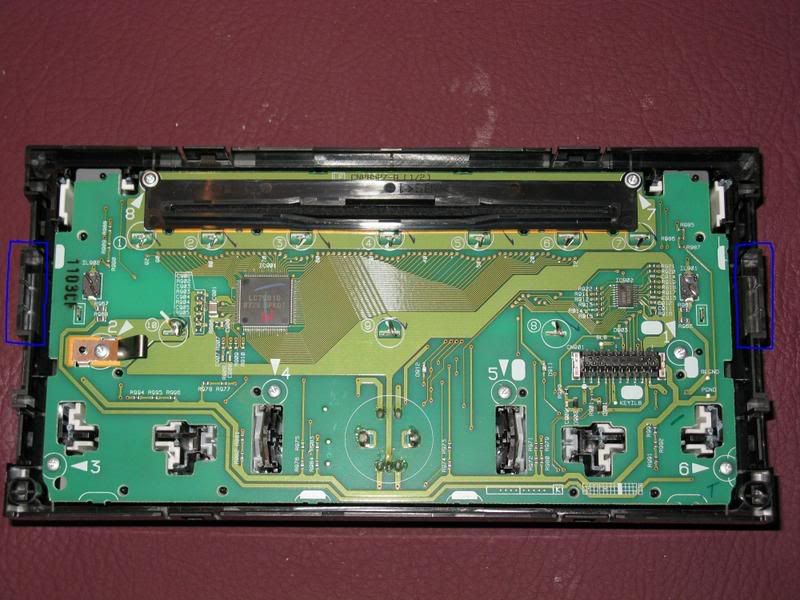
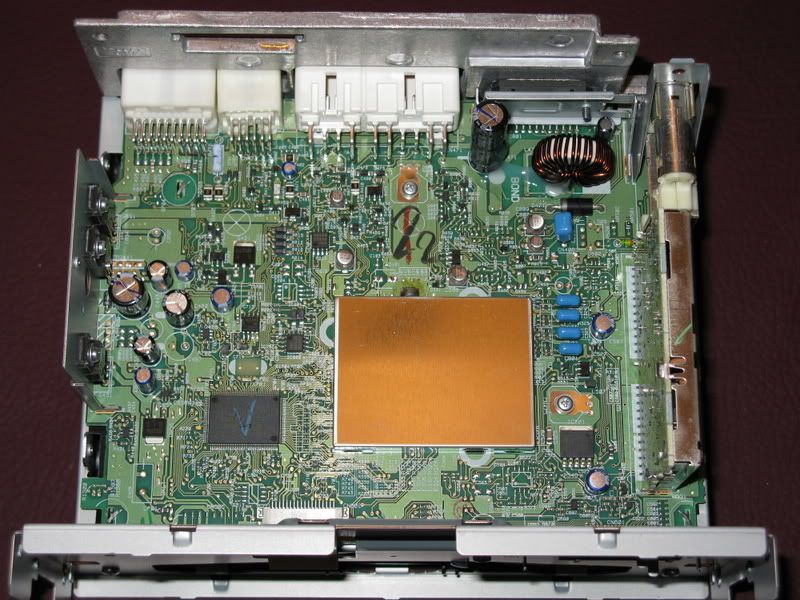
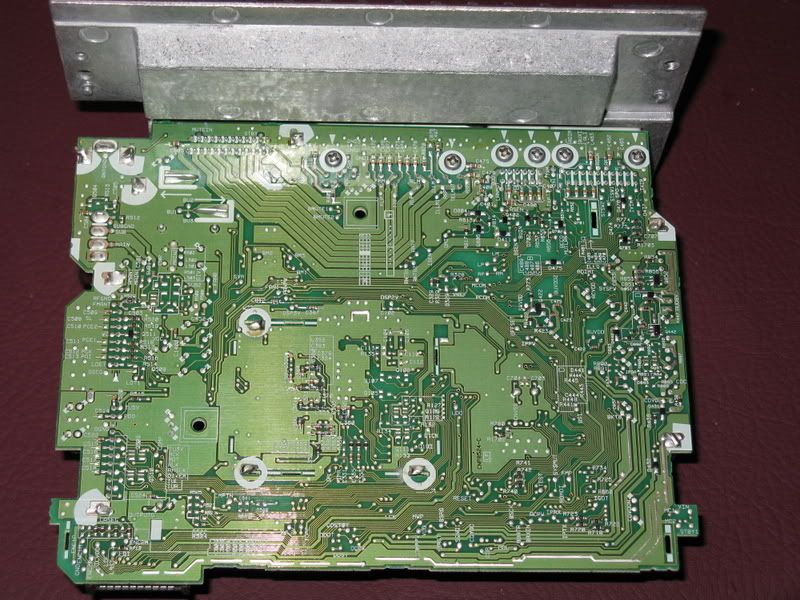
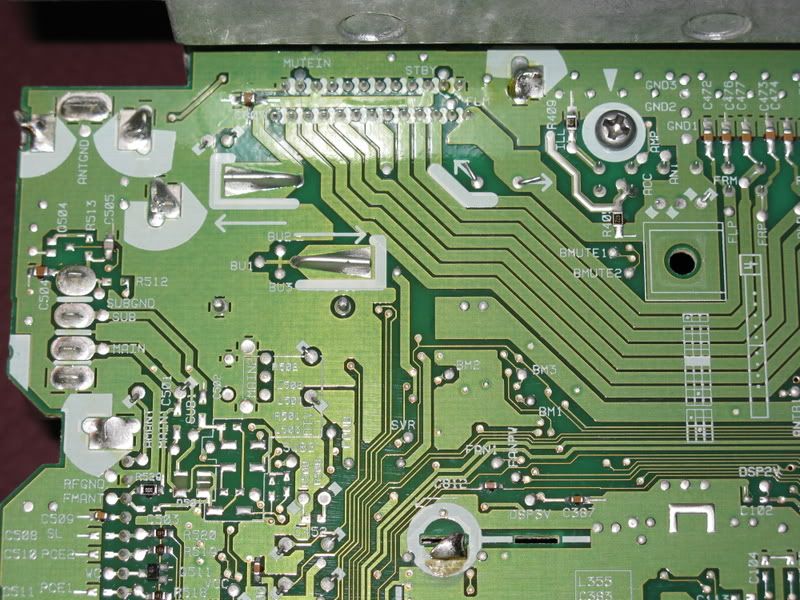
One final thing of note youll see in the pic of the back of the stereo that I drilled an opening to get to the second antenna input. However, as someone else pointed out on somewhere (I think it was here), unfortunately the diversity tuner circuitry is not populated on the circuit board. I have noticed that radio reception is slightly worse than the factory stereo, which is probably why there was a diversity antenna in the first place. At least the receptacle gives you a good place to put the extra plug. Here are several pics of the stereos circuit board:

Last edited by CO_FlyFisher; 07-14-2009 at 03:25 PM.
Reason: Re-did the post after new software pooched it.
|
|
|
Reply With Quote
|
|
03-11-2008, 09:39 PM
|
#4
|
|
Member
|
|
Join Date: Mar 2008
Location: Littleton, CO
Posts: 431
|
|
|
Member
Join Date: Mar 2008
Location: Littleton, CO
Posts: 431
|
Again. too many images, continued from above:
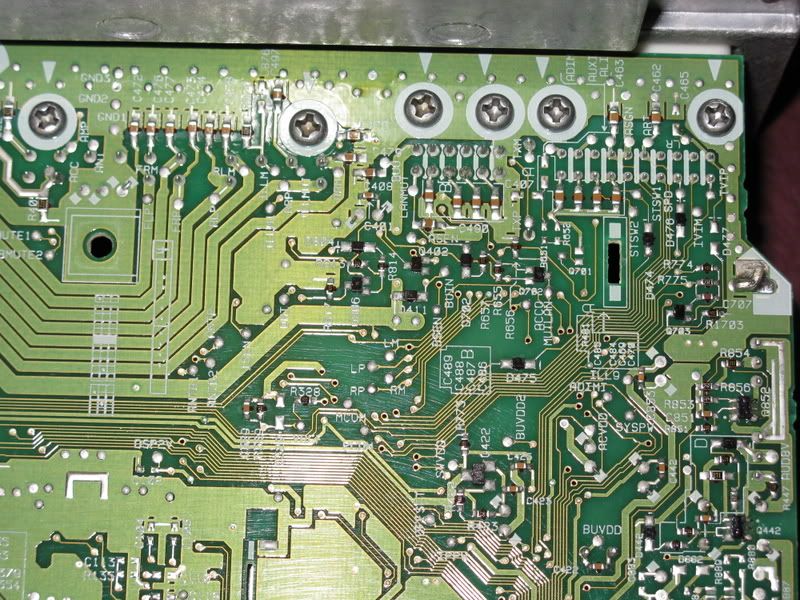
Bottom side note the AUXI, ALI, ASGN, and ARI callouts on the circuit board near the top right.
Over all, I am very happy with this mod! The sound quality is 5x better than the factory stereo, and I love the Aux input capability! There is no noise present at all on the Aux input; with the truck running, I can pause the MP3 player while it is plugged in to the trucks 12vdc for power, and there is no sign of alternator noise. I did the mod over the course of a couple of days an evening for the Aux input cable, and part of the day for the install. I would say it took me about 4-5 hours total, including time out to take pics.
Hope this helps some of you out!!! 
Last edited by CO_FlyFisher; 07-14-2009 at 03:28 PM.
Reason: Re-did the post after new software pooched it.
|
|
|
Reply With Quote
|
|
03-11-2008, 11:08 PM
|
#5
|
 |
Member
|
|
Join Date: Oct 2007
Location: Salmon Arm BC , Canada
Posts: 714
Real Name: Jeff
|
|
|
Member
Join Date: Oct 2007
Location: Salmon Arm BC , Canada
Posts: 714
Real Name: Jeff
|
That is a EXCELLENT write up !! Great job and thanks . Should be able to do this on my 98 . So you left the factory amp out ? That just looks so much better than a after market HU .
__________________
1998 4Runner 4WD Ltd

|
|
|
Reply With Quote
|
|
03-12-2008, 12:47 PM
|
#6
|
|
Member
|
|
Join Date: Mar 2008
Location: Littleton, CO
Posts: 431
|
|
|
Member
Join Date: Mar 2008
Location: Littleton, CO
Posts: 431
|
I took the amp out, and left it out. No reason to tote it around everywhere I go if it is not being used. I might use the new real estate to mount a remote CB.
So far, I'm pretty happy with the new stereo. My wife even notices the better sound quality, so I know it is a significant difference.
I am still on the fence on whether or not to change the color of one of the displays to make the two match.
__________________
Engineers dont idle well.
'99 Limited 4WD
Upgrades: BFG AT T/A KO 265/75/16, Husky floor liners, WeatherTech window deflectors, Silverstar Ultra headlights, TaskLED Dome lights, Red & White LED maplights, LED tails & 3rd brake light, 35% tinted front windows, TrueFlow air fliter, hardwired V1, Scion T1807 HU w/ Aux input, Masterflow MF1052 in rear side storage
Mods: Deckplate/ISR, independent fog light control, rear diff breather, constant hot 12v outlets, seat-mounted LED Maglite
|
|
|
Reply With Quote
|
|
04-08-2008, 07:39 PM
|
#7
|
|
Member
|
|
Join Date: Mar 2008
Location: Littleton, CO
Posts: 431
|
|
|
Member
Join Date: Mar 2008
Location: Littleton, CO
Posts: 431
|
T1807 User Manual
One thing I forgot - here is a .pdf of the T1807 user's manual!
 Scion T1807 User's Manual
__________________
Engineers dont idle well.
'99 Limited 4WD
Upgrades: BFG AT T/A KO 265/75/16, Husky floor liners, WeatherTech window deflectors, Silverstar Ultra headlights, TaskLED Dome lights, Red & White LED maplights, LED tails & 3rd brake light, 35% tinted front windows, TrueFlow air fliter, hardwired V1, Scion T1807 HU w/ Aux input, Masterflow MF1052 in rear side storage
Mods: Deckplate/ISR, independent fog light control, rear diff breather, constant hot 12v outlets, seat-mounted LED Maglite
|
|
|
Reply With Quote
|
|
04-26-2008, 10:41 PM
|
#8
|
 |
Member
|
|
Join Date: May 2007
Location: Kansas City
Posts: 74
|
|
|
Member
Join Date: May 2007
Location: Kansas City
Posts: 74
|
Ive got an '00 sr5 and the hu is going out. If Im too lazy to make a cable like you did, how can I install one of these scion hu's and still get the aux input capability?
|
|
|
Reply With Quote
|
|
04-28-2008, 12:58 PM
|
#9
|
|
Member
|
|
Join Date: Mar 2008
Location: Littleton, CO
Posts: 431
|
|
|
Member
Join Date: Mar 2008
Location: Littleton, CO
Posts: 431
|
If you're lazy, it will simply cost you more money! :awais:
You can get a SC12235 cable for iPod control (if the HU supports it), and a SC12337 cable for the Aux input. Both plug right into the back of the HU, and the other end plugs right into your auxillary device. Can't be any easier! :headslap:
Here are a couple of links to past ebay auctions for each cable. The first one HERE is the SC12235 iPod cable.
The next one HERE is a similar cable, but for the Aux input instead, #SC12237.
Note the seller is the same for both cables ( billc41 on ebay), but there aren't currently any for sale of either one.
Each cable will cost about what the HU cost though, so if you're going to buy a HU and BOTH cables, you might be better off with an aftermarket HU or a better Scion Nav HU. Hope that helps you out a little more.
__________________
Engineers dont idle well.
'99 Limited 4WD
Upgrades: BFG AT T/A KO 265/75/16, Husky floor liners, WeatherTech window deflectors, Silverstar Ultra headlights, TaskLED Dome lights, Red & White LED maplights, LED tails & 3rd brake light, 35% tinted front windows, TrueFlow air fliter, hardwired V1, Scion T1807 HU w/ Aux input, Masterflow MF1052 in rear side storage
Mods: Deckplate/ISR, independent fog light control, rear diff breather, constant hot 12v outlets, seat-mounted LED Maglite
|
|
|
Reply With Quote
|
|
07-08-2008, 12:18 PM
|
#10
|
|
Junior Member
|
|
Join Date: Jan 2008
Location: So Cal
Posts: 4
|
|
|
Junior Member
Join Date: Jan 2008
Location: So Cal
Posts: 4
|
DAMN! That is creative. NO WAY would i ever attempt something like this...its just really insane...I would just buy an after market HU and call it a day.
But GOD DAMN man...that is awesome!
|
|
|
Reply With Quote
|
|
01-23-2009, 12:45 PM
|
#11
|
 |
Member
|
|
Join Date: May 2008
Location: Mullins, SC
Posts: 481
|
|
|
Member
Join Date: May 2008
Location: Mullins, SC
Posts: 481
|
great writeup I also have a Sansa and id like to upgrade the player in my 3rd gen but dont want to have to solder and such. Is there another way thats easier? I can deal with making the unit fit in the dash but im far from gifted in electrical  Any help would be greatly appreciated
__________________
2001 4 Runner 4wd SR5 v6 auto. TRD Tundra coils,adj. Bilstein 5100's, 8 wrap LC coils, 15% tint, Hella 500's, Skyjacker Nitros, 285/75/16 Mud Dawgs, 16x10 rims, B&M 70268
|
|
|
Reply With Quote
|
|
01-23-2009, 02:09 PM
|
#12
|
|
Member
|
|
Join Date: Mar 2008
Location: Littleton, CO
Posts: 431
|
|
|
Member
Join Date: Mar 2008
Location: Littleton, CO
Posts: 431
|
Best thing I can tell you is either get one of the ready-made cables (see my last post a few above this one) from somewhere like ebay, or use a different head unit that has native capability or an aux input built in.
Really, making the cable is the easy part imho.
PS - BOTH cables are currently available on ebay from billc41. The Aux cable you would want is $30 Buy-it-now.
__________________
Engineers dont idle well.
'99 Limited 4WD
Upgrades: BFG AT T/A KO 265/75/16, Husky floor liners, WeatherTech window deflectors, Silverstar Ultra headlights, TaskLED Dome lights, Red & White LED maplights, LED tails & 3rd brake light, 35% tinted front windows, TrueFlow air fliter, hardwired V1, Scion T1807 HU w/ Aux input, Masterflow MF1052 in rear side storage
Mods: Deckplate/ISR, independent fog light control, rear diff breather, constant hot 12v outlets, seat-mounted LED Maglite
Last edited by CO_FlyFisher; 01-23-2009 at 02:13 PM.
|
|
|
Reply With Quote
|
|
01-23-2009, 03:25 PM
|
#13
|
|
Member
|
|
Join Date: May 2008
Location: Mullins, SC
Posts: 481
|
|
|
Member
Join Date: May 2008
Location: Mullins, SC
Posts: 481
|
Quote:
Originally posted by CO_FlyFisher
Best thing I can tell you is either get one of the ready-made cables (see my last post a few above this one) from somewhere like ebay, or use a different head unit that has native capability or an aux input built in.
Really, making the cable is the easy part imho.
PS - BOTH cables are currently available on ebay from billc41. The Aux cable you would want is $30 Buy-it-now.
|
thanks for the reply, guess ill make it easier on myself and buy one with input built in No good deals on Ebay, most are at least $70 shipped . on second though,maybe ill re-read your instructions and give it a shot, it really looks nice installed
__________________
2001 4 Runner 4wd SR5 v6 auto. TRD Tundra coils,adj. Bilstein 5100's, 8 wrap LC coils, 15% tint, Hella 500's, Skyjacker Nitros, 285/75/16 Mud Dawgs, 16x10 rims, B&M 70268
|
|
|
Reply With Quote
|
|
01-29-2009, 11:09 PM
|
#14
|
 |
Member
|
|
Join Date: Mar 2008
Location: Albany, GA
Posts: 450
|
|
|
Member
Join Date: Mar 2008
Location: Albany, GA
Posts: 450
|
This really is wonderful. Looks great in the dash as well.
__________________
1997 T4R Limited - Tow Vehicle
2004 Mazda RX-8 - Daily Driver
1984 Mazda RX-7 - Track Toy/Race Car
1990 Mazda RX-7 w/LS2 - Track Toy/Race Car
|
|
|
Reply With Quote
|
|
03-31-2009, 11:52 PM
|
#15
|
|
Member
|
|
Join Date: Jun 2004
Location: nyc
Posts: 660
|
|
|
Member
Join Date: Jun 2004
Location: nyc
Posts: 660
|
Nice write up. Time to upgrade to the scion navigation system though. It's an alpine and sounds better than the scion/pioneer deck IMO.
Nice pics too.
|
|
|
Reply With Quote
|
 Posting Rules
|
You may not post new threads
You may not post replies
You may not post attachments
You may not edit your posts
HTML code is On
|
|
|
|


 Linear Mode


