My Pioneer AVH-X3500BHS Head Unit Installation

toiday

New member
I have completed the installation of the Pioneer AVH-X3500BHS head unit in my 4Runner. I want to thanks all the people in this community who posted the information and responded to my questions. I couldn't have done this without your helps.

My installations:
  • Pioneer AVH-X3500BHS
  • Axxess Metra ASWC-1 Universal Steering Wheel Control Interface with New Micro B Connector
  • Metra 95-8202 Toyota DDIN Multi Dash Kit
  • Metra 70-1761 Radio Wiring Harness For Toyota 87-Up
  • MicroBypass Parking Brake Override Bypass
  • USB/3.5mm AUX Extension Cable
After trying 3 different head units, I decided to go with the Pioneer AVH-X3500BHS. Other units considered were:
  • Kenwood DDX470 – the reason I like this head unit was because it has the knot volume control rather than pressing +/- buttons. That makes much easier to control while driving. The sound is also good, about the same as the OEM. FM radio is good but not the best. I'll explain later. But the biggest reason I decided against this is the graphic display. It's so basic. The touch screen is full of rectangular buttons rather then pictures. This head unit is also lacked a remote control; something very useful when the kids are watching videos from the back seats.
  • Pioneer AVH-X4500BT – I like this unit for it larger screen size (the largest of all three). The buttons are in the bottom rather then the side. This make it a little easier to handle since you can rest your hand on the dash while control the buttons. The graphic is much better looking than the Kenwood. The tilt screen seems to be nice but not work well for 4Runner. When installed on the 4Runner, the screen is already tilted up a little. This unit only allows the screen to tilt up. I don't see a need for tilting further up but tilting down would be better. Again, the FM radio is good but not the best.
I finally decided with the Pioneer AVH-X3500BHS. The thing that makes this unit standouts from the other 2 was the Digital Radio. With digital radio, you get the CD quality from FM. I can tell the big different in the sound quality by switch between analog and digital. The station also passes over the song information and even album art (see attached picture). The volume button is a little difficult to press while driving but that's solved by installing the Steering wheel control. I installed the USB/3.5mm AUX Extension Cable to the center storage area, the same area the original AUX input was installed. This way, I can have my handheld equipment hide away. For the microphone, I posted a question to get input from this community. I ended up installed it under the rear view mirror. I want to install somewhere in the middle so that the passenger seat can engages to the conversation. My original spot was to drill a hole in the reading lights/sunroof switch and hide all the microphone wire away. However, that unit was molded together and I'm not able to drill a hole through it.

Some issues I had were the FM reception and the bypass switch. At first, I installed the bypass switch and it works nicely. Per instructions, I connect the black wire to the black on the harness, the blue to the blue/white, and the green to parking break wire on the head unit. Then I was having issue with the radio reception. After posting question here, I found that the 4Runner has an antenna booster and it needs to power up by connection the blue wire from the harness (power antenna wire) to the blue/white wire from the head unit. I left this out at first thinking there is not power antenna in this model of 4Runner. So the reception issue was fixed and I'm getting all the stations I got before. I few days later when my kids play a DVD, the bypass switch stops working. It turns out that by adding the antenna booster wire to the blue/white wire, the bypass quits working. I work around this by switching the antenna booster wire to the yellow wire from the harness (the ACC switch wire).
 

Attachments

  • IMG_20130619_193500.jpg
    IMG_20130619_193500.jpg
    95.4 KB · Views: 9,694
  • IMG_20130619_193512.jpg
    IMG_20130619_193512.jpg
    137 KB · Views: 9,166
Register to hide this ad
How do you like it so far? I'm considering the same unit. Thinking about a back up camera?

Also, can you post some links or more pics of the other components? Which USB/3.5 cable are you using? Does it work well?
 
Last edited:
It looks great! Have you done Bluetooth music streaming with it yet, and did it work well?

I installed mine yesterday. Bluetooth streaming seems to work great. I'm using an HTC One X. When I stream just any sound that's playing on the phone (a downloaded podcast, YouTube, etc), it acts the same as if I hooked it up through a cable and no information is output on the screen, but if I go through Pandora (wireless) it shows me song and artist info and artwork on the screen and I can select stations and skip songs right from the display. Very cool!

I started installing last night at 6 and wasn't finished until almost 10. I decided to leave the camera for another day.

The microbypass switch worked fine, but I couldn't get the ASWC to work. I assume a bad connection is the issue.
 
Sorry I was on vacation and didn't have access to internet...

About the bluetooth... I have the Nexus 4 phone and it streams music just fine but without the ID3 tag info. This is not the Android thing and NOT Pioneer issue because when streaming from iPhone, all information (except for artwork) shows up. There are rumors that Android will fix it on 4.3.

Another inconvenience is the video format (USB). It only takes Divx format. This format is outdated since all smartphones are using mp4. There is not free divx converter that I can find.

[MENTION=94324]smekas[/MENTION], did you get the ASWC-1 or ASWC. ASWC-1 is newer and replaces the ASWC. Check your connection and press the reset button to try again.

I used this USB/3.5mm AUX Extension Cable: http://www.ebay.com/itm/Car-Dashboa...nsion-Cable-Lead-Mounting-Panel-/281061930839. Notice the 3.5mm has 4 connections and works with the head unit. I believe the extra connection is for video from iPod/iPhone. You would also need another cable if you're using it with iPod/iPhone. Something like this one: http://www.ebay.com/itm/NEW-PIONEER...98?pt=US_Adapters&hash=item3f2666042e&vxp=mtr

I have not installed the camera. If you have done that, let's know how it goes. There is a video on YouTube on how to install rearview camera on 4Runner. You should check it out.
 
Last edited:
Sorry I was on vacation and didn't have access to internet...

About the bluetooth... I have the Nexus 4 phone and it streams music just fine but without the ID3 tag info. This is not the Android thing and NOT Pioneer issue because when streaming from iPhone, all information (except for artwork) shows up. There are rumors that Android will fix it on 4.3.

Another inconvenience is the video format (USB). It only takes Divx format. This format is outdated since all smartphones are using mp4. There is not free divx converter that I can find.
Have you tried just renaming the file (changing the extension)? Sometimes that works?

[MENTION=94324]smekas[/MENTION], did you get the ASWC-1 or ASWC. ASWC-1 is newer and replaces the ASWC. Check your connection and press the reset button to try again.
I got the ASWC-1. I think it's my connection. I'll need to take it apart to work on the backup camera anyway.

I used this USB/3.5mm AUX Extension Cable: Car Dashboard Flush Mount USB 3 5mm 1 8 Aux Extension Cable Lead Mounting Panel | eBay. Notice the 3.5mm has 4 connections and works with the head unit. I believe the extra connection is for video from iPod/iPhone. You would also need another cable if you're using it with iPod/iPhone. Something like this one: New Pioneer CD IU200V iPod iPhone Aux Interface Input Cable 3 5mm USB US Seller | eBay
Looks nice. I haven't measured, but that doesn't seem like it would fit inside one of the blank buttons in the middle. I haven't measured. It would be nice.
I have not installed the camera. If you have done that, let's know how it goes. There is a video on YouTube on how to install rearview camera on 4Runner. You should check it out.
I'll check it out. I'll post an update once I do it.
 
Have you tried just renaming the file (changing the extension)? Sometimes that works?

I got the ASWC-1. I think it's my connection. I'll need to take it apart to work on the backup camera anyway.


Looks nice. I haven't measured, but that doesn't seem like it would fit inside one of the blank buttons in the middle. I haven't measured. It would be nice.

I'll check it out. I'll post an update once I do it.

Yes, update please when you do this! I'm interested in this exact setup w/ camera.

Now I have a 4th Gen w/o JBL...is this what you guys have?
 
Have you tried just renaming the file (changing the extension)? Sometimes that works?

Looks nice. I haven't measured, but that doesn't seem like it would fit inside one of the blank buttons in the middle. I haven't measured. It would be nice.

Nope, file rename didn't work.

I didn't put the usb/3.5mm on the button. I put it inside the storage area where the 120v and the existing 3.5mm were. I had to take it all apart to drill the hole and make sure room for it behind.

For [MENTION=95796]F4injected[/MENTION], it was the one w/o JBL.
 
Have you tried just renaming the file (changing the extension)? Sometimes that works?

Looks nice. I haven't measured, but that doesn't seem like it would fit inside one of the blank buttons in the middle. I haven't measured. It would be nice.

Nope, file rename didn't work.

I didn't put the usb/3.5mm on the button. I put it inside the storage area where the 120v and the existing 3.5mm were. I had to take it all apart to drill the hole and make sure room for it behind.

For [MENTION=95796]F4injected[/MENTION], it was the one w/o JBL.
 
Well, I got the ASWC-1 to work. I connected the ground wire from the ASWC-1 module to the ground on the car, but I didn't know I also had to ground the wire coming from the steering wheel controls. So I did that, too. While I was back there, I removed the T-taps and used the little screw nuts to connect the wires. Taped everything up and finally it worked. Thanks to the forum. Still think $50 is high for volume and channel +/1 but whatever.

Meanwhile, I tested the camera I got and it seemed to work fine in the cabin, although a bit washed out and low in contrast. I routed the VGA cable all the way back only for the camera to be completely washed out and milky once I hooked it up. The screen was gray and you could just barely see the outlines of things. I will return it to Amazon. It was only $15. I don't know whether to bother with another cheapo or to get something more expensive.
 
I BOUGHT THE BOYO license plate camera for $32...works ok..with painted guidelines on the screen...has been installed for about 1 yr now, hooked up with pioneer avh4400bh

could you post a pic of the steering control module you bought?
 
Just bought rear camera.

I BOUGHT THE BOYO license plate camera for $32...works ok..with painted guidelines on the screen...has been installed for about 1 yr now, hooked up with pioneer avh4400bh

could you post a pic of the steering control module you bought?

I just got a Crimestopper license plate rear camera to connect to the Pioneer AVH-X3500BHS I just bought. Any helpful hints on the camera install would be greatly appreciated. Did you need to drill a hole behind the license plate to run the wiring?

Thanks
Carl
 
Just bought the same unit.

Looks great in you 4Runner. :thumb3:Are you still using the JBL system? I want to keep using the JBL. I have the Metra TYTO-01 Toyota amp turn on interface for the JBL. I also have the Metra 70-8117 Factory Amplifier Harness for 2004-Up Toyota Vehicles with JBL System. I'm not sure if I need both if I'm planning on using the JBL System. I also have the ASWC-1 for the steering wheel controls. Any help would be appreciated.

Thanks
Carl
 
MicroBypass Parking Brake Override Bypass

BTW, no need to buy the microbypass. Just buy a 2-way switch. Green wire from stereo to the ON. Another wire taps into stereo ground, then to OFF. When you get the pioneer message that is it not recommended to drive and use the LCD etc... Flip the switch ON-OFF-ON, bypassed. I just installed the x8500BHS a couple of weeks ago and did this.
 
sorry for the late response..i had the whole unit professionally installed.

bought the microbypass kit, looking for tips on how to install it on the t4r....have the avh 4400bh.
could anyone who has done the video bypass show me how?..i bought the micro bypass with 3 single wires extending from it.......do i need to take apart the dash to connect it?
 
Last edited:
My installation of a backup camera (and other components)

This forum (and YouTube, EBay, etc.) was very helpful in the successful installation of the following components in our recently purchased 2007 4Runner. :rockon:

- Backup Camera (found on EBay; search for BACKUP CAMERA FOR Toyota 4Runner)
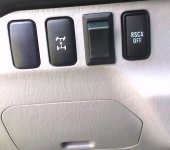
- DelCity supplied SPDT On-On Full Size Rocker Switch Item # 7700018 (Del City - Electrical Supplies & Professional Grade Wiring Products, backup camera bypass switch (aka backup camera mod; to turn on backup camera at anytime)
- Metra 40-UV43 Male to Female Motorola Antenna Cable (a 2 input/connector with one output/connector for antenna; aka splitter)
- Scosche Mda-B Micro/Delco Antenna Adapter Tip (adapts the smaller antenna connector to the Motorola connector)

And items listed by toiday
- Pioneer AVH-X3500BHS head unit
- Axxess Metra ASWC-1 Universal Steering Wheel Control Interface with New Micro B Connector
- Metra 95-8202 Toyota DDIN Multi Dash Kit
- Metra 70-1761 Radio Wiring Harness For Toyota 87-Up
- MicroBypass Parking Brake Override Bypass (still waiting for delivery; we decided that it was needed after using head unit for a few days)
- USB/3.5mm AUX Extension Cable

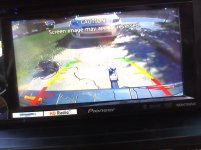
The key component for us was the backup camera. The radio head unit with all of its great features is nice, but the installation was done mainly to add the backup camera and video display. More on the camera later...

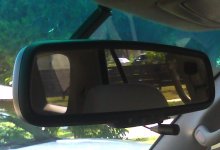
First off...I agree that the best position for the phone mic is on the rearview mirror. In this position, the phone mic is centered for the driver and front passenger, and it is in the middle from the side windows which could introduce some road noise. Next, I recommend that a bypass switch be installed with any backup camera to be used for towing. It was interesting that the DelCity supplied rocker switch fit into the blank hole without making the hole in the dash larger. It was a very snug fit. I tried installing the switch in a different empty hole, but it would not have installed there without making hole larger. Others that have installed this switch on a 4th Gen 4Runner have commented that they had to enlarge the hole.

Possible helpful hint: I created a free DelCity account before deciding to order the switch. A few days later, DelCity sent me a coupon code for free shipping; so I got free shipping on the switch. :)

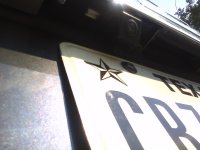
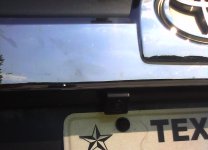
After unsuccessfully searching for a premium camera that was specifically designed for my SUV, I decided to try an inexpensive camera (~$20) on Ebay that claimed to be designed to mount to a 4th Gen 4Runner in the license plate light position. While the camera did mount in the license plate light position, plastic shims and longer mount screws had to be added to keep the camera from pointing almost straight down. In other words, the supplier could have made installation much easier by including the shims and longer screws since the camera was specifically advertised for this vehicle. While it was understood before purchasing, it should also be mentioned that it took ~3 weeks for the camera to be delivered since the unit was shipped from China. I'm hopeful the camera will work out for the long term; however, there was enough room to leave the Toyota OEM/stock license plate light (light bulb removed) inside the cover on the lift gate. If the camera needs to be switched to a different style of camera, the Toyota OEM/stock license plate light can be moved back into its position. Also, there is a significantly less chance of losing it by leaving on the vehicle. The license plate light with the camera is a LED light; so it should last for years. If someone on this forum decides to use this camera, please be aware that LED lights require that the polarity of the wires be correct to operate. Other cameras can offer infrared lights for night time use; however, the license plate and reverse lights seem adequate enough to see the blind spots. The picture quality is fine also. However if you are wanting to shoot movie clips with a backup camera, this camera may not be for you. It may not sound like it, but overall, I'm happy with this backup camera so far. The price was right and the premium cameras that I researched had less of a stock/OEM appearance.

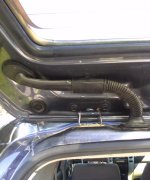
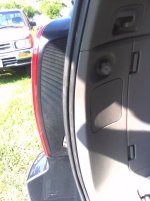
The backup camera cable run to the radio and the power antenna output on the radio caused me some frustration. The video cable that came with the backup camera was too short and the RCA connector was too large to be pulled through the rubber grommet between the lift gate and the vehicle. Long story cut short...the video cable was spliced and an extension cable was added. The pull strength on the video cable was not great; so a couple feet of the cable was damaged by the pulling through the lift gate grommet. I could hear the wire breaking inside the cable while pulling it through the grommet before the RCA connector was cutoff the cable. Even if the couple feet of video cable had not been damaged, the video cable was still too short.

Another item to mention...the power antenna output on the radio added noise back into the radio when the output was connected to the Toyota OEM/stock antenna amplifier (aka booster). The solution was to use the ACC power for the antenna amplifier which was suggested in another post in this thread. It was not an option to leave the antenna amplifier disconnected from power since the radio reception was terrible without it. If you are unaware, the 4th Gen 4Runner has something known as a diversity antenna (well...our 4Runner has this type of antenna anyways). It is actually 2 antennas with an antenna amplifier. The antenna cable into the stock radio has 2 inputs/connectors and a wire for power to the antenna amplifier. Some folks have reported that their radio reception is fine without the connecting the smaller antenna connector with the Metra splitter to their aftermarket radio, but I installed the splitter since the source of the noise was unknown at the time.

Has anyone else that has installed this head unit experienced noise issues with the power antenna output connected to the Toyota OEM/stock antenna amplifier?

I am considering adjusting camera to get more of the horizon into view
BackUpCamera1.jpg

Sorry for the poor photo of camera, but I did not want to wait for a better light.
BackUpCamera2.jpg

As you can see in this photo, the camera is somewhat hidden from view.
BackUpCamera3.jpg

This a photo of the rubber grommet that caused me some difficulty.
BackUpCamera4.jpg

The DelCity supplied SPDT On-On Full Size Rocker Switch looks OEM/stock.
BackUpCameraSwitch.jpg

The phone mic looks great too
PhoneMic.jpg

This is a photo of the driver's side tail light. To me, this was the best place to splice into the reverse light power. A cable was attached to the reverse light power at this location and run to the Backup Camera bypass switch. The interior panels had to be partially removed to run the video cable and power for camera anyways.
ReverseLight.jpg

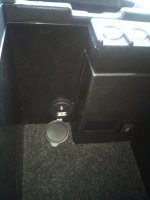
The USB/3.5mm AUX Extension Cable was mounted inside the center console.
USBAuxConnector.jpg
 

Attachments

  • BackUpCamera1.jpg
    BackUpCamera1.jpg
    53.1 KB · Views: 2,423
  • BackUpCamera2.jpg
    BackUpCamera2.jpg
    116.2 KB · Views: 2,228
  • BackUpCamera3.jpg
    BackUpCamera3.jpg
    72 KB · Views: 2,231
  • BackUpCamera4.jpg
    BackUpCamera4.jpg
    56.3 KB · Views: 2,243
  • BackUpCameraSwitch.jpg
    BackUpCameraSwitch.jpg
    91.4 KB · Views: 2,231
  • PhoneMic.jpg
    PhoneMic.jpg
    96.5 KB · Views: 2,228
  • ReverseLight.jpg
    ReverseLight.jpg
    70.2 KB · Views: 2,262
  • USBAuxConnector.jpg
    USBAuxConnector.jpg
    130 KB · Views: 2,224
Last edited:
I have this same set up! Back up cam too. and an 8 inch kicker. BUT I'm trying to install it all and was wondering, did you have any helpful links with your install? I've seen the one about taking the dash apart and getting to the stock radio but I can't find anything on the wiring.
 
If you order the units you want through crutchfield, they give you a Mastersheet installation guide, and wiring adaptors, its literally, twist their adaptor with your pioneer wiring, then plug it into your existing harnesses. The only shitty thing I've noticed about this setup is that the microphone has terrible quality. I can be going 0 MPH and people will tell me they think I'm going through a tunnel. I have it mounted on the right, bottom side of the mirror. Any suggestions on where to mount it for better sound quality?
 
If you order the units you want through crutchfield, they give you a Mastersheet installation guide, and wiring adaptors, its literally, twist their adaptor with your pioneer wiring, then plug it into your existing harnesses. The only shitty thing I've noticed about this setup is that the microphone has terrible quality. I can be going 0 MPH and people will tell me they think I'm going through a tunnel. I have it mounted on the right, bottom side of the mirror. Any suggestions on where to mount it for better sound quality?

I know this wasn't directed at me but this is where mine is mounted:
 

Attachments

  • BT Mic.jpg
    BT Mic.jpg
    130.8 KB · Views: 1,973

Members online

Forum statistics

Threads
278,316
Messages
3,554,120
Members
248,016
Latest member
Advally Service

Trending content

Back
Top