Some updates:
First, I'm copying this over from a post I made on yotatech a while back. I had the blinking 4wd lights and could not figure out what the issue was because it wasn't one of the common fixes. Here's what ended up fixing it:
This ended up being my solution to the blinking 4WD light problem. Wanted to post a little write-up about it because I haven't seen any other posts with this particular version of the issue, and the shop was saying I was looking at a potential $2k bill to have the transfer case pulled. This fix cost me about $11 all together (for a tube of epoxy and a trailer wire harness that I harvested the wires from) and a morning's work. I wanted to make this easy to understand even for someone without much car knowledge. This will require basic soldering and a willingness to break your car in order to try to fix it. This is definitely a MacGyver fix and not a by-the-book one so try it at your own peril.
4WD blinking light issue: Mine is a 99 LTD Multi-Mode with the
button on the shift lever. After driving for about 10 minutes from a cold start, the 4WD light would start blinking and would be unable to shift into or out of 4WD. After a while, it would stop but would start and stop again erratically, sometimes in response to vibration like driving over potholes, etc. For what it's worth I also had a bad 4WD switch which confused the issue even more. Those switches would be the first thing to check if you are having the blinking light issue. See
this thread for more info.
Background on Toyota 4wd systems:
YouTube
YouTube
The Automatic Disconnecting Differential system: Off-Road.com
http://www.4x4wire.com/toyota/tech/add/
How the actuator works:
Then the actuator receives power, a motor turns a worm gear, which is engaged with the timing gear. This timing gear has several traces on it, which line up with contacts mounted on a plate screwed to the inside of the barrel. These operate as position switches for the shaft. The timing gear is attached to a pinion gear which interfaces with a rack gear on the shaft. The shaft holds the yoke, which moves the transfer case gears into place, shifting the car into 4WD/AWD (if applicable). The vacuum tube into the barrel doesn't appear to be necessary for the functioning of the actuator and my guess is that it's there to pull out any moisture in the system.
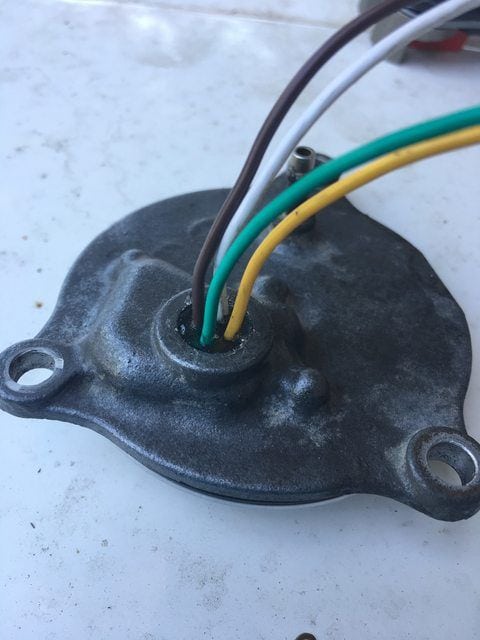
My problem: one of the wires connecting to the 4 timing contacts was bad, giving only intermittent connection. Complicating the issue is that these wires are potted in place with some kind of rubberized compound that seems to be injected into the casing.
Solution: By opening up the barrel of the actuator, I was able to find the bad wire by connecting a multimeter in Cont mode to the contacts in the transfer case actuator electrical connector and then to the contacts inside the barrel while manipulating the wiring harness. I ended up clipping all the wires, un-potting them, and then replacing them with new wires and desoldering the barrel cap wires to the rest of the harness.
Step by step:- Disconnect the battery
- Remove the vacuum line connected to the barrel cap. If itÂs old and crusty, snip off the ratty part, but no more than you have to so it is still long enough to connect.
- Using a 10mm socket, remove the three bolts holding the barrel cap onto the actuator. Using a slot-head screwdriver and a few light taps from a mallet, remove the barrel cap (there is an o-ring in there, so I found itÂs easiest to tap with the mallet until there is a gap you can fit the screwdriver in and then moving between the three bolt holes, slowly wedge it out of the barrel.)
- Snip the wires of the harness that connect into the barrel cap (this is the point of no return in this operation)
- With the barrel cap removed, unscrew the two screws holding the plastic contact mount plate into the barrel cap. The mount plate will not separate from the barrel cap because of the potting.
- Un-pot the contacts. I ended up just pulling on the contact plate until the rubber potting material tore away from the wires enough to release the plate and then used a pair of pliers (any roughly cylindrical-shaped object of the right circumference should do) to push the potting through from the outside of the barrel cap, pushing on the rubber around where the wires entered the barrel cap. This eventually popped out a big chunk of the potting relatively cleanly, and I went back in with a knife and some pliers to clean it up a bit.
- Solder new wires to the contacts and run them through the hole in the barrel cap. To line them up properly, I threaded them though the chunk of potting I had just pushed out of that hole and then butted it up against the barrel cap.
- Re-pot the new wires. If you can think of a good rubberized material to use here, go for it. I just used 5 minute epoxy from kit with a mixer tip that I picked up for a few bucks at Home Depot. The chunk of old potting served as a decent dam to hold the epoxy and leave a clean-looking exit for the wires. You might also try taping over the hole with electrical tape and pricking a hole for each wire.
- Cut the wires to length (I left them a little longer than the original wire harness for ease of installation. Added maybe an inch and a half or so.) Add heat-shrink to the cables and reattach the barrel cap to the actuator.
- Strip and resolder new cases to old wiring harness.
- Put heat-shrink in place an shrink. Wrap your new wiring harness in electrical tape. Make sure everything is plugged back in, including vacuum hose.
- Reconnect the battery
- Test drive
Pictures:
The first two I stole from an ebay listing of an actuator similar but not identical to mine. The third is a picture I took of the barrel cap before trimming the wires and reinstallation
 note that one of the 4wd sensors is missing in this image