 02-15-2013, 06:06 AM
|
#46
|
|
Member
|
|
Join Date: Apr 2011
Location: Burbank, CA
Posts: 222
|
|
|
Member
Join Date: Apr 2011
Location: Burbank, CA
Posts: 222
|
what kind of gas mileage are you getting with these duratracs. i'm about to take the plunge.
|

|
 Reply With Quote Reply With Quote
|
|
02-15-2013, 05:25 PM
|
#47
|
 |
Member
|
|
Join Date: Jan 2013
Location: Atlanta, GA
Age: 51
Posts: 237
Real Name: Steve
|
|
|
Member
Join Date: Jan 2013
Location: Atlanta, GA
Age: 51
Posts: 237
Real Name: Steve
|
Quote:
Originally Posted by fightman80

Nicely built rig man! I really like how you tied in the signal lights below the headlights!
I quit going to YT a long time ago too.... too many internet tough guys over there! lol!
|
Thanks! I reconfigured everything. The turn signals are now in my corner light location. Used a yellow superbright LED in place of the stock bulb. So the Hella lights below the headlight are wired from what used to be the corner lights. The first position on the light switch is just Hellas, next is headlights and hellas.
Agreed. I am really enjoying T4R.org.
Quote:
Originally Posted by T4Rex.
I really like those lights under ur headlights how did you do that, and what did you use???
|
Thanks! I used these:
My Hella Lights :: LEDayline DRL
I removed the little trim piece from under the headlight, dremel'd out the dimensions of the lens (but they are almost a perfect fit) and installed the lights from behind.
I used some little 'L' brackets from Home Depot and mounted to the underside of the headlight housing. Something like these: 1-1/2 in. Zinc Plated Corner Braces (4-Pack)-15304 at The Home Depot
I think I used 1-1/4" brackets. Cant remember. I have an ol coffee can full of bits like that. They did the trick.
Quote:
Originally Posted by FrankM23
what kind of gas mileage are you getting with these duratracs. i'm about to take the plunge.
|
Ah man! I try to forget. I am regeared with 4:88's. It is not too bad. On highway, depending on driving style 15-17mpg consistently via scan gauge. I've seen 18 but I was drafting a truck and going the speedlimit. When these wear out, I will look at the duratracs again, but also the km2's.
__________________
In addition to the "Like" clicky, can we also get a "Throat Punch" clicky?
|
|
|
Reply With Quote
|
|
02-15-2013, 06:15 PM
|
#48
|
|
Member
|
|
Join Date: Apr 2011
Location: Burbank, CA
Posts: 222
|
|
|
Member
Join Date: Apr 2011
Location: Burbank, CA
Posts: 222
|
Ah man! I try to forget. I am regeared with 4:88's. It is not too bad. On highway, depending on driving style 15-17mpg consistently via scan gauge. I've seen 18 but I was drafting a truck and going the speedlimit. When these wear out, I will look at the duratracs again, but also the km2's.[/QUOTE]
lol yeah these fit the bill for the type of driving my truck will see. i couldn't justify mtr's. i wouldn't use them for what they're meant for.
|
|
|
Reply With Quote
|
|
02-23-2013, 06:53 PM
|
#49
|
|
Member
|
|
Join Date: Jan 2013
Location: Atlanta, GA
Age: 51
Posts: 237
Real Name: Steve
|
|
|
Member
Join Date: Jan 2013
Location: Atlanta, GA
Age: 51
Posts: 237
Real Name: Steve
|
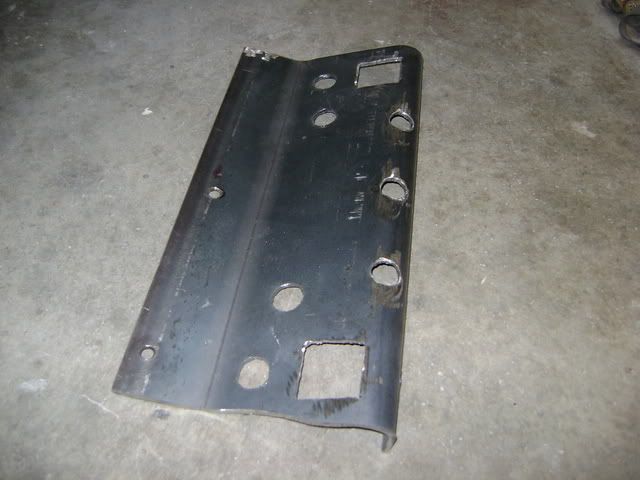
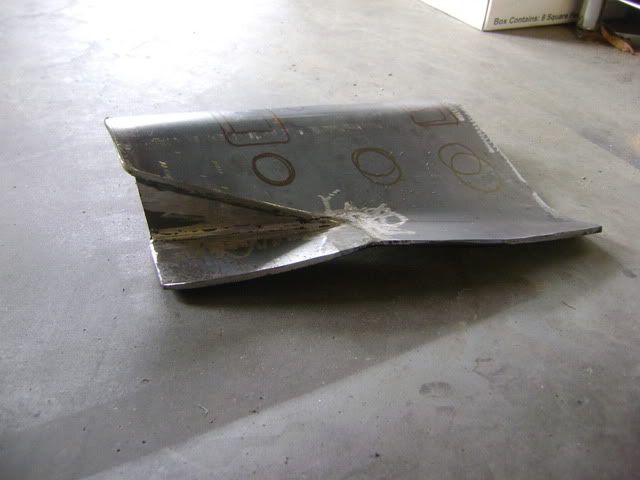
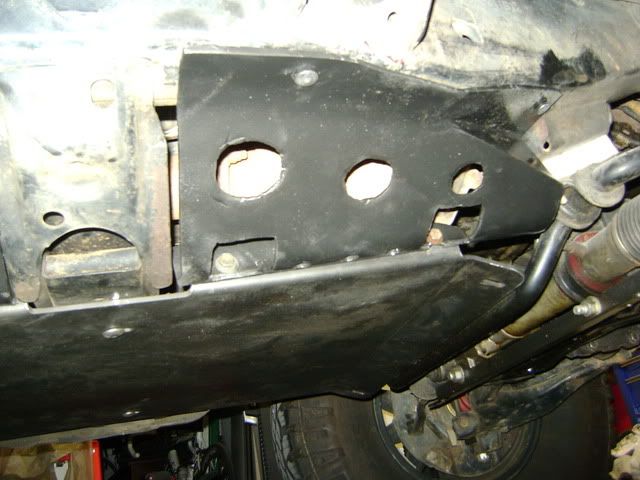
Cat Skids; Catalytic Converter skid plates
You do not have to read the forum too long until you read about a lost cat:

No. Not that lost cat. A lost or stolen catalytic converter. The Budbuilt skids offer a little coverage but the cats are still largely exposed.
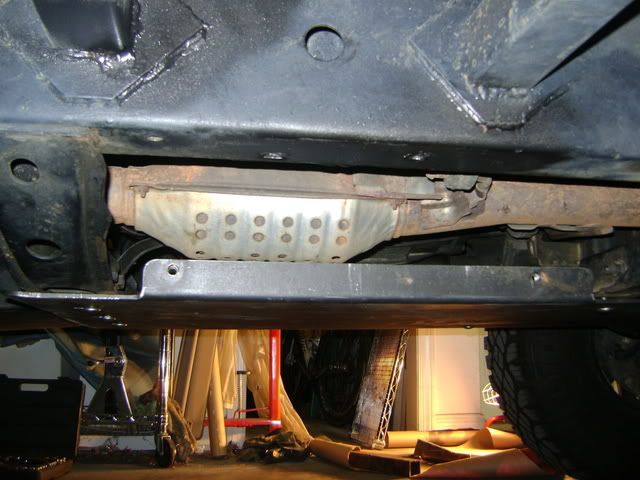
California model with 2 converters.
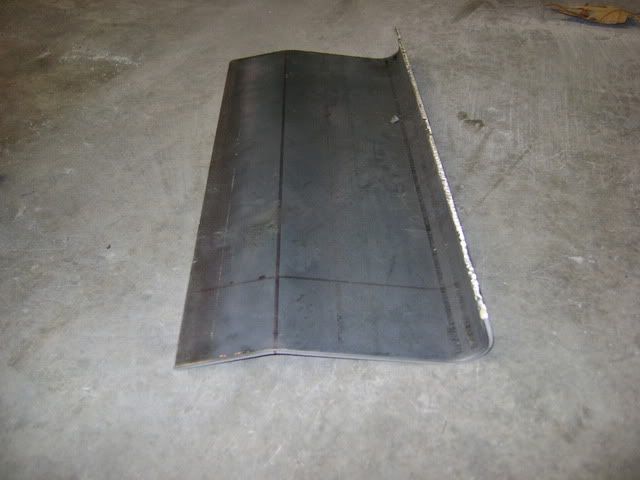
I stopped by the metal supplier and went thru the drop bin until I found a nice piece of 3/16" sheet steel. I would have to make the skid in 2 pieces since my metal brake can only handle 20" at a time.
1st piece starting to take shape:
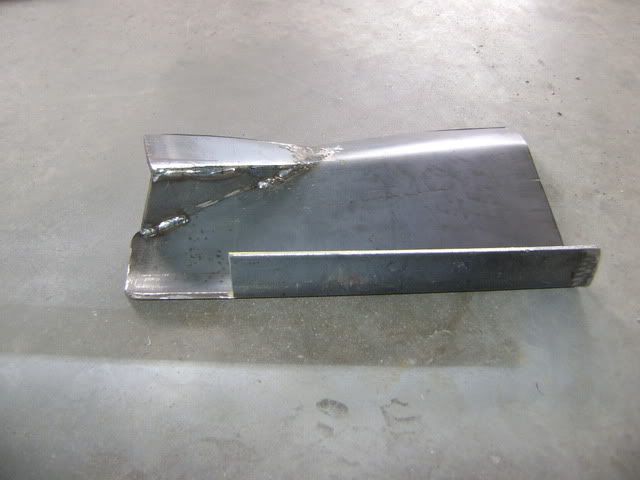
The outboard side will use pre-existing threaded holes on the underside of the frame rail. There are lots of M8 threaded holes under there. I can't remember if those were for the running boards or something else.
The inboard side mounts to the Budbuilt Skid. The Budbuilt has a 1.5" lip and I just mirrored that. I welded some nuts on the inside of the Budbuilt so that I can simply bolt them on thru the ports.
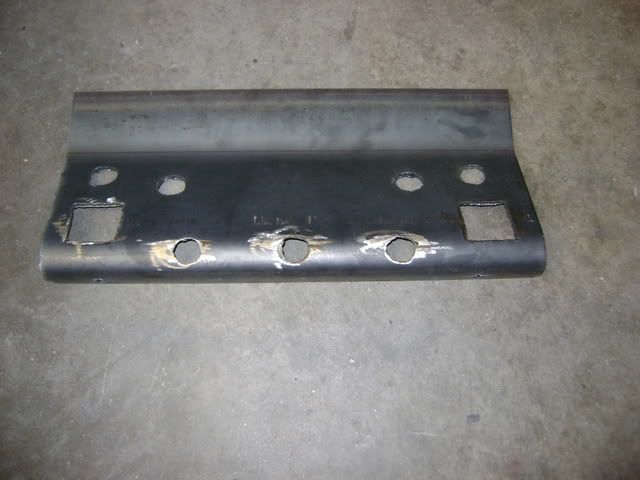
Lots of holes for drainage, and heat dissipation and 2 ports for bolt access.
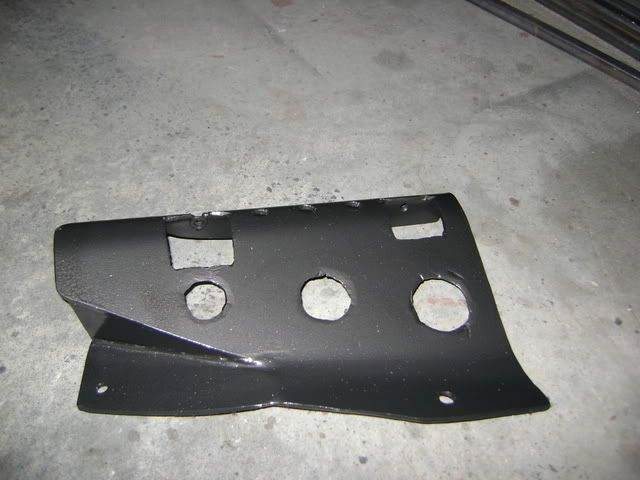
Painted up with Rustoleum black like the rest of the skids.
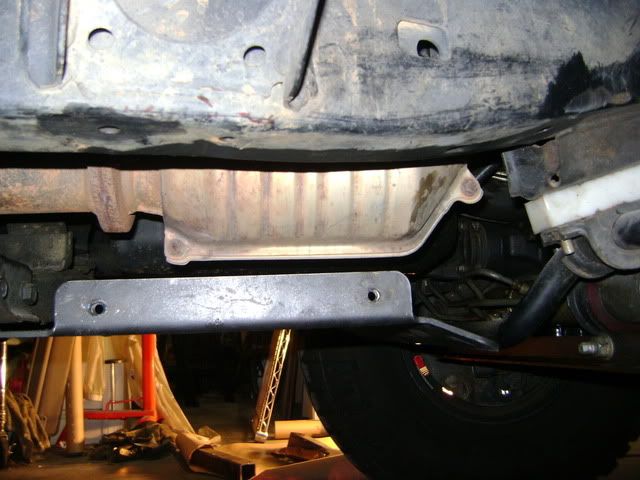
But the Crown Jewel and the Cherry on Top is:
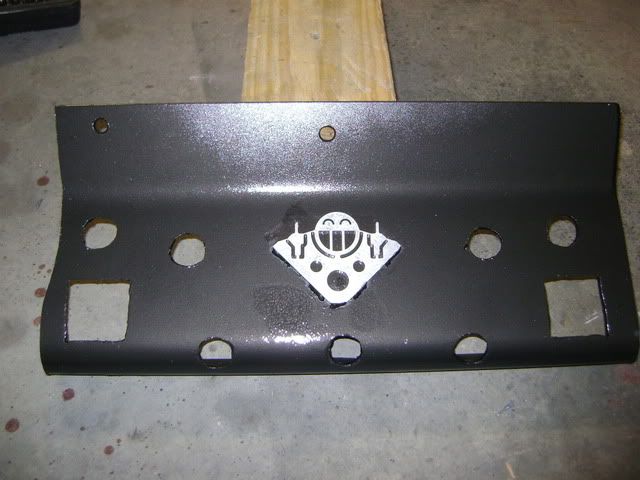

Just in case a thief were to size up my cats.
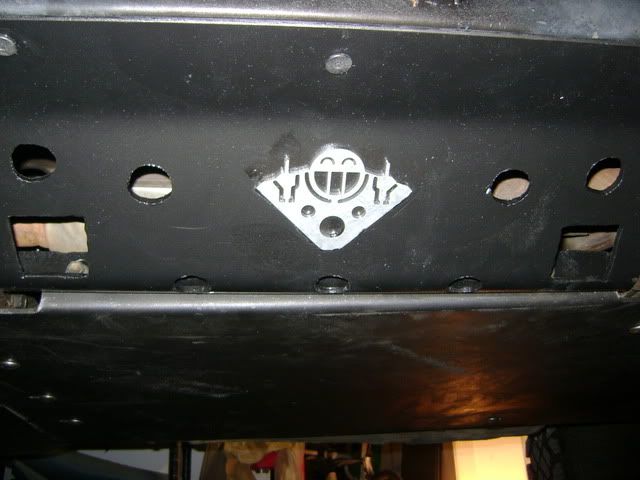
Bolted up:
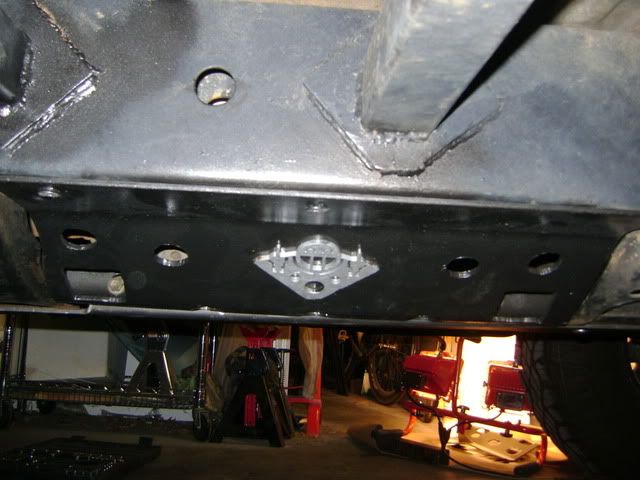
The 2nd piece was a PITA! The frame rails angle in and up so the skid had to conform. There are already threaded holes in the frame here also which made it nice.
Lots more holes for drainage, heat, and ports for bolts. In addition to the holes, there is still plenty of air space around the cats so heat shouldn't be an issue but I am going to keep an eye on it.
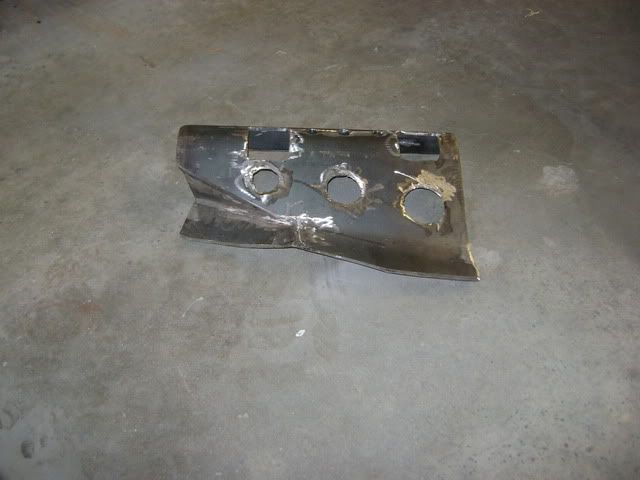
Painted up black. I tried to dimple die the holes but the 3/16" laughed at my harbor freight dies. Unsuccessful. Oh well.
Bolted up.
And the 2 together:
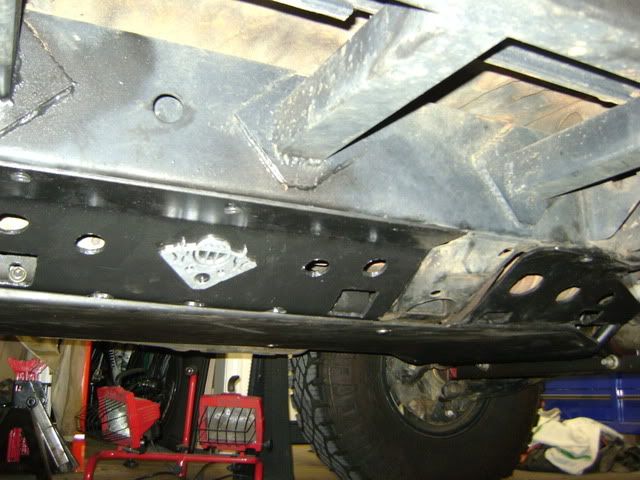
This ties into my full modualar skid idea, offers some more protection, and some theft deterrance. I'm fully aware that a really motivated thief could still get them by cutting further up or down. Though, likely he would move on to an easier target, or be forced to make a bit more noise. If nothing else, at least I got a chance to flip him off before he steals my cats.
Thanks for checkin' in.
__________________
In addition to the "Like" clicky, can we also get a "Throat Punch" clicky?
|
|
|
Reply With Quote
|
|
02-23-2013, 07:42 PM
|
#50
|
 |
Senior Member
|
|
Join Date: Nov 2012
Location: The Springs
Posts: 1,746
Real Name: Nathan
|
|
|
Senior Member
Join Date: Nov 2012
Location: The Springs
Posts: 1,746
Real Name: Nathan
|
Nicely done man! I have been planning something similar for my Savage skids. Nice to see someone else try it first.
Nate
__________________
Sold the 3rd Gen, someone totaled my 4th Gen. Sold the LT'd Tacoma. Finally got my FZJ80! 
|
|
|
Reply With Quote
|
|
02-25-2013, 01:30 PM
|
#51
|
|
Member
|
|
Join Date: Jan 2013
Location: Atlanta, GA
Age: 51
Posts: 237
Real Name: Steve
|
|
|
Member
Join Date: Jan 2013
Location: Atlanta, GA
Age: 51
Posts: 237
Real Name: Steve
|
Quote:
Originally Posted by NateMob
Nicely done man! I have been planning something similar for my Savage skids. Nice to see someone else try it first.
Nate
|
Thanks! They seemed to take forever though. I'm sure the pros (Lilskipsoffroad
@ Gerdo
, Bud, or Savage) could've done a better job in a fraction of the time.
Thanks again!
__________________
In addition to the "Like" clicky, can we also get a "Throat Punch" clicky?
|
|
|
Reply With Quote
|
|
03-07-2013, 01:47 PM
|
#52
|
|
Member
|
|
Join Date: Jan 2013
Location: Atlanta, GA
Age: 51
Posts: 237
Real Name: Steve
|
|
|
Member
Join Date: Jan 2013
Location: Atlanta, GA
Age: 51
Posts: 237
Real Name: Steve
|
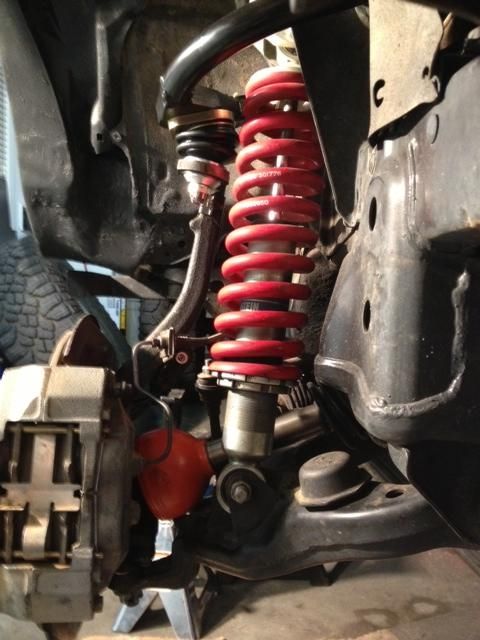
LR UCA's
I finally got around to installing my Light Racing Upper Control Arms. This was a B**** of a project. I read all the posts from other installs so I was ready for a fight. My upper ball joints were also ready for a fight. About a year ago I noticed a tear in the boot of my upper ball joint. I'm not sure how long it had been there. Probably happened during the lift install or from too much droop on the trail. I could still see grease in there and there was no excess play so I put it off until now.
Torn UBJ boot:
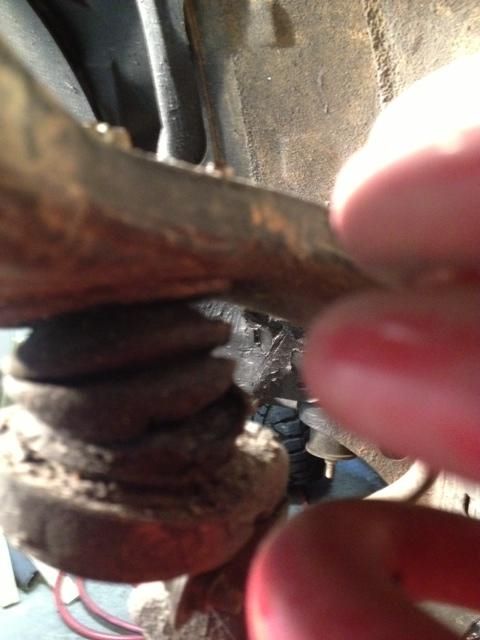
There are lots of threads on the UBJ removal so I won't repeat.
This write up was helpful: R&R Upper and Lower Ball Joints - TTORA Forum
The early steps are easy and go quickly. It's like when your playing pool and you make a couple shots in a row and you start struttin' around like you're gonna shark the whole bar, then you miss everything else. All goes well until you must press the UBJ from the steering spindle.
There is an SPC video on youtube showing the process on a Tacoma, though the UBJ's are different than our 3rd Gens. It shows a guy leisurely turning wrenches and removing bolts. This was not my experience. This was the aftermath after getting 1 UBJ seperated from the steering spindle
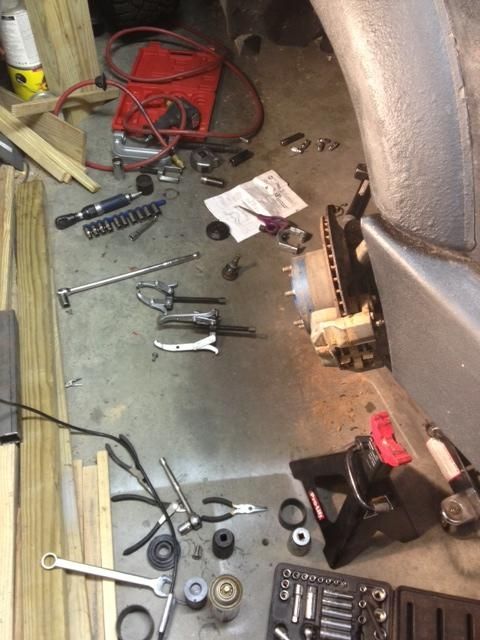
The combination that finally worked was the 3 Jaw puller with a homemade spacer of 1.75 tubing, and the top and bottom receiver pieces from the c-clamp ball joint press. Add a breaker bar, some yelling, a few cuss words and "Pow!" the ubj breaks free and slowly presses out of the spindle.
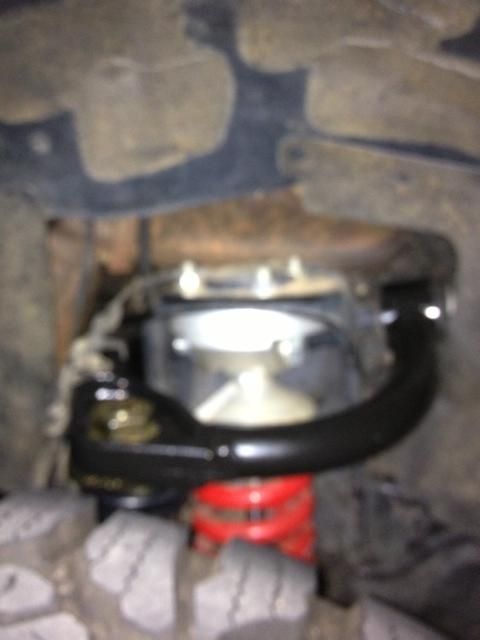
Fortunately the install of the new UCA's and ball joint is much much easier. Here is the finished product:
I got an alignment yesterday and I am happy with the results. The amount of information out there regarding the adjustment of Caster and Camber is dizzying. The front end feels much better. I assume much of this is likely due to the new bushings in the UCA and the return of caster. I noticed it immediately. I need to find a better alignment place though. Someone who has experience with non-factory, aftermarket parts, and specs. Basically, most places are trying to get you to factory specs. They put your truck on the rack, type in 99 4Runner and start trying. There is very little factory spec left on my truck. The guy basically wouldn't touch the UCA's and dialed everything in with the LCA's.
Sorry. I couldn't get my crappy cell phone pic to rotate.
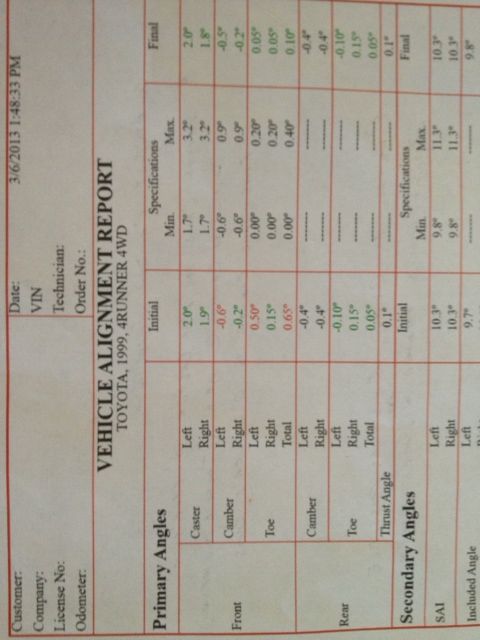
I know there is tons of adjustability yet to be had and likely another degree of positive caster. I'm gonna roll with this for now, and it feels really good, but will likely knock it out of alignment with a few wheelin trips and then find a better shop. I spoke to SPC after the fact, and they basically said adjusting more caster at the UCA is fine, but will push the wheel back in the wheel well. I have no room for that. So, they said, set UCA caster to +2 degrees (where it is). Max out the caster at the LCA's and then dial in camber using the adjustment nut on top of the UCA's. This will move the wheel slightly forward rather than back. I literally couldn't sleep last night processing my crash course in alignment 101. Basically, I need to find a shop that will allow me to customize my alignment. The 'big-box' shops likely will not, as I found out.
Really happy with the UCA's! I'm adding limit straps tonight (already installed lower shock bolt, just need to weld in bracket and bolt in strap/clevis). Will use strap install from
@ BigFishAllDay
and
@ Dirtco
as a guide. Going offroad 2x in the next week and will update.
Thanks for checkin' in!
Oh, and yes, those are the 'super pimp' RCV CVJ axles. I installed those while I had everything torn out. That will be a separate write-up if I decide to keep them. So far the entire process has been a disaster. I'm not one to start ranting or throwing around negative reviews, but everything has been a challenge to say the least. I may be the first person to have ordered them (and at that price point I understand why). They have been very accomodating and said satisfaction guranteed, but we are not there yet. Will test them this week. Thanks!
__________________
In addition to the "Like" clicky, can we also get a "Throat Punch" clicky?
|
|
|
Reply With Quote
|
|
03-07-2013, 04:27 PM
|
#53
|
 |
Member
|
|
Join Date: Nov 2009
Location: Alturas, CA
Age: 32
Posts: 720
Real Name: Matt
|
|
|
Member
Join Date: Nov 2009
Location: Alturas, CA
Age: 32
Posts: 720
Real Name: Matt
|
This. Thread. Is. Awesome.
I wish I could see the look on some lowlife's face when they try to steal your cat, and see the 2 middle fingers looking down at them...
__________________
97 4Runner SR5 5 Speed Swap, ARB bumper - Warn M8000 winch - Custom rear bumper w/ tire carrier - Dual Jerry Can Carrier - Dual Optima Batteries - BlueSea Battery Isolator and Charger -Rear E-locker retrofit- ARB Front Locker - ARB Compressor - Hiflow exaust - ISR/deckplate mod - Trail Gear sliders - Tepui Kukenam Rooftop Tent - JDM Field Monitor Unit - 170 Amp Alternator - Bilstein 5125's - OME 861's - Toytec Coilovers - Camburg UCA's - 1" Toytec BL - 315/75/16 STT Pro's on Tacoma TRD wheels
|
|
|
Reply With Quote
|
|
03-07-2013, 05:29 PM
|
#54
|
|
Member
|
|
Join Date: Jan 2012
Location: St. Louis
Posts: 142
|
|
|
Member
Join Date: Jan 2012
Location: St. Louis
Posts: 142
|
Have you driven it on the highway with those caster numbers yet? That is where mine is and it is a bit scary. The steering is twitchy and unpredictable I need to go back and get it set a little higher but have two wheeing trips planned and dont want to get it fixed before that because it will just get messed up again.
|
|
|
Reply With Quote
|
|
03-07-2013, 05:49 PM
|
#55
|
 |
Senior Member
|
|
Join Date: Dec 2007
Location: Castle Rock, CO
Age: 34
Posts: 2,337
Real Name: Jeff
|
|
|
Senior Member
Join Date: Dec 2007
Location: Castle Rock, CO
Age: 34
Posts: 2,337
Real Name: Jeff
|
Looking good!
Just curious, where did you purchase the LR UCA's from? And when? Looks like they have the old style bushings. They are notorious for going out after 8-10K miles. SPC came out with a new style bushing for those and have been selling them for over a year now. Just a heads up.
__________________
3RDGENS.COM
My Video's
'96 Limited - October '08 T4R Of The Month (Sold)
'00 SR5 - Lifted/Supercharged/E-locker
'16 SR5 Barcelona Red
|
|
|
Reply With Quote
|
|
03-07-2013, 06:08 PM
|
#56
|
 |
Member
|
|
Join Date: Oct 2010
Location: Midwest
Posts: 393
|
|
|
Member
Join Date: Oct 2010
Location: Midwest
Posts: 393
|
It's awesome to see people that are the original owners of the 4runners on here. It even more awesome to see people like you, who, 290k later have it not only running like a top, but looking like this as well. A true testament to how much you love the the vehicle!
Are the engine and transmission original as well?
__________________
1997 4runner. Sr5. 5speed. 191k.
|
|
|
Reply With Quote
|
|
03-08-2013, 04:08 AM
|
#57
|
 |
Senior Member
|
|
Join Date: May 2009
Location: ABQ, NM, USA
Posts: 2,870
|
|
|
Senior Member
Join Date: May 2009
Location: ABQ, NM, USA
Posts: 2,870
|
"LOSS CAT".... 
Thanks for posting the pictures of the rear tire carrier work. It helped me with some ideas for mine. Those cat protection plates are pretty nice.. they do look like a total PITA to make though. I'm thinking of welding up a test pipe for my rig and running a URD O2 simulator at the back. Then I can just drop the stock pipe & cats out, run with no cats until it's time for emissions, then put the stock pipe back in for a day or two to get tested.
I appreciate the mention on the limit straps. I think they're a really good idea, especially when you start adding a bunch of extra droop to the front end. I'm dreading the UBJ job. If the first one gives me hell, the second one is going to a shop w/the whole spindle to get pressed out.
Quote:
|
It's like when your playing pool and you make a couple shots in a row and you start struttin' around like you're gonna shark the whole bar, then you miss everything else
|
So true.
PS. Those alignment specs are not too bad. I read what gs300tt posted, and I would have to disagree. I'm running with less caster than that on the front of my '01, and and it doesn't feel bad at all.
|
|
|
Reply With Quote
|
|
03-08-2013, 01:17 PM
|
#58
|
|
Member
|
|
Join Date: Jan 2013
Location: Atlanta, GA
Age: 51
Posts: 237
Real Name: Steve
|
|
|
Member
Join Date: Jan 2013
Location: Atlanta, GA
Age: 51
Posts: 237
Real Name: Steve
|
Quote:
Originally Posted by Stockwell45
This. Thread. Is. Awesome.
I wish I could see the look on some lowlife's face when they try to steal your cat, and see the 2 middle fingers looking down at them...
|
Ha! Thanks!!! When I got the alignment I saw the tech do a double take as it was going up on the lift. A few of them were taking cell phone pics of it.
Quote:
Originally Posted by gs300tt
Have you driven it on the highway with those caster numbers yet? That is where mine is and it is a bit scary. The steering is twitchy and unpredictable I need to go back and get it set a little higher but have two wheeing trips planned and dont want to get it fixed before that because it will just get messed up again.
|
It rides like a dream on the highway now. At 70mph it is smooth, straight and steering is effortless. Best it's felt in years. If I hadn't read too much on the internet I'd be happy as a lark right now. But, I was hoping for closer to 3 degrees positive caster and just knowing that it's available makes me want it. With the lift and tires, these arms are a huge improvement.
Maybe get a new alignment, and maybe even at a different shop. I've had a few questionable alignments and some really bad tire balancing jobs in the past.
Quote:
Originally Posted by sn0wrunner
Looking good!
Just curious, where did you purchase the LR UCA's from? And when? Looks like they have the old style bushings. They are notorious for going out after 8-10K miles. SPC came out with a new style bushing for those and have been selling them for over a year now. Just a heads up.
|
Dangit! You're right. Good eye and thanks for the heads up. I got them from Toytec, but last May. I had a mystery noise coming from the right front. Found a torn UBJ boot and assumed it was the culprit and it gave me an excuse to get new UCA's. However, replaced poly sway bar bushings with OEM rubber and noise went away. So these have been sitting on my shelf while I worked up the courage and built up my biceps for the install.
I called SPC after reading your post and inquired. They are a great company do deal with by the way. I've had them on the phone 2x in the past week and they've been awesome. The new bushings are headed my way. They offered to send me new arms, and I would return mine. But I'm okay with swapping the bushings when these start to chirp. So probably in about a year I will freshen them up. Pulling the LR UCA is easy and everything is a simple bolt in/out modular replacement, including the ball joint.
Thanks again. I had no idea.
Quote:
Originally Posted by madbomber08
It's awesome to see people that are the original owners of the 4runners on here. It even more awesome to see people like you, who, 290k later have it not only running like a top, but looking like this as well. A true testament to how much you love the the vehicle!
Are the engine and transmission original as well?
|
Thank you! I really appreciate it.
Yes. Original engine and transmission. Someday the inevitable will happen and will likely need a replacement, but they have been great. In fact, I was loosely planning on driving it back out West (I grew up in CA) this summer, wheelin' the piss out of it, then driving it home. Didn't even hesitate to start to plan the trip. However, accidentally got the wife pregnant again and due date is in July. Don't drink wine in Sonoma, Co, CA ;) Seems to be the culprit. So maybe I'll reschedule the trip for next year. KOH, Rubi, or Moab are likely destinations. I figured it out one time that me, my 4Runner, and my late dog (RIP) have been in 23 different states. Pretty cool.
Quote:
Originally Posted by BigFishAllDay
"LOSS CAT"....
Thanks for posting the pictures of the rear tire carrier work. It helped me with some ideas for mine. Those cat protection plates are pretty nice.. they do look like a total PITA to make though. I'm thinking of welding up a test pipe for my rig and running a URD O2 simulator at the back. Then I can just drop the stock pipe & cats out, run with no cats until it's time for emissions, then put the stock pipe back in for a day or two to get tested.
I appreciate the mention on the limit straps. I think they're a really good idea, especially when you start adding a bunch of extra droop to the front end. I'm dreading the UBJ job. If the first one gives me hell, the second one is going to a shop w/the whole spindle to get pressed out.
PS. Those alignment specs are not too bad. I read what gs300tt posted, and I would have to disagree. I'm running with less caster than that on the front of my '01, and and it doesn't feel bad at all. |
No Cats! I like that idea even better.
Your build is so helpful for me and all the rest of the 3rd gen crowd. Everytime I get an idea, I just go to your pg 1 with the "table of contents" and see if you have already done it. I used your pics for reference on the limit strap brackets. It is depressing how little droop we have left. 2in! Woohoo. :corkgun: (not a real emoji, but it would fit here).
Alignment feels great. I just can't seem to walk away and leave that degree of remaining +caster on the table.
Thanks again!
__________________
In addition to the "Like" clicky, can we also get a "Throat Punch" clicky?
|
|
|
Reply With Quote
|
|
03-08-2013, 01:34 PM
|
#59
|
|
Senior Member
|
|
Join Date: Dec 2007
Location: Castle Rock, CO
Age: 34
Posts: 2,337
Real Name: Jeff
|
|
|
Senior Member
Join Date: Dec 2007
Location: Castle Rock, CO
Age: 34
Posts: 2,337
Real Name: Jeff
|
Glad I could help! They did the same for me. SPC is great to work with. Like you said swapping them won't be bad, you already got the adapter pressed into the spindle. That was the biggest pain for me.
__________________
3RDGENS.COM
My Video's
'96 Limited - October '08 T4R Of The Month (Sold)
'00 SR5 - Lifted/Supercharged/E-locker
'16 SR5 Barcelona Red
|
|
|
Reply With Quote
|
|
03-08-2013, 01:48 PM
|
#60
|
|
Member
|
|
Join Date: Jan 2013
Location: Atlanta, GA
Age: 51
Posts: 237
Real Name: Steve
|
|
|
Member
Join Date: Jan 2013
Location: Atlanta, GA
Age: 51
Posts: 237
Real Name: Steve
|
Strapped!
Limit Straps:
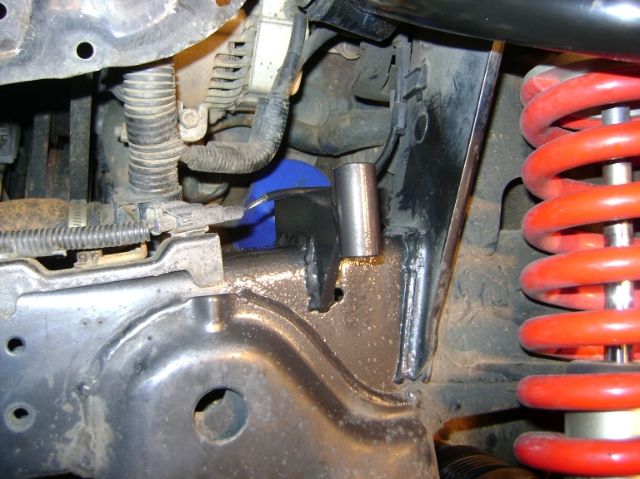
RCV tells me I can beat on the axles up to a 28 degree angle at the inboard joint and 45 degrees at the outboard joint. No need to worry about that. Even at full droop, it only gets to 23 degrees. I backed it off a little bit to allow for some stretch and strapped it at around 21.
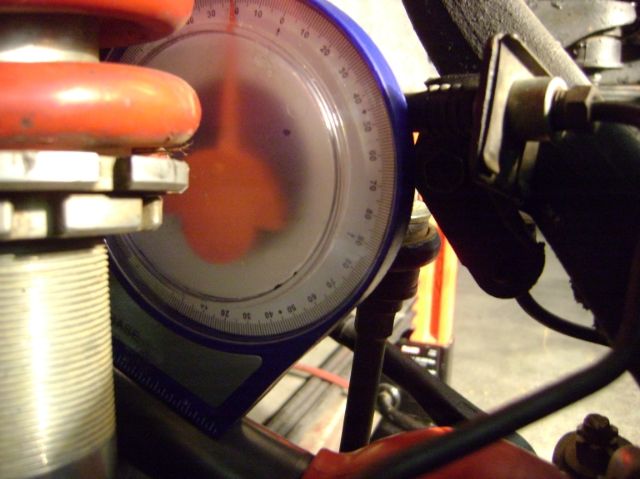
Sorry! Still can't get the new version of photobucket to cooperate. 
__________________
In addition to the "Like" clicky, can we also get a "Throat Punch" clicky?
|
|
|
Reply With Quote
|
 Posting Rules
|
You may not post new threads
You may not post replies
You may not post attachments
You may not edit your posts
HTML code is On
|
|
|
|


 Linear Mode


