 08-28-2013, 10:26 AM
|
#31
|
 |
official vendor
|
|
Join Date: Aug 2013
Location: Eugene, OR
Posts: 5,313
Real Name: Mike
|
|
|
official vendor
Join Date: Aug 2013
Location: Eugene, OR
Posts: 5,313
Real Name: Mike
|
Quote:
Originally Posted by the kid

LC 9 wraps.... they will give you 5-6" lift empty but with the load you will have you should sit about 3.5-4" in the back and still have a good ride and crazy flex
sorry i didnt realize you would have that kinda load, i guess i just missed that part of things my bad -see arent you glad you posted up here and others chimed in with their thoughts?
|
Very glad. I'm not really sure on the weight of a new bumper, and I'm sure the platform with storage will at least be 100lbs. If we take our backpacking gear, maybe another 60-70lbs. The weight in the rear of course will very with every trip, some will have more weight, and some might not have any.
It seems like the LC 9 wraps would give it a lot of rake with just 3" in the front.
|

|
 Reply With Quote Reply With Quote
|
|
08-28-2013, 10:33 AM
|
#32
|
 |
Elite Member
|
|
Join Date: Nov 2010
Location: Earth
Posts: 6,453
Real Name: Isaac
|
|
|
Elite Member
Join Date: Nov 2010
Location: Earth
Posts: 6,453
Real Name: Isaac
|
yeah if you are going light they would give a good amount of rake. its the reason im not gonna run mine till i have a rear bumper on my runner. your other option is a set of LC 7 wraps or the OME 891s, with a set of air bags to keep the height under load
__________________
if a*sholes could fly this place would be an airport -2004 GX470 spm -97 SR5 3.4, SCS Stealth 6's w/305 70 17s MTRs, Icon 2.5" RR w/700#coils, OME861s w/Icon tacoma 2.0 RR, ARBs w/nitro 4.88, PIAA LED lights, 170amp CS144, ARB snorkel, ARB bumper w/xd9000ce, CBI swingout loaded, BudBuilt skids, lil skip tank skid, sliders, LCE 231s(d&s), first gen roll bar mod, LED interior/dash lighting, B&M 70624+perma cool w/electric fan, dual electric fanshttp://www.toyota-4runner.org/3rd-ge...ld-thread.html http://www.metaltech4x4.com/
|
|
|
Reply With Quote
|
|
08-28-2013, 10:54 AM
|
#33
|
|
official vendor
|
|
Join Date: Aug 2013
Location: Eugene, OR
Posts: 5,313
Real Name: Mike
|
|
|
official vendor
Join Date: Aug 2013
Location: Eugene, OR
Posts: 5,313
Real Name: Mike
|
Quote:
Originally Posted by the kid
yeah if you are going light they would give a good amount of rake. its the reason im not gonna run mine till i have a rear bumper on my runner. your other option is a set of LC 7 wraps or the OME 891s, with a set of air bags to keep the height under load
|
I might just stick with the 891's. Would you still recommend getting air bags with those springs?
|
|
|
Reply With Quote
|
|
08-28-2013, 10:57 AM
|
#34
|
|
Elite Member
|
|
Join Date: Nov 2010
Location: Earth
Posts: 6,453
Real Name: Isaac
|
|
|
Elite Member
Join Date: Nov 2010
Location: Earth
Posts: 6,453
Real Name: Isaac
|
yeah it wouldnt be a bad idea, if for nothing else you can really fine tune the spring rate with the air bags, if you dont like the ride or its too soft then add a little air, or if you are dragging to much butt then put some air in the level it out. i run air bags and i love them.
__________________
if a*sholes could fly this place would be an airport -2004 GX470 spm -97 SR5 3.4, SCS Stealth 6's w/305 70 17s MTRs, Icon 2.5" RR w/700#coils, OME861s w/Icon tacoma 2.0 RR, ARBs w/nitro 4.88, PIAA LED lights, 170amp CS144, ARB snorkel, ARB bumper w/xd9000ce, CBI swingout loaded, BudBuilt skids, lil skip tank skid, sliders, LCE 231s(d&s), first gen roll bar mod, LED interior/dash lighting, B&M 70624+perma cool w/electric fan, dual electric fanshttp://www.toyota-4runner.org/3rd-ge...ld-thread.html
http://www.metaltech4x4.com/
|
|
|
Reply With Quote
|
|
08-28-2013, 11:22 AM
|
#35
|
|
official vendor
|
|
Join Date: Aug 2013
Location: Eugene, OR
Posts: 5,313
Real Name: Mike
|
|
|
official vendor
Join Date: Aug 2013
Location: Eugene, OR
Posts: 5,313
Real Name: Mike
|
Quote:
Originally Posted by the kid
yeah it wouldnt be a bad idea, if for nothing else you can really fine tune the spring rate with the air bags, if you dont like the ride or its too soft then add a little air, or if you are dragging to much butt then put some air in the level it out. i run air bags and i love them.
|
I might go ahead and do that. Thanks a lot
|
|
|
Reply With Quote
|
|
08-29-2013, 10:19 AM
|
#36
|
|
official vendor
|
|
Join Date: Aug 2013
Location: Eugene, OR
Posts: 5,313
Real Name: Mike
|
|
|
official vendor
Join Date: Aug 2013
Location: Eugene, OR
Posts: 5,313
Real Name: Mike
|
Thanks for all the help. I'm won't be doing any work for a week as so, since we're heading out to Colorado for a little backpacking. We plan on doing a couple nights of dispersed camping near Stillwater Pass. From there we'll head into the Never Summer Wilderness for a couple nights a backpacking. The only downfall to the trip is we're not taking the 4runner, instead we'll be taking our other Jeep. I'll get some pictures up when we get back.
|
|
|
Reply With Quote
|
|
09-15-2013, 06:53 PM
|
#37
|
|
official vendor
|
|
Join Date: Aug 2013
Location: Eugene, OR
Posts: 5,313
Real Name: Mike
|
|
|
official vendor
Join Date: Aug 2013
Location: Eugene, OR
Posts: 5,313
Real Name: Mike
|
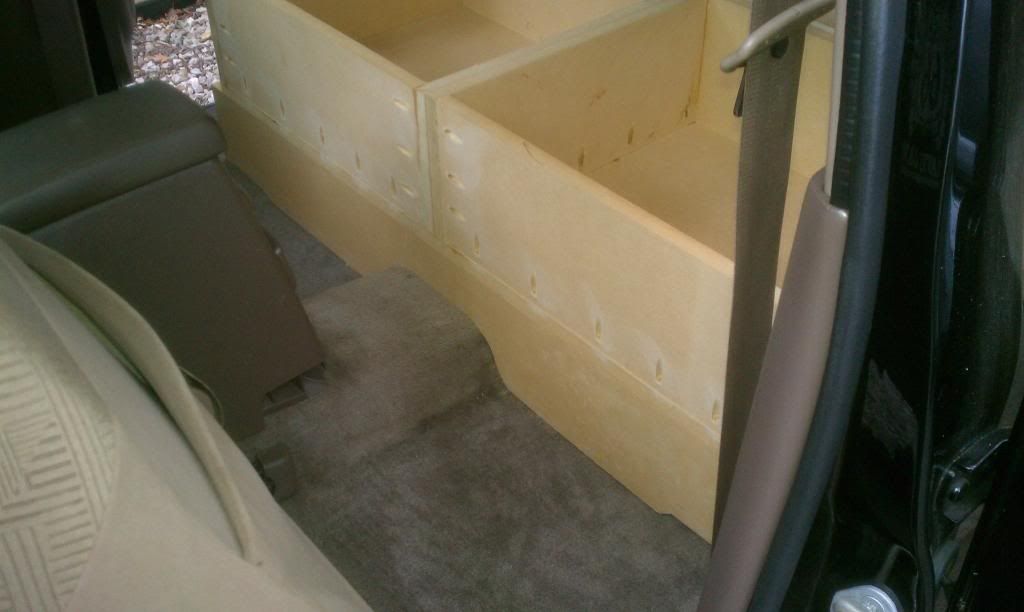
Started getting some interior work done today. The is to order our suspension this coming Friday and install it the first weekend in October.
I was able to get some work done on the beginning stages of the sleeping platform. I'm building two individual drawers with a small opening in between for something (don't know what yet).
Started by removing the backing on the seats.
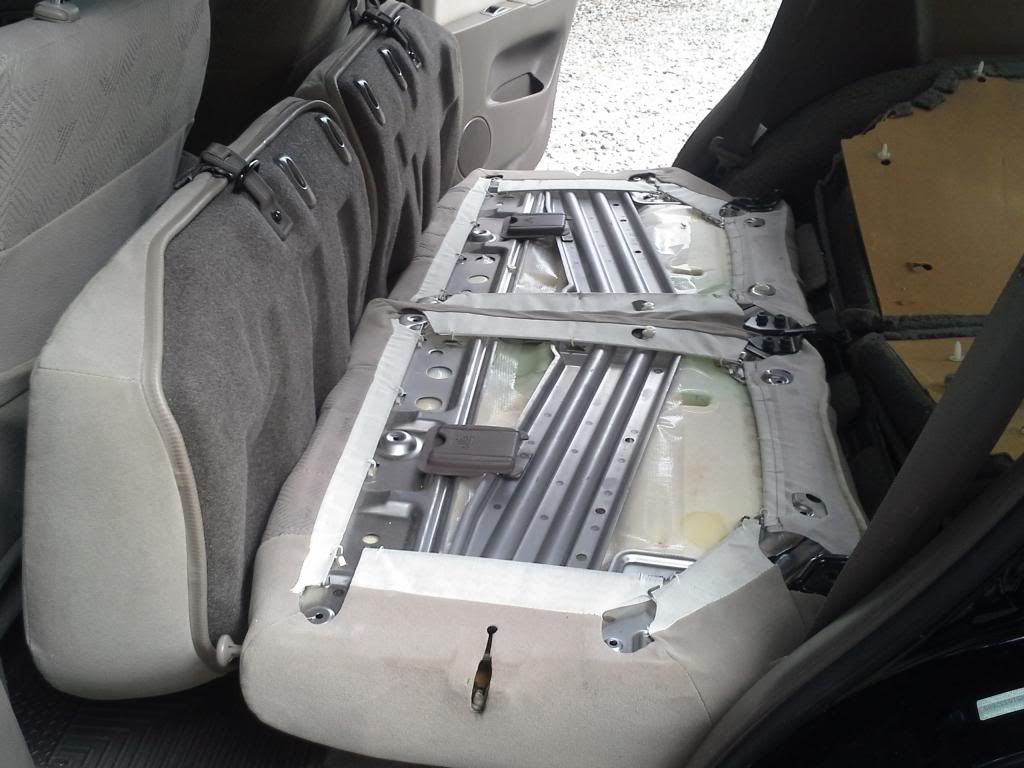
Seat backs are out, and so are the cushions (just no picture).
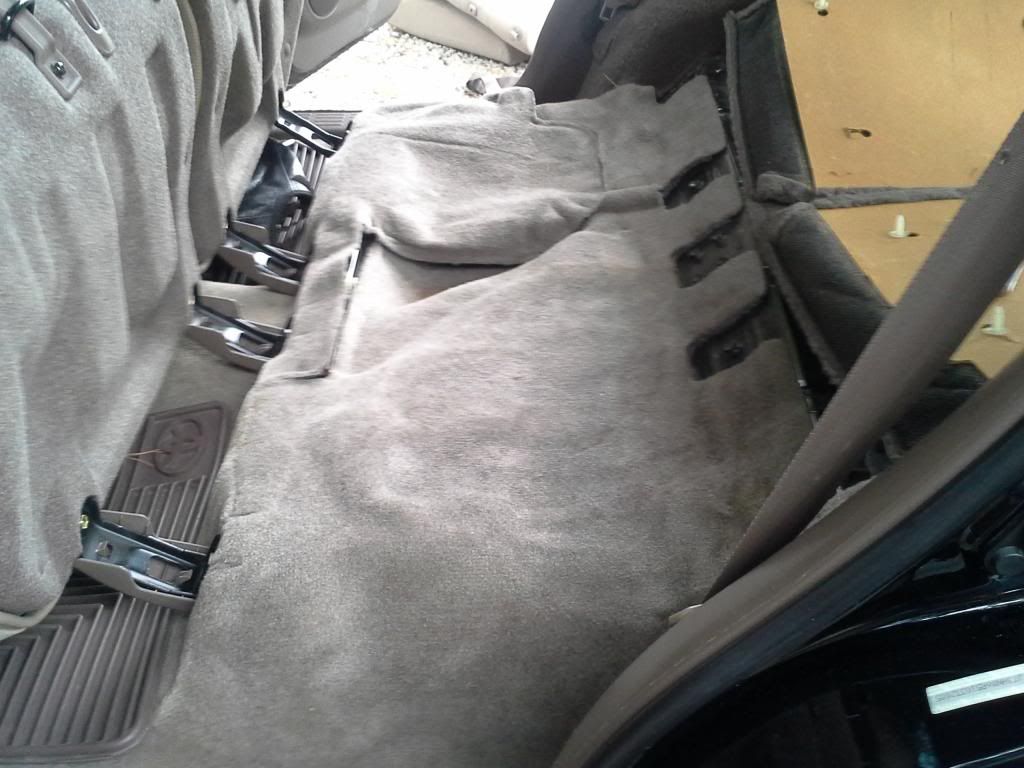
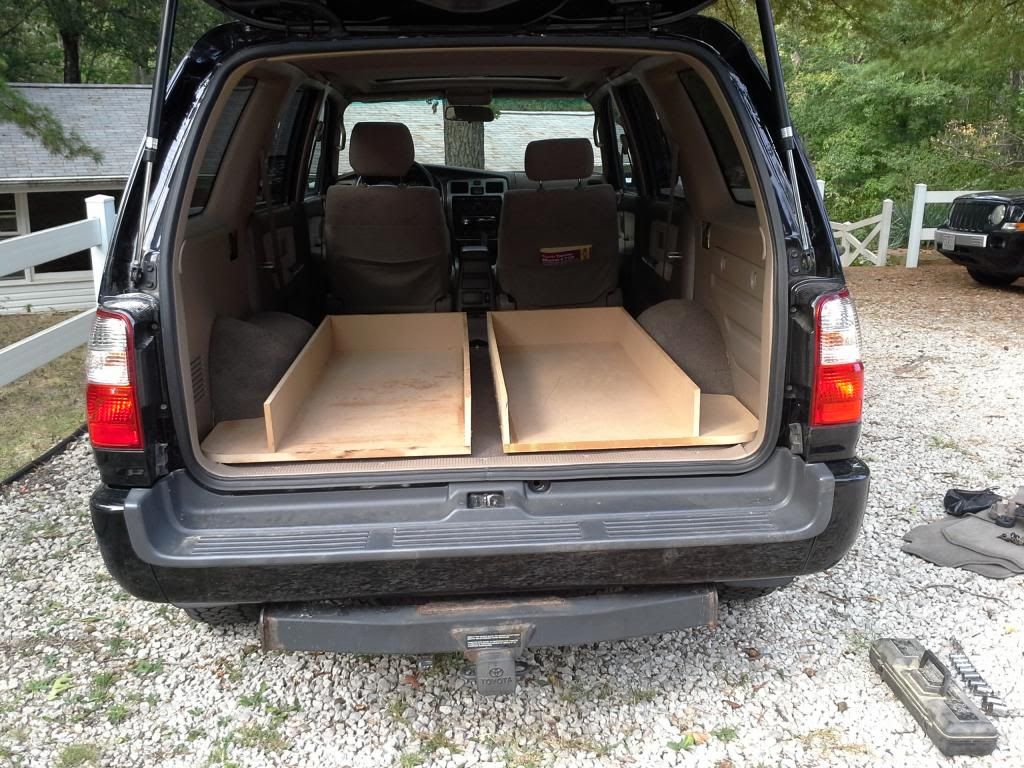
We took the rear seat completely out since this is going to be a dedicated camping car. We also doubt there will ever be a passenger riding along with us, and if by chance there we'll figure that part out.
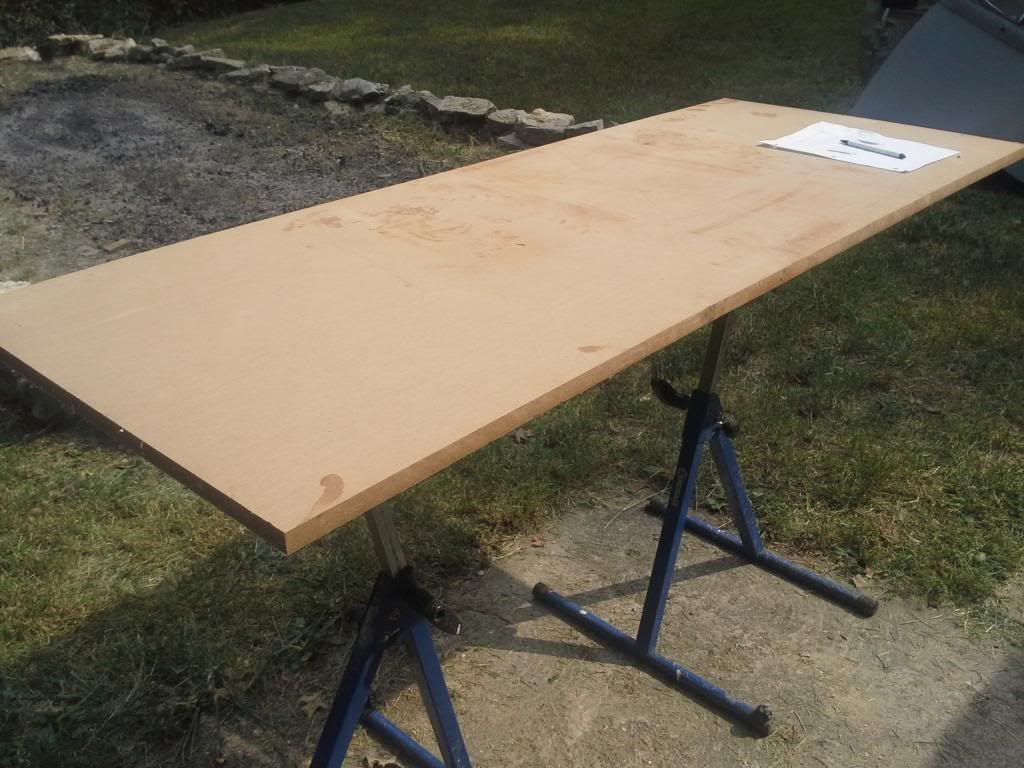
Two pieces of wood the same size, one for each side.
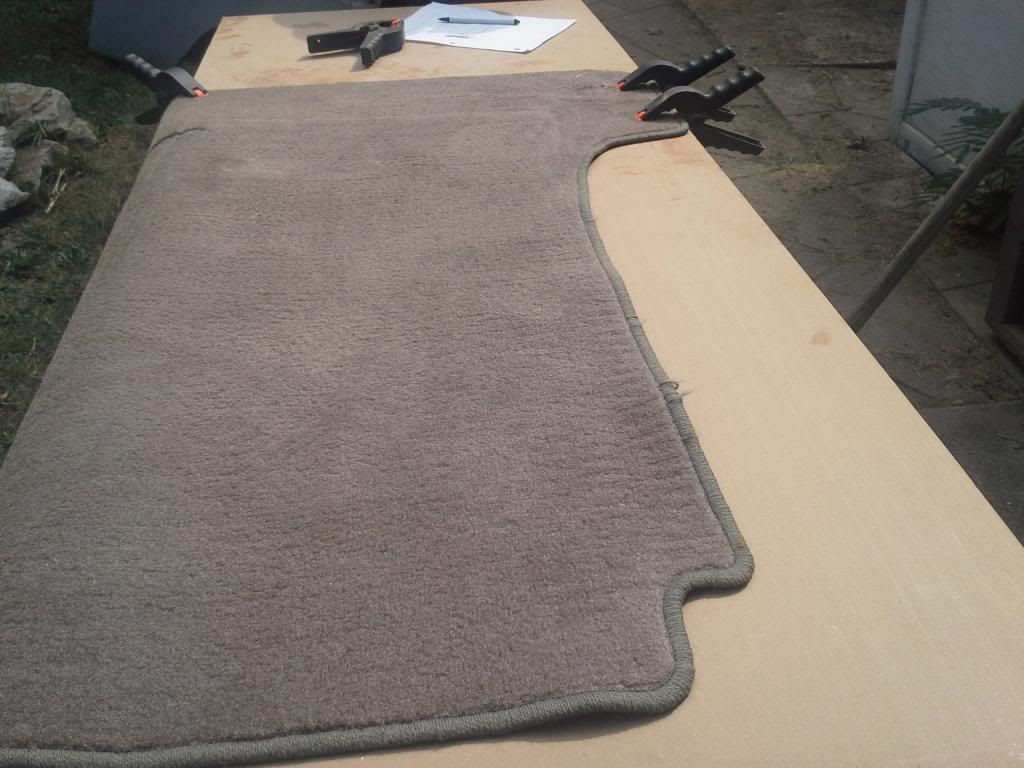
We started by using the cargo mat as a template for the wheel well opens.
Four side were cut to the same length and pocket drilled with a Kreg Jig.

Both bottoms cut and fitting the sides to them, as well as the back.
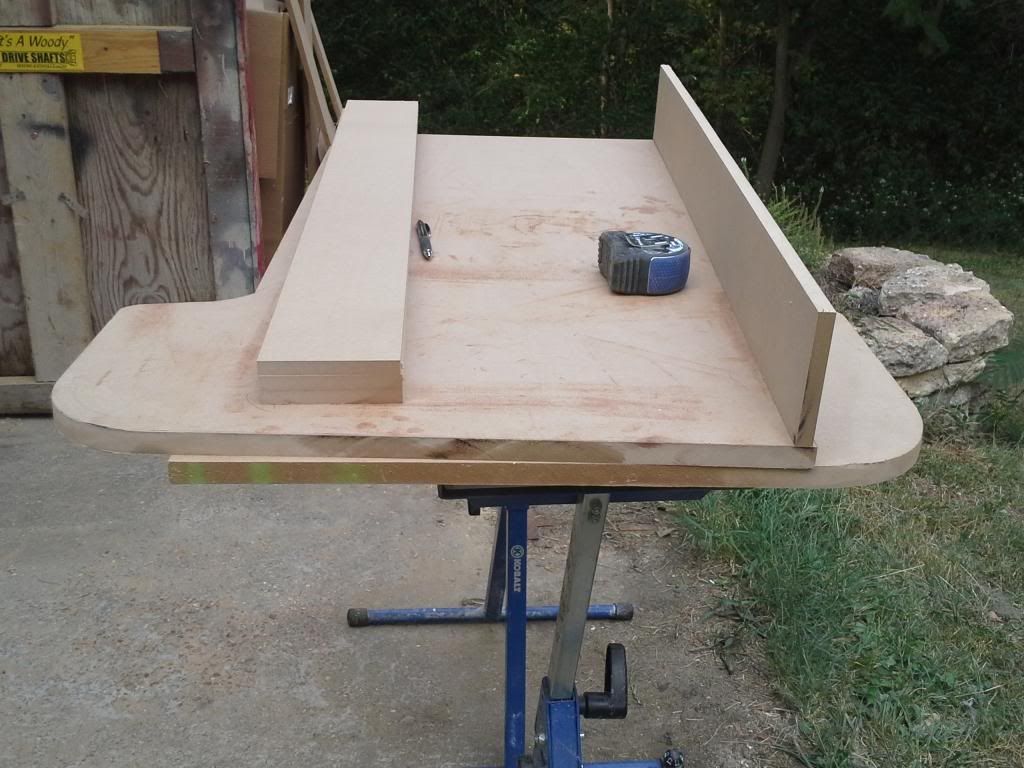
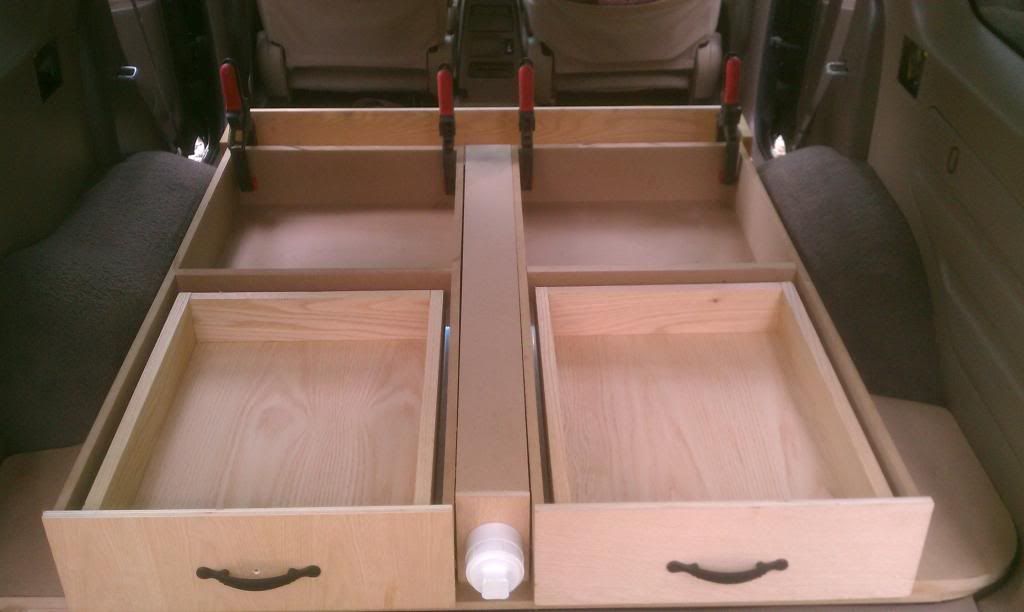
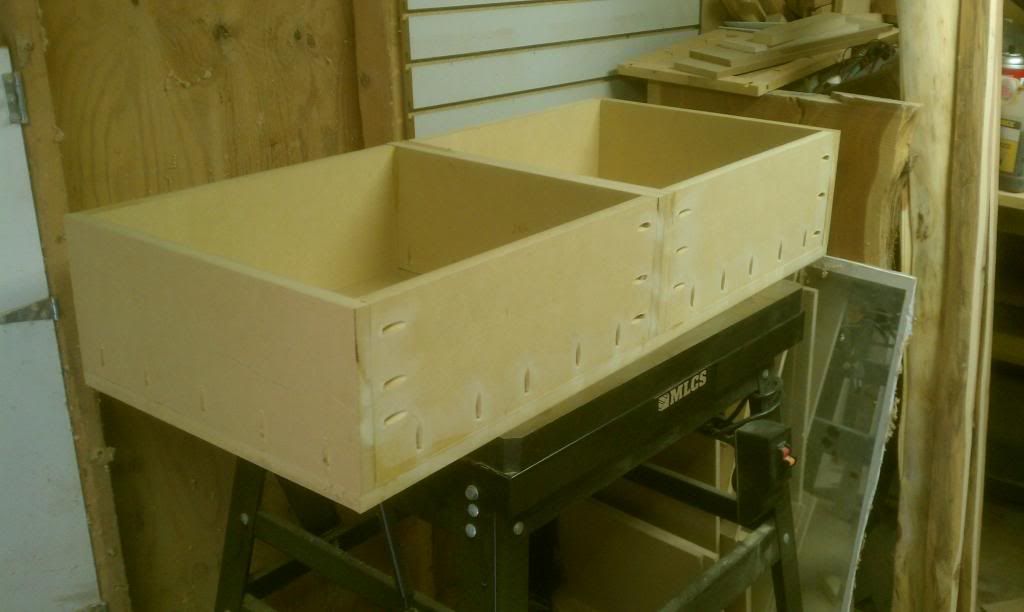
Both compartment in place. I plan on building a small box in between the two halves.
The overall height of the platform is going to be roughly 5-3/4" with 4-1/4" drawers. With the drawer roughly being 16" wide and 40" deep. The trick is going to find drawer slide long enough to support drawers that long. Hopefully I get some more done this week.
|
|
|
Reply With Quote
|
|
09-16-2013, 08:34 PM
|
#38
|
|
official vendor
|
|
Join Date: Aug 2013
Location: Eugene, OR
Posts: 5,313
Real Name: Mike
|
|
|
official vendor
Join Date: Aug 2013
Location: Eugene, OR
Posts: 5,313
Real Name: Mike
|
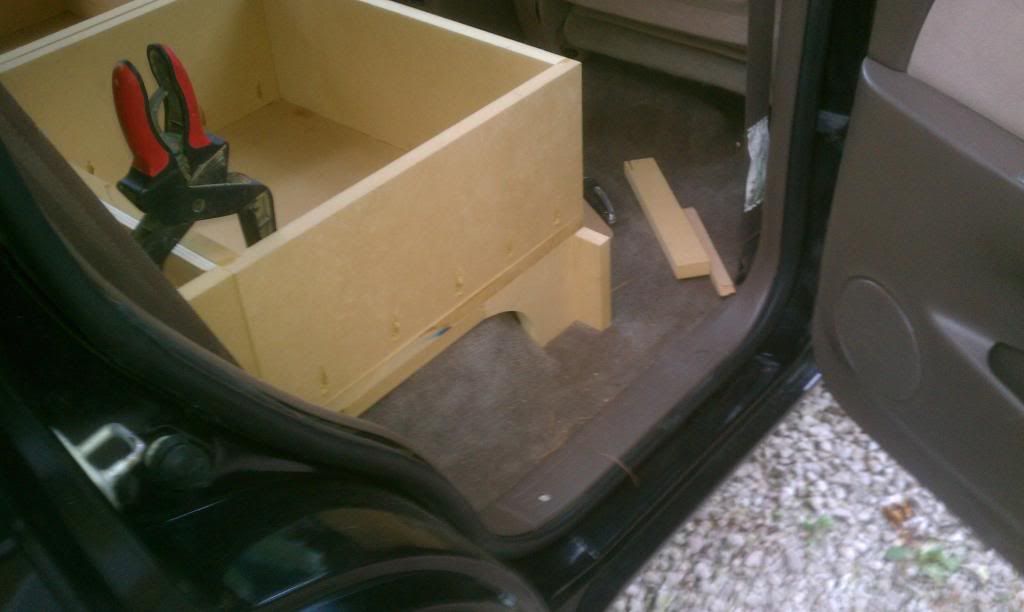
Not as much progress as I hoped for from today. Still though, I was able to get more done, and will be back at it tomorrow.
I have no pictures of this, but I added an extra 1/2" of sheathing to the bottom of my drawers. With as long as they are, they sat on the lip just behind where the back seats were. Without the extra 1/2" there was a nice gap under the drawers and the carpet. After adding the extra sheathing, it pretty much leveled out the back end.
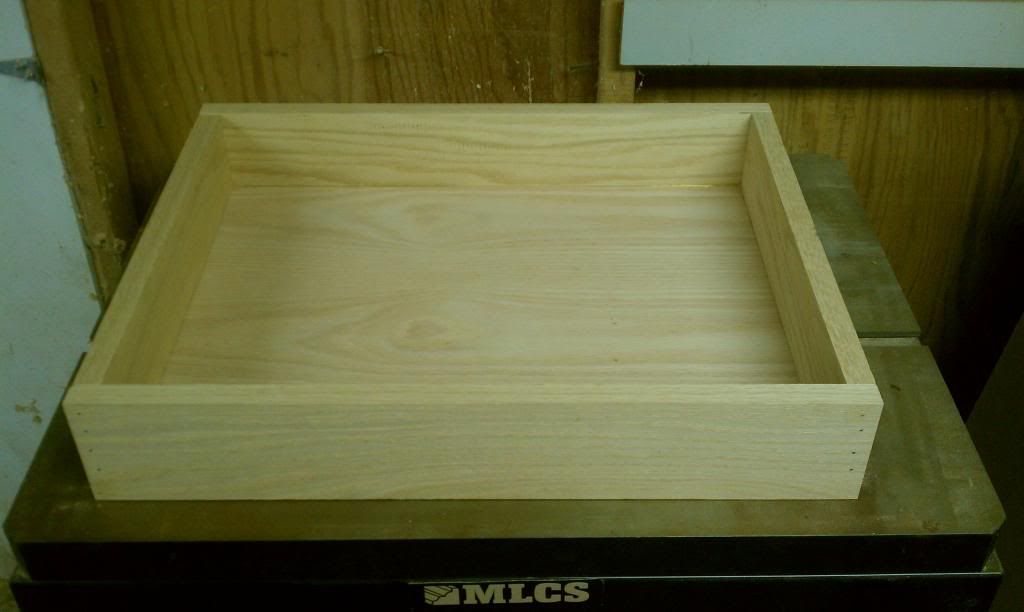
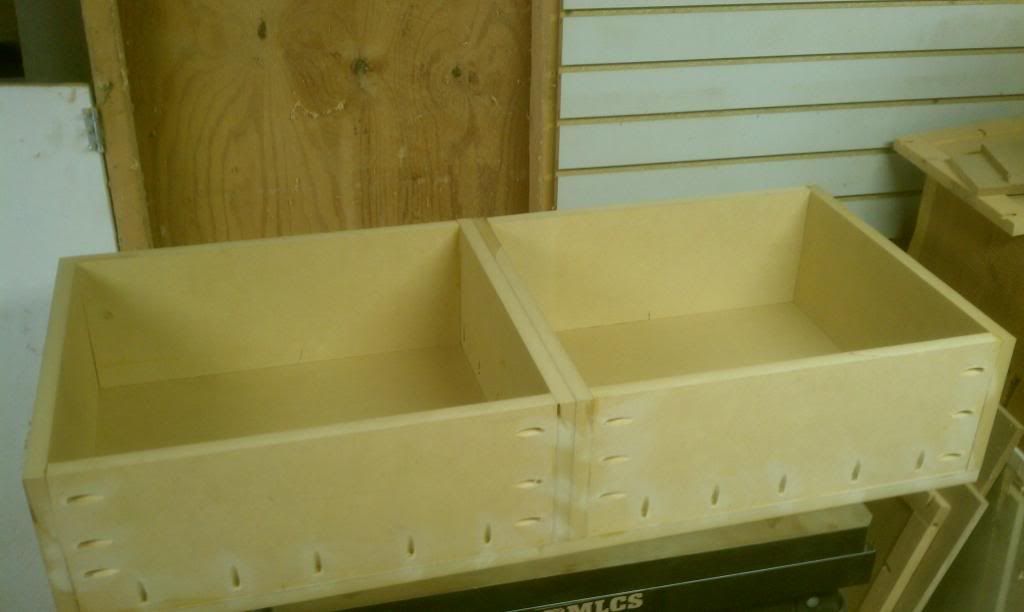
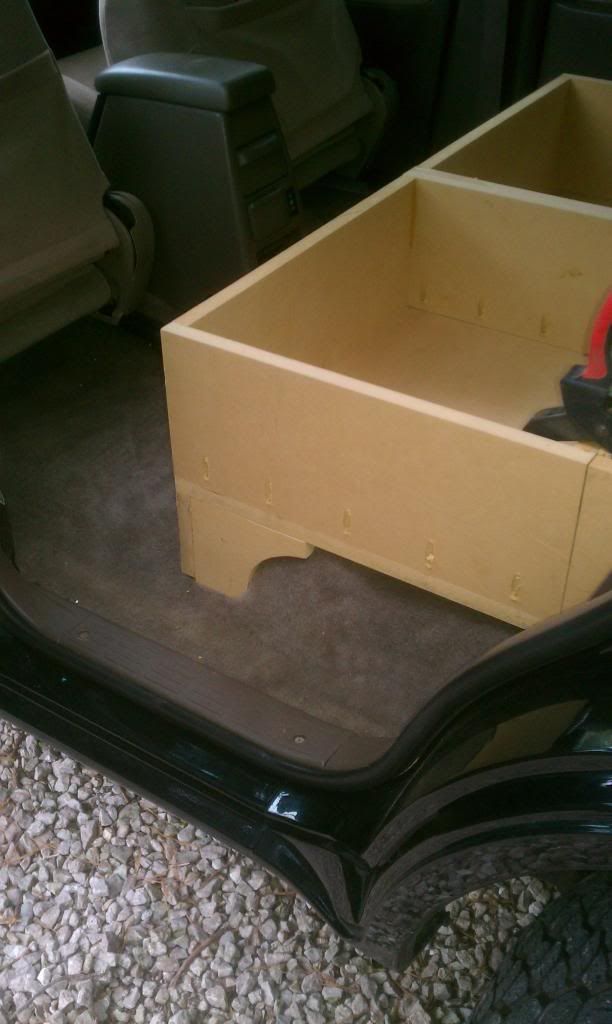
Fitting the drawer slides, both sides were the same so I'll just show one of them.

First drawer is done, both are the same as well.
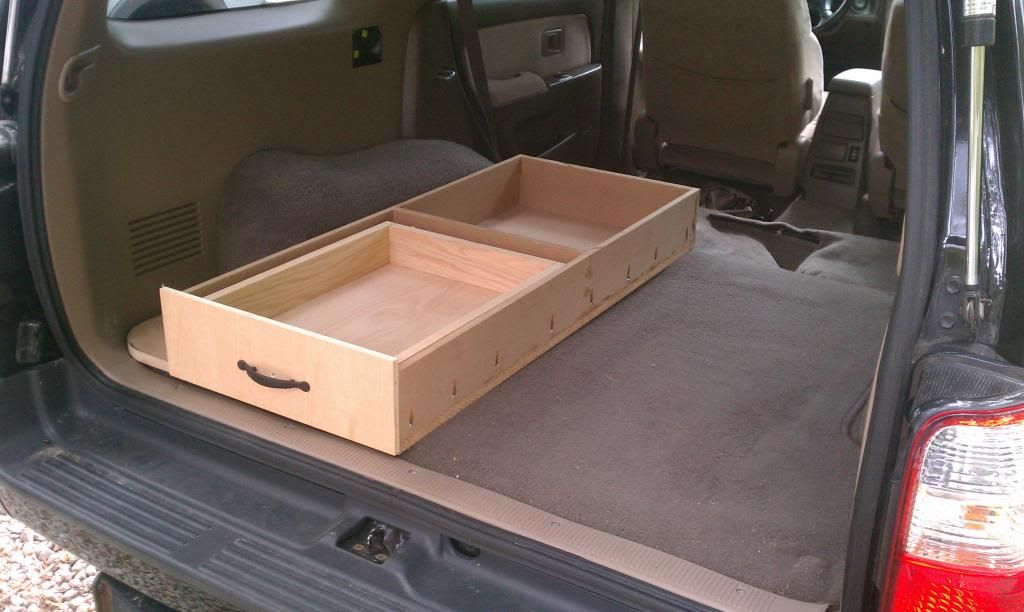
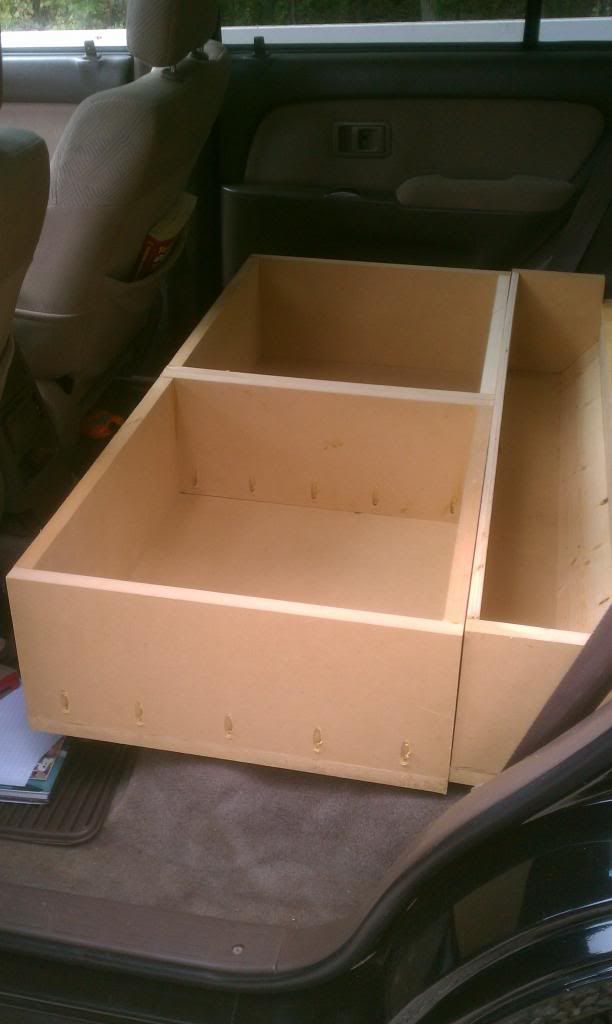
First drawer in place.
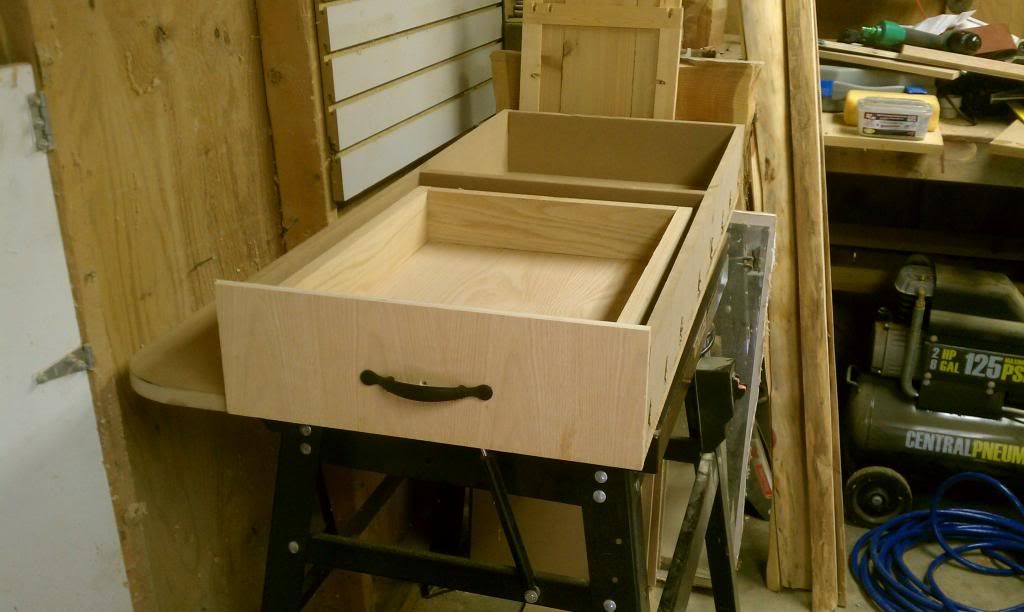
First drawer opened.
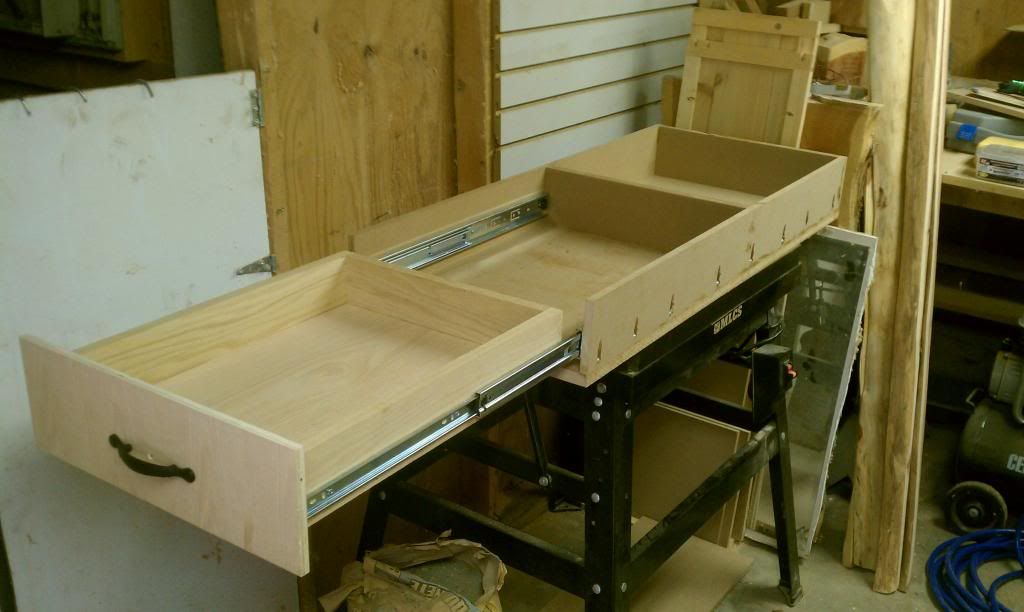
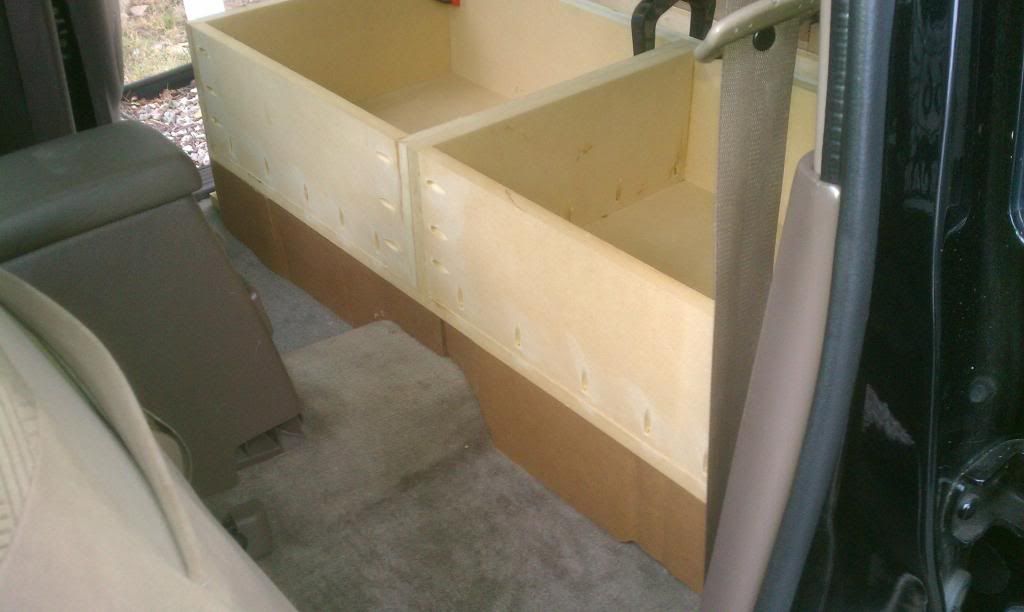
Drivers side in place.
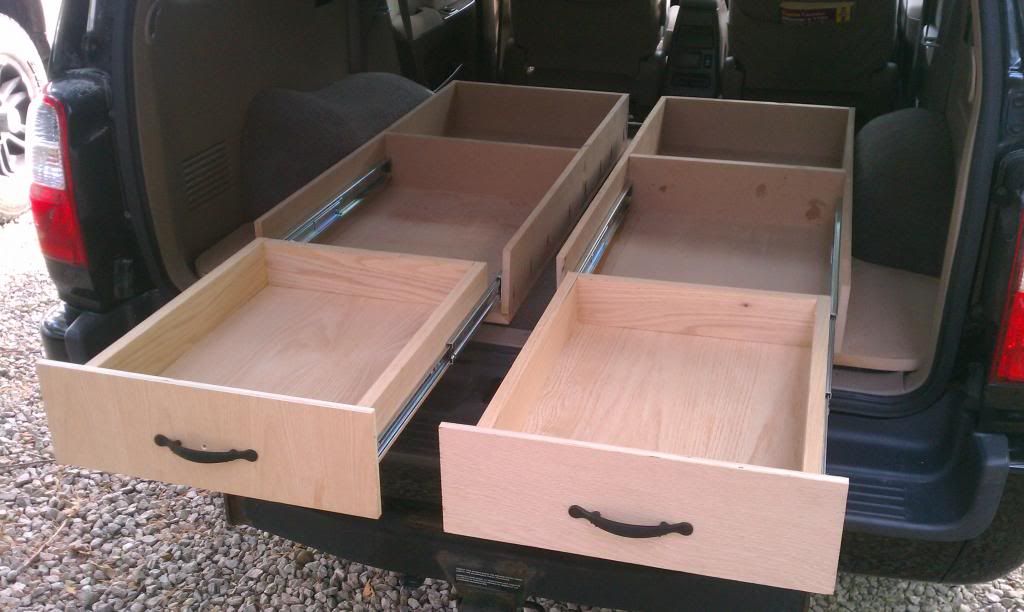
Both in place, and open they open just about the right distance.
Tomorrow I'm hoping to install two PVC tubes between the drawers and work on the section where the back seats were. At this point I have spend $0 on the entire platform. Hoping to complete the entire at no cost to me, with the exception of carpeting for the top.
|
|
|
Reply With Quote
|
|
09-17-2013, 11:22 AM
|
#39
|
|
official vendor
|
|
Join Date: Aug 2013
Location: Eugene, OR
Posts: 5,313
Real Name: Mike
|
|
|
official vendor
Join Date: Aug 2013
Location: Eugene, OR
Posts: 5,313
Real Name: Mike
|
Been at it for a couple hours now, and here is the progress so far. Still a lot more to come today though.
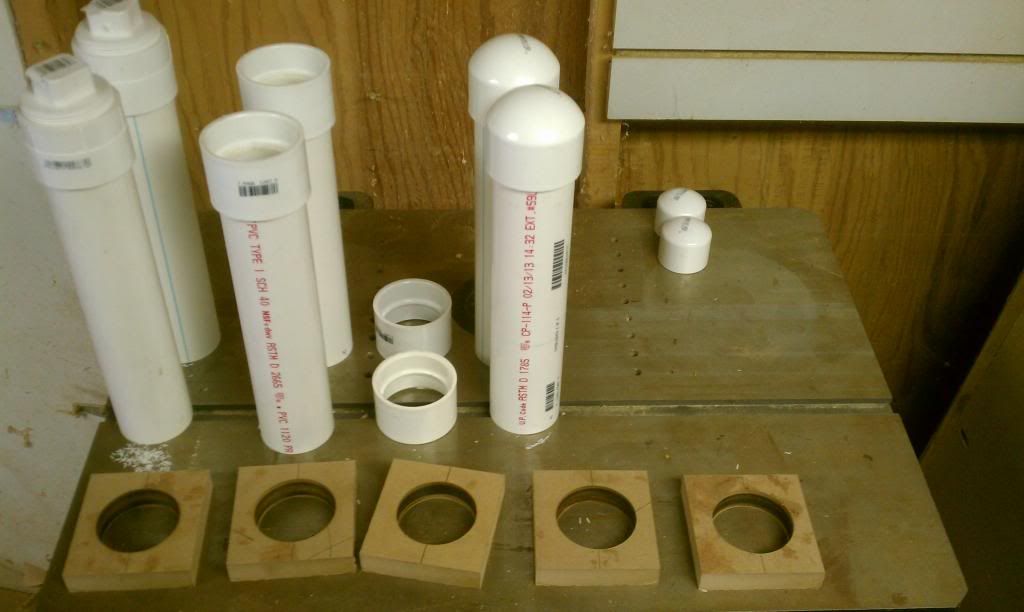
Got the PVC for my storage tubes cut. Spacer blocks cut and drilled to hold the tube. Used 2" sch40, and drilled out holes at 2-3/8".
All framed in.
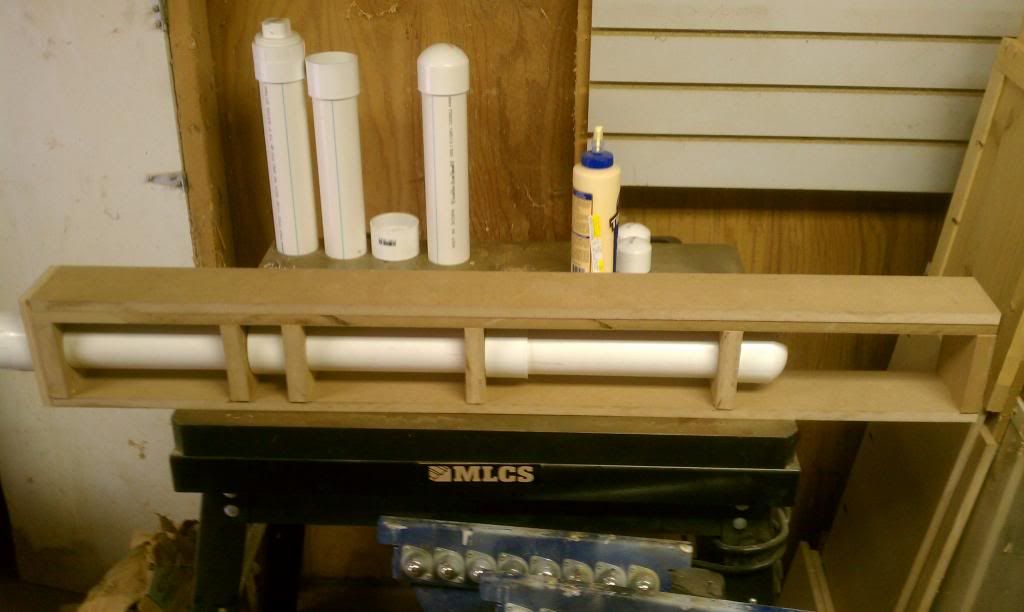
In the the 4runner.
 L]
This tube is going to hold the awning and frame that we're going to make for the back of the 4runner. Should be just about the right size to hold the material and old tent poles we're using I could have been about 10" longer, but I would have needed to spend money on that.
__________________

|
|
|
Reply With Quote
|
|
09-17-2013, 02:04 PM
|
#40
|
|
official vendor
|
|
Join Date: Aug 2013
Location: Eugene, OR
Posts: 5,313
Real Name: Mike
|
|
|
official vendor
Join Date: Aug 2013
Location: Eugene, OR
Posts: 5,313
Real Name: Mike
|
The next section is finished and in place. Now I'm ready to start the last section behind the front seats. The section I just did is cut to fit snugly against the drawer boxes in the rear. This box is most likely going to store our trekking poles or some other longer items.
The finished box.
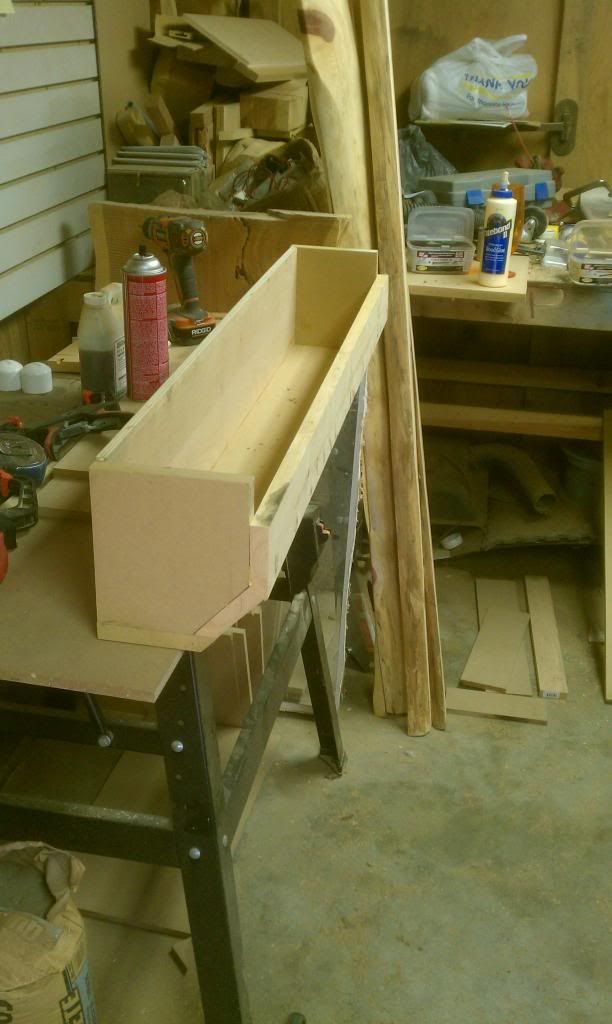
Test fit.
Test fit, with the next bottom section in place.
__________________
|
|
|
Reply With Quote
|
|
09-17-2013, 03:46 PM
|
#41
|
|
official vendor
|
|
Join Date: Aug 2013
Location: Eugene, OR
Posts: 5,313
Real Name: Mike
|
|
|
official vendor
Join Date: Aug 2013
Location: Eugene, OR
Posts: 5,313
Real Name: Mike
|
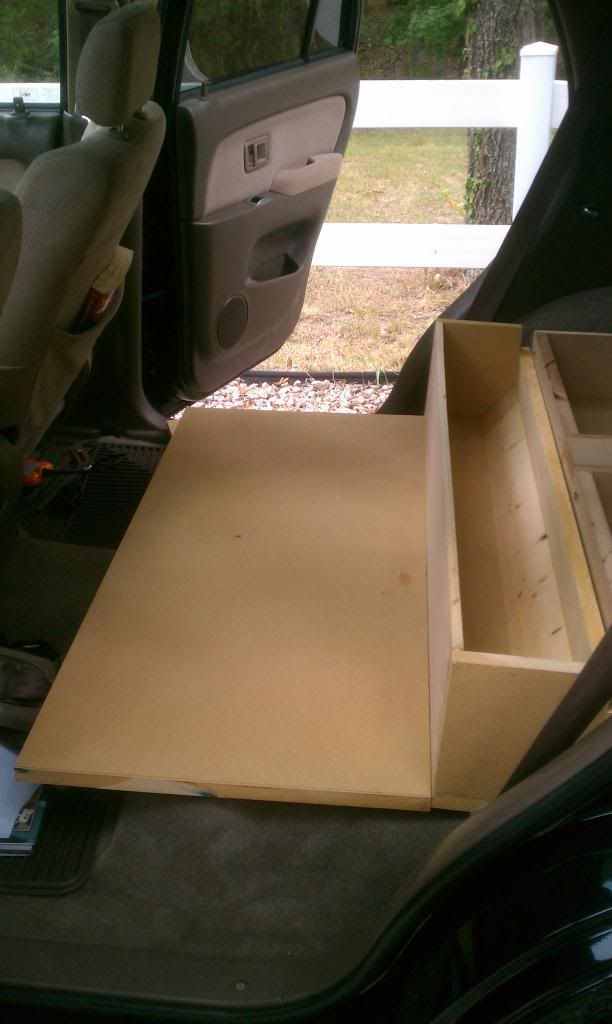
The final section is almost done. I decided to go with driver and passenger side boxes on this one. Both of these will most likely be hinged, but still not 100% sure. I'll skid the box building part since this is starting to get picture heavy.
The finished box. Two boxes, but only one platform.
Section in place.

I was really hoping to get 72" out of the platform but oh well. I'll have to make a removable piece to cover the last few inches.

I want to make a support section that goes under the lip on the box. It'll add support between the box and the floor behind the front seats. If anyone needs measurements or more information on what I've done feel free to ask.
__________________
|
|
|
Reply With Quote
|
|
09-17-2013, 04:21 PM
|
#42
|
 |
Senior Member
|
|
Join Date: Oct 2009
Location: Burnaby, BC
Posts: 2,019
Real Name: Ervin
|
|
|
Senior Member
Join Date: Oct 2009
Location: Burnaby, BC
Posts: 2,019
Real Name: Ervin
|
I've used biscuit jointer before but never the Kreg jig, and for someone who's had some fair share of woodworking experiences, I didn't know such a tool existed.
Great job with the drawers and the overall project................
__________________
97 4Runner SR5 TRDSC URD Yukon Camburg Toytec Trekmaster 4Crawler SonoranSteel Level8 Nitto SavageOff-Road ARB Smittybilt MasterPull Powertank SpiderTrax B&M Jaos Gobi Flowmaster Cobra Firestik Alpine CompuStar Hella PIAA RigidIndustries WeatherTech
my build http://www.toyota-4runner.org/3rd-ge...formation.html July 2012 T4RoTM / 2012 T4RoTY
|
|
|
Reply With Quote
|
|
09-17-2013, 05:37 PM
|
#43
|
|
official vendor
|
|
Join Date: Aug 2013
Location: Eugene, OR
Posts: 5,313
Real Name: Mike
|
|
|
official vendor
Join Date: Aug 2013
Location: Eugene, OR
Posts: 5,313
Real Name: Mike
|
Quote:
Originally Posted by blcktpgsr
I've used biscuit jointer before but never the Kreg jig, and for someone who's had some fair share of woodworking experiences, I didn't know such a tool existed.
Great job with the drawers and the overall project................
|
I do woodworking and remodeling for myself. The Kreg Jig is a great tool, and I find myself using it on a little of everything. I would like to have been able to use a biscuit jointer with the MDF, but that is the one tool I still don't have. I've been trying to make everything in individual cabinets since MDF isn't strongest. My theory is that by making them smaller with less open space, they will be less prone to breaking. Although, I must say that working with MDF is not my forte. If I had my way I would be using all live edge cedar to build this. But, who can argue with free!
__________________
Last edited by MStudt; 09-17-2013 at 05:40 PM.
|
|
|
Reply With Quote
|
|
09-17-2013, 05:49 PM
|
#44
|
|
official vendor
|
|
Join Date: Aug 2013
Location: Eugene, OR
Posts: 5,313
Real Name: Mike
|
|
|
official vendor
Join Date: Aug 2013
Location: Eugene, OR
Posts: 5,313
Real Name: Mike
|
So I made the main support going across the front of the box, and two small pieces for the sides. I need to do some leveling and shimming on the front. Everything seems to be pretty close from front to back, but I'm going to give it a once over to double check.
Made a template from some old cardboard I had.
Copied the template, started cutting, and ended up with this.
Did the same thing for the sides.
Of course I still need to make lids and tops for everything. Once that is done I'll be carpeting everything to match the original carpeting that inside.
On a side note, does anyone know if I still need working seat belts in the rear if the seat are removed? I'm only wondering for state inspections. I remember reading somewhere that all original seat belt locations must be working regardless of if there is a seat present or not. Of course that was in PA, and I'm in MO.
__________________
|
|
|
Reply With Quote
|
|
09-17-2013, 06:12 PM
|
#45
|
 |
Member
|
|
Join Date: Jul 2012
Location: Phoenix, AZ
Posts: 322
|
|
|
Member
Join Date: Jul 2012
Location: Phoenix, AZ
Posts: 322
|
Quote:
Originally Posted by MStudt
Lets move onto the next issue, and I need some help with this. I'm getting codes P0440 and P0442, along with the VSC OFF and VSC TRAC lights on the dash. My code reader is saying the both are Auxiliary Emission Control problems. The only thing I've done so far is replace the gas cap. Any help would be great.
Thanks
|
I haven't seen any answers to this issue yet, did you get this sorted out?
My 02 throws 442, 446 and 440 every drive cycle. I replaced the gas cap initially, then on my Ex-Brother-In-Law's(former Toyota mechanic) recommendation I replaced the Evap Canister ($400ish) with a Toyota one. Started throwing codes the next day. Replaced the VSV with a Toyota part ($80) and still throwing codes. I threw in the towel and took it to the Stealership for a diagnostic. They tell me it's a valve of some sort on top of the gas tank that is bad. $500 mostly labor for pulling the tank.
Not trying to give any recommendation other than chasing this code costs a lot of money. I think I paid $70 for the dealership to find out what was wrong.
Good luck!
kp
|
|
|
Reply With Quote
|
 Posting Rules
|
You may not post new threads
You may not post replies
You may not post attachments
You may not edit your posts
HTML code is On
|
|
|
|


 Linear Mode


