Like most of us here, I decided to remove my factory running boards. And like most of us know, that removing the running boards will allow your front tires to spray mud and what-not all over the side of your rig.
I have a 2001 Sport, so I have the limited style painted fender flares. These have no OEM replacement (unlike the black SR5 fender flares). I decided to go with the Rally Armor universal mudflaps found here:
Rally Armor basic mud flap black logo
For the mounting hardware I used plated #8 3/4" screws with matching washers. I painted them black with some rattle can enamel.

I removed the wheel so I could sit right in there to have a good view and a straight shot for drilling the holes (I have this side mocked up already)

When I decided where it was going to go, I put the mud flap in place and traced it onto the flare.

Locate the factory screw by measuring off of the point shown on the flap. Then drill a hole in the flap for the factory screw.

With the flap attached by the factory flare screw, I lined up the flap with my pencil outline from earlier.

I chose the spot on the left side of the picture because there was a shoulder that seemed to be a good spot to fasten to. I predrilled the holes with an 1/8" drill bit so the #8 screws to have something to bite into.
There is no mounting point that is flush with the fender flare pictured on the right. Because it is going into steel, the screw is able to bite nicely and make the flap conform to the needed shape.

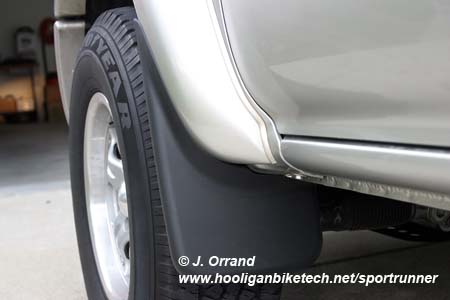
Shown here attached. I put the extra screw in to make the flap sit flush on the fender flare. Be very careful not to over tighten the screws that are fastening to plastic only.

Here it is attached.


The other side was an exact mirror image on my vehicle. So the steps are the same.


 Linear Mode


