 02-27-2015, 01:38 AM
|
#1
|
 |
Member
|
|
Join Date: Feb 2012
Location: Waipahu, Hawaii
Posts: 36
|
|
|
Member
Join Date: Feb 2012
Location: Waipahu, Hawaii
Posts: 36
|
Cam and crank seals when replacing timing belt
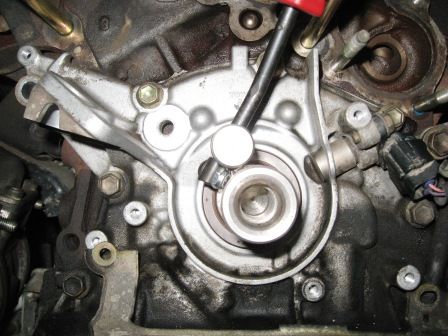
Been searching thru some threads but couldnt find any specific info on how to pull out the old cam and crank seals and to put the new seals in when doing the timing belt/water pump. Any info would be greatly appreciated.
|

|
 Reply With Quote Reply With Quote
|
|
02-27-2015, 04:07 AM
|
#2
|
|
Member
|
|
Join Date: Jun 2014
Location: Los Angeles
Posts: 511
Real Name: Alex
|
|
|
Member
Join Date: Jun 2014
Location: Los Angeles
Posts: 511
Real Name: Alex
|
just did my timing belt and misc parts after doing a lot of research and I was also afraid of getting stuck on the seal removal.
I did the drill -> wood screw (wide thread, shorter thread was harder to penetrate and grab) -> pull method that I read somewhere and worked perfectly for both seals.
The removal and insert in just few mins and go pick up a small pvc w/ matching diameter to help pushing them in.
Last edited by s20004runner; 02-27-2015 at 04:15 AM.
|
|
|
Reply With Quote
|
|
02-27-2015, 04:14 AM
|
#3
|
|
Member
|
|
Join Date: Feb 2012
Location: Waipahu, Hawaii
Posts: 36
|
|
|
Member
Join Date: Feb 2012
Location: Waipahu, Hawaii
Posts: 36
|
Quote:
Originally Posted by s20004runner

just did my timing belt and misc parts after doing a lot of research and I was also afraid of getting stuck on the seal removal too.
I did the drill -> wood screw (wide thread) -> pull method that I read somewhere and worked perfectly for both seals.
|
So you drilled a screw into the seal and pulled it out? Then lubed up the new seal and pushed the new seal in, used a socket or something to push it in evenly? You did that to both the CAM and CRANK shaft seals?
|
|
|
Reply With Quote
|
|
02-27-2015, 05:09 AM
|
#4
|
|
Member
|
|
Join Date: Jun 2014
Location: Los Angeles
Posts: 511
Real Name: Alex
|
|
|
Member
Join Date: Jun 2014
Location: Los Angeles
Posts: 511
Real Name: Alex
|
yes, just did it this past weekend. I drilled a small pilot hole first before screwing in a screw.
|
|
|
Reply With Quote
|
|
02-27-2015, 10:48 AM
|
#5
|
 |
Elite Member
|
|
Join Date: May 2011
Location: OBX, NC and Obamaville
Posts: 6,801
|
|
|
Elite Member
Join Date: May 2011
Location: OBX, NC and Obamaville
Posts: 6,801
|
I have used a drill and screw method before but found using this tool to be much easier and quicker:
http://www.amazon.com/Lisle-58430-Sh...le+seal+puller
Though I did not use it to remove the cam seals since my dealer did not stock them, the crank took about 20 seconds to take out:
Then after freezing the seal for an hour and putting some grease in the inner lip I tapped the new one in with a 5oz tack hammer.
|
|
|
Reply With Quote
|
|
02-27-2015, 02:13 PM
|
#6
|
 |
Member
|
|
Join Date: May 2014
Location: Illinois
Posts: 114
|
|
|
Member
Join Date: May 2014
Location: Illinois
Posts: 114
|
Yeah I have cam and crank seals brand new sitting in my garage, if you need them. When I got in there mine weren't leaking at all, so I avoided that headache. If there good don't mess with theM. If there leaking then you can replace them. The crank one is the easiest.
|
|
|
Reply With Quote
|
|
02-27-2015, 03:07 PM
|
#7
|
|
Member
|
|
Join Date: Jun 2014
Location: Los Angeles
Posts: 511
Real Name: Alex
|
|
|
Member
Join Date: Jun 2014
Location: Los Angeles
Posts: 511
Real Name: Alex
|
I also looked to that same tool but couldn't get it delivered fast enough to when I wanted to do the job. Glad to know it worked.
|
|
|
Reply With Quote
|
|
02-27-2015, 03:50 PM
|
#8
|
 |
Senior Member
|
|
Join Date: Jun 2012
Location: washington
Posts: 4,990
|
|
|
Senior Member
Join Date: Jun 2012
Location: washington
Posts: 4,990
|
Quote:
Originally Posted by macshemi57
Yeah I have cam and crank seals brand new sitting in my garage, if you need them. When I got in there mine weren't leaking at all, so I avoided that headache. If there good don't mess with theM. If there leaking then you can replace them. The crank one is the easiest.
|
agreed.
__________________
1985 pickup : EFI 331/4r70W-Dana 300-42 TSL SXII's/raceline beadlocks-30spl longs-5.29's-spools-sky Hi steer-OBA/4g tank-10.5k RR winch-dual blue tops-200 amp alt-flatbed.
1985 4runner sr5 : 22RE/5spd-6" pro-comp suspension-37 BFG at's-5.29 gears-Badlands Basher bumper-8.5k RR winch.
2006 4runner v8 limited : stock. Build Thread YouTube Channel
|
|
|
Reply With Quote
|
|
02-27-2015, 04:03 PM
|
#9
|
 |
Member
|
|
Join Date: Dec 2014
Location: Vancouver, BC
Posts: 91
|
|
|
Member
Join Date: Dec 2014
Location: Vancouver, BC
Posts: 91
|
i don't agree with this. The seals are cheap and require the timing belt to be taken off. Why not do them at the same time? It's and extra what, 20-30min to do them if you're taking your sweet time. There's a good chance they'll start leaking before you need a new timing belt.
I use a pointed 90deg and carefully stab the seal, then pull it out. Tap new one in with oil and a big socket.
|
|
|
Reply With Quote
|
|
02-27-2015, 04:32 PM
|
#10
|
|
Member
|
|
Join Date: Feb 2012
Location: Waipahu, Hawaii
Posts: 36
|
|
|
Member
Join Date: Feb 2012
Location: Waipahu, Hawaii
Posts: 36
|
Thanks guys for the info, hopefully i can get this done soon
|
|
|
Reply With Quote
|
|
03-01-2015, 01:53 AM
|
#11
|
|
Member
|
|
Join Date: Feb 2012
Location: Waipahu, Hawaii
Posts: 36
|
|
|
Member
Join Date: Feb 2012
Location: Waipahu, Hawaii
Posts: 36
|
Is fipg needed any where?
|
|
|
Reply With Quote
|
|
03-01-2015, 09:50 AM
|
#12
|
|
Elite Member
|
|
Join Date: May 2011
Location: OBX, NC and Obamaville
Posts: 6,801
|
|
|
Elite Member
Join Date: May 2011
Location: OBX, NC and Obamaville
Posts: 6,801
|
No..................
|
|
|
Reply With Quote
|
|
05-22-2015, 08:21 PM
|
#13
|
 |
Member
|
|
Join Date: Sep 2010
Location: Pittsburgh, PA
Posts: 258
|
|
|
Member
Join Date: Sep 2010
Location: Pittsburgh, PA
Posts: 258
|
Quote:
Originally Posted by LittleCaesar
...Then after freezing the seal for an hour...
|
You put seals in the freezer? Should I just keep them in there until I'm ready to install or is there a max freeze time?
By the way, Lil Caeser's tool works - this one does not: http://www.summitracing.com/parts/oes-25014
__________________
2000 4Runner Limited V6
1997 4Runner Limited V6
Last edited by azcat90; 05-23-2015 at 11:03 AM.
|
|
|
Reply With Quote
|
|
05-26-2015, 08:39 PM
|
#14
|
|
Senior Member
|
|
Join Date: May 2015
Location: north east of Fairbank out there in the frontiers Alaska
Posts: 3,182
Real Name: 3 Bears
|
|
|
Senior Member
Join Date: May 2015
Location: north east of Fairbank out there in the frontiers Alaska
Posts: 3,182
Real Name: 3 Bears
|
Quote:
Originally Posted by LittleCaesar
I have used a drill and screw method before but found using this tool to be much easier and quicker:
http://www.amazon.com/Lisle-58430-Sh...le+seal+puller
Though I did not use it to remove the cam seals since my dealer did not stock them, the crank took about 20 seconds to take out:
Then after freezing the seal for an hour and putting some grease in the inner lip I tapped the new one in with a 5oz tack hammer. |
this one I have also, have used it on BMW, Volvo, Toyota corolla...works great
__________________
2000 SR-5 Highlander version 4:30's, factory locker , green, bought 6/21
2001 SR-5... bought 11/20..sold 6/21....
2000 SR-5 moded, lifted, e locker, other cool stuff, totaled 10/20
|
|
|
Reply With Quote
|
|
05-26-2015, 10:12 PM
|
#15
|
 |
Senior Member
|
|
Join Date: Mar 2014
Location: New Jersey
Age: 56
Posts: 1,963
Real Name: John
|
|
|
Senior Member
Join Date: Mar 2014
Location: New Jersey
Age: 56
Posts: 1,963
Real Name: John
|
When putting the new seals in just go real slow, making sure it goes in evenly and all the way. Don't assume that because your using a large socket or piece of PVC, that it wont get cocked, especially when you're first driving it in.
__________________
SILVER 2000 4runner Limited TOTALED  WHITE/SILVER 1999 4runner Limited l Rear Locker l Tundra/890 coils | 5100 Bilsteins all around | Sonoran Steel Bumpstops l 199 mm Tundra brake upgrade | SCS Matte Gray Ray10 Rims | 275 70 17 BFG KO2 tires | LR UCAs | EIMKEITH panhard brackets | LED interior upgrade l Rear LED tailights l Pioneer AVH-X5700BHS Alpine Type "R" speakers NVX JAD800.4 Class D Amp Kenwood Under seat Subwoofer l Front window tint 20% l Weathertech window visors and floormats l OutGear Solutions Full Length roofrack l Morimoto 40" LED lightbar
|
|
|
Reply With Quote
|
 Posting Rules
|
You may not post new threads
You may not post replies
You may not post attachments
You may not edit your posts
HTML code is On
|
|
|
|


 Linear Mode


