 08-16-2015, 05:06 PM
|
#1
|
 |
Senior Member
|
|
Join Date: Nov 2014
Location: Cowlitz County, Washington
Posts: 1,777
Real Name: Mike
|
|
|
Senior Member
Join Date: Nov 2014
Location: Cowlitz County, Washington
Posts: 1,777
Real Name: Mike
|
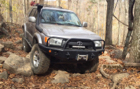
Shrockworks Bumper Assistance Needed with Fitment
Completed a few little projects yesterday and decided to get started on my new Shrockworks bumper.
I'm not sure how the passenger or drivers side frame brackets are supposed to fit. I have welds on either side of the frame that will not allow the frame brackets to be installed.
Here are the brackets that came with the bumper.
@ jicko
any assistance would be greatly appreciated.
__________________
2001 Imperial Jade Gold Letter Sport Package - Original Owner
Last edited by Rock_Rat; 08-16-2015 at 05:14 PM.
|

|
 Reply With Quote Reply With Quote
|
|
08-16-2015, 05:11 PM
|
#2
|
|
Senior Member
|
|
Join Date: Nov 2014
Location: Cowlitz County, Washington
Posts: 1,777
Real Name: Mike
|
|
|
Senior Member
Join Date: Nov 2014
Location: Cowlitz County, Washington
Posts: 1,777
Real Name: Mike
|
Shrockworks Bumper Assistance Needed with Fitment
Here are a couple of front photos with the welds that interfere with the long extension on the bracket. It's probably something I'm overlooking. Time to walk away from it for while.
Unfortunately, I no longer have an excuse for not jumping on my tractor, cutting the grass and trimming around the pond.
__________________
2001 Imperial Jade Gold Letter Sport Package - Original Owner
|
|
|
Reply With Quote
|
|
08-16-2015, 05:58 PM
|
#3
|
 |
Senior Member
|
|
Join Date: Oct 2012
Location: Smyrna, TN
Posts: 1,031
|
|
|
Senior Member
Join Date: Oct 2012
Location: Smyrna, TN
Posts: 1,031
|
When I installed my Shrockworks bumper, I took a grinder to the welds that kept the bracket from fitting flush.
About the part that you were asking how it fits on the frame...
It actually is supposed to go on the inside wall of the frame and fit between the frame and the radiator. On my 4R, it was an extremely tight fit and actually bent the radiator fins in. I recently had to remove my radiator and was unable to do so because of those brackets. So, i ended up cutting off that piece on each side.
I love my Shrockworks bumper, but if I had known what a pain the install was, I probably wouldn't have bought it.
|
|
|
Reply With Quote
|
|
08-16-2015, 11:05 PM
|
#4
|
 |
Member
|
|
Join Date: Jun 2012
Location: Dawsonville, Ga.
Posts: 412
Real Name: Vince
|
|
|
Member
Join Date: Jun 2012
Location: Dawsonville, Ga.
Posts: 412
Real Name: Vince
|
I had the same issue with mine. I wasn't thrilled. Luckily my buddy that was helping me install it happens to have a CNC machine, so we notched the mounting brackets to clear. I'm sure that you could grind down those welds, but at the time I was hesitant to do it. Plus I wanted to use the CNC.
Like
@ ugamurph
said, killer bumper, but it definitely wasn't nearly as easy as the instructions let on.
__________________
'99 Millenium Silver SR5. Auto, Shrockworks front bumper, Engo winch, Tundra 231mm, Toytec Ultimate lift, Light Racing UCAs, Tundra wheels, 285/70/17" Duratracs, B&M trans cooler, Whitson Metalworks short roof rack.
|
|
|
Reply With Quote
|
|
08-16-2015, 11:42 PM
|
#5
|
|
Senior Member
|
|
Join Date: Nov 2014
Location: Cowlitz County, Washington
Posts: 1,777
Real Name: Mike
|
|
|
Senior Member
Join Date: Nov 2014
Location: Cowlitz County, Washington
Posts: 1,777
Real Name: Mike
|
Quote:
Originally Posted by ugamurph

When I installed my Shrockworks bumper, I took a grinder to the welds that kept the bracket from fitting flush.
I love my Shrockworks bumper, but if I had known what a pain the install was, I probably wouldn't have bought it.
|
Took a break and came back to it later this afternoon. All I can do is grind away at the inside welds. I see what you mean about the radiator bracket. I'm not sure how I'm going to get by that. I've had a 1" lift in my garage for a while from Toytec. Decided to move forward with that installation first and get back to the bumper later this week. Huge PITA.
__________________
2001 Imperial Jade Gold Letter Sport Package - Original Owner
|
|
|
Reply With Quote
|
|
08-16-2015, 11:47 PM
|
#6
|
|
Senior Member
|
|
Join Date: Nov 2014
Location: Cowlitz County, Washington
Posts: 1,777
Real Name: Mike
|
|
|
Senior Member
Join Date: Nov 2014
Location: Cowlitz County, Washington
Posts: 1,777
Real Name: Mike
|
Quote:
Originally Posted by CdaleR4000si
I had the same issue with mine. I wasn't thrilled. Luckily my buddy that was helping me install it happens to have a CNC machine, so we notched the mounting brackets to clear. I'm sure that you could grind down those welds, but at the time I was hesitant to do it. Plus I wanted to use the CNC.
Like
@ ugamurph
said, killer bumper, but it definitely wasn't nearly as easy as the instructions let on. |
Huge PITA. I was able to grind away at the inside welds a bit. Decided to do the lift first. It's just my fun project so I'll get back to it later this week. Still frustrating. Once he bumper and sliders are installed I'll have the "big" stuff done.
__________________
2001 Imperial Jade Gold Letter Sport Package - Original Owner
|
|
|
Reply With Quote
|
|
08-18-2015, 03:14 AM
|
#7
|
|
Senior Member
|
|
Join Date: Jan 2015
Location: San Diego, CA
Posts: 1,625
|
|
|
Senior Member
Join Date: Jan 2015
Location: San Diego, CA
Posts: 1,625
|
Quote:
Originally Posted by Rock_Rat
@ jicko
any assistance would be greatly appreciated. |
Sorry, I wouldn't be of much help; as I am not associated with the company, so I have not much insight into products that I don't personally have.
Altho I do have a 3rd gen, I don't have experience with the SW bumper for 3rds.
Now, I think your best bet is from asking around here or talk directly to SW.
I am pretty sure that they will help!
__________________
2015 SR5 Premium 4x4 / 3rd row seat
Jicko's Build & Adventure Thread
"Group buy, anyone?"
|
|
|
Reply With Quote
|
|
08-18-2015, 03:28 AM
|
#8
|
 |
Elite Member
|
|
Join Date: Mar 2006
Location: Monroe, NY
Posts: 5,706
Real Name: Scramble
|
|
|
Elite Member
Join Date: Mar 2006
Location: Monroe, NY
Posts: 5,706
Real Name: Scramble
|
It says right in the instructions that you have to file those welds down.
I did the front one as much as I could with the angle grinder & did the back one with a good old fashion round hand file.
__________________
____________
'99 4Runner - 2.7L 3RZ, 5 Speed, 4.56 Gears - Lifted, Locked & Loaded - 166k Original owner - http://www.toyota-4runner.org/3rd-ge...ld-thread.html
'99 Limited - E-Locker- Stock (for now) - 233k 2nd Owner http://www.toyota-4runner.org/3rd-ge...ted-build.html
|
|
|
Reply With Quote
|
|
08-18-2015, 09:05 AM
|
#9
|
|
Senior Member
|
|
Join Date: Nov 2014
Location: Cowlitz County, Washington
Posts: 1,777
Real Name: Mike
|
|
|
Senior Member
Join Date: Nov 2014
Location: Cowlitz County, Washington
Posts: 1,777
Real Name: Mike
|
Quote:
Originally Posted by Scramble
It says right in the instructions that you have to file those welds down.
I did the front one as much as I could with the angle grinder & did the back one with a good old fashion round hand file.
|
That's exactly what I've done, however, they still rub on the radiator bracket and the pinch weld on the body once it starts to taper upward the further you install it. I'm sure I'll figure it out this weekend. It's not too difficult.
__________________
2001 Imperial Jade Gold Letter Sport Package - Original Owner
|
|
|
Reply With Quote
|
 Posting Rules
|
You may not post new threads
You may not post replies
You may not post attachments
You may not edit your posts
HTML code is On
|
|
|
|


 Linear Mode


