 05-14-2017, 03:45 PM
|
#211
|
 |
Senior Member
|
|
Join Date: Jan 2015
Location: Yucaipa, CA
Posts: 1,004
Real Name: Steven
|
|
|
Senior Member
Join Date: Jan 2015
Location: Yucaipa, CA
Posts: 1,004
Real Name: Steven
|
So I got the 35's mounted, fenders trimmed, and firewall tubbed. It was quite a bit of work but totally worth it.
What I did was pull the fenders, struts and the wheelers front bump stops so that I can jack up the wheel to full bump and test fit everything. I then started trimming, and trimming and trimming. I actually had to trim more than I expected to clear at full bump and full lock. I used 18 gauge sheet metal for the patch pieces. Here is how much got cut. Be careful to not cut any of the wires in the cab!

From there I started making the patches. I started with just a piece that was eyeballed a little larger than the hole. Then tacked it on in a few spots to get the shape and mark the spots that need to be trimmed some more. Once it was trimmed where it needed to be, it got welded on.


On the drivers side, the tire actually just barely rubbed the body mount, so I just hammered the mount in a little to clear. You can see how close it is. I doubt I'll be at full bump and full lock often, if ever, so I wasn't worried about having too much clearance in that spot. 1/4" should be fine.

After everything was welded and put back together, I spayed the areas with Rustoleum bed liner.


I still need to make room in the front of the wheel well where the battery and intake is at but I'll have to save that for next weekend.
Full bump.


Tires rub on the front quite a bit. Definitely needs to be taken care of quickly.

|

|
 Reply With Quote Reply With Quote
|
|
05-14-2017, 04:26 PM
|
#212
|
 |
Senior Member
|
|
Join Date: Jul 2016
Location: Bishop, Ca
Posts: 2,332
|
|
|
Senior Member
Join Date: Jul 2016
Location: Bishop, Ca
Posts: 2,332
|
How much did you end up taking out? I'm thinking of going 287/75R17. The tire I want if I go that way will be 33.8". I don't mind beating the crap out of the fenders with I BFH but I'd rather not get into any sheet metal work right now.
__________________
Quote:
|
Only two things are infinite, the universe and human stupidity, and I'm not sure about the former. --Albert Einstein
|
|
|
|
Reply With Quote
|
|
05-14-2017, 04:54 PM
|
#213
|
 |
Member
|
|
Join Date: Dec 2013
Location: High Park Colorado
Posts: 340
Real Name: Levi
|
|
|
Member
Join Date: Dec 2013
Location: High Park Colorado
Posts: 340
Real Name: Levi
|
Is your control arm cracked ?
__________________
96 SR5 5 speed, 4:88s with rear ARB , 255/85/R16s , some armor and lights
|
|
|
Reply With Quote
|
|
05-14-2017, 05:07 PM
|
#214
|
 |
Senior Member
|
|
Join Date: Aug 2008
Location: Arizona
Age: 51
Posts: 1,163
|
|
|
Senior Member
Join Date: Aug 2008
Location: Arizona
Age: 51
Posts: 1,163
|
Quote:
Originally Posted by AssBurns

So I got the 35's mounted, fenders trimmed, and firewall tubbed. It was quite a bit of work but totally worth it.
What I did was pull the fenders, struts and the wheelers front bump stops so that I can jack up the wheel to full bump and test fit everything. I then started trimming, and trimming and trimming. I actually had to trim more than I expected to clear at full bump and full lock. I used 18 gauge sheet metal for the patch pieces. Here is how much got cut. Be careful to not cut any of the wires in the cab!
From there I started making the patches. I started with just a piece that was eyeballed a little larger than the hole. Then tacked it on in a few spots to get the shape and mark the spots that need to be trimmed some more. Once it was trimmed where it needed to be, it got welded on.
On the drivers side, the tire actually just barely rubbed the body mount, so I just hammered the mount in a little to clear. You can see how close it is. I doubt I'll be at full bump and full lock often, if ever, so I wasn't worried about having too much clearance in that spot. 1/4" should be fine.
After everything was welded and put back together, I spayed the areas with Rustoleum bed liner.
I still need to make room in the front of the wheel well where the battery and intake is at but I'll have to save that for next weekend.
Full bump.
Tires rub on the front quite a bit. Definitely needs to be taken care of quickly.
|
Damn that's a big hole! Seeing posts like this actually scares me because I've been building mine to take 35s. Then I remember not everyone puts the body lifts or UCA in and things lime that.....
Sent from my SM-G920I using Tapatalk
|
|
|
Reply With Quote
|
|
05-14-2017, 05:11 PM
|
#215
|
|
Senior Member
|
|
Join Date: Aug 2008
Location: Arizona
Age: 51
Posts: 1,163
|
|
|
Senior Member
Join Date: Aug 2008
Location: Arizona
Age: 51
Posts: 1,163
|
Quote:
Originally Posted by hounddogman
Is your control arm cracked ?
|
Lol. Good eye. I think that's just paint flaking off with surface rust under it. Had me looking at it as well.
Sent from my SM-G920I using Tapatalk
|
|
|
Reply With Quote
|
|
05-14-2017, 05:37 PM
|
#216
|
 |
Member
|
|
Join Date: Mar 2015
Location: Bozeman, Montana
Age: 25
Posts: 917
Real Name: Phoenix
|
|
|
Member
Join Date: Mar 2015
Location: Bozeman, Montana
Age: 25
Posts: 917
Real Name: Phoenix
|
Quote:
Originally Posted by psraff
Lol. Good eye. I think that's just paint flaking off with surface rust under it. Had me looking at it as well.
Sent from my SM-G920I using Tapatalk
|
Its a crack. I remember a few pages back when it cracked along with some other stuff he ground it down and welded it back together but looks like it cracked again
__________________
98 Limited - Solid Axle Swapped,Turboed,And On 37s - Build
Transgo Shit Kit Writeup - Click Here
|
|
|
Reply With Quote
|
|
05-14-2017, 05:38 PM
|
#217
|
|
Senior Member
|
|
Join Date: Jan 2015
Location: Yucaipa, CA
Posts: 1,004
Real Name: Steven
|
|
|
Senior Member
Join Date: Jan 2015
Location: Yucaipa, CA
Posts: 1,004
Real Name: Steven
|
Quote:
Originally Posted by theesotericone
How much did you end up taking out? I'm thinking of going 287/75R17. The tire I want if I go that way will be 33.8". I don't mind beating the crap out of the fenders with I BFH but I'd rather not get into any sheet metal work right now.
|
Not sure exactly how much I took out since I beat the hell out of it with a BFH a few years back when I went to 33's. It's kind of hard to tell but at least 2" from the very bottom of the firewall. Not sure if you'll be able to get away with 285/75R17 without sheet metal work or a body lift.
Quote:
Originally Posted by hounddogman
Is your control arm cracked ?
|
Not exactly sure. So the story behind that is that a few months back, I cracked the LCA in a few spots and also the shock tower in a few spots. I ended up welding it all back together but not sure if the crack itself came back or just the paint is cracking. It looked like the paint but I didn't spend too much time inspecting it. I'll probably just pick up another control arm instead of chasing down another crack.
|
|
|
Reply With Quote
|
|
05-18-2017, 10:34 AM
|
#218
|
|
Member
|
|
Join Date: May 2017
Location: Wenatchee Washington
Posts: 76
Real Name: Neil Fiedler
|
|
|
Member
Join Date: May 2017
Location: Wenatchee Washington
Posts: 76
Real Name: Neil Fiedler
|
Quote:
Originally Posted by AssBurns
My last name is Burns and when I was a kid my dad gave us nicknames as a joke. My is Ass Burns, my brother is Dick Burns, and my sister is Rug Burns.
|
RUG BURNS...... 
|
|
|
Reply With Quote
|
|
05-20-2017, 05:25 PM
|
#219
|
|
Senior Member
|
|
Join Date: Jan 2015
Location: Yucaipa, CA
Posts: 1,004
Real Name: Steven
|
|
|
Senior Member
Join Date: Jan 2015
Location: Yucaipa, CA
Posts: 1,004
Real Name: Steven
|
AssBurns 2000 Limited Build Thread
Last edited by AssBurns; 05-20-2017 at 05:48 PM.
|
|
|
Reply With Quote
|
|
06-02-2017, 11:11 AM
|
#220
|
|
Member
|
|
Join Date: Apr 2017
Location: Pennsylvania
Posts: 37
|
|
|
Member
Join Date: Apr 2017
Location: Pennsylvania
Posts: 37
|
Nice job on the fenderwell tub. I love the new battery box/coolant overflow setup you made.
Coming together nicely.
|
|
|
Reply With Quote
|
|
06-05-2017, 10:44 AM
|
#221
|
|
Senior Member
|
|
Join Date: Jan 2015
Location: Yucaipa, CA
Posts: 1,004
Real Name: Steven
|
|
|
Senior Member
Join Date: Jan 2015
Location: Yucaipa, CA
Posts: 1,004
Real Name: Steven
|
AssBurns 2000 Limited Build Thread
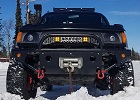
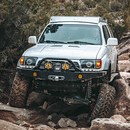
Well here it is guys. What you've all been waiting for... well, maybe only me. I've been waiting to get this done for too long. I haven't ran a front bumper since KOH '16! Decided to build my front bumper out of tube to save some weight while still having the protection I need and the ability to have a winch. Saving weight was quite a success over the heavy plate bumpers. I weighted the bumper before I painted it, without the skid and it weighted 56lbs. So with the skid, paint, and hardware I'm estimating ~60lbs. The materials I used were 1.75" DOM tube for most of tube work except for the side tubes that connect to body mount perches. Those are 1.5" DOM. For the frame horns and winch plate I used 3/16" plate. The skid plate is 3/16" 6011 Aluminum. 6011 is the hard stuff so it should hold up decently and saves so much weight over steel. Luckily I had a buddy that me borrow some handy tools to made the build much easier. I got to use his JD2 Tube Bender, Tube Roller and his JD2 Tube Notcher. Tube notcher hands down is the most convenient tool compared to using the old school chop saw technique. Definitely gonna buy one in the near future. Overall the bumper turned out exactly as planned except it sticks out about an inch or so further than I planned, which is still okay. The cool thing about the way it got designed is that when I get a winch, the fairlead will actually be tucked back into the tubing away from damage and even the winch hook should be able to be tucked back as well. So the tube bumper itself should be the furthest thing forward after everything is said and done, not winch parts to get banged up. I still need to get some more trick tabs to mount some lights on the bumper. I have two 130w KC daylighters right now and will probably just pick up two more to have 4 lights on the bumper. Now for pictures...
First use with the hydro kit so I bent a sample tube to test things.

Tube Roller. Way more time and effort than I was expecting, but the hydro tube bender made up the difference in effort.

And the build starts. 1st mockup.


Painters tape works get for visualizing tube placement.

I cleaned everything really well with mineral spirits and let it dry, then primed it, and painted it. Just painted with Rustoleum semi-gloss black.

Last edited by AssBurns; 06-05-2017 at 10:52 AM.
|
|
|
Reply With Quote
|
|
06-05-2017, 10:49 AM
|
#222
|
|
Senior Member
|
|
Join Date: Jan 2015
Location: Yucaipa, CA
Posts: 1,004
Real Name: Steven
|
|
|
Senior Member
Join Date: Jan 2015
Location: Yucaipa, CA
Posts: 1,004
Real Name: Steven
|
|
|
|
Reply With Quote
|
|
06-05-2017, 05:52 PM
|
#223
|
 |
Elite Member
|
|
Join Date: Sep 2010
Location: Colorado
Age: 33
Posts: 5,317
Real Name: Jim
|
|
|
Elite Member
Join Date: Sep 2010
Location: Colorado
Age: 33
Posts: 5,317
Real Name: Jim
|
nicely done on that fab work. I really like the curved top bar of the bumper!
__________________
'13 Tacoma TRD-OR: The Spruce Goose. BUILD
'02 Sport Ed.- V2.0: The better build. Totaled BUILD 2.0
'02 Sport Ed.- V1.0: The college build Sold BUILD

|
|
|
Reply With Quote
|
|
06-06-2017, 12:09 AM
|
#224
|
|
Senior Member
|
|
Join Date: Jan 2015
Location: Yucaipa, CA
Posts: 1,004
Real Name: Steven
|
|
|
Senior Member
Join Date: Jan 2015
Location: Yucaipa, CA
Posts: 1,004
Real Name: Steven
|
Quote:
Originally Posted by 4-Ripcord
nicely done on that fab work. I really like the curved top bar of the bumper!
|
Thanks Rip! I got lucky that a friend had a tube roller. I really like having the nice smooth radius.
|
|
|
Reply With Quote
|
|
06-06-2017, 12:19 AM
|
#225
|
|
Senior Member
|
|
Join Date: Jan 2015
Location: Yucaipa, CA
Posts: 1,004
Real Name: Steven
|
|
|
Senior Member
Join Date: Jan 2015
Location: Yucaipa, CA
Posts: 1,004
Real Name: Steven
|
AssBurns 2000 Limited Build Thread
On my way home from work today I noticed my coolant temp started to rise, so I pulled over to check it out. My first thoughts were that I was just low on coolant or that the bumper was blocking the air flow somehow. I had a gallon of coolant in the back and a few water bottles to add to the radiator. I was super low on coolant so I knew there was an issue beyond just low coolant but wasn't quite sure where. Shortly after a CalTrans truck pulled up and the guy asked if I needed help. We topped off the radiator and started the truck. Sure enough we noticed the heater control valve broke and was dumping coolant. I was able to make it off the freeway to the nearest gas station and had my sister pick me up and take me to Autozone up the street to pick up a new part. Bummer to spend $50 on such a simple little part that isn't even OEM. Didn't have a choice at that time though. 5 minutes later I had the new part swapped in and coolant topped off. What a hassle for a Monday!

|
|
|
Reply With Quote
|
 Posting Rules
|
You may not post new threads
You may not post replies
You may not post attachments
You may not edit your posts
HTML code is On
|
|
|
|


 Linear Mode


