I figured now I’m here I should probably throw a build thread up.
The truck is a ’96 Hilux Surf SSR-X Limited. (KZN-185)
I originally bought it back in 2007 to be my daily driver alongside my ’88 Supra twin turbo..
I sold both cars to buy and E46 M3, then about a year after selling the truck bought it back… I missed it that much… now the M3 is gone after 6 years of service, but I still have the truck!
When I first got it, it looked like this…
Mods when sold:
Full sound deadened floor roof and sides,
Alpine IVA-W202R double DIN touch screen, (with Bluetooth phone and iPod adaptor)
When I got it back for the second time it looked like this…
Mods fitted by other owner
Factory Hilux Surf Bull Bar
Digital TV Tuner
Landcruiser Colorado Wheels with tarmac tyres
CB Radio
Clear front indicator lenses
4 Front facing Ring Spot Lights.
It now looks like this. (a full respray later!)
I have had the V8 running now for nearly 3 years… so far it’s been pretty much flawless. In fact the only issue I have had so far was a dirty contact on the tank side of the fuel pump plug causing the fuel pump to not fire…
It drives well, makes a load of noise and makes me smile.
The AC works, but the Idle up when the clutch magnet engages does not.... the VVTi engine needs a pulse signal, not a straight voltage, so I have to wire in a device that replicates this signal... It also will cut the clutch if it detects the pump seizing, and disconnects it at full throttle. - The AC no longer works.. the clutch failed. I have the parts for a full overhaul to fit
I want to remove the single 16" fan and replace it with more smaller ones, and possibly try and squeeze in some kind of fan shroud. One of these fans should be triggered by the AC clutch locking.
The diesel trucks never had cruise control... the LS400 did... and it was controlled by the ECU and the fly by wire throttle.. its not working yet, but I'll get it working
I have a facelift Centre console currently sitting in customs from Japan. That'll need fitting.
There was a factory Twin battery option on the Diesel Surfs... Mine never had it (or the rear heater and heated fuel filter) this annoyed my greatly as it was something I knew about but didn't have... and it was a big gaping hole in my engine bay..
The final straw was getting a flat battery one cold evening when I had offered to give one of my company directors a lift... so I decided instead of just buying new battery... buy two.
My single battery was on the Left hand side, so I found a twin battery one being broken, and cut away the section of inner wing with the factory mount and took that away along with the factory tray, bracket, and second battery wiring loom (they are wired in parallel)
I carefully drilled out the spot welds and masked off the location and placed it on, tracing the bolt holes to be.
Once done all fresh cut metal was rust protected and painted with Hammerite, as was the tray itself.
Once all bolted up, wiring was simple.. I shortened the main starter cable and ran it direct to the "new" battery, and added the positive terminal link. I also took this chance to seriously beef up the earth points, with each battery earth terminal getting a dedicated thick gauge earth to a point on the Frame, Body and Engine. I also ran an earth from the rear transfer box to the frame... simply because I had a spare OEM Toyota earth strap from a Supra.
The difference was day and night... probably more from the earths than anything else, interior lights felt brighter, headlights were better... everything electrical just felt "stronger"
I also added negative terminal isolators... so if I'm camping or at a car show I can isolate one battery and use the other to power the stereo.... knowing that there is no way I'll be able to flatten both batteries.... the terminals were fairly cheap Ebay parts.. and worked well for a few years, recently however I was having power brown outs... I assumed it was something to do with all my other fairly serious wiring work done, at first.. but it turns out it was these contacts. I cleaned them up, and used a bit of conductive carbon grease.. now as good as new (better in fact). Lights are bright once again!
Yeah I know what you are saying.. "Get onto the V8 already" I will.. I'm just trying to keep stuff in mildly chronological Order..
One thing that really annoyed me on my truck was the utter lack of heated mirrors... I went out to Irvine California on a training course... one of the many things that struck me (other friendly people, sun, hot women, god places to eat, hot women) was that a, there are LOADS of 3rd Gens out there... (we natively never got them here so all ours are imports.. its a bit of an event to see another one) and how TINY they look out there. Here in the UK the country lanes where I live are small, and anything much bigger than this would be awkward for daily use... parking spaces are also way, way smaller... as such I NEED door mirrors that I can see out of!
On the damp winter mornings I was getting to the office and they still weren't really clear, so I decided to do something about it...
I had read on the Internet (Quite possibly this very forum....) some wise person had used motorbike handle bar heaters to heat their mirrors... and they hadn't exploded or cracked or anything.. I figured "I'll do that"
Ordered from china via my favourite supplier (ebay...) 1 pair of motorbike handlebar warmers....
I carefully prized off the mirror glass stuck these to the back of it, and refitted the glass using mirror mastic (I had head that other adhesives can damage the mirror finish) drilling a hole for the cables to escape. I then pulled apart the mirror mechanism (JDM electric folding mirrors, naturally) fed the cables and reassembled.
The end result is... it works! This is when first switched on... but after a few minutes the entire glass clears.
They are activated by turning on the rear screen demister (as in OEM Toyotas) and were first wired in series as I was worried they would be too hot... this was utterly useless so I re wired them in parallel for more heat...
The rear screen demist/heated mirrors are also connected to my Viper remote start alarm, so on a cold morning it activates them. Brilliant!!
I now have a company car... it has non of this... so from being super smug and saying "I never have to unfrost my car" I now do. Not Brilliant.
After many years of wanting to do it, and the girlfriend saying no... I decided to browse Ebay one night after a few beers... There was a complete '99 LS400.. ready to drive, road legal with 98,000 miles.
It had been declared an insurance write off due to rear damage... so I bid on it, as you do.... and ended up winning it for £421. (this is an utter bargain) I wanted the full car as there are security aspects to using the VVTi variant of this engine, and its always nice to know you A, have everything you can need to make the thing run, B, you can hear it run, and drive it.
I went out with my dad and bought home the donor car...
Strategically parked to hide the rear left hand side door and wing damage
It was actually a nice car... it was a bit of a shame to kill it... but I wanted this.
Bear in mind this was over 3 years ago now... there had been a few V8 swaps done that I'd seen on 2nd gens, and Tacos, but the only 3rd gen I'd seen was a 2UZ (one of our members here!) so most of what I was doing was a bit of a voyage of discovery, research, and educated guesses. (most of which I got right....) there certainly weren't any VVTi 3rd gen builds about (But I do know of at least one other one here in the UK!)
Anyway enough of that.... Lets tear it apart..
It came apart fairly easily... wow, these things are built like tanks though..... Lots of everything.. even more wires.... all in all it seemed like a good solid car, no oil leaks... it had come from an older guy and been his pride and joy... (sorry old guy from Ebay!)
With that all out, it was time to have the first of many tidy ups and bring the truck in... Here it would stay on and off for about 4-5 months.....
There were many questions running about my head... Will it fit? Will it over heat? Will the ECU fit? Can I use the 5 Speed auto?
The ECU was a lot bigger.... however the radiator was smaller.. so it should stay nice and cool... Truck/Lexus comparisons.
Time to pull the Truck apart.. Again I felt a bit bad.... Now I know in the US the diesel engine is rare and sought after... over here nearly all the imports are diesel... I don't like it.. its slow.. smelly, sounds rubbish... it had been 100% reliable though.
Meh. it's not a V8. Out it came. (really easy... although roof clearance was fun)
I kinda liked how the truck sat with no engine in it..... I decided it's going to probably want more lift later...
I clean things..... I can't help it... there have been so many nice looking build threads its corrupted me... So basically if I take stuff off I can't put it back without replacing it, upgrading it, painting it... or at least cleaning it so it looks like new..... So before and after of my V8s new home.
I have helpers.... You may have noticed Boris the Cat checking out the LS400 earlier...It was March and cold as hell... so Cleo the German Shepherd kept me company at all times.... using the LS400 boot mat as a bed.
Anyway... Both engines out.. things cleaned... another tidy up and it was time to get started on the fun stuff...
I was quite surprised at how much debris there was "in the V" of a sensible saloon that had belonged to a sensible seeming person... Obviously rigorous cleaning was imminent.
Another question was gearboxes.... I wanted to use the LS400 5 speed... It had nicer low gear ratios and it would run from the factory management for ease.
I considered manual, but I like auto for trucks.. It suits the lazy feel and I prefer it off road. This is the factory 4 Speed A340F vs the Factory Lexus A650. They looked similar, but it later turned out that to get my transfer box to fit the A650 involved a huge task of custom adaptors and shaft adaptors.. It would cost lots, delay the project ages, and I had also read that the 5 speed wasn't as strong.
Instead I opted to use the factory gearbox, with the input shaft (and as a result oil pump and overdrive assembly) from an earlier LS400...
This lead to another slight issue... The transmission oil pans were different... The truck one much deeper, and the dip stick was on the wrong side.
I kinda went a bit overboard, and have a "thing" for genuine parts... Its a really bad habit and costs me loads... (you'll see this later on)
So I promptly bought a new Water Pump, all engine seals, tensioner pulleys, and timing belt from Lexus... and started taking apart, cleaning.. building... Fun times!
At this point I decided it was time...
Lets see if the thing actually FITS, It did.
That could have been awkward.
I had a good friend over that has earned his weight twice in beer for helping me with all my welding... My welding really sucks, so he helped me make the engine mounts and exhaust...
I should have said earlier, I'm not a mechanic, or a fabricator... or even an engineer.. I do computer stuff. So there was a fair bit of learning... (I've done a few engine transplants before... but they involved stuff that belonged there)
So onto Mounts...
I had some friends over to help me man-handle the thing into place and help with clearance checking...We measured everything, stood back... Looked at it... Measured everything again and decided the position was good.
At this point the engine was propped up on wooden blocks and resting firmly in place.
I had previously prepared the engine mount end plates from 5mm steel, where they meet the engine block and factory rubber mount, I bolted these up and we tacked a strip of metal between them to get the positioning right.. we then VERY CAREFULLY raised the engine and removed the mounts so we had a template to work on to build them up.
Cardboard templates were made of the parts to make the box section, and traced out and cut out of more 5mm steel. the basic construction is a 4 sided box section at the top, and a 3 sided section below to allow access to the engine mount rubber nut.
The engine mounts were cleaned up, painted and attached to the block
It's IN!
At last... this was a really big moment for me... it was properly in, bolted down on its own mounts, not balanced on blocks of wood.
(actually the transision mount spacer was still wood at this point...)
Time to look at the exhaust.
The exhaust was a pain... I had provisionally bought Ebay (yup, again) Tundra stainless headers, and modified the chassis strut mounts as I had read on another thread... However in my application this did not work... it really didn't work.. the actual suspension arm top bushes were in the way. Bad times. At this point I realised that I should have tried the manifolds sooner...
You live and learn.
Yup, I cringed here too... rest assured its seem welded up with thicker than stock metal. I have 100% faith in its structrural rigidity.
After this and after reverting to the factory LS400 heaters, I ground off the heat shield mounting points.. The flanges hit the steering column (Classic V8 issue) so I ground them off too, and cleaned them up for re using...
"Why Re Use? I thought you were OCD about stuff like that"
Yes.. but as I'm retaining factory management, and these run pre and post catalytic converter O2 sensors, I'm using the factory cats!
So the flanges were extended further back. Yes I know having the cats so far back is not optimal..
But it was the only way to fit it all in...
I fitted the headers and refitted the engine (I was getting well practiced at that now)
Did I mention it's TIGHT????
From Below... It's taking shape!
I had another exhaust issue... the no.1 cylinder header was super close to the suspension bush..
Like really really close..
Like when we refitted it it was touching close.
I swore lots, had a think.. took it out and had to do the one compromise of this build that really annoys me.
Actually I'd half forgotten about it and re-writing this has reminded me how much its annoyed me...
I had to shave off a section of the header and cap it with flat metal...
Using man maths I noticed that the exhaust ports are way smaller than the header.. and the slimmed down cross section is still bigger than that... I know this is an over simplified model of how exhausts work.. and it doesn't allow for gas expansion.. but it is what it is... I'll probably rebuild this at a later date...
Here is the end result.
I also found that as the Transmission was sitting 3CM higher, along with the 2" body lift (up from 1") the shifter linkage was out, so I had to extend it 3.5cm.
No oen will ever see it, but I thought this came out pretty nicely.
At this point I aslo thought it was time to say goodby to my wooden transmission spacer.. and replace it with a billet alloy one.
At this point the body lift blocks were also 2" wood.. as I was waiting for my 4Crawler 2" lift to clear UK customs... it really sucks having to import pretty much EVERYTHING for my truck....
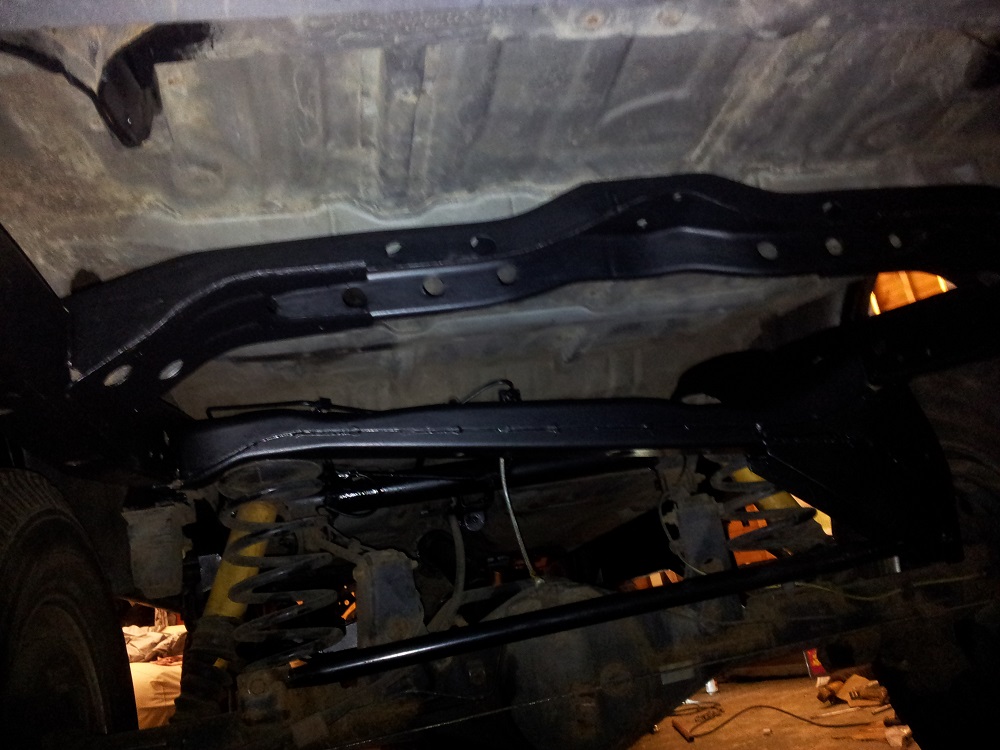
I took this chance to also clean up the chassis and run over it all with chassis paint before fitting the "proper" Body lift... I actually want to redo this at some point... but I'll make it a body off frame job... Rust is a real killer here in the UK. At this point my truck looked nicer underneath than it did on top!
I noticed the steering rack was seeping at the seals... So I replaced it.. As you do.. (not genuine.. its a remanufactured one.. shocker!)
Remember me mentioning post cat 02 sensors? I had to drill holes in the floor... I know the Lexus had holes in the floor but this felt really wrong to me...
I had to dig through a few layers of sound deadening drill the hole rust proof the hell out of it and fix the bung.. I'm confident its as waterproof as any other factory seal...
Talking of which... I also noticed that my steering column seal had failed.. so replaced it... its worth checking those!!
Slightly random, but the factory oil filter point was of no use, so I needed to run a relocation kit. I made up these hoses using billet fittings and -AN12 hose.
If you have never worked with stainless braided hose its the most unpleasant thing on earth.
It's horrible.. it falls apart, spikes you.. covers itself in your blood.
Strong dislike for the stuff... it looks nice though... so here is a picture... no one would ever have known the effort these were otherwise!!
With the front part of the exhaust done... steering rack fitted body lift now fitted, shifter done... engine and transmission mounts done... it was time to finish off the engine...
I cleaned things and painted things... as I said.. you just can't "re-fit stuff"
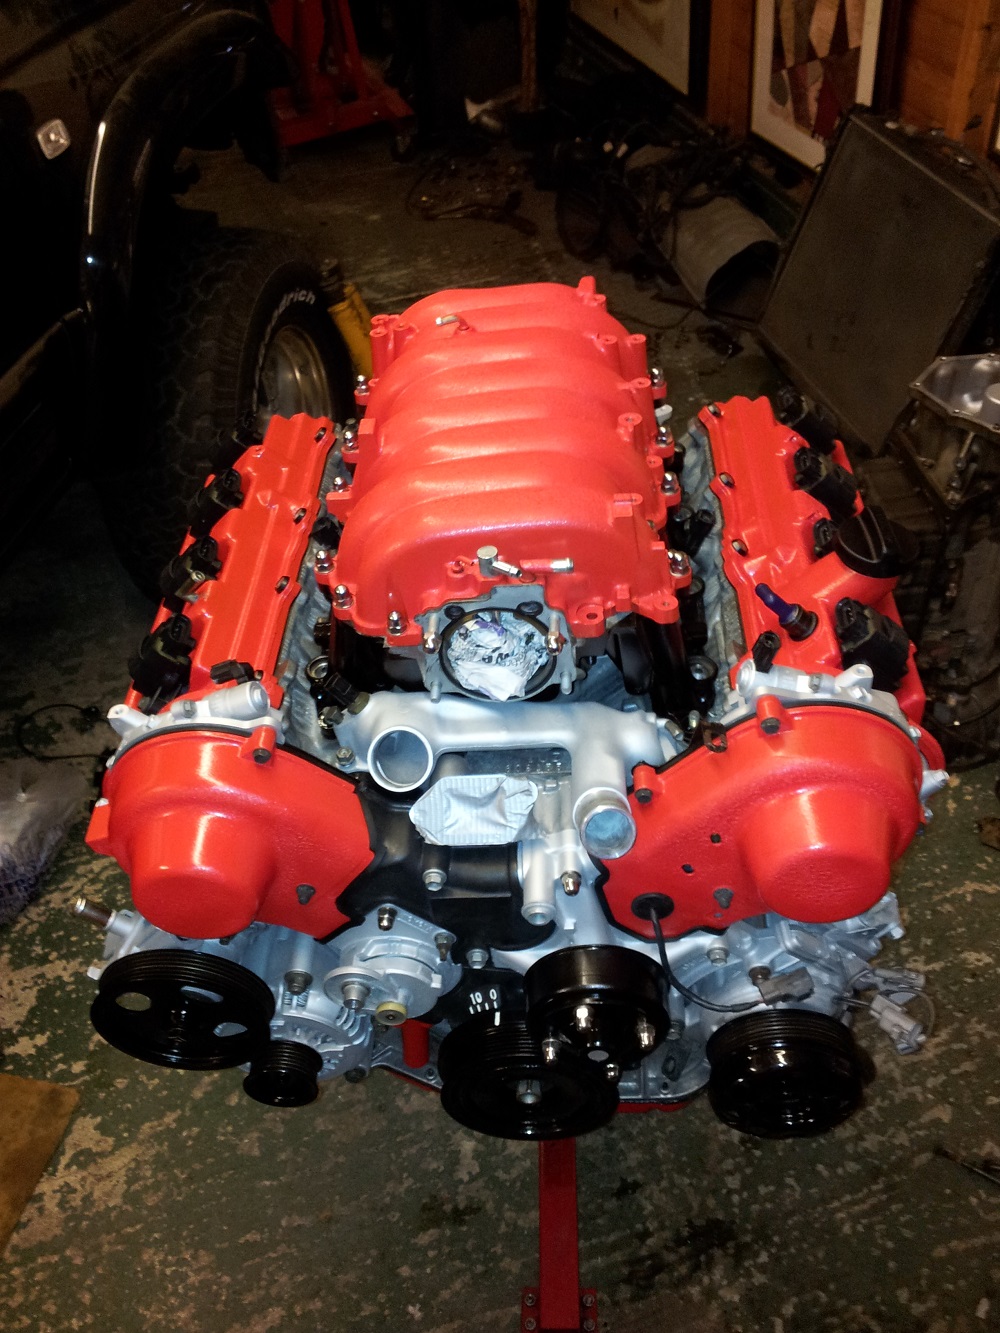
So now with all my bits replaced, cleaned or cleaned and painted it was time to put the engine together.
This was the first time I'd seen it all together and it really looked... bright... All my previous builds have tried to look more factory... but this is a jacked up V8 truck on 33s... time for a change!
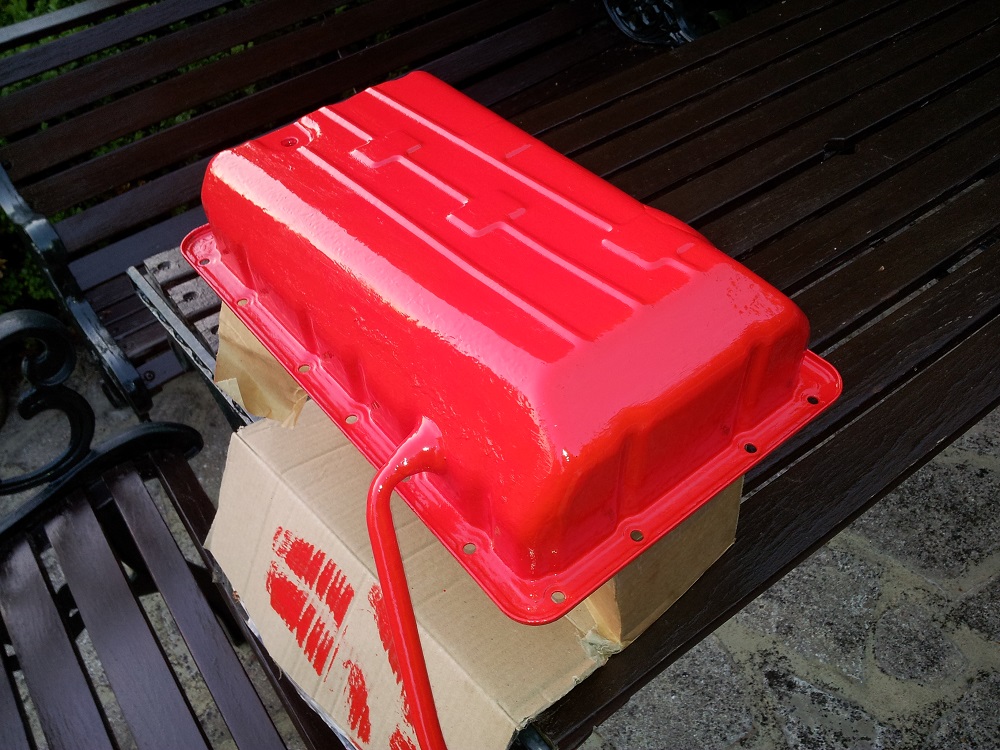
The factory Surf sump had its dipstick removed, and the Lexus one was grafted in, so the mount at the top of the engine would remain in the factory position.
It's in!! I love the red in black... Now we are really getting somewhere!
Pre VVTi 1UZs have their own power steering reservoir, as did the factory Surf Diesel, so I carefully ground off the brackets of the LS400 reservoir, and welded some stainless brackets to stainless jubilee clips to mount it to the body. Space was getting tight, but it fits quite nicely.
I got a local hose shop to make up the power steering lines to fit between the 1UZ and the truck, I also got them to do the AC lines too...
Because you have to keep working AC.
Even in England.
I said space was tight.... next time someone moans about space in their factory engine bay.... I stop listening.
Another front view of how things sit.
I've never liked mounting fans through the fins, but I didn't have enough room for a shroud.
(actually this is another mini project I have in mind.... I'll outline that later)
It was time to start mocking up the intake and coolant lines.
The front facing intake made this harder, so I had to have a more elaborate that planned coolant hose path.
I want to get these hoses remade as custom "one piece" silicone hoses... But no one is replying to my emails..
I fabricated an air box out of sheet metal.. this hold the air filter itself, protects from engine heat, and also acts as a bracket for the oil filter mount, and ADD VSVs.
Yes this looks like a typical "warm air" setup... more on that later.
Exhaust Time!! Stainless of course... I was a little concerned it might be a *bit* loud...
It turns out later on I was right to be...
Lots of mocking up and cutting and holding things together with tape before getting my welder buddy to stick it all together. we were doing it with an old MIG welder... but it did the job and he did an amazing jo with the tools we had.
The finished exhaust... Tail pipe exits tidied up, cleaned up, polished, ready to fit.
Sorry for the increasingly poorer quality photos...
Here is an idea of what its like underneath when all together.
Now it was time for the bit that scares people on these... the wiring.
There was a lot.
As I was unable to sue the Lexus 65 speed, and opted for the factory 4 speed with a few early LS400 parts in it, the factory 5 speed management wouldn't control it, so I got a SupraStick standalone transmission ECU. I laid out the gearbox part of my truck wiring loom, the Lexus ECU and the SupraStick and got going..
I'm not going to lie... this was a big job.. the wiring diagrams I had were challenging, in that they weren't always *quite* for my application, and the one that was was poor resolution and hard to read...
It took 2 weeks of evenings to build my loom... it wasn't too bad I was warm inside... and could listen to music and drink beer.
The immobilisers are built into the ECU on the VVTi, so unless you send the ECU off to be modified, you need to use the original Lexus transponder key and receiver... I mounted this in my centre console as a second level of security.. without that, it won't start.
This is also handy as I can leave the main keys in when camping for listening to the stereo, but know that no one can jump in and drive off.
Lots of wiring diagrams... and a second relay panel to be mounted behind the glove box.
After all that it was time for final assembly...
fill the fluids and coolant, make sure the power steering is full.... and see if the thing would start...
You know what... after about 15 minutes messing about.... it DID start!
So I thought I'd roll it outside... with one last nagging concern... would it FIT out with the extra 1" body lift and natural lift from the lighter engine??
Just!
It moved there! By itself! with V8 power!
I still had a few more parts to sort out so back it went...
I had a really weird issue where the brakes worked fin once... then took ages to work again.. I scratched my head for a while and realised, although vacume was really string, the vac to the brake booster was weak.... it turns out that the ports blocked off with tape on first start up had inhaled some of the tape, partially blocking the line. No harm done... but it confused me for a bit.
I tidied up the wiring, somehow managed to get the glove box all fitting back together and closing with the larger ECU and SupraStick... put everything back together.. and drove it outside again.
Freshly finished... still with months of garage dust... but its DONE!
Time for an obligatory test drive... its LOUD (bit quieter now the exhaust has built up carbon deposits) the videos don't really do it justice... the bass seems to vanish.
Also the gearbox shift points were all wrong at this point...
So above you could see what appeared to be a semi sealed airbox, that could only gulp hot air... I had a plan for that.
I'd been looking for one for ages, but eventually a Hilux Surf Diesel Turbo Intercooler hood came up. These look like the "Sport hoods" on the USDM 4Runners.. but the scoop is function for the top mount intercooler.
I was really happy to find this as they are super rare in the UK, and very sought after!
I retained the plastic inner intercooler ducting and made a flat panel out of Aluminium sheet, that fixed to the underside framework using the 4 large factory fixing holes, and an additional 3 that I drilled. I also drilled the holes for the Redline gas strut kit as it made sense to do that before paint.
Once I was happy that I had a base to work on, I made a cardboard template of the mouth of the intake that would feed into the airbox... I fixed it to the sheet and actually filmed it being closed with my phone to get an idea of clearances!
After drawing lots of lines and taking measurements, I finally settled on the shape.. notched the metal airbox and repainted it and started creating the shape using insulation foam... and created a fibreglass moulding of that shape (sorry no pics of this stage)
Once I had the basic shape I mocked it all together with tape and started trial fitting.
People that saw my truck with the white hood and bits of fibreglass held together with tape were convinced I'd ruined it this time... (mostly the same people that said "don't take out a perfectly good engine")
I took the entire thing off, marked the location points and filled smoothed and painted the interior surfaces.. (I know, no once can see them... but I'd know....)
I then used more fibreglass to bond the Fibreglass ducting and Aluminium base plate together, and put a skim of filler on that.
I used the flexible bumper filler as it is a lot more resilient to cracking, I figured with opening and closing the hood regular filler would crack... also although it looks thick here.. most of it was going to be sanded off... and reapplied.. and sanded off... I really spent way too much time on this! I did notice that when using the belt sander the fibreglass resin heaed up lots, and the micro bubbles expanded and popped... so I ran over the entire thing with a heat gun trying to catch and potential bubbles that would pop, and filled them.. it is going to sit over a 290Bhp V8 after all!
After much smoothing it looked like this...
So I treated it to a few coats of high build primer and rubbed it down again.
I'm happy with the end result... its quite subtle, but totally functional. I designed it so any water that gets in the scoop will drip out between the inside wall of the airbox and the air filter..
Performance wise it seems good.. I've not measured air temperatures, but after even a slow drive the air filter is cold to the touch... as is the entire airbox, which is good as it has the oil filter bolted to it.
The seal between the top of the box and the hood isn't mega tight, probably about 5-10mm at most in different places. I do still need to find a suitable rubber trim to close this down, but so far everything I've tried looks messy.
Not the best pic, but this is looking down the "throat" of the scoop. you can see the factory ducting, and the stainless dome bolts and rivets that I used to attach that to my aluminium base.
(and its Dirty!!)
I know this is a pretty standard thing now... but I soon found that the already bad stock brakes were getting really bad... and I'd just considerable upped the power...
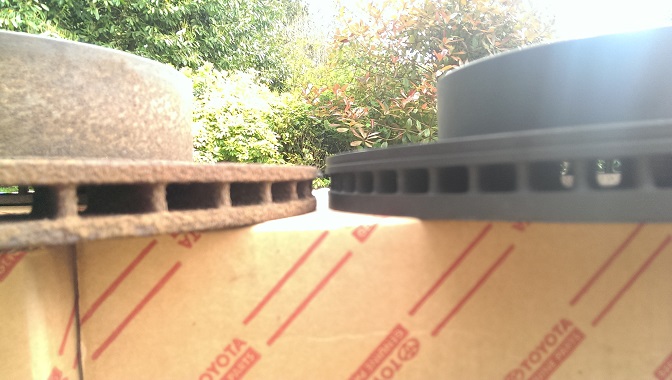
So it was time for a Tundra Brake upgrade.
I went for the 231mm 13WL calipers... because they were bigger.. and saying as I was going to have to get them shipped from the states anyway.. might as well go big or go home.
Parts used were all genuine Toyota (I didn't really want to pay international shipping on disks...) OEM part numbers are below:
Pads: 04465-35290
Squeal shim kit: 04945-35080
Caliper Rebuild Kit Front: 04479-60080
Location Pin clip x 4 47749-35040
Front Disk x 2 43512-0C011
The benefits are clear... much chunkier disks that can dissipate more heat, and are less likely to warp... my old ones were warped...
I had an issue that when my calipers arrived (used, Ebay...) one of them had the blead nipple smashed off... I tried to extract it but failed (the stud extractor snapped) so I took it to a local engineering shop who drilled it out and re-tapped it...
unfortunately when I assembled it all and went to bleed it there was a list of brake fluid (in my face, thanks) where they'd not quite got it right. The caliper was scrap, so I ordered another one (from US ebay) this one was "remanufactured".
When that arrived, I checked it over and it wasn't broken... but as the other one was now bright red, I stripped it down to paint it. on removing the pistons I found that what ever idiot had refurbished it had PAINTED the piston side walls... if it had ever worked it couldn't have lasted long. Luckily the pistons were good from my other caliper, so I rebuilt it using those (and another Toyota rebuild kit...) and all was well.
New vs Old
Once installed, loads more stopping power..
Another view all fitted.
As documented these are a direct straight fit apart from trimming the metal dust shield. I used an angle grinder and finished it off with a file for a neat job, then sealed the lot with paint to prevent rust setting in.
A quick note of wheel fitment.... These will fit under the standard "5 spoke" wheels, but won't fit under the factory "split 3 spoke" wheels without either spacers, or grinding things. I personally don't like grinding that's that support you or stop you, so I'd probably advise against that.
They fit under my split rims nicely though.
This is in my opinion one of the single best mods we can do... if you can get hold of them without international shipping DO IT.
actually... even if you do need to pay international shipping.. still do it!
I just need to upgrade the rears now ;)
While I'm near wheels...
I managed to find a matching set of 5 split rims. (Ebay!)
They are Japanese in origin and came over on a Mitsubishi Pajero... I picked them up for a good price (they came with 33s mounted) I was stock height at the time, so ordered a local lift kit and got them on.. (OK this is where my build order of stuff gets screwed up.. I've not covered suspension yet).
The brand is "Raguna" (Nope never heard of them either) and the Model is ZZYZX. They were expensive new and feel really well made, with steel inserts around the lug nuts etc. they are 16" but I'm unsure of the offset (I need to measure) it's certainly a strong negative offset. Width wise I'd guess 9 or 10"
They were nice but looking a bit tired, so I got them refurbed, and got fresh BFGoodrich AT's fitted.
I opted for Audi Titanium Grey for the centres.
...and satin silver for the rim. they were originally anodised, but I couldn't get them re anodised...
All back and ready to mount... 5 33s takes up so much space!
I was missing centre caps, but I managed to find a company that can order things from Japan, so I got some new ones direct from the manufacturer.
I also asked the guy to get the writing on the tyres so it was as central as possible... yes I really am that OCD.
Yes he did think I was winding him up..
He did it though!
The overall effect with the Tundra calipers and super cheesy "dice" valve caps (random impulse buy because they were so terrible)
Suspension & Interior
(yes I've lost all relative linking and chronological order now)
The suspension on my truck has been through a few phases... I started off with a locally sourced kit... Vendor spec springs on Monroe shocks.. it was meant to give 2" lift but I don't think it did... the coils were also far too hard and the truck felt like it was shaking itself to pieces! However with a 1" Body lift it cleared my Tyres.. There was zero flex though.
After a year or so it had sagged so much I did the pretty much unspeakable, and bolstered it with a levelling kit... sagged again so I bolstered it again with a "3" levelling kit"
This did the job for a while, but after being "a bit exuberant" off road and getting some air it was time to upgrade again.. Frustrated with what was available locally, I got onto Toymods, who were awesomely helpful and shipped me a Boss kit to the UK.
I opened the boxes and cracked up at their packing note
Again a really good team and I can't recommend their services of their products enough!
The kit arrived and I unboxed it ready to fit.. I opted for the 550lb springs, as I figured that with my twin batteries that would be about right.. in retrospect, with the alloy blocked V8 500s would have probably been better suited. I ran with the OME rear springs and the Bilstein shocks... as well as the SPC Performance Adjustable upper arms (Now light racing?)
I must say the kit all looked and felt good!
The top mounts for the Bilsteins are mush more robust looking than the factory style Monroes... this feels like proper stuff...
The kit went on really easily.. far easier than wrestling with compressing springs for the front struts..
The fact that both top and rear have pivot mounts also frees things up a lot.. and the ride was SOOO much better.
I also installed my home brew panhard bar... this was a factory one modified with a heavy duty threaded section to take a heim joint... mounted in a custom drop bracket that was done previously..
The difference is huge, but since rejigging my truck and lowering it slightly after removing the previous "lift on lift" kit I need to move the body side of the panhard up slightly. its still "to do"
Yes, the rear axle stands out as the only bit that has not been tidied up.... I didn't bother as I had plans!!! (3 years later and I'm finally getting around to them)
I put the stock wheels back on (no ones alignment equipment can cope with the 285/75/16s) and got it aligned.
I was super happy with the results after before.. the castor is now correct so the steering straightens out as it should... its more compliant over bumps, and just feels a lot more like stock to drive... this is a good thing... especially when you have nearly 300bhp to keep straight...
Ages ago..
Really ages ago, before I sold it and bought it back, I decided I hated the diesel tractor noise so much I'd start sound deadening.
I stripped out the entire interior apart from the dash and door cards, and sound deadened the truck floor, as far us behind the dash as I could and roof with "E-Dead" sound deadening.
I then ran over a second layer with the foamy "E-dead Techlite" sound deadening.
Excuse the Exes POS Polo!
The difference was huge... it really cut down some rattles and made it a nice place to be... obviously I wouldn't get the full effect until the doors and tailgate were done...
The factory speakers really sucked... skipping forward to the time I bought my truck back, (Time hopping confusing everyone yet?) I was now used to the factory fitted Harman Kardon system.. it felt rich and smooth and like listening to warm honey... or something... so I decided to thicken up my trucks sound system with a sub.
I didn't want a huge "Blow the windows out" system, nor did I want to lose ANY luggage space (I have a Truckbedz air bed for camping) so I wanted something compact and neat... so I did the following...
I created a MDF face plate and worked out how deep it should sit... then using fibreglass created a sealed back.. the overall internal volume, although not a perfect shape is as near as dammit the 1 cubic foot that JL audio recommended for that 10" sub
The finished product was a "semi Stealth" Sub that sounded good, took up no space.. and looked pretty neat.
Skip on, um... 8 years.... and I had to reseal a gasket on the exhaust... to get the wires for the rear lambda sensors undone I had to remove the seats and pull up the carpet...
In my mind this was the perfect time to fit an amp I'm be "meaning to get around to fitting" for 8 years (bought off Ebay... really really weirdly buy someone I met 5 years later and is now my boss!).. as I was doing the Amp time for new speakers... I wanted something that sounded warm so opted for Morel Tempo 6 6.5" components, and rear 5.25" coaxials.
They sound ok to me... I need to replace my aging headunit (now 8+ year old Alpine Double Din DVD/TV/Nav unit) but it has the sort of sound I was after.
I also got around to fitting my bosses old amp... I don't have the rear heater, just a really odd shaped floor where there isn't one, so I fabbed up a metal bracket to sit it on, and installed it under my drivers seat.
Excuse the stains in the carpet.. I really want to replace that....
As always one change highlights other changes that need to be made....
I now had a very sound deadened truck with a very loud engine.... the stock horns really suck....
For Christmas a few years back My dad had also complained about the factory horn on his S class.. so I replaced it with a huge metal air horn from Russia (yup, Ebay).
I liked it... so I decided I need TWO on my truck... they are pretty big, I'd say over a foot and a half long... and they are LOUD...
So brackets were made and the horns were fitted...
This was a HUGE improvement... there is definitely no concern that the horn is too quiet now
__________________ 2001 Sport Edition 4WD, IJM, Auto, DD 1999 SR5 4WD, Millennium Silver Metallic, 5 speed, E-locker, Trail Rig 1998 SR5 4WD Custom bodywork from hitting a median. Beater truck. 1999 Limited 4WD No longer a vehicle. Now it's in parts and stored away.


 **
**


 Linear Mode


