Home Menu

Site Navigation


User Tag List

Reply
 
Thread Tools Rate Thread Display Modes
Old 06-18-2019, 10:04 AM #481
Taylor20's Avatar
Taylor20 Taylor20 is offline
Member
 
Join Date: May 2013
Location: Kentucky
Posts: 619
Taylor20 will become famous soon enough Taylor20 will become famous soon enough
Taylor20 Taylor20 is offline
Member
Taylor20's Avatar
 
Join Date: May 2013
Location: Kentucky
Posts: 619
Taylor20 will become famous soon enough Taylor20 will become famous soon enough
I like what you did with the rear links. Currently I am building a beefier and adjustable set to match the stock length, but when I outgrow that you have given me the idea of using my lower links up top extended to the frame and then build another lower set.

If I am ever out west, I hope to wheel with you. I could probably learn a few things.
__________________

02 Sport
Toytec Boss/LJ - TRD Pro & 255's - TBU - 4:30's - Elocker
4xI - AED - Savage
Taylor20 is offline   Reply With QuoteReply With Quote
Old 06-18-2019, 12:29 PM #482
Yellowg Yellowg is offline
Junior Member
 
Join Date: Sep 2018
Location: Tulsa
Posts: 12
Yellowg is on a distinguished road
Yellowg Yellowg is offline
Junior Member
 
Join Date: Sep 2018
Location: Tulsa
Posts: 12
Yellowg is on a distinguished road
looking good man
Yellowg is offline   Reply With QuoteReply With Quote
Old 06-23-2019, 08:34 PM #483
Black798's Avatar
Black798 Black798 is offline
Member
 
Join Date: Mar 2015
Location: Bozeman, Montana
Age: 25
Posts: 917
Real Name: Phoenix
Black798 is just really nice Black798 is just really nice Black798 is just really nice Black798 is just really nice
Black798 Black798 is offline
Member
Black798's Avatar
 
Join Date: Mar 2015
Location: Bozeman, Montana
Age: 25
Posts: 917
Real Name: Phoenix
Black798 is just really nice Black798 is just really nice Black798 is just really nice Black798 is just really nice
Counter Measures

Its pretty well documented that with the TRD supercharger the 3.4s fuel and computer system isn't really up to snuff for running the motor properly. My truck was no exception even living at 6000 ft. I have been having the usual high gear low rpm pinging issue, mostly on the highway in 4th gear or 3rd climbing a large hill at 60ish mph.

With these issues I was flying basically blind though since I onyl had my Scangauge which is pretty limited on its ability to show how the motor was running. Watching my long term fuel trims though I was seeing at cruise they were around -12 to -14 and at lower rpms around +10. Huh thats odd, more airflow but less fuel? yeah something definitely is up. I was also noticing around 4k rpms on a hard pull power would suddenly pick up a lot.

I needed some gauges, I knew I needed a AFR gauge for tuning, boost gauge is useful as well even though the piggy back ecu could display this for me, and I figured having an oil pressure gauge wouldnt be a bad idea either as a general health check on the motor.

Then I needed to mount them and anyone whos installed extra gauges in the 3rd gen knows there arent a lot of ways to do it. With how small the cab is I wasnt a fan of a pillar pod so I decided to move my radio to the lower DIN slot and put the gauges in the upper slot. I CNC cut a bracket and then spent a ton of time trimming and test fitting, heres what I ended up with.

IMG_20190623_175210
IMG_20190623_175229
IMG_20190623_175240

And for cable routing I just brought everything through the factory boot that houses the ECM wiring harness.
IMG_20190623_175304

Didnt take any pictures of the install but there really wasn't much to it other than a lot of time.

With the gauges in I took the truck for a test drive and here are my findings. Oil pressure is good, ranges from 20-70 psi while driving and idls around 6 to 10psi. Seems fine to me.

Boost maxes out around 5psi, seems pretty standard for the stock pulley at this elevation.

Now the AFRs were pretty interesting. Once warmed up the ECU is targeting 14.7 AFR all the time and it does a very good job of that with the AFRS hovering around there alternating lean to rich slightly as the ECU makes little adjustments. For a NA motor this would be pretty close to perfect as far as efficiency goes. But for a boosted motor its not ideal nor is it terribly safe. Under boost while cruising I was seeing 14.7 to 15.3 AFR, couple that with 22 degrees of timing advance and thats a perfect recipe for pinging ad eventual engine damage. The good news though was that under hard acceleration as soon as the ECU goes to open loop the AFRs drop down to a healthy 12.5-11.0 and the timing also retards by 5 to 7 degrees all the way up to redline. This also corresponds to a massive power increase that throws you back in the seat. Id be interested to see how this acted without the supercharger or if the ECU would target a leaner mixture. For me though it gives a good starting point of what is safe for when the time comes to tune closed loop.

And speaking of tuning I had originally planned to go with the AEM FIC6 due to price and the flexibility it provides over the 7th injector. For me spraying the fuel through the blower and not having direct control of the stock computer and fuel distribution just doesn't do it. Unfortunately though sometime this year AEM discontinued both the FIC6 and FIC8 so I needed another solution. I ended up going with a MAPecu3. Despite being almost twice as expensive as the FIC it provides a lot of extra features. Most I wont use but it does give me the ability to advance timing along with retarding it. That is scheduled to be delivered next week so well see how the tuning goes with it, fingers crossed.
__________________
98 Limited - Solid Axle Swapped,Turboed,And On 37s - Build
Transgo Shit Kit Writeup - Click Here
Black798 is offline   Reply With QuoteReply With Quote
Old 07-06-2019, 11:27 AM #484
Black798's Avatar
Black798 Black798 is offline
Member
 
Join Date: Mar 2015
Location: Bozeman, Montana
Age: 25
Posts: 917
Real Name: Phoenix
Black798 is just really nice Black798 is just really nice Black798 is just really nice Black798 is just really nice
Black798 Black798 is offline
Member
Black798's Avatar
 
Join Date: Mar 2015
Location: Bozeman, Montana
Age: 25
Posts: 917
Real Name: Phoenix
Black798 is just really nice Black798 is just really nice Black798 is just really nice Black798 is just really nice
Counter Measures Pt 2

Now that I had some gauges to know what was going on with the motor it was time to tune it. First I needed to install the MAPecu3 though. I decide to install the magic box in the glove box for easy access. Cutting into the stock ecu harness is always fun but finding the wiring diagram was kinda tough since TIS no longer works. As an FYI to anyone thinking about using it I created an account, was charged the 20$, and never able to access my account, I ended up calling my credit card company and having them void the charge.

IMG_20190629_183438 IMG_20190629_183446

I also logged all the wire connections I made into an excel spreadsheet. It doesn't have the factory ecu wire connections as that will vary from model year to model year but maybe this will help someone else trying to install this as well.
Screenshot (29)

After getting it installed and zeroing all the maps out the truck fired right up. In my case I havent needed to tune open loop but I have spent a good amount of time tuning the closed loop 02 map to manage fueling and also pulled some timing out at high boost and low rpms. I've completely eliminated the pinging even on the hottest days and really have picked up a lot of mid range torque. I've now started focusing on tuning the vacuum areas of my o2 map in closed loop to advance timing slightly and lean it out to about 15:1 afr and it has picked me up about 2 mpg which is awesome.

Even with the proper fueling I was seeing engine temps knocking the door on 200 when pulling large hills where before the supercharger I never broke 193. I decided to swap in the Stant 170 degree thermostat most use yesterday. Well see how that effects temps over the next few days. I also picked up this can of race gas octane additive. This is purely as a safety net so that if I end up somewhere and am either not able to get 91 octane or end up with a bad tank that I cant tune the ping out of it I can add this to help save the motor until I can get another tank of good fuel.

IMG_20190705_120629

Also picked up this guy when I ordered the ecu. URD 2.2 Pulley. I have not installed it yet as I'm actually really happy with the power on the stock pulley and I want to really nail down the tune before changing anything else.
IMG_20190626_185417_Bokeh

Unfortunately though turns out my transmission with 200k on it was not up to the task of the added power despite the transgo shift kit. Ive been noticing that first gear has really started to slip above 40% throttle and it seems to be getting progressively worse despite having fresh fluid that isnt burnt. Last Monday I called John at IPT Trans and after talking with him for the better part of an hour have decided to pull the transmission after my next trip, ship it out to him and have him go through and rebuild the whole thing. This goes a few steps beyond their valve body mod as it not only includes that, but he modifies the clutches in the torque converter, installs new HD clutches throughout the trans that will increase the holding power, and he does a fair amount of machine work to refresh things and improve upon the factory short comings. Im not looking forward to the 3k dollar bill but I feel the peace of mind of having a trans that can handle the power and abuse I put it through will be well worth it.
__________________
98 Limited - Solid Axle Swapped,Turboed,And On 37s - Build
Transgo Shit Kit Writeup - Click Here
Black798 is offline   Reply With QuoteReply With Quote
Old 09-15-2019, 10:59 AM #485
Black798's Avatar
Black798 Black798 is offline
Member
 
Join Date: Mar 2015
Location: Bozeman, Montana
Age: 25
Posts: 917
Real Name: Phoenix
Black798 is just really nice Black798 is just really nice Black798 is just really nice Black798 is just really nice
Black798 Black798 is offline
Member
Black798's Avatar
 
Join Date: Mar 2015
Location: Bozeman, Montana
Age: 25
Posts: 917
Real Name: Phoenix
Black798 is just really nice Black798 is just really nice Black798 is just really nice Black798 is just really nice
Been meaning to update this for a long time lol. Quite a bit has happened since I last updated this so guess ill start with the recent mods and such Ive taken care of.

First big one is the transmission, Im not sure how but it has somehow healed itself and no longer slips so I am just going to keep running it. I changed the fluid in it last week and there was no evidence of burning or a large amount of clutch material so I believe its in good shape and I somehow of may have been getting a lot of belt slippage without it losing boost or something. Very weird but Im not complaining.

Next was the power steering cooler, a while back I found my ps fluid was totally cooked after only a year and I could still physically feel when the steering was getting hot and the power assist would decrease a lot. Ended up installing one of the aluminum finned in line heat exchangers on the front diff cross member behind the skid. There was already a power steering return line here so install was super easy, it nearly doubled the fluid capacity of the system and it does see some airflow off the radiator fan. So far it has been making a huge difference in how long it takes for the steering to get how and the fluid is staying much nicer..

IMG_20190710_193809


Next "mod" was swapping out spark plugs. When I installed the blower I got some e3 plugs that were speced in the same temp range as the denso ik22s. My theory with them was that they were the closest to a dual ground plug I could find. Well all I can say is they suck, I was getting random rich misfires, stupid amounts of ping that I couldnt tune out no matter what I did and just not the performance I wanted. Decided to pull them and heres what I found. See all that shiny stuff on the ground strap? yeah that's aluminum melted to the electrode from all the pinging, and the back specs? those are little bits of oil that's gotten burnt into the porcelain which is also a sign of detonation problems.
IMG_20190722_170137

Finally got smart and swapped in some denso ik24s and have been having much better results and am getting very close to having the tune for the 2.2 pulley be 100% ping free no matter what and make plenty of power while doing it. Thats it for mods so onto the Colorado trip....
__________________
98 Limited - Solid Axle Swapped,Turboed,And On 37s - Build
Transgo Shit Kit Writeup - Click Here
Black798 is offline   Reply With QuoteReply With Quote
Old 09-15-2019, 04:45 PM #486
Black798's Avatar
Black798 Black798 is offline
Member
 
Join Date: Mar 2015
Location: Bozeman, Montana
Age: 25
Posts: 917
Real Name: Phoenix
Black798 is just really nice Black798 is just really nice Black798 is just really nice Black798 is just really nice
Black798 Black798 is offline
Member
Black798's Avatar
 
Join Date: Mar 2015
Location: Bozeman, Montana
Age: 25
Posts: 917
Real Name: Phoenix
Black798 is just really nice Black798 is just really nice Black798 is just really nice Black798 is just really nice
Every year I make it a point to get down to Colorado to visit family and do a little wheeling. This year I was able to make it happen the last two weeks of July and while I was down there I was able to run Holy Cross and Wheeler Lake for a second time.

Holy Cross is one of the harder trails in Colorado and for us ifs guys Id say it gets right up there on the limit of what we can do. Theres really only 4 tough obstacles but they all will kick your ass and have a lot of potential for body damage. As luck would have it the day we ran it there was rain most of the day.


After getting past the 1 way section the first obstacle is 100 yards up the trail. There was already a line when we got there and we could hear someone getting real friendly with the skinny pedal.

First obstacle is marked by the sign
IMG_9951

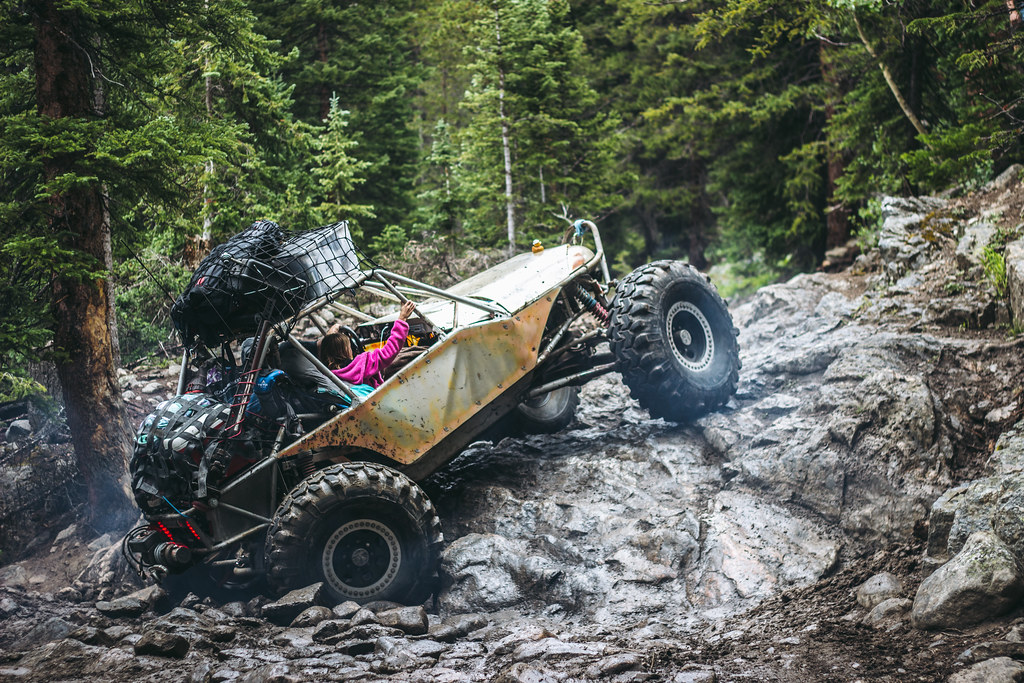
And this was where all the noise came from. Full tube buggy on 44s, we watched him work at it for 15 minutes before finally winching.
IMG_9946

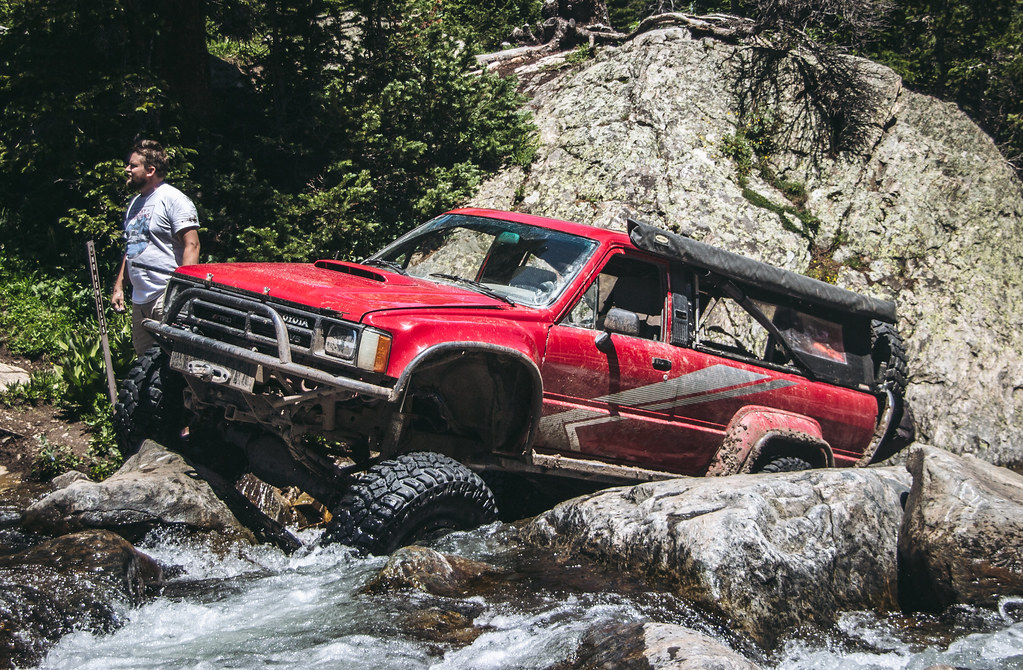
There were a few rzrs in front of us and when the first one tried to bump it up the wall he immediately blew his trans axle giving him 3 neutrals. After getting him out of the way Justin in the red 1st gen walked right up the wall.
IMG_9954

I rolled up onto the wall and started off with both lockers on and after giving it two light bumps I could feel that the truck really wanted to climb and would probably of gone if I hit it a little harder but having a line of 30 jeeps behind us and not wanting to break on the first obstacle I opted to winch

We ended up winching david up as well since it started pouring rain..
IMG_9958

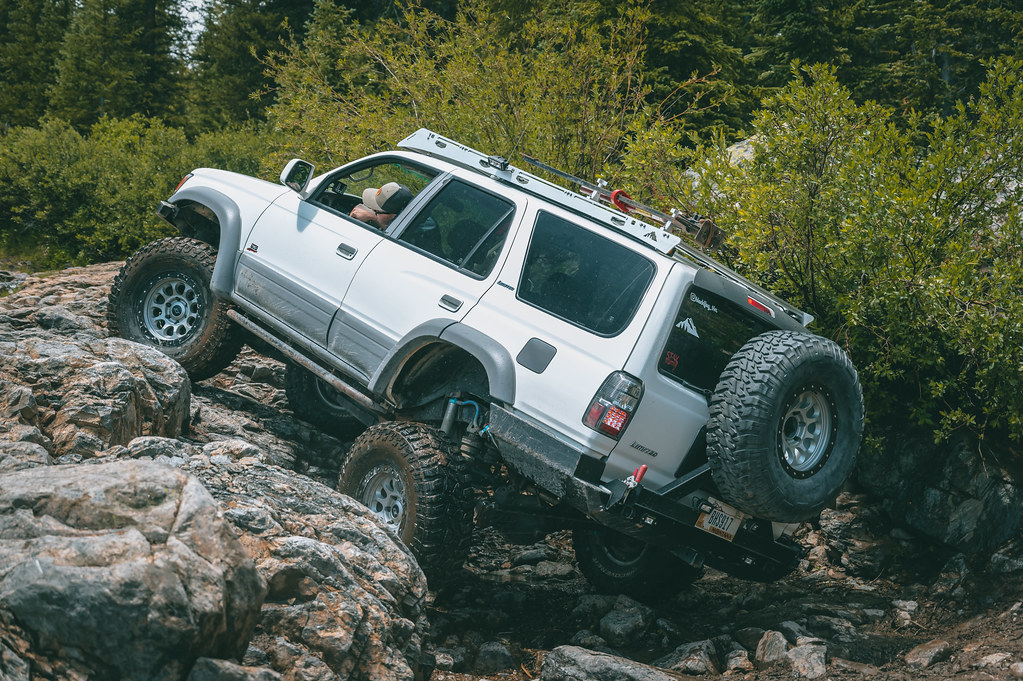
We made good time up to the next ledge and again Justin walked the first gen right up...
IMG_9966
IMG_9972
IMG_9970

I really wanted to make the far left line work but after trying for a few minutes I couldnt get the ass end to line up and follow the front how I wanted and it was getting pretty tippy. I ended up taking the right line, turtling on my gas tank and then after letting the tires warm up I made it up under my own steam.
_DSC2500

David followed the same line up with similar results.
IMG_9980

IMG_9989

IMG_0005

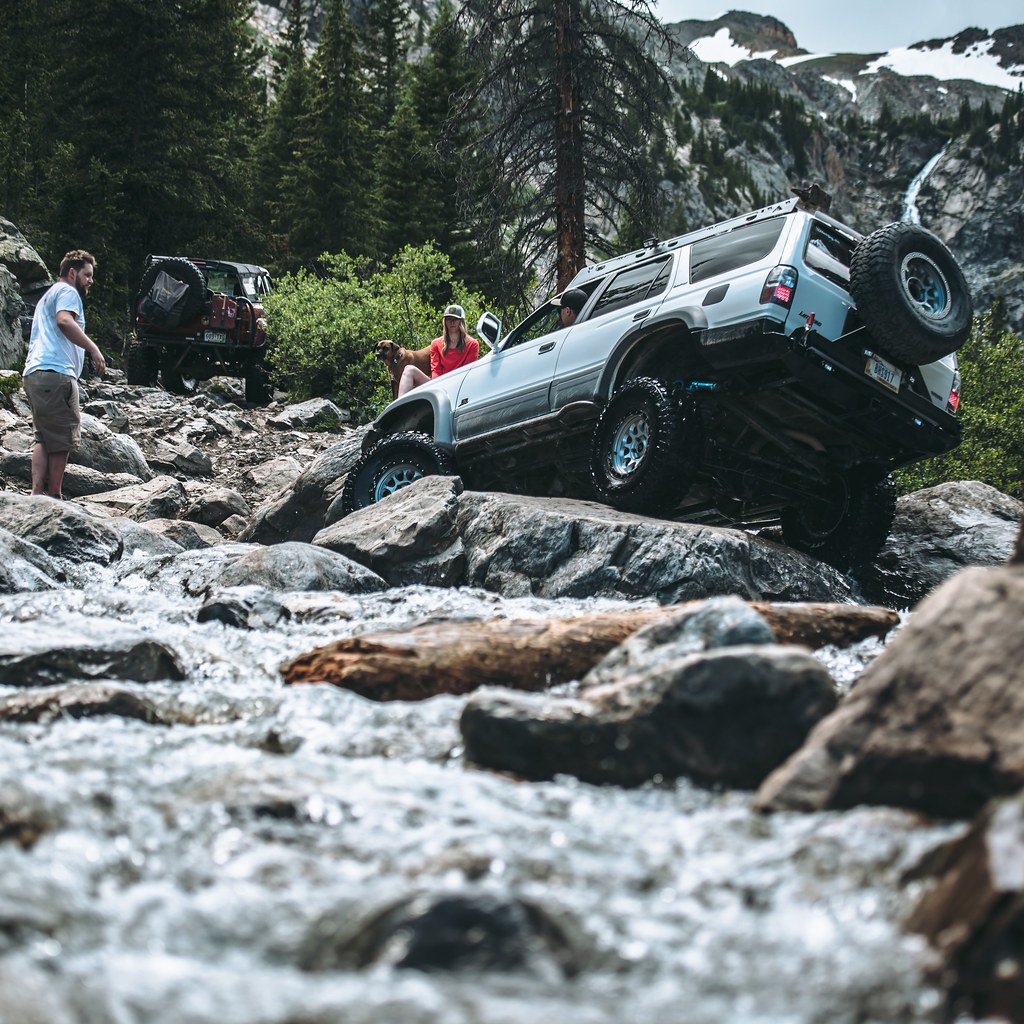
The next obstacle is only about 5 minutes up the trail and I think its what earns this trail its reputation. French creek is a pretty large creek crossing with car sized boulders that are scattered all across the exit. Big rocks, lots of water, and little traction, perfect recipe.

Justin went to take the right line and when re positioning his front diff snagged on a rock and flexed the leaf springs enough that it pulled his front driveshaft apart at the slip yoke so he had no choice but to fix it in the creek.

IMG_0014
IMG_0026
IMG_0029

After getting the driveshaft fixed he continuted on through the creek and out the other end. I was up next and took the right line as well. Id seen a few videos of @Dirtco taking the same line and I could see a pretty clear path so I felt like I had a decent shot at making it despite how deep the water was.

IMG_20190729_071152_539

I ended up needing to take a few stabs at it but after getting it lined up just right I climbed right up.

IMG_20190727_223142_033

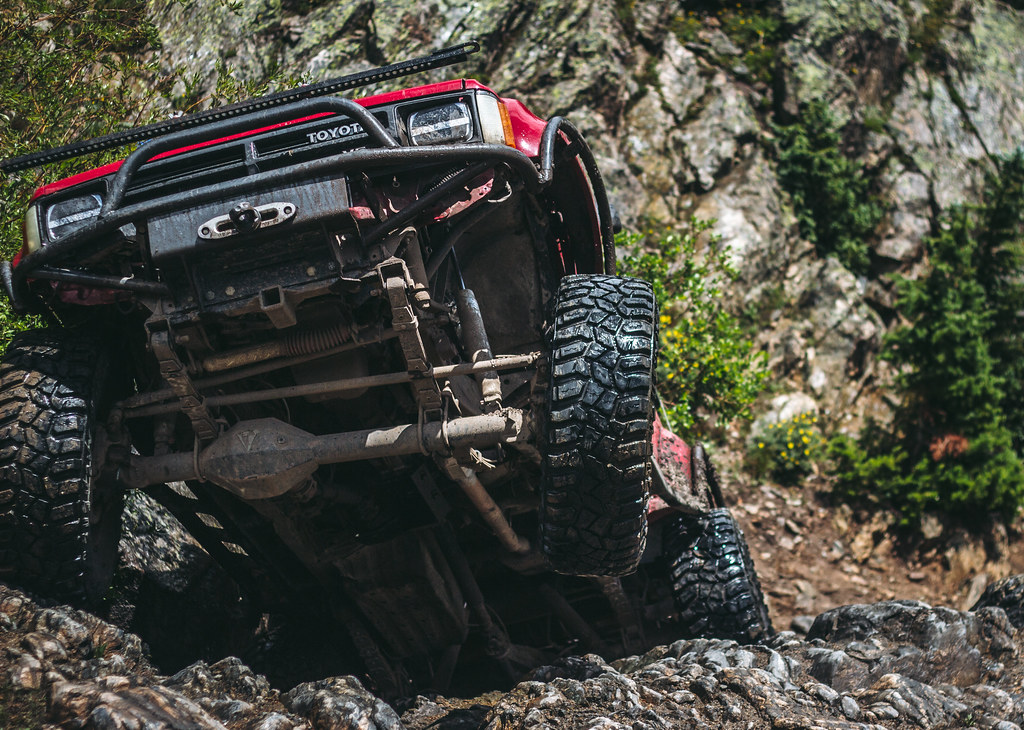
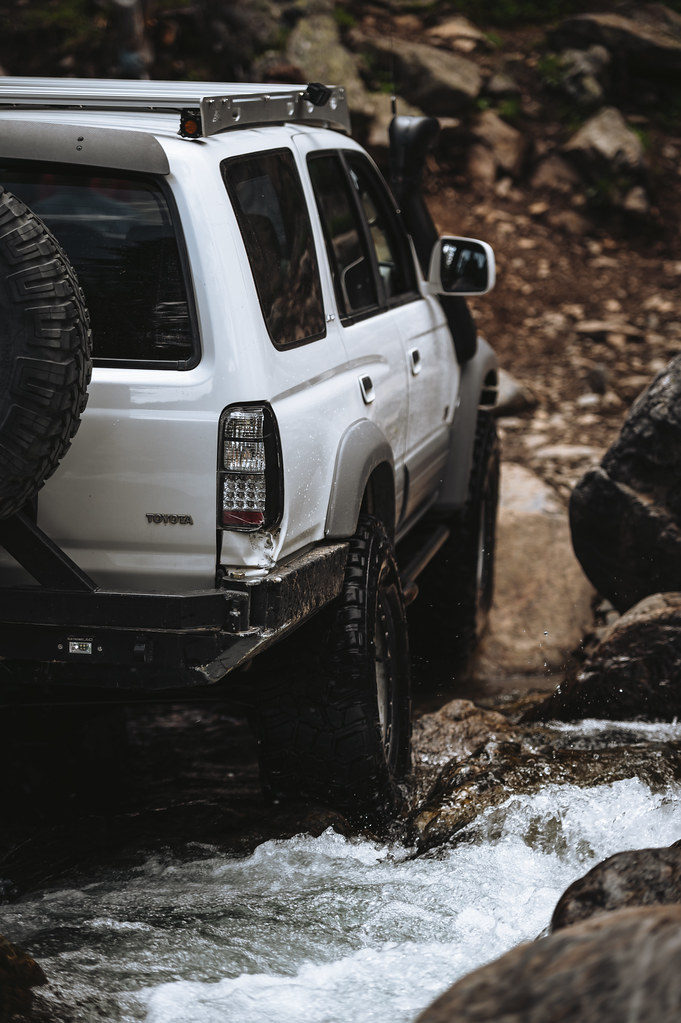
And then it happened.. I got up the big line unlocked the front and the front end went down into a hole. It didnt feel very deep so I flipped the front locker back on and started to climb over the rock. Just as the front end came up there was a loud bang and a bunch of shit went bouncing off the rocks. The passenger CV had exploded the outer cup and shot all the balls out under the truck. With only 3wd and the tires covered in water there was no way I was getting out of the creek under my own power so out came the winch. To add insult to injury due to me being dumb and listening to one of the jeep guys that tried to help spot me up the first rock I ran my passenger taillight and quarter panel into a rock pretty hard causing some pretty good body damage.

After winching out of the hole I was in because of how it broke the cv fell the rest of the way out on its own and I was able to limp the rest of the way out of the creek.

Full view of the body damage...
_DSC2753

By now the spotty weather had turned and we were getting dumped on again so we opted to drive untill we either hit the city or found a flat spot to swap my cv out. In the meantime I left the rear locked and locked the front as needed to get the front end up things. There was one more good ledge before the city and without all 4 wheels it as just too sloppy to get up and I needed to winch.
_DSC2789

About 10 minutes later we were at the city and I swapped the cv in about 20 minutes.
IMG_0043

Annnndddd the carnage. Notice how the inner cage that typically blows was intact but all 6 balls managed to get out and the outer cup shattered in half. Not something you see everyday but for wheeling how I do and only breaking this one axle in 8 months Ill take it.
IMG_20190728_073115
__________________
98 Limited - Solid Axle Swapped,Turboed,And On 37s - Build
Transgo Shit Kit Writeup - Click Here
Black798 is offline   Reply With QuoteReply With Quote
Old 09-15-2019, 04:47 PM #487
Black798's Avatar
Black798 Black798 is offline
Member
 
Join Date: Mar 2015
Location: Bozeman, Montana
Age: 25
Posts: 917
Real Name: Phoenix
Black798 is just really nice Black798 is just really nice Black798 is just really nice Black798 is just really nice
Black798 Black798 is offline
Member
Black798's Avatar
 
Join Date: Mar 2015
Location: Bozeman, Montana
Age: 25
Posts: 917
Real Name: Phoenix
Black798 is just really nice Black798 is just really nice Black798 is just really nice Black798 is just really nice
We went up and watched some buggys play on cleveland rock for a bit before we turned around and headed back down.

IMG_0049
IMG_0055
IMG_0069

The pictures really put french creek and the size of the rocks into perspective.
IMG_20190729_211111_238
IMG_0093

IMG_0100

Dropping back down the ledge
IMG_0123

And buggys doing buggy things...
IMG_0139


That was about it for Holy Cross. Despite wrecking my quarter panel which I was quoted 3500 to fix it was an awesome day. I havent really recided what to do about it yet since I cant replace the tail light with the sheet metal as bent as it is but Im thinking now of splicing in a different skin from another 4runner and having it painted. I guess well see.

Better shot of the corner...
IMG_20190727_140741
__________________
98 Limited - Solid Axle Swapped,Turboed,And On 37s - Build
Transgo Shit Kit Writeup - Click Here
Black798 is offline   Reply With QuoteReply With Quote
Old 09-18-2019, 11:08 PM #488
Dirtco's Avatar
Dirtco Dirtco is offline
Senior Member
 
Join Date: Mar 2011
Location: Colorado
Posts: 1,758
Real Name: Jeremiah
Dirtco is a name known to all Dirtco is a name known to all Dirtco is a name known to all Dirtco is a name known to all Dirtco is a name known to all Dirtco is a name known to all
Dirtco Dirtco is offline
Senior Member
Dirtco's Avatar
 
Join Date: Mar 2011
Location: Colorado
Posts: 1,758
Real Name: Jeremiah
Dirtco is a name known to all Dirtco is a name known to all Dirtco is a name known to all Dirtco is a name known to all Dirtco is a name known to all Dirtco is a name known to all
Thanks for posting your Holy Cross pictures! I was wondering how the trail looked after the last winter we had. If you make another Colorado next year let me know, I would love to meet up if possible.

Sucks about the tail light, I think your best bet would be finding a donor and grafting in that section below the tail light housing. I would be wiling to bet you could get a tail light back in after some work with one of those welding stud guns and some "creative" body work, but it wouldn't be pretty.
Dirtco is offline   Reply With QuoteReply With Quote
Old 09-19-2019, 06:52 PM #489
Fishwerks's Avatar
Fishwerks Fishwerks is offline
Senior Member
 
Join Date: Jan 2012
Location: Southwest
Posts: 1,075
Real Name: Chris
Fishwerks will become famous soon enough Fishwerks will become famous soon enough
Fishwerks Fishwerks is offline
Senior Member
Fishwerks's Avatar
 
Join Date: Jan 2012
Location: Southwest
Posts: 1,075
Real Name: Chris
Fishwerks will become famous soon enough Fishwerks will become famous soon enough
Might as well cut the back end of the 4runner off now that it's dented.
__________________
Fishwerks' Photo/Build Thread 2000 SR5 l White on White l 35s l Supercharged
--
2010 Trail Edition l Salsa Red Pearl l Stock
--
Instagram
Fishwerks is offline   Reply With QuoteReply With Quote
Old 09-20-2019, 08:59 AM #490
Black798's Avatar
Black798 Black798 is offline
Member
 
Join Date: Mar 2015
Location: Bozeman, Montana
Age: 25
Posts: 917
Real Name: Phoenix
Black798 is just really nice Black798 is just really nice Black798 is just really nice Black798 is just really nice
Black798 Black798 is offline
Member
Black798's Avatar
 
Join Date: Mar 2015
Location: Bozeman, Montana
Age: 25
Posts: 917
Real Name: Phoenix
Black798 is just really nice Black798 is just really nice Black798 is just really nice Black798 is just really nice
Quote:
Originally Posted by Dirtco View Post
Thanks for posting your Holy Cross pictures! I was wondering how the trail looked after the last winter we had. If you make another Colorado next year let me know, I would love to meet up if possible.

Sucks about the tail light, I think your best bet would be finding a donor and grafting in that section below the tail light housing. I would be wiling to bet you could get a tail light back in after some work with one of those welding stud guns and some "creative" body work, but it wouldn't be pretty.
I'll for sure let you know next time I make it down there. Will probably be around the same time next year.

I agree about the tailight. Body shop wanted to cut all the way up by the rear door which is just impractical and after looking close at it the actual structure of the truck around the hatch is totally fine all the damage seems to be isolated to the outer skin. Ive been working to track down a donor truck to go cut a chunk off of but most around here are in the yard for being hit in the rear. It's not super high on the priority list since the rear axle is also bent in about 3 different ways. With your previous trail gear setup and fror full float kit was there anything that you would of changed about that setup or did it work pretty flawless? I'm looking at going a similar route if the tg housing with stock shafts and then in a year or so when I can afford to start a SAS on the front convert it to full float.

Quote:
Originally Posted by Fishwerks View Post
Might as well cut the back end of the 4runner off now that it's dented.
Don't tempt me with a good time.... A front sas is already in the future for this thing. I'm sick of replacing the same ball joints and other wear items like that once a year without any options for upgrades.
__________________
98 Limited - Solid Axle Swapped,Turboed,And On 37s - Build
Transgo Shit Kit Writeup - Click Here
Black798 is offline   Reply With QuoteReply With Quote
Old 09-28-2019, 06:05 PM #491
Dirtco's Avatar
Dirtco Dirtco is offline
Senior Member
 
Join Date: Mar 2011
Location: Colorado
Posts: 1,758
Real Name: Jeremiah
Dirtco is a name known to all Dirtco is a name known to all Dirtco is a name known to all Dirtco is a name known to all Dirtco is a name known to all Dirtco is a name known to all
Dirtco Dirtco is offline
Senior Member
Dirtco's Avatar
 
Join Date: Mar 2011
Location: Colorado
Posts: 1,758
Real Name: Jeremiah
Dirtco is a name known to all Dirtco is a name known to all Dirtco is a name known to all Dirtco is a name known to all Dirtco is a name known to all Dirtco is a name known to all
Quote:
Originally Posted by Black798 View Post
With your previous trail gear setup and fror full float kit was there anything that you would of changed about that setup or did it work pretty flawless? I'm looking at going a similar route if the tg housing with stock shafts and then in a year or so when I can afford to start a SAS on the front convert it to full float.
Honestly, you would be better off just buying a Diamond housing (if your going to stick with Toyota running gear). The full float kit is nice but it has it's issue's. First, unlike a Diamond housing the axle seal is located in the spindle adapter vs the outer edge of the center section in the housing. Even with my custom machined spindle adapters my seals have always leaked, I've replaced them so many times that I've given up on them sealing.

I also have issues with the adapter leaking oil between the axle flange. Even with a high quality silicone compound (I've tried many different brands) after a few months I get a small leak. On my new housing I welded the adapter straight to the housing for extra strength and to prevent the leak.

Other than that it is a nice kit, and much easier to work on vs the pressed on bearings. It's also strong and I have yet to break anything major (knock on wood). BUT, if I could go back in time I would probably just buy some one ton Super Duty axles and build those instead.

Last edited by Dirtco; 09-28-2019 at 06:08 PM.
Dirtco is offline   Reply With QuoteReply With Quote
Old 09-28-2019, 06:53 PM #492
eimkeith's Avatar
eimkeith eimkeith is offline
Official Vendor
 
Join Date: Aug 2008
Location: Charlotte, NC
Posts: 1,471
eimkeith is a glorious beacon of light eimkeith is a glorious beacon of light eimkeith is a glorious beacon of light eimkeith is a glorious beacon of light eimkeith is a glorious beacon of light eimkeith is a glorious beacon of light
eimkeith eimkeith is offline
Official Vendor
eimkeith's Avatar
 
Join Date: Aug 2008
Location: Charlotte, NC
Posts: 1,471
eimkeith is a glorious beacon of light eimkeith is a glorious beacon of light eimkeith is a glorious beacon of light eimkeith is a glorious beacon of light eimkeith is a glorious beacon of light eimkeith is a glorious beacon of light
Quote:
Originally Posted by Dirtco View Post
On my new housing I welded the adapter straight to the housing for extra strength and to prevent the leak.
What's the down-side there? sounds like a great solution?
__________________
keith
eimkeith.com
all product descriptions © eimkeith LLC 2016-2023
eimkeith is offline   Reply With QuoteReply With Quote
Old 09-28-2019, 10:09 PM #493
Black798's Avatar
Black798 Black798 is offline
Member
 
Join Date: Mar 2015
Location: Bozeman, Montana
Age: 25
Posts: 917
Real Name: Phoenix
Black798 is just really nice Black798 is just really nice Black798 is just really nice Black798 is just really nice
Black798 Black798 is offline
Member
Black798's Avatar
 
Join Date: Mar 2015
Location: Bozeman, Montana
Age: 25
Posts: 917
Real Name: Phoenix
Black798 is just really nice Black798 is just really nice Black798 is just really nice Black798 is just really nice
Quote:
Originally Posted by Dirtco View Post
Honestly, you would be better off just buying a Diamond housing (if your going to stick with Toyota running gear). The full float kit is nice but it has it's issue's. First, unlike a Diamond housing the axle seal is located in the spindle adapter vs the outer edge of the center section in the housing. Even with my custom machined spindle adapters my seals have always leaked, I've replaced them so many times that I've given up on them sealing.

I also have issues with the adapter leaking oil between the axle flange. Even with a high quality silicone compound (I've tried many different brands) after a few months I get a small leak. On my new housing I welded the adapter straight to the housing for extra strength and to prevent the leak.

Other than that it is a nice kit, and much easier to work on vs the pressed on bearings. It's also strong and I have yet to break anything major (knock on wood). BUT, if I could go back in time I would probably just buy some one ton Super Duty axles and build those instead.
Thats interesting to hear about the FF kit issues. Good info though since not a lot of people are running them so finding any honest reviews of it is near impossible. I hear ya on the pressed bearings though, they arent hard to work on but its such a pain especially when Im burning through seals and bearings in less than a year.

I'm not so sure Ill be going with a diamond axle after the experience two guys I know have had. The most recent one called diamond 5 times to confirm the knuckle balls on his front axle would not be welded on and also to get a tracking number. When the tracking number was finally sent to him the axle was already waiting for pickup and the knuckle balls were welded on and gusseted so now were stuck figuring out how to cut and turn those since the pinion angle is way off and we cant get a response by phone call or email. There were also several spots on the housing inside that weren't fully welded like they should be which for the price I find unacceptable.

Right now since the housing is only off an 1/8th and it drives halfway decent Im just going to replace the bent shaft until I have the money and better plan for a long term solution. Well see how it drives in the snow that might change plans a bit if it is trying to send me all over the road.

After seeing this diamond housing in person though I dont see any reason I couldn't build a housing myself which could be kind of a fun project and I could build it exactly how I want. Id just need to source a few machined parts and make some good jigs to keep everything straight. The other option is a ruffstuff housing but Ive heard their center sections are massive rock anchors. Whichever route I go Ill for sure be having the full float flanges welded in. Tons would be sweet but at that point I might as well build a buggy.
__________________
98 Limited - Solid Axle Swapped,Turboed,And On 37s - Build
Transgo Shit Kit Writeup - Click Here
Black798 is offline   Reply With QuoteReply With Quote
Old 11-24-2019, 09:07 PM #494
Black798's Avatar
Black798 Black798 is offline
Member
 
Join Date: Mar 2015
Location: Bozeman, Montana
Age: 25
Posts: 917
Real Name: Phoenix
Black798 is just really nice Black798 is just really nice Black798 is just really nice Black798 is just really nice
Black798 Black798 is offline
Member
Black798's Avatar
 
Join Date: Mar 2015
Location: Bozeman, Montana
Age: 25
Posts: 917
Real Name: Phoenix
Black798 is just really nice Black798 is just really nice Black798 is just really nice Black798 is just really nice
After a lot of debate over the different routes I could go to fix the rear axle situation I have decided to build my own housing. I started the design a few weeks ago and am pretty much at the point where I am ready to start construction. I have already cut and bent all the pieces for the center section so I just need the tubes and truss parts. I also figured if Im going to have a fresh clean housing it makes sense to redo the rear suspension how I want now so Ill be doing that as well. The plan for that will be a cantilever setup with coilovers to get around 14 inches of travel and add a bunch of stability and tuneability.

Key features of this will be..

Land cruiser 9.5" diff (no more worrying Ill have to deal with a broken ring and pinion every time I bump my fat ass up something)

3.5" 3/8 wall axle tubes

Full backbone truss

Full float chromoly hubs and spindles

Chromoly axle shafts

Disk breaks


Quite the upgrade over stock in my opinion, it will be heavy enough to help lower the cog and keep the truck planted with plenty of strength without sacrificing all my ground clearance. Super excited to get started on this and Ill post up some updates once I have them

Rear Axle Master Assembly Front

Rear Axle Master Assembly Rear
__________________
98 Limited - Solid Axle Swapped,Turboed,And On 37s - Build
Transgo Shit Kit Writeup - Click Here
Black798 is offline   Reply With QuoteReply With Quote
Old 11-25-2019, 12:17 AM #495
Road Bull's Avatar
Road Bull Road Bull is offline
Senior Member
 
Join Date: Jan 2015
Location: WA.
Posts: 2,065
Real Name: Ryder
Road Bull is a jewel in the rough Road Bull is a jewel in the rough Road Bull is a jewel in the rough Road Bull is a jewel in the rough
Road Bull Road Bull is offline
Senior Member
Road Bull's Avatar
 
Join Date: Jan 2015
Location: WA.
Posts: 2,065
Real Name: Ryder
Road Bull is a jewel in the rough Road Bull is a jewel in the rough Road Bull is a jewel in the rough Road Bull is a jewel in the rough
[QUOTE=Black798;3396506]After a lot of debate over the different routes I could go to fix the rear axle situation I have decided to build my own housing. I started the design a few weeks ago and am pretty much at the point where I am ready to start construction. I have already cut and bent all the pieces for the center section so I just need the tubes and truss parts. I also figured if Im going to have a fresh clean housing it makes sense to redo the rear suspension how I want now so Ill be doing that as well. The plan for that will be a cantilever setup with coilovers to get around 14 inches of travel and add a bunch of stability and tuneability.

Key features of this will be..

Land cruiser 9.5" diff (no more worrying Ill have to deal with a broken ring and pinion every time I bump my fat ass up something)

3.5" 3/8 wall axle tubes

Full backbone truss

Full float chromoly hubs and spindles

Chromoly axle shafts

Disk breaks


Quite the upgrade over stock in my opinion, it will be heavy enough to help lower the cog and keep the truck planted with plenty of strength without sacrificing all my ground clearance. Super excited to get started on this and Ill post up some updates once I have them

That sounds pretty bad ass. I'm looking forward to seeing how it turns out. Necessity is the mother of invention. For the price of some of the other options, I can see how flaws and compromises would be extremely irritating. At least by building your own, you can get something custom tailored for your needs.
__________________
2002 SR-5 in Millennium Silver.
Timeline>> http://www.toyota-4runner.org/3rd-ge...-timeline.html DEAD
2002 SR5 Changeling Build https://www.toyota-4runner.org/3rd-g...ing-build.html
Road Bull is offline   Reply With QuoteReply With Quote
Reply


Posting Rules
You may not post new threads
You may not post replies
You may not post attachments
You may not edit your posts

BB code is On
Smilies are On
[IMG] code is On
HTML code is On

Forum Jump

Similar Threads
Thread Thread Starter Forum Replies Last Post
Zak's 03 Limited Build Thread zopperman 4th Gen T4Rs 212 09-10-2020 03:05 AM
TRDTeen '99 Limited Build Thread TRDteen 3rd gen T4Rs 194 04-03-2020 10:56 PM
ZOMBRNR's 06 T4R Limited Build Thread ZOMBRNR 4th Gen T4Rs 104 07-20-2018 01:26 PM
541joseph's 96 limited build thread 541joseph 3rd gen T4Rs 3 12-08-2015 01:52 PM
Ped's 97 Limited Build Thread pedmonds0219 3rd gen T4Rs 30 01-28-2014 04:41 PM

Powered by vBadvanced CMPS v3.2.2

All times are GMT -4. The time now is 08:15 PM.

Powered by vBulletin® Version 3.8.11
Copyright ©2000 - 2024, vBulletin Solutions Inc.
Search Engine Optimisation provided by DragonByte SEO (Pro) - vBulletin Mods & Addons Copyright © 2024 DragonByte Technologies Ltd.
Feedback Buttons provided by Advanced Post Thanks / Like (Lite) - vBulletin Mods & Addons Copyright © 2024 DragonByte Technologies Ltd.
User Alert System provided by Advanced User Tagging (Lite) - vBulletin Mods & Addons Copyright © 2024 DragonByte Technologies Ltd.
***This site is an unofficial Toyota site, and is not officially endorsed, supported, authorized by or affiliated with Toyota. All company, product, or service names references in this web site are used for identification purposes only and may be trademarks of their respective owners. The Toyota name, marks, designs and logos, as well as Toyota model names, are registered trademarks of Toyota Motor Corporation***Ad Management plugin by RedTyger
 
Copyright © 2020