 09-17-2016, 11:04 PM
|
#1
|
 |
Senior Member
|
|
Join Date: Jul 2013
Location: Tennessee
Age: 26
Posts: 2,852
Real Name: Charlie
|
|
|
Senior Member
Join Date: Jul 2013
Location: Tennessee
Age: 26
Posts: 2,852
Real Name: Charlie
|
How To: Rear Wheel Bearings/ Seals at Home
This is a little guide I'm writing as a supplement to BFAD and drcoffee's write-ups. This is the part that a machine shop would normally do, but I'm too cheap for that (and up for a challenge), so I did it myself. This is going to be the first writeup for an ABS axle that includes the press work for the "backwards retainer" method.
Here is BFAD's thread: Rear Axle Seals: The Ultimate Information and Replacement Thread (3rd gen)
And drcoffee's thread about flipping the retainer: A possible solution to leaking axle seals
Here are the new parts I bought:
Timken bearing with retainers (re-boxed NACHI Made In Japan)
Wagner Lug Studs (made in USA)
Doorman Wheel Cylinders (Painted black to prevent rust)
Toyota Outer Seal
Toyota Inner Seal
Toyota Snap Ring
Toyota O-Ring
Doorman ABS Ring
Wagner Brake Hardware (1 kit does both sides, made in USA)

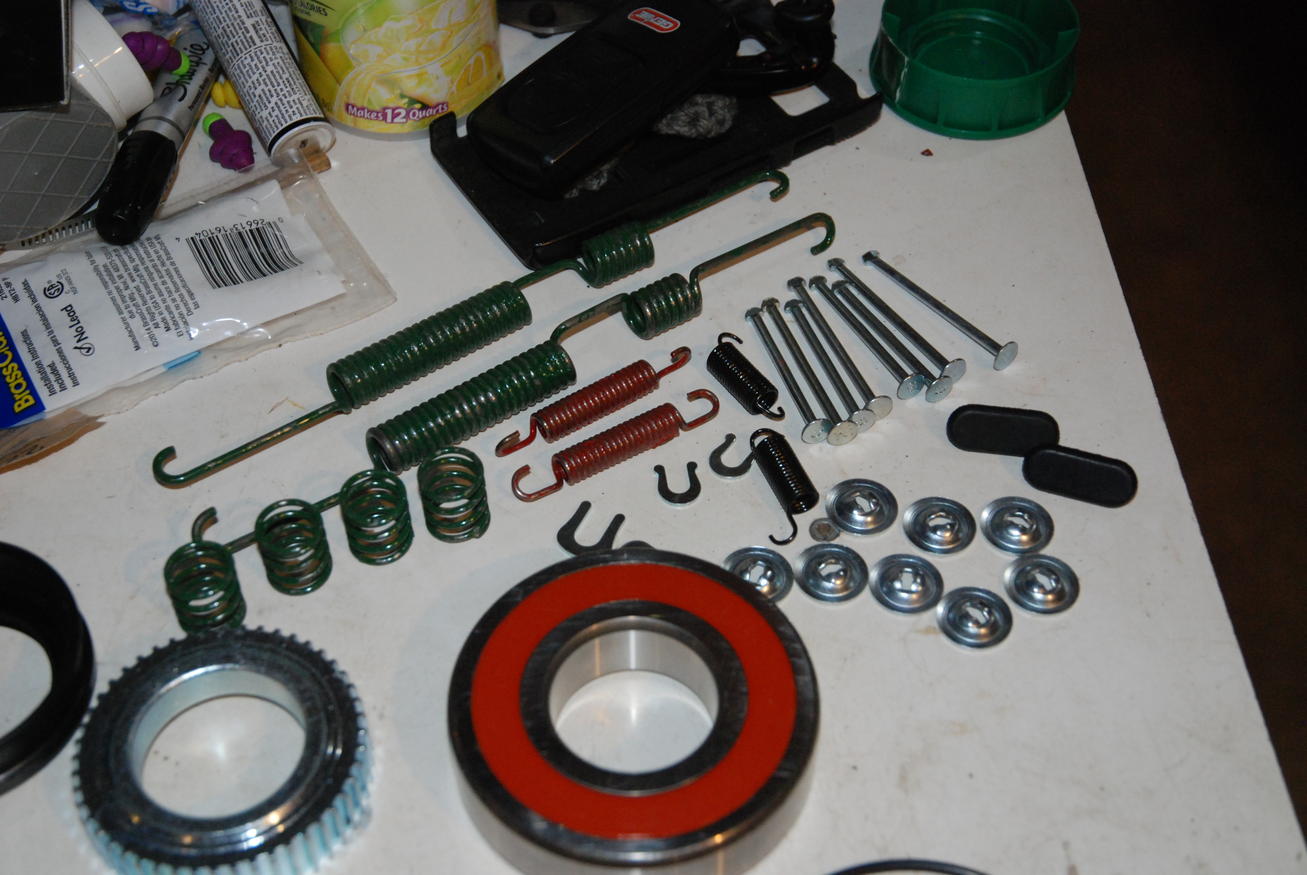
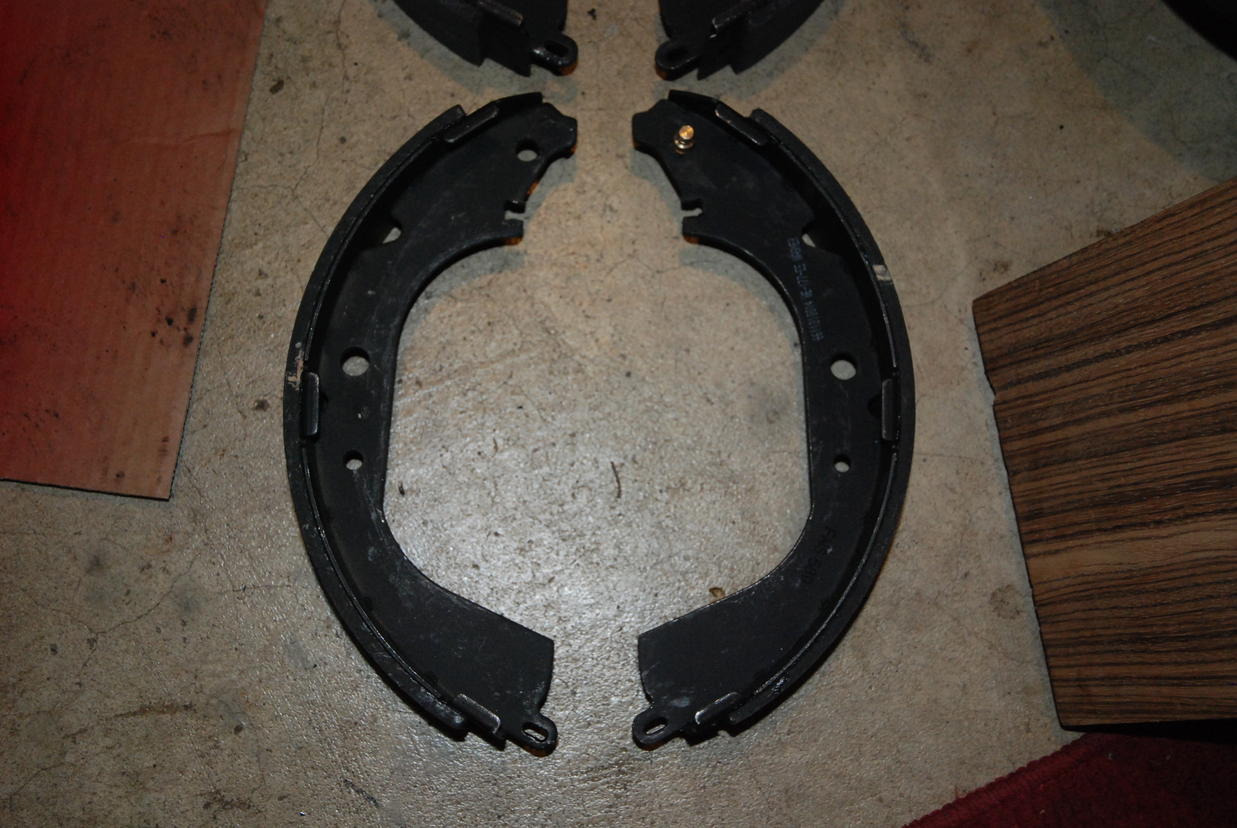
Wagner ThermoQuiet Brake Shoes- notice they come with the pin installed
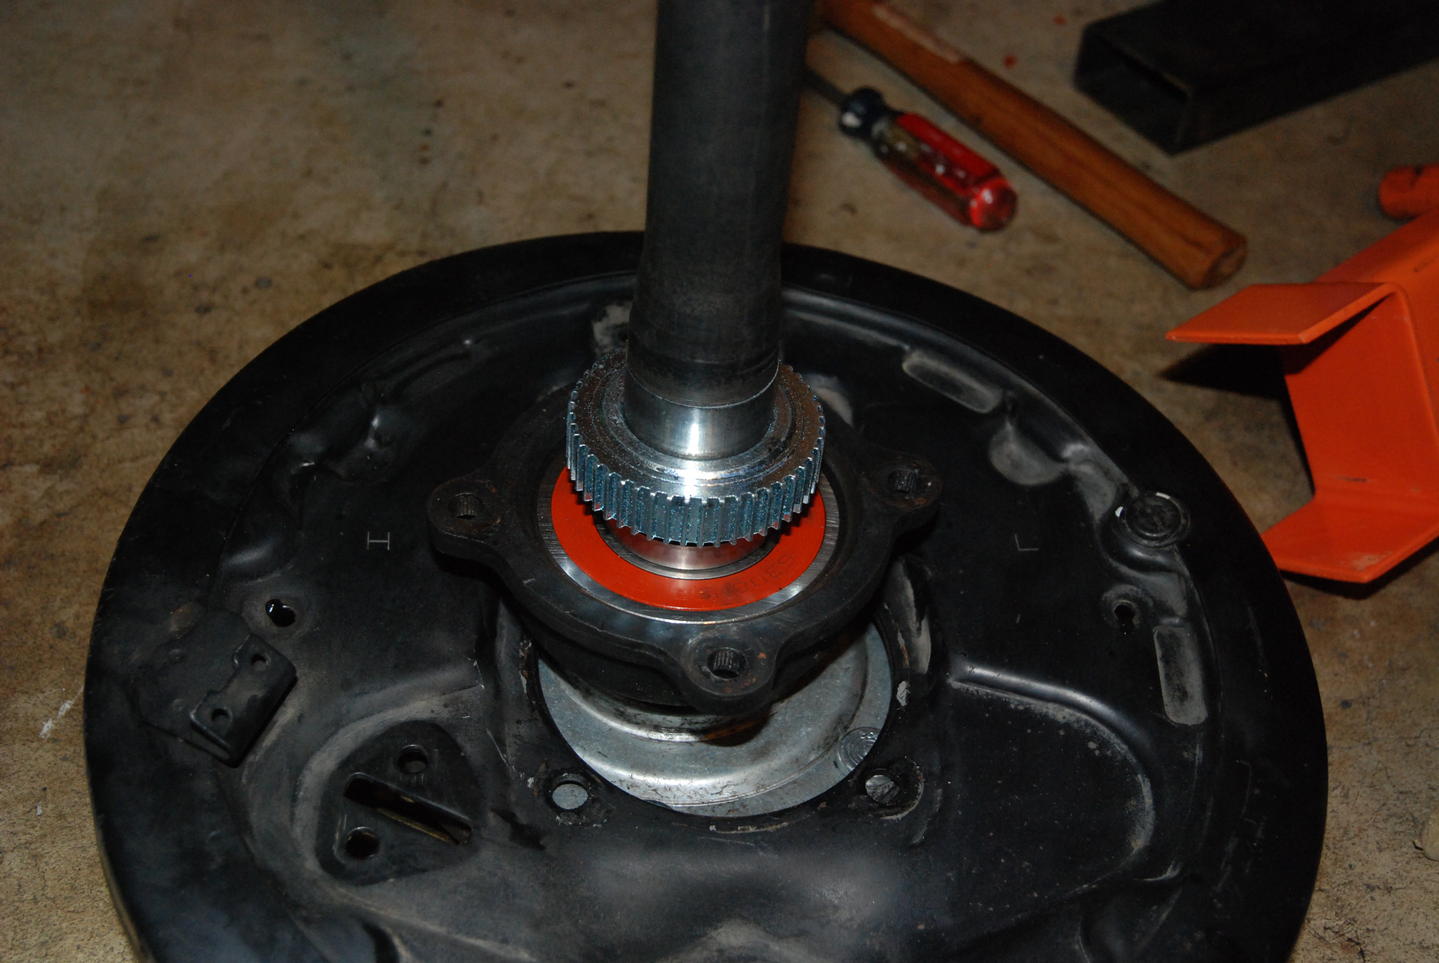
Since there are good threads about how to get the axle removed, I am starting with the axle shaft work.
Remove the brake shoes, adjuster, bell crank, wheel cylinder, and any other parts
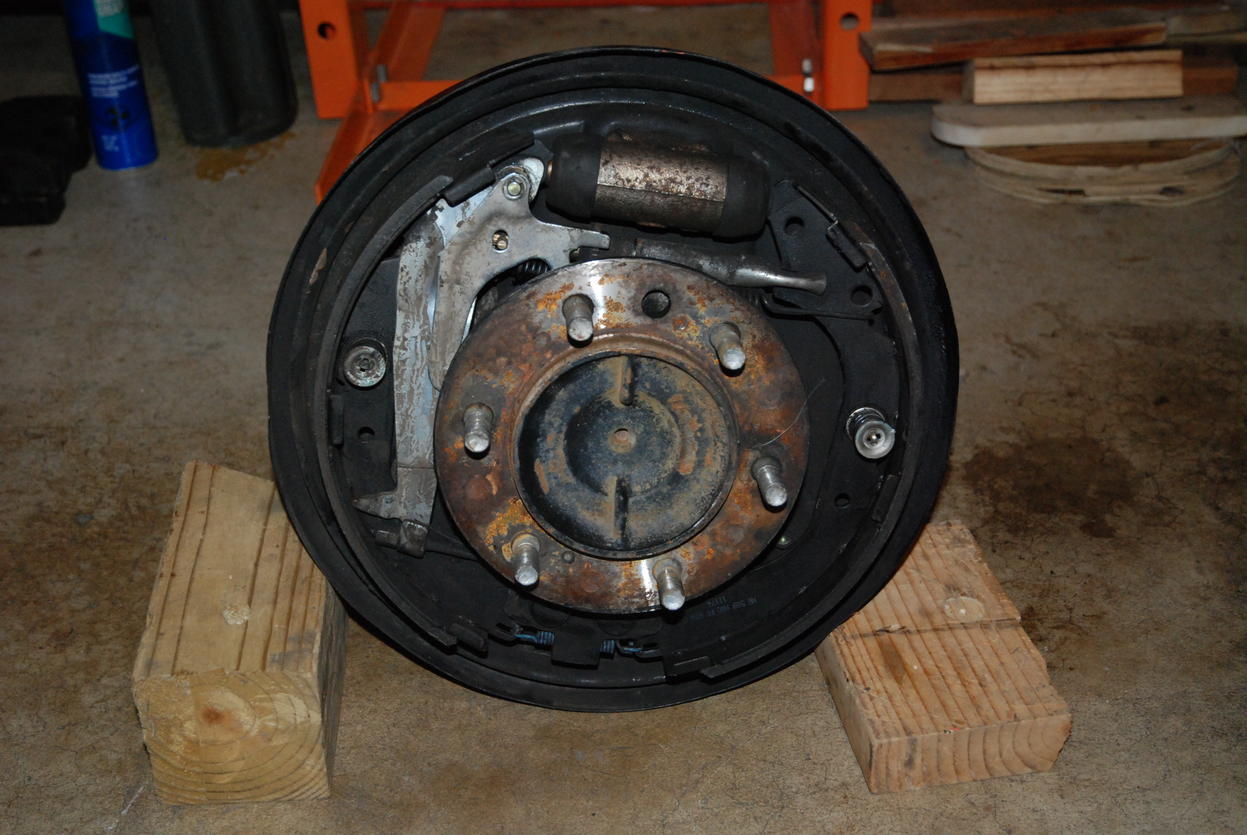
Now you are left with this:

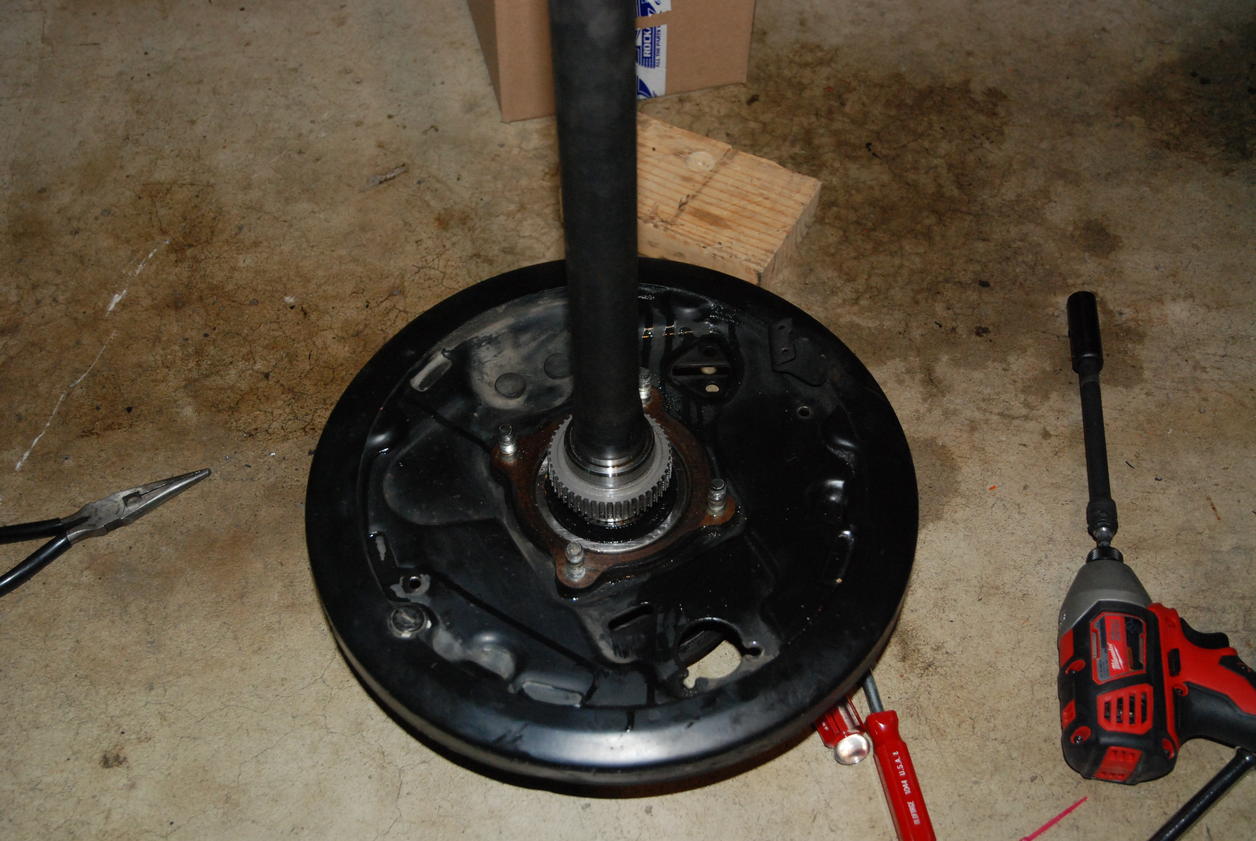
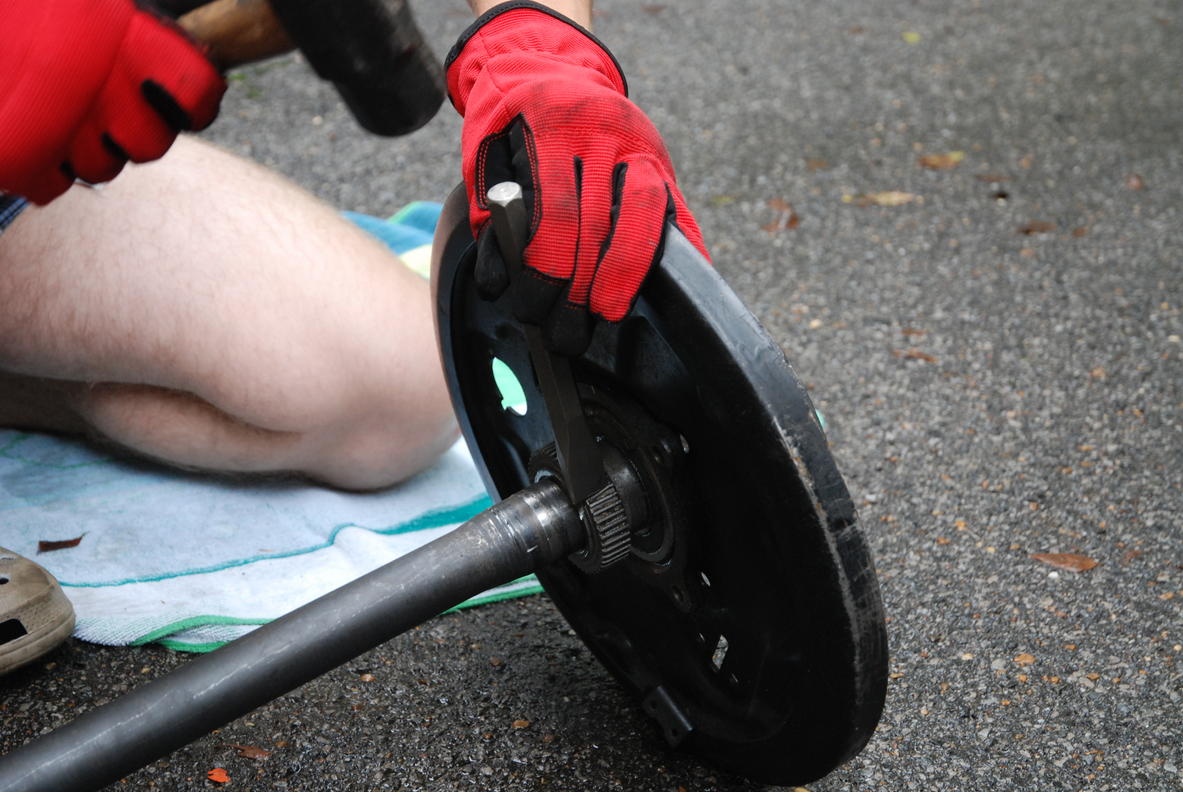
Put the nuts on the 4 backing plate studs and pound them out with a brass hammer or brass drift


__________________
Quote:
Originally Posted by STX4Runner

90% of the build threads in the 5th Gen section consist of Fuel Wheels, Plastidip, Duratracs and window tint.
|
1998 4Runner "Diamond" - Daily Driver (rolled & rebuilt) - 3.4 5-Speed, Coastal Bumper, Manual Hubs, 255/80r17 AT3Ws (409k+ Miles)
1997 4Runner "Becky" - Camping Rig - 3.4 Auto (for now), Armored, Cable E-Locked, Coastal Bumper, Sleeper Deck, 255/80r17 AT3Ws (185k+ Miles)
1989 4Runner | Tennessee 4Runner Group
Last edited by Chuckles89; 09-19-2016 at 02:14 PM.
|

|
 Reply With Quote Reply With Quote
|
|
09-17-2016, 11:05 PM
|
#2
|
|
Senior Member
|
|
Join Date: Jul 2013
Location: Tennessee
Age: 26
Posts: 2,852
Real Name: Charlie
|
|
|
Senior Member
Join Date: Jul 2013
Location: Tennessee
Age: 26
Posts: 2,852
Real Name: Charlie
|
I had to remove the lug studs to fit the axle in my press. If you have a bigger press, you might not have to do this. I just used a sledge hammer to get them out since I'm replacing them with new ones.

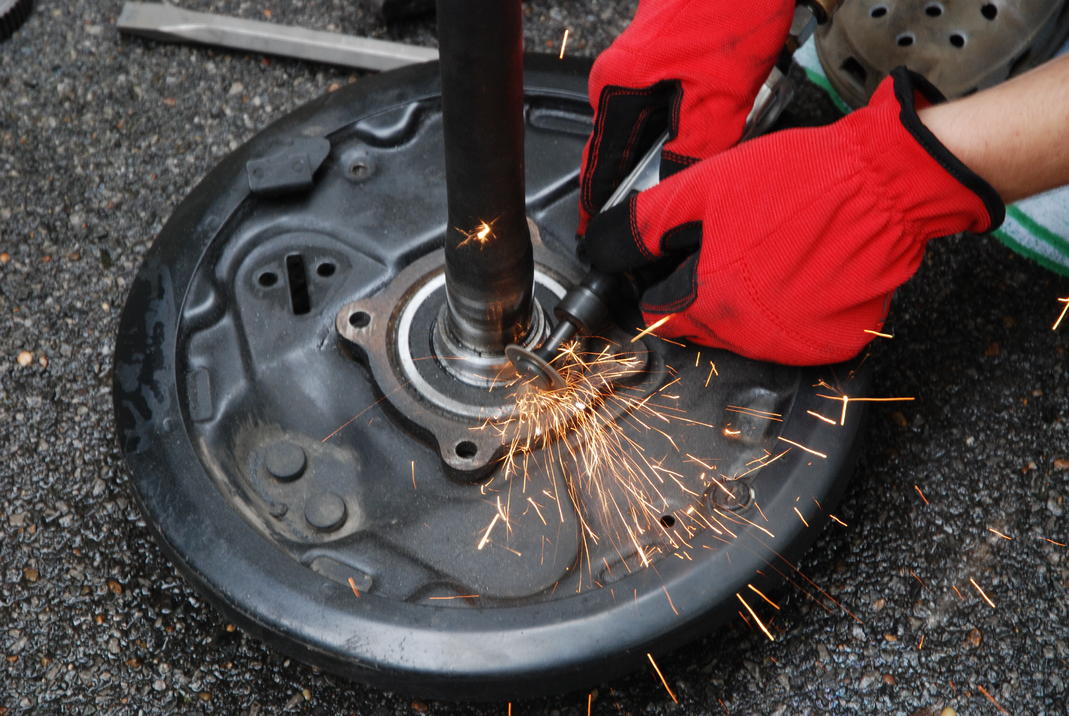
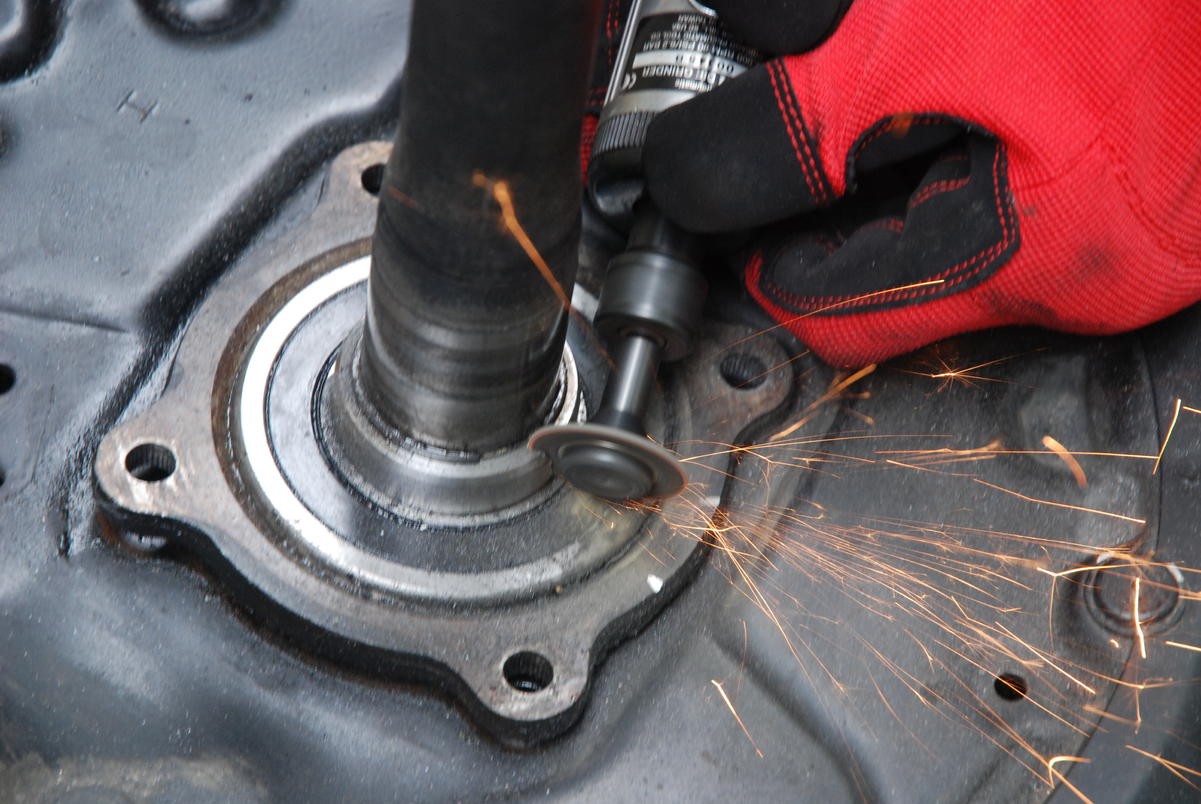
Then, cut the retainer ring and ABS ring off. Cut it at an angle and go 80% through. Make sure to not cut into the shaft. On this one, I got a tiny nick in it, but if you get very much into it, you should replace the shaft with another one. Just take your time and have good lighting to see what you're doing.

Then, use a large chisel and a sledge hammer to cut the rings off and slide them off the axle shaft
Here I am cutting the last retainer off. Make sure to remove the snap ring so it will slid off the axle shaft
__________________
Quote:
Originally Posted by STX4Runner
90% of the build threads in the 5th Gen section consist of Fuel Wheels, Plastidip, Duratracs and window tint.
|
1998 4Runner "Diamond" - Daily Driver (rolled & rebuilt) - 3.4 5-Speed, Coastal Bumper, Manual Hubs, 255/80r17 AT3Ws (409k+ Miles)
1997 4Runner "Becky" - Camping Rig - 3.4 Auto (for now), Armored, Cable E-Locked, Coastal Bumper, Sleeper Deck, 255/80r17 AT3Ws (185k+ Miles)
1989 4Runner | Tennessee 4Runner Group
Last edited by Chuckles89; 09-19-2016 at 02:00 PM.
|
|
|
Reply With Quote
|
|
09-17-2016, 11:05 PM
|
#3
|
|
Senior Member
|
|
Join Date: Jul 2013
Location: Tennessee
Age: 26
Posts: 2,852
Real Name: Charlie
|
|
|
Senior Member
Join Date: Jul 2013
Location: Tennessee
Age: 26
Posts: 2,852
Real Name: Charlie
|
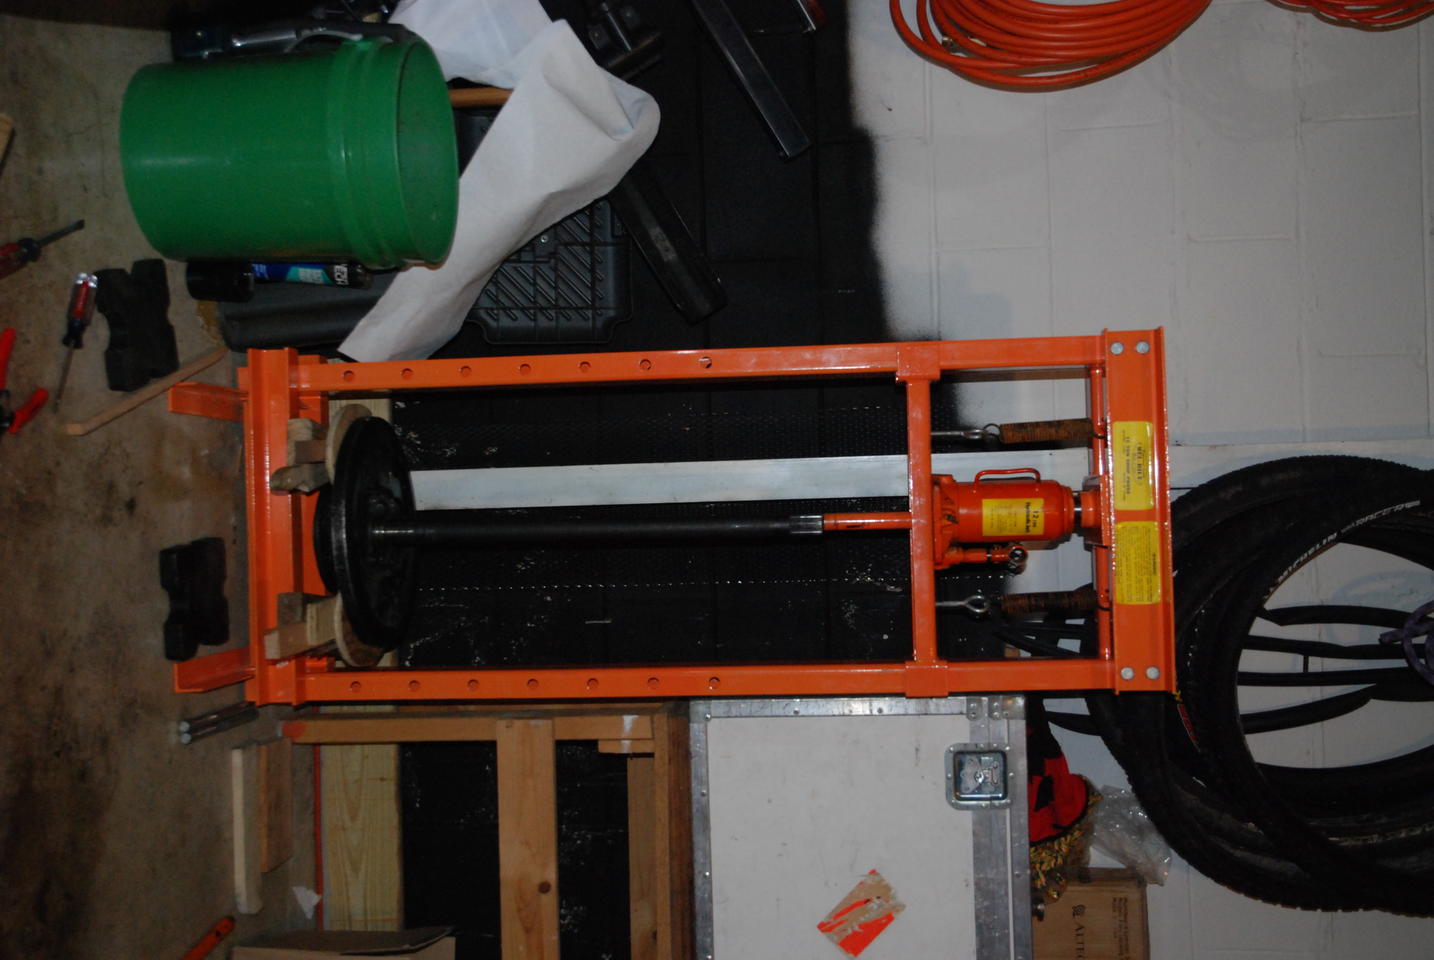
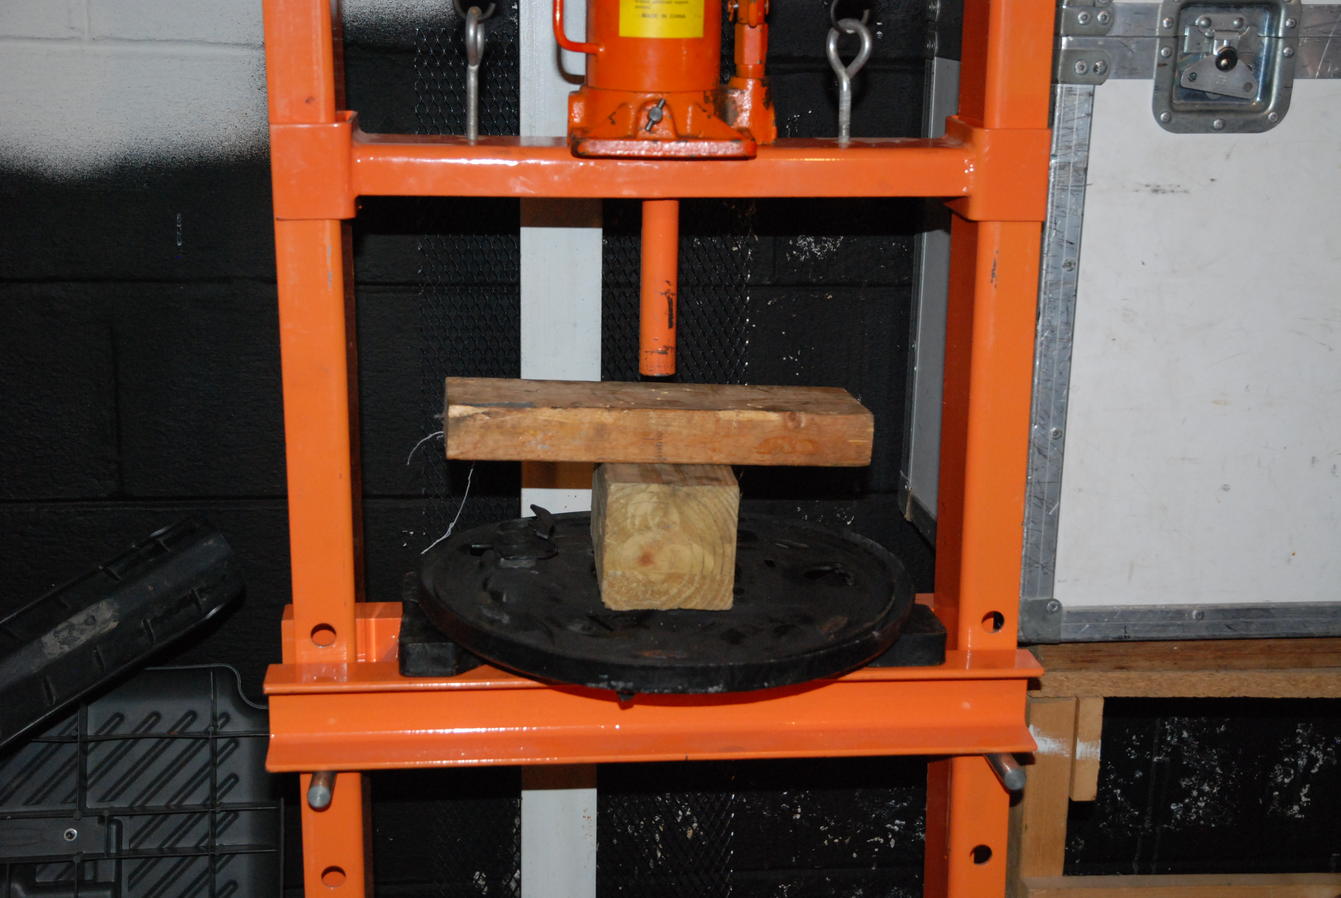
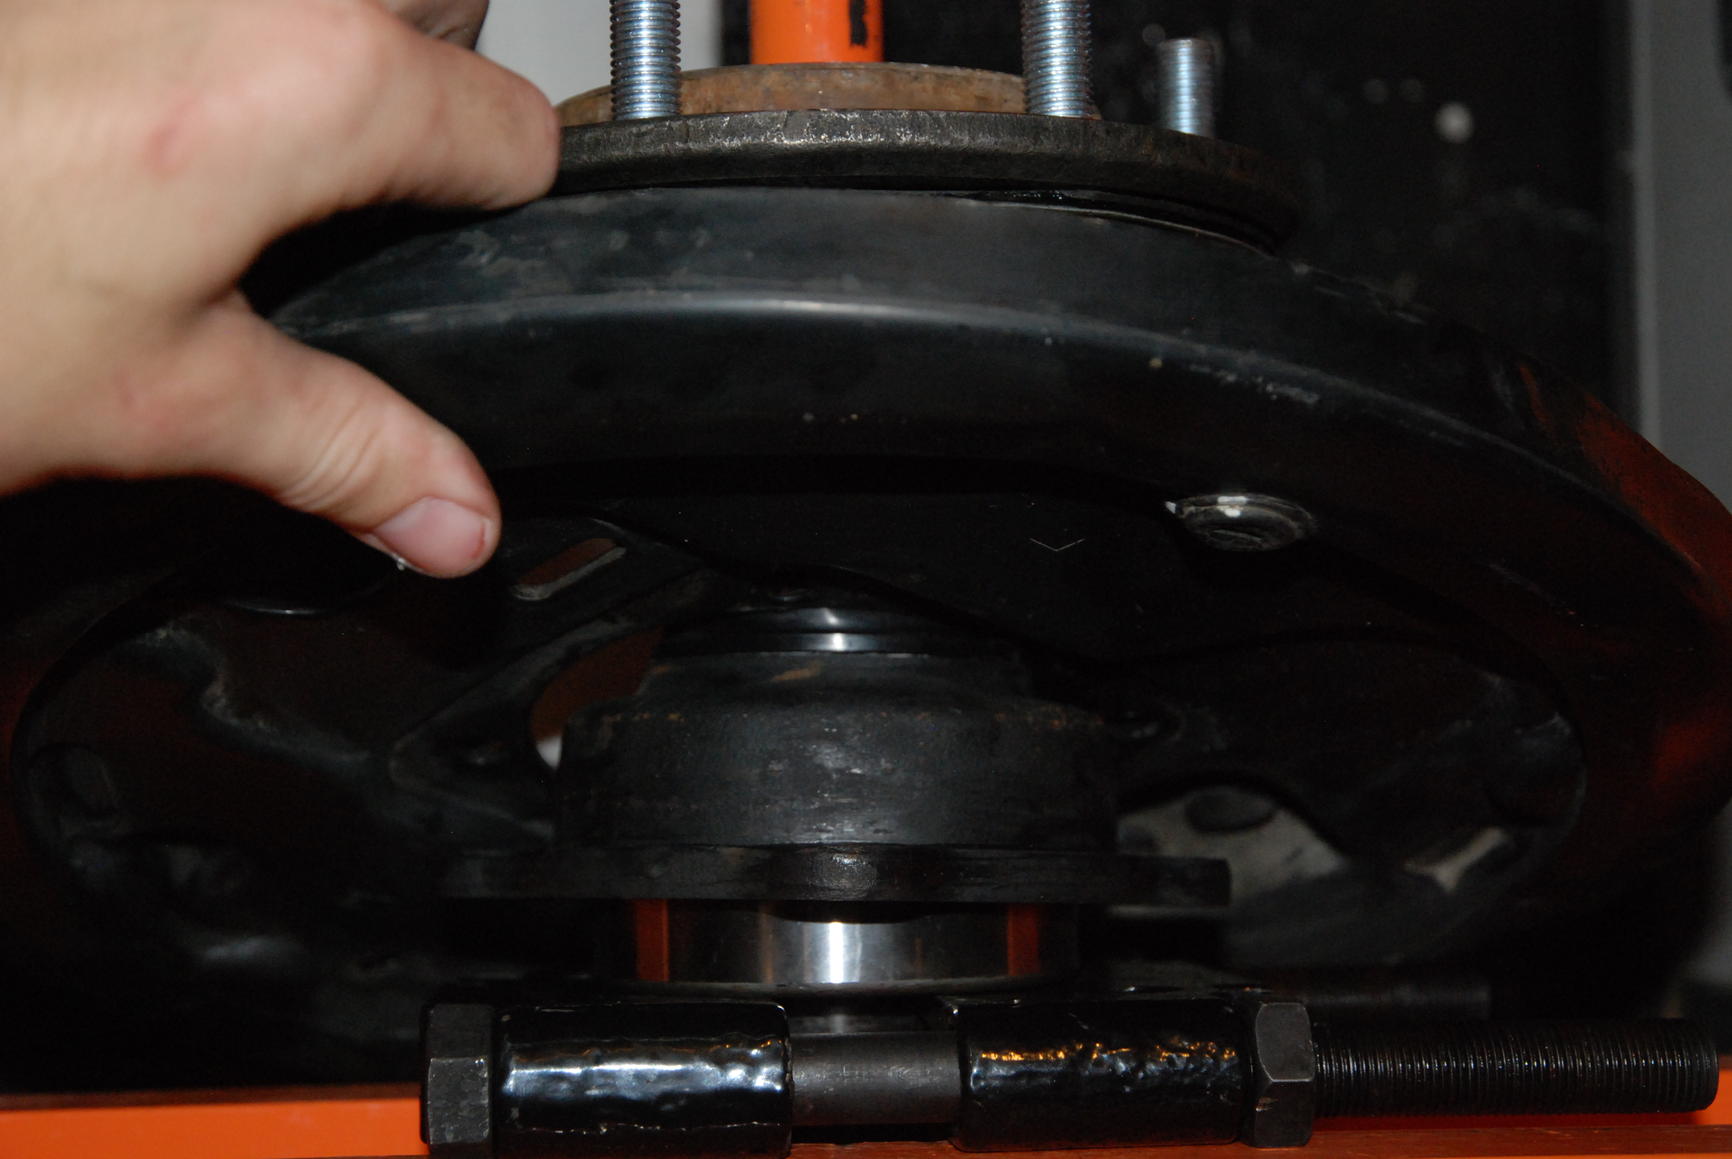
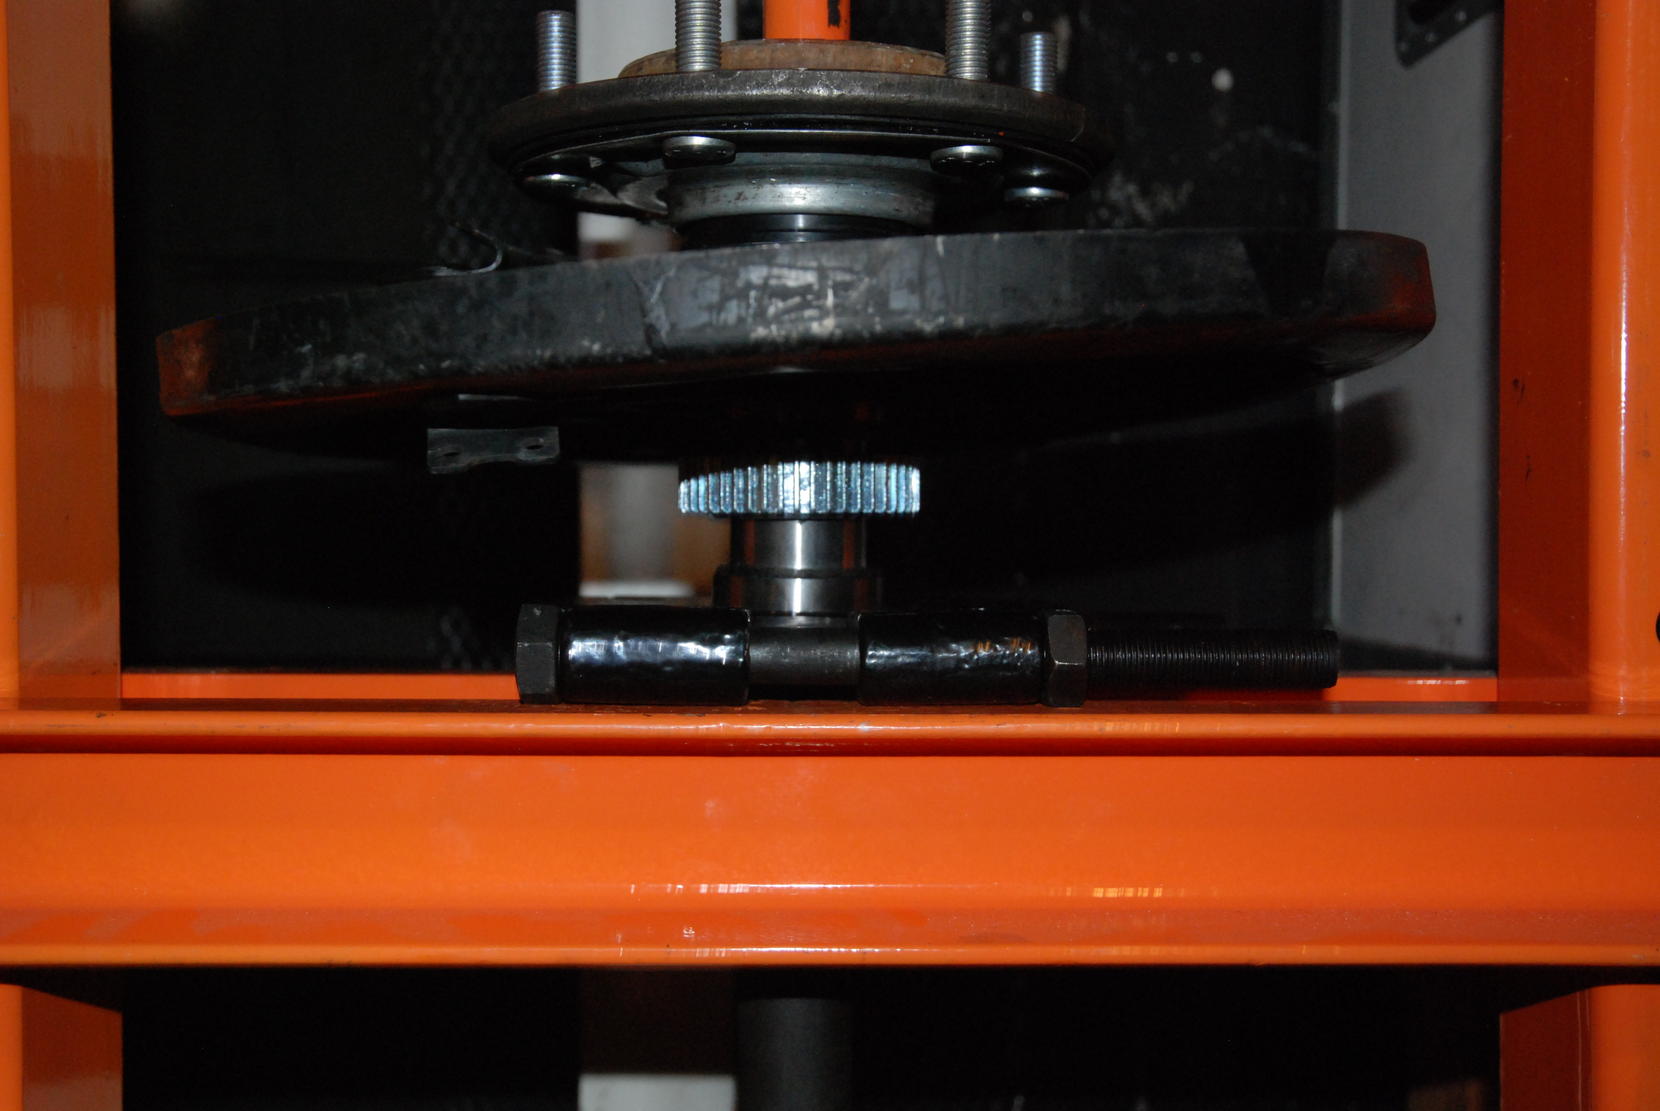
This is how I press the bearings off. This method will bend the backing plate a slight bit, but it shouldn't be enough to hurt anything. The force is not a lot. If it seems like it's bending the plate a lot, you need to find another method than this.
I just have the backing plate held up by pieces of wood then I have the press pushing down on the shaft.
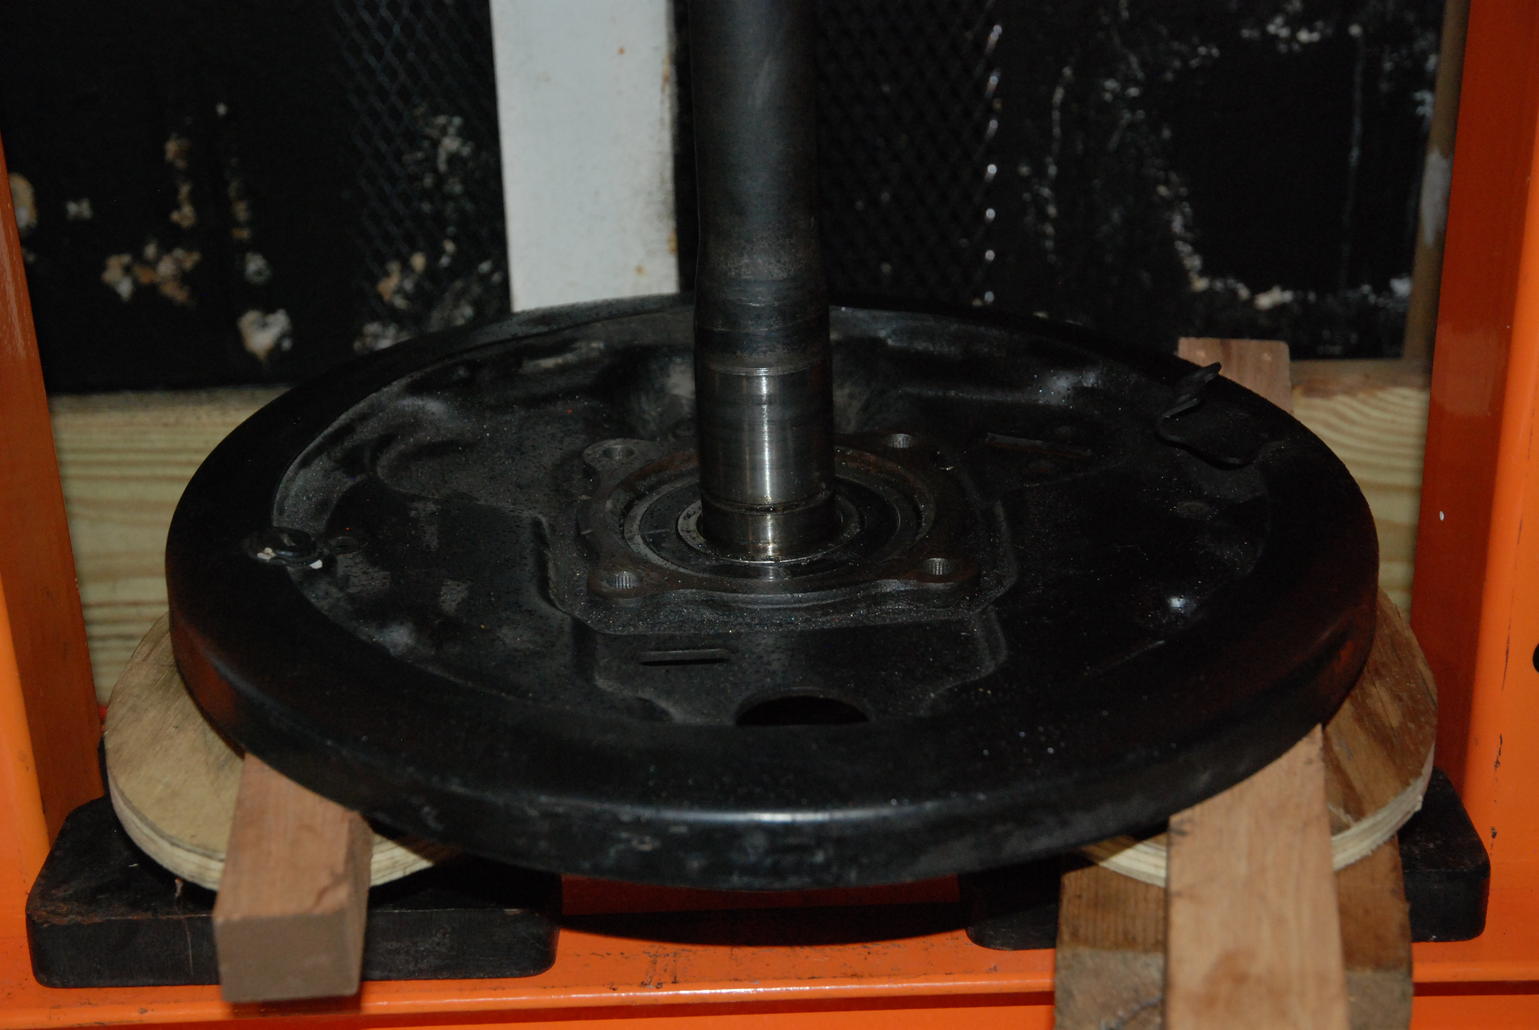
When it gets far enough off, the shaft will fall out

This is what you are left with now
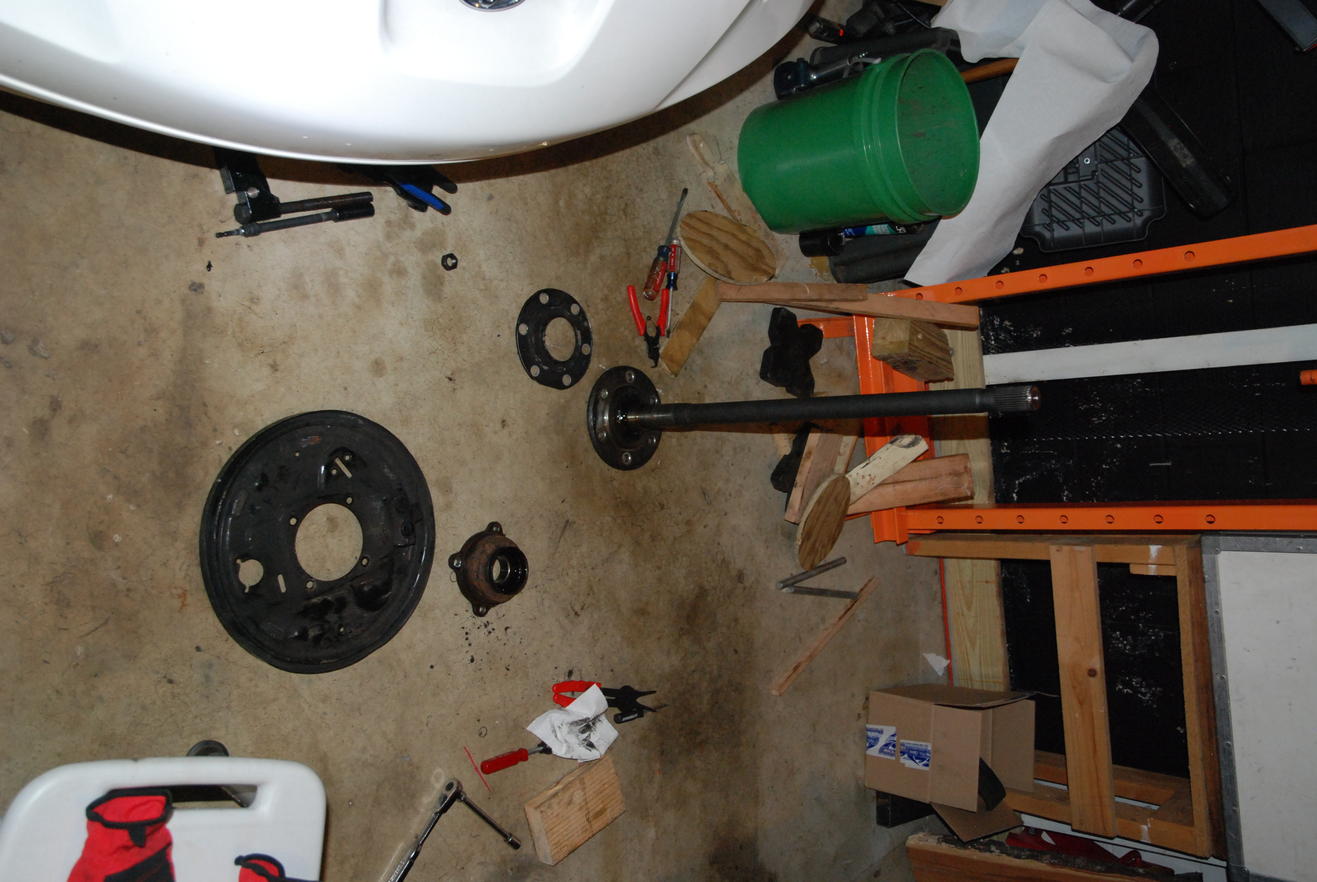
Pull off the outer seal with some pliers
and no, I don't have a clue why my pictures rotate. They are correct on my computer then they turn sideways when I upload them on here 
__________________
Quote:
Originally Posted by STX4Runner
90% of the build threads in the 5th Gen section consist of Fuel Wheels, Plastidip, Duratracs and window tint.
|
1998 4Runner "Diamond" - Daily Driver (rolled & rebuilt) - 3.4 5-Speed, Coastal Bumper, Manual Hubs, 255/80r17 AT3Ws (409k+ Miles)
1997 4Runner "Becky" - Camping Rig - 3.4 Auto (for now), Armored, Cable E-Locked, Coastal Bumper, Sleeper Deck, 255/80r17 AT3Ws (185k+ Miles)
1989 4Runner | Tennessee 4Runner Group
Last edited by Chuckles89; 09-19-2016 at 02:15 PM.
|
|
|
Reply With Quote
|
|
09-17-2016, 11:05 PM
|
#4
|
|
Senior Member
|
|
Join Date: Jul 2013
Location: Tennessee
Age: 26
Posts: 2,852
Real Name: Charlie
|
|
|
Senior Member
Join Date: Jul 2013
Location: Tennessee
Age: 26
Posts: 2,852
Real Name: Charlie
|
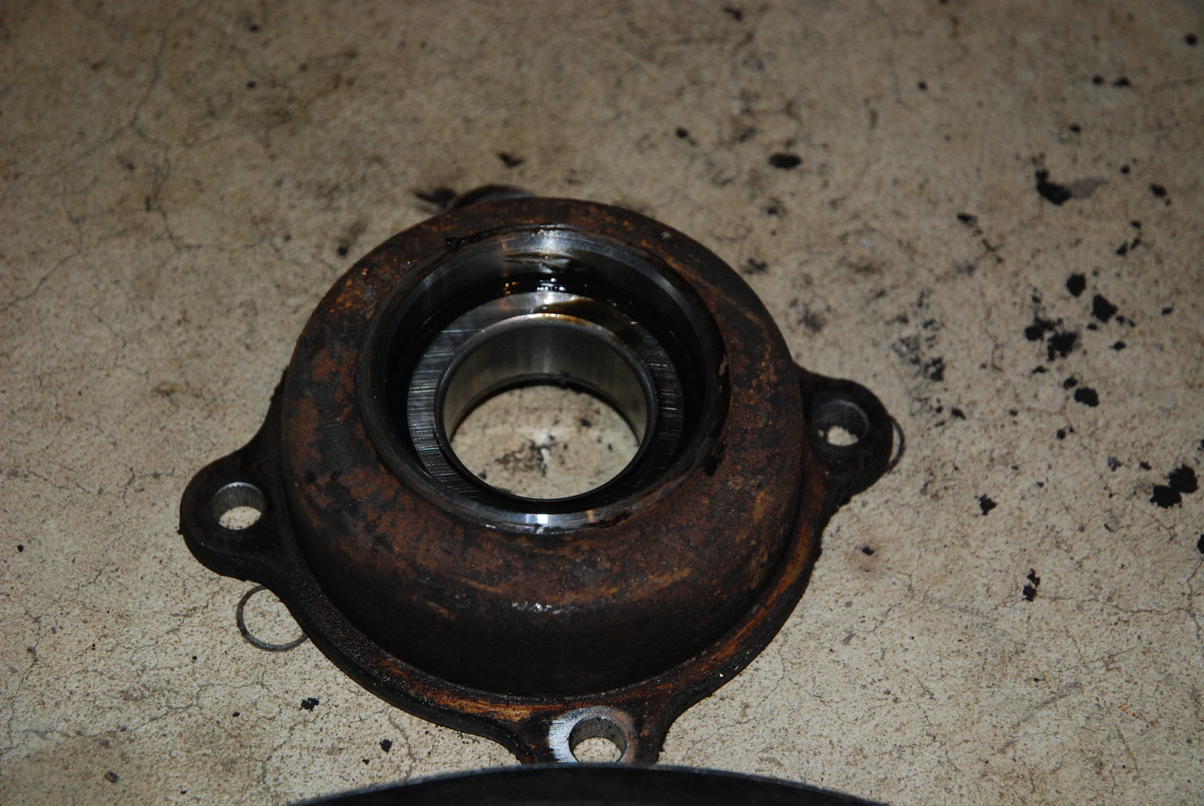
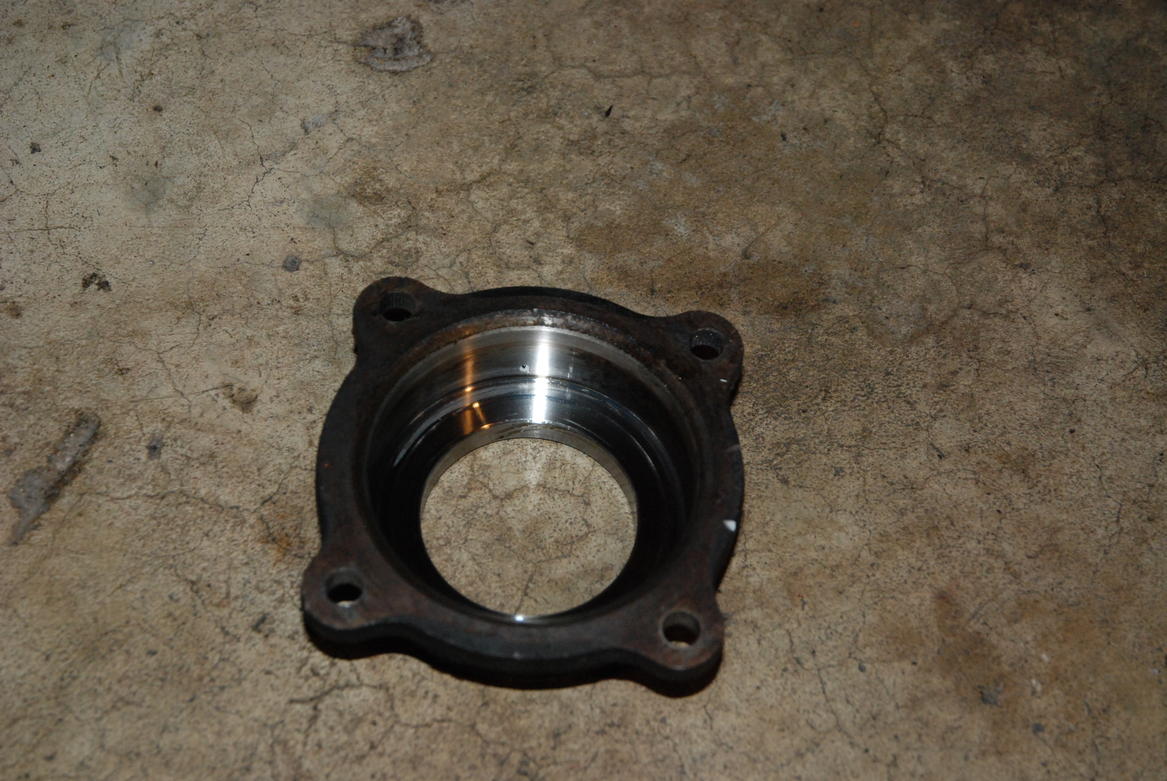
Now, it's time to remove the bearing from the bearing cup. This is not a press fit, so it is very easily pushed out

A spindle nut socket for Toyota torsion bar IFS is a perfect fit

Applying a little pressure

Then, the bearing will fall out
This is the bearing cup you're left with
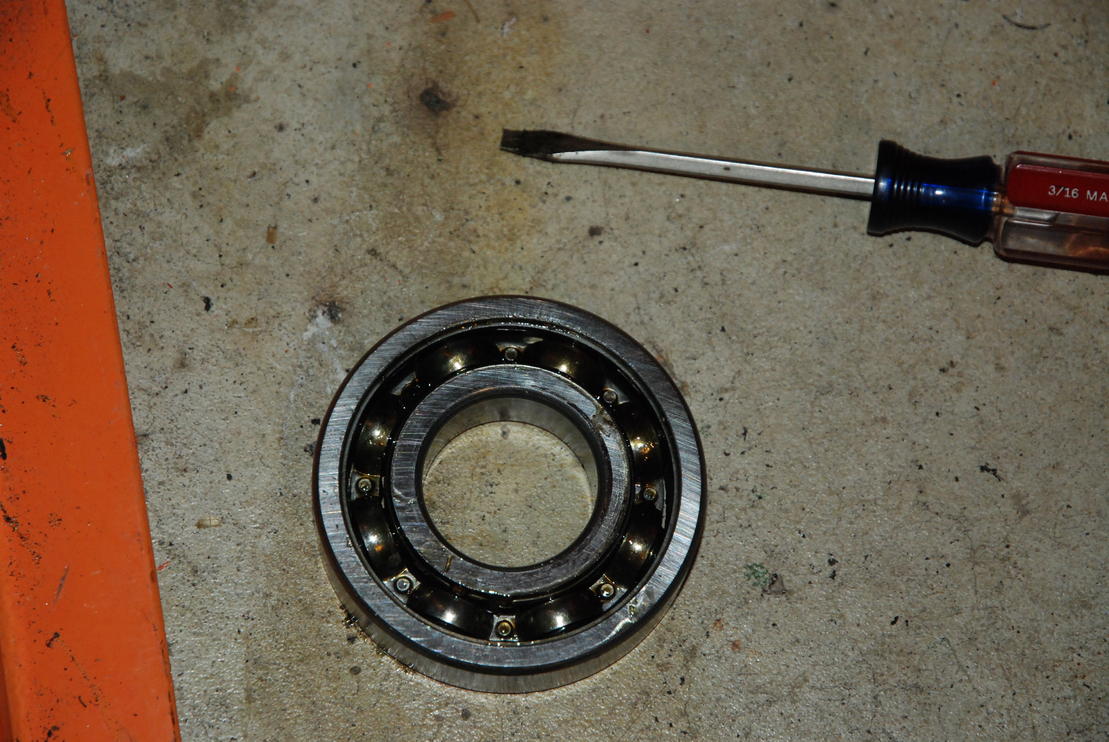
Just for fun, I pulled off the seal to see what was inside the old bearing. There was hardly any grease and lots of gear oil ewwww
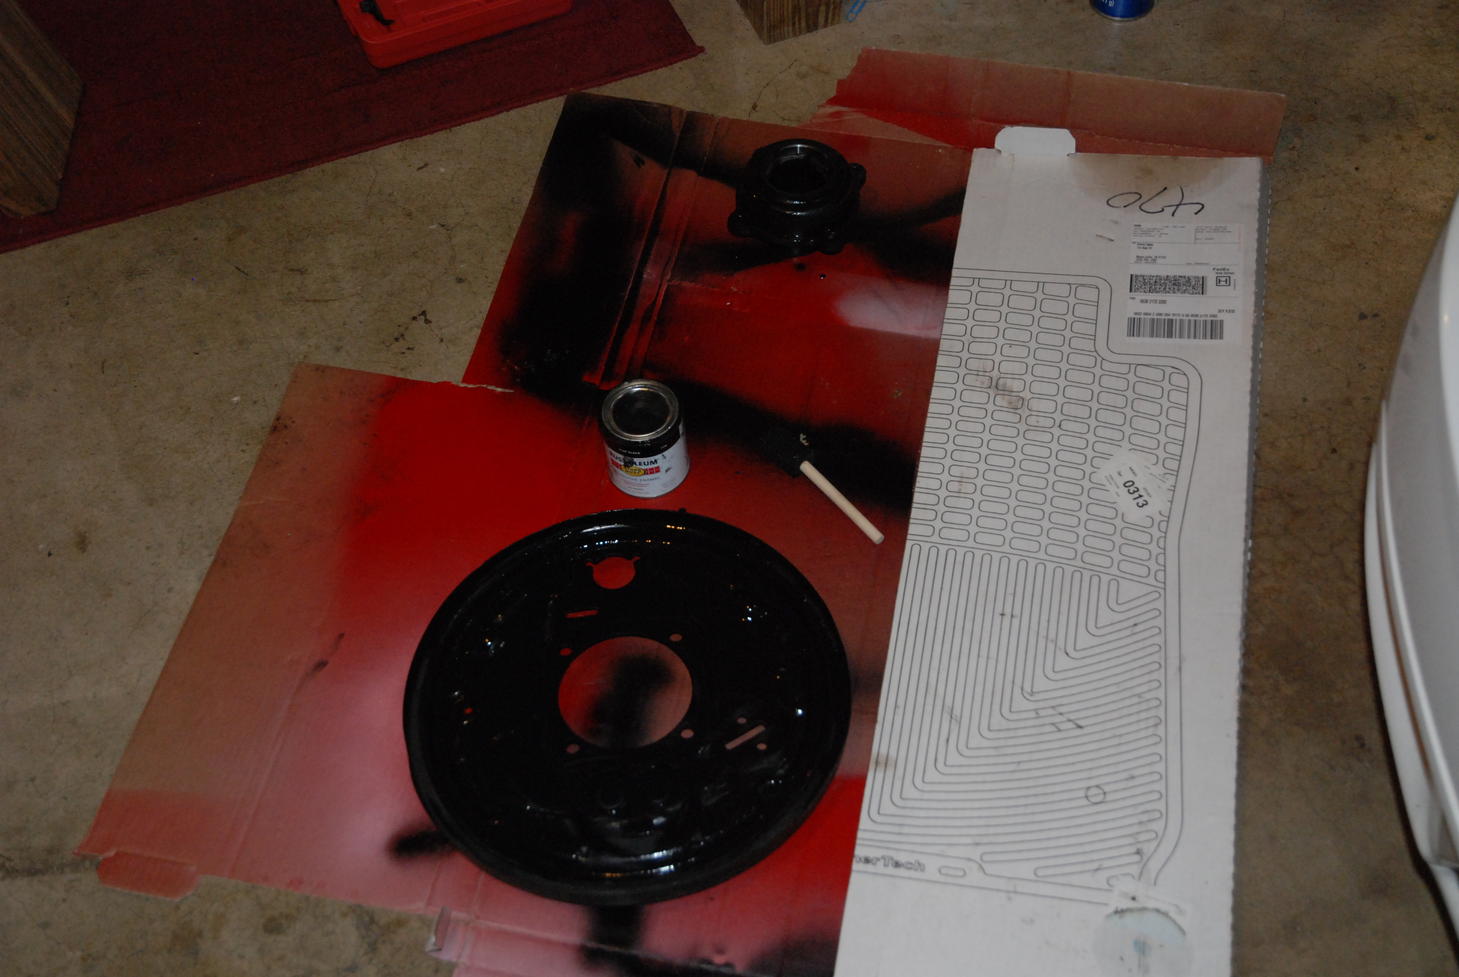
Here I am bending the backing plate back a little
Then, I sanded the backing plate and bearing cup to give them some fresh black paint
__________________
Quote:
Originally Posted by STX4Runner
90% of the build threads in the 5th Gen section consist of Fuel Wheels, Plastidip, Duratracs and window tint.
|
1998 4Runner "Diamond" - Daily Driver (rolled & rebuilt) - 3.4 5-Speed, Coastal Bumper, Manual Hubs, 255/80r17 AT3Ws (409k+ Miles)
1997 4Runner "Becky" - Camping Rig - 3.4 Auto (for now), Armored, Cable E-Locked, Coastal Bumper, Sleeper Deck, 255/80r17 AT3Ws (185k+ Miles)
1989 4Runner | Tennessee 4Runner Group
Last edited by Chuckles89; 09-19-2016 at 02:12 PM.
|
|
|
Reply With Quote
|
|
09-17-2016, 11:06 PM
|
#5
|
|
Senior Member
|
|
Join Date: Jul 2013
Location: Tennessee
Age: 26
Posts: 2,852
Real Name: Charlie
|
|
|
Senior Member
Join Date: Jul 2013
Location: Tennessee
Age: 26
Posts: 2,852
Real Name: Charlie
|
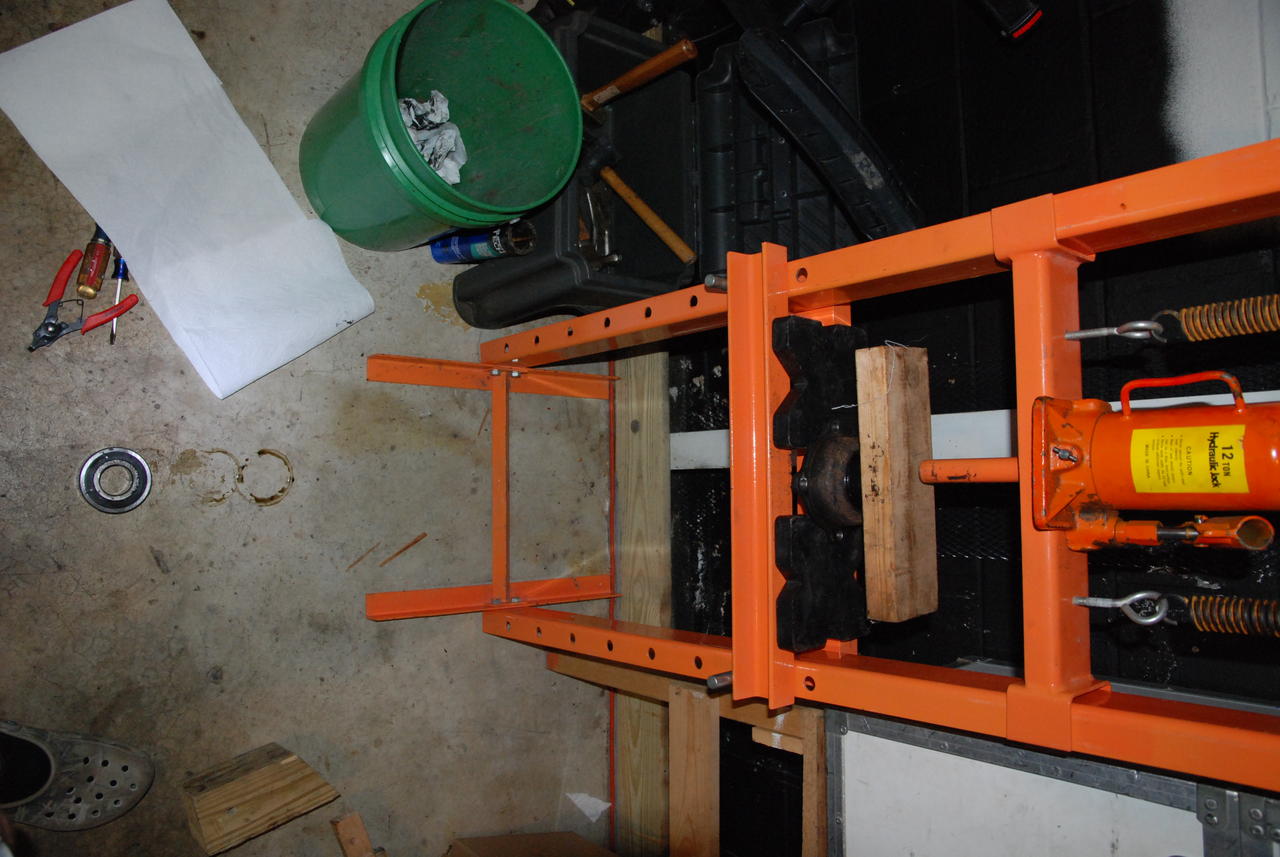
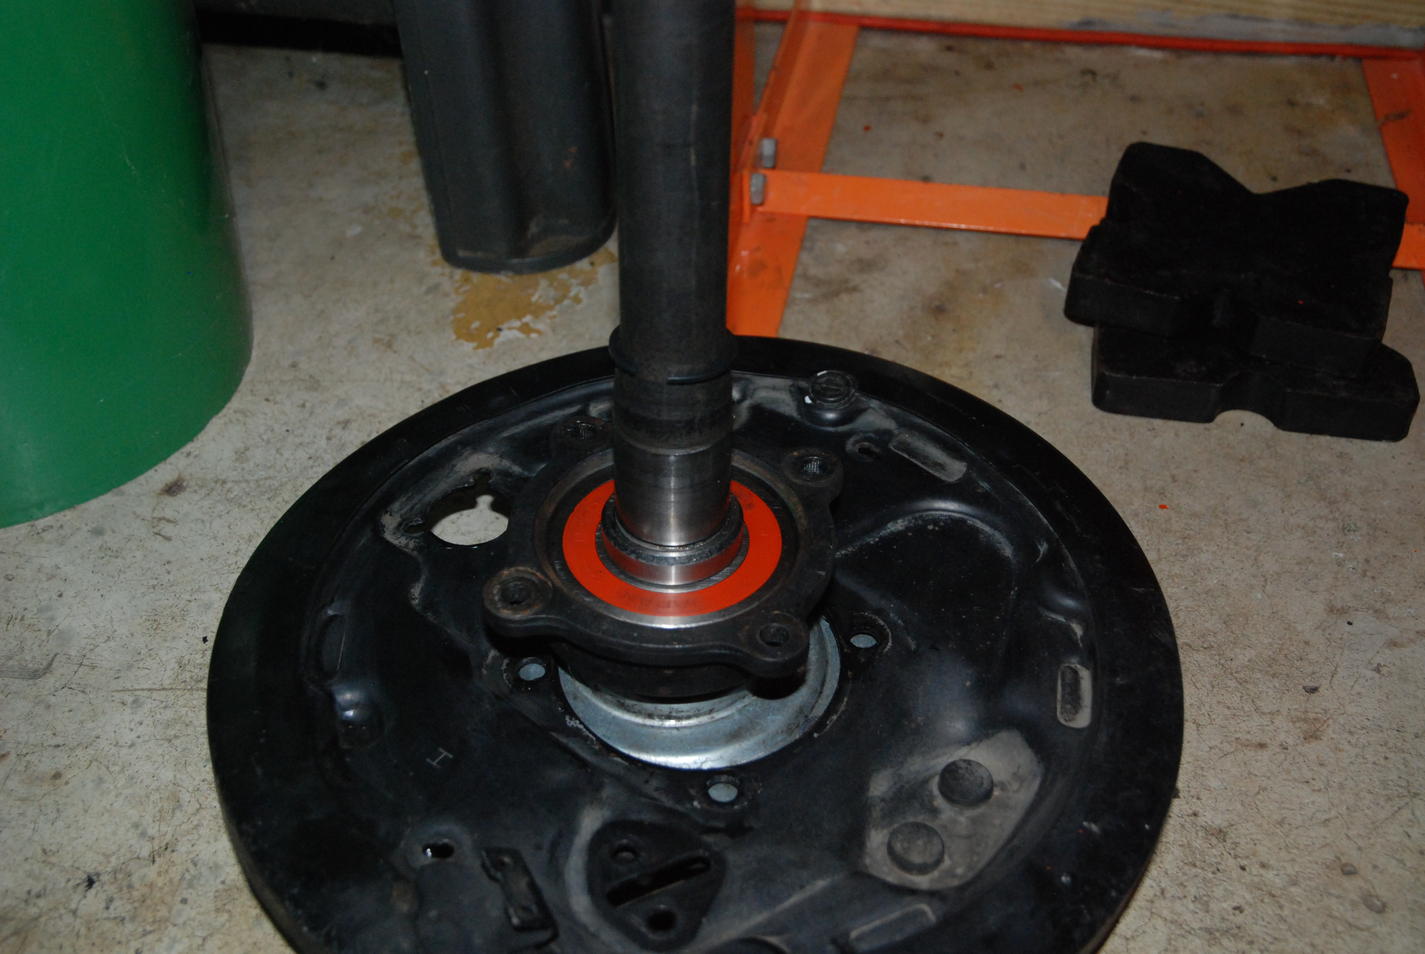
I then pressed in the new lug studs since there was nothing in my way

You can push the new outer seal on by hand

Here is the new bearing being pressed on. I am using a "Large Bearing Seperator" fron Harbor Freight to press everything on with.
Then, press the first retaining ring on all the way till the snap ring groove appears. Then istall the snap ring. The easiest way I found was to get two pieces of 2x4 wood and slam the ring down until it seats in the groove.
Then slide the ABS ring down
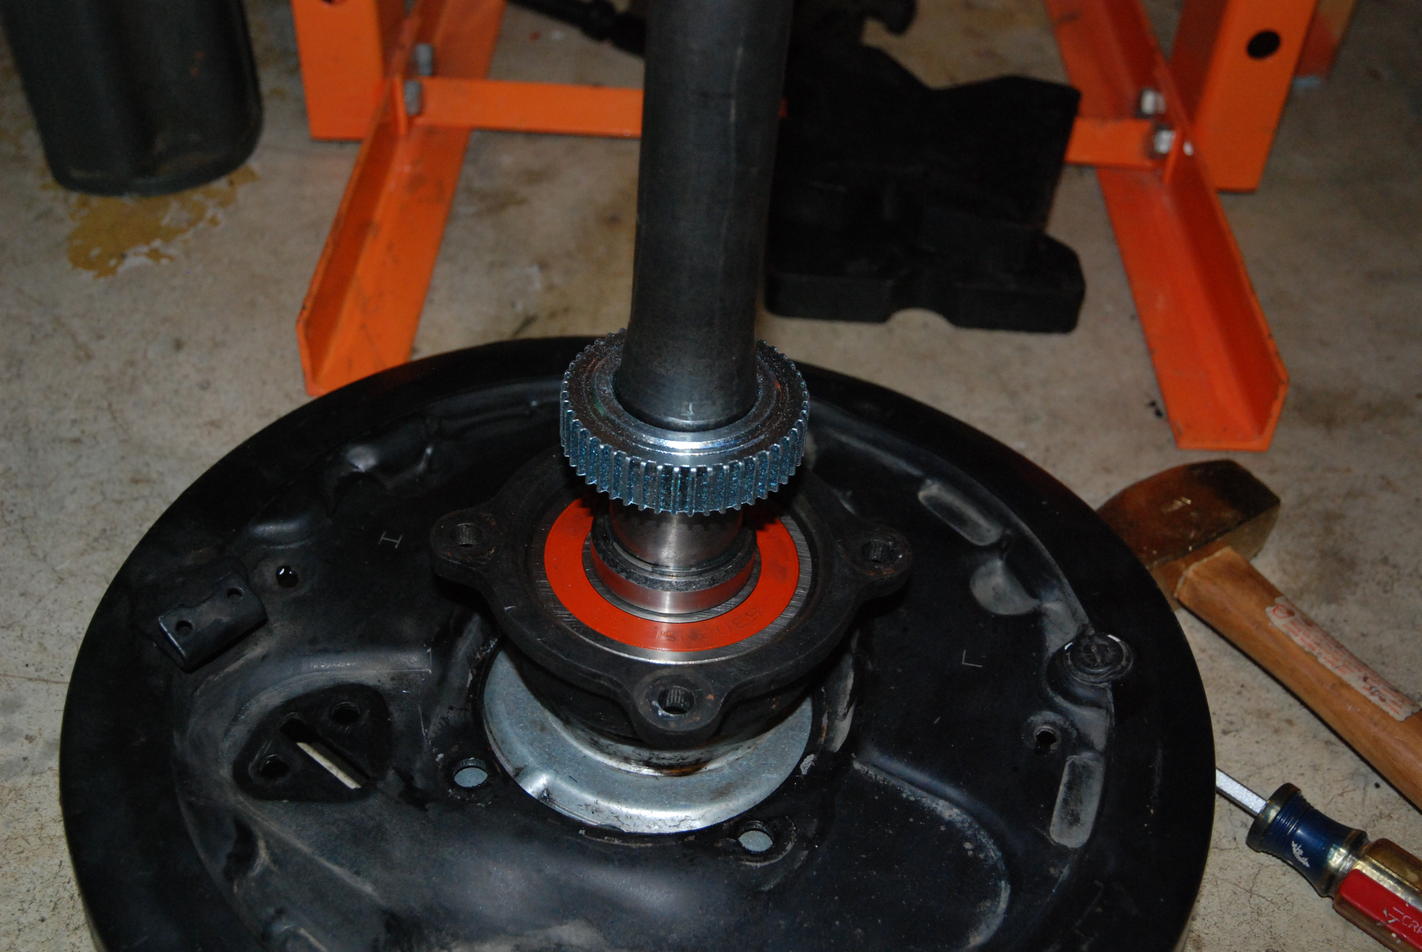
Press it down to the correct location. I just eyeballed this one because if I didn't go far enough, I can always put the axle shaft back in the press and push it down a little more.

Last edited by Chuckles89; 09-19-2016 at 02:20 PM.
|
|
|
Reply With Quote
|
|
09-17-2016, 11:06 PM
|
#6
|
|
Senior Member
|
|
Join Date: Jul 2013
Location: Tennessee
Age: 26
Posts: 2,852
Real Name: Charlie
|
|
|
Senior Member
Join Date: Jul 2013
Location: Tennessee
Age: 26
Posts: 2,852
Real Name: Charlie
|
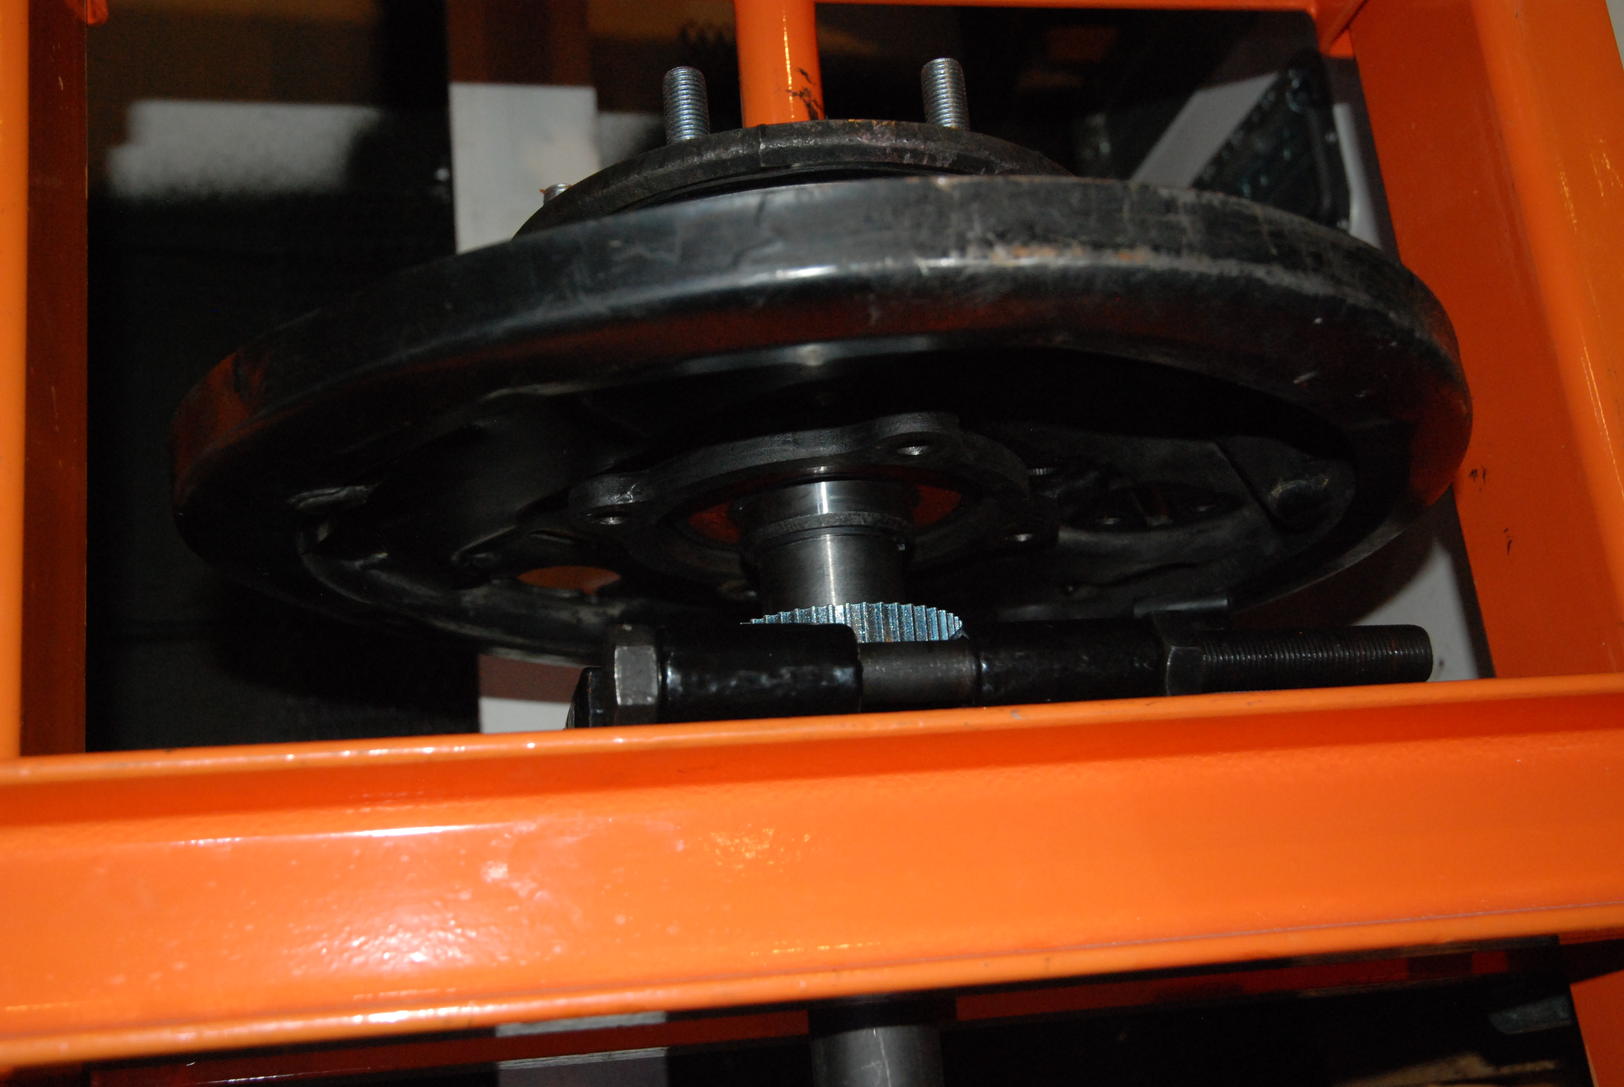
Now, the most critical step- pressing down the last retaining ring. This is what the inner axle seal seals against and it has to be in the perfect location or it will leak. I chose to do the "backwards" method and have the bevel facing away from the inner seal. I also installed it 4mm from where the polished part of the axle shaft starts.

Pressing it on
The Final Position

This is the grease test to see if the retainer is in the right place. With the new inner seal in place, put a good amount of grease on the retainer then slide the axle all the way in with the nuts tight. Spin the axle several times, then pull it out again. There should be a line where the seal is toughing the retainer and if it looks like this, then the retainer is in the correct place.

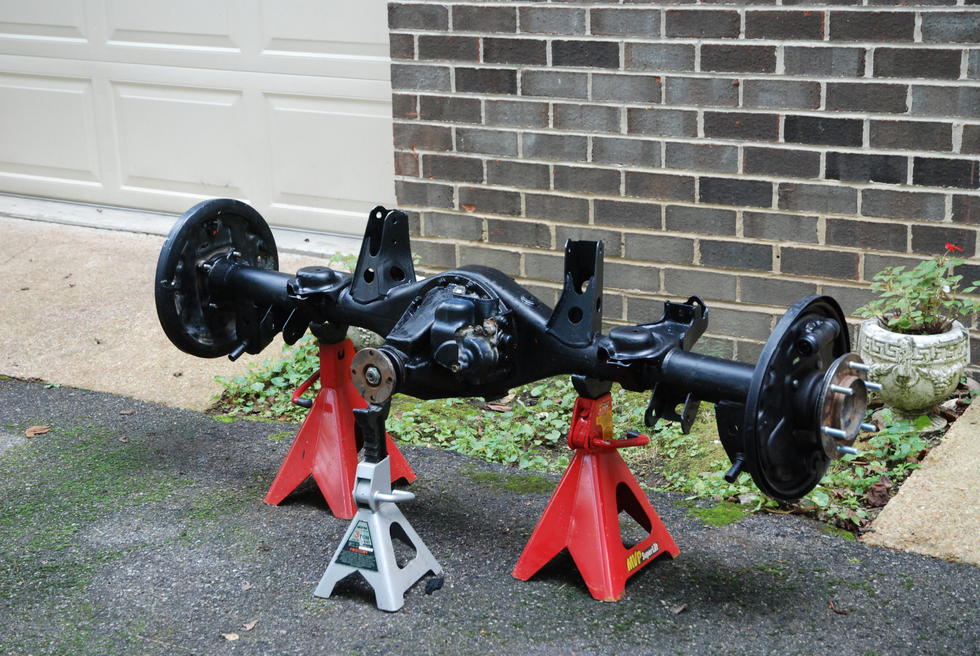
Here is the current state of my axle. I'm going to be adding the rear brakes to this write-up in the next couple weeks.
__________________
Quote:
Originally Posted by STX4Runner
90% of the build threads in the 5th Gen section consist of Fuel Wheels, Plastidip, Duratracs and window tint.
|
1998 4Runner "Diamond" - Daily Driver (rolled & rebuilt) - 3.4 5-Speed, Coastal Bumper, Manual Hubs, 255/80r17 AT3Ws (409k+ Miles)
1997 4Runner "Becky" - Camping Rig - 3.4 Auto (for now), Armored, Cable E-Locked, Coastal Bumper, Sleeper Deck, 255/80r17 AT3Ws (185k+ Miles)
1989 4Runner | Tennessee 4Runner Group
Last edited by Chuckles89; 09-19-2016 at 02:26 PM.
|
|
|
Reply With Quote
|
|
09-17-2016, 11:08 PM
|
#7
|
|
Senior Member
|
|
Join Date: Jul 2013
Location: Tennessee
Age: 26
Posts: 2,852
Real Name: Charlie
|
|
|
Senior Member
Join Date: Jul 2013
Location: Tennessee
Age: 26
Posts: 2,852
Real Name: Charlie
|
reserved
__________________
Quote:
Originally Posted by STX4Runner
90% of the build threads in the 5th Gen section consist of Fuel Wheels, Plastidip, Duratracs and window tint.
|
1998 4Runner "Diamond" - Daily Driver (rolled & rebuilt) - 3.4 5-Speed, Coastal Bumper, Manual Hubs, 255/80r17 AT3Ws (409k+ Miles)
1997 4Runner "Becky" - Camping Rig - 3.4 Auto (for now), Armored, Cable E-Locked, Coastal Bumper, Sleeper Deck, 255/80r17 AT3Ws (185k+ Miles)
1989 4Runner | Tennessee 4Runner Group
Last edited by Chuckles89; 09-19-2016 at 02:26 PM.
|
|
|
Reply With Quote
|
|
09-17-2016, 11:08 PM
|
#8
|
|
Senior Member
|
|
Join Date: Jul 2013
Location: Tennessee
Age: 26
Posts: 2,852
Real Name: Charlie
|
|
|
Senior Member
Join Date: Jul 2013
Location: Tennessee
Age: 26
Posts: 2,852
Real Name: Charlie
|
reserved
__________________
Quote:
Originally Posted by STX4Runner
90% of the build threads in the 5th Gen section consist of Fuel Wheels, Plastidip, Duratracs and window tint.
|
1998 4Runner "Diamond" - Daily Driver (rolled & rebuilt) - 3.4 5-Speed, Coastal Bumper, Manual Hubs, 255/80r17 AT3Ws (409k+ Miles)
1997 4Runner "Becky" - Camping Rig - 3.4 Auto (for now), Armored, Cable E-Locked, Coastal Bumper, Sleeper Deck, 255/80r17 AT3Ws (185k+ Miles)
1989 4Runner | Tennessee 4Runner Group
Last edited by Chuckles89; 09-19-2016 at 02:26 PM.
|
|
|
Reply With Quote
|
|
09-19-2016, 02:27 PM
|
#9
|
|
Senior Member
|
|
Join Date: Jul 2013
Location: Tennessee
Age: 26
Posts: 2,852
Real Name: Charlie
|
|
|
Senior Member
Join Date: Jul 2013
Location: Tennessee
Age: 26
Posts: 2,852
Real Name: Charlie
|
Just finished the entire bearing replacement process and fixed some spelling mistakes. Just need to add brake installation.
__________________
Quote:
Originally Posted by STX4Runner
90% of the build threads in the 5th Gen section consist of Fuel Wheels, Plastidip, Duratracs and window tint.
|
1998 4Runner "Diamond" - Daily Driver (rolled & rebuilt) - 3.4 5-Speed, Coastal Bumper, Manual Hubs, 255/80r17 AT3Ws (409k+ Miles)
1997 4Runner "Becky" - Camping Rig - 3.4 Auto (for now), Armored, Cable E-Locked, Coastal Bumper, Sleeper Deck, 255/80r17 AT3Ws (185k+ Miles)
1989 4Runner | Tennessee 4Runner Group
|
|
|
Reply With Quote
|
|
09-22-2016, 12:36 AM
|
#10
|
 |
Senior Member
|
|
Join Date: Sep 2013
Location: Tempe, Az
Posts: 1,557
|
|
|
Senior Member
Join Date: Sep 2013
Location: Tempe, Az
Posts: 1,557
|
nice. all i have to add is if you have the sst press tool you can save everything, except the bearing when you do it. then to put it all back on I used a long thick walled piece of dom I have thats for another project.
__________________
'02 Toyota 4Runner SR5
E-Locked | Geared | Mid-Travel | 35s | Armored | 100% Chooched 
|
|
|
Reply With Quote
|
|
09-22-2016, 09:38 AM
|
#11
|
|
Senior Member
|
|
Join Date: Mar 2014
Location: Trying to figure this out
Posts: 1,462
|
|
|
Senior Member
Join Date: Mar 2014
Location: Trying to figure this out
Posts: 1,462
|
Thank you for doing this "how too" write up!!
|
|
|
Reply With Quote
|
|
09-29-2016, 12:03 PM
|
#12
|
 |
Senior Member
|
|
Join Date: Jul 2012
Location: Imperial County, CA
Posts: 2,354
Real Name: Jeff
|
|
|
Senior Member
Join Date: Jul 2012
Location: Imperial County, CA
Posts: 2,354
Real Name: Jeff
|
Somebody's been busy. Good work.
__________________
97 SR5 4runner: 2" OME Lift, rear E-Locker, 231mm Tundra Brakes, 203K, B&M 70264 Tranny Cooler, Duratracs
Build
|
|
|
Reply With Quote
|
|
09-29-2016, 02:22 PM
|
#13
|
|
Member
|
|
Join Date: Sep 2016
Location: Richmond, TX
Posts: 70
|
|
|
Member
Join Date: Sep 2016
Location: Richmond, TX
Posts: 70
|
Thanks Great info.
|
|
|
Reply With Quote
|
|
09-29-2016, 02:43 PM
|
#14
|
 |
Member
|
|
Join Date: Jun 2012
Location: Bronx, NY -:moved:- Clearfield, PA
Posts: 81
|
|
|
Member
Join Date: Jun 2012
Location: Bronx, NY -:moved:- Clearfield, PA
Posts: 81
|
Weird.. your spring kit is missing one small spring that mine had. Hold the smaller metal arm (If memory serves me correct) back with tension.. hooked to the brake shoe.
|
|
|
Reply With Quote
|
|
09-29-2016, 03:16 PM
|
#15
|
|
Senior Member
|
|
Join Date: Jul 2013
Location: Tennessee
Age: 26
Posts: 2,852
Real Name: Charlie
|
|
|
Senior Member
Join Date: Jul 2013
Location: Tennessee
Age: 26
Posts: 2,852
Real Name: Charlie
|
Quote:
Originally Posted by 98Fizzy
Weird.. your spring kit is missing one small spring that mine had. Hold the smaller metal arm (If memory serves me correct) back with tension.. hooked to the brake shoe.
|
I guess I'll find out this weekend...
__________________
Quote:
Originally Posted by STX4Runner
90% of the build threads in the 5th Gen section consist of Fuel Wheels, Plastidip, Duratracs and window tint.
|
1998 4Runner "Diamond" - Daily Driver (rolled & rebuilt) - 3.4 5-Speed, Coastal Bumper, Manual Hubs, 255/80r17 AT3Ws (409k+ Miles)
1997 4Runner "Becky" - Camping Rig - 3.4 Auto (for now), Armored, Cable E-Locked, Coastal Bumper, Sleeper Deck, 255/80r17 AT3Ws (185k+ Miles)
1989 4Runner | Tennessee 4Runner Group
|
|
|
Reply With Quote
|
 Posting Rules
|
You may not post new threads
You may not post replies
You may not post attachments
You may not edit your posts
HTML code is On
|
|
|
|


 Linear Mode


