 06-08-2021, 02:48 AM
|
#136
|
 |
Member
|
|
Join Date: Aug 2014
Location: Bay Area, CA
Age: 30
Posts: 433
Real Name: Drew
|
|
|
Member
Join Date: Aug 2014
Location: Bay Area, CA
Age: 30
Posts: 433
Real Name: Drew
|
January, 2021
Total Chaos Spindle Gussets
Parts List:
- TC Weld-On Spindle Gussets (Part# 59697)
- Koyo Wheel Bearings (517011)
- Inner and Outer Seals
- Toyota Snap Rings (90521-99114)
- Junkyard OEM Spindles
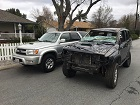
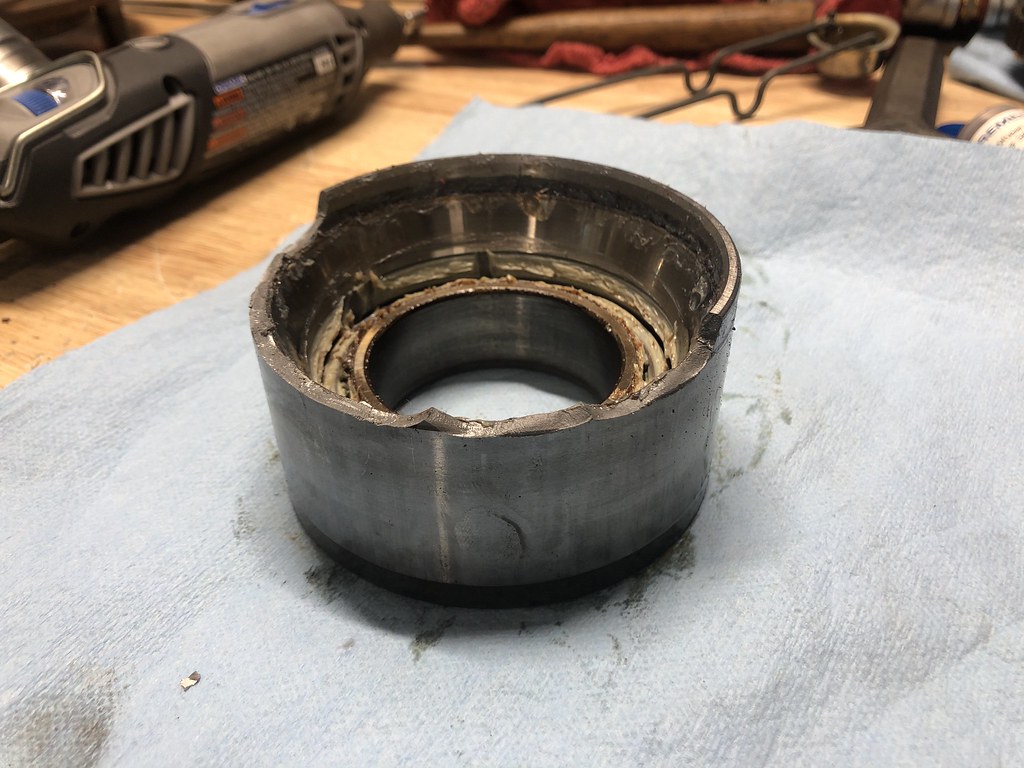
I bought these gussets initially for the first 4Runner, but never got around to installing them. With the trip down to KOH coming up, I figured might as well just go for it. Since I use my car for daily driving, I wanted to get a "new" set of spindles ready to swap over to limit the downtime. And while the wheel bearings were probably fine and didn't show any major sign of wear, I figured it was time after 245K miles.
I pulled a set from 2 different junkers at the local pick n pull that looked pretty decent. They just had a bit of surface rust that could be cleaned off relatively easy. I started off by pressing out the wheel hubs. The first one was extremely easy, but the second one was rusted to the inner race of the bearing. Since the snap ring that holds the bearing in place is not accessible until the hub is out, I thought I was screwed. I tried using heat, hitting it with a hammer, letting it sit in PB Blaster, but nothing seemed to work.
I finally decided to just press through it and hope for the best. With enough force, the bearing gave up and exploded. Luckily the only damage to the spindle was where the snap ring pushed against the outer edge of the slot. I had to use a dremel to cut off the inner race from the hub as it was still stuck. I slightly nicked the hub's shaft, but luckily it didn't go too deep. With all of the parts removed, I started removing all of the surface rust that I could. With a variety of wire wheel attachments, most of the rust was able to get off.
Next up was to actually weld the gussets in place. My buddy was there again to help me out with this. Maybe one of these days I'll pick up welding again, but a 6 pack and a couple hours is a pretty good deal. Welding went pretty quick after some grinding to get it to fit better. I masked off the important areas, and after a few coats of paint, these spindles were good as new!
Pressing in the new bearings went much smoother than removal. Because of the slight lip that was formed from the broken bearing, I wasn't able to fully seat the outer seal. I had to remove the seal and grind down the burr to get everything to seat properly. After that, everything else was pretty straightforward.
Way too much text, so onto pics.
Backing plate removed
 The stuck hub and the carnage


 Prepped spindles
 Welding
 Painted
 Fully installed

__________________
1999 Black SR5 Highlander 4wd V6 Automatic ( Build Thread) 
2001 Millennium Silver SR5 Sport 4wd V6 Automatic (Build Thread V2)
|

|
 Reply With Quote Reply With Quote
|
|
06-10-2021, 01:08 AM
|
#137
|
|
Member
|
|
Join Date: Aug 2014
Location: Bay Area, CA
Age: 30
Posts: 433
Real Name: Drew
|
|
|
Member
Join Date: Aug 2014
Location: Bay Area, CA
Age: 30
Posts: 433
Real Name: Drew
|
February 4th-6th, 2021
King of the Hammers
Was able to head back down to KOH earlier this year and had an absolute blast! This was the first time bringing my own car on the trip, so was definitely excited to rip around in the desert. The rig did great during the 8 hour drive and we went straight back out to explore the area. I was having some trouble in the deep sand dunes, but I think that was from not filling the transmission enough during the change I did right before the trip.
We didn't do any of the crazy trails, but did get some pretty good speed (for me) on the desert whoops. During one of those runs, the steering started to feel weird and make a popping noise whenever the suspension cycled. I figured it was the inner tie rod, so I jacked up the front to check for play and found there to be quite a bit side to side. I did have a spare but didn't really want to replace it, so I was just hoping it would make it all the way back home. I'm still not sure how it happened, but I'm guessing bottoming out the suspension multiple times didn't exactly help. Only real damage from the trip was the inner tie rod and the outer seal that must have been damage from the rack moving.
The race itself was fun to watch with lots of excitement, but I think I was more happy to be on a real trip again since covid. Here are some of the pictures, but I have a whole Google Photo album of stuff too here!


__________________
1999 Black SR5 Highlander 4wd V6 Automatic ( Build Thread)
2001 Millennium Silver SR5 Sport 4wd V6 Automatic (Build Thread V2)
|
|
|
Reply With Quote
|
|
09-17-2021, 01:31 AM
|
#138
|
|
Member
|
|
Join Date: Aug 2014
Location: Bay Area, CA
Age: 30
Posts: 433
Real Name: Drew
|
|
|
Member
Join Date: Aug 2014
Location: Bay Area, CA
Age: 30
Posts: 433
Real Name: Drew
|
I know you're not supposed to take pictures while driving, but I hit 250K miles when I was driving to Arizona back in April!

__________________
1999 Black SR5 Highlander 4wd V6 Automatic ( Build Thread)
2001 Millennium Silver SR5 Sport 4wd V6 Automatic (Build Thread V2)
|
|
|
Reply With Quote
|
|
09-17-2021, 01:51 AM
|
#139
|
|
Member
|
|
Join Date: Aug 2014
Location: Bay Area, CA
Age: 30
Posts: 433
Real Name: Drew
|
|
|
Member
Join Date: Aug 2014
Location: Bay Area, CA
Age: 30
Posts: 433
Real Name: Drew
|
__________________
1999 Black SR5 Highlander 4wd V6 Automatic ( Build Thread)
2001 Millennium Silver SR5 Sport 4wd V6 Automatic (Build Thread V2)
|
|
|
Reply With Quote
|
|
09-21-2021, 01:19 AM
|
#140
|
|
Member
|
|
Join Date: Aug 2014
Location: Bay Area, CA
Age: 30
Posts: 433
Real Name: Drew
|
|
|
Member
Join Date: Aug 2014
Location: Bay Area, CA
Age: 30
Posts: 433
Real Name: Drew
|
July 16-19th, 2021
Shock Rebuild
Parts List:
- 4x FK COM 10T-F1 bearings
- 2x FK COM 12T-F1 bearings
- Some spiral internal retaining rings
- 4x Icon 2.5 remote resi shock service kit (IVD-252011)
- Gallon of Icon shock oil
- 700 lb/in 14" Icon coils (IVD-158508)
After putting around 35,000 miles on the shocks, I figured it was time to rebuild them. The oil in the rear was pretty brown and had a little metallic sheen to it, but nothing too bad. The actual rebuild is fairly straightforward, just replacing the old o-rings with the new ones. Hardest part was just keeping all the shims in the correct order after cleaning them. Everything else in the internals looked pretty good and the shafts had no sign of pitting either.
For the front coilovers, I decided to go up to a 700 lb/in spring based on the amount of weight I have in the truck. After a few months of driving, this was absolutely the wrong decision... The ride is super harsh and is not as enjoyable to drive anymore. I'm planning on going back to the stock 650 lb/in relatively soon.
Once everything was back together, I brought the shocks to a motorcycle shop to get 150 psi of Nitrogen into the reservoirs. Overall it was a pretty fun project!


__________________
1999 Black SR5 Highlander 4wd V6 Automatic ( Build Thread)
2001 Millennium Silver SR5 Sport 4wd V6 Automatic (Build Thread V2)
|
|
|
Reply With Quote
|
|
09-21-2021, 11:51 AM
|
#141
|
 |
Senior Member
|
|
Join Date: Nov 2014
Location: Huntsville, AL
Posts: 3,929
|
|
|
Senior Member
Join Date: Nov 2014
Location: Huntsville, AL
Posts: 3,929
|
Quote:
Originally Posted by JerkyDrewster

April 26, 2021
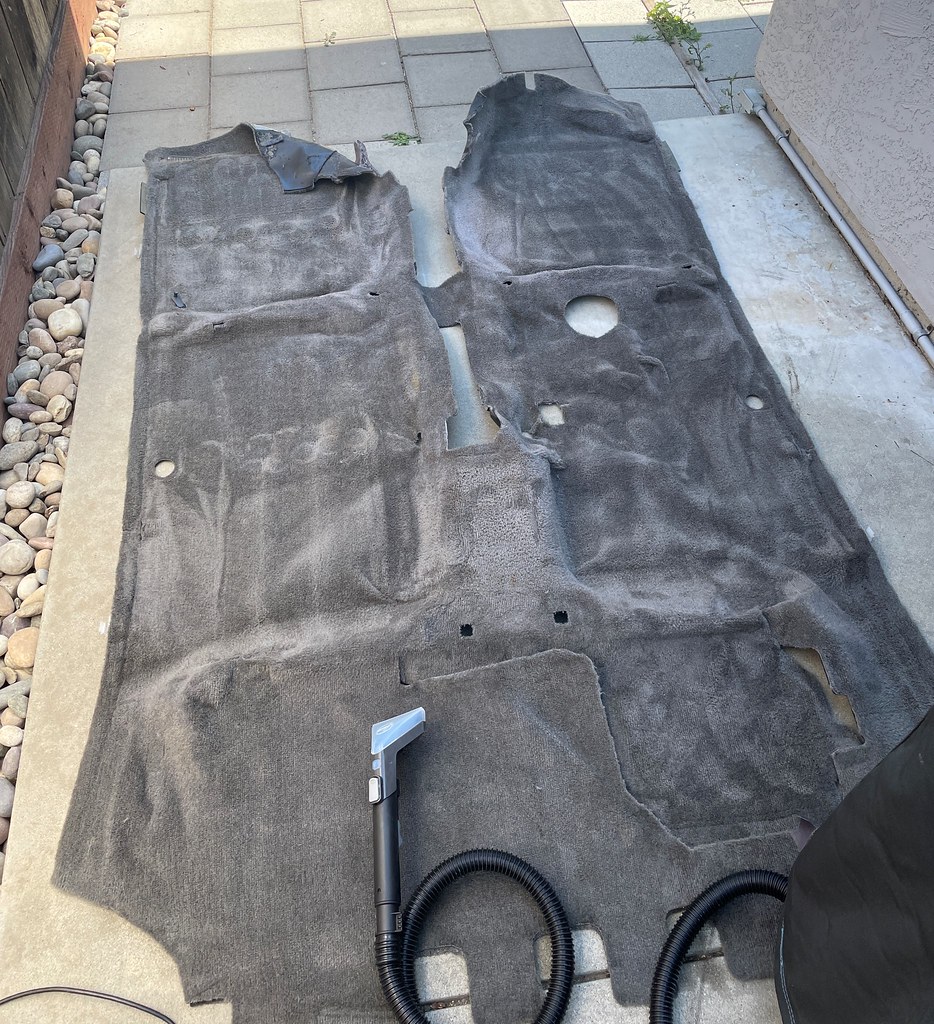
Finishing the Sound Deadening
Before the trip out to AZ, I wanted to finish up the last bit of sound deadening in the cab. The carpets were pretty dirty, but underneath didn't require too much cleaning. I did mostly the same as the cargo area, but used significantly less of the foam as I didn't want to buy anymore of it. Overall, I am very happy with the noise difference and now the music sounds SO much better! The main noise I hear now comes from the engine bay since I didn't add anything to the firewall.
Carpet before and after
]
|
That carpet looks great! Did you just use a regular carpet cleaner machine? This makes me want to pull mine and do the same. It doesn't look like too much work to pull the carpet.
Sound deadening looks good too!
Quote:
Originally Posted by JerkyDrewster
July 16-19th, 2021
Shock Rebuild
Parts List:
- 4x FK COM 10T-F1 bearings
- 2x FK COM 12T-F1 bearings
- Some spiral internal retaining rings
- 4x Icon 2.5 remote resi shock service kit (IVD-252011)
- Gallon of Icon shock oil
- 700 lb/in 14" Icon coils (IVD-158508)
After putting around 35,000 miles on the shocks, I figured it was time to rebuild them. The oil in the rear was pretty brown and had a little metallic sheen to it, but nothing too bad. The actual rebuild is fairly straightforward, just replacing the old o-rings with the new ones. Hardest part was just keeping all the shims in the correct order after cleaning them. Everything else in the internals looked pretty good and the shafts had no sign of pitting either.
For the front coilovers, I decided to go up to a 700 lb/in spring based on the amount of weight I have in the truck. After a few months of driving, this was absolutely the wrong decision... The ride is super harsh and is not as enjoyable to drive anymore. I'm planning on going back to the stock 650 lb/in relatively soon.
Once everything was back together, I brought the shocks to a motorcycle shop to get 150 psi of Nitrogen into the reservoirs. Overall it was a pretty fun project!
]
|
Was that 35k hard miles or mostly street? Mine have probably 40k miles, but that is a lot of highway miles. Did you run into any issues doing the rebuild? Did the reservoirs complicate it at all?
__________________
2008 Toyota 4Runner Limited 4x4 - Salsa Red, DD, Mostly Stock, 89k miles
2001 Toyota 4Runner SR5 4x4 - Not Stock, Lifted, Armored, 291k miles
1987 Toyota Supra N/A - Stock, 2nd Owner, 92k miles
|
|
|
Reply With Quote
|
|
09-21-2021, 02:03 PM
|
#142
|
|
Member
|
|
Join Date: Aug 2014
Location: Bay Area, CA
Age: 30
Posts: 433
Real Name: Drew
|
|
|
Member
Join Date: Aug 2014
Location: Bay Area, CA
Age: 30
Posts: 433
Real Name: Drew
|
Quote:
Originally Posted by Unner
That carpet looks great! Did you just use a regular carpet cleaner machine? This makes me want to pull mine and do the same. It doesn't look like too much work to pull the carpet.
Sound deadening looks good too!
|
Yea we have one of the Hoover carpet cleaners and it did a great job. I think I had to empty the container 3 times or so, and the water was absolutely disgusting. I could have probably got it even cleaner, but I was pretty happy with how it looked!
Quote:
|
Was that 35k hard miles or mostly street? Mine have probably 40k miles, but that is a lot of highway miles. Did you run into any issues doing the rebuild? Did the reservoirs complicate it at all?
|
It was definitely mostly street and highway miles. There were some good trips in there, but the most abusive I was to the suspension was at KOH.
The rebuild was very straightforward and I think the reservoirs make it even easier since you don't have to set the height of the IFP in the main shaft. Basically just fill the shock body with oil, bleed the air out by cycling the resi, and you're good to go. I used some 1/4" all thread and an aluminum plate as a handle to help cycle the resi for bleeding that worked pretty well. I did not change out any of the seals in the tubes going to the resi. I could see those being more of a pain.
__________________
1999 Black SR5 Highlander 4wd V6 Automatic ( Build Thread)
2001 Millennium Silver SR5 Sport 4wd V6 Automatic (Build Thread V2)
|
|
|
Reply With Quote
|
|
09-24-2021, 01:00 AM
|
#143
|
|
Member
|
|
Join Date: Aug 2014
Location: Bay Area, CA
Age: 30
Posts: 433
Real Name: Drew
|
|
|
Member
Join Date: Aug 2014
Location: Bay Area, CA
Age: 30
Posts: 433
Real Name: Drew
|
September, 2021
Re-gear and Air Locker
Parts List:
- Nitro front and rear gear package ( GPTOY1-488)
- ARB Air Locker (RD132)
- Some cheap diff oil
The time has come to finally re-gear. I was tired of pressing the pedal to the floor and barely going anywhere. For the constant gear hunting on even the smallest of hills. I put in a quite a bit of research on which ratio I wanted, but finally ended up with 4.88:1. This seemed like the best given that this is mostly a daily driver, and I'm most likely going to stick with 33's. Even if I wanted to up to 35's these should still work pretty well and wouldn't lose too much power.
The next decision was to lock just the rear or also go with the front. I've honestly gone back and forth with this for the past few years and I just can't justify locking the front. With how I currently use this rig, if I end up on a trail where I need F&R lockers and a winch, I did something wrong. The rear locker should help me out a ton if I ever get to an obstacle that the skinny pedal just can't get me out of!
Front Diff
I wanted to start with the front so I could get over the hard part first. Pulling the diff was relatively straightforward, but I couldn't drain all of the fluid since the drain plug was seized. The deconstruction process was pretty easy and allowed me to do a deep clean of all of the parts. The only part that was a PITA was the drain plug. I tried welding a nut on, but couldn't get any penetration for some reason. I then took a 3/4" drill bit and bored a hole through the center. I was then able to cut a slot and use a chisel to back it out. The threads looked perfect, so I have absolutely no idea why it was stuck... The bearings and gears looked extremely good for how many miles were on them, which I guess makes sense due to it being the front.
Putting everything back together wasn't terrible, but it was very tedious. I had to pull the the assembly apart 5 or 6 times in order to check the pinion depth and the contact pattern. I also hoped for the best on ring gear backlash since I didn't receive any carrier bearing shims. Once I got a desirable pattern, I worked on the pinion preload. This took another 4 tries or so till I got an acceptable measurement. Once I was happy with the results, I started to put everything back together and mounted it back onto the frame.
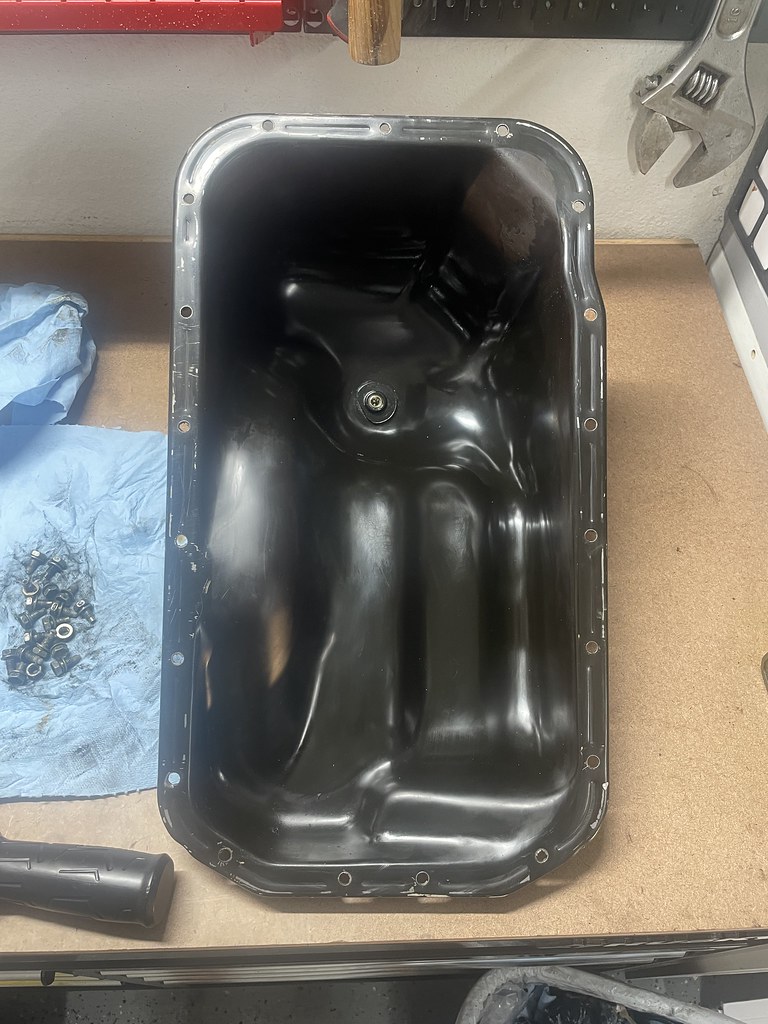
Before putting the diff back in, I decided to drop the oil pan and clean the gasket. It had been seeping for a couple years and figured this is the best time to do it. I cleaned off all the old gasket material and put some new RTV down. I somehow lost one of the bolts in the process, but so far it has been holding all of the oil.
Final measurements for the front are:
- Pinion Depth: .073"
- Pinion Preload Spacer: 2.194"
- Pinion Preload: ~13 in-lbf
- Ring-Side Carrier Spacer: .099"
- Pinion-Side Carrier Spacer: .089"
Rear Diff
A couple weeks later (last week) I tackled the rear. This one went so much smoother than the front minus the fact that Nitro sent me one of the wrong carrier bearings. Since I didn't want to be down, I decided to reuse the nicest looking one I took off. The installation was pretty straightforward again, but getting everything dialed in was quite tedious. The drive pattern took 6 times to get right and the pinion preload another 4 or so.
Once that was figured out, I just had to installed the sealing ring onto the end of the carrier and route the air line to the outside of the housing. From there, I coated the axle with some RTV and bolted the 3rd member back up. I routed the air line up the passenger side frame rail and followed the rear heater lines up the engine bay to meet with the air compressor.
Final measurements for the rear are:
- Pinion Depth: .075"
- Pinion Preload Spacer: 1.866"
- Pinion Preload: ~15 in-lbf
- Ring Gear Backlash: .006"
This was easily the most involved project I have done on any vehicle, and even though there were some challenging moments, I definitely had a blast doing it. As long as you take your time dialing everything in, anyone should be able to set up their own gears. I'm still in the break in period, but the truck finally feels normal when you step on the gas again. I can actually accelerate and I can't tell any noticeable difference in the noise coming from the front or rear diffs. So far I am very happy with the outcome!
Front diff


 Drive pattern
 Coast pattern

 Oil pan

 Rear diff
 Checking backlash
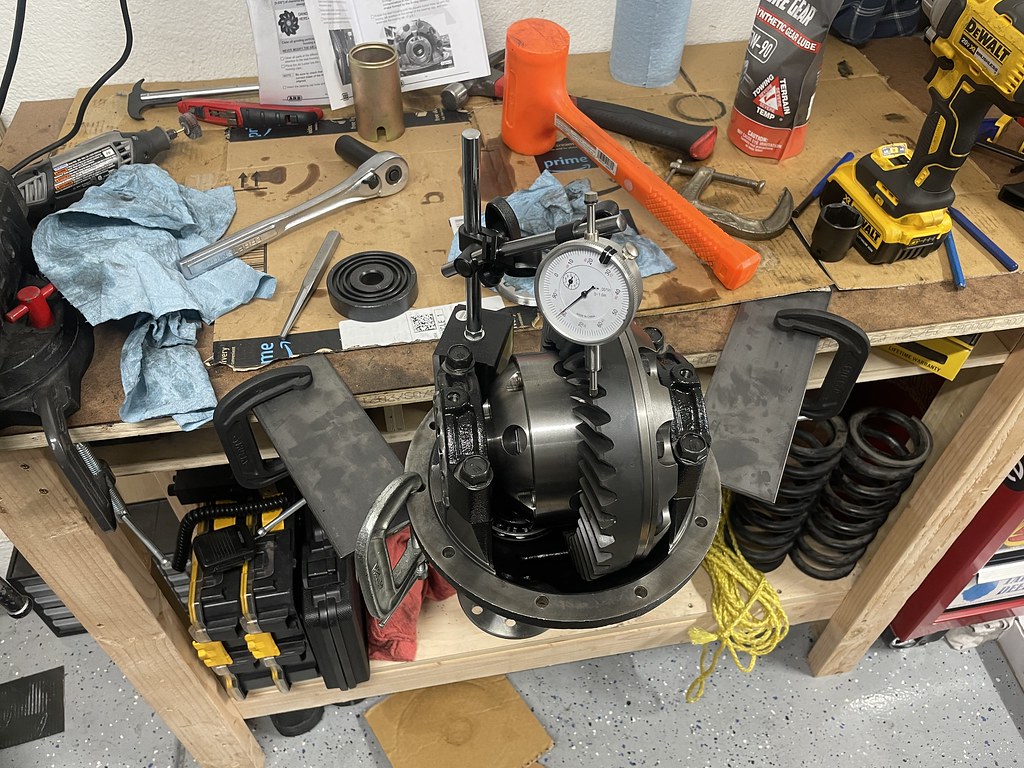 Drive pattern
 Coast pattern
 Before
 After
After
 The aftermath!

__________________
1999 Black SR5 Highlander 4wd V6 Automatic ( Build Thread)
2001 Millennium Silver SR5 Sport 4wd V6 Automatic (Build Thread V2)
Last edited by JerkyDrewster; 09-24-2021 at 01:20 AM.
|
|
|
Reply With Quote
|
|
01-28-2022, 01:31 AM
|
#144
|
|
Member
|
|
Join Date: Aug 2014
Location: Bay Area, CA
Age: 30
Posts: 433
Real Name: Drew
|
|
|
Member
Join Date: Aug 2014
Location: Bay Area, CA
Age: 30
Posts: 433
Real Name: Drew
|
__________________
1999 Black SR5 Highlander 4wd V6 Automatic ( Build Thread)
2001 Millennium Silver SR5 Sport 4wd V6 Automatic (Build Thread V2)
Last edited by JerkyDrewster; 01-28-2022 at 01:38 AM.
|
|
|
Reply With Quote
|
|
01-29-2022, 01:48 AM
|
#145
|
 |
Senior Member
|
|
Join Date: Dec 2013
Location: SF Bay Area California
Posts: 2,763
|
|
|
Senior Member
Join Date: Dec 2013
Location: SF Bay Area California
Posts: 2,763
|
....
__________________
1998 Desert Dune Toyota 4runner Limited 4x4 w/ factory e-locker
2000 BLACK Toyota 4runner Limited 4x4 w/ factory e-locker Build Thread
2002 Thundercloud Metalic Toyota 4runner Limited 4x4
Build Thread

|
|
|
Reply With Quote
|
|
01-29-2022, 03:28 PM
|
#146
|
|
Member
|
|
Join Date: Aug 2014
Location: Bay Area, CA
Age: 30
Posts: 433
Real Name: Drew
|
|
|
Member
Join Date: Aug 2014
Location: Bay Area, CA
Age: 30
Posts: 433
Real Name: Drew
|
Quote:
Originally Posted by infamousRNR
....
|
Just wait for the next update or so...it's a fun one 
__________________
1999 Black SR5 Highlander 4wd V6 Automatic ( Build Thread)
2001 Millennium Silver SR5 Sport 4wd V6 Automatic (Build Thread V2)
|
|
|
Reply With Quote
|
|
01-29-2022, 03:57 PM
|
#147
|
|
Member
|
|
Join Date: Aug 2014
Location: Bay Area, CA
Age: 30
Posts: 433
Real Name: Drew
|
|
|
Member
Join Date: Aug 2014
Location: Bay Area, CA
Age: 30
Posts: 433
Real Name: Drew
|
__________________
1999 Black SR5 Highlander 4wd V6 Automatic ( Build Thread)
2001 Millennium Silver SR5 Sport 4wd V6 Automatic (Build Thread V2)
Last edited by JerkyDrewster; 01-29-2022 at 04:01 PM.
|
|
|
Reply With Quote
|
|
01-30-2022, 12:19 AM
|
#148
|
|
Member
|
|
Join Date: Aug 2014
Location: Bay Area, CA
Age: 30
Posts: 433
Real Name: Drew
|
|
|
Member
Join Date: Aug 2014
Location: Bay Area, CA
Age: 30
Posts: 433
Real Name: Drew
|
__________________
1999 Black SR5 Highlander 4wd V6 Automatic ( Build Thread)
2001 Millennium Silver SR5 Sport 4wd V6 Automatic (Build Thread V2)
Last edited by JerkyDrewster; 02-21-2022 at 12:48 AM.
|
|
|
Reply With Quote
|
|
01-30-2022, 11:00 AM
|
#149
|
 |
Official Vendor
|
|
Join Date: Aug 2008
Location: Charlotte, NC
Posts: 1,471
|
|
|
Official Vendor
Join Date: Aug 2008
Location: Charlotte, NC
Posts: 1,471
|
hey, thanks for the order!
BTW, that second set of holes is set up for the Tacoma pattern - useful when running upper strut tops designed for that platform, so they are oriented correctly. 
I can't see from your photos, but the curved slot in the rear is a weld slot also - since it is difficult to get to the rear edge of the plate.
__________________
keith
eimkeith.com
all product descriptions © eimkeith LLC 2016-2023
|
|
|
Reply With Quote
|
|
01-30-2022, 02:20 PM
|
#150
|
|
Member
|
|
Join Date: Aug 2014
Location: Bay Area, CA
Age: 30
Posts: 433
Real Name: Drew
|
|
|
Member
Join Date: Aug 2014
Location: Bay Area, CA
Age: 30
Posts: 433
Real Name: Drew
|
Quote:
Originally Posted by eimkeith
hey, thanks for the order!
BTW, that second set of holes is set up for the Tacoma pattern - useful when running upper strut tops designed for that platform, so they are oriented correctly.
I can't see from your photos, but the curved slot in the rear is a weld slot also - since it is difficult to get to the rear edge of the plate. |
Thanks for making great stuff! That's pretty cool about the curved slot. If I had a lower profile hood, I think I would have gone for it instead of the rear, but I couldn't get a good angle to see it.
__________________
1999 Black SR5 Highlander 4wd V6 Automatic ( Build Thread)
2001 Millennium Silver SR5 Sport 4wd V6 Automatic (Build Thread V2)
|
|
|
Reply With Quote
|
 Posting Rules
|
You may not post new threads
You may not post replies
You may not post attachments
You may not edit your posts
HTML code is On
|
|
|
|


 Linear Mode


