 07-09-2017, 06:38 PM
|
#31
|
 |
Member
|
|
Join Date: Aug 2014
Location: Bay Area, CA
Age: 30
Posts: 433
Real Name: Drew
|
|
|
Member
Join Date: Aug 2014
Location: Bay Area, CA
Age: 30
Posts: 433
Real Name: Drew
|
Quote:
Originally Posted by infamousRNR

sweet progress & pics drew!
I'm hoping there will be a "convoy down the coast" part III either later this year or early 2018!!!
|
Thanks Sean! Let me know if you need any help planning...I would definitely be down for another one!
Quote:
Originally Posted by nihkon
I'm a big fan of your build dude! I love how simple and cleanly executed it is!
Keep up the good work! 
And congrats on the proposal! |
Thanks dude! I've been trying to learn how to make this one better than the last, and it's been a bunch of fun. You're rig is looking killer too!
__________________
1999 Black SR5 Highlander 4wd V6 Automatic ( Build Thread) 
2001 Millennium Silver SR5 Sport 4wd V6 Automatic (Build Thread V2)
|

|
 Reply With Quote Reply With Quote
|
|
07-16-2017, 09:17 PM
|
#32
|
|
Member
|
|
Join Date: Aug 2014
Location: Bay Area, CA
Age: 30
Posts: 433
Real Name: Drew
|
|
|
Member
Join Date: Aug 2014
Location: Bay Area, CA
Age: 30
Posts: 433
Real Name: Drew
|
July 7th, 2017
Steering Rack Guide & Rear Axle Seals
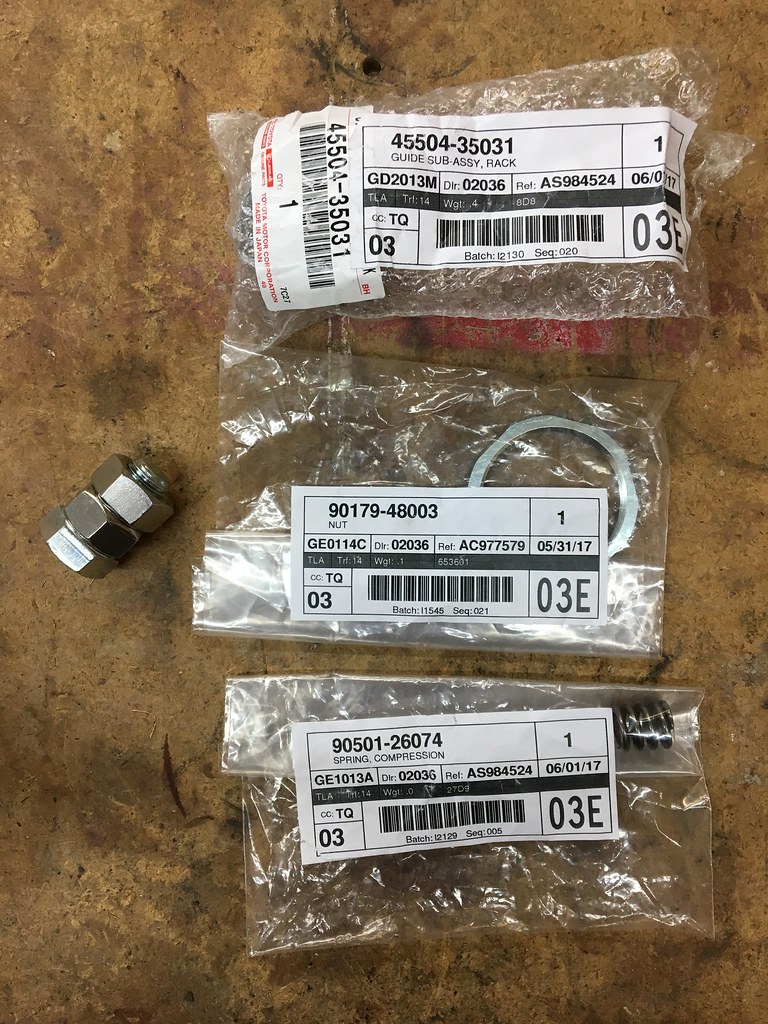
Parts List:
- Rack Guide (45504-35031)
- Rack Guide Spring (90501-26074)
- Rack Guide Nut (90179-48003)
- Inner Rear Axle Seal (90310-50006)
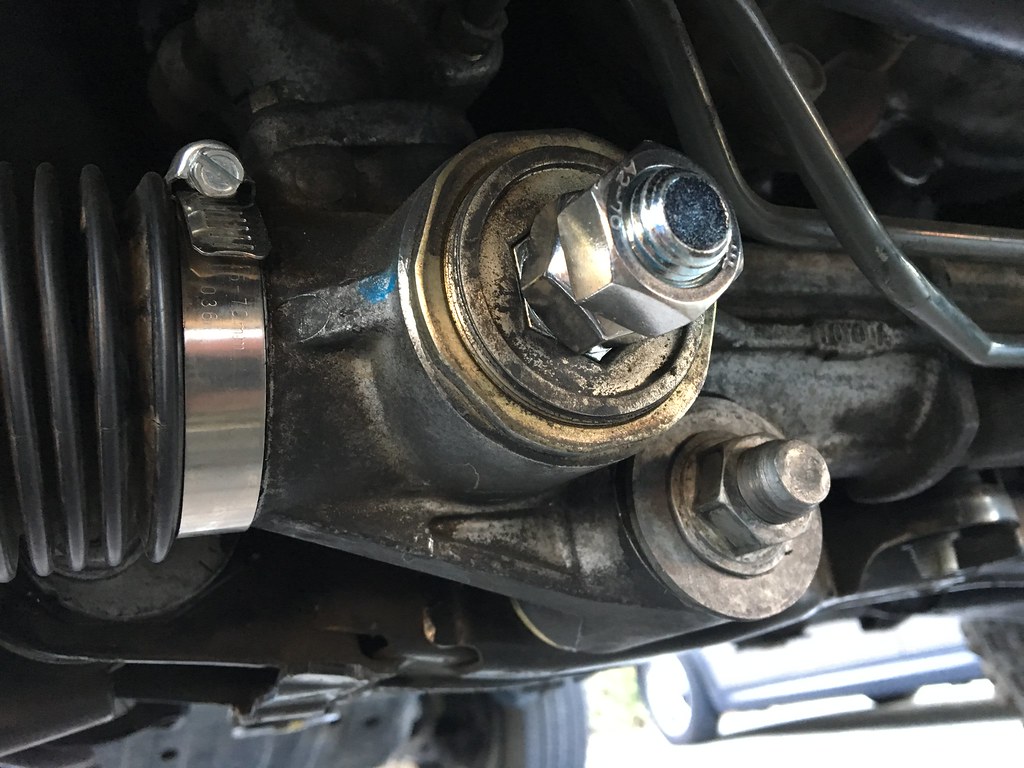
Tools Used:
- 16mm Bolt
- 2x 16mm Nuts
- 24mm Socket
- Torque Wrench
- Channel Lock Pliers
- Vice-Grips
- 10mm Flare Nut Wrench
- Crescent Wrench
- 12-14mm Sockets
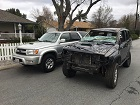
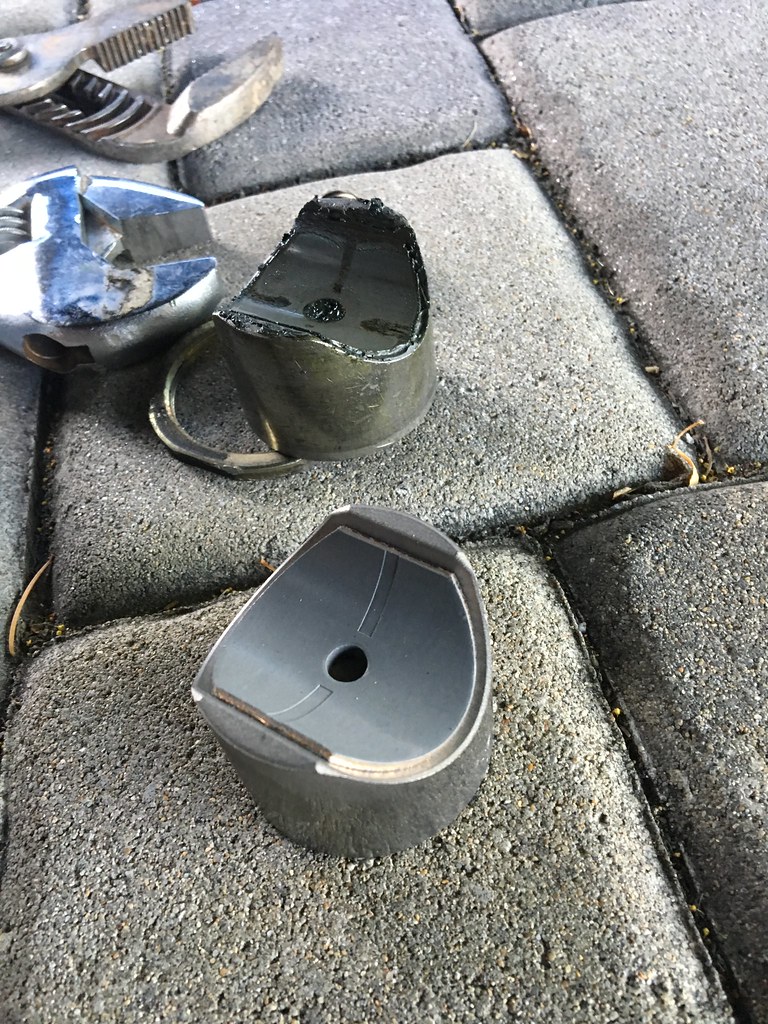
This past weekend I decided to tackle what I thought was the cure to a clicking noise underneath the driver-side of the car. Since it only happened while stopped and turning the wheels, and sometimes when I would first accelerate, I thought it had something to do with the steering rack. Since I had just replaced both sets of tie rods, I ruled those out. Short of replacing the entire rack, I went with the rack guide. Since I didn't want to shell out an extra $30 for a 24mm hex bit socket, I looked up what size bolt has a 24mm head on it. Turns out it was a 16mm! I went by my hardware store to pick up the bolt and 2 nuts for the wrench.
Once I got home, I used the channel locks to remove the large retaining nut. Once off, I put the bolt head into the cap and got it off no problem. I replaced the rack guides and retorqued it to about 18 ft-lbs then backed off a little. I might need to go back in to adjust it, but the clicking went away for the most part. I can still feel it every once in a while, but it is mostly gone.
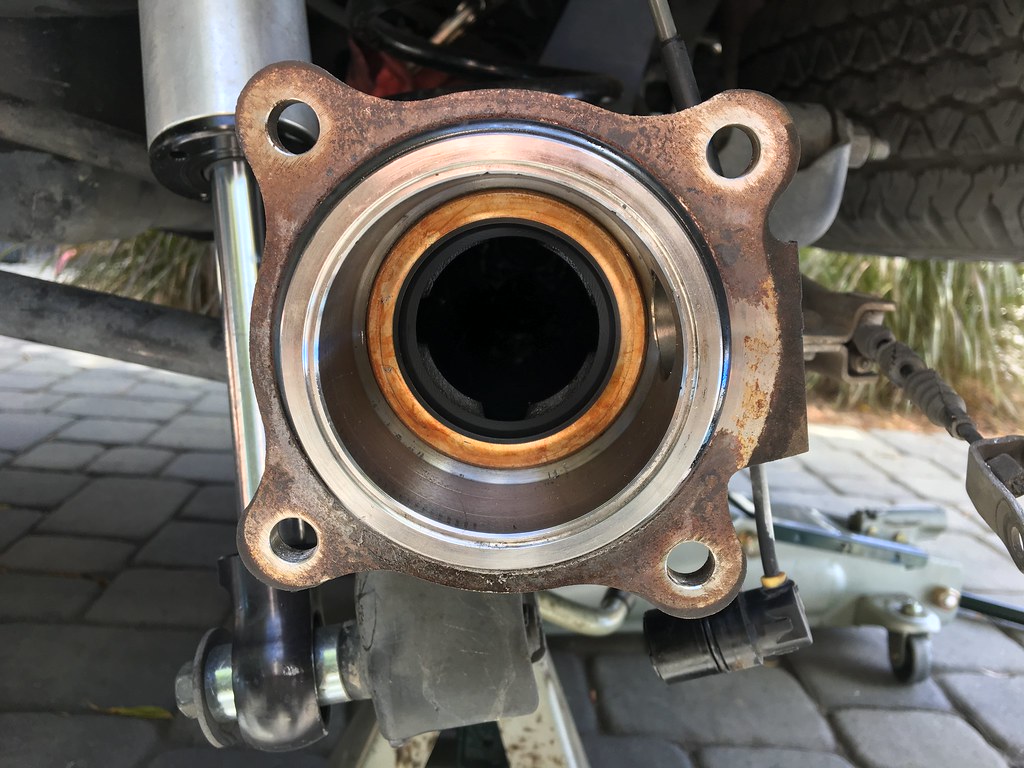
This weekend I decided to test fate and swap something out that wasn't broken...my rear axle seals. Since it was an expensive fix the last time I had to do them, with the bearings and shop time for the press, I wanted to see if I could get ahead of any failure on the new rig. Getting everything off of the car was super easy now that there is no rust to deal with...I just love it! I took off the drums to check the status of the brakes, and besides being dirty, they looked pretty good. Next up was removing the brake line and the 4 nuts holding the backing plate to the axle. Once the shaft was removed I was able to get a good look at the perfectly fine seal...oh well...I decided to continue and remove it since I was already that far into the axle. It came time to press the new one on and I was having the hardest time getting it started. I ended up getting one side in, and using a socket on one side of the seal driver to get it straightened out.
I got everything else back on without issue, but since the seal looked fine, I decided to not mess with the passenger side. Now I'm guessing that it's going to leak soon just to spite me. While I was under the car, I noticed some oil seepage from the 3rd member and axle housing. I really didn't want to drain the oil and drop the drive shaft, so I decided to check the torque on the bolts. I found maybe 5 that were under-torqued by quite a bit, and it was right where the seepage was so I'm hoping that will solve the issue for the time being.
All in all, I bought 2 inner seals, 2 outer seals, a drive shaft seal, and the 3rd member gasket, and I only installed 1 inner seal. At least I have extras for when it all blows up later!  Rack guide parts
 The 16mm socket in the cap
 Side by side
 New seal
__________________
1999 Black SR5 Highlander 4wd V6 Automatic ( Build Thread)
2001 Millennium Silver SR5 Sport 4wd V6 Automatic (Build Thread V2)
Last edited by JerkyDrewster; 11-21-2017 at 05:13 PM.
|
|
|
Reply With Quote
|
|
08-28-2017, 12:59 AM
|
#33
|
|
Member
|
|
Join Date: Aug 2014
Location: Bay Area, CA
Age: 30
Posts: 433
Real Name: Drew
|
|
|
Member
Join Date: Aug 2014
Location: Bay Area, CA
Age: 30
Posts: 433
Real Name: Drew
|
August 27th, 2017
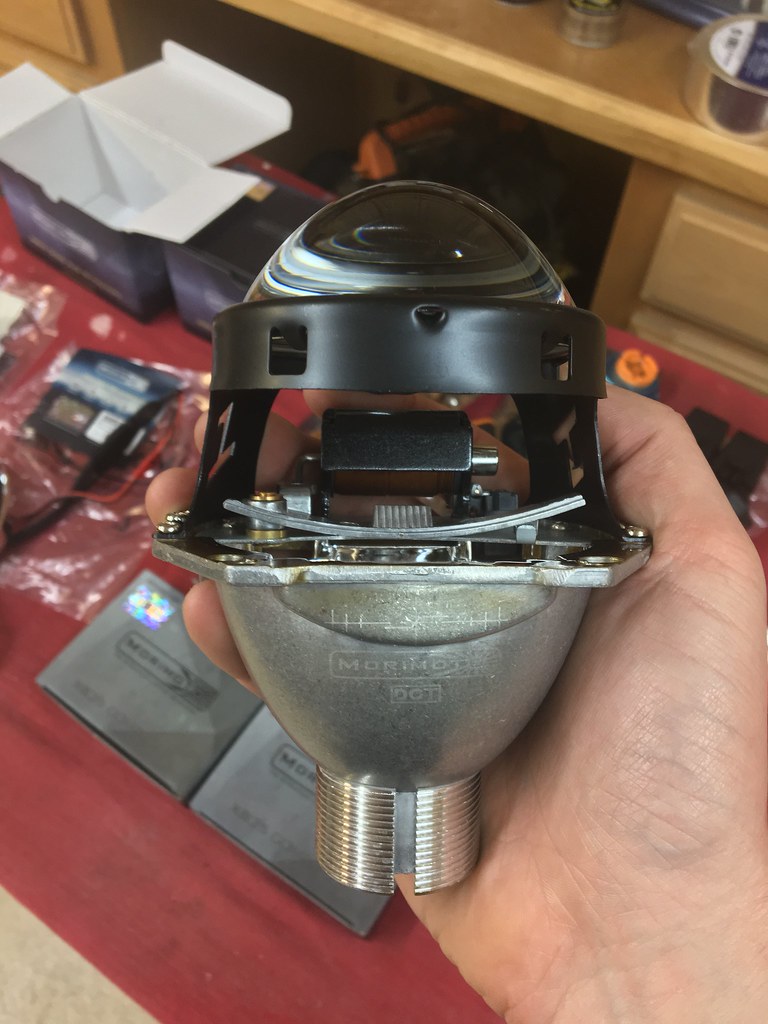
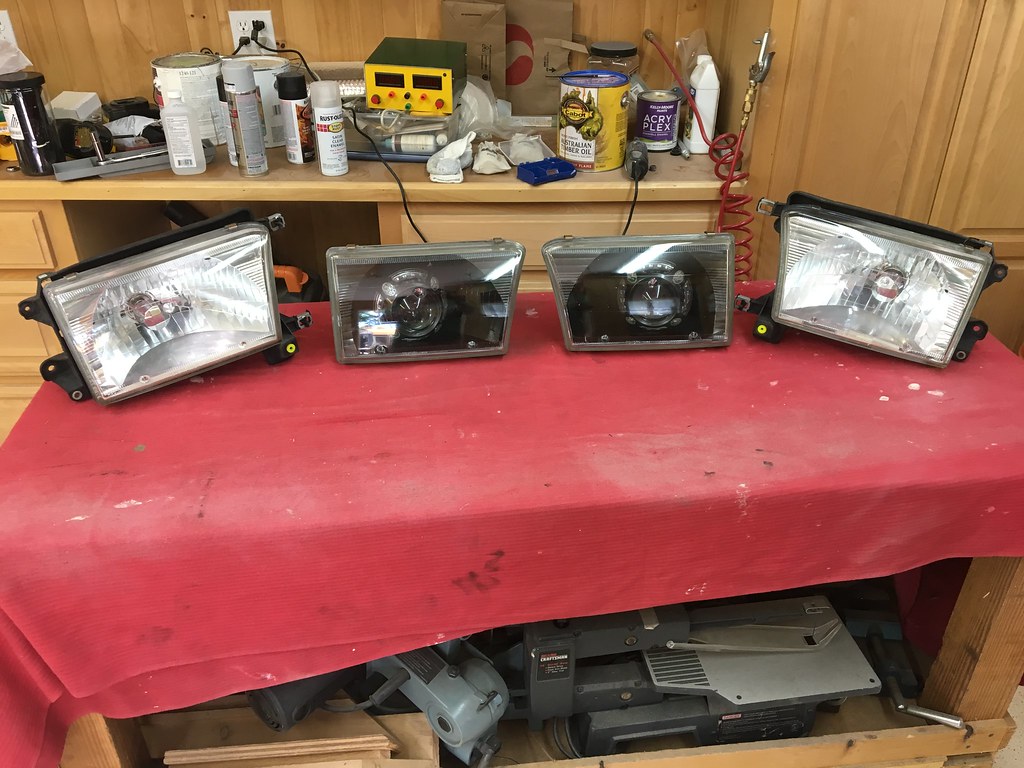
Projector Retrofits
Parts List:
- Bi-Xenon: Morimoto Mini D2S Stage III Kit
- OEM TYC Headlights
- Rustoleum Metallic Black Paint
- Rustoleum Semi-Gloss Clear Coat
Tools List:
- 10mm Socket Wrench
- Philips and Flat Head Screw Driver
- Dremel with Sanding Attachment
- JB Weld
- Silicone Sealant
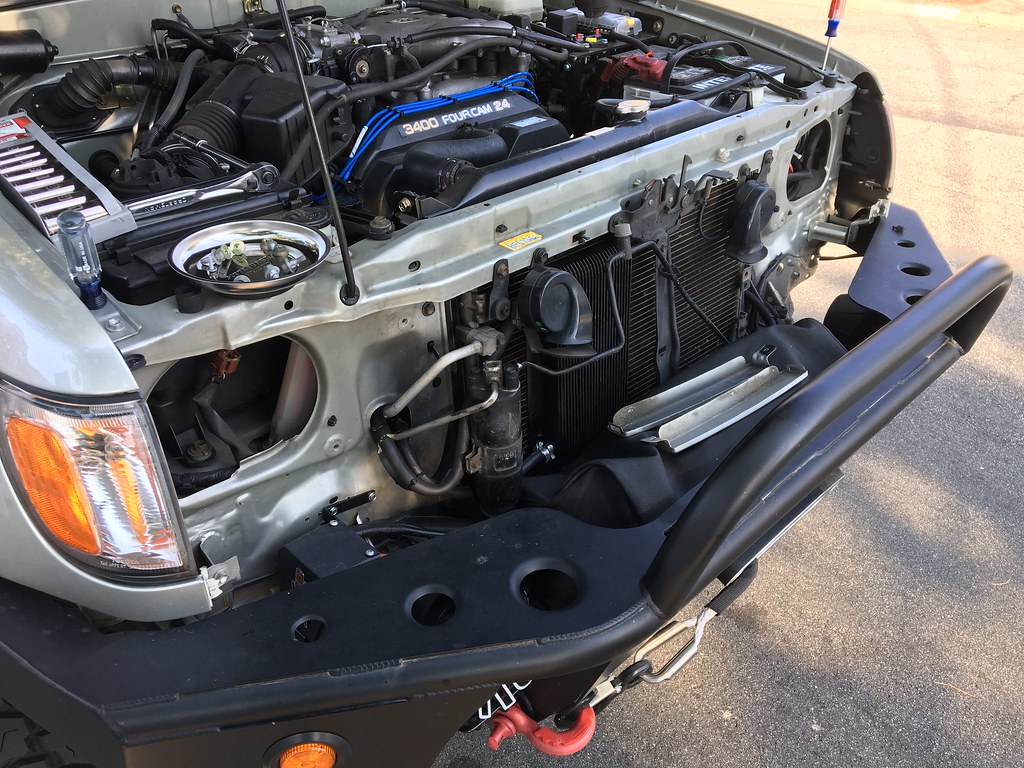
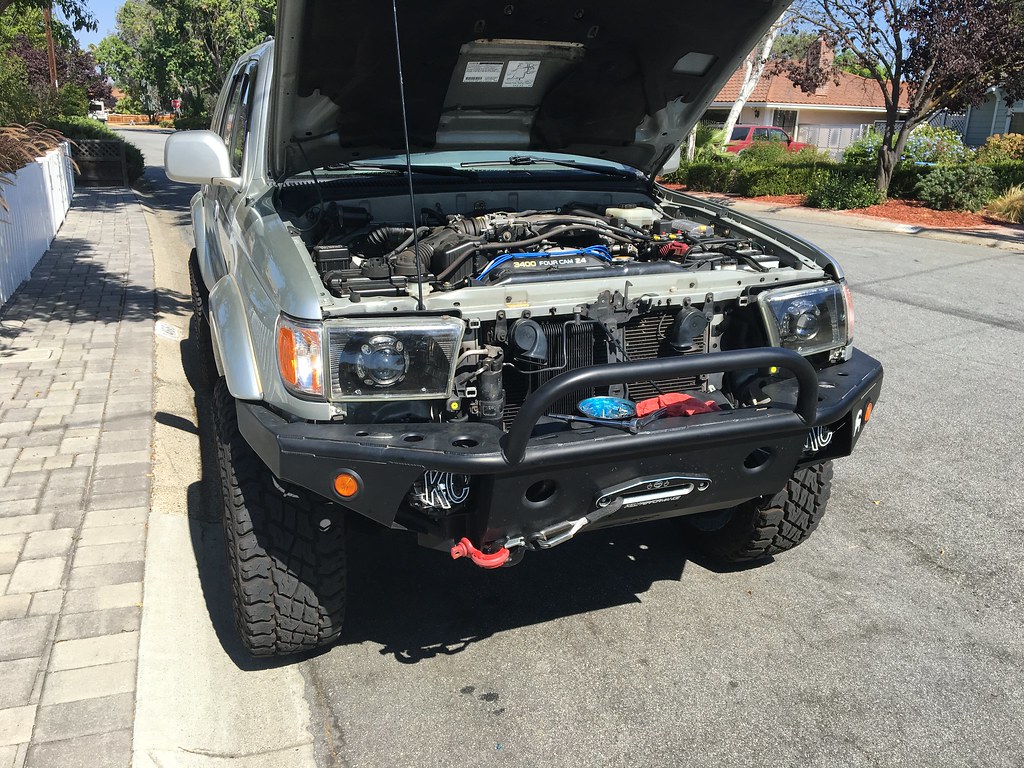
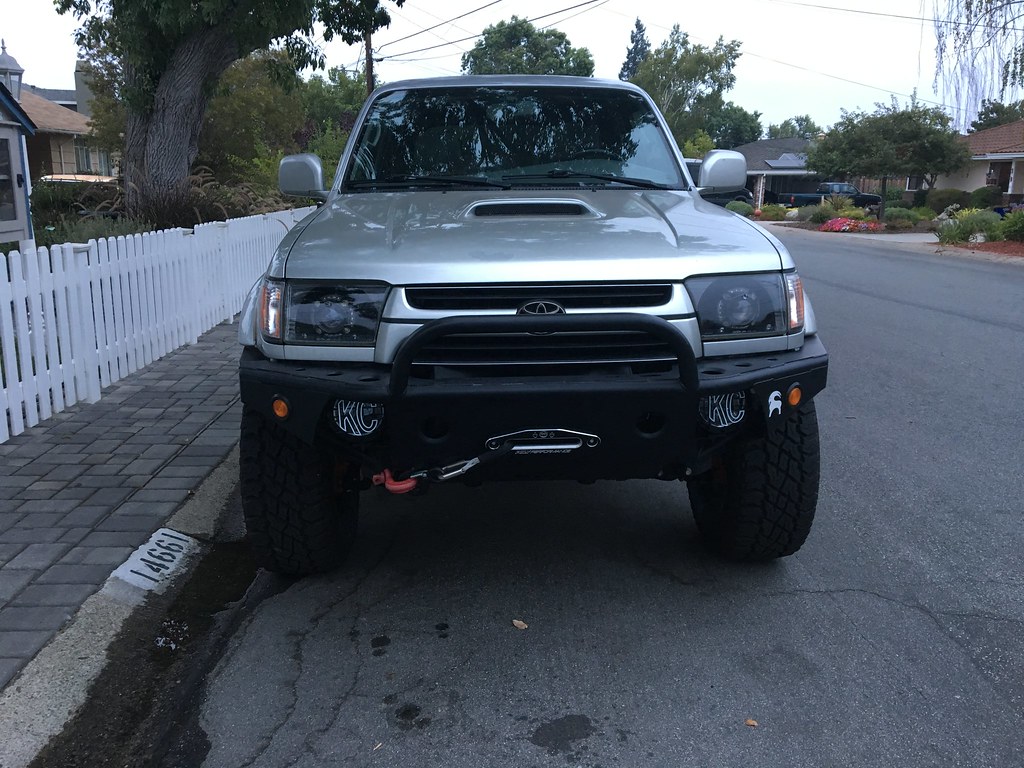
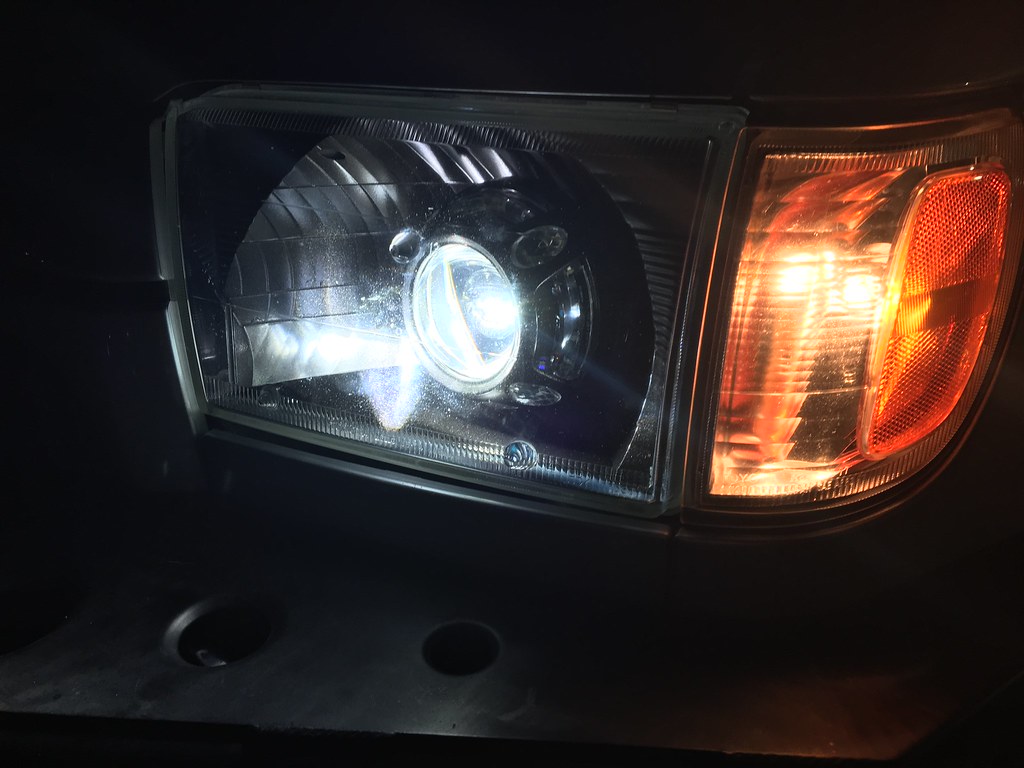
I was able to finish offf my projector headlight retrofit project today (minus aiming them). I am extremely happy with how they turned out, and I'm sure it will look even better when they are aimed. The actual modification to the OEM housing was simple. I took a dremel with the sanding attachment and removed the structure that holds the original light in place. I then used JB Weld to secure the projector alignment key in place on that surface. As others have done before, I used aluminum tape to completely seal the projector from light leakage.
I wanted to get the paint as perfect as possible, so I scuffed up the interior of the reflector bowls before cleaning them some paint thinner. I sprayed a couple coats of primer before putting on a black metallic paint. I finished it up with a clear coat to protect to give it a more glossy sheen.
Since the mounting holes were covered up, I used 3M VHB tape to secure the Panamera shrouds in place. The high beam and shroud cables were routed through the square hole near where the light is, and sealed it off with some silicone. I cleaned everything off one last time before placing them in the oven for a bit and pressing the glass and bowl together. I removed the OEM headlights and attached mine. Unfortunately I didn't have time to fully align them, but I got them pretty parallel to the ground. I'm hoping I can finish the rest off tomorrow when I have a flat surface and a wall.
Time for some pictures!
All the parts
 The projectors are huge!
 Ballasts and Bulbs
 Removing the stock headlights
 Mounting locations of the ballasts
 Back of the housing
 Testing out the lights
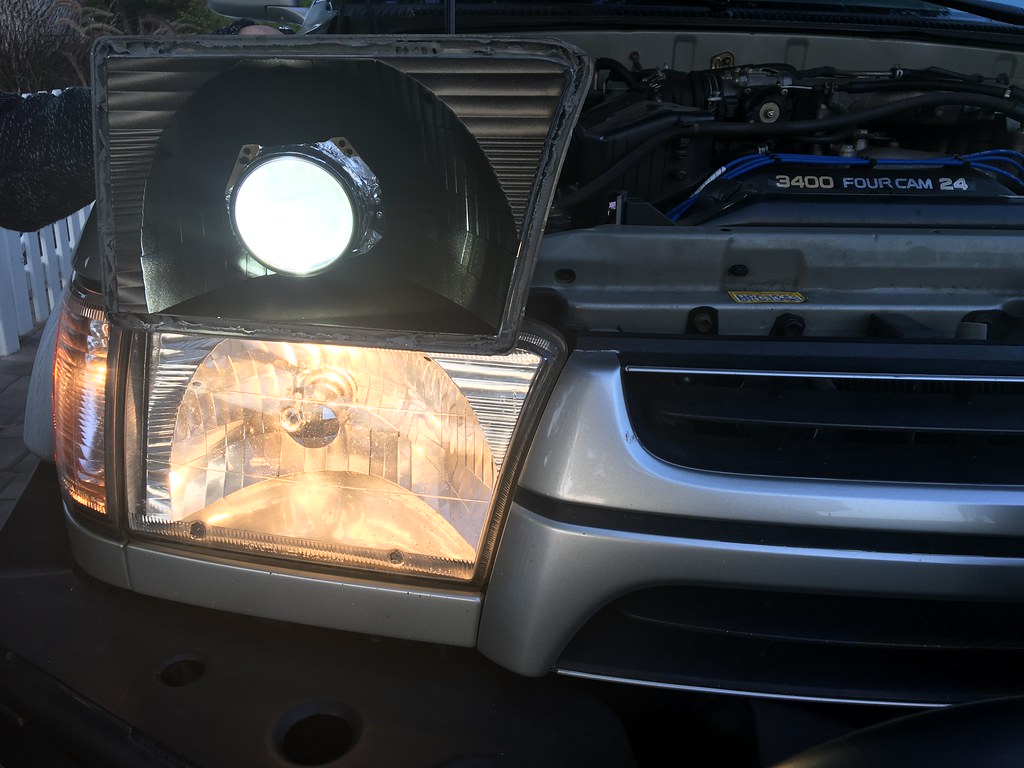
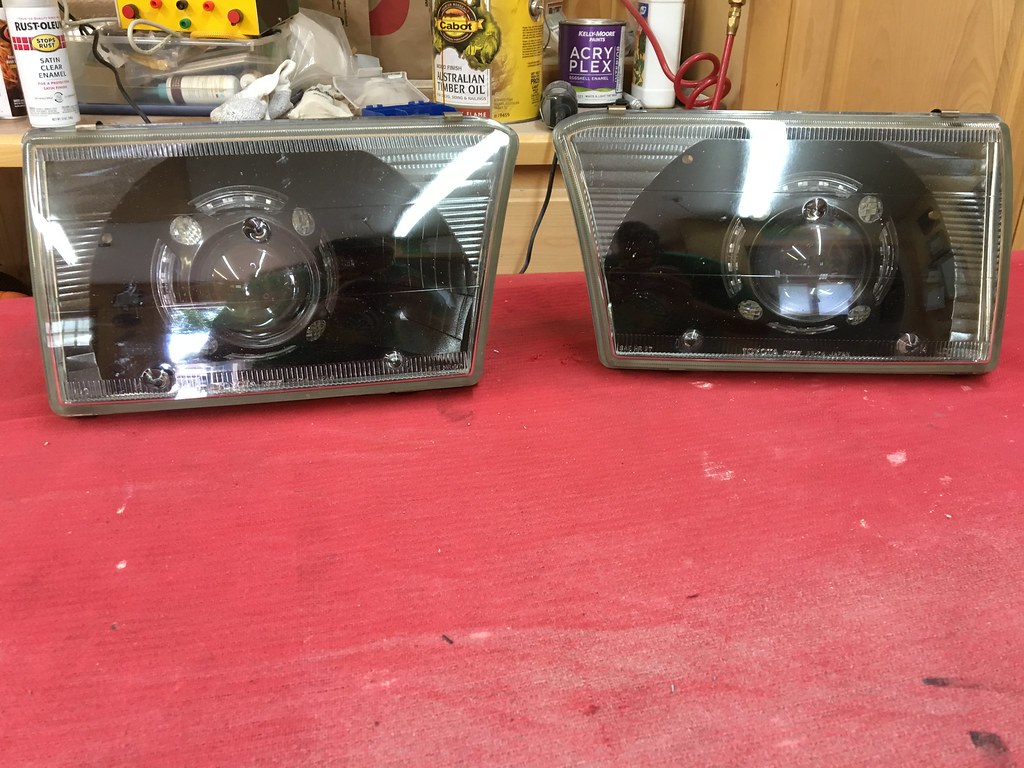 Finally placed on the car!
__________________
1999 Black SR5 Highlander 4wd V6 Automatic ( Build Thread)
2001 Millennium Silver SR5 Sport 4wd V6 Automatic (Build Thread V2)
Last edited by JerkyDrewster; 11-21-2017 at 05:14 PM.
|
|
|
Reply With Quote
|
|
08-28-2017, 12:03 PM
|
#34
|
 |
Senior Member
|
|
Join Date: Oct 2016
Location: Atlanta
Posts: 2,257
|
|
|
Senior Member
Join Date: Oct 2016
Location: Atlanta
Posts: 2,257
|
Nice work on the projectors!
Got any tips on aiming headlights? I replaced my housings months ago and have yet to get them really pointed right!
|
|
|
Reply With Quote
|
|
08-28-2017, 12:39 PM
|
#35
|
 |
Member
|
|
Join Date: Aug 2015
Location: Morrison, CO
Posts: 650
Real Name: Alex Fleming
|
|
|
Member
Join Date: Aug 2015
Location: Morrison, CO
Posts: 650
Real Name: Alex Fleming
|
Such a sick build so far! Super excited to see where you take this! Keep it up 
__________________
00' SR5 SPORT - 35's - Weekend Toy
@a.flemster on the gram.
Owner of Sherpa Equipment Co.
Build Thread

|
|
|
Reply With Quote
|
|
08-29-2017, 01:35 AM
|
#36
|
|
Member
|
|
Join Date: Aug 2014
Location: Bay Area, CA
Age: 30
Posts: 433
Real Name: Drew
|
|
|
Member
Join Date: Aug 2014
Location: Bay Area, CA
Age: 30
Posts: 433
Real Name: Drew
|
Quote:
Originally Posted by JZiggy
Nice work on the projectors!
Got any tips on aiming headlights? I replaced my housings months ago and have yet to get them really pointed right!
|
Thanks Jordan! Ater working on them tonight, you really need to find a long, flat space. I had a slight incline so the lights are a little bit too high. The lower adjustment nut seemed to adjust vertical alignment while the upper nut did horizontal. For the projectors, I adjust both sides so the cut-off aligned with each other. Fror halogens, I'm not sure how you would do it.
Quote:
Originally Posted by Flemster
Such a sick build so far! Super excited to see where you take this! Keep it up |
Thanks so much Alex. I've been trying to hold myself to a higher standard while building it, and I think it is definitely paying off. I saw the video of your trip to FJ Summit...looks like you guys had a killer time! Can't wait to see the next video of it, and hope that one day I can make it up there. Cheers!
__________________
1999 Black SR5 Highlander 4wd V6 Automatic ( Build Thread)
2001 Millennium Silver SR5 Sport 4wd V6 Automatic (Build Thread V2)
|
|
|
Reply With Quote
|
|
08-29-2017, 01:52 PM
|
#37
|
|
Member
|
|
Join Date: Aug 2014
Location: Bay Area, CA
Age: 30
Posts: 433
Real Name: Drew
|
|
|
Member
Join Date: Aug 2014
Location: Bay Area, CA
Age: 30
Posts: 433
Real Name: Drew
|
__________________
1999 Black SR5 Highlander 4wd V6 Automatic ( Build Thread)
2001 Millennium Silver SR5 Sport 4wd V6 Automatic (Build Thread V2)
Last edited by JerkyDrewster; 08-30-2017 at 12:20 AM.
|
|
|
Reply With Quote
|
|
08-29-2017, 03:00 PM
|
#38
|
 |
Elite Member
|
|
Join Date: May 2011
Location: OBX, NC and Obamaville
Posts: 6,801
|
|
|
Elite Member
Join Date: May 2011
Location: OBX, NC and Obamaville
Posts: 6,801
|
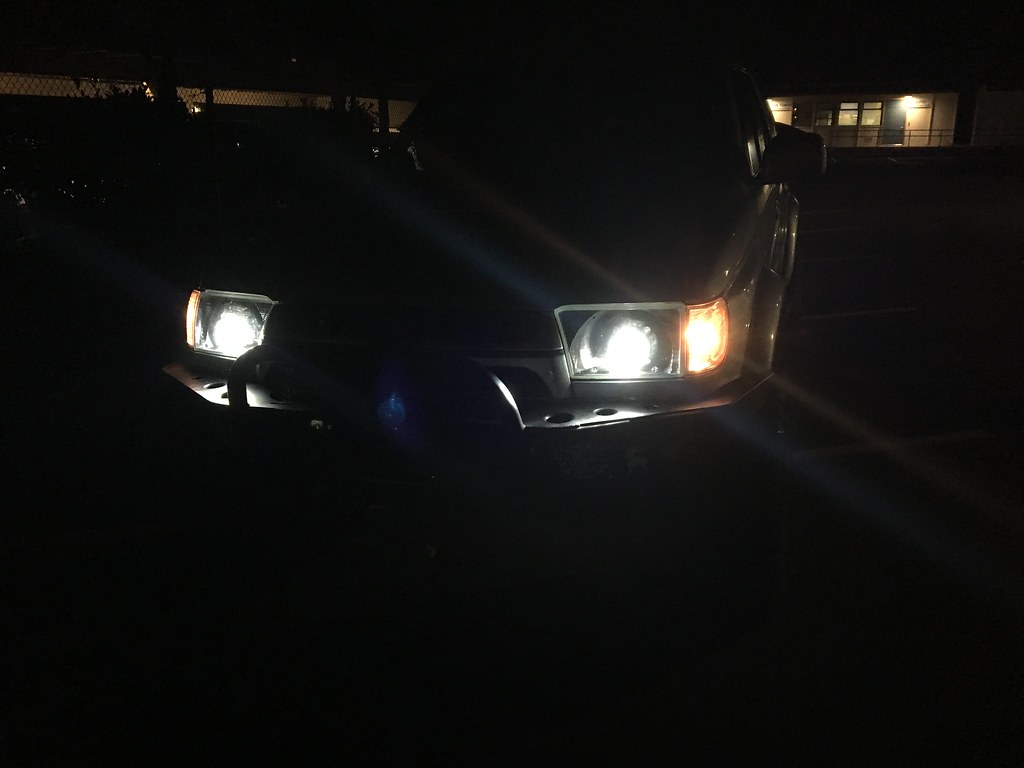
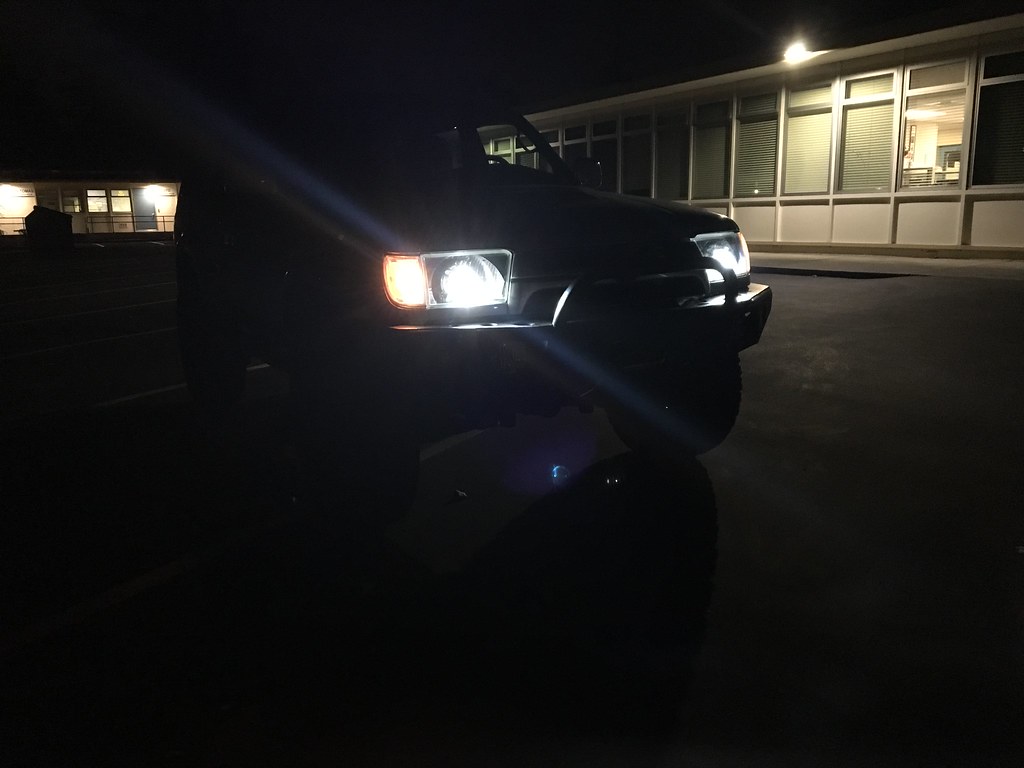
Any night time front shots?
|
|
|
Reply With Quote
|
|
08-29-2017, 04:33 PM
|
#39
|
|
Member
|
|
Join Date: Jul 2017
Location: Florida
Posts: 43
Real Name: Aidan
|
|
|
Member
Join Date: Jul 2017
Location: Florida
Posts: 43
Real Name: Aidan
|
 Amazing!
Such a clean and not overly complicated build here! Props to you for making it look so good. Im in the market looking for a new 3rd gen as well and I really like the way yours came out so Im thinking of doing something similar.... 3" lift with 285/75's and maybe a front bumper but not overly complicated. Thanks for the inspiration and once i get those A's in highschool expect to be hearing from me!
|
|
|
Reply With Quote
|
|
08-30-2017, 12:16 AM
|
#40
|
|
Member
|
|
Join Date: Aug 2014
Location: Bay Area, CA
Age: 30
Posts: 433
Real Name: Drew
|
|
|
Member
Join Date: Aug 2014
Location: Bay Area, CA
Age: 30
Posts: 433
Real Name: Drew
|
Quote:
Originally Posted by LittleCaesar
Any night time front shots?
|
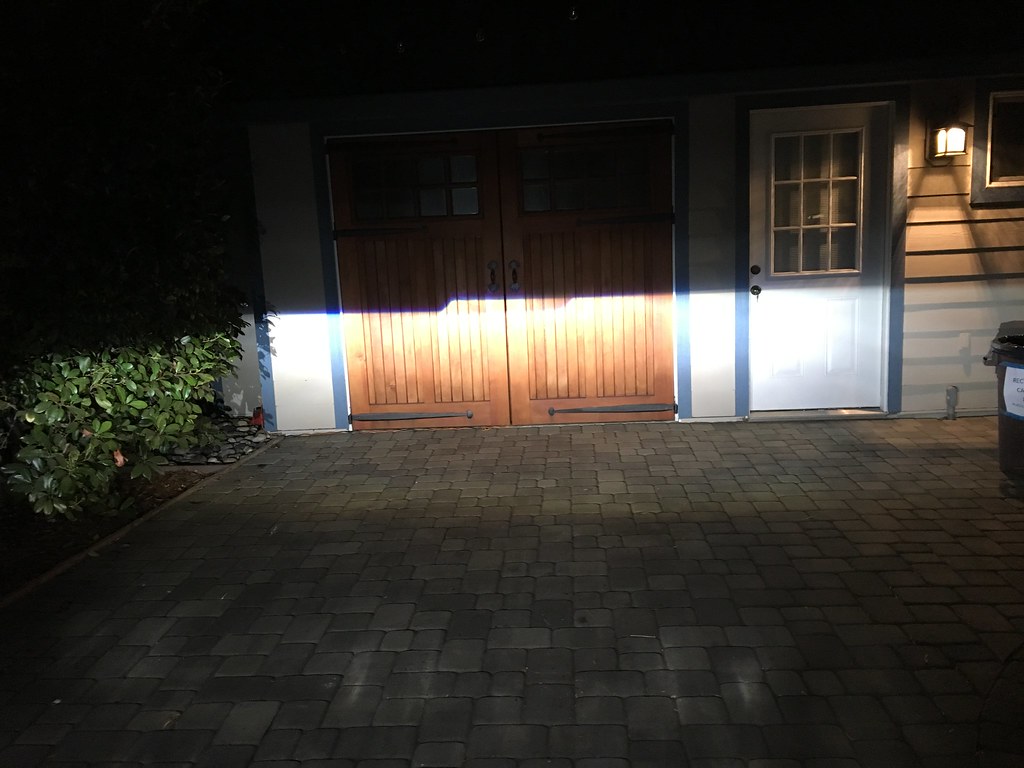
I just added them to the original post! It was tough to get a decent shot with just my phone. I hope it's what you're looking for!
Quote:
Originally Posted by aidanyota
Such a clean and not overly complicated build here! Props to you for making it look so good. Im in the market looking for a new 3rd gen as well and I really like the way yours came out so Im thinking of doing something similar.... 3" lift with 285/75's and maybe a front bumper but not overly complicated. Thanks for the inspiration and once i get those A's in highschool expect to be hearing from me! |
Well thanks for taking inspiration from my rig! I noticed that you posted in my other thread some time back. Do you have your own 4Runner now or just looking to pick one up? Keep it up in high school, and let me know if you have any questions about 4Runners (even though there are way more qualified people on here  )!
__________________
1999 Black SR5 Highlander 4wd V6 Automatic ( Build Thread)
2001 Millennium Silver SR5 Sport 4wd V6 Automatic (Build Thread V2)
|
|
|
Reply With Quote
|
|
08-30-2017, 08:18 PM
|
#41
|
|
Member
|
|
Join Date: Jul 2017
Location: Florida
Posts: 43
Real Name: Aidan
|
|
|
Member
Join Date: Jul 2017
Location: Florida
Posts: 43
Real Name: Aidan
|
Quote:
Originally Posted by JerkyDrewster
I just added them to the original post! It was tough to get a decent shot with just my phone. I hope it's what you're looking for!
Well thanks for taking inspiration from my rig! I noticed that you posted in my other thread some time back. Do you have your own 4Runner now or just looking to pick one up? Keep it up in high school, and let me know if you have any questions about 4Runners (even though there are way more qualified people on here )! |
No problem :P As of right now I do not have a T4R but I am looking for one! Im thinking 98-02. I'm just trying to gain as much knowledge about them and what I want to do to mine now so I can save that time later. I don't even have a runner and modding is already addicting to me . But I will, and thank you... I will friend you in just a second here!
|
|
|
Reply With Quote
|
|
09-05-2017, 02:13 PM
|
#42
|
|
Member
|
|
Join Date: Aug 2014
Location: Bay Area, CA
Age: 30
Posts: 433
Real Name: Drew
|
|
|
Member
Join Date: Aug 2014
Location: Bay Area, CA
Age: 30
Posts: 433
Real Name: Drew
|
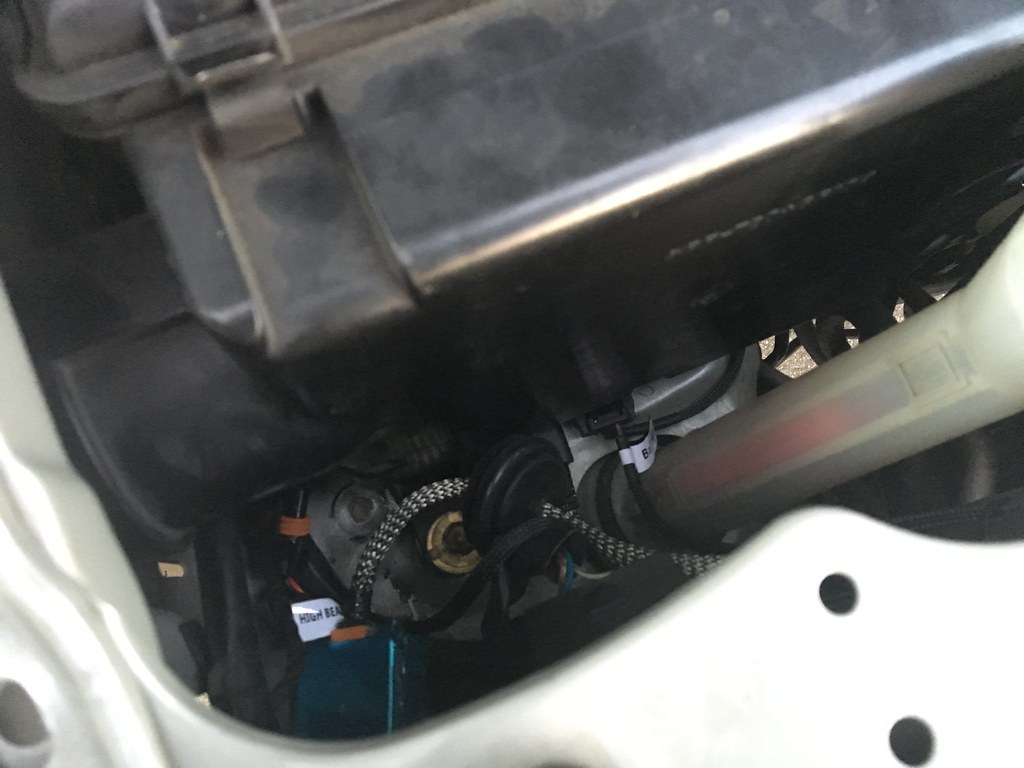
September 4th, 2017
Misc. Things
Parts List:
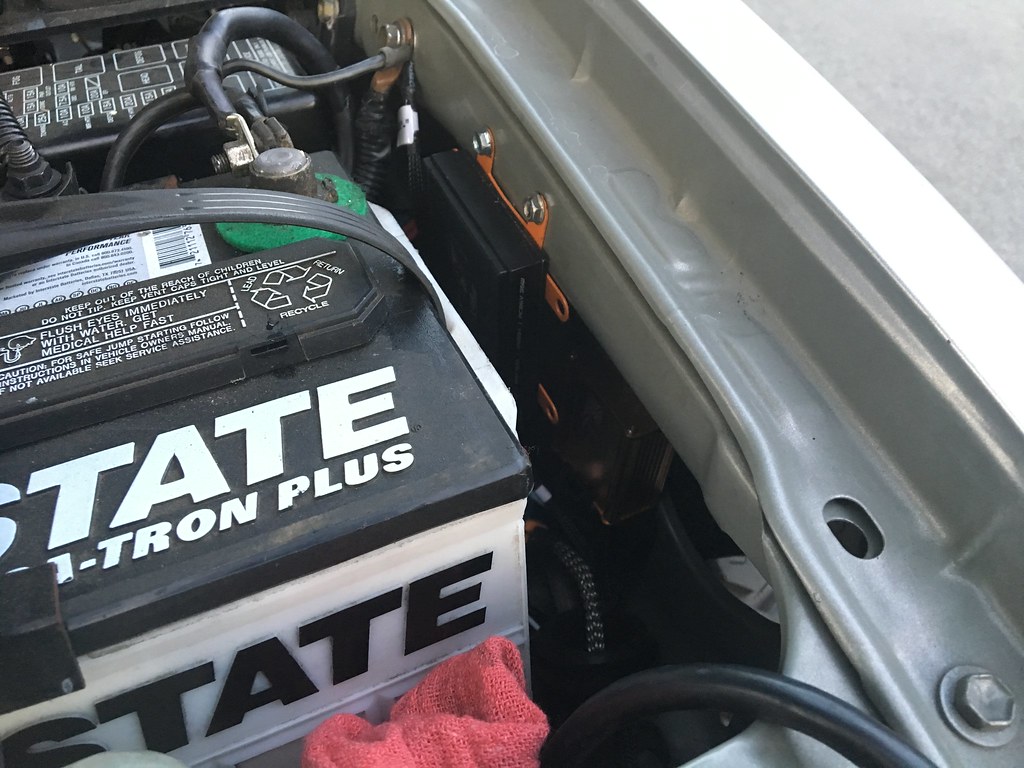
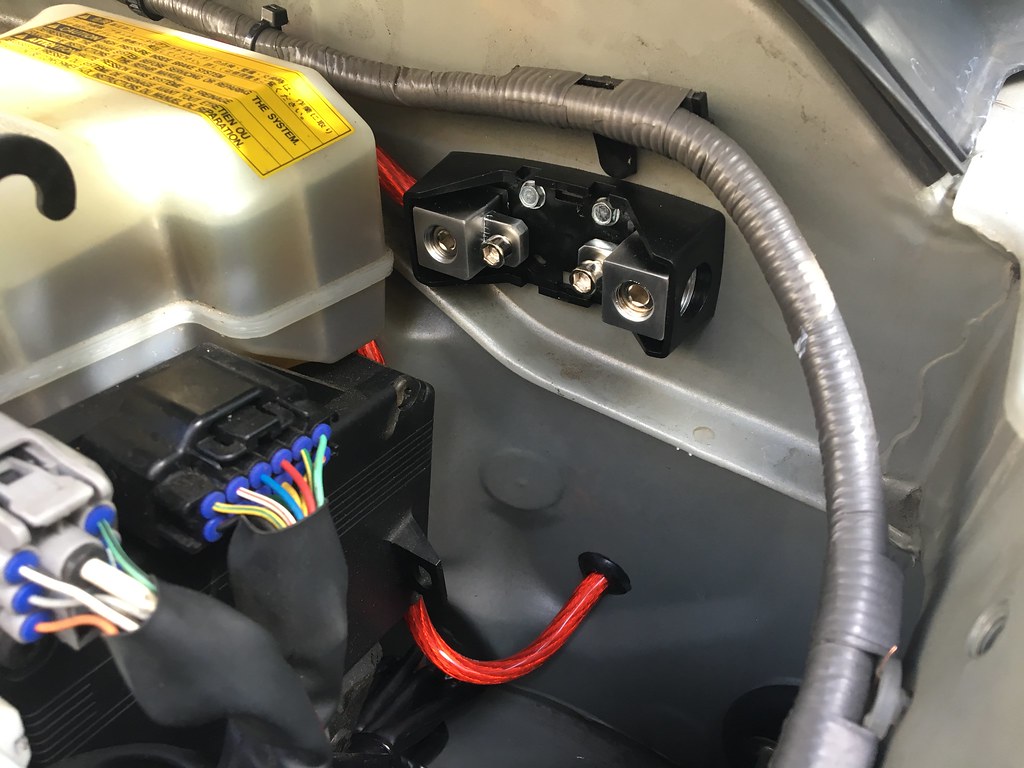
- Blue Sea 100A Common Busbar
- Marine Battery Terminal
- Some exhaust tubing and barbed fitting
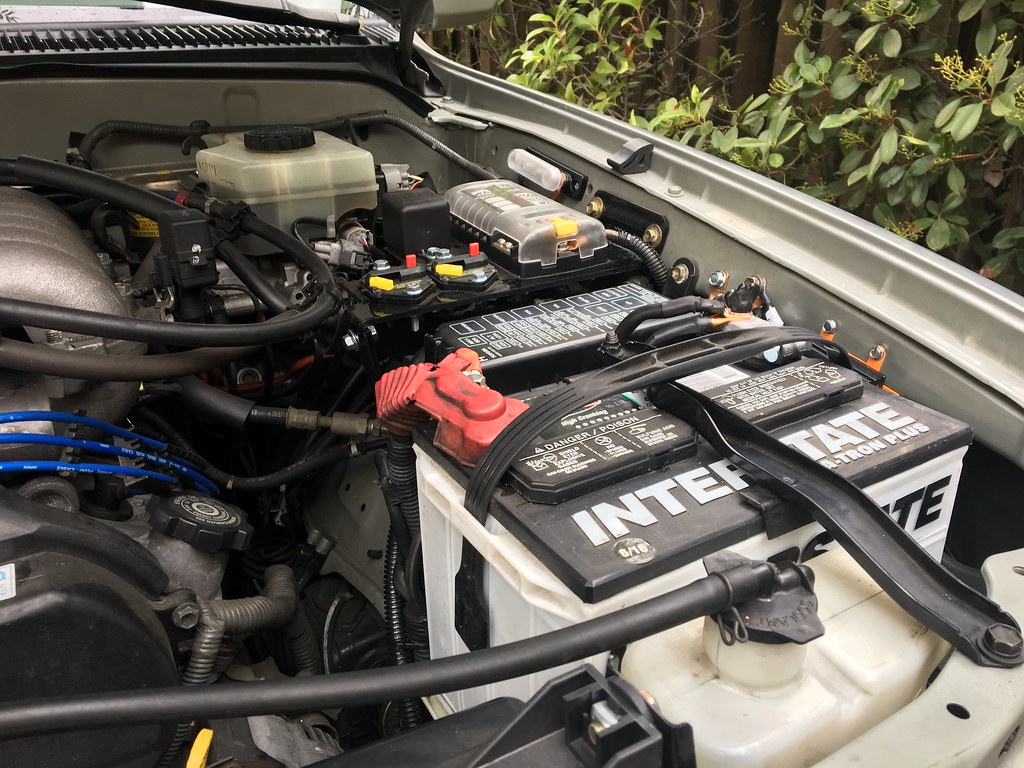
This weekend I was able to work on some small things that I've been meaning to do for awhile now. I started off with installing a Blue Sea Busbar to reduce the clutter on the positive battery terminal. For now, some sheet metal screws are holding it to the fender wall, but eventually I will make an L-bracket to straighten it out and be more presentable. So far, the headlights and the aux fuse block are attached to the bar.
Next up was cleaning up some of the wiring and the way it was routed. I wanted all of the wires I added to be neatly tucked underneath the stock wiring, so pulled everything back to the front, and rerouted them back towards the cab. On the battery side, I removed old electrical tape and used some adhesive-lined heatshrink instead. Since a new set of battery terminals are being used, I had to add ring connectors to the stock negative wires using a torch and some solder. Overall, I am happy with the way the wiring looks!
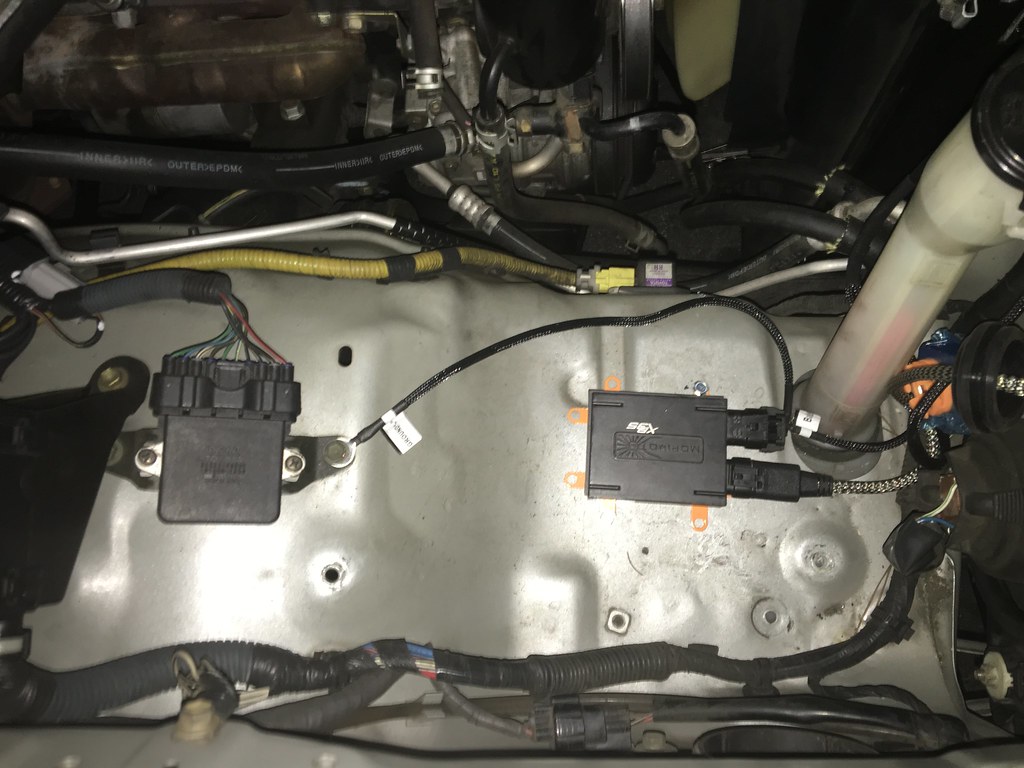
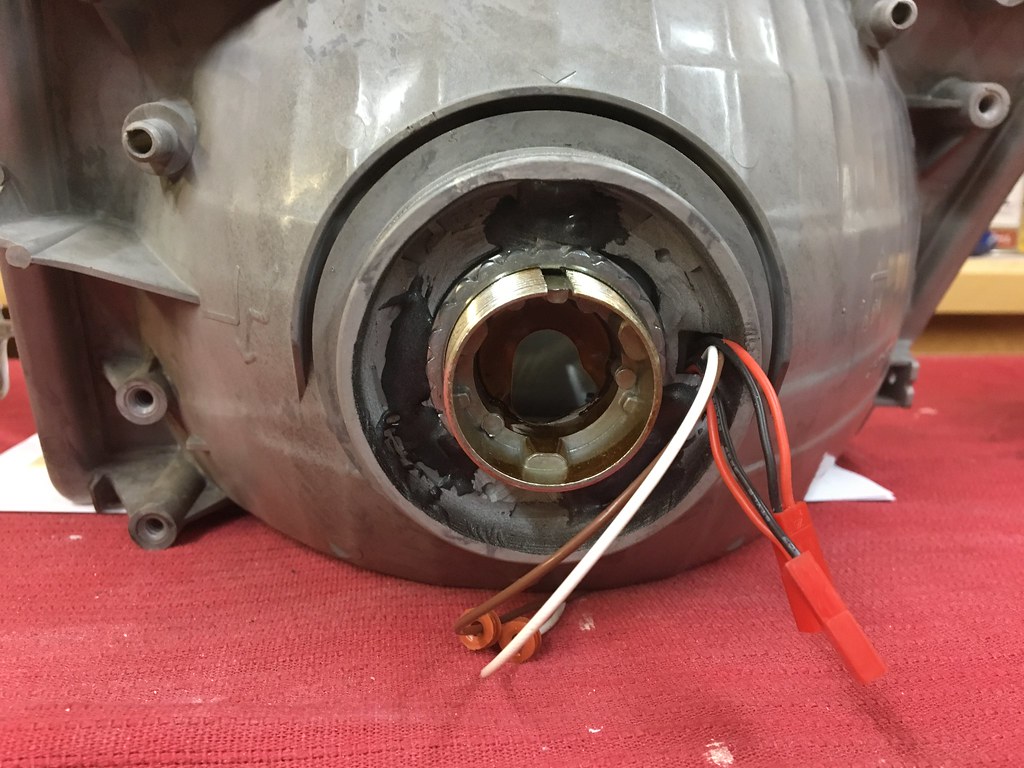
After installing the HID projectors, I never put the light housing's rubber sealer back on. Since the HID igniter is larger than the stock plug, I had to open the hole of a bit as well as make a slit for the high beams and halo wires to pass through. The back of the housing definitely looks less naked with it back on.
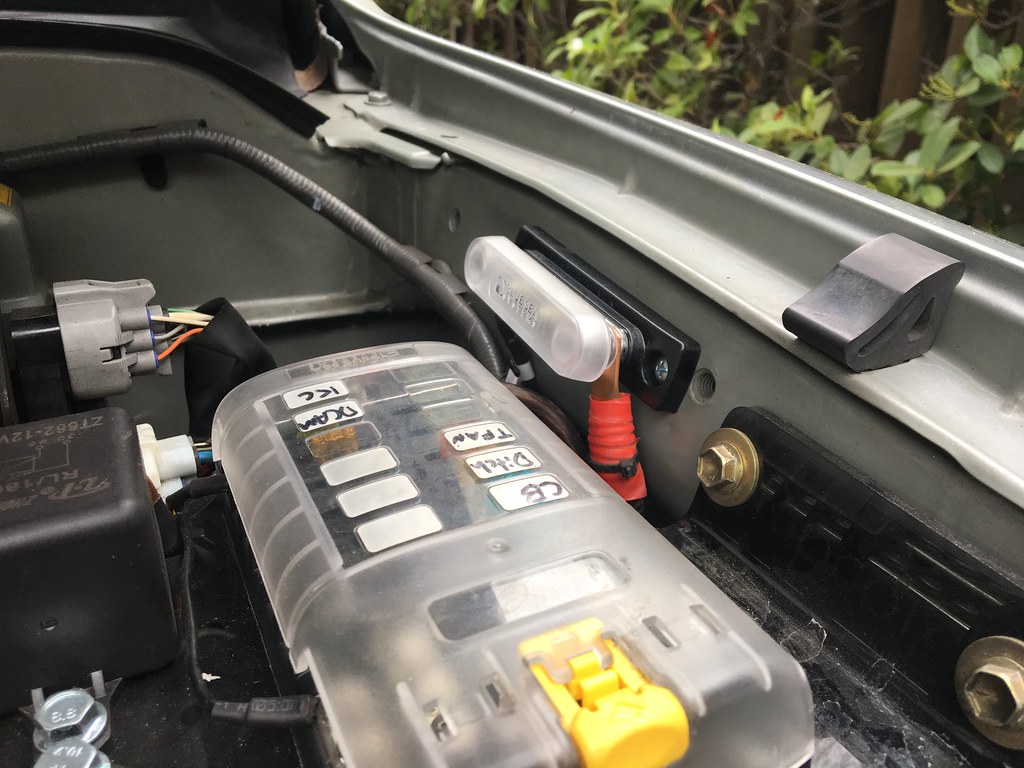
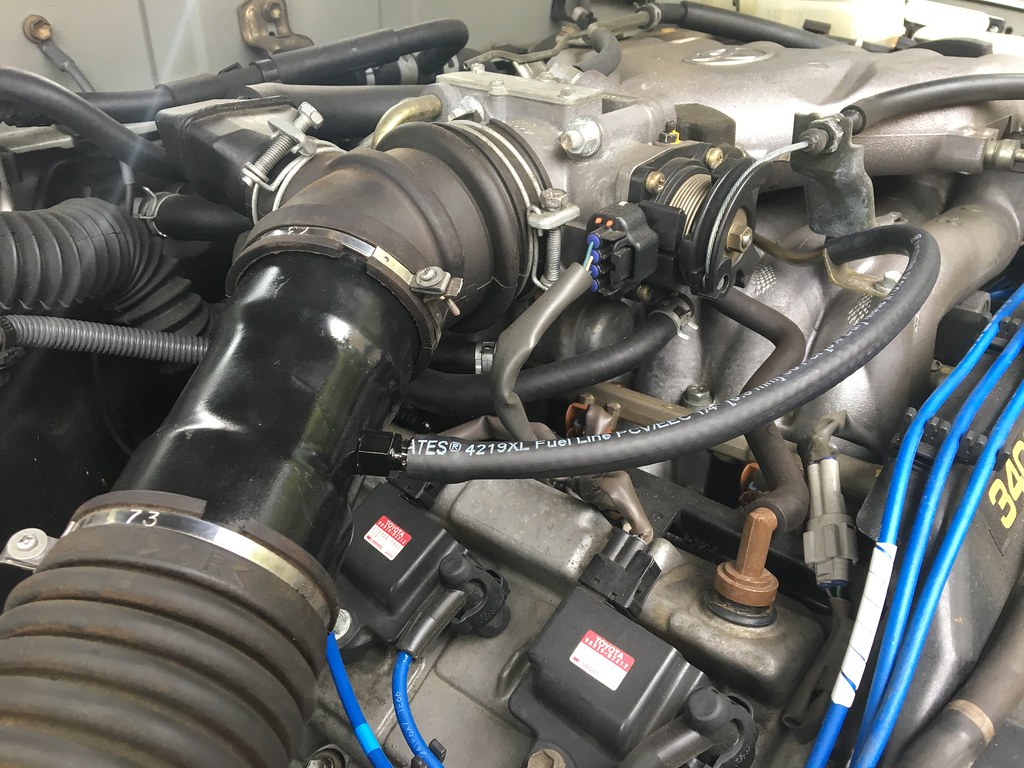
Finally, I removed the intake silencer and added the section of tubing I had on the '99. This time, I drilled a hole in the middle section to add a barbed hose fitting for the stock vacuum line. On the previous 4Runner, I used a t-fitting to seal it off, but I wanted to do it right this time. After a coat of paint and some silicone to seal the fitting, it was good to go! While I don't think it does anything, I do like that it takes up less room and makes the engine bay a little "cleaner".
New terminals and busbar (still need to work on the positive terminal cover)
 ISR Delete
__________________
1999 Black SR5 Highlander 4wd V6 Automatic ( Build Thread)
2001 Millennium Silver SR5 Sport 4wd V6 Automatic (Build Thread V2)
Last edited by JerkyDrewster; 11-21-2017 at 05:15 PM.
|
|
|
Reply With Quote
|
|
09-28-2017, 10:04 PM
|
#43
|
|
Member
|
|
Join Date: Aug 2014
Location: Bay Area, CA
Age: 30
Posts: 433
Real Name: Drew
|
|
|
Member
Join Date: Aug 2014
Location: Bay Area, CA
Age: 30
Posts: 433
Real Name: Drew
|
Jerkydrewster's 2001 4Runner Build V2
September 24th, 2017
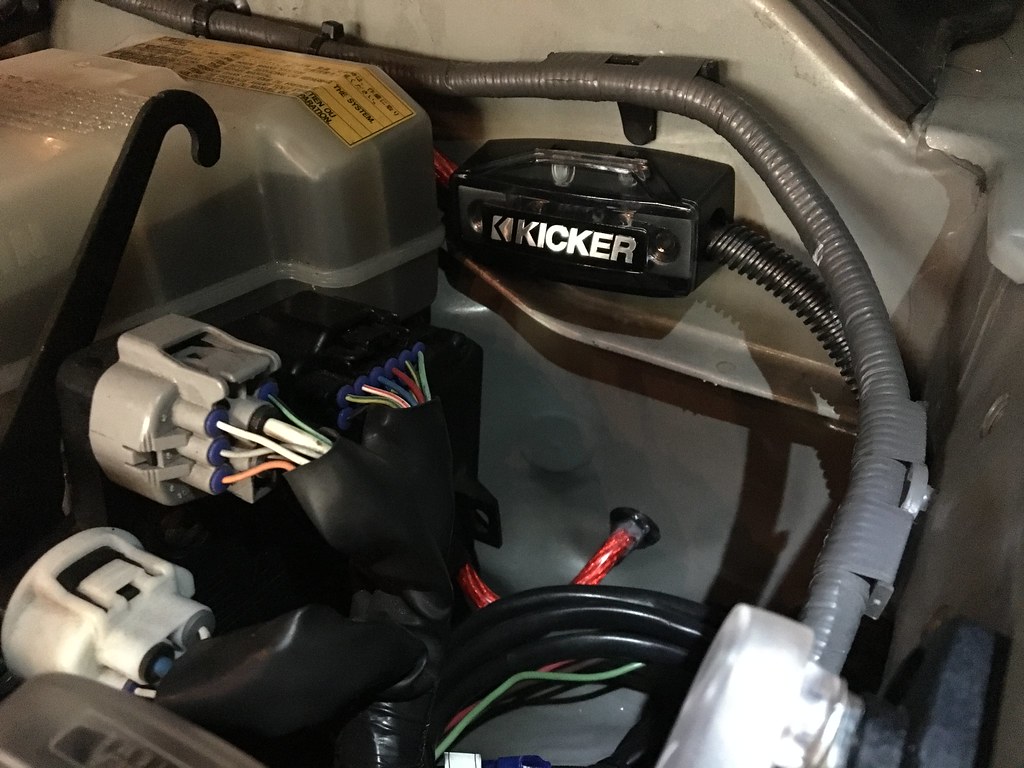
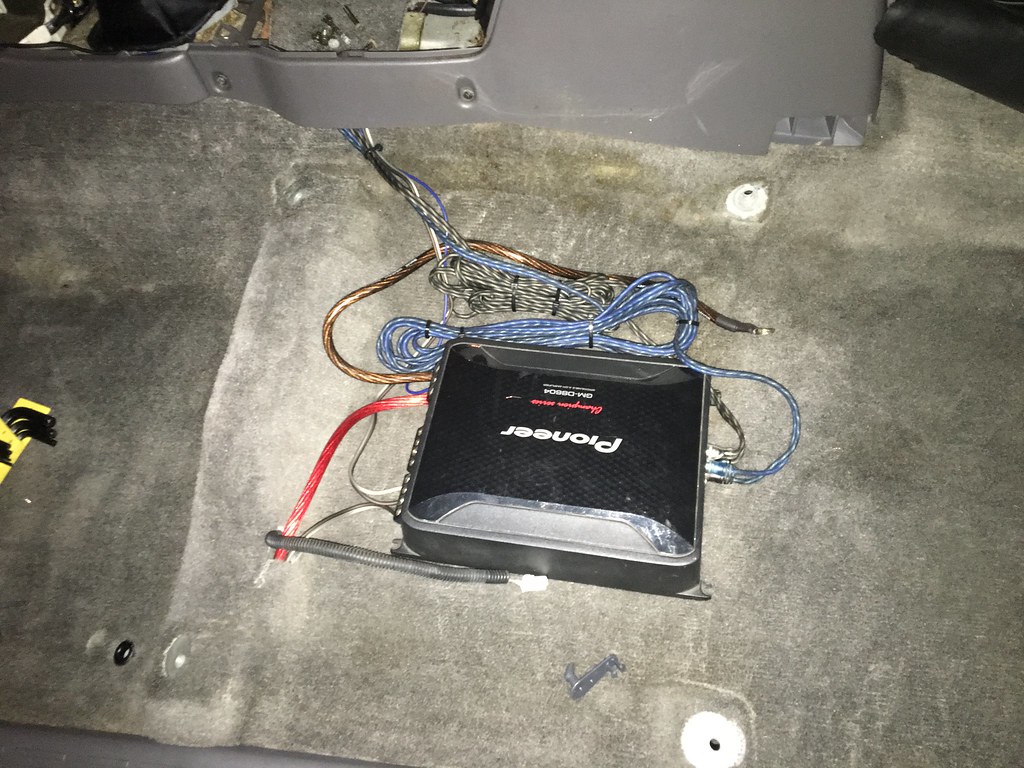
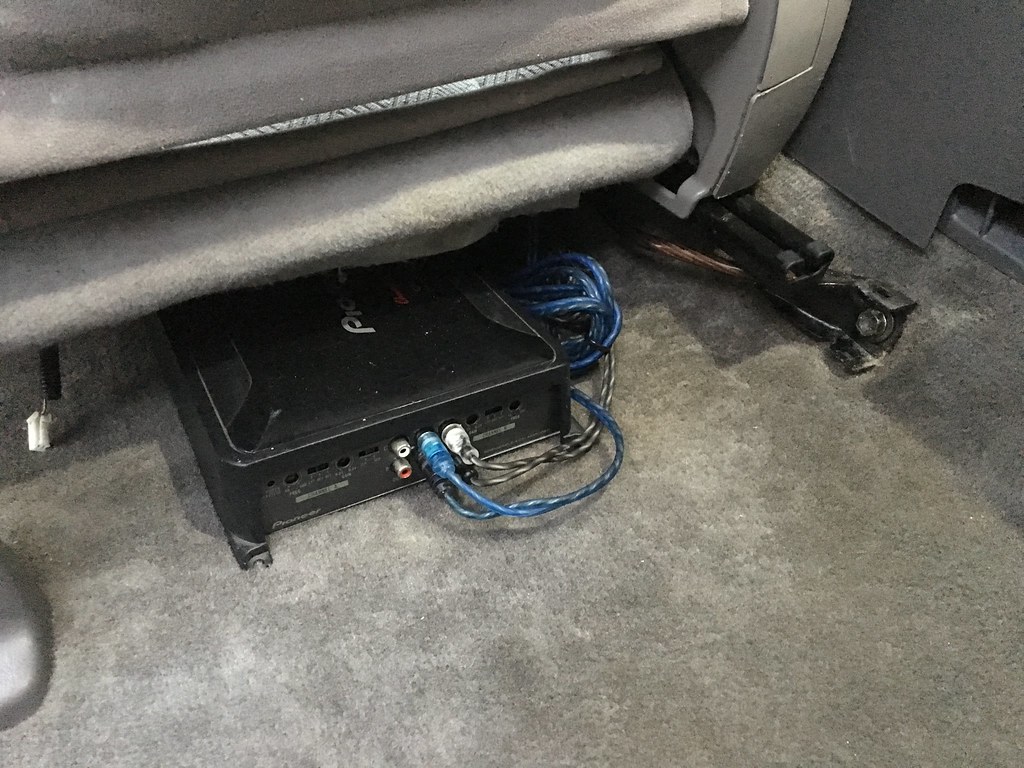
Amp Installation
Parts List:
- Pioneer Amp GM-D8604
- Kicker FHS AFS Fuse Holder
- T-Spec V8-MANL80 V8 Series Nickel Plated MINI ANL Fuse
- SoundBox Connected 4 Gauge Amp Wiring Kit
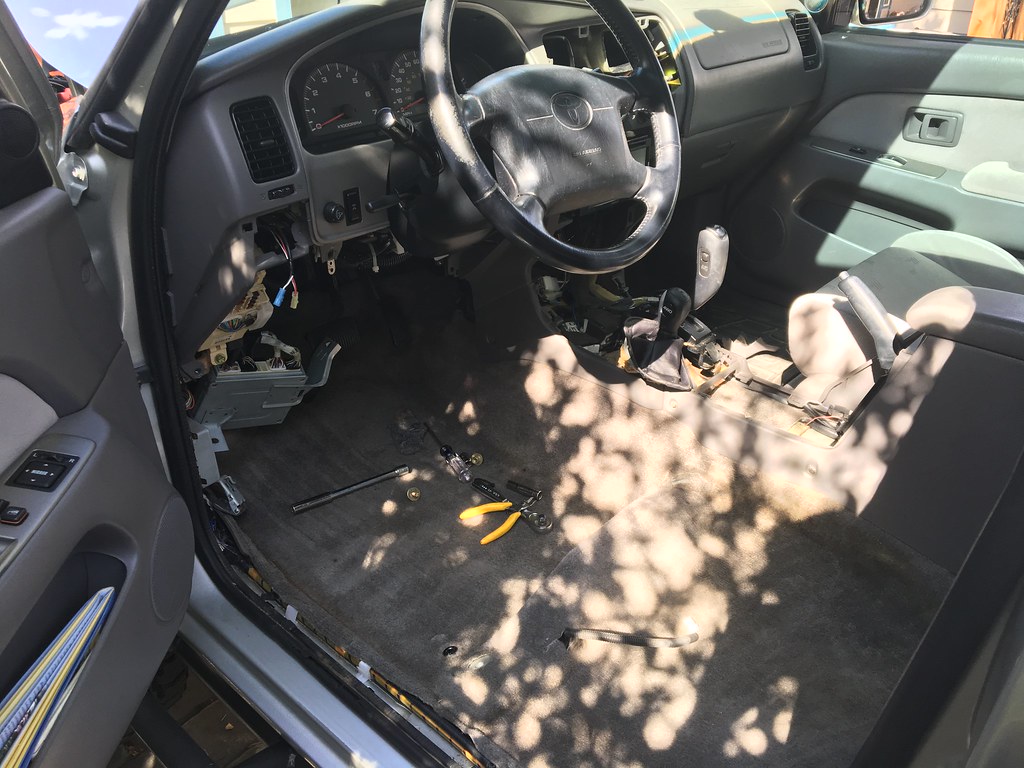
This is something that I have been wanting to install since I got the new 4Runner. It's been sitting in a box since the accident, and I finally decided to take the plunge and send my first wire through the firewall. Unlike before, I ended up drilling a hole dedicated to the 4ga wire with a grommet to keep it from rubbing. Overall, this install was quite a bit cleaner, and I'm definitely happy with the results.
I started by removing the driver seat, the dash covers, and kick panel covers on both sides. I wanted to run all of the wiring first, so I had to clear anything in the way in order to get the drill to the firewall. I used a 1/2" bit to make way for the grommet, then fed the power cable through. Since I'm running out of room in my engine bay, I decided to screw the fuse holder to the back of the firewall. I might find another place for it in the future, but it works for now.
I routed the speaker cables to the doors, and did the same thing I had done on the old rig, where I spliced them to the correct wires. This proved to be the easiest way since I didn't have to route the wires through the doors. Next up was the RCA cables from the pre-amp on the back of the head unit to the amp. These went though the center console and under the seat. Finally was the ground cable, which I attached to the right, rear bolt that holds in the seat. It fit perfectly under the cover, so I was excited that I didn't need to drill anymore, and that it wasn't visible.
Once all that was done, all that was left was to hook the amp up and put everything back into its place. Definitely am happy with the way the speakers sound now, and once I build a new box for the rear, I'll put my small sub back in to get a little more bass.
Starting out
 Firewall grommet and fuse holder
 Cover and silicone in place
 Amp wired up from the top
 Amp from the back of the seat
__________________
1999 Black SR5 Highlander 4wd V6 Automatic ( Build Thread)
2001 Millennium Silver SR5 Sport 4wd V6 Automatic (Build Thread V2)
Last edited by JerkyDrewster; 11-21-2017 at 05:15 PM.
|
|
|
Reply With Quote
|
|
11-05-2017, 10:04 PM
|
#44
|
|
Member
|
|
Join Date: Aug 2014
Location: Bay Area, CA
Age: 30
Posts: 433
Real Name: Drew
|
|
|
Member
Join Date: Aug 2014
Location: Bay Area, CA
Age: 30
Posts: 433
Real Name: Drew
|
November 3rd-4th, 2017
Polygoat's Hollisterween 2017 Trip
Hollister Hills SVRA, CA
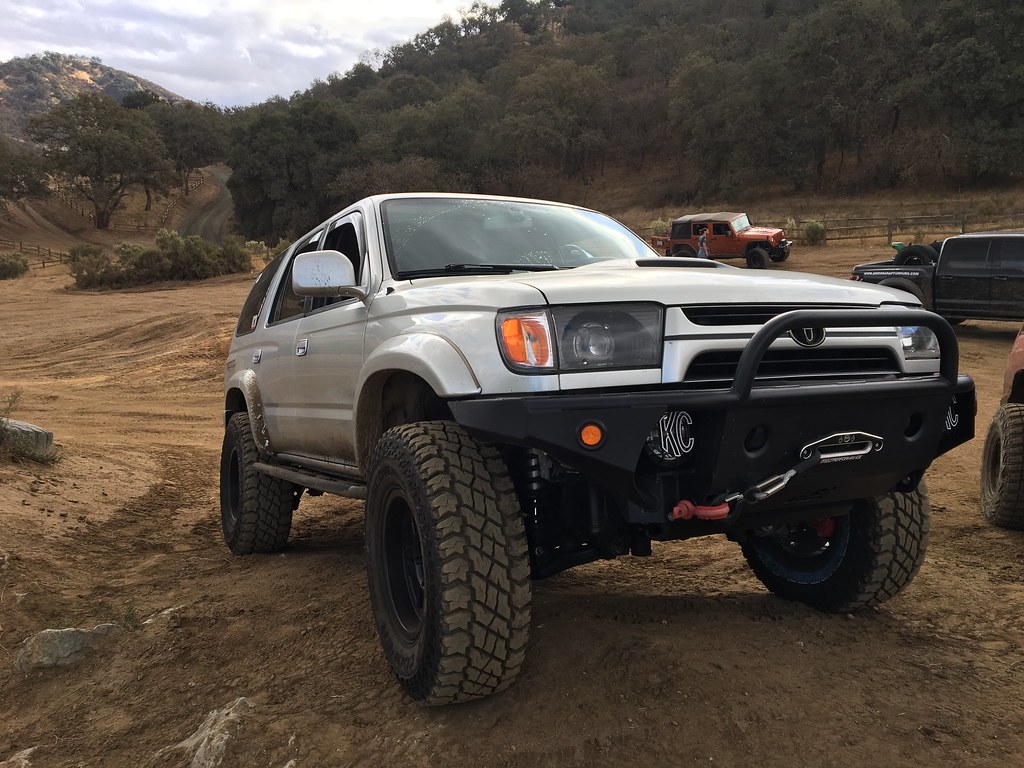
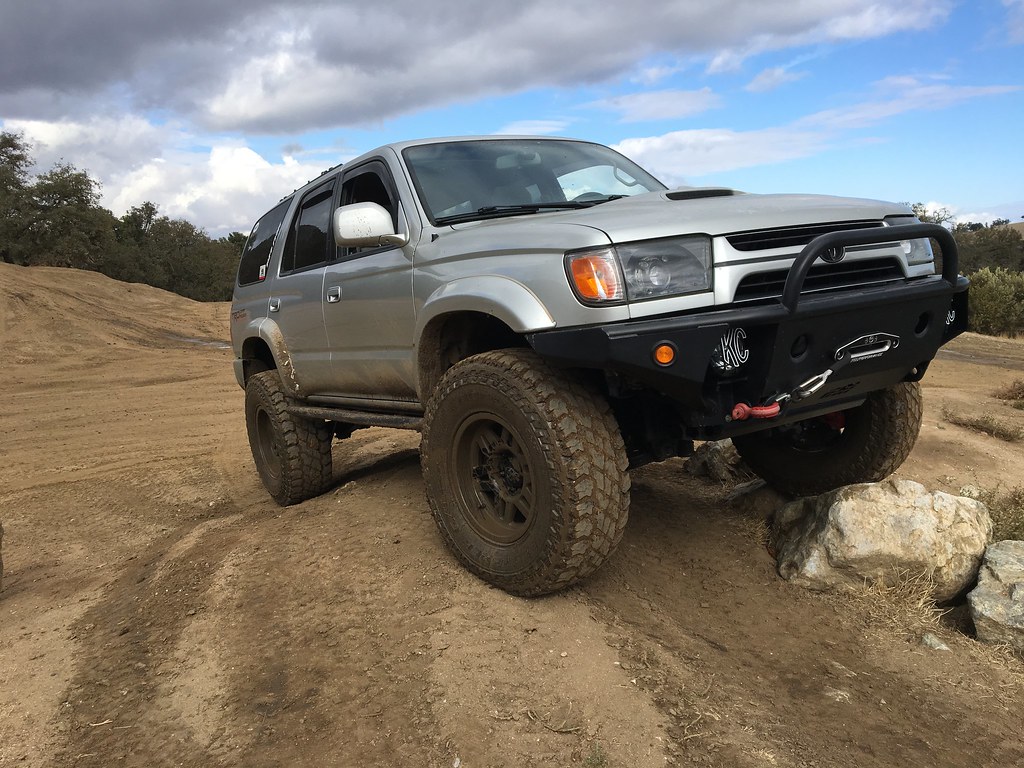
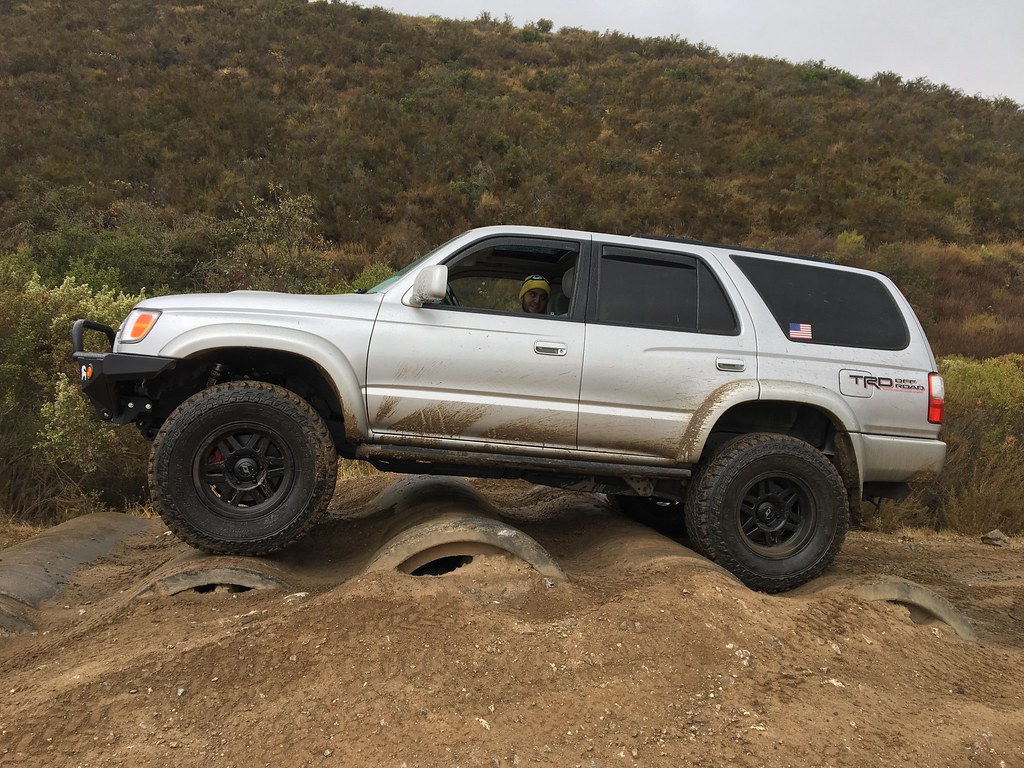
This past weekend I got to meet up with my college's off-roading club at Hollister. This was the first time I was able to bring my rig into the dirt and mud, so I was pretty happy to go and test everything out. While I didn't do anything too crazy, I was able to get a good feel for it and how it performed off-road. From the get-go, I was extremelly happy with the feel of the tires and the suspension. The tires gripped on the pretty muddy terrain and over the obstacle courses that I took it on. They slipped up a little bit when I tried the log pit, but nothing a little skinny pedal couldn't solve! The Icons did not dissapoint off-road either. I was cruising through the park on the midde settings, and it was extremely comfortable...which is a weird thing to say. My passengers even were suprised with the ride quality over the rough terrain. I wanted to try out jungle run (don't know the actual name of the trail; this is just what we have always called it), but with it being so muddy, I didn't want to get super stuck and break something. I decided to spot a few of the rigs instead, which is always fun. The trail was pretty wrecked compared to last year and in the end, our group had 5 or 6 breaks ranging from a u-joint, a locker, cv axle, a battery, as well as some others.
I'm seriously considering some sort of air locker now, and I think the only thing that held me back from that trail was the lack of a locker...even though some guy in our group did the whole thing in a bronco that lost its 4wd. The trip was a ton of fun getting to catch up with some alumni and meeting the younger kids in the club. Hopefully I'll be able to make it out to their JV New Years trip!
Unfortunately I didn't get any pictures on the trail, but I do have a couple of poser shots that I took while the group was re-assembling back together.
__________________
1999 Black SR5 Highlander 4wd V6 Automatic ( Build Thread)
2001 Millennium Silver SR5 Sport 4wd V6 Automatic (Build Thread V2)
Last edited by JerkyDrewster; 11-21-2017 at 05:15 PM.
|
|
|
Reply With Quote
|
|
11-06-2017, 12:50 AM
|
#45
|
|
Member
|
|
Join Date: Sep 2017
Location: Bay Area
Posts: 47
|
|
|
Member
Join Date: Sep 2017
Location: Bay Area
Posts: 47
|
Absolutely love your truck! The contrast of the black cbi to silver is too slick. Looks so much better than your original 4runner IMO. And that's coming from someone who owns a black 4runner! Diggin' the tires too, when I upgrade I might go same route.
Just curious, did you take any parts off your black 4runner? Was the black sports hood still good? Please tell me I can stop by tomorrow and buy it off you?!?! 
|
|
|
Reply With Quote
|
 Posting Rules
|
You may not post new threads
You may not post replies
You may not post attachments
You may not edit your posts
HTML code is On
|
|
|
|


 Linear Mode


