 05-20-2017, 06:34 PM
|
#1
|
 |
Member
|
|
Join Date: Aug 2014
Location: Bay Area, CA
Age: 30
Posts: 433
Real Name: Drew
|
|
|
Member
Join Date: Aug 2014
Location: Bay Area, CA
Age: 30
Posts: 433
Real Name: Drew
|
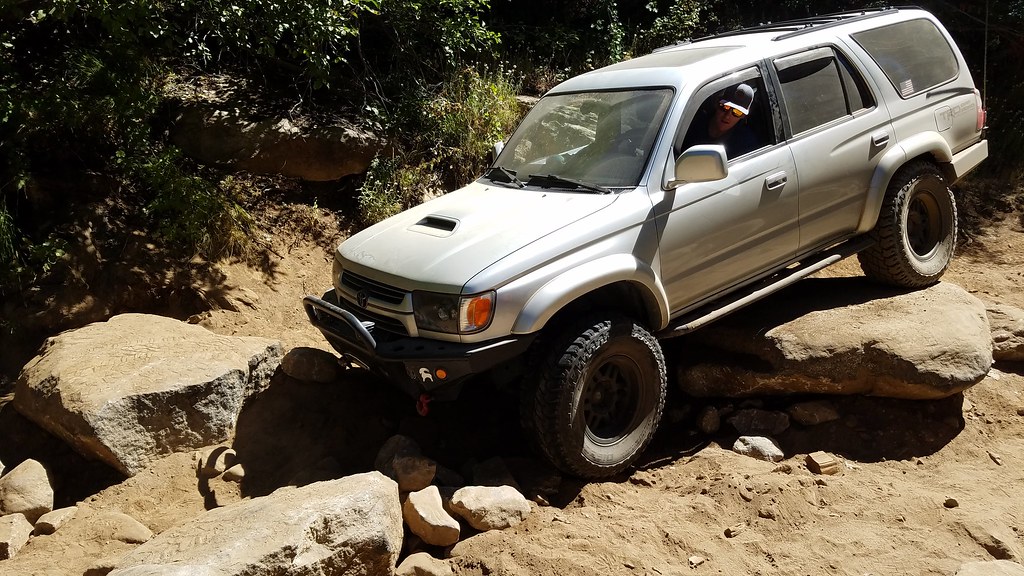
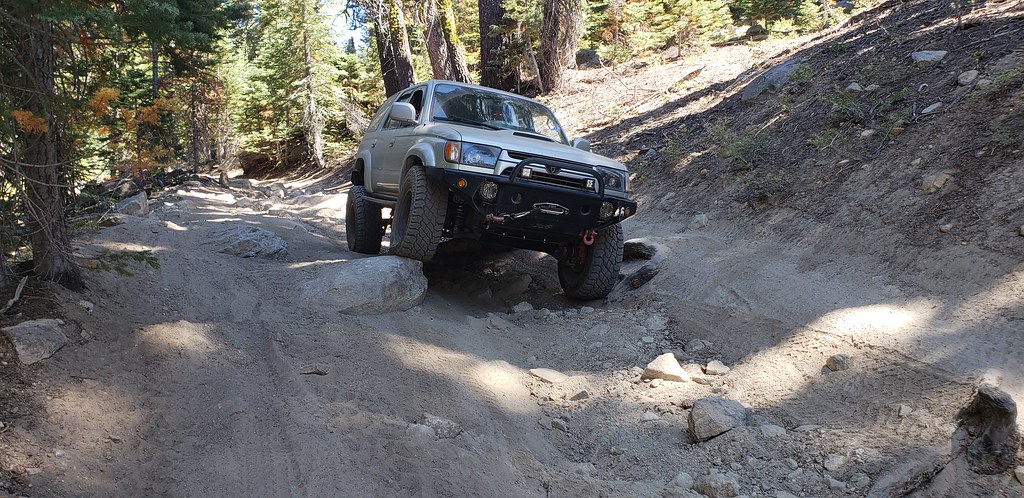
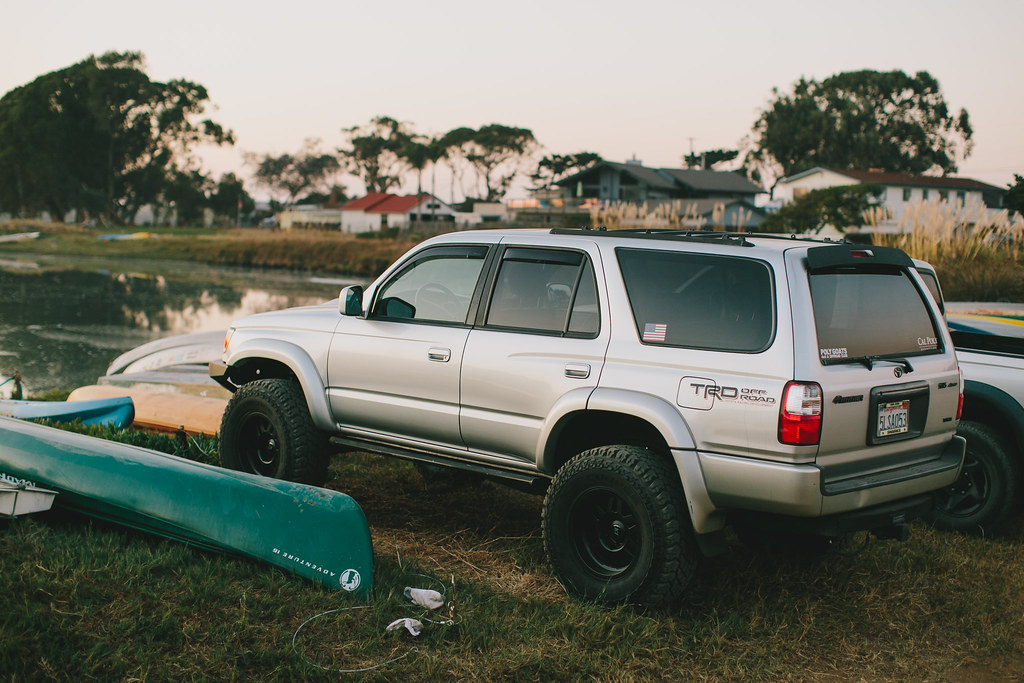
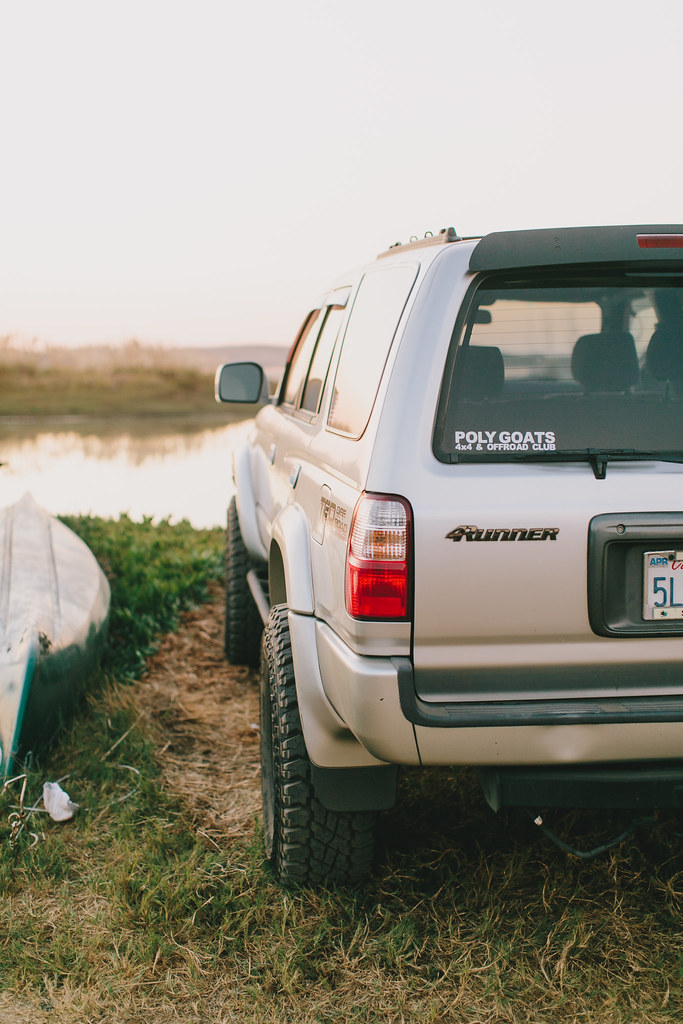
JerkyDrewster's 2001 4Runner Build V2
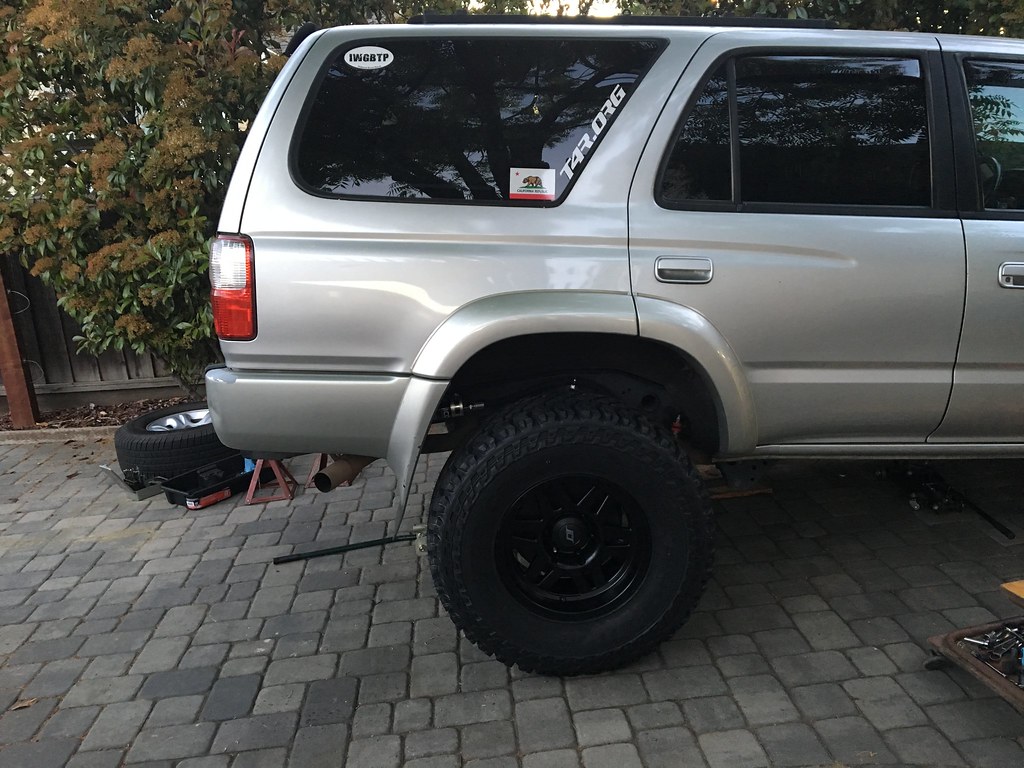
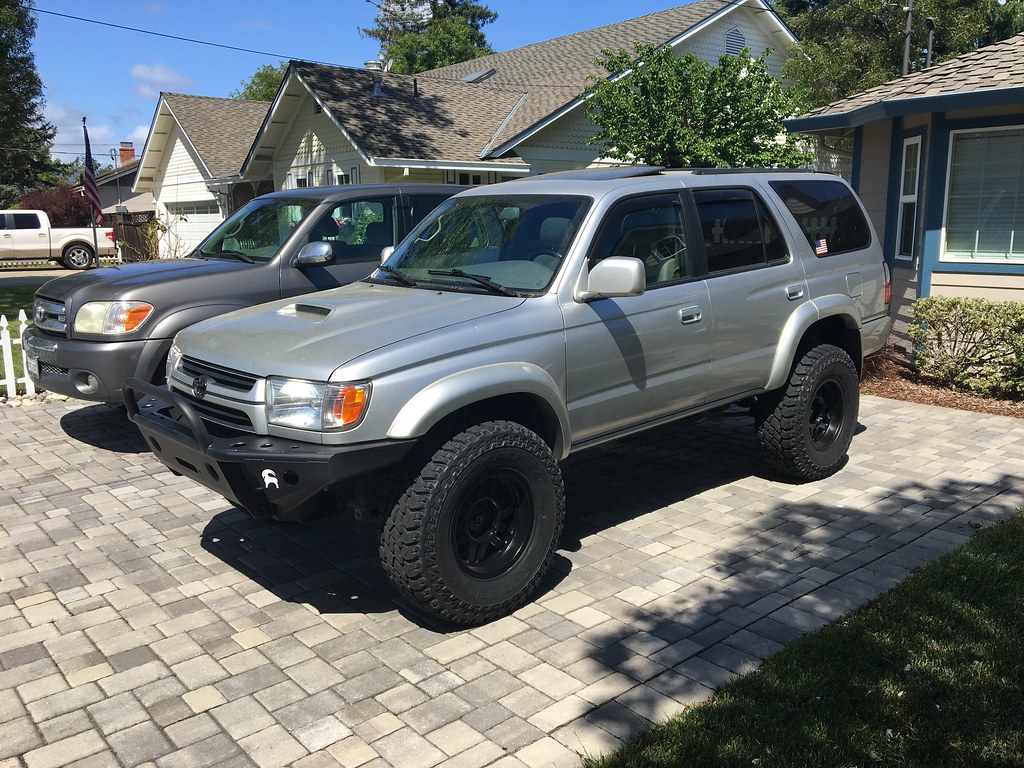
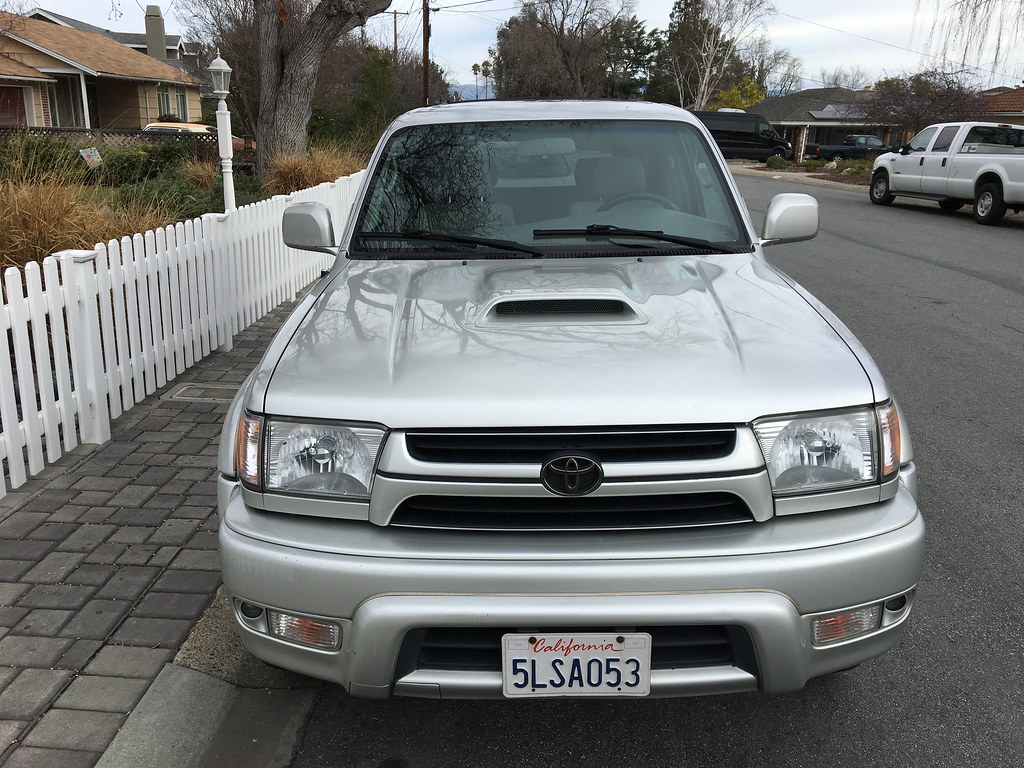
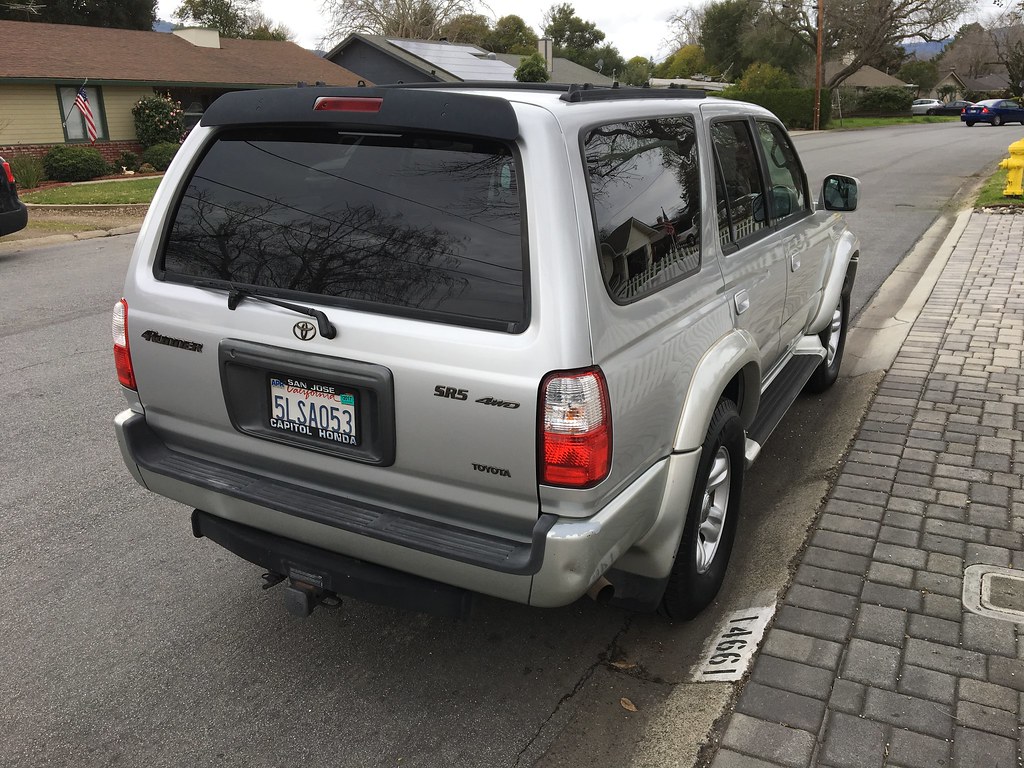
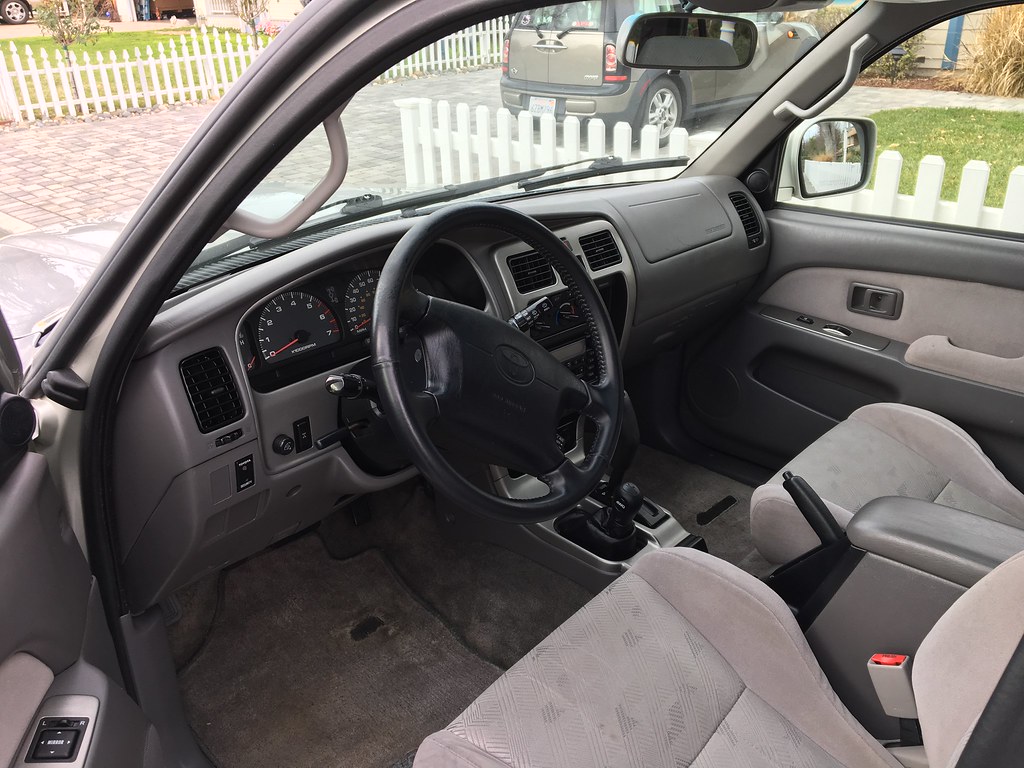
2001 Toyota 4Runner SR5 Sport Edition - Millennium Silver
Current picture - April 2018

I bought this 4Runner on February 4th, 2017 with just over 214,000 miles on the clock. It was very well maintained by the previous owners with most of its services from Toyota, including 2 timing belt jobs. It lived its entire life in the Bay Area, so there is almost no rust on the entire vehicle. So far, it has been so much nicer to work on compared to my previous rig.
The day I brought it home - Feb. 2017
 Upgrades & Modifications
 - February 2022
Wheels & Tires
- 285/75R16 Cooper Discoverer S/T MAXX (Page 1, Post 9)
- 315/75R16 Falken Wildpeak AT3W (Page 11, Post 154)
- Stealth Custom Series 16x8 Stealth 6 (Page 1, Post 9)
Suspension
- Fat Pats 1" Body Lift
Front
- ICON 58716C 2.5 Extended Travel Remote Reservoir Coilover with CDCV (Page 1, Post 9)
- ICON 650 Lbs/in Springs (Page 1, Post 9)
- ICON 58400 Tubular Upper Control Arms (Page 1, Post 9)
- MStudt's Sway Bar End Links (Page 1, Post 9)
- Energy Suspension Sway Bar Bushings (Page 1, Post 9)
- Whiteline Lower Control Arm Bushings (Page 1, Post 9)
- Toytec 1" Differential Drop (Page 1, Post 9)
- Total Chaos Weld-On LCA Cam Tab Gussets (Page 2, Post 27)
- Strongflex LCA Bushings (Page 9, Post 121)
- Total Chaos Spindle Gussets (Page 10, Post 136)
- Eimkeith Strut Tower Reinforcement (Page 10, Post 148)
Rear
- Toytec Superflex Springs (Page 1, Post 9)
- ICON 57800CP 2.5 Remote Reservoir Shock with CDCV (Page 1, Post 9)
- 2001 Chevy Blazer Bump Stops (Page 1, Post 9) [Junkyard Bumps]
- MStudt's Sway Bar End Links (Page 1, Post 9)
- Energy Suspension Sway Bar Bushings (Page 1, Post 9)
- Toytec Panhard Drop Kit (Page 2, Post 27)
- EimKeith Panhard Correction Kit (Page 9, Post 122)
Undercarriage/Drive Train
Front
- Power Stop 231mm Tundra Calipers (13WL) (Page 1, Post 9)
- OEM Tundra Rotors (Page 1, Post 9)
- Toytec Braided Brake Lines (Page 1, Post 9)
- Energy Suspension Steering Rack Bushings (Page 1, Post 9)
- CVJ Re-manufactured CV Axles with Extended Inner Boots (Page 1, Post 9)
- B&M 70264 SuperCooler Transmission Cooler (In series)
- 4.88:1 Nitro Gears (Page 10, Post 143)
Rear
- Extended Rear Diff Breather
- 4.88:1 Nitro Gears (Page 10, Post 143)
- ARB Air Locker RD132 (Page 10, Post 143)
- Wheeler's Braided Brake Line
Electrical
- Blue Sea Systems 12 Circuit Fuse Block (Page 4, Post 56)
- Blue Sea Systems 100A & 120A Circuit Breakers (Page 4, Post 56)
- Blue Sea Systems 150A Busbar (Page 4, Post 56)
- Ripcord's Fuse Block Bracket (Page 4, Post 56) [Thread]
- Modified Ripcord's Fuse Block Bracket (Page 11, Post 153)
- Mega-Tron Plus MTP-24F Battery
- Delphi Weather Pack 22-Position Bulkhead Connector (Page 4, Post 56)
- 12V 100A SPST Relay (Page 4, Post 56)
- Upgr8 7" Electric Fan
- CS144 Alternator (Page 8, Post 114)
- "Big 3" Upgrade (Page 8, Post 114)
- EP35 Flasher Relay (Page 8, Post 114)
Stereo System/CB/Ham
- Kenwood DDX371 Receiver
- Sony XAV-AX6000 Receiver
- Polk Audio db6501 6-1/2" Front Speakers
- Kicker 43DSC504 5-1/4" Rear Speakers
- Pioneer TS-SWX2502 Sub
- Pioneer GM-D8604 Amp (Page 3, Post 43)
- 2015 Baofeng UV-5R5 Handheld Ham Radio
- Uniden Pro520XL CB Radio (Page 4, Post 60)
- Yaesu FT-7800R Ham Radio
Interior
- Rexing V1 Dashcam
- WeatherTech Floor Liners
- OTRATTW Lower Independent Light SPST Switches (Page 5, Post 63)
- Advanced Keys Smart Keyless Entry and Push Button Start (Page 6, Post 81)
- Custom Cargo Box V2 (Page 9, Post 129)
Interior Lighting
- LED Gauge Lighting (Red)
- LED Dome and Cargo Lights (White)
Exterior
- WeatherTech Window Deflectors
- Smittybilt 9.5K Synthetic Line Winch (Page 2, Post 25)
- Poly Performance Aluminum Winch Fairlead
- MStudt's Drifter CB Mount (Page 6, Post 81) [Thread]
- FireStik FL3-B 3' Black CB Antenna
- Diamond NR-770HBNMO Antenna
- ARB High Output Air Compressor (Page 9, Post 135)
- Spiker Engineering Hood Struts (Page 11, Post 153)
Exterior Lighting
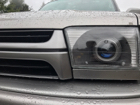
- TRS Bi-Xenon: Morimoto Mini D2S Stage III Headlight Retrofit (Page 3, Post 33)
- KC HiLites 6" Pro Sport LED Lights (Page 2, Post 25)
- Rigid Industries Dually Flood Lights
- Offroadtown Flush Mounted LED Pods (Page 8, Post 120)
- Eagle Eye LED Rock Lights (Page 10, Post 144)
Armor
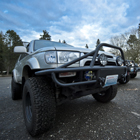
- CBI Offroad Front Hybrid Bumper (Page 2, Post 19)
- Savage Offroad Front Engine and Differential Skids
- Stubb's Welding HD-SKO Sliders (Page 2, Post 27)
- CBI Offroad Rear Plate Bumper (Page 5, Post 74)
- Lil Skip's Gas Tank Skid (Page 8, Post 116)
__________________
1999 Black SR5 Highlander 4wd V6 Automatic ( Build Thread) 
2001 Millennium Silver SR5 Sport 4wd V6 Automatic (Build Thread V2)
Last edited by JerkyDrewster; 02-16-2023 at 03:16 AM.
|

|
 Reply With Quote Reply With Quote
|
|
05-20-2017, 06:35 PM
|
#2
|
|
Member
|
|
Join Date: Aug 2014
Location: Bay Area, CA
Age: 30
Posts: 433
Real Name: Drew
|
|
|
Member
Join Date: Aug 2014
Location: Bay Area, CA
Age: 30
Posts: 433
Real Name: Drew
|
Background:
While my history with 4Runner's might not be as long as others, I'll still share a little bit.
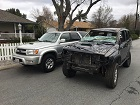
My love for the 4Runner started 2.5 years ago when I got my 1999 4Runner SR5 "Highlander" in black. I learned everything I know now about cars and how to work on them, and I wouldn't trade anything for that experience. It left me frustrated countless times due to the rust, but I did get it when it only had 92,000 miles on it. Over the past couple years, I put 25,000 miles on it, but is good life ended short when I was heading up to snowboard in Bear Valley this past January. The back end hit some ice and I wasn't able to recover it. I regained traction going sideways and I did a complete roll of the car. Luckily no one was injured, but all of the work I put into it had vanished in an instant. Here is the video from the accident that I captured on my dash cam...funnily enough, we were all talking about how I had not captured anything interesting on it yet...
Insurance definitely came through on this one which included aftermarket insurance. I was able to salvage a lot of my old components including suspension, axles, the front bumper (only minor damage), and a lot of electrical! Some pictures of the aftermath and parts can be seen below.
Original Build Thread - Jerkydrewster's 99 4Runner Build Thread


__________________
1999 Black SR5 Highlander 4wd V6 Automatic ( Build Thread)
2001 Millennium Silver SR5 Sport 4wd V6 Automatic (Build Thread V2)
Last edited by JerkyDrewster; 05-20-2017 at 06:55 PM.
|
|
|
Reply With Quote
|
|
05-20-2017, 06:35 PM
|
#3
|
|
Member
|
|
Join Date: Aug 2014
Location: Bay Area, CA
Age: 30
Posts: 433
Real Name: Drew
|
|
|
Member
Join Date: Aug 2014
Location: Bay Area, CA
Age: 30
Posts: 433
Real Name: Drew
|
__________________
1999 Black SR5 Highlander 4wd V6 Automatic ( Build Thread)
2001 Millennium Silver SR5 Sport 4wd V6 Automatic (Build Thread V2)
Last edited by JerkyDrewster; 11-21-2017 at 05:09 PM.
|
|
|
Reply With Quote
|
|
05-21-2017, 09:18 PM
|
#4
|
|
Member
|
|
Join Date: Aug 2014
Location: Bay Area, CA
Age: 30
Posts: 433
Real Name: Drew
|
|
|
Member
Join Date: Aug 2014
Location: Bay Area, CA
Age: 30
Posts: 433
Real Name: Drew
|
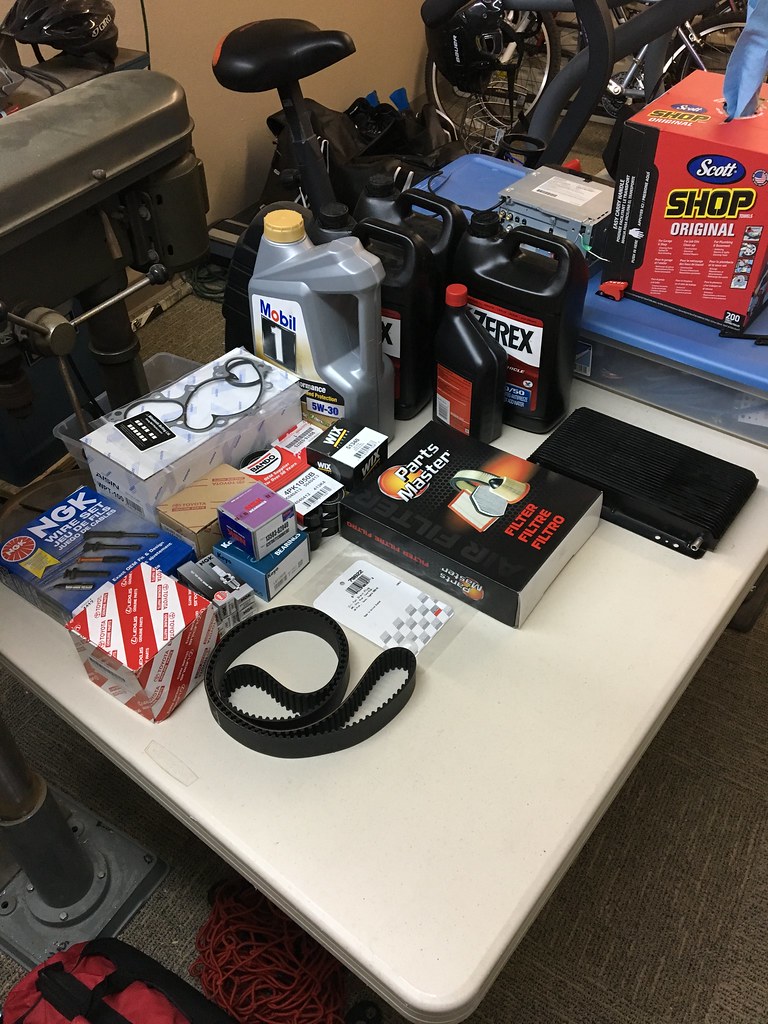
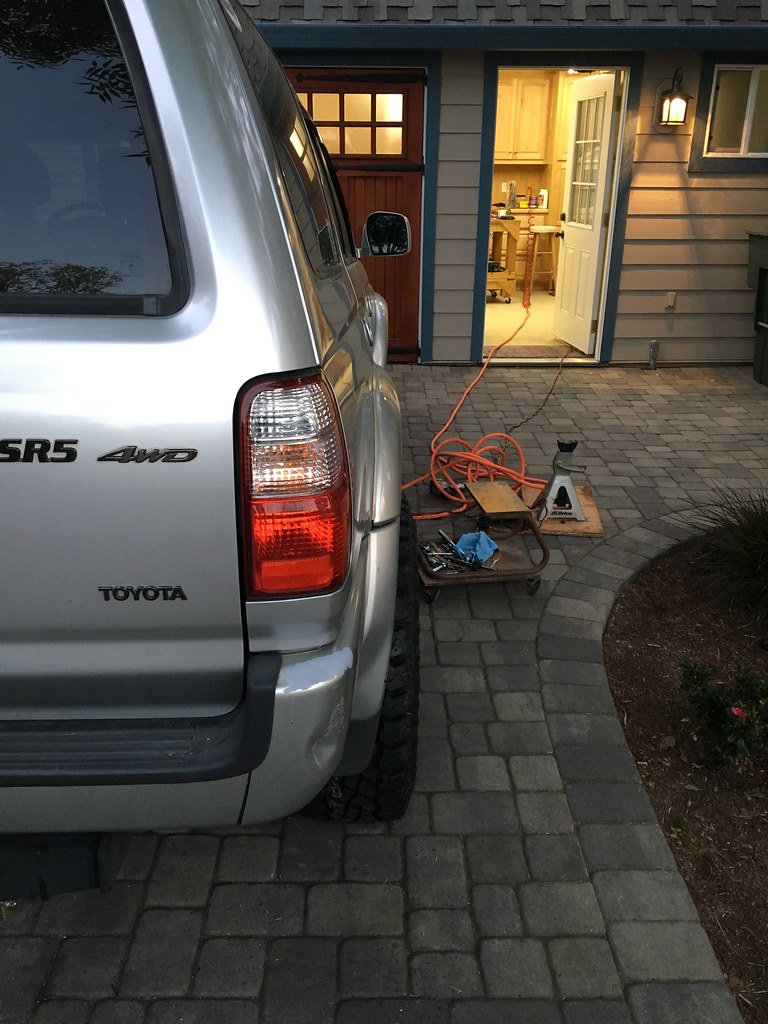
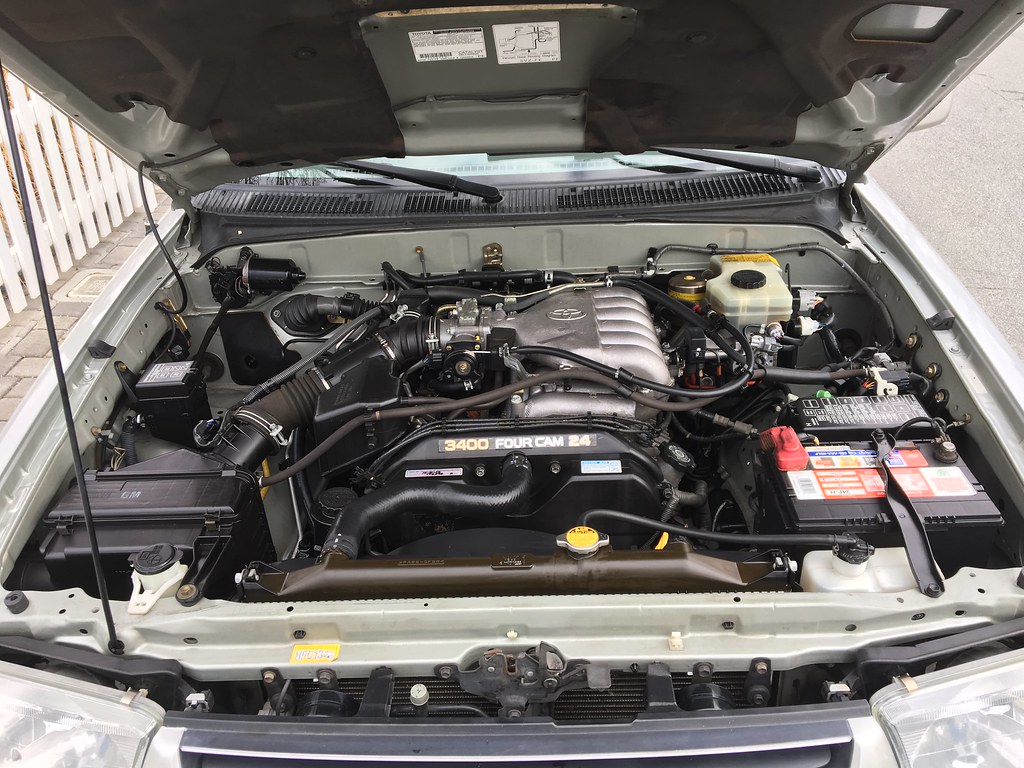
February 10th, 2017
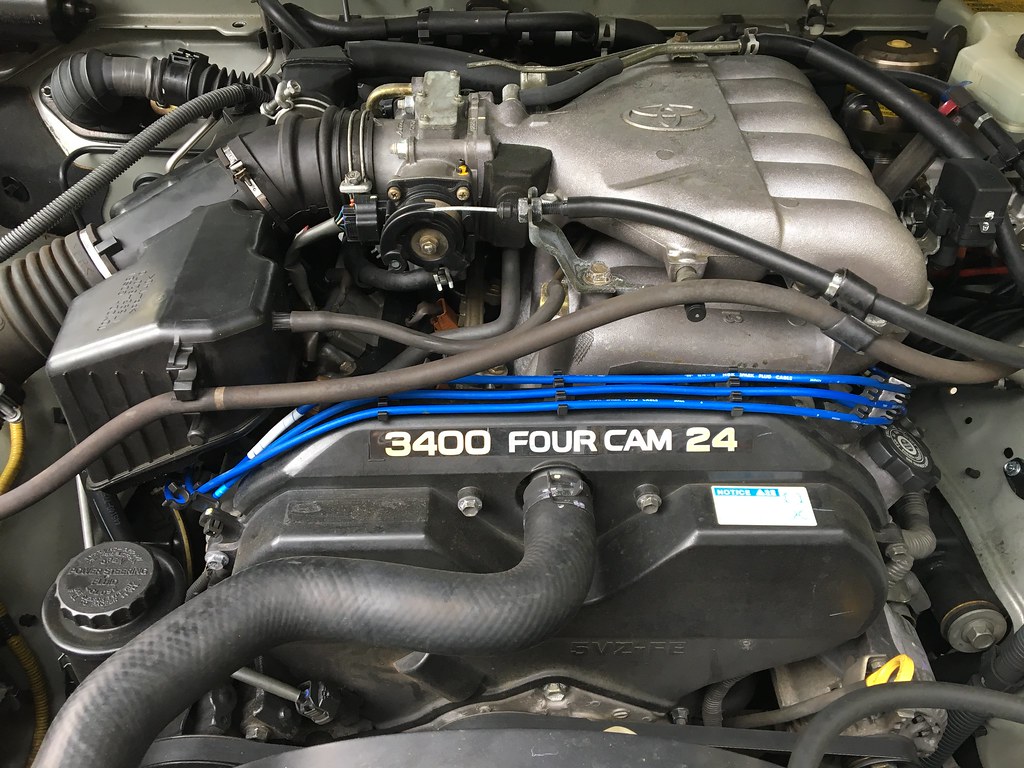
General Engine Maintenance
Even though the timing belt had been completed at around 175,000 miles, I wanted to have piece of mind and start it all fresh. This step was mainly engine maintenance since I wanted to do all of the suspension at the same time. I didn't take a ton of pictures of the install, but I'll post what I got.
Parts List:
- Aircabinman 3.4L V6 Timing Belt Kit from eBay
- 5W-30 Mobil 1 Extended Performance Synthetic Oil (5.5 Qts.)
- 75W-90 Synthetic Gear Oil (3 Qts.)
- 80W-90 Synthetic Gear Oil (1 Qt.)
- Zerex Red Coolant (3 Gallons)
- Toyota Fuel Filter
- Toyota PCV Valve and Grommet
- Wix Oil Filter (51348)
- NGK Spark Wire Set
- NGK Spark Plugs
- Generic Air Filter
Most of the parts:
 In-process of removing covers:
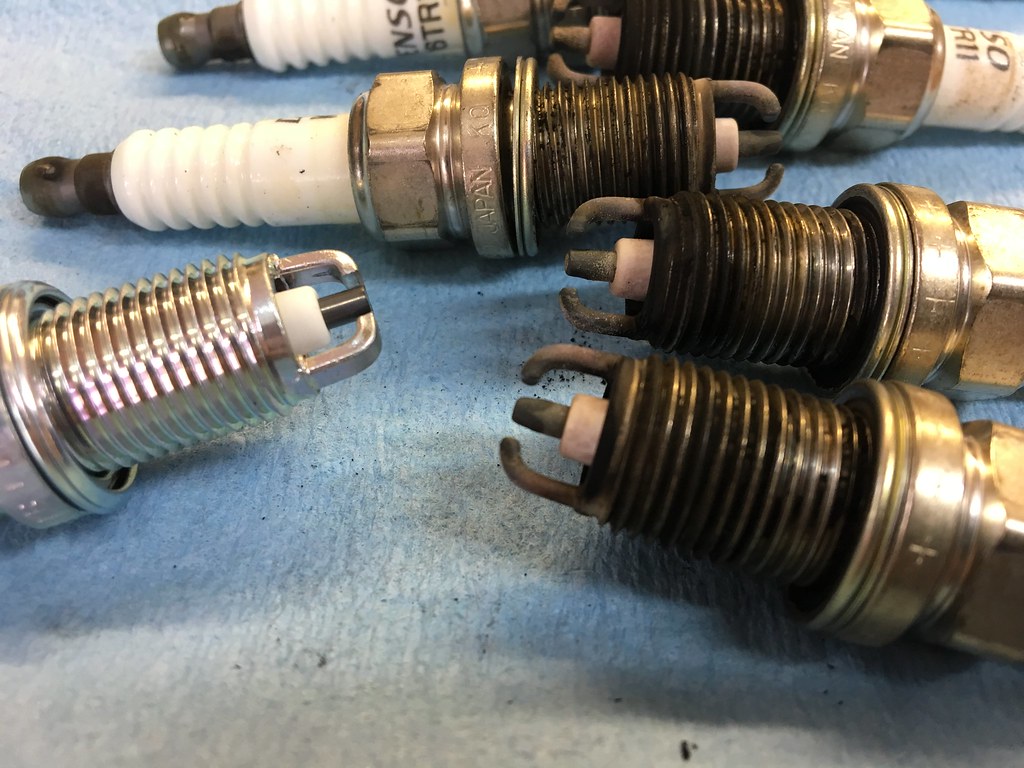
 New vs. old spark plugs:
 All buttoned up:
__________________
1999 Black SR5 Highlander 4wd V6 Automatic ( Build Thread)
2001 Millennium Silver SR5 Sport 4wd V6 Automatic (Build Thread V2)
Last edited by JerkyDrewster; 01-21-2019 at 11:37 PM.
|
|
|
Reply With Quote
|
|
05-21-2017, 11:00 PM
|
#5
|
 |
Senior Member
|
|
Join Date: Nov 2014
Location: Huntsville, AL
Posts: 3,929
|
|
|
Senior Member
Join Date: Nov 2014
Location: Huntsville, AL
Posts: 3,929
|
About time you get a build thread up for the new beast! Can't wait to see where this one takes you, looks good so far!
__________________
2008 Toyota 4Runner Limited 4x4 - Salsa Red, DD, Mostly Stock, 89k miles
2001 Toyota 4Runner SR5 4x4 - Not Stock, Lifted, Armored, 291k miles
1987 Toyota Supra N/A - Stock, 2nd Owner, 92k miles
|
|
|
Reply With Quote
|
|
05-22-2017, 11:48 PM
|
#6
|
|
Member
|
|
Join Date: Aug 2014
Location: Bay Area, CA
Age: 30
Posts: 433
Real Name: Drew
|
|
|
Member
Join Date: Aug 2014
Location: Bay Area, CA
Age: 30
Posts: 433
Real Name: Drew
|
Quote:
Originally Posted by Unner

About time you get a build thread up for the new beast! Can't wait to see where this one takes you, looks good so far!
|
Thanks Unner! I'm excited with what it is turning into so far. Yours is looking extremely clean, and I like how you did the pinch weld mod. I couldn't even leave the driveway without rubbing so I did a quick and dirty job...I'll have to fix it eventually.
__________________
1999 Black SR5 Highlander 4wd V6 Automatic ( Build Thread)
2001 Millennium Silver SR5 Sport 4wd V6 Automatic (Build Thread V2)
|
|
|
Reply With Quote
|
|
05-22-2017, 11:52 PM
|
#7
|
 |
Member
|
|
Join Date: Aug 2013
Location: SF Bay area, Ca
Posts: 446
Real Name: Not jay
|
|
|
Member
Join Date: Aug 2013
Location: SF Bay area, Ca
Posts: 446
Real Name: Not jay
|
The new rig looks dope! Im partial to silver too haha were you able to salvage the rear bumper?
__________________
09' metropolitan 50cc low and slow grocery scoot
97' SR5 rwd stock 300k club
02' SR5. 4wd. Lifted,air locked, SC'd, etc.
|
|
|
Reply With Quote
|
|
05-23-2017, 12:20 AM
|
#8
|
|
Member
|
|
Join Date: Aug 2014
Location: Bay Area, CA
Age: 30
Posts: 433
Real Name: Drew
|
|
|
Member
Join Date: Aug 2014
Location: Bay Area, CA
Age: 30
Posts: 433
Real Name: Drew
|
Quote:
Originally Posted by Jayjayb96
The new rig looks dope! Im partial to silver too haha were you able to salvage the rear bumper?
|
Thanks man! Unfortunately, the rear bumper was pretty damaged with the entire driver side of it was caved in. I sold it to
@ SCRunner12
and he had hoped to repair it, but I'm not sure how far along he has gotten with it.
__________________
1999 Black SR5 Highlander 4wd V6 Automatic ( Build Thread)
2001 Millennium Silver SR5 Sport 4wd V6 Automatic (Build Thread V2)
|
|
|
Reply With Quote
|
|
05-23-2017, 01:53 AM
|
#9
|
|
Member
|
|
Join Date: Aug 2014
Location: Bay Area, CA
Age: 30
Posts: 433
Real Name: Drew
|
|
|
Member
Join Date: Aug 2014
Location: Bay Area, CA
Age: 30
Posts: 433
Real Name: Drew
|
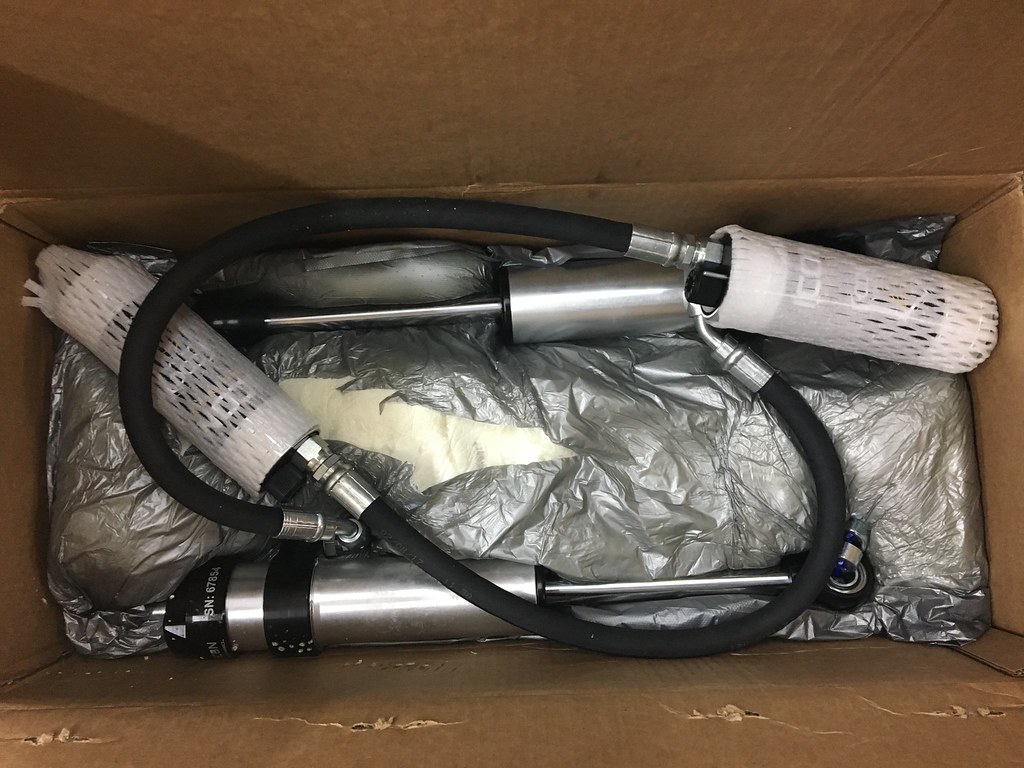
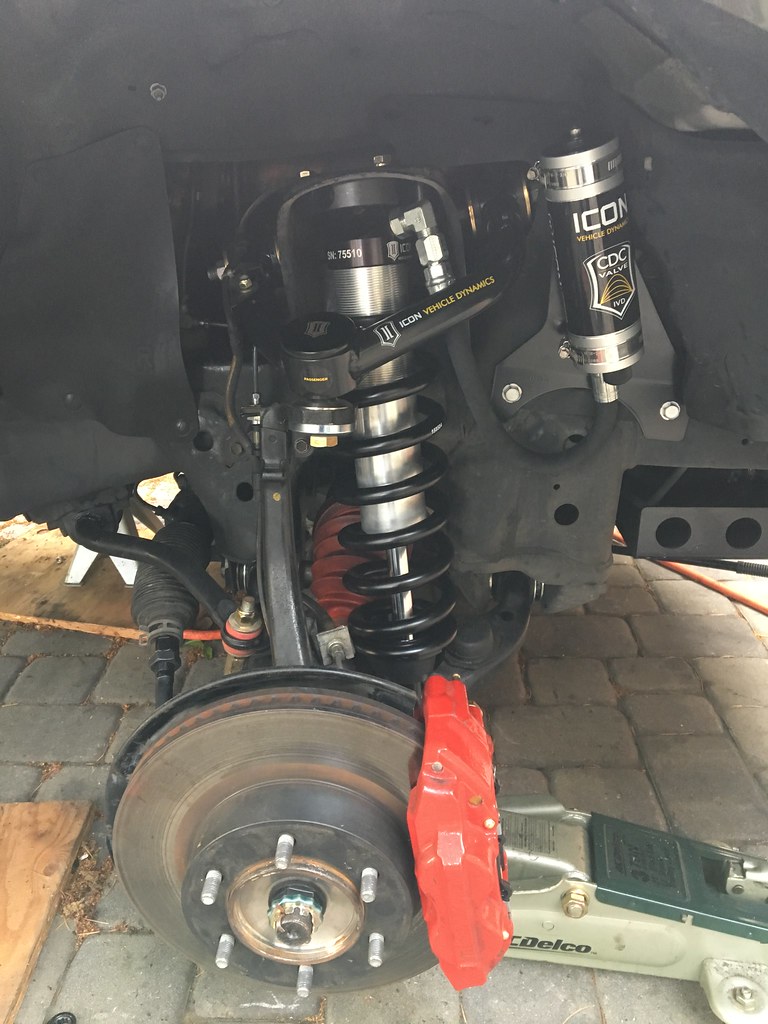
May 11th, 2017
Suspension Maintenance and Upgrade
Parts List:
Upgrades:
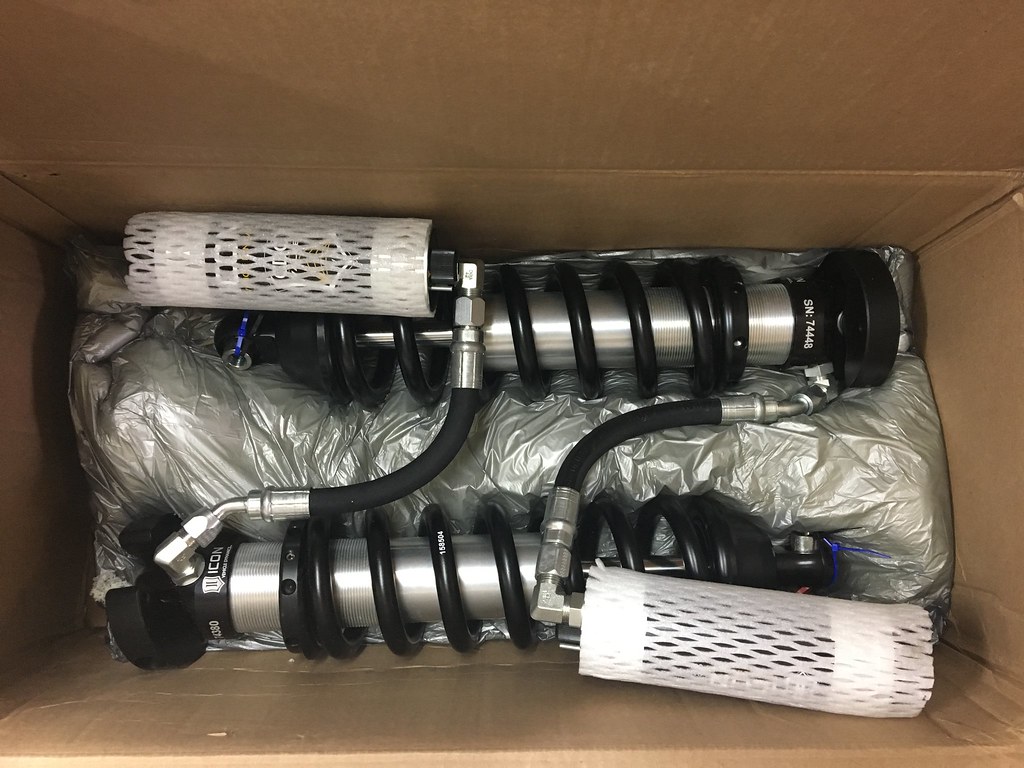
- ICON 2.5 Extended Travel Remote Reservoir Coilovers with CDCV [58716C]
- ICON Tubular UCA [58400]
- ICON 2.5 Remote Reservoir Rear Shock with CDCV [57800CP]
- "Junkyard" Bump Stops
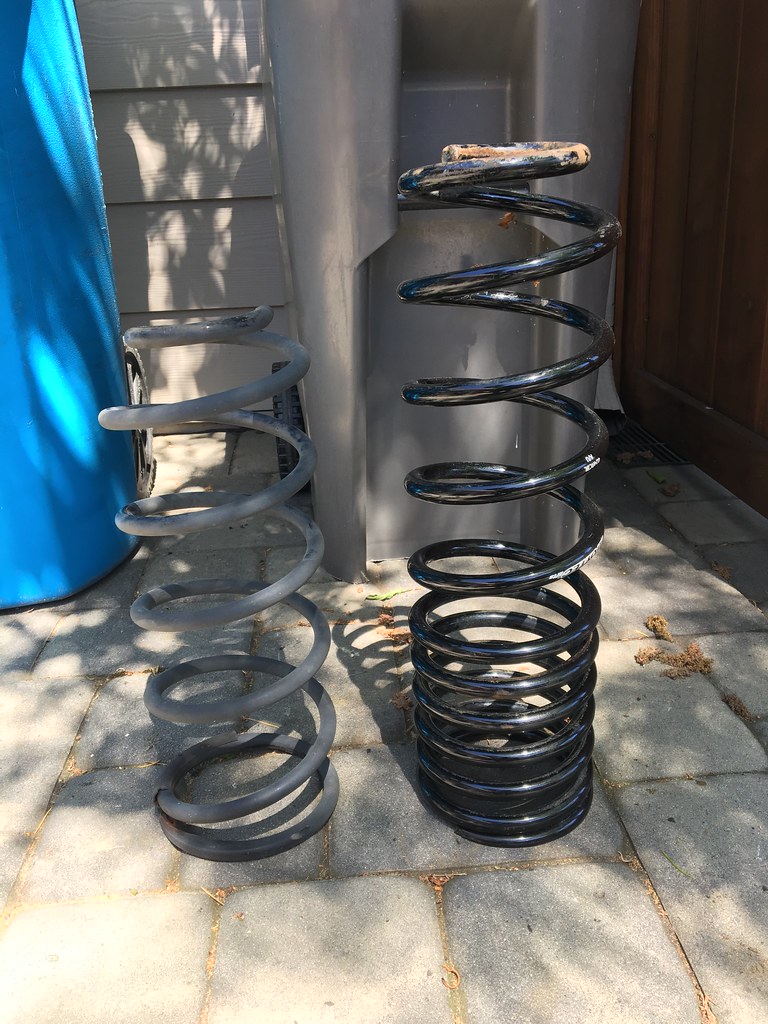
- Toytec Superflex Coils [024RCB]
- Energy Suspension Polyurethane Steering Rack Bushings [8.10101G]
- Energy Suspension Polyurethane Front Sway Bar Bushings [8.5141G]
- Energy Suspension Polyurethane Rear Sway Bar Bushings [8.5142G]
- MStudt's Sway Bar End Links
- Power Stop 231mm Calipers
- Ceramic Brake Pads [Napa - Adaptive One]
- Toytec Front SS Braided Brake Line [SS-4RFBL]
- Toytec 1" Differential Drop [TAC-DR]
- CVJ Re-manufactured CV Axles with Extended Inner Boots
OEM Parts:
- Lower Ball Joints [43330-39585 & 43340-39465]
- Outer Tie Rods [45046-39335 & 45047-39215]
- Tundra Rotors [43512-0C011]
Also Replaced:
- Inner Tie Rods [Napa]
OEM Fasteners:
- Lower Ball Joint bolts x8 [90080-10066]
- Damper Bolt washer x2 [94622-41400]
- Damper Nut x2 [90170-14026]
- Damper Bolt x2 [90105-14104]
After a long time of mulling over the many options out on the market, I finally decided to go with the the ICON Stage 5 suspension system. While it might be a little overkill for what I'm going to end up doing with it, I did like that it was fully adjustable and that I would be able to tune it to whatever I'll be doing.
It took about 6 weeks to receive the parts from the time I ordered, but I did run in to some issues. I received the correct UCAs and rear shocks, but the coilovers were meant for a first gen Tacoma. These might have worked, but I contacted ICON and they assured me that they would have a rush job done on the correct set as well as a tool bag and t-shirt. Unfortunately, they were delayed for a week before I got a package, and even more so, it still wasn't the coilovers. After 2 weeks of waiting after the initial set, they had finally arrived! I had started on my car when I first got the packages thinking everything was ready to go, so the car sat idle for quite some time which was an inconvenience, but not the end of the world. Overall, it was a pain to deal with, but the guys over at
@ TotalAutomotiveLV
and ICON handled it very well.
I started by removing the front brakes, suspension, and axles on the passenger side. I replaced the inner and outer tie rods as well as the sway bar and steering rack bushings with polyurethane Energy Suspension bushings. Had some trouble getting the long bolt through the rack, but managed to semi press it through with a socket and a wood clamp. It would have been much easier to remove everything from the vehicle but I was determined!
Next up was pressing out the LCA bushings and getting the Whitelines in. I used the same method that
@ mtbtim
outlined in one of his videos where they used a bottle jack to press out the old bushings. I didn't use heat or a lubricant and they came right out. Had to use a box to make sure they didn't punch a hole through the wall. The new bushings pressed in easily using a bench vice, and I reinstalled the LCAs using the same hardware. At the time I didn't notice, but the alignment shop informed me that my passenger side Cam alignment tabs were bent and broken. I just received the Total Chaos replacement tabs in the mail and I should be able to weld them on sometime in the near future.
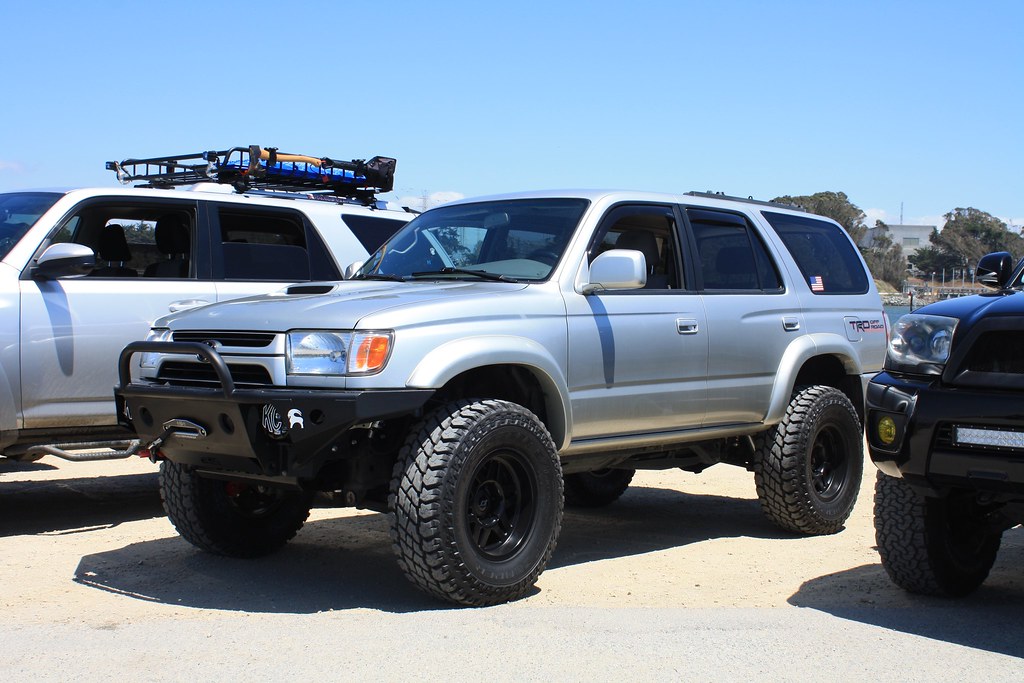
Pressing the ball joint adapter into the spindle was easy using a regular ball joint press I borrowed from O'Reillys. After that, everything just fell into place. I greased bushings that go into the UCA and fastened everything together. I was happy to be able to reuse the brakes off my old car too. Definitely liked saving some money there! It wasn't until I was going to install the coilovers that I realized they were the wrong ones. I put the tires back onto the front and lowered it to the bump stops before I jacked the rear up.
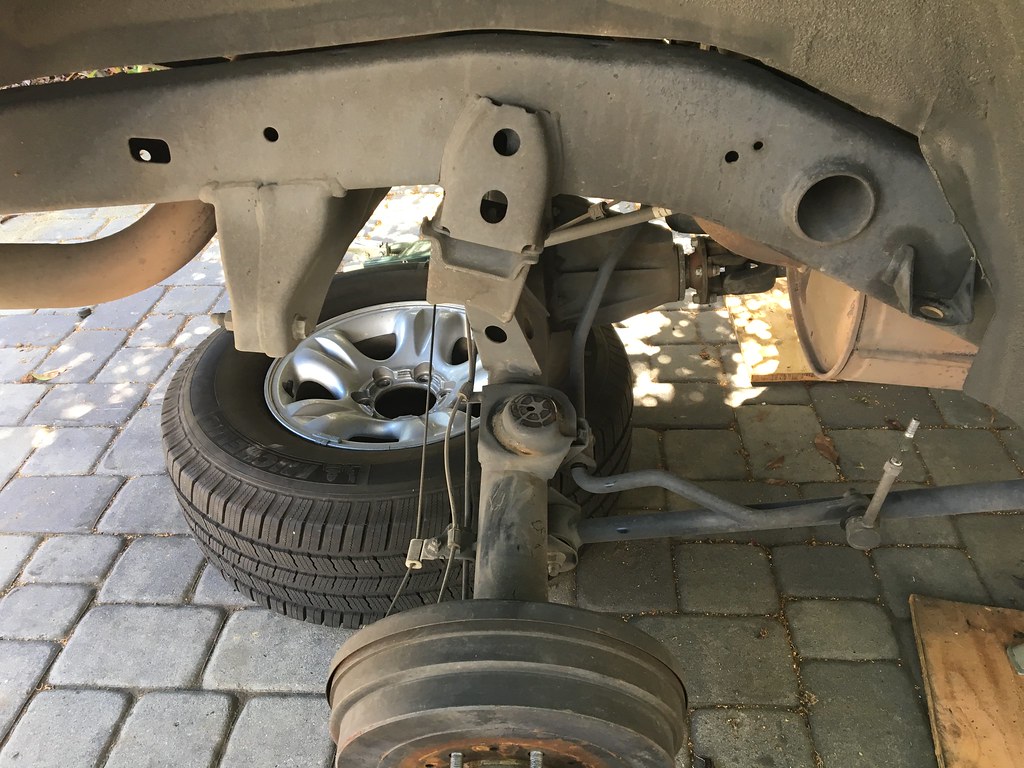
The back was pretty simple to get through. I started by removing the shocks and dropping the axle all the way to remove the coils. I had to use a spring compressor to get the Superflex coils in since they are much larger than the stock ones. The shocks went in without issue as well, just had to drill some holes in order to mount the reservoir bracket. I ended up using some junkyard bump stops that I intended to use for the other rig. Glad I was able to salvage them! Dropped the rear end down with the new tires and wheels and while it seems a little high, it does look great!
After I received the correct coilovers, I installed them almost immediately without issue. I used the bottle jack to lower the control arms a little bit, but I almost could have gotten by without it. The mount for the front reservoir utilizes a couple of holes meant for clips that hold in some rubber shielding. Once completed, I bled the brakes and lowered everything to its own weight. The following day I got it aligned at the shop and was able to drive it again!
Overall, I am extremely impressed with the suspension in how it feels and how it looks. After a short 200 mile break in period, the suspension feels really good. I just need to finish up with the alignment tabs and the panhard bar drop bracket.
Alright, that was a lot of text...now time for the picture dump!
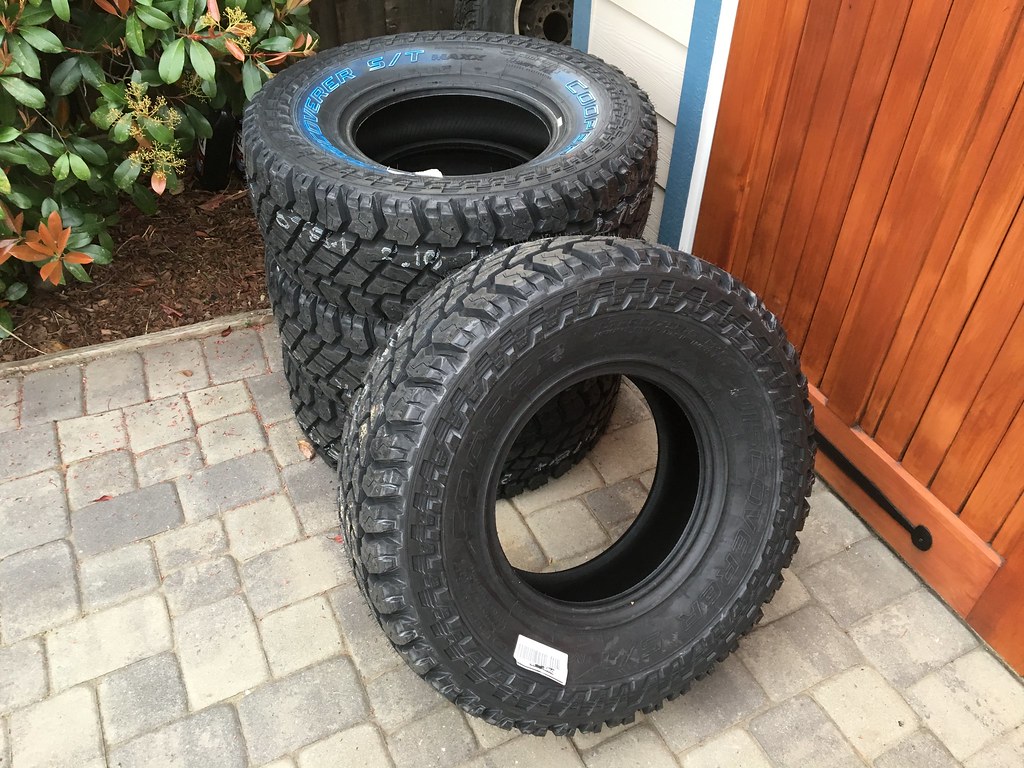
New tires - Cooper Discoverer S/T MAXX
 SCS Stealth 6
 CDCV Coilovers
 CDCV Shocks
 Stock vs. Superflexes
 Removing everything
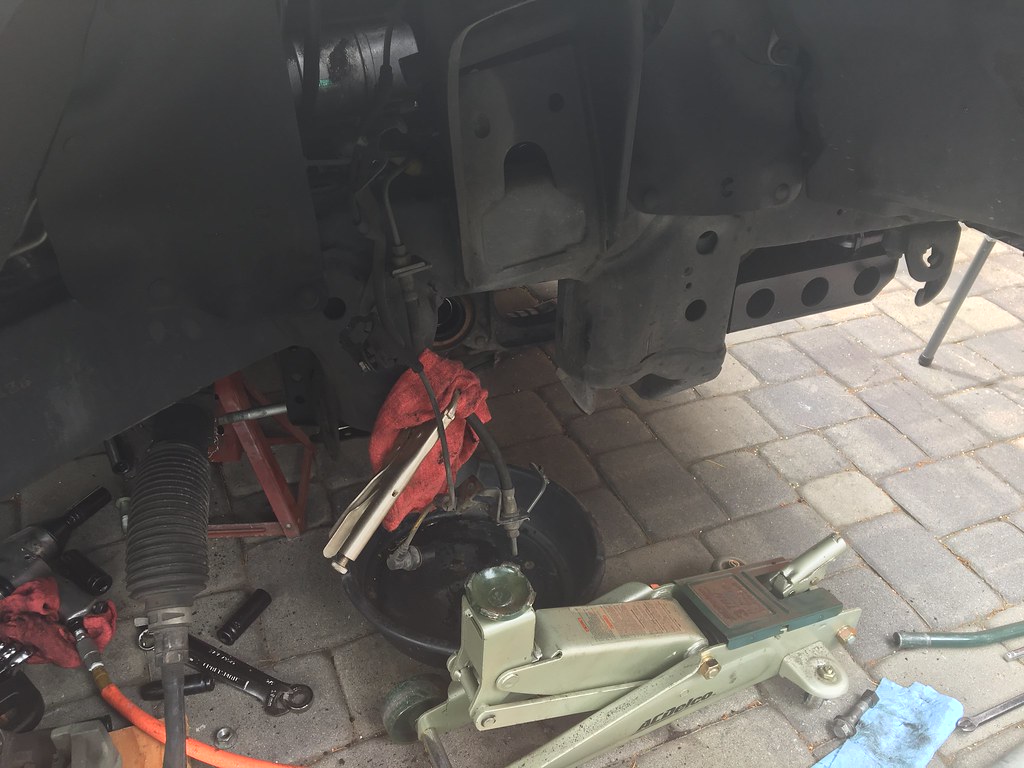 Removing the LCA Bushings
 Getting more installed

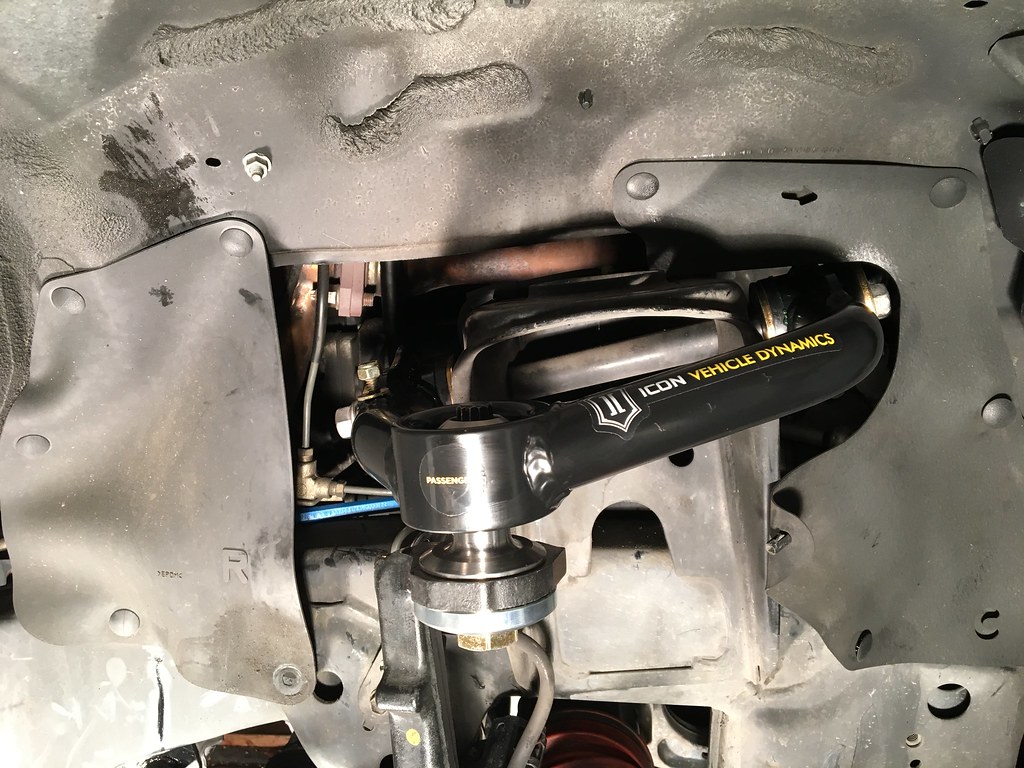 Fully installed front!!
 Working on the rear
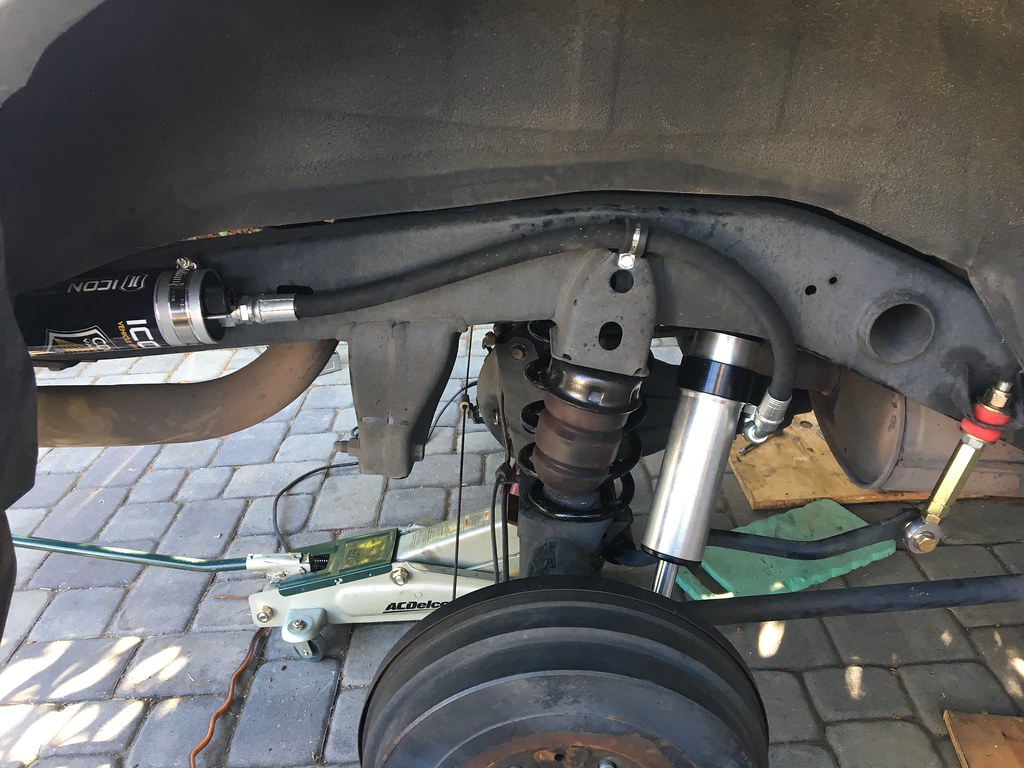 On its own feet

__________________
1999 Black SR5 Highlander 4wd V6 Automatic ( Build Thread)
2001 Millennium Silver SR5 Sport 4wd V6 Automatic (Build Thread V2)
Last edited by JerkyDrewster; 11-21-2017 at 05:11 PM.
|
|
|
Reply With Quote
|
|
05-23-2017, 09:57 AM
|
#10
|
 |
Elite Member
|
|
Join Date: Feb 2015
Location: San Jose, California
Age: 58
Posts: 5,278
Real Name: Tim
|
|
|
Elite Member
Join Date: Feb 2015
Location: San Jose, California
Age: 58
Posts: 5,278
Real Name: Tim
|
Quote:
Originally Posted by JerkyDrewster
May 11th, 2017
Suspension Maintenance and Upgrade
Next up was pressing out the LCA bushings and getting the Whitelines in. I used the same method that
@ mtbtim
outlined in one of his videos where they used a bottle jack to press out the old bushings. I didn't use heat or a lubricant and they came right out. Had to use a box to make sure they didn't punch a hole through the wall. The new bushings pressed in easily using a bench vice, and I reinstalled the LCAs using the same hardware. At the time I didn't notice, but the alignment shop informed me that my passenger side Cam alignment tabs were bent and broken. I just received the Total Chaos replacement tabs in the mail and I should be able to weld them on sometime in the near future.
|
Hey Drew, just so you know and anyone reading your build thread knows the reason for the heat when using the bottle jack technique to remove the LCA bushings is so you don't have to use a ton of force to get them out. With this bottle jack technique, we're applying forces on the LCA that it probably wasn't designed for so that's why the heat is a good idea to allow you to remove the bushings with less spreading force on the LCA.
Good job on all the work you did. You've invested quite a bit of money into your new rig and just think what all that work would have cost you if you paid someone to do it for you. I like seeing people tackle their own work.
__________________
"My old man is a television repairman, he's got this ultimate set of tools. I can fix it!"
|
|
|
Reply With Quote
|
|
05-23-2017, 10:21 AM
|
#11
|
 |
Elite Member
|
|
Join Date: Sep 2010
Location: Colorado
Age: 33
Posts: 5,317
Real Name: Jim
|
|
|
Elite Member
Join Date: Sep 2010
Location: Colorado
Age: 33
Posts: 5,317
Real Name: Jim
|
Having a new platform to start on with the experience from the first is such a valuable resource.
You are starting out really clean on this one, I am excited to see where you take it!
__________________
'13 Tacoma TRD-OR: The Spruce Goose. BUILD
'02 Sport Ed.- V2.0: The better build. Totaled BUILD 2.0
'02 Sport Ed.- V1.0: The college build Sold BUILD

|
|
|
Reply With Quote
|
|
05-23-2017, 10:48 AM
|
#12
|
 |
Elite Member
|
|
Join Date: Aug 2010
Location: Seattle, WA
Posts: 7,712
|
|
|
Elite Member
Join Date: Aug 2010
Location: Seattle, WA
Posts: 7,712
|
We're almost twins! Looking good.
__________________
2001 4Runner 4WD Sport Package, Millennium silver, 110,000 miles, 2nd gen TRD Supercharger, Toytec BOSS coilovers, 890 OME rear springs, Bilstein 5125 rear shocks, custom Baldlands front bumper, PIAA 520 driving lights and fogs, 4x Innovation Sliders (welded on!), 18" Magnaflow muffler, JDM corners, 65" Thule bars, 20% tint, 16x8 FJ80 wheels on 265/75-16 Duratracs, Husky mats w/ cargo, rear diff breather mod, 3M clear bra, remote start, Pioneer AVIC-8200NEX
|
|
|
Reply With Quote
|
|
05-23-2017, 12:43 PM
|
#13
|
 |
Senior Member
|
|
Join Date: Nov 2014
Location: The Great PNW
Posts: 2,016
|
|
|
Senior Member
Join Date: Nov 2014
Location: The Great PNW
Posts: 2,016
|
Hell yeah man! Lookin so good 
|
|
|
Reply With Quote
|
|
05-23-2017, 12:58 PM
|
#14
|
|
Senior Member
|
|
Join Date: Feb 2015
Location: Las Vegas, NV
Posts: 3,026
|
|
|
Senior Member
Join Date: Feb 2015
Location: Las Vegas, NV
Posts: 3,026
|
Looking Good!
This was an awesome post. Thank you for sharing all the details and pics.
__
|
|
|
Reply With Quote
|
|
05-23-2017, 01:41 PM
|
#15
|
|
Member
|
|
Join Date: Aug 2014
Location: Bay Area, CA
Age: 30
Posts: 433
Real Name: Drew
|
|
|
Member
Join Date: Aug 2014
Location: Bay Area, CA
Age: 30
Posts: 433
Real Name: Drew
|
Quote:
Originally Posted by mtbtim
Hey Drew, just so you know and anyone reading your build thread knows the reason for the heat when using the bottle jack technique to remove the LCA bushings is so you don't have to use a ton of force to get them out. With this bottle jack technique, we're applying forces on the LCA that it probably wasn't designed for so that's why the heat is a good idea to allow you to remove the bushings with less spreading force on the LCA.
Good job on all the work you did. You've invested quite a bit of money into your new rig and just think what all that work would have cost you if you paid someone to do it for you. I like seeing people tackle their own work.
|
That's a really good point, and I didn't think about that aspect of it. Makes sense that the arms would not experience that kind of force often, if ever. And thanks for the kind words! I definitely enjoy doing my own work, and the fact that it saves me money is definitely a bonus. I'm thankful to be able to use the things I have learned to help others out as well...pretty rewarding!
__________________
1999 Black SR5 Highlander 4wd V6 Automatic ( Build Thread)
2001 Millennium Silver SR5 Sport 4wd V6 Automatic (Build Thread V2)
|
|
|
Reply With Quote
|
 Posting Rules
|
You may not post new threads
You may not post replies
You may not post attachments
You may not edit your posts
HTML code is On
|
|
|
|


 Linear Mode


