 01-03-2018, 10:38 PM
|
#31
|
 |
Elite Member
|
|
Join Date: Feb 2015
Location: San Jose, California
Age: 58
Posts: 5,283
Real Name: Tim
|
|
|
Elite Member
Join Date: Feb 2015
Location: San Jose, California
Age: 58
Posts: 5,283
Real Name: Tim
|
Quote:
Originally Posted by theesotericone

No worries Tim.
Here's a thread that has a photo of the brass T and the original gauge and pillar pod. I've since returned that shitty Glo-Shift gauge and bought an Auto Meter gauge and pod. Way better. I'll link the pod and gauge for you. A lot of guys have put them in the lower center console up and left of the shifter. If you decide on that location you don't need the pillar pod.
I also have an aftermarket cooler wired in series with the stock trans cooler. The parts should be the same either way. Just cut a tee into the supply line going to your radiator. Passenger side is supply, drivers is return. Both sides of the tee get 1/4 NPT x 3/16 barbed male fittings. The top port gets a 1/4 NPT x 1/8 NPT bushing. The kit comes with the sensor. It goes in the 1/8" bushing. Put some band clamps on the barbed sides then wire the gauge.
The gauge wiring is super simple. Just follow the instructions.
Parts:
1/4 Brass NPT Tee
Two 1/4" NPT x 3/16th barbed fittings
1/4 x 1/8 bushing
Two 1" band clamps.
Auto-Meter Trans Temp Gauge
Auto Meter Pillar Pod |
Awesome. Thanks for sharing this.
__________________
"My old man is a television repairman, he's got this ultimate set of tools. I can fix it!"
|

|
 Reply With Quote Reply With Quote
|
|
01-04-2018, 12:42 AM
|
#32
|
 |
Senior Member
|
|
Join Date: Nov 2017
Location: Palos Verdes, CA
Posts: 1,973
Real Name: Leon
|
|
|
Senior Member
Join Date: Nov 2017
Location: Palos Verdes, CA
Posts: 1,973
Real Name: Leon
|
Quote:
Originally Posted by theesotericone
Both sides of the tee get 1/4 NPT x 3/16 barbed male fittings. The top port gets a 1/4 NPT x 1/8 NPT bushing. The kit comes with the sensor. It goes in the 1/8" bushing. Put some band clamps on the barbed sides then wire the gauge.
The gauge wiring is super simple. Just follow the instructions.
Parts:
1/4 Brass NPT Tee
Two 1/4" NPT x 3/16th barbed fittings
1/4 x 1/8 bushing
Two 1" band clamps.
Auto-Meter Trans Temp Gauge
Auto Meter Pillar Pod |
Thanks for the info. I assume you mean 3/8" barbed fittings, not 3/16"?
I'm still torn between installing the gauge in the lower console or the A-pillar. Leaning towards the A-pillar, with this kind of pod - https://www.amazon.com/gp/product/B0...=ATVPDKIKX0DER.
Also, I'm beginning to come around from my original post in this thread, and leaning towards putting the sensor in the cooler line, or in the place of the current A/T temp idiot light sensor. I read enough posts to convince me that that is the correct way (the best way to measure the hottest fluid temp, which is what I really care about, not the diluted fluid in the pan). Plus Toyota put the sensor in that location, so that's got to count for something.
__________________
1997 4Runner Limited 4WD E-Locker ~200k | Falken Wildpeak A/T3W 265/75/16 | Pro Comp 69 16x8 | OME 2906 | B&M 70264
Addicted Offroad Front Bumper | Spiker Engineering High-Lift Hood Struts and Ultragauge Mount
|
|
|
Reply With Quote
|
|
01-04-2018, 01:15 AM
|
#33
|
 |
Senior Member
|
|
Join Date: Jul 2016
Location: Bishop, Ca
Posts: 2,332
|
|
|
Senior Member
Join Date: Jul 2016
Location: Bishop, Ca
Posts: 2,332
|
Quote:
Originally Posted by 4Runner4Leon
Thanks for the info. I assume you mean 3/8" barbed fittings, not 3/16"?
|
Thanks man. It's been a while. lol
5/16 actually and I'm pretty sure I had 1/4 tee but ended up using a 3/8" tee. SO anyone reading my parts list might want to remember my memory sucks. The idea is to get barbed fittings that fit snug and a tee that's as big as the ID of the trans hose but still allows them to go on fully. I really should have started a build thread earlier. lol
__________________
Quote:
|
Only two things are infinite, the universe and human stupidity, and I'm not sure about the former. --Albert Einstein
|
|
|
|
Reply With Quote
|
|
01-04-2018, 11:34 AM
|
#34
|
|
Senior Member
|
|
Join Date: Nov 2017
Location: Palos Verdes, CA
Posts: 1,973
Real Name: Leon
|
|
|
Senior Member
Join Date: Nov 2017
Location: Palos Verdes, CA
Posts: 1,973
Real Name: Leon
|
Quote:
Originally Posted by theesotericone
Thanks man. It's been a while. lol
5/16 actually and I'm pretty sure I had 1/4 tee but ended up using a 3/8" tee. SO anyone reading my parts list might want to remember my memory sucks. The idea is to get barbed fittings that fit snug and a tee that's as big as the ID of the trans hose but still allows them to go on fully. I really should have started a build thread earlier. lol
|
No worries, I can't remember anything either which is why I write things down or take pics  .
I rounded up a 1/4" brass T and 1/4" NPT x 3/8" barbs this morning, hopefully that will work out. I'll let you know if it doesn't.
__________________
1997 4Runner Limited 4WD E-Locker ~200k | Falken Wildpeak A/T3W 265/75/16 | Pro Comp 69 16x8 | OME 2906 | B&M 70264
Addicted Offroad Front Bumper | Spiker Engineering High-Lift Hood Struts and Ultragauge Mount
|
|
|
Reply With Quote
|
|
01-04-2018, 12:20 PM
|
#35
|
 |
Senior Member
|
|
Join Date: Mar 2016
Location: West Bend, WI
Posts: 2,340
Real Name: Mike
|
|
|
Senior Member
Join Date: Mar 2016
Location: West Bend, WI
Posts: 2,340
Real Name: Mike
|
Couple more thoughts:
Leon, it sounds like you are considering the T fitting route instead of the tapping into the pan. I think its the way you should go. If you are going to tap the pan and use the rubber gasket, do not put any RTV on it. I've had mine pan off so many damn times and reused the rubber gasket every time and it has never leaked a drop. No need to make a mess and deal with removing RTV/FIPG if you ever need to drop the pan again. Just make sure you clean everything up real good and it will seal fine.
If you do go the T fitting route, it sounds like you (and Tim) got the info you need.
If you have any other questions about how I did, shoot me a message. I really like the glowshift gauge. Just make sure you use good quality hose clamps and it doesn't hurt to check them for tightness every once in awhile. I've never had to tighten mine so they are holding up fine and have never leaked.
One last thing, If you do install the gauge on the center console, I put mine a little too far to the left. I'm a big guy (6'3") and my big fat knee can obstruct my view of the gauge a little bit. If it was moved over another inch, it would be a little more visible. For now, I just have to move my leg inwards to see it a little better.
__________________
1997 SR5 4x4 Auto, 99' tall coils up front, OME 906's, Truetrac LSD, Airaid MIT
1999 SR5 4x4 Auto for parts
2011 Camry SE V6
2011 Highlander Limited
|
|
|
Reply With Quote
|
|
01-04-2018, 12:32 PM
|
#36
|
|
Senior Member
|
|
Join Date: Nov 2017
Location: Palos Verdes, CA
Posts: 1,973
Real Name: Leon
|
|
|
Senior Member
Join Date: Nov 2017
Location: Palos Verdes, CA
Posts: 1,973
Real Name: Leon
|
Quote:
Originally Posted by thegipper
Couple more thoughts:
Leon, it sounds like you are considering the T fitting route instead of the tapping into the pan. I think its the way you should go. If you are going to tap the pan and use the rubber gasket, do not put any RTV on it. I've had mine pan off so many damn times and reused the rubber gasket every time and it has never leaked a drop. No need to make a mess and deal with removing RTV/FIPG if you ever need to drop the pan again. Just make sure you clean everything up real good and it will seal fine.
If you do go the T fitting route, it sounds like you (and Tim) got the info you need.
If you have any other questions about how I did, shoot me a message. I really like the glowshift gauge. Just make sure you use good quality hose clamps and it doesn't hurt to check them for tightness every once in awhile. I've never had to tighten mine so they are holding up fine and have never leaked.
One last thing, If you do install the gauge on the center console, I put mine a little too far to the left. I'm a big guy (6'3") and my big fat knee can obstruct my view of the gauge a little bit. If it was moved over another inch, it would be a little more visible. For now, I just have to move my leg inwards to see it a little better.
|
Mike,
Thanks so much for the thoughts and the offer to message you for help (if needed)!
I actually came to the same decision last night, no sealant with the rubber gasket. I have had a rubber gasket with no sealer on my minivan for 5 years, and not a drop of fluid. If worse comes to worst and it leaks, I can remove it easily and try something else without dealing with the scraping mess.
And yes, I'll go with the T in the cooler line, as recommended by you and others, by GM, and by where Toyota places the idiot light (right near the cooler line).
I'm also 6'3", so I see what you mean about the knee obstructing the gauge in the console. I might put it there initially just to try things out, but maybe relocate it to the A pillar later. Have you ever considered that location? I like my gauges to be closer to line of sight, if possible.
__________________
1997 4Runner Limited 4WD E-Locker ~200k | Falken Wildpeak A/T3W 265/75/16 | Pro Comp 69 16x8 | OME 2906 | B&M 70264
Addicted Offroad Front Bumper | Spiker Engineering High-Lift Hood Struts and Ultragauge Mount
|
|
|
Reply With Quote
|
|
01-04-2018, 12:41 PM
|
#37
|
 |
Elite Member
|
|
Join Date: May 2013
Location: Los Angeles
Posts: 5,154
Real Name: C8H18 Mike
|
|
|
Elite Member
Join Date: May 2013
Location: Los Angeles
Posts: 5,154
Real Name: C8H18 Mike
|
For grins and giggles I just took some trans temp readings with my no-touch infrared thermometer and compared to Torque Pro. Drove for about 30 mins and pulled over and left it idling. All readings were taken more than once and were within 2-3°
The readings below are the average, or numbers seen most:
Torque Pro: 145°
Pan: 145°
Trans body and output line to rad cooler: 157°
Rad cooler output to aux cooler: 111° (same at aux cooler coz not moving) I guess Toyota is reading the temp near the pan because the readings around the pan were within consistently 1-2° of Torque Pro and I suppose these values could radically change and while driving under various conditions (load)
None of this matters, just sharing
__________________
.
1999 Toyota 4Runner SR5 Sport 4WD, V6 5-Speed e-Locker-> 4WD 4runner Journal Thread
1999 Toyota 4Runner SR5 Un-Sported 2WD, V6 Auto -> 2WD 4runner Journal Thread
1959 Chevy 3100 1/2 Ton Pickup EVERYTHING done 'cept paint and body
.
Last edited by octanejunkie; 01-04-2018 at 12:43 PM.
|
|
|
Reply With Quote
|
|
01-04-2018, 12:46 PM
|
#38
|
|
Senior Member
|
|
Join Date: Nov 2017
Location: Palos Verdes, CA
Posts: 1,973
Real Name: Leon
|
|
|
Senior Member
Join Date: Nov 2017
Location: Palos Verdes, CA
Posts: 1,973
Real Name: Leon
|
Quote:
Originally Posted by octanejunkie
For grins and giggles I just took some trans temp readings with my no-touch infrared thermometer and compared to Torque Pro. Drove for about 30 mins and pulled over and left it idling. All readings were taken more than once and were within 2-3°
The readings below are the average, or numbers seen most:
Torque Pro: 145°
Pan: 145°
Trans body and output line to rad cooler: 157°
Rad cooler output to aux cooler: 111° (same at aux cooler coz not moving) I guess Toyota is reading the temp near the pan because the readings around the pan were within consistently 1-2° of Torque Pro and I suppose these values could radically change and while driving under various conditions (load)
None of this matters, just sharing |
Interesting data Mike! I wonder where Toyota places the trans temp sensor on the '99's - we do know that on the '97's the idiot light sensor is right near the cooler line, so I thought (think?) that the '99 would use the same location, just replacing the idiot light sensor with a temp sensor. But what do I know about A340s...
__________________
1997 4Runner Limited 4WD E-Locker ~200k | Falken Wildpeak A/T3W 265/75/16 | Pro Comp 69 16x8 | OME 2906 | B&M 70264
Addicted Offroad Front Bumper | Spiker Engineering High-Lift Hood Struts and Ultragauge Mount
|
|
|
Reply With Quote
|
|
01-04-2018, 12:50 PM
|
#39
|
|
Elite Member
|
|
Join Date: May 2013
Location: Los Angeles
Posts: 5,154
Real Name: C8H18 Mike
|
|
|
Elite Member
Join Date: May 2013
Location: Los Angeles
Posts: 5,154
Real Name: C8H18 Mike
|
Quote:
Originally Posted by 4Runner4Leon
Interesting data Mike! I wonder where Toyota places the trans temp sensor on the '99's - we do know that on the '97's the idiot light sensor is right near the cooler line, so I thought (think?) that the '99 would use the same location, just replacing the idiot light sensor with a temp sensor. But what do I know about A340s...
|
There appears to be a connection in the same place as yours on my 99, so I imagine they hook up similarly, but I don't know for certain.
Realistically, my opinion matters least Lol you've gotten good info from more informed members, go with it 
__________________
.
1999 Toyota 4Runner SR5 Sport 4WD, V6 5-Speed e-Locker-> 4WD 4runner Journal Thread
1999 Toyota 4Runner SR5 Un-Sported 2WD, V6 Auto -> 2WD 4runner Journal Thread
1959 Chevy 3100 1/2 Ton Pickup EVERYTHING done 'cept paint and body
.
|
|
|
Reply With Quote
|
|
01-04-2018, 01:58 PM
|
#40
|
|
Senior Member
|
|
Join Date: Mar 2016
Location: West Bend, WI
Posts: 2,340
Real Name: Mike
|
|
|
Senior Member
Join Date: Mar 2016
Location: West Bend, WI
Posts: 2,340
Real Name: Mike
|
Pillar would work too, I considered it but had already spent boat loads of money on other stuff so I just decided to mount it on the center console near the shifter.
The only catch is, I had to use a hole saw and drill a spot for it. I would just get a pillar mount since that sounds like what you want anyway.
I think Tim asked about where the wires were run. I tapped into the headlight switch wire I believe by steering column, if you look back on that post I made it says which color the wire is. The glowshift gauge I bought dims when you turn on the headlights which is nice. For the signal wires (if installed on shift console) I just fed them back and up and over (I believe, maybe under) the steering console and fed it to the boot on the drivers side firewall (where the massive wire loom goes through) and snaked it around the engine bay to the T fitting. I zip tied everything to secure it so it doesn't break or get messed up.
Good luck
__________________
1997 SR5 4x4 Auto, 99' tall coils up front, OME 906's, Truetrac LSD, Airaid MIT
1999 SR5 4x4 Auto for parts
2011 Camry SE V6
2011 Highlander Limited
Last edited by thegipper; 01-04-2018 at 02:33 PM.
|
|
|
Reply With Quote
|
|
01-04-2018, 02:12 PM
|
#41
|
|
Senior Member
|
|
Join Date: Nov 2017
Location: Palos Verdes, CA
Posts: 1,973
Real Name: Leon
|
|
|
Senior Member
Join Date: Nov 2017
Location: Palos Verdes, CA
Posts: 1,973
Real Name: Leon
|
Quote:
Originally Posted by thegipper
Pillar would work too, I considered it but had already spent boat loads of money on other stuff so I just decided to mount it on the center console near the shifter.
The only catch is, I had to use a hole saw and drill a spot for it. I would just get a pillar mount since that sounds like what you want anyway.
I think Tim asked about where the wires were run. I tapped into the headlight switch wire I believe by steering column, if you look back on that post I made it says which color the wire is. The glowshift gauge I bought dims when you turn on the headlights which is nice. For the signal wires (if installed on shift console) I just fed them back and up and over (I believe, maybe under) the steering console and fed it to the boot on the drivers side firewall (where the massive wire loom goes through) and snaked it around the engine bay to the T fitting. I zip tied everything to secure it so it does break or get messed up.
Good luck
|
Thanks! And for Tim/others, the dimmable illumination wires in the 4Runners are always G for hot and W-G for ground. There are plenty of them routed behind dash bezel and switches, just pick one.
__________________
1997 4Runner Limited 4WD E-Locker ~200k | Falken Wildpeak A/T3W 265/75/16 | Pro Comp 69 16x8 | OME 2906 | B&M 70264
Addicted Offroad Front Bumper | Spiker Engineering High-Lift Hood Struts and Ultragauge Mount
|
|
|
Reply With Quote
|
|
01-04-2018, 02:44 PM
|
#42
|
 |
Member
|
|
Join Date: Jul 2017
Location: East Bay, CA
Posts: 205
|
|
|
Member
Join Date: Jul 2017
Location: East Bay, CA
Posts: 205
|
Quote:
Originally Posted by mtbtim
Awesome. Thanks for sharing this.
|
Tim, if you decide to do this let me know. I'd love to see how it's done first hand and maybe do it on my '97.
|
|
|
Reply With Quote
|
|
01-06-2018, 01:17 PM
|
#43
|
|
Elite Member
|
|
Join Date: Feb 2015
Location: San Jose, California
Age: 58
Posts: 5,283
Real Name: Tim
|
|
|
Elite Member
Join Date: Feb 2015
Location: San Jose, California
Age: 58
Posts: 5,283
Real Name: Tim
|
Quote:
Originally Posted by 4Runner4Leon
Thanks! And for Tim/others, the dimmable illumination wires in the 4Runners are always G for hot and W-G for ground. There are plenty of them routed behind dash bezel and switches, just pick one.
|
Ok, just to let you and others know on this thread, I'm an Electrical Tard. My experience with auto electrical is very very minimal but I'm willing to learn.
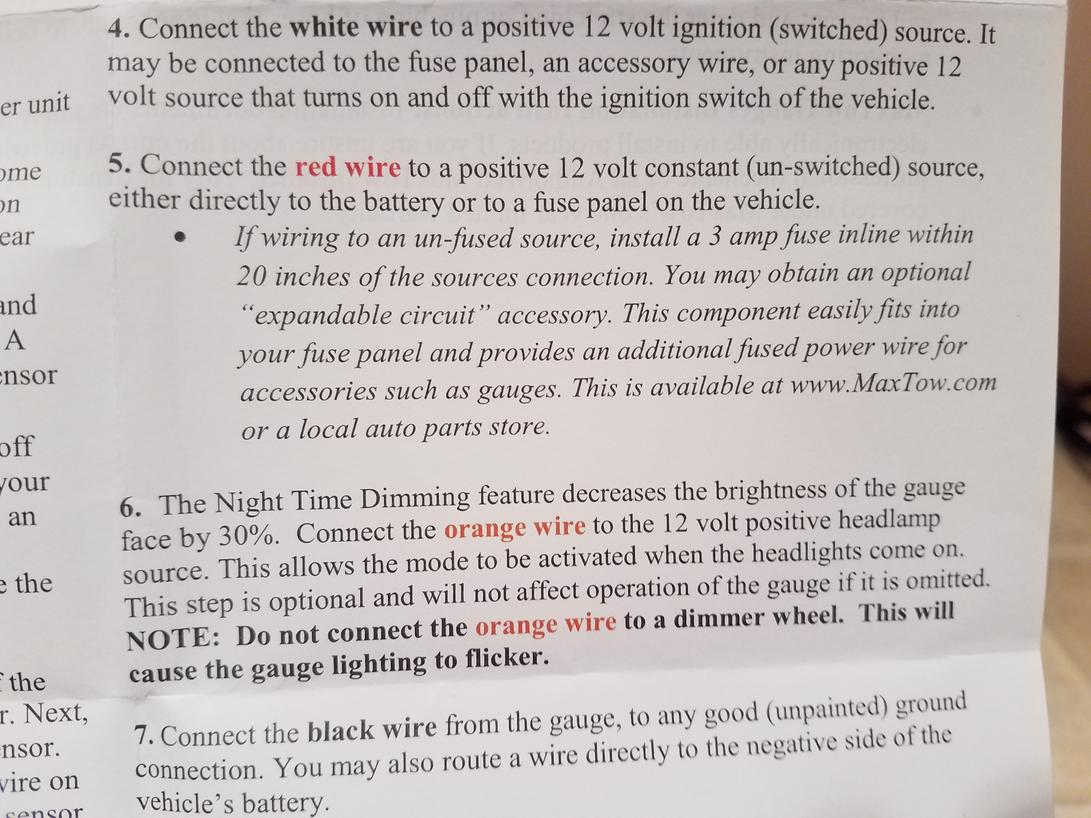
I just bought a Max Tow gauge via Amazon. It had better reviews than the Auto Meter. To wire the meter, it has 4 wires (white, red, orange and black). The black is easy because I just have to connect that to a ground somewhere. Where to tap the other ones into are what confuses me. The white is suppose to connect to a 12 volt ignition (switched source). The red is is suppose to a 12 volt constant (un-switched source). The orange is suppose to connect to a 12 volt positive (headlamp source).
Here's a copy of the instructions. It's steps 4-6 I need to figure out. What would be a switched source to connect to? What would be an un-switched source to connect to? And, what would be the positive headlamp source to connect to? What kind of connector do you use to tap into these wires? Based off what you said above, it sounds like I could hook up the orange wire to one under the dash with a "G" and then connect the black wire to one under the dash with a "W-G"?
Sorry for highjacking this thread but I think anyone finding this thread would appreciate the extra detail I'm asking for and some pictures of what you're talking about would be awesome if you have them. I plan on making a video of the install so I want to pass on accurate information. Thanks!
@ thegipper
@ theesotericone
__________________
"My old man is a television repairman, he's got this ultimate set of tools. I can fix it!"
Last edited by mtbtim; 01-06-2018 at 01:33 PM.
|
|
|
Reply With Quote
|
|
01-06-2018, 01:18 PM
|
#44
|
|
Elite Member
|
|
Join Date: Feb 2015
Location: San Jose, California
Age: 58
Posts: 5,283
Real Name: Tim
|
|
|
Elite Member
Join Date: Feb 2015
Location: San Jose, California
Age: 58
Posts: 5,283
Real Name: Tim
|
Quote:
Originally Posted by calnhob
Tim, if you decide to do this let me know. I'd love to see how it's done first hand and maybe do it on my '97.
|
I will.
__________________
"My old man is a television repairman, he's got this ultimate set of tools. I can fix it!"
|
|
|
Reply With Quote
|
|
01-06-2018, 01:54 PM
|
#45
|
 |
Member
|
|
Join Date: Dec 2015
Location: Earth
Posts: 912
|
|
|
Member
Join Date: Dec 2015
Location: Earth
Posts: 912
|
Acutemp adapter. I did read somewhere the temps were about 10deg cooler than inside the pan?
Genos Garage (Diesel)

__________________
2018 Offroad Premium w/KDSS
1993 Jeep YJ w/stuff
|
|
|
Reply With Quote
|
 Posting Rules
|
You may not post new threads
You may not post replies
You may not post attachments
You may not edit your posts
HTML code is On
|
|
|
|


 Linear Mode


