 01-20-2018, 10:51 AM
|
#16
|
 |
Member
|
|
Join Date: Jan 2012
Location: Houston, TX
Age: 35
Posts: 498
Real Name: Jake
|
|
|
Member
Join Date: Jan 2012
Location: Houston, TX
Age: 35
Posts: 498
Real Name: Jake
|
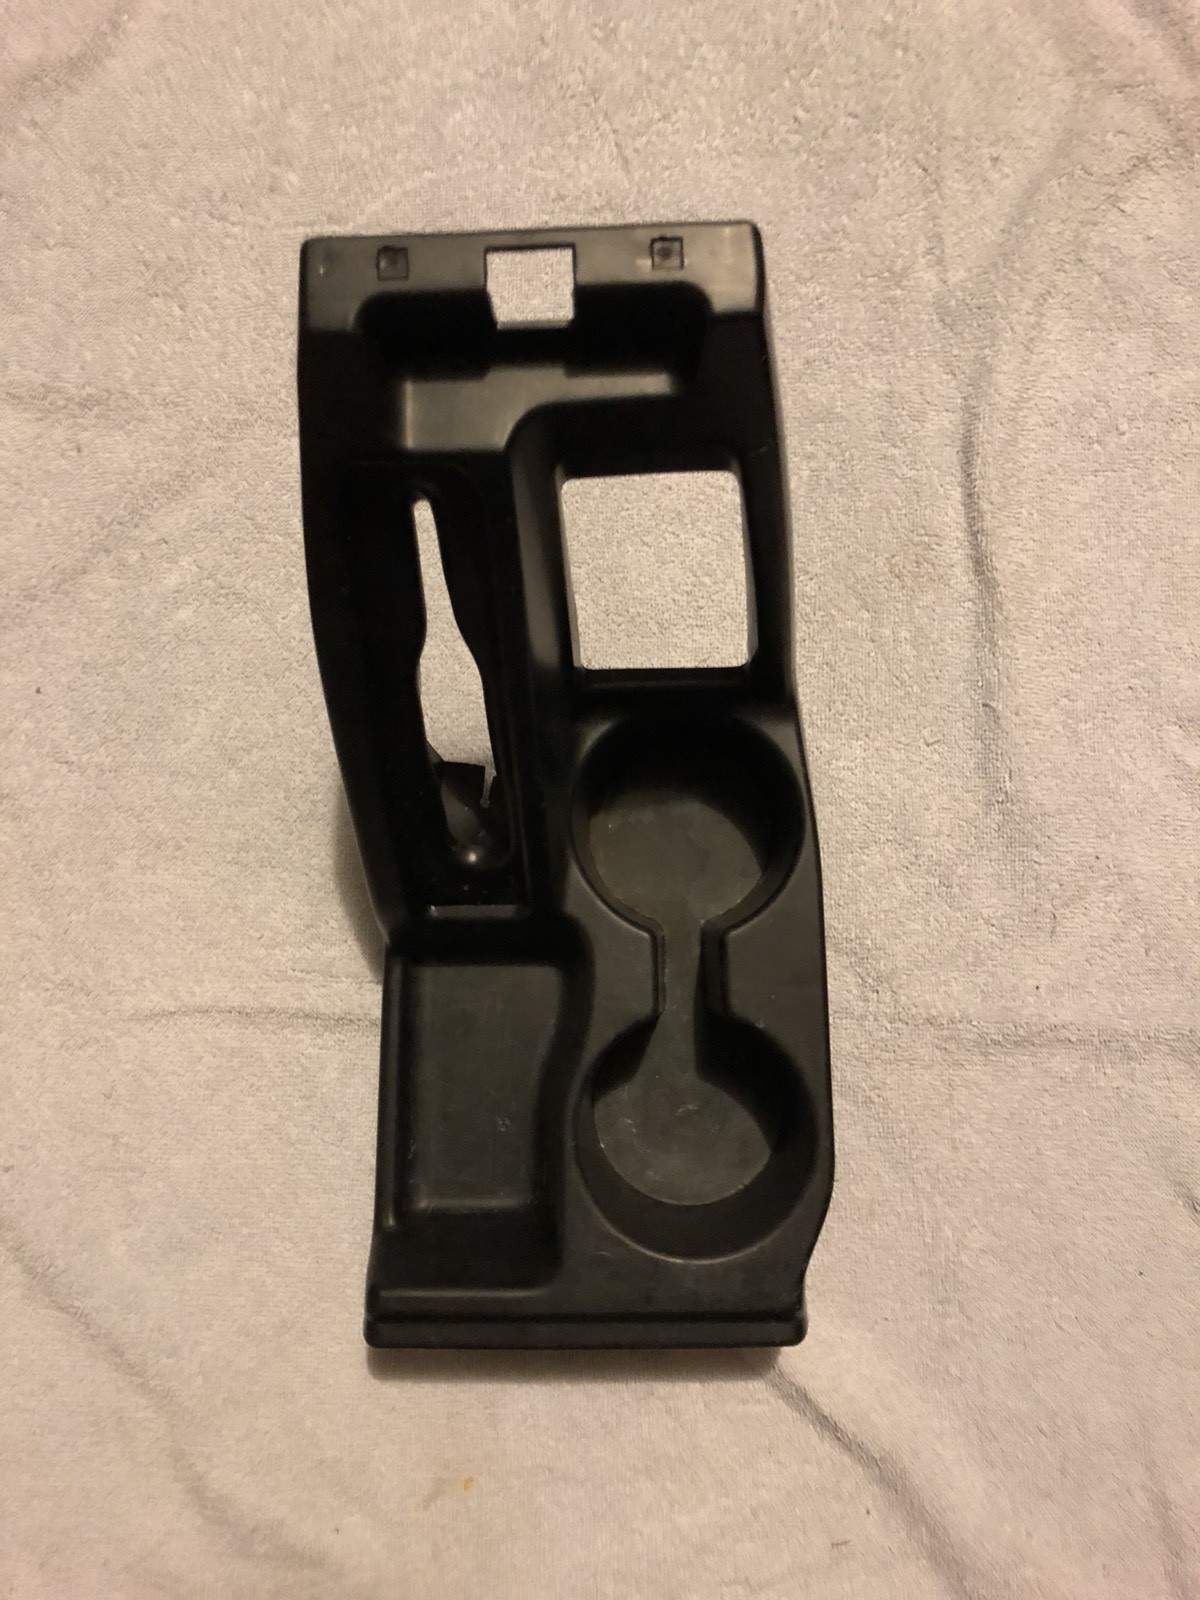
99 center console bezel only swap?
Will this swap directly into my 1996 center console?
__________________
https://i.imgur.com/WQdryKXm.jpg
The Sequel - 1996 4Runner SR5 - Houston, TX
The Original - 2001 4runner SR5 - SOLD
Etsy Page - Custom Pinstriping and Sign Making
@8LinePinstripe: Instagram
|

|
 Reply With Quote Reply With Quote
|
|
01-20-2018, 03:24 PM
|
#17
|
 |
Member
|
|
Join Date: Apr 2011
Location: Death Valley
Posts: 591
|
|
|
Member
Join Date: Apr 2011
Location: Death Valley
Posts: 591
|
Quote:
Originally Posted by Lamer

so looks like I will find a shop to assemble the front struts for me, and do the rest of the work myself.
|
You can do it yourself without much issue. I bought one of these since I felt a little safer than the dual clamps. I tweaked it a little so I just tossed it after I was done. was cheaper that way then paying a shop.
https://www.amazon.com/Yaheetech-Sin...476097&sr=1-22
Or you can spend more money on a nicer one and have it around for friends or future uses. I bet a shop will charge you around $100+ to do it.
Last edited by calimobber; 01-20-2018 at 03:28 PM.
|
|
|
Reply With Quote
|
|
01-20-2018, 07:21 PM
|
#18
|
|
Member
|
|
Join Date: Jan 2012
Location: Houston, TX
Age: 35
Posts: 498
Real Name: Jake
|
|
|
Member
Join Date: Jan 2012
Location: Houston, TX
Age: 35
Posts: 498
Real Name: Jake
|
Quote:
Originally Posted by calimobber
You can do it yourself without much issue. I bought one of these since I felt a little safer than the dual clamps. I tweaked it a little so I just tossed it after I was done. was cheaper that way then paying a shop.
https://www.amazon.com/Yaheetech-Sin...476097&sr=1-22
Or you can spend more money on a nicer one and have it around for friends or future uses. I bet a shop will charge you around $100+ to do it. |
oh man thanks for the link. I found a shop that was actually just across the street from my apartment. $60
Looks like Monday is the day. getting everything prepped and making sure I have all of the right sized sockets and tools. I have watched enough videos I hope I can get all of this done in one day.
__________________
https://i.imgur.com/WQdryKXm.jpg
The Sequel - 1996 4Runner SR5 - Houston, TX
The Original - 2001 4runner SR5 - SOLD
Etsy Page - Custom Pinstriping and Sign Making
@8LinePinstripe: Instagram
|
|
|
Reply With Quote
|
|
01-21-2018, 10:36 PM
|
#19
|
|
Member
|
|
Join Date: Jan 2012
Location: Houston, TX
Age: 35
Posts: 498
Real Name: Jake
|
|
|
Member
Join Date: Jan 2012
Location: Houston, TX
Age: 35
Posts: 498
Real Name: Jake
|
Lift, ball joints, tie-rod end links, and poly bushing preparations
Have everything layed out, went through all of manuals and youtube videos and disocvered I need to buy a 24mm and 22mm socket. hoping to get all of this done in one day and completely change the characteristics of the ride feel.

__________________
https://i.imgur.com/WQdryKXm.jpg
The Sequel - 1996 4Runner SR5 - Houston, TX
The Original - 2001 4runner SR5 - SOLD
Etsy Page - Custom Pinstriping and Sign Making
@8LinePinstripe: Instagram
|
|
|
Reply With Quote
|
|
01-21-2018, 11:05 PM
|
#20
|
 |
Member
|
|
Join Date: Sep 2017
Location: Chicago NW burbs
Posts: 418
Real Name: Teri
|
|
|
Member
Join Date: Sep 2017
Location: Chicago NW burbs
Posts: 418
Real Name: Teri
|
Interesting project you got yourself. What do you plan to do with the paint?
I have some clear coat issues myself I'm now noticing.
Just need to know what Seafoam does for the gas tank.
Thanks
|
|
|
Reply With Quote
|
|
01-21-2018, 11:19 PM
|
#21
|
|
Member
|
|
Join Date: Jan 2012
Location: Houston, TX
Age: 35
Posts: 498
Real Name: Jake
|
|
|
Member
Join Date: Jan 2012
Location: Houston, TX
Age: 35
Posts: 498
Real Name: Jake
|
Quote:
Originally Posted by TrexRunnerGirl
Interesting project you got yourself. What do you plan to do with the paint?
I have some clear coat issues myself I'm now noticing.
Just need to know what Seafoam does for the gas tank.
Thanks
|
not sure on the paint honestly, maybe go with a black spray on bedliner for the hood, but my fenders clear coat is chipping away so I might get them repainted/cleared at a local shop.
Seafoam is magical, cleans the fuel system of deposits. It also cleans carbon from your combustion chamber and allow your vehicle to run better. I plan on running it in my oil next week for a couple days then get get an oil changee. eventually will put some into the vacuum lines.
__________________
https://i.imgur.com/WQdryKXm.jpg
The Sequel - 1996 4Runner SR5 - Houston, TX
The Original - 2001 4runner SR5 - SOLD
Etsy Page - Custom Pinstriping and Sign Making
@8LinePinstripe: Instagram
|
|
|
Reply With Quote
|
|
01-21-2018, 11:34 PM
|
#22
|
 |
Member
|
|
Join Date: Oct 2016
Location: Denver, Colorado
Posts: 209
|
|
|
Member
Join Date: Oct 2016
Location: Denver, Colorado
Posts: 209
|
Quote:
Originally Posted by Lamer
Made my way to a couple shops around town today to get quotes on the work below: (I have all the parts, they were quoting the labor only)
replace Upper and lower ball joints on driver and passenger sides
Pass CV axle
both tie rod ends
assemble new front coils and struts
install new front coils and struts
install rear coils and struts
Guess what the lowest quote was..........$1,972.87!!!!!!!!! thats bonkers.
so looks like I will find a shop to assemble the front struts for me, and do the rest of the work myself.
fortunately two of the shops inspected my control arm bushings and both shops said they are ok and do not need replacing. that helps but down on the man hours big time. plus, after replacing nearly everything else, if there is anything funky about my front end, I will know where to start looking.
|
Yes now you can use the money you saved by doing the work yourself to buy some tools!!!!
I HIGHLY suggest you get a torque wrench if you don't already have one. There are some components on your 4Runner that you can just tighten up snug and call it a day, but suspension components don't fall into that category. Torquing those LBJs to the correct spec is could be the difference between them lasting 100,000+ miles or failing catastrophically (wheel falls off while driving), as is what has happened to at least one owner on this forum. Don't let that scare you from doing the work yourself -- just double check everything, torque it properly, GET AN ALIGNMENT IMMEDIATELY AFTERWARDS, and recheck torques after about 500 miles. Good luck!
Also, download the factory service manual (FSM) if you haven't already. Here's a snippet on how the struts should be assembled. I highly recommend you print the image out and give it to the shop, then be sure to check their work (the shop I brought it to still got it wrong).

|
|
|
Reply With Quote
|
|
01-22-2018, 12:40 AM
|
#23
|
|
Member
|
|
Join Date: Jan 2012
Location: Houston, TX
Age: 35
Posts: 498
Real Name: Jake
|
|
|
Member
Join Date: Jan 2012
Location: Houston, TX
Age: 35
Posts: 498
Real Name: Jake
|
Quote:
Originally Posted by marcus clarkus
Yes now you can use the money you saved by doing the work yourself to buy some tools!!!!
I HIGHLY suggest you get a torque wrench if you don't already have one...
Also, download the factory service manual (FSM)...
|
YES! I'm all for new tools.
I already have a Craftsman 20-150 ft-lb torque wrench (Probably going to buy some metric ratcheting wrenches next)
I have a Haynes repair manual already, but I'm interested in the factory service manual (Does it specify the tool sizes i.e. sockets/wrenches required for each job?) that's really the most annoying thing to research. Haynes manual specifies the torque but no socket/wrench sizes...
Is there one online for download?
__________________
https://i.imgur.com/WQdryKXm.jpg
The Sequel - 1996 4Runner SR5 - Houston, TX
The Original - 2001 4runner SR5 - SOLD
Etsy Page - Custom Pinstriping and Sign Making
@8LinePinstripe: Instagram
Last edited by Lamer; 01-22-2018 at 12:56 AM.
|
|
|
Reply With Quote
|
|
01-22-2018, 02:21 AM
|
#24
|
|
Member
|
|
Join Date: Oct 2016
Location: Denver, Colorado
Posts: 209
|
|
|
Member
Join Date: Oct 2016
Location: Denver, Colorado
Posts: 209
|
Quote:
Originally Posted by Lamer
YES! I'm all for new tools.
I already have a Craftsman 20-150 ft-lb torque wrench (Probably going to buy some metric ratcheting wrenches next)
I have a Haynes repair manual already, but I'm interested in the factory service manual (Does it specify the tool sizes i.e. sockets/wrenches required for each job?) that's really the most annoying thing to research. Haynes manual specifies the torque but no socket/wrench sizes...
Is there one online for download?
|
Nope, but if you have 12mm, 14, 17, 19, 22, 24 that will cover 99% of the sizes you need. I can't remember if 21mm is in the category too, or if I just always grab for it and realize I need a 22mm...
Search google for the 1996 FSM and I bet you'll find it. Another option is to pay to join the Toyota TIS website, download the FSM, then cancel you subscription (about $15). The only downside to that is that you have to individually download hundreds of PDF files. If you want the 1999 or 2000 FSM then message me and I might be able to help you with that.
Another tip - watch videos and read posts for tips on how to remove you old rear shocks and tighten the new bilsteins in place. With the right tools/strategy, it's a hundred times faster and easier.
edit - also, not sure how I missed your picture if the already assembled struts. If they did them wrong you could take them back to the shop, or go to one of the big Auto Parts stores to rent a spring compressor. It shouldn't be that hard/dangerous to fix by yourself because it assembled so you only have to compress it to allow you to rotate things in place.
Last edited by marcus clarkus; 01-22-2018 at 02:26 AM.
|
|
|
Reply With Quote
|
|
01-22-2018, 10:36 AM
|
#25
|
|
Member
|
|
Join Date: Jan 2012
Location: Houston, TX
Age: 35
Posts: 498
Real Name: Jake
|
|
|
Member
Join Date: Jan 2012
Location: Houston, TX
Age: 35
Posts: 498
Real Name: Jake
|
Quote:
Originally Posted by marcus clarkus
Nope, but if you have 12mm, 14, 17, 19, 22, 24 that will cover 99% of the sizes you need. I can't remember if 21mm is in the category too, or if I just always grab for it and realize I need a 22mm...
Search google for the 1996 FSM and I bet you'll find it. Another option is to pay to join the Toyota TIS website, download the FSM, then cancel you subscription (about $15). The only downside to that is that you have to individually download hundreds of PDF files. If you want the 1999 or 2000 FSM then message me and I might be able to help you with that.
Another tip - watch videos and read posts for tips on how to remove you old rear shocks and tighten the new bilsteins in place. With the right tools/strategy, it's a hundred times faster and easier.
edit - also, not sure how I missed your picture if the already assembled struts. If they did them wrong you could take them back to the shop, or go to one of the big Auto Parts stores to rent a spring compressor. It shouldn't be that hard/dangerous to fix by yourself because it assembled so you only have to compress it to allow you to rotate things in place.
|
ya the only size i'm missing is the 24mm. going to pick that up today. along with the rental ball joint press kit. and maybe a second kit to give me more sizes of sockets to press the UBJ back in with.
i plan to watch all the videos i saved once more today. to make sure I have it all understood. Thanks!
__________________
https://i.imgur.com/WQdryKXm.jpg
The Sequel - 1996 4Runner SR5 - Houston, TX
The Original - 2001 4runner SR5 - SOLD
Etsy Page - Custom Pinstriping and Sign Making
@8LinePinstripe: Instagram
|
|
|
Reply With Quote
|
|
01-23-2018, 08:54 PM
|
#26
|
|
Member
|
|
Join Date: Jan 2012
Location: Houston, TX
Age: 35
Posts: 498
Real Name: Jake
|
|
|
Member
Join Date: Jan 2012
Location: Houston, TX
Age: 35
Posts: 498
Real Name: Jake
|
the failday
well today could have gone better.
in an attempt to accomplish everything front end related I was only able to complete the lower ball joints and the new front strut install.
old LBJ was removed with no issue, new LBJ went in great. removing the old upper ball joint went great, but it was then that I struggled. pressing in the new upper ball joint just wasn't gonna happen. I spent 3.5 hrs on it!!! I called to confirm I had the right part #'s, and they were correct. no matter what I tried it would not press in. finally I had enough. proceeded to re-install the old one (which pressed in with no issue) and installed the new front strut assembly. I then moved to the other side and did the same. didn't even touch the upper ball joint though.
Today the 4runner defeated me. sadly, I just do not have the time nor the patience to try it again. I will be calling shops tomorrow to see what they will quote for the upper ball joints, and maybe the steering rack bushings...maybe.
ill tackle the rear end later, unless the shop quotes is cheap.
sad day. 
__________________
https://i.imgur.com/WQdryKXm.jpg
The Sequel - 1996 4Runner SR5 - Houston, TX
The Original - 2001 4runner SR5 - SOLD
Etsy Page - Custom Pinstriping and Sign Making
@8LinePinstripe: Instagram
|
|
|
Reply With Quote
|
|
01-24-2018, 01:46 AM
|
#27
|
|
Member
|
|
Join Date: Apr 2017
Location: Brooklyn, NY
Age: 40
Posts: 358
|
|
|
Member
Join Date: Apr 2017
Location: Brooklyn, NY
Age: 40
Posts: 358
|
I was able to press in the UBJ with a harbor freight 3 jaw puller on one side (using adapter cups from the Amazon Ball joint service kit) and the other side with a $50 ball joint service kit I got off Amazon. Probably takes 30 minutes or less (assuming everything is off and ready to go).
Put the UBJ in the freezer for an hour beforehand, I also used a thin layer of anti seize to help lube it up. That helped a lot.
Heres a little write up I did with the links to the tools Did my UBJ here are a few helpful notes
Sent from my iPhone using Tapatalk
__________________
1997 Limited 4x4 3.4l 199k E-locker Blue Wire Mod | 255/85 r16 Maxxis Bighorn MT - LX450 9 wrap + Tokico black rear | Front: 2.5" King Coilover set @ 2" lift | True North Fab Front Bumper + Warn m8000 + Baja Designs Squadron Sport | Custom Sliders | NguyenWorks Rear Bumper + Tire Swingout
|
|
|
Reply With Quote
|
|
01-24-2018, 09:48 AM
|
#28
|
|
Member
|
|
Join Date: Jan 2012
Location: Houston, TX
Age: 35
Posts: 498
Real Name: Jake
|
|
|
Member
Join Date: Jan 2012
Location: Houston, TX
Age: 35
Posts: 498
Real Name: Jake
|
ya maybe that 3 jaw puller was the way to go for installing the new one.
I may still try that depending on what the shops quote me for the work. not sure yet.
thanks for the advise, I like the simplicity of it
__________________
https://i.imgur.com/WQdryKXm.jpg
The Sequel - 1996 4Runner SR5 - Houston, TX
The Original - 2001 4runner SR5 - SOLD
Etsy Page - Custom Pinstriping and Sign Making
@8LinePinstripe: Instagram
|
|
|
Reply With Quote
|
|
01-24-2018, 05:19 PM
|
#29
|
|
Member
|
|
Join Date: Jan 2012
Location: Houston, TX
Age: 35
Posts: 498
Real Name: Jake
|
|
|
Member
Join Date: Jan 2012
Location: Houston, TX
Age: 35
Posts: 498
Real Name: Jake
|
installed my new TYC headlight assemblies. man are they sharp!

also, I was parusing around in my engine bay and found a couple odd things, can anyone tell me what these are for? and if I am missing anything?
circled in blue

and then this:

__________________
https://i.imgur.com/WQdryKXm.jpg
The Sequel - 1996 4Runner SR5 - Houston, TX
The Original - 2001 4runner SR5 - SOLD
Etsy Page - Custom Pinstriping and Sign Making
@8LinePinstripe: Instagram
|
|
|
Reply With Quote
|
|
01-24-2018, 05:22 PM
|
#30
|
|
Member
|
|
Join Date: Apr 2017
Location: Brooklyn, NY
Age: 40
Posts: 358
|
|
|
Member
Join Date: Apr 2017
Location: Brooklyn, NY
Age: 40
Posts: 358
|
To be clear - with the 3 jaw puller you do still need to use a few of the adapters from the Ball Joint Service/puller kit. You might be able to rent a kit from an auto parts store that has the adapters that would work.
I do like using the 3 jaw puller though, it's simple, strong, super adaptable, and looks like futuristic robot claw, so it checks all the boxes.
|
|
|
Reply With Quote
|
 Posting Rules
|
You may not post new threads
You may not post replies
You may not post attachments
You may not edit your posts
HTML code is On
|
|
|
|


 :
:  Linear Mode


