 02-15-2018, 05:34 PM
|
#1
|
 |
Member
|
|
Join Date: May 2015
Location: Reno, NV
Posts: 67
Real Name: Mike Henderson
|
|
|
Member
Join Date: May 2015
Location: Reno, NV
Posts: 67
Real Name: Mike Henderson
|
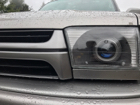
DIY dashboard accessory mount
I made a simple mounting plate for phone mounts and radios and even an iPad for the dashboard of my 1999 4Runner.

I used a piece of 22 ga sheet metal from home depot and cut it to size with tin snips.
Here it is without anything on it. The silver ball is a Nite-Ize Steeling phone mount.

It has to clear the hazard light switch.

For stability, I used a strip of sheet metal attached to the dash with velcro. The black tape is 3m vinyl wrap. Both the 3m adhesive tape and the 3m velcro tape is SUPER STICKY and will ruin or leave residue on anything. The vinyl wrap is super adhesive, but releases really well.

If you're interested, I made a video of how I made it:
https://www.youtube.com/watch?v=2wm_LnbTwPM&t=16s
-M
|

|
 Reply With Quote Reply With Quote
|
|
02-15-2018, 06:21 PM
|
#2
|
|
Senior Member
|
|
Join Date: Mar 2014
Location: Parker CO
Age: 57
Posts: 1,080
|
|
|
Senior Member
Join Date: Mar 2014
Location: Parker CO
Age: 57
Posts: 1,080
|
You don't own a file to clean up those cut edges?
|
|
|
Reply With Quote
|
|
02-15-2018, 07:41 PM
|
#3
|
|
Member
|
|
Join Date: May 2015
Location: Reno, NV
Posts: 67
Real Name: Mike Henderson
|
|
|
Member
Join Date: May 2015
Location: Reno, NV
Posts: 67
Real Name: Mike Henderson
|
Quote:
Originally Posted by csp

You don't own a file to clean up those cut edges?
|
They're clean enough that they won't cut your finger if you run it along the edge. I used a grinder, file and sandpaper.
|
|
|
Reply With Quote
|
|
02-16-2018, 12:30 AM
|
#4
|
 |
Senior Member
|
|
Join Date: Nov 2014
Location: The Great PNW
Posts: 2,016
|
|
|
Senior Member
Join Date: Nov 2014
Location: The Great PNW
Posts: 2,016
|
Quote:
Originally Posted by csp
You don't own a file to clean up those cut edges?
|
You don't have any manners?
Watch the video, and you'll see he used a file for his "final draft".
While not my style, nice job on the mounting solution 
The part of the video I found most interesting is the way you use the handle to open your door  I could be wrong, but I'm pretty sure I go from the rear, while you pull from the front.
|
|
|
Reply With Quote
|
|
02-16-2018, 11:47 AM
|
#5
|
|
Member
|
|
Join Date: May 2015
Location: Reno, NV
Posts: 67
Real Name: Mike Henderson
|
|
|
Member
Join Date: May 2015
Location: Reno, NV
Posts: 67
Real Name: Mike Henderson
|
Quote:
Originally Posted by Tyler James Inc
You don't have any manners?
Watch the video, and you'll see he used a file for his "final draft".
While not my style, nice job on the mounting solution
The part of the video I found most interesting is the way you use the handle to open your door I could be wrong, but I'm pretty sure I go from the rear, while you pull from the front. |
Thanks.
I'll have to review the tape on door handle operation...
-M
|
|
|
Reply With Quote
|
|
02-16-2018, 11:49 AM
|
#6
|
|
Member
|
|
Join Date: May 2015
Location: Reno, NV
Posts: 67
Real Name: Mike Henderson
|
|
|
Member
Join Date: May 2015
Location: Reno, NV
Posts: 67
Real Name: Mike Henderson
|
Quote:
Originally Posted by Tyler James Inc
While not my style, nice job on the mounting solution |
I have access to a 3d Printer. Maybe I'll try to think of a way to print it.
|
|
|
Reply With Quote
|
|
02-16-2018, 12:19 PM
|
#7
|
|
Member
|
|
Join Date: Jan 2018
Location: Grimes, Iowa
Posts: 30
|
|
|
Member
Join Date: Jan 2018
Location: Grimes, Iowa
Posts: 30
|
Nicely done, if you go the 3D version I would be interested in one. Makes great use of the small dash close windshield design of the Runner
|
|
|
Reply With Quote
|
|
02-16-2018, 12:20 PM
|
#8
|
 |
Senior Member
|
|
Join Date: Jan 2016
Location: Bend
Posts: 1,026
|
|
|
Senior Member
Join Date: Jan 2016
Location: Bend
Posts: 1,026
|
Quote:
Originally Posted by RoofRack
I have access to a 3d Printer. Maybe I'll try to think of a way to print it.
|
I like solutions that don't require drilling.
I have some prototypes that are probably never going to be redone because they just keep working.
__________________
1999 Base model 4x4 3RZ 5 speed - added e-locker, front Aussie, dual cases with 4.7 front, manual hubs, Tundra/OME 861 springs, Shaved firewall (thanks Tyler James Inc), AssBurns rear links (run as 3 link),Limited interior w/ Mazda3 Grand Touring seats, Savage front and rear bumpers w/ winch, sliders, Thorley header w/ Magnaflow exhaust, SPC UCAs, 37s with 5.29 gears, roof rack and storage box, sport hood, BL and more. Linky
|
|
|
Reply With Quote
|
|
02-16-2018, 02:23 PM
|
#9
|
|
Member
|
|
Join Date: May 2015
Location: Reno, NV
Posts: 67
Real Name: Mike Henderson
|
|
|
Member
Join Date: May 2015
Location: Reno, NV
Posts: 67
Real Name: Mike Henderson
|
Quote:
Originally Posted by rkntoy
I like solutions that don't require drilling.
I have some prototypes that are probably never going to be redone because they just keep working.
|
Same here. When I built my prototype I cut the hazard button notch on the wrong end. But now I use that a a nest for the CB handset. So It's a feature, not a fault!
-M
|
|
|
Reply With Quote
|
|
02-16-2018, 09:51 PM
|
#10
|
|
Member
|
|
Join Date: Sep 2016
Location: Atlanta, GA
Posts: 84
|
|
|
Member
Join Date: Sep 2016
Location: Atlanta, GA
Posts: 84
|
Quote:
Originally Posted by RoofRack
Same here. When I built my prototype I cut the hazard button notch on the wrong end. But now I use that a a nest for the CB handset. So It's a feature, not a fault!
-M
|
Give us prototype and I may buy it.
|
|
|
Reply With Quote
|
|
02-19-2018, 03:33 PM
|
#11
|
|
Senior Member
|
|
Join Date: Mar 2014
Location: Parker CO
Age: 57
Posts: 1,080
|
|
|
Senior Member
Join Date: Mar 2014
Location: Parker CO
Age: 57
Posts: 1,080
|
Quote:
Originally Posted by RoofRack
They're clean enough that they won't cut your finger if you run it along the edge. I used a grinder, file and sandpaper.
|
Quote:
Originally Posted by Tyler James Inc
You don't have any manners?
|
Lets put it this way. The photos displayed don't look what I'd consider a finished product. And no, I didn't look at the video. Didn't need a video to understand how such a simple piece is made. I saw pictures of what I thought were completed pieces. If they weren't the final, there was no way to know that.
|
|
|
Reply With Quote
|
|
02-23-2018, 11:06 AM
|
#12
|
|
Member
|
|
Join Date: May 2015
Location: Reno, NV
Posts: 67
Real Name: Mike Henderson
|
|
|
Member
Join Date: May 2015
Location: Reno, NV
Posts: 67
Real Name: Mike Henderson
|
Quote:
Originally Posted by csp
Lets put it this way. The photos displayed don't look what I'd consider a finished product. And no, I didn't look at the video. Didn't need a video to understand how such a simple piece is made. I saw pictures of what I thought were completed pieces. If they weren't the final, there was no way to know that.
|
Yep, It's the final product. How many can I put you down for?
-M
|
|
|
Reply With Quote
|
|
02-23-2018, 11:14 AM
|
#13
|
|
Member
|
|
Join Date: Feb 2018
Location: San Jose
Posts: 30
|
|
|
Member
Join Date: Feb 2018
Location: San Jose
Posts: 30
|
I dont have a bunch of gear to hang but would still be interested in a finished product! Are there similar products you benchmarked? Planning to take orders? Thanks.
|
|
|
Reply With Quote
|
|
02-23-2018, 11:53 AM
|
#14
|
 |
Senior Member
|
|
Join Date: Nov 2017
Location: Palos Verdes, CA
Posts: 1,973
Real Name: Leon
|
|
|
Senior Member
Join Date: Nov 2017
Location: Palos Verdes, CA
Posts: 1,973
Real Name: Leon
|
I agree that the version shown in the picture looks a bit rough, but it's a prototype. And I very much appreciate the creativity and ingenuity of the mount.
A couple of thoughts/suggestions:
- Have you considered changing the lower portion (the one with the cutout for the hazard) from something that sticks to the front of the dash bezel to something that slips behind the bezel? That way you would not be relying on adhesive at that interface, so it would be stronger and probably cleaner looking.
- Similarly, is there something that you can hook the back stabilizer brace to, instead of gluing it to the dash top?
- As a suggestion, you can also use the real estate of the mount to add switches, warning lights, or even gauges, right at your line of sight!
Anyway, great concept!
__________________
1997 4Runner Limited 4WD E-Locker ~200k | Falken Wildpeak A/T3W 265/75/16 | Pro Comp 69 16x8 | OME 2906 | B&M 70264
Addicted Offroad Front Bumper | Spiker Engineering High-Lift Hood Struts and Ultragauge Mount
|
|
|
Reply With Quote
|
|
07-26-2018, 03:23 PM
|
#15
|
|
Member
|
|
Join Date: May 2015
Location: Reno, NV
Posts: 67
Real Name: Mike Henderson
|
|
|
Member
Join Date: May 2015
Location: Reno, NV
Posts: 67
Real Name: Mike Henderson
|
Good ideas!
I think you'd be better off attaching to the window than the dash. The tape will rip a hole in the dash cover. (ask me how I know)
I like the idea of switches!
I think attaching to the faceplate with screws might work. Just find one in a salvage yard to drill into to keep the original nice.
-M
Quote:
Originally Posted by 4Runner4Leon
I agree that the version shown in the picture looks a bit rough, but it's a prototype. And I very much appreciate the creativity and ingenuity of the mount.
A couple of thoughts/suggestions:
- Have you considered changing the lower portion (the one with the cutout for the hazard) from something that sticks to the front of the dash bezel to something that slips behind the bezel? That way you would not be relying on adhesive at that interface, so it would be stronger and probably cleaner looking.
- Similarly, is there something that you can hook the back stabilizer brace to, instead of gluing it to the dash top?
- As a suggestion, you can also use the real estate of the mount to add switches, warning lights, or even gauges, right at your line of sight!
Anyway, great concept!
|
|
|
|
Reply With Quote
|
 Posting Rules
|
You may not post new threads
You may not post replies
You may not post attachments
You may not edit your posts
HTML code is On
|
|
|
|


 Linear Mode


