 12-11-2020, 03:45 PM
|
#136
|
 |
Senior Member
|
|
Join Date: Apr 2011
Location: Oceanside, CA
Posts: 1,892
Real Name: Evan
|
|
|
Senior Member
Join Date: Apr 2011
Location: Oceanside, CA
Posts: 1,892
Real Name: Evan
|
Quote:
Originally Posted by rickashay

UPDATE - Summer 2020
Side note, HERE are the turn signals I am running on the bumper. They have been unreal and held up great this last year+. So bright!
|
Do you have daytime photos showing how bright the VLed amber strip lights are? Im using one of the brightest amber 7440 leds I can find inside of my amber tinted corner markers, and they work great even in the daytime but Ive been thinking about adding another more forward facing turn signal on the front of my tube bumper or on the headlight filler plate, and a lot of the cheaper smaller aftermarket amber leds are not bright enough for daytime use IMO.
__________________
2000 Black Sport 4WD 5spd -JD Fabrication long travel/ Fox 2.5 8 RR/ Anonymous Fab lower uniball McNeil Racing fenders Toytec Superflex/ 5th gen Bilstein 5100/ Wheelers Superbumps 315/70/17 BFG KO2 on Robby Gordon wheels 231mm TBU / Wheelers SS lines MStudt rear swaybar links Tom Woods driveshaft Satoshi K&N FIPK w/ AFE dry filter Borla Pro XS URD short throw shifter & Ellis Precision shift knobs Uniden PRO 520XL & 3' Firefly on custom mount Prinsu full rack Baja Designs Squadron Sport Sae & combo beam lights Paranoid Fab switch panel with Ram mounts Extended rear diff breather 01-02 tail lights Stubbs HD-SKO sliders Any 7 Offroad gas tank skid @Assburns custom tube front bumper Nguyen Works swing out bumper FROR rear links
|

|
 Reply With Quote Reply With Quote
|
|
12-12-2020, 01:15 PM
|
#137
|
 |
Member
|
|
Join Date: Apr 2012
Location: Vernon, BC, Canada
Posts: 879
Real Name: Doug
|
|
|
Member
Join Date: Apr 2012
Location: Vernon, BC, Canada
Posts: 879
Real Name: Doug
|
Quote:
Originally Posted by rickashay
Your trip looked insane! Jealous is all I can say. I really do hope I am able to follow in similar footsteps one day. So rad. Don't need to be a pro photographer either, just need to use what you have, but more importantly make sure you take the time to take in the moment and not worry about the photos. Memories are worth more than the photos (I have to remind myself of this sometimes too... gotta live in the moment as much as possible!)
|
CAN'T AGREE MORE!
Having travelled a little when I finished College--backpacking through the UK and France, doing the youth hostel experience (and camping across the Western US)-- I wouldn't change a thing! Then meeting my English Wife and spending many Summers' crisscrossing the USA and Canada with her by car, and later with the family, and now, the two of us, seeing more of the World now that we have the time and $$, I feel blessed! Before we met, My Wife had already travelled extensively--- travel was a passion in her family--- her brother has spent the last 30 years living and travelling in India and Asia--- her parents embarked on 2 world tours after retirement! I don't know if we'll be able to match this, but I'm sure my Wife has plans to try!
Out of the trips we've done so far, Vietnam and SE Asia was the least expensive and unsurprisingly, Eastern Europe the most expensive(excluding the USA$$$). S. America was very reasonable approx. $12kCDN (5 wks)-- not much more than Vietnam... My Wife is not a fan of tours, so we have always researched routes in detail--- my Wife planned all flights, accommodations and itineraries in advance, leaving wiggle room for changes when we arrived. All our adventures have been unbelievable experiences-- the things we've seen and done....I have to pinch myself!! We've been doing this for 6 years now, and because I get 6 weeks of vacation a year, all doable!
In the end, its the memories and experiences that make us who we are, and hopefully more compassionate and better global citizens! I don't take for granted, for one moment, how lucky we've been to be in a place or be in a position, to do the things we have!!
__________________
1998 SR5 3.4L V6 Auto... Pretty much bone stock...aside from the Tundra brakes, OME880 and OME906's in back all with Rancho 9000XL adjustable shocks ... "Livin' the dream in the Canadian Okanagan!"
Electronics/Telecommunications Engineering Technologist
|
|
|
Reply With Quote
|
|
12-19-2020, 08:00 PM
|
#138
|
 |
Senior Member
|
|
Join Date: Dec 2010
Location: Nelson, BC
Posts: 2,552
Real Name: Addison
|
|
|
Senior Member
Join Date: Dec 2010
Location: Nelson, BC
Posts: 2,552
Real Name: Addison
|
Quote:
Originally Posted by cblock406
Awesome build. I might not have commented before but I've enjoyed going through all of your build threads since I've been on the forum.
Can I ask what kind of spoiler you have? I've never seen an acrylic one (or whatever material that is) before, but I like it.
|
Thanks! Damn your truck is clean too. Love it.
The rear spoiler is a Toyota unit. That's all I know... Canada spec from 2000. Not sure if that helps you. lol I agree though, I like the dark tint/transparency of it.
Quote:
Originally Posted by SIKHILUXSURF
🤣 👋 brotha! Im still alive! I havent forgotten about you! My head has been in the clouds from this anticipating the Bronco order. Well we are pushed back another month till Jan 2021 on the build and order date. But once Im ready to part everything out the headlights can get on their way to you. I just need to build another set to go on the rig to replace them.
|
Tony! All good dude. Maybe we could work out a trade so it's easy for you? No rush. Stoked to see what you do with that Bronco!
Quote:
Originally Posted by Fishwerks
Glad you are posting on here again, great photos as always. Truck and the daily are looking good!
|
Cheers as always dude! Need to line up and wheel! (been saying this forever...)
Quote:
Originally Posted by Dezert4Runner
Do you have daytime photos showing how bright the VLed amber strip lights are? Im using one of the brightest amber 7440 leds I can find inside of my amber tinted corner markers, and they work great even in the daytime but Ive been thinking about adding another more forward facing turn signal on the front of my tube bumper or on the headlight filler plate, and a lot of the cheaper smaller aftermarket amber leds are not bright enough for daytime use IMO.
|
Hmmm I don't actually. I will make a point of grabbing some for you though. They are SUPER bright. I would highly recommend them.
|
|
|
Reply With Quote
|
|
12-19-2020, 08:51 PM
|
#139
|
|
Senior Member
|
|
Join Date: Dec 2010
Location: Nelson, BC
Posts: 2,552
Real Name: Addison
|
|
|
Senior Member
Join Date: Dec 2010
Location: Nelson, BC
Posts: 2,552
Real Name: Addison
|
**UPDATE**
Just picking up where I left off to catch this thread back up.
Rear Axle Seal Issues:
I've had some rear axel seal woes over the last year. The rear wheel bearings were done on the truck right before I bought it by a Toyota dealership but when I was in Utah I blew my 1st rear axle seal. We repaired it in Moab and about a month later it started leaking again. (same side) I replaced it one more time hoping that it was just a fluke, but sure enough it blew again. This time I measured where the retainer was and knew there was a poor installation when the wheel bearings were last done. I used to be a Toyota Parts Manager and I used to see these improperly installed by other shops ALL the time. Despite my truck having the rear bearings done by a Toyota dealership (not the one I worked at), I knew thatI was on borrowed time and it would soon leak again. So I put my 3rd seal in and ordered a 4th, along with all the associated bearing parts. Sure enough it leaked a 4th time, so I got one of the tech's at the dealership I used to work at help me after hours to replace the bearing. After pulling everything apart we found that the previous installer had even nicked my axle shaft and left a 1/4" cutoff disc gouge in it. Icing on the cake, I decided to replace the shaft while it was all apart. The tech who helped me get the bearing and retainer back on has done 100's of these and is a Toyota 4x4 enthusiast himself so we did the 'grease test" and ensure everything was perfect going back in.
Drove for a couple months and then the right rear axel seal blew. Replaced the seal twice, and then went through the same motions on the passenger side, eventually doing the bearing and retainer as well (it was also installed incorrectly - no gouged axle shaft this time though).
Been driving leak free for about 5 months now. Glad to have it sorted for now. If it happens again, I will start looking at full floaters or other axle options I think....
Headlights
Sometime last year I did a projector retrofit on the truck. I used to do this as a business when I was in University so I have done a LOT of retrofits. I went with the Morimoto Mini 5.0 D2S. I used to be kind of against these "thread in" projectors because the output quality was so much better with the OEM projectors. However, TRS and Morimoto have come a long ways and these new Mini d2S projectors are just so good right out of the box. I am running OEM Kioto ballasts (I had them professionally potted by an electronics manufacturing company to keep them moisture free) along with Osram CBI 5000K bulbs. They have been great so far and I still preach to people about how this is literally one of the best and most practical mods you can do - you use your headlights ALL the time.... way more than skid plates, sleeping platforms, and beadlock wheels ;)
I opted to keep them as OEM+ as I could, and kept them all chrome. Still have to think about wiring up the LED halos in the Apollo shrouds though..

IMG_2491.jpg by Addison Rickaby, on Flickr

_08I6786.jpg by Addison Rickaby, on Flickr
Interior & Electronics
Somewhere along the line I scooped up a used sPOD with the touchscreen. Install was a breeze and sure makes wiring quick and painless. Love all the adjustability and dimmability with each circuit. Only thing I hate is the terrible touch screen - it's not very touch sensitive (old style) and really wish it was a new capacitive screen. Oh well, for the price I paid for it, I'm willing to live with it. May switch out for a switch panel in the future but we'll see.
Also installed some Baja Design Squadrons in the bumper and a Sony XAV-AX100 headunit. So clean and it has a volume knob ;)

_08I6111.jpg by Addison Rickaby, on Flickr
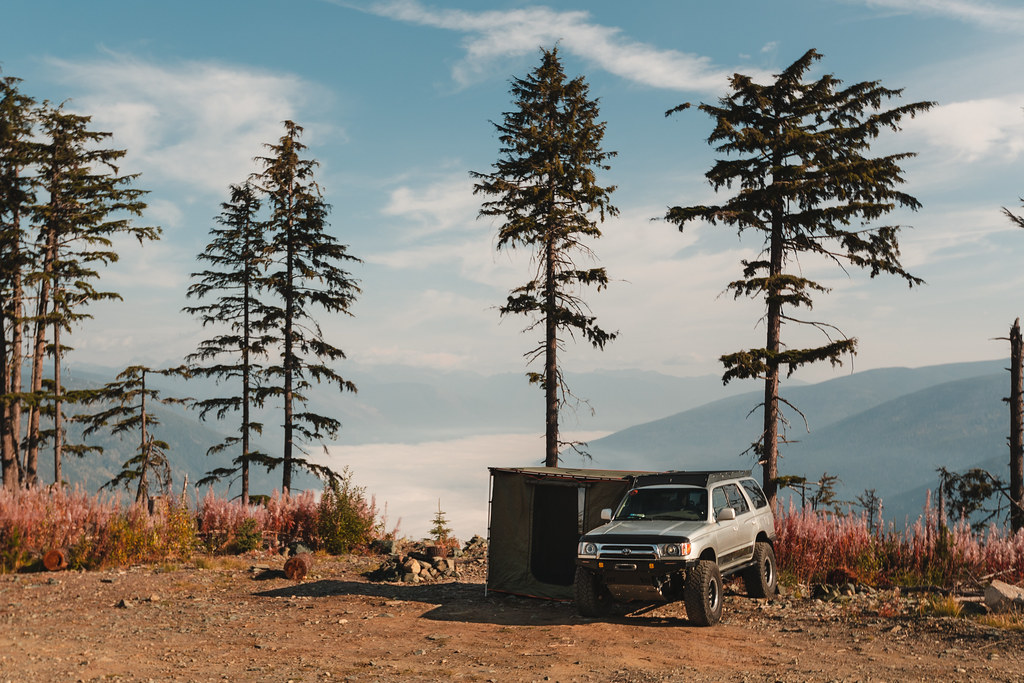
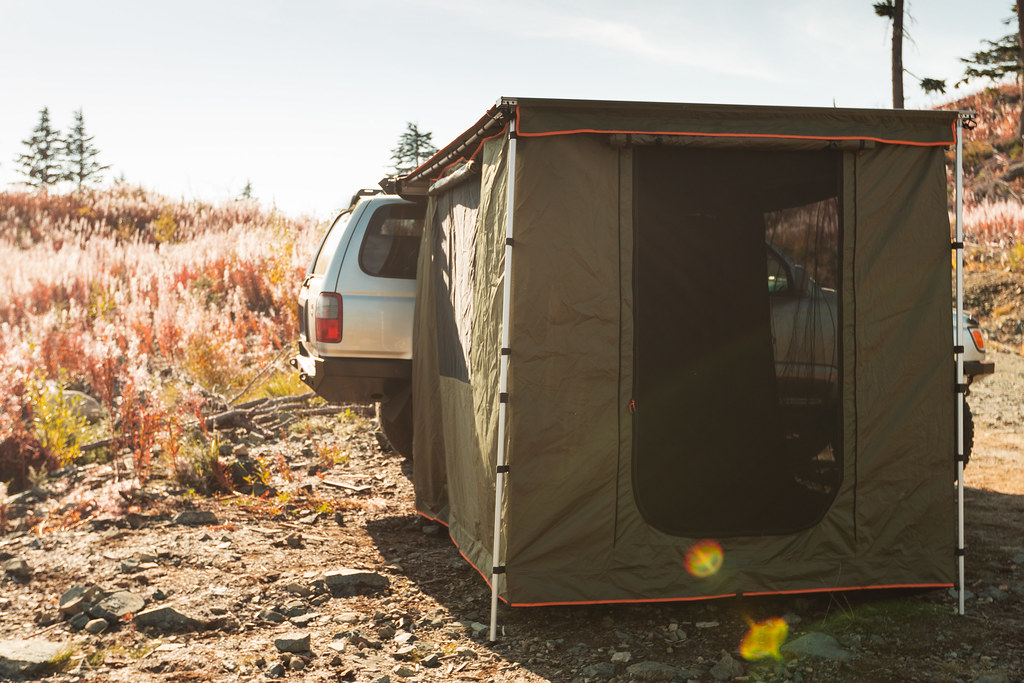
Camping Setup Improvements
I often camp solo. But on other trips I will be out there with my wife and daughter. This required an increase in sleeping space as the sleeping platform I made has been great for those solo trips, but not so much for the family outings (as designed). I reached out to ROAM Adventure Co and got one of their awnings and rooms. I used to have an ARB unit that is was very similar but I must say the metal hinges, rubberized floor, and cool color palette take this awning setup a notch above my old ARB stuff. Really happy with it so far and love having shade in just the awning form, but also the extra sleeping room with the family. Really makes the sleeping setups quite versatile and the best part is that I don't have to haul all that extra weight of the awning room, if I'm not using it (I just leave it at home). Also I love keeping the COG low vs. a big bulky rooftop tent.
Awning Link HERE.
_08I4796.jpg by Addison Rickaby, on Flickr
_08I4760.jpg by Addison Rickaby, on Flickr

_08I4785.jpg by Addison Rickaby, on Flickr

_08I4824.jpg by Addison Rickaby, on Flickr
Last edited by rickashay; 12-19-2020 at 09:13 PM.
|
|
|
Reply With Quote
|
|
12-22-2020, 07:33 PM
|
#140
|
 |
Member
|
|
Join Date: Nov 2013
Location: Nampa Idaho
Posts: 349
Real Name: Durwin
|
|
|
Member
Join Date: Nov 2013
Location: Nampa Idaho
Posts: 349
Real Name: Durwin
|
Quote:
Originally Posted by rickashay
**UPDATE**
Just picking up where I left off to catch this thread back up.
Headlights
Sometime last year I did a projector retrofit on the truck. I used to do this as a business when I was in University so I have done a LOT of retrofits. I went with the Morimoto Mini 5.0 D2S. I used to be kind of against these "thread in" projectors because the output quality was so much better with the OEM projectors. However, TRS and Morimoto have come a long ways and these new Mini d2S projectors are just so good right out of the box. I am running OEM Kioto ballasts (I had them professionally potted by an electronics manufacturing company to keep them moisture free) along with Osram CBI 5000K bulbs. They have been great so far and I still preach to people about how this is literally one of the best and most practical mods you can do - you use your headlights ALL the time.... way more than skid plates, sleeping platforms, and beadlock wheels ;)
I opted to keep them as OEM+ as I could, and kept them all chrome. Still have to think about wiring up the LED halos in the Apollo shrouds though..
IMG_2491.jpg by Addison Rickaby, on Flickr
_08I6786.jpg by Addison Rickaby, on Flickr
[/url] _08I4824.jpg by Addison Rickaby, on Flickr
|
Addison, I completely agree! I was initially intimidated by this mod. So I tried several 'high quality' bulbs, including some expensive LED replacements before performing this mod. And the Morimoto mini 5.0 D2S HID retro's from the TRS are such a big improvement to any and all of them. My only regret with the HID retro's is, I wish I would have skipped all the replacement bulbs and just did the retro first.
I used a video from another OG on here,
@ Speedy
as my tutorial and it made the project a breeze, even for a knuckle head like me....
Cheers and keep posting the amazing pics!
Durwin
__________________
99 2.7l 5spd ARB locked F & R, 5.29's, dual cases, Shrockworks front bumper w/ Warn M8000s, King 25001-151EXT coilovers, OME 861/LC shocks, Stubb's sliders, Shrockworks full skids, custom built rear bumper, Kenda Klever RT 35x10.5r17 on FN FX pro 17x8's, TBU
|
|
|
Reply With Quote
|
|
12-25-2020, 11:28 PM
|
#141
|
|
Senior Member
|
|
Join Date: Dec 2010
Location: Nelson, BC
Posts: 2,552
Real Name: Addison
|
|
|
Senior Member
Join Date: Dec 2010
Location: Nelson, BC
Posts: 2,552
Real Name: Addison
|
Quote:
Originally Posted by owyheerat
Addison, I completely agree! I was initially intimidated by this mod. So I tried several 'high quality' bulbs, including some expensive LED replacements before performing this mod. And the Morimoto mini 5.0 D2S HID retro's from the TRS are such a big improvement to any and all of them. My only regret with the HID retro's is, I wish I would have skipped all the replacement bulbs and just did the retro first.
I used a video from another OG on here,
@ Speedy
as my tutorial and it made the project a breeze, even for a knuckle head like me....
Cheers and keep posting the amazing pics!
Durwin |
Thanks Durwin and Merry Chirstmas!
|
|
|
Reply With Quote
|
|
01-02-2021, 11:27 AM
|
#142
|
 |
Member
|
|
Join Date: Jul 2016
Location: Connecticut
Posts: 431
Real Name: Alex
|
|
|
Member
Join Date: Jul 2016
Location: Connecticut
Posts: 431
Real Name: Alex
|
Quote:
Originally Posted by owyheerat
Addison, I completely agree! I was initially intimidated by this mod. So I tried several 'high quality' bulbs, including some expensive LED replacements before performing this mod. And the Morimoto mini 5.0 D2S HID retro's from the TRS are such a big improvement to any and all of them. My only regret with the HID retro's is, I wish I would have skipped all the replacement bulbs and just did the retro first.
I used a video from another OG on here,
@ Speedy
as my tutorial and it made the project a breeze, even for a knuckle head like me....
Cheers and keep posting the amazing pics!
Durwin |
My biggest apprehension with doing this mod is long term durability. It seems like most people have to regularly open the lights back up to repair them or reattach the projectors.
__________________
2000 SR5 3.4, Manual, 4x4
Icon 2.5 extended coilovers & 2.0 rear, JBA UCAs
265/75R16 General Grabber X3 on LC80s
Full Skid Plates
|
|
|
Reply With Quote
|
|
01-04-2021, 03:03 AM
|
#143
|
|
Senior Member
|
|
Join Date: Dec 2010
Location: Nelson, BC
Posts: 2,552
Real Name: Addison
|
|
|
Senior Member
Join Date: Dec 2010
Location: Nelson, BC
Posts: 2,552
Real Name: Addison
|
Quote:
Originally Posted by raKnizek
My biggest apprehension with doing this mod is long term durability. It seems like most people have to regularly open the lights back up to repair them or reattach the projectors.
|
I started a small retrofit business while I was in University back when retrofits were just starting to take off. (Literally helped fund my initial t4r build lol). I’ve retrofitted more than 100 headlights and never had a single set come back for a broken or unseated projector. In the last ~7-8 years I’ve had retrofits on my personal vehicles and wheeled/daily driven them all quite extensively.
I think a lot of people over complicate their retrofits and also don’t spend the $$$$ where it is most important. Buy colourful LED’s or spend the money on higher quality components? I know where my money will go every time.
Here’s my thoughts on achieving ultimate reliability in a projector retrofit setup using today’s common retrofitting components:
Ballasts: I have seen a lot of aftermarket ballasts fail. They are cheap and are usually covered under warranty when they fail, but still a PITA to trouble shoot and replace. My time is too valuable for that!
I’ve been running the same set of Denso ballasts for 4 years now (on two separate trucks), without issue. Pay the price for OEM parts and get OEM reliability where you can! Knowing the weak point of the OEM ballasts can be water intrusion, you can even have the ballasts potted by an electrical manufacturer to eliminate the issue (which I have done to mine).
Bulbs: Run Philips or Osram bulbs. They are OEM supplier of bulbs - again, OEM parts for OEM reliability.
Projectors: Morimoto Mini D2S. Years ago they were sub-par to the other OEM-replica projectors that were more difficult to install. The Mini D2S have come a LONG ways and are just too good right out of the box. Tons of value here. The trick to installing them for years of trouble free use (even when you rally gravel/logging roads a lot, like we do up here) is to buy the special socket that allows you to really snug them down when you thread them in. Once they are tight, most people just re-seal the lights and away they go. I like to JB weld the threaded section of the projector in place once I am certain everything is tight and installed properly. This ensures that the locking ring will never back off after years of vibration, causing the projector to slop around or rotate in the housing.
Housings: a very important component. OEM housings are way better than the TYC and DEPO. In my experience they have tighter tolerances on all the plastic components and must use higher quality components in the adjustment mechanisms as they are way less prone to cracking and failing. Even if you have a bad set of OEM 99+ lights - buy a set of TYC’s off RockAuto and swap the fresh lenses onto the old OEM housings, adjusters, and backing plates. The headlight housings were not designed to support the weight of a projector hanging off the reflector. So my logic is that using the higher quality plastic (OEM) components will not eliminate failure but will prolong the life of a retrofitted set of lights as long as possible.
There is my $.02. Now just don’t be like me and forget to connect the ground on the driver’s side ballast and wonder why you have been having intermittent driver’s headlight issues for the last 6 months ;)
Hope some of that helps!
Last edited by rickashay; 01-04-2021 at 03:08 AM.
|
|
|
Reply With Quote
|
|
01-06-2021, 09:43 AM
|
#144
|
|
Member
|
|
Join Date: Jul 2016
Location: Connecticut
Posts: 431
Real Name: Alex
|
|
|
Member
Join Date: Jul 2016
Location: Connecticut
Posts: 431
Real Name: Alex
|
This is very helpful! Thank you for the thorough response! I am certainly more convinced. If I do get there someday I would try to keep it as stock looking as I can.
__________________
2000 SR5 3.4, Manual, 4x4
Icon 2.5 extended coilovers & 2.0 rear, JBA UCAs
265/75R16 General Grabber X3 on LC80s
Full Skid Plates
|
|
|
Reply With Quote
|
|
01-10-2021, 02:34 AM
|
#145
|
|
Senior Member
|
|
Join Date: Dec 2010
Location: Nelson, BC
Posts: 2,552
Real Name: Addison
|
|
|
Senior Member
Join Date: Dec 2010
Location: Nelson, BC
Posts: 2,552
Real Name: Addison
|
Quote:
Originally Posted by raKnizek
This is very helpful! Thank you for the thorough response! I am certainly more convinced. If I do get there someday I would try to keep it as stock looking as I can.
|
No worries, glad I could help!
|
|
|
Reply With Quote
|
|
01-14-2021, 02:58 PM
|
#146
|
 |
Member
|
|
Join Date: Oct 2012
Location: SoCal
Posts: 404
|
|
|
Member
Join Date: Oct 2012
Location: SoCal
Posts: 404
|
Just to add on to what Addison already said about projector retrofits.....
I installed the Morimoto Mini H1 setup in oem 99+ housings about 8 years ago. They're been perfect this whole time. I only had to finally replace one of the bulbs within the past couple of months. Of course, I went with a "cheap" bulb (Xentec)) for the replacement, and it only lasted a few weeks. I should have spent the extra bucks on Morimoto replacement bulbs, as the first set lasted 8 years! lol
Addison, with the Mini D2S, did you have to enlarge the hole in the back of the housing to fit the threaded portion? I thought I had read that the threaded portion on the Mini D2S has a slightly larger diameter than on the Mini H1.
__________________
Build thread: The Trail Monkey
|
|
|
Reply With Quote
|
|
01-27-2021, 03:57 PM
|
#147
|
 |
Senior Member
|
|
Join Date: Jan 2012
Location: Southwest
Posts: 1,075
Real Name: Chris
|
|
|
Senior Member
Join Date: Jan 2012
Location: Southwest
Posts: 1,075
Real Name: Chris
|
Quote:
Originally Posted by rickashay
Cheers as always dude! Need to line up and wheel! (been saying this forever...)
|
No doubt! If you sneak into the states to Moab or something let me know.
Thanks for posting the info on retrofits too, that's getting higher on my to-do list so it's good to know what has worked long-term.
__________________
Fishwerks' Photo/Build Thread 2000 SR5 l White on White l 35s l Supercharged
--
2010 Trail Edition l Salsa Red Pearl l Stock
--
Instagram
|
|
|
Reply With Quote
|
|
01-27-2021, 08:06 PM
|
#148
|
|
Senior Member
|
|
Join Date: Dec 2010
Location: Nelson, BC
Posts: 2,552
Real Name: Addison
|
|
|
Senior Member
Join Date: Dec 2010
Location: Nelson, BC
Posts: 2,552
Real Name: Addison
|
Quote:
Originally Posted by nihkon
Just to add on to what Addison already said about projector retrofits.....
I installed the Morimoto Mini H1 setup in oem 99+ housings about 8 years ago. They're been perfect this whole time. I only had to finally replace one of the bulbs within the past couple of months. Of course, I went with a "cheap" bulb (Xentec)) for the replacement, and it only lasted a few weeks. I should have spent the extra bucks on Morimoto replacement bulbs, as the first set lasted 8 years! lol
Addison, with the Mini D2S, did you have to enlarge the hole in the back of the housing to fit the threaded portion? I thought I had read that the threaded portion on the Mini D2S has a slightly larger diameter than on the Mini H1.
|
Wow that's a great review about the long-term on these things. That's why you use OEM and quality parts in the first place! Great info, thanks for sharing.
I did not have to enlarge the holes. One thing I will say is that the actual threaded 'retainer' that threads onto the actual projector body is a slightly larger diamter than the ID that it is supposed to nest into on the back of the housings. I used my Dremel to remove maybe 1/8" so it would nest flush. But honestly I think you could just tighten it up as much as possible and then JB weld everything in place without even having to take that extra step that I did. This probably doesn't make sense until your actual doing this retrofit and have the parts infront of you. Lol
Quote:
Originally Posted by Fishwerks
No doubt! If you sneak into the states to Moab or something let me know.
Thanks for posting the info on retrofits too, that's getting higher on my to-do list so it's good to know what has worked long-term.
|
Totally! I'm planning a Wyoming trip as soon as the borders open again. I am sure I'll be trying to line up with
@ NateMob
and some of the Sherpa crew as well. Would be rad for you to join us too!
|
|
|
Reply With Quote
|
|
01-27-2021, 08:31 PM
|
#149
|
|
Senior Member
|
|
Join Date: Dec 2010
Location: Nelson, BC
Posts: 2,552
Real Name: Addison
|
|
|
Senior Member
Join Date: Dec 2010
Location: Nelson, BC
Posts: 2,552
Real Name: Addison
|
**UPDATE** - Magnaflow Overland Exhaust Install
https://www.youtube.com/watch?v=CBD9BOwE5qw&feature=youtu.be
First of all, hope you enjoy the video. I want to do more quick & dirty edits like this instead of just posting photos. It's nothing special but I think it's a good way to supplement information in the forum post.
I was lucky enough to get an early version of this kit direct from Connor at Magnaflow. My stock exhaust was getting crusty at 300,000kms and it was time to swap it out and upgrade at the same time. Definitely not a mod where I was hoping for a noticeable performance gain. I actually was hunting long and hard to find something mainly quiet, with minimal highway drone. I guess I would describe the exhaust note as 'tight' and 'mature' - certainly not obnoxious or loud.
Fitment was OEM or better. I was previously a Toyota Parts Manager and this felt better than an OEM system and fit beautifully. Welds and quality of construction are amazing. The ability to 'tune' the sound is limited, but you can install the extra 'NPT' resonator (like I did) or if you want more of an aggressive sound, you can install the system without. I will say that the exhaust is slightly louder in person than it appears in the video.
My Cliff Notes on the system:
- Fit and finish are superb (installed in less than 45 mins with the help of a die grinder to cut out the old studs/system)
- The least amount of drone I've ever heard/ran in a 'performance exhaust' system at highway speeds
- tail is pre bent/tucked so it's not low hanging fruit on the trail
- entire system is tucked up higher than OEM to help with the whole 'flat belly' principle
- A little noticeable drone from 1000-2000 RPM (a low RPM hum... sounds good)
- 2000-2500 RPM on the highway it's virtually silent
- Closer to 3500RPM is where it is probably the loudest (it's a great tone here)
- Overall very very happy with the product
I should note that I did not pay full retail for this. But I want people to know that I actually reached out to Magnaflow as the entire concept of the system was intriguing to me (not vise-versa). If I had bad words, I would say them, but I truly think they executed well on their objectives for the design. Also cool to see an old forum member actually led the design on this, so props to the T4R community once again.

_08I7016.jpg by Addison Rickaby, on Flickr

_08I7036.jpg by Addison Rickaby, on Flickr
Tucked up nice!
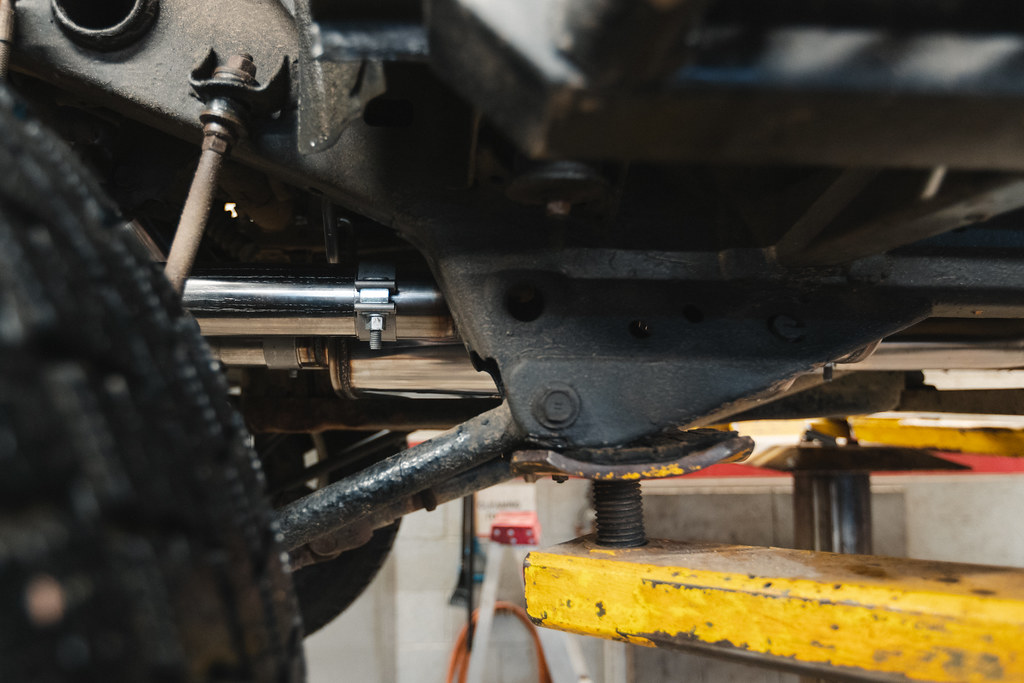
_08I7043.jpg by Addison Rickaby, on Flickr
Exit below the Eimkeith bumper

_08I7333.jpg by Addison Rickaby, on Flickr
Last edited by rickashay; 01-27-2021 at 08:37 PM.
|
|
|
Reply With Quote
|
|
02-11-2021, 12:35 AM
|
#150
|
|
Senior Member
|
|
Join Date: Dec 2010
Location: Nelson, BC
Posts: 2,552
Real Name: Addison
|
|
|
Senior Member
Join Date: Dec 2010
Location: Nelson, BC
Posts: 2,552
Real Name: Addison
|
**UPDATE** - Shifter Leak & Clutch Pedal Bushings
Going to start putting more mods AND repairs in there. As these things get older, they seem to get more needy. But that's ok because 3rd Gen's rule.
I had a leak that was dripping onto my belly pan. I could see what looked like gear oil running down the side of the trans between the T-Case and the Trans. At first I though it was the seal between the two units but I called my good friend (Ex - Toyota Master Tech) and he told me to check the metal gasket at the shifter. Knowing I did Marlin shifter bushings about 8 months ago and it wasn't leaking then, I was honestly in doubt, but thought before I dig too deep and make a rash decision, I should check. Low and behold, I pulled the shifter trim and shifter boot off and this is what I found. (I re-used the metal gasket when I did the shifter bushings)
Harder to see than I remember - but rearward of the shifter you can see the dark oil stain from the leak.

_08I6737.jpg by Addison Rickaby, on Flickr
Pulled the shifter and cleaned off the base in prep for some RTV.

_08I6739.jpg by Addison Rickaby, on Flickr
RTV'd this face as well as both faces of the black metal "plate" pictured above.

_08I6750.jpg by Addison Rickaby, on Flickr
Then I re-assembled - wish I had some brake cleaner to clean the oil residue but I was out!
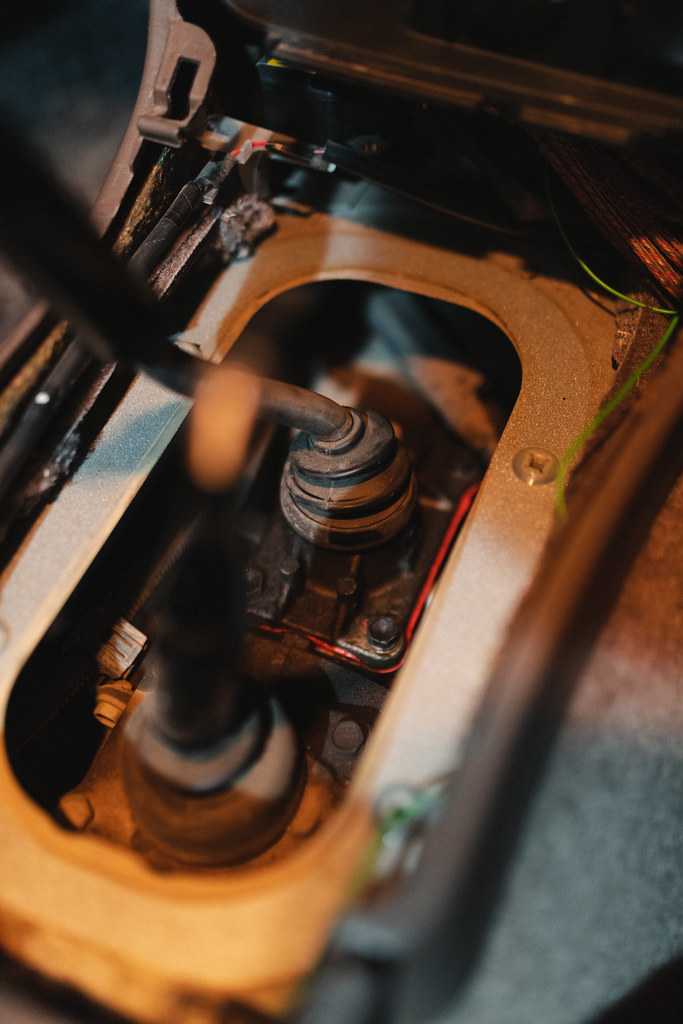
_08I6752.jpg by Addison Rickaby, on Flickr
Been about 7 weeks now and the oil leak has stopped. Good news!
Next up was the shifter bushings in my clutch pedal. As you can hear in my Magnaflow exhaust video, I had a prominent squeak on clutch depress. I had read all the horror stories of a squeaky clutch pedal being left too long causing the actually clutch pedal retain to wear and eventually require you to buy a new pedal with all the bushings. It appears Toyota never really did "fix" this issue and a lot of people have attempted fixes on the forums - using a brake spring instead, different bushing material (rubber types, brass, and even 3D print). However, I just think this is going to become a frequent maintenance item for me. Once it squeaks - remove the pedal assembly, pay the ~$100 for new parts, and put it back together. I bought everything including a new OEM spring, even though mine wasn't showing any wear.
I used this thread for reference (some Part #'s in here too):
5-speed clutch pedal sticks on floor in morning (three days in a row)
First off, I highly recommend removing the whole pedal assembly. I tried to do this job while it was in the truck and ended up tweaking my neck pretty bad. hahah (I guess I'm getting old?). Should have just unbolted it in the first place and I would have been done in 1/4 the time.
Checking the old parts as they come out - Pedal assembly pivot bushings actually in decent shape.
_08I7902.jpg by Addison Rickaby, on Flickr
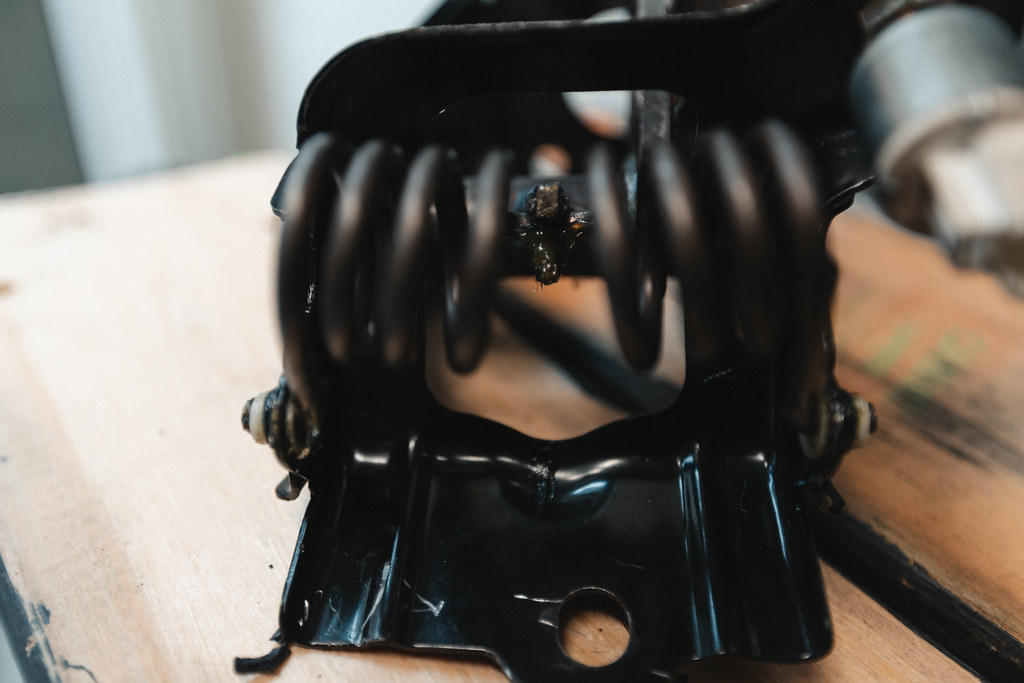
Here you can see the black clutch spring bushing was cracked and starting to deteriorate. Spring retainer bushings exploded when I tried to remove them (white bushings). Can also see that my clutch spring wasn't worn in the metal like some are when they do this job.

_08I7899.jpg by Addison Rickaby, on Flickr
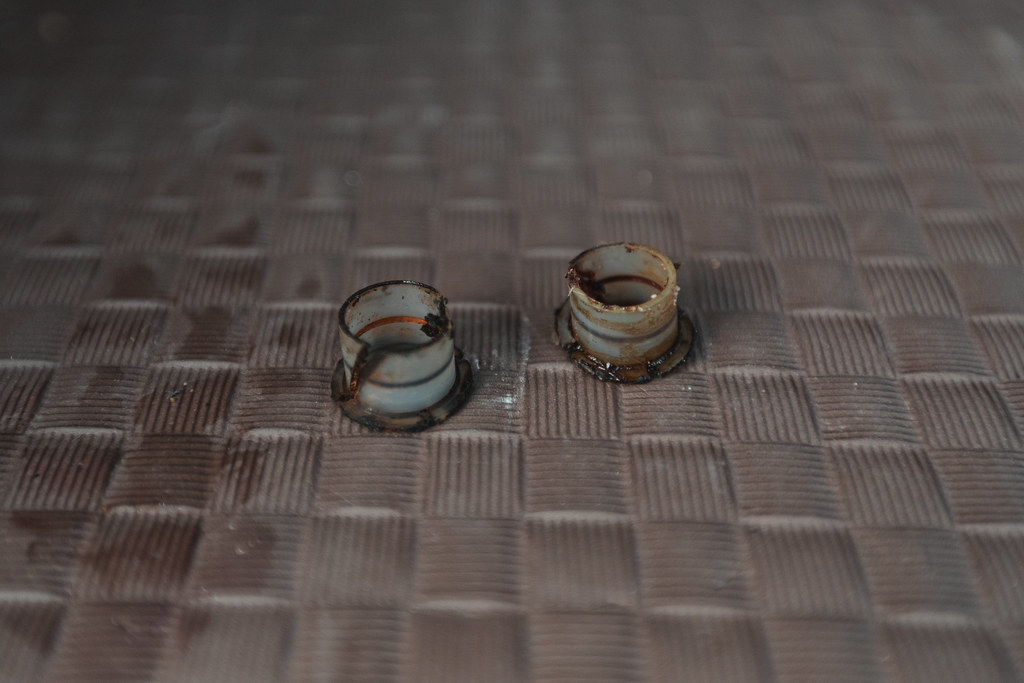
Here you can see the groove where the black clutch spring bushing sits. on the pedal assembly. Luckily for me, the metal shape has not been eroded at all and therefore the new bushing will fit in there as it should, upon replacement. A keen eye can also see the Toyota parts sticker on the side of the assembly. This makes me think that the previous owner had it done at the dealer early in the trucks life under warranty when Toyota "updated" the design. I have every receipt for this truck since it was brand new, and there is no invoice for this item, so that's why I'm thinking it was a dealer/warranty fix. My truck has ~305,000kms (~190k miles) of mainly highway driving its whole life. Surprised it's held up so long.

_08I8488.jpg by Addison Rickaby, on Flickr
I installed all the new parts on my work bench. Before I did that though, I greased everything heavily in Moly grease. I know it works good for these plastic-type bushings, so I thought why not? Put it back in the truck and it's been absolutely silent in operation for the last few weeks. So happy to have that annoying squeak gone!
_08I8763.jpg by Addison Rickaby, on Flickr
|
|
|
Reply With Quote
|
 Posting Rules
|
You may not post new threads
You may not post replies
You may not post attachments
You may not edit your posts
HTML code is On
|
|
|
|


 Linear Mode


