05-30-2019, 06:32 PM
|
#31
|
 |
Member
|
|
Join Date: Nov 2013
Location: Nampa Idaho
Posts: 349
Real Name: Durwin
|
|
|
Member
Join Date: Nov 2013
Location: Nampa Idaho
Posts: 349
Real Name: Durwin
|
Quote:
Originally Posted by turbodb

Thanks! Glad you're enjoying. I've had a fun time writing up everything with the Tacoma, and the 4Runner is shaping up to be a lot of fun as well, so it's nice that you're enjoying it.
As far as finishing the platform - I considered some poly or enamel, but decided against it because the point of this thing isn't some piece of fine furniture that needs to last in pristine condition for generations. I expect that it will get banged up from gear going in/out, and might need to be tweaked over time as we use it and see what works well and what can be improved. So for now at least, it stays raw.
|
That makes sense. I assumed you had thought it through, and was mostly just curious what you decided. If you do ever decide to put a finish on the 'final revision', I would highly recommend a tintable bedliner. I built a sleeping / storage platform for my 4runner 2 years ago and also used baltic birch ply, and finished it will a tinted bedliner that matches (fairly well) the interior plastics. It has held up remarkably well and is a breeze to clean. I always travel with my golden retriever and he has not put a scratch in it. If interested I can try and post a pic.
Either way, great job.
Durwin
__________________
99 2.7l 5spd ARB locked F & R, 5.29's, dual cases, Shrockworks front bumper w/ Warn M8000s, King 25001-151EXT coilovers, OME 861/LC shocks, Stubb's sliders, Shrockworks full skids, custom built rear bumper, Kenda Klever RT 35x10.5r17 on FN FX pro 17x8's, TBU
|

|
 Reply With Quote Reply With Quote
|
|
05-30-2019, 11:21 PM
|
#32
|
 |
Member
|
|
Join Date: Jul 2017
Location: PNW
Posts: 58
|
|
|
Member
Join Date: Jul 2017
Location: PNW
Posts: 58
|
Quote:
Originally Posted by owyheerat
That makes sense. I assumed you had thought it through, and was mostly just curious what you decided. If you do ever decide to put a finish on the 'final revision', I would highly recommend a tintable bedliner. I built a sleeping / storage platform for my 4runner 2 years ago and also used baltic birch ply, and finished it will a tinted bedliner that matches (fairly well) the interior plastics. It has held up remarkably well and is a breeze to clean. I always travel with my golden retriever and he has not put a scratch in it. If interested I can try and post a pic.
Either way, great job.
Durwin
|
That's a great idea if I ever do decide to paint it (or a future revision), thanks! 
|
|
|
Reply With Quote
|
|
05-31-2019, 04:51 PM
|
#33
|
 |
Member
|
|
Join Date: Jun 2018
Location: Northern NM
Age: 26
Posts: 214
|
|
|
Member
Join Date: Jun 2018
Location: Northern NM
Age: 26
Posts: 214
|
So...
When are you gonna turbo it?
__________________
2000 SR5 - Build Thread
|
|
|
Reply With Quote
|
|
06-02-2019, 01:16 AM
|
#34
|
|
Member
|
|
Join Date: Jul 2017
Location: PNW
Posts: 58
|
|
|
Member
Join Date: Jul 2017
Location: PNW
Posts: 58
|
Quote:
Originally Posted by Quantumkiwi
So...
When are you gonna turbo it?
|
No plans for that! Want to keep this one relatively stock.
|
|
|
Reply With Quote
|
|
09-03-2019, 04:17 PM
|
#35
|
|
Member
|
|
Join Date: Jul 2017
Location: PNW
Posts: 58
|
|
|
Member
Join Date: Jul 2017
Location: PNW
Posts: 58
|
Frogs, Snakes, and Axle Seals
July 31 - Aug 1, 2019.
We hadn't been back from our adventure on the Idaho Backcountry Discovery Route (IDBDR) long when we decided that we should really get out with the child. After all, we had this nice 4Runner for her to sleep in and the last time we'd gone had been - to our surprise - the " best day of [her] life," according to her.
Hoping to best our previous success, we figured that this time, we'd pair the camping with a nice restaurant for dinner and some pick-your-own peaches the following day. Oh, no naive we were to think that we could possibly influence the whims of a child.
We headed out just before noon on a Wednesday, sure that upon our arrival, we'd get our favorite spot - now safer due to one less dead tree looming over the site. But as we flexed out the 4Runner a bit and pulled in to the site, we discovered another family with the same idea we had... and they'd arrived about 3 minutes before us. Tarnations!
The parents disappointed, but @mini.turbodb ecstatic - since she thinks the backup site is far cooler than the favorite spot - we headed over to the backup site. It was - as we've always found it to be - available, and we proceeded to setup camp.
Much playing ensued. Mostly it consisted of me skipping rocks, @mrs.turbodb enjoying her book next to the river, and @mini.turbodb doing everything she could to get as dirty and wet in the creek as possible. Eventually, I was even able to convince her to actually swim 10' across the creek in one of the deeper swimming holes - the water level much lower, and safer, than the last time we'd visited.
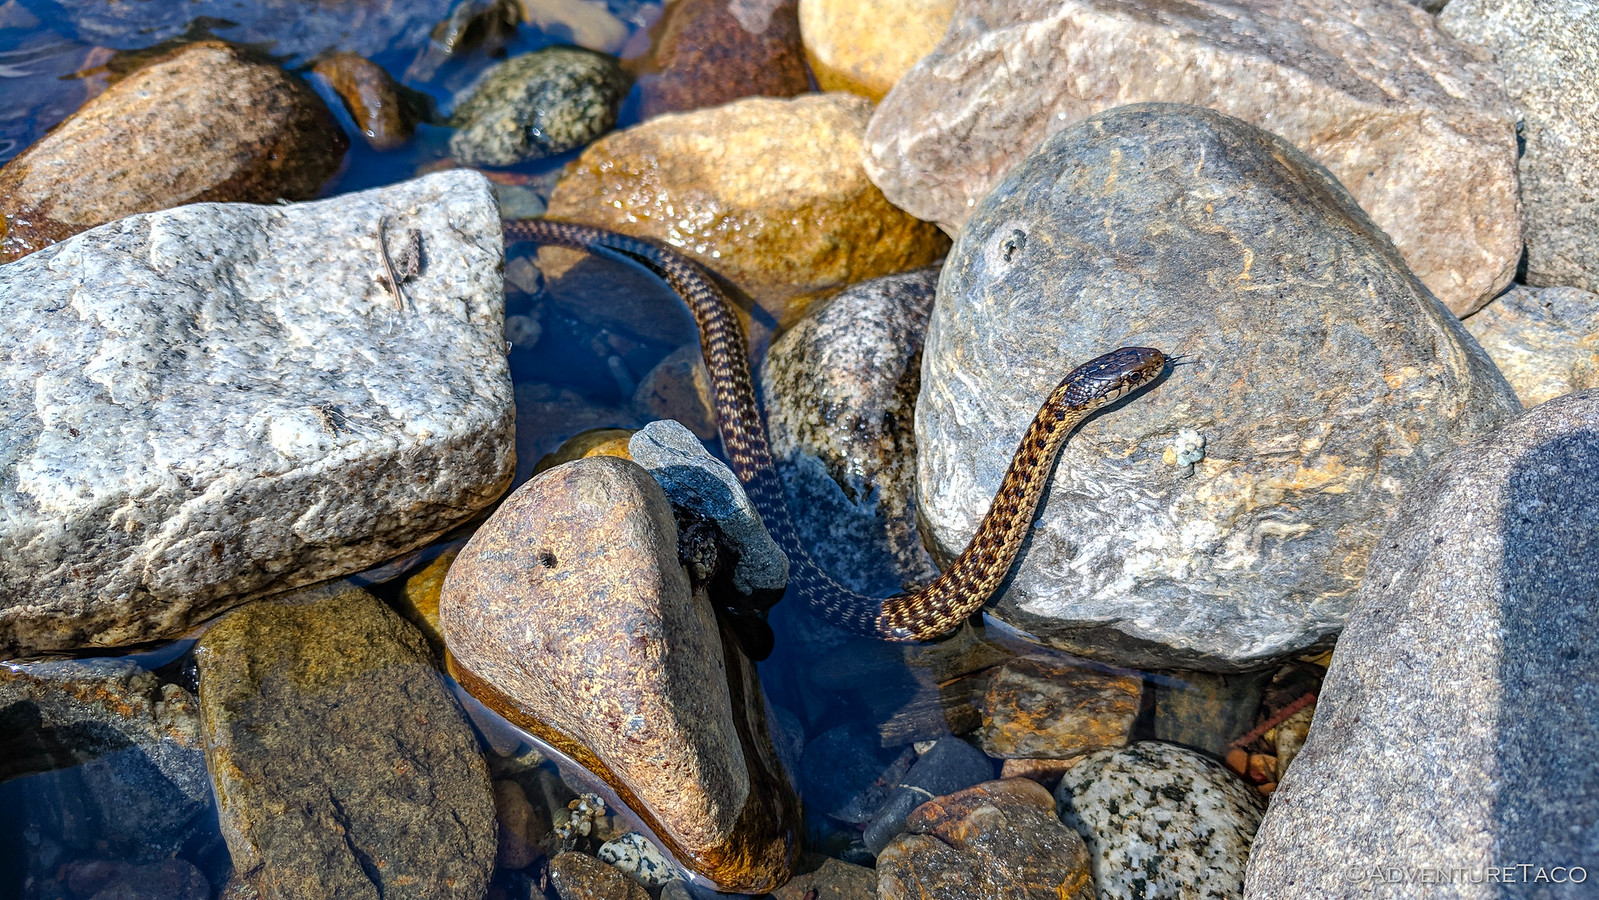
One of the things I really enjoy about @mini.turbodb is that she's much more comfortable with and doing traditionally non-girl things that other kids I've been around. So, when we were playing on the rocks and I noticed a snake, she piped right up with, "Oh, I saw one of those earlier. It was brown with diamonds on it's back." The fact that it didn't even phase her - she'd not mentioned it at all when she'd seen it, is pretty great in my opinion. And of course, now that I'd found noticed one, we were definitely going to catch it.
:yes:
I proceeded to fish it out of the rocks and water, and immediately there was a request for a transfer. Or at least the opportunity to pet. Because... of course.
Eventually, it was time for dinner - so we headed into town and had one of the best dinners we've eaten at one of our favorite restaurants. It's a reasonably fancy buffet-style joint, and over the years we've gotten to know the chef and staff - to the point where we are on a first-name basis, and can request certain items be available on the nights we're there.
Their specialty is steak, and @mini.turbodb and I were elated to come up with a new - and we think best - way of evaluating a trip to the buffet: You've made a good decision of what to put on your plate if you've maximized your steak intake. 
Everyone full, it was back to camp with us - still light, but way after bedtime - and into our respective floors of the 4Runner.
We awoke the next morning to no real plans, and a breakfast of champions - cookies we'd packed into a to-go box at the dinner buffet the night before. Generally, this is frowned upon by @mrs.turbodb, but with cookies is a little more OK, and this morning she was happy to partake.
It was once again a beautiful day down at the creek. Well, it was beautiful all over, but we only ever went down by the creek.
More water play ensued, @mini.turbodb finding a route across the river she'd never known was accessible to her, and we explored further upstream. Through various pools, some of us throwing big splashy rocks just at the other's feet :anonymous:, skipping stones across the glass-like surface of side pools, and having an all-around great time.
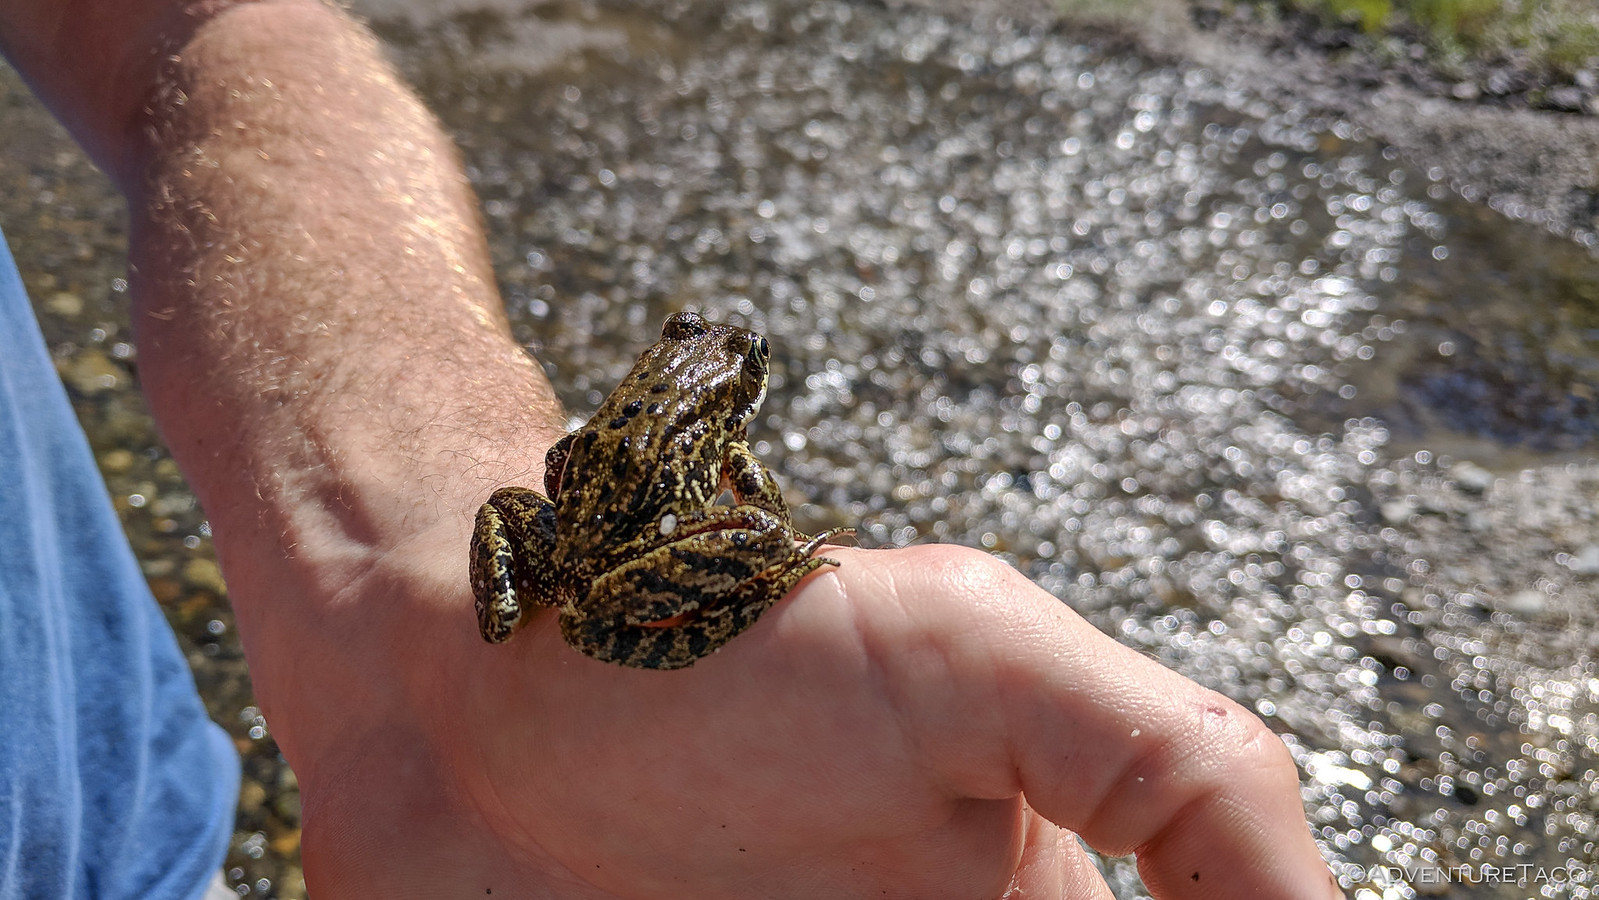
Then, as we were headed back, the ground seemed to move beneath my foot. Or rather, just before my foot hit the ground. Or rather, a small frog jumped.
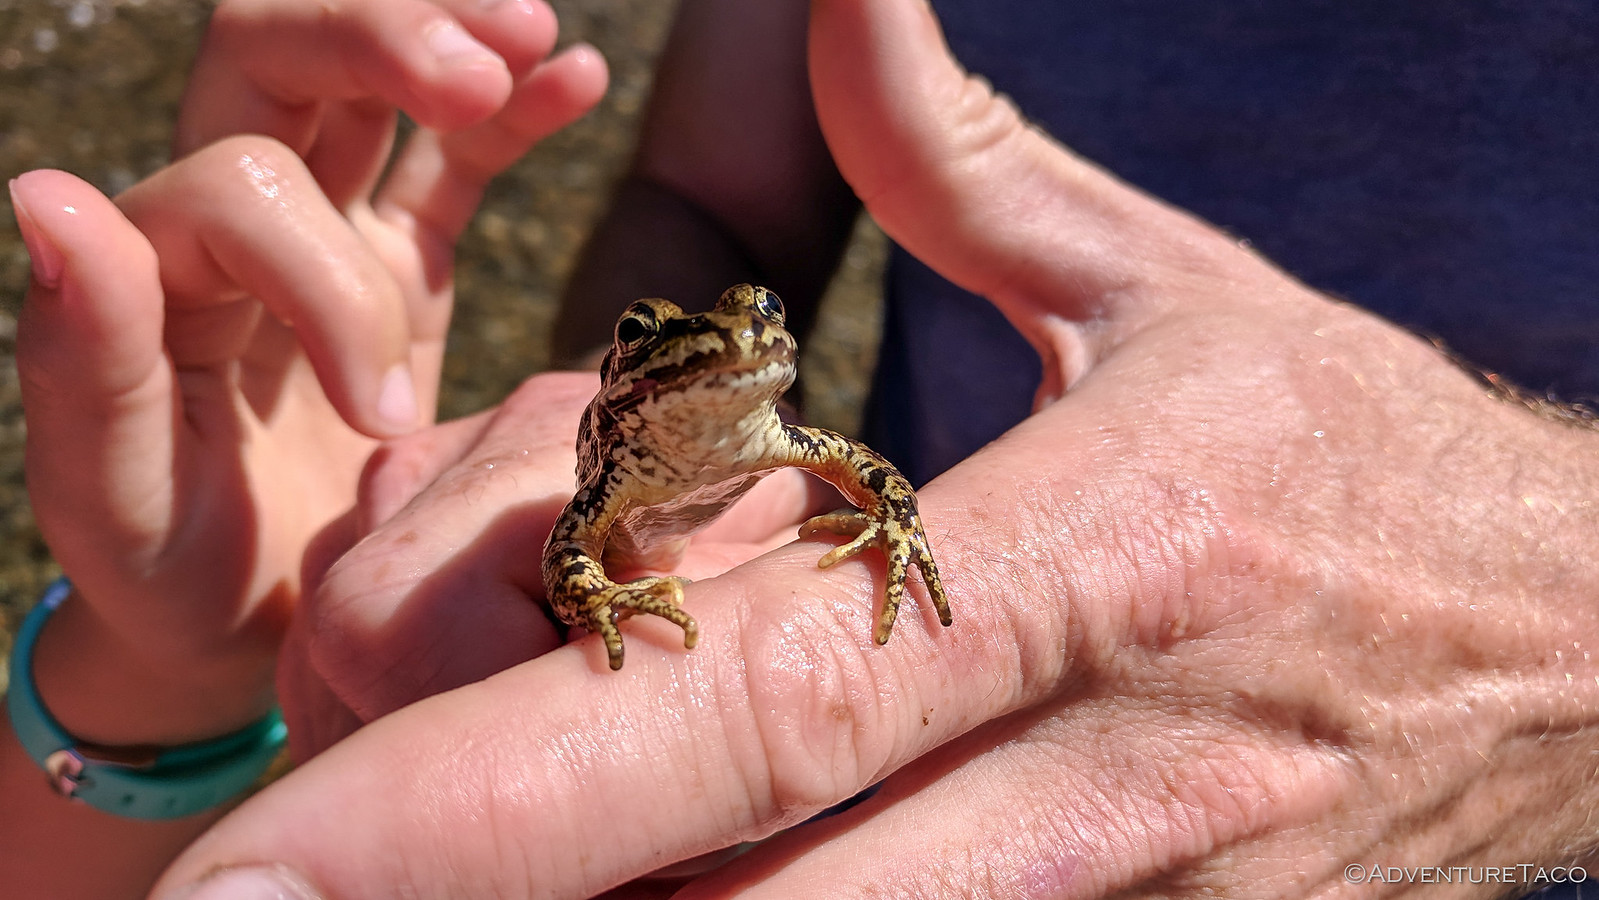
As usual, no small wild animal is safe around me, and it was soon scooped up and a call went out to the child. We'd found lunch!
Once again, she was keen to get her hands all over this little guy, so the transfer was made - even if it would only be momentary - and she was thrilled.
Just as had been the case the day before, we eventually had to call it quits. @mini.turbodb had lost our only lunch to the creek, and if I'm being totally honest, it probably wouldn't have been enough to feed the three of us anyway. Plus, @mrs.turbodb had informed us that - under no uncertain terms - we were going to u-pick peaches, where she planned to spend hours selecting as many peaches as she wanted for $0.69 per pound.
Oh, twist our arms why don't you?!  After 20 minutes, we went home with 43 lbs of peaches.
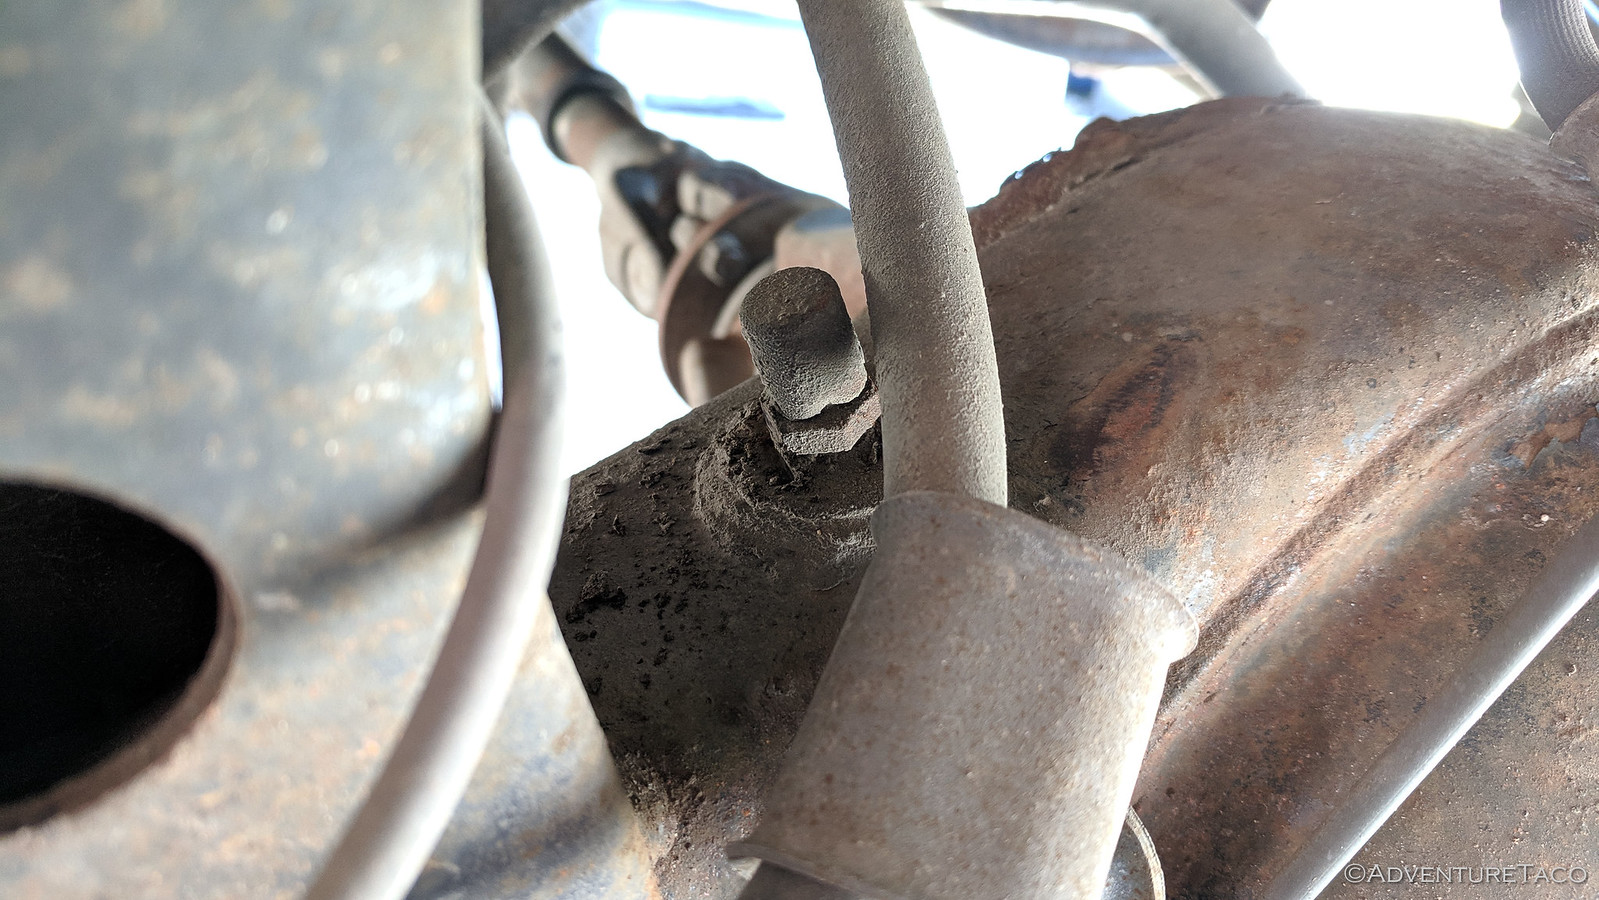
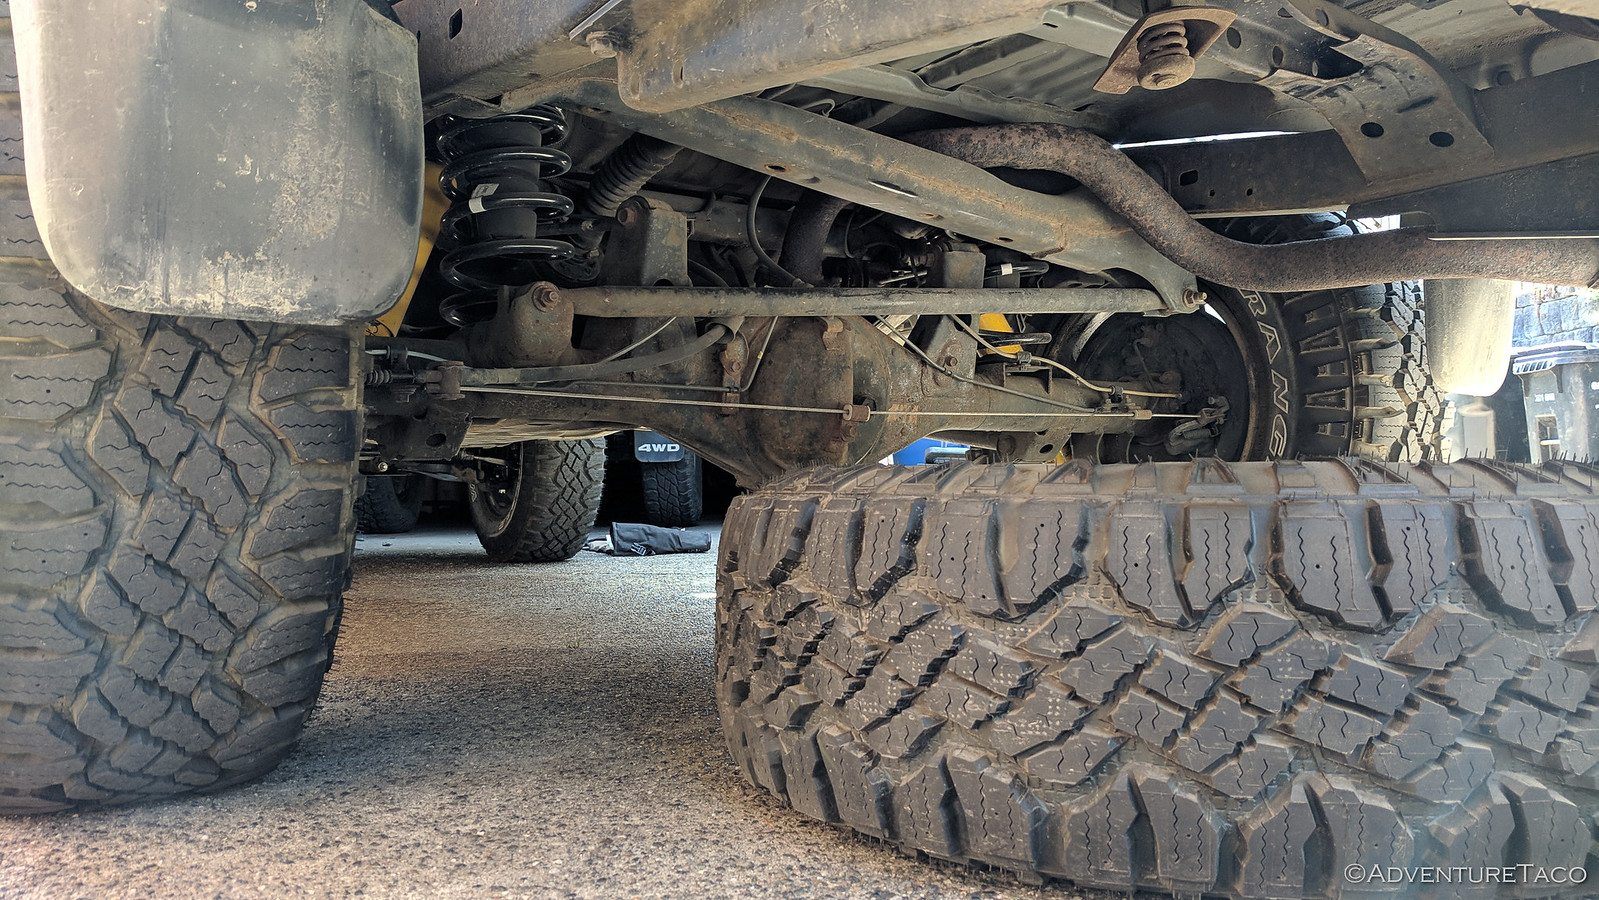
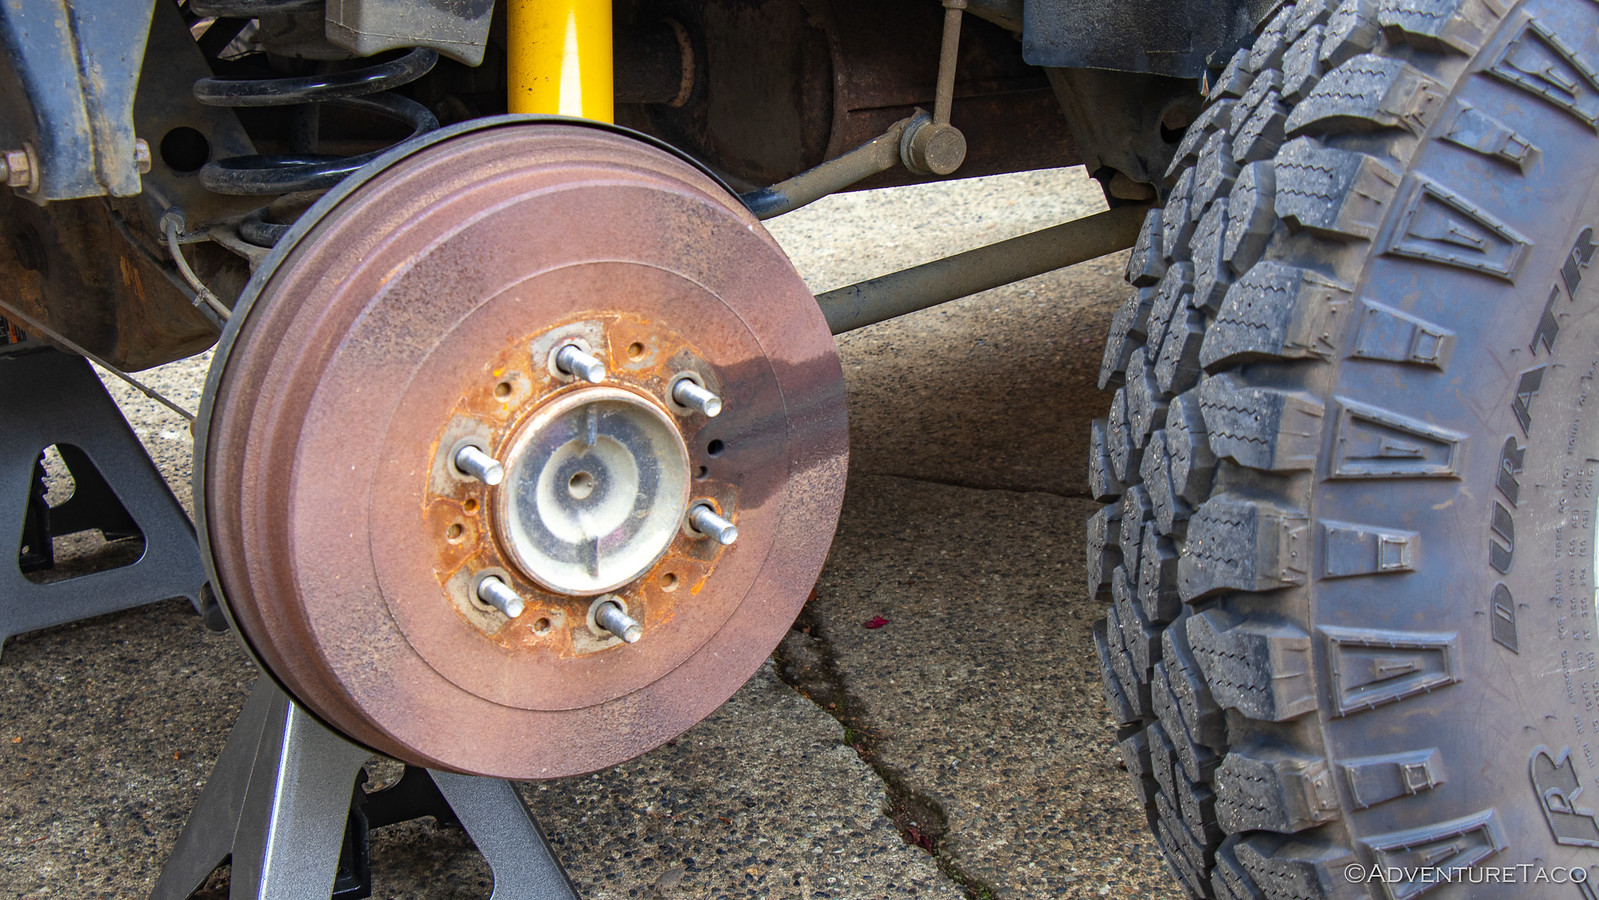
It had been a good trip - or should I say great trip - to this point. Everyone was happy, though we hadn't heard anything about "best life day" or anything like that. However, upon arriving home, I noticed a disturbing sight decorating the rear wheel wells of the 4Runner - wet streaks.
Visible on both sides, there's only one thing this can really be - and it's easily verified by a quick look at the brake drums: both rear axle seals on the 4Runner are leaking. :annoyed_gaah: Guess there's some work on the 4Runner in my future!
|
|
|
Reply With Quote
|
|
09-04-2019, 10:32 AM
|
#36
|
|
Member
|
|
Join Date: Nov 2013
Location: Nampa Idaho
Posts: 349
Real Name: Durwin
|
|
|
Member
Join Date: Nov 2013
Location: Nampa Idaho
Posts: 349
Real Name: Durwin
|
Turbo, what a great way to spend a couple of days. Looks like fun.
Sorry to hear about your rear axle seals giving out. I'm sure you will have them replaced and have the 4runner back on the road / trail soon.
Thanks for taking the time to share your adventures.
Durwin
__________________
99 2.7l 5spd ARB locked F & R, 5.29's, dual cases, Shrockworks front bumper w/ Warn M8000s, King 25001-151EXT coilovers, OME 861/LC shocks, Stubb's sliders, Shrockworks full skids, custom built rear bumper, Kenda Klever RT 35x10.5r17 on FN FX pro 17x8's, TBU
|
|
|
Reply With Quote
|
|
09-04-2019, 01:19 PM
|
#37
|
|
Member
|
|
Join Date: Jul 2017
Location: PNW
Posts: 58
|
|
|
Member
Join Date: Jul 2017
Location: PNW
Posts: 58
|
Quote:
Originally Posted by owyheerat
Turbo, what a great way to spend a couple of days. Looks like fun.
Sorry to hear about your rear axle seals giving out. I'm sure you will have them replaced and have the 4runner back on the road / trail soon.
Thanks for taking the time to share your adventures.
Durwin
|
Thanks man. I've got it patched up already, and it wasn't too bad once I got the right tools.
Will get that written up (hopefully soon here) so others can benefit as well!
|
|
|
Reply With Quote
|
|
09-04-2019, 01:41 PM
|
#38
|
|
Member
|
|
Join Date: Jul 2017
Location: PNW
Posts: 58
|
|
|
Member
Join Date: Jul 2017
Location: PNW
Posts: 58
|
I'm Too Late! - Rear Diff Breather Mod on 3rd Gen 4Runner
August 7, 2019.
I have a confession to make: I procrastinated this job and it may have cost me.
So let's back up for a moment. See, this was a mod that I knew I needed to do to the 4Runner as soon as I got it. Toyota has conveniently placed the rear diff breather right on top of the rear diff - pretty much as low as it can go. All well and good except that it's not at all well and good. In that position, not only can the breather can suck water into the diff when submerged in deep water, it can also get clogged up by road grime.
This latter issue isn't one that you generally hear of when it comes to relocating the breather, but it's the one that can cost you hundreds - or thousands - of dollars if it happens. Because when it does, and the diff heats up - expanding the air and oil inside - the air and oil have nowhere to go... and so they force their way out the easiest path possible - generally your rear axle seals.
And then you get a nice ring of gear oil in your wheel wells. And the opportunity to replace your axle seals, wheel bearings, and rear brake shoes. Oh, and you get to purchase a bunch of special tools, if you decide to do it yourself.
But now we're getting into another story for another post. This time, we're just going to do the diff breather relocation...so this never happens again. Oh, the trouble I could have saved myself doing this one week earlier!
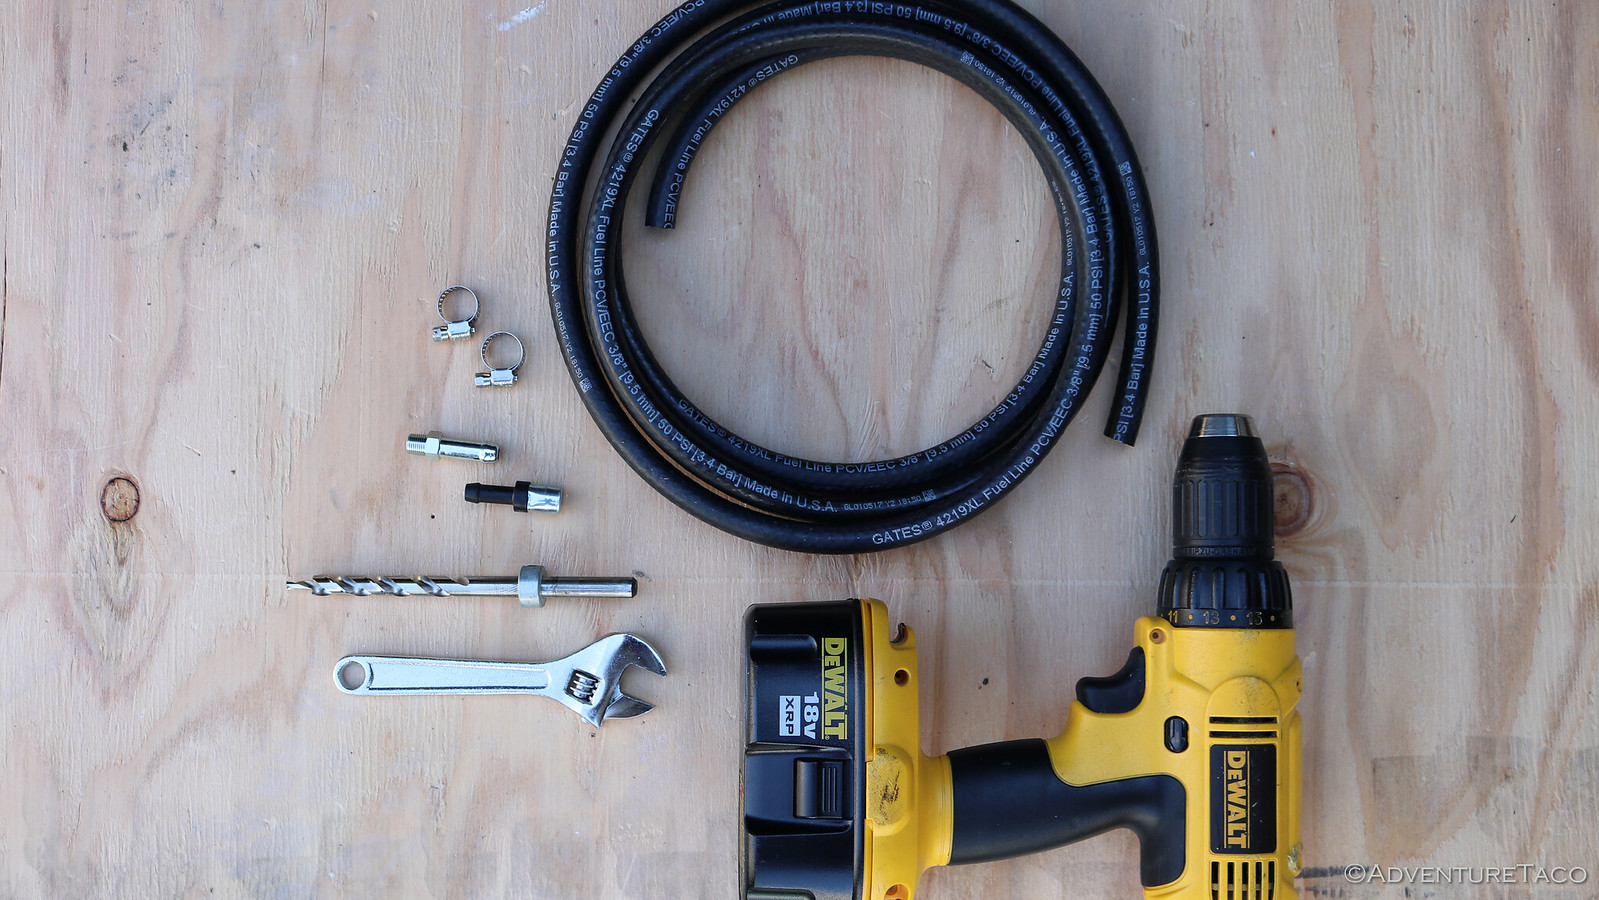
The mod is pretty simple: add an extension to the breather to move it up out of the reach of any water crossing and road grime. The hardest step is finding the right parts to do the mod. Luckily, others have gone before, and the parts have been well identified. They work for all generations of 4Runners, and all generations of Tacomas. And probably a lot more Toyotas to boot. - 90930-03136 Plug Breather
- 90404-51319 Union
You'll also need a few other odds and ends, and tools: - Two stainless steel hose clamps
- A length of 3/8th inch fuel line (8' is plenty, I used exactly 5' to get to the fuel door location)
- Slot screwdriver
- Drill (if you're going to drill a hole for the relocated breather)
- Adjustable wrench
- A few zip ties
Once you've gathered everything, the process is reasonably straight forward, though slightly less so on the 4Runner than the 1st gen Tacoma - only because the fuel filler gasket is a rubber material instead of hard plastic. - Drop the spare, to get a bit more room to work under the truck. Then jack up the rear using the hitch receiver.
- Clean around the OEM breather (so nothing falls in your diff as you make the swap, and then remove the OEM breather, prep the Union by optionally wrapping it with a bit of Teflon tape, and install it.
- Attach the fuel line to the Union with a hose clamp and run the other end to the location you'll install the new Plug Breather. Zip tie it as you go, and don't forget to allow for rear axle droop (leave some slack). Note: If you've lifted the truck off the rear wheels in step 1, you've already accounted for axle droop.
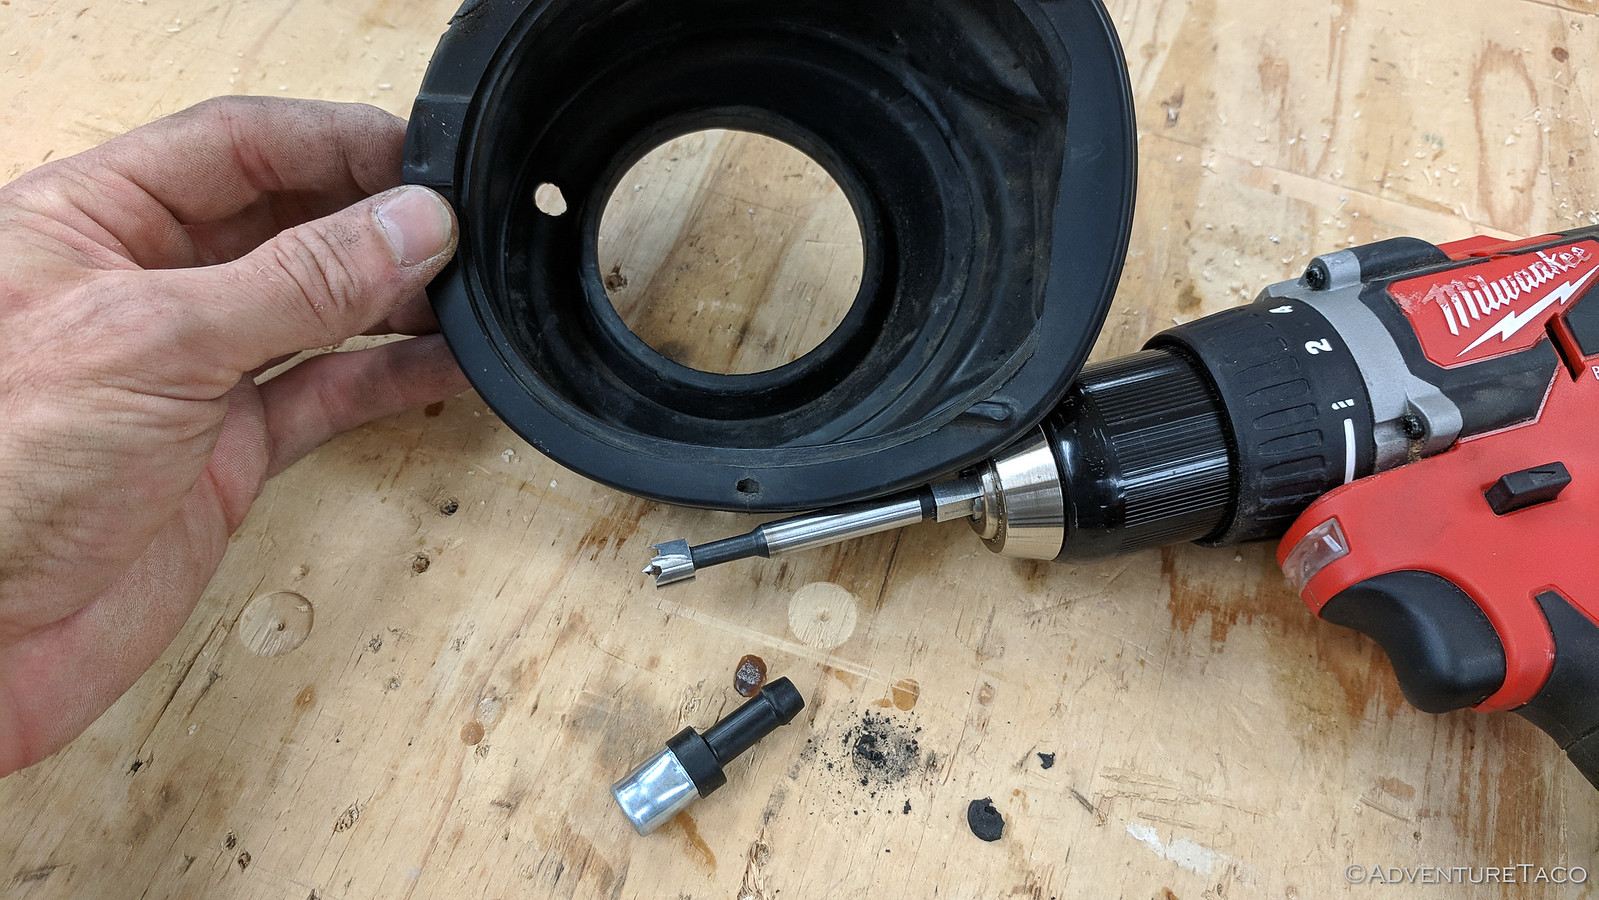
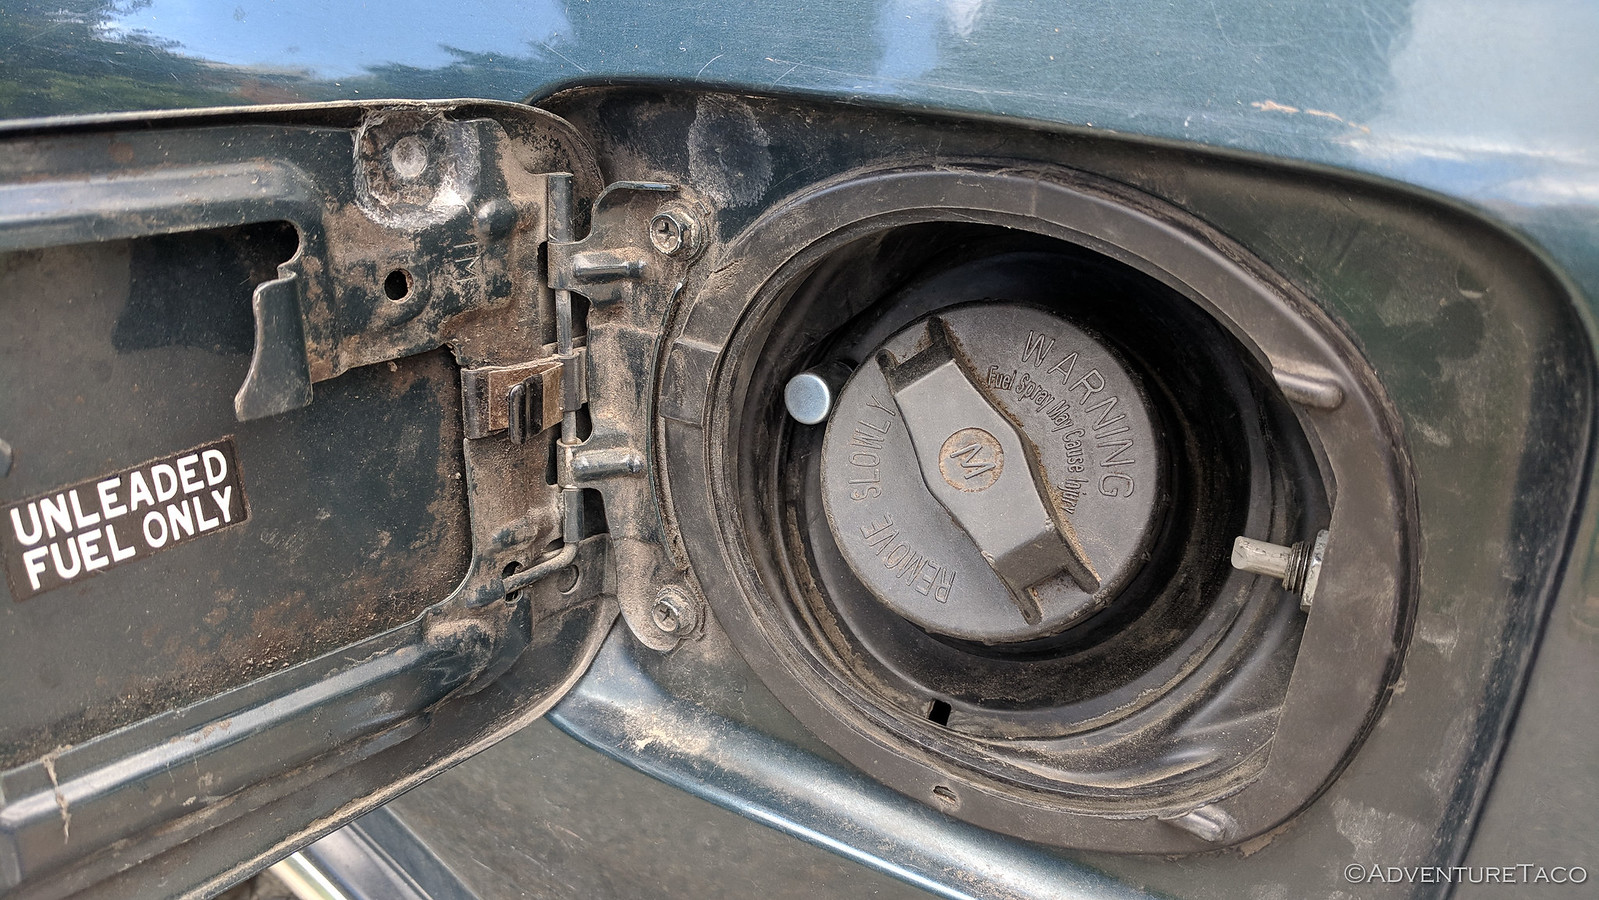
- If you're putting the breather behind the fuel filler door, you'll need to remove the gasket. This is tedious, but not hard. Start by removing the nut that holds the latching mechanism, and then pry out the two (2) wire clamps that hold the gasket in place.
- Drill a hole in the place of your choice in the gasket. I choose the 9-o'clock position since it seemed to be out of the way and have enough room to make a small hole.
- Push the new Plug Breather through the gasket, and then attach the fuel line with the other hose clamp. Then, reinstall the fuel filler gasket.
You're basically done with the mod at this point, and your 4Runner will thank you the next time you make your way through some water. Or mud.
|
|
|
Reply With Quote
|
|
09-09-2019, 04:55 PM
|
#39
|
|
Member
|
|
Join Date: Jul 2017
Location: PNW
Posts: 58
|
|
|
Member
Join Date: Jul 2017
Location: PNW
Posts: 58
|
Replacing My Rear Axle Seals & Bearings on a Toyota 4Runner (also Tacoma)
August 22, 2019.
Well, as I mentioned previously, our last family camping trip was both a success and a failure. I mean, the camping part was all success, but noticing that my rear axle seals were leaking when we got home - that part was definitely a failure.
My first order of business was to address what I hoped was what caused the seals to leak in the first place - by relocating the rear diff breather. With that out of the way, it was time to address the actual problem - so I procrastinated.
See, I was worried that this was going to be a huge, complicated job - and let me be the first to assure you - it's not! I mean, you need a few special tools and such, but with a bit of interweb research, the right tools and a list of the necessary steps, the job is straight forward and reasonably easy.
If you've come here just looking for the tools and steps - perhaps to print out for doing the job yourself - follow this link to everything you'll need...
Step-by-Step: Replacing Rear Axle Seal & Bearing on a 1st gen Tacoma w/ABS (or 3rd gen 4Runner)
OK, so having written up all the steps, it was - as usual - time to gather the parts and tools. This is a double-edged sword for me - I love new tools, but don't love paying for them. But hey, I'm saving money by doing this myself, right?
:spending:
buy to save
The parts for this project are reasonably few, and I went OEM on everything since I generally figure that a few extra bucks for parts that are perfect is worth it. Even then, nothing here is that expensive. Note that I decided to save about $150 and re-use the ABS tone rings and inner- and outer-retainers. The steps I've linked to above can help you save that same $150.
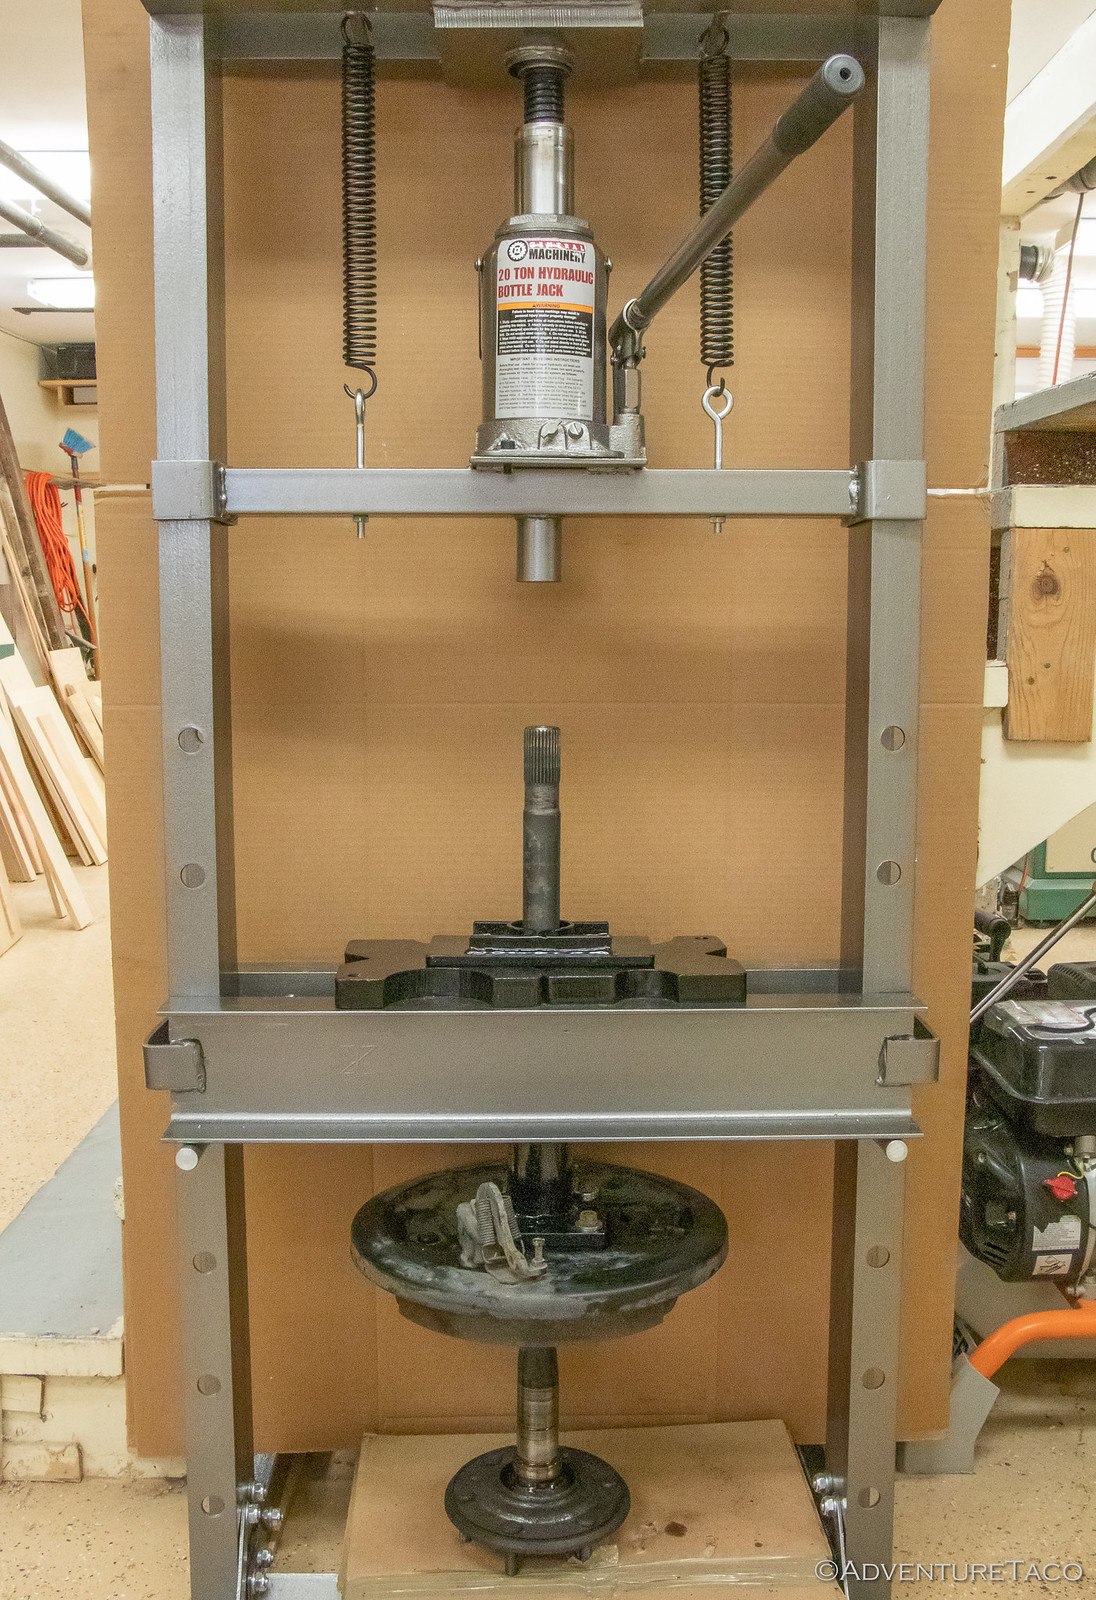
Next, I needed to pick up a few special tools. - 20 ton press from Harbor Freight
- Rear Wheel Axle Bearing Puller & Tone Ring Tool/Installer - used with the shop press to both remove and install various components on the rear axle. Amazing tool, worth twice it's price, and you're supporting a fellow gear head in the process. Plus, this tool works across much of Toyota's truck lineup - 1st, 2nd, and 3rd gen 4Runners ('84-02), 1st gen Tacomas ('96-04), older Hilux, T100 ('92-97), and 1st gen Tundras ('00-06). It's also available with a late model adapter, adding 2nd & 3rd gen Tacomas ('05-present), 4th & 5th gen 4Runners ('03-present), 2nd gen Tundras ('07-present), all FJ Cruisers, and all Sequoia's. Sweet.
- 3 ABS cleanout, with cap - to seat the new rear axle bearing.
- OTC 4507 Seal Driver Kit - to seat the new rear axle seal.
And of course, I used the "normal" tools that we all have around the shop for the various jobs we do on our trucks. - Floor jack and (2) 6 ton jack stands.
- Misc sockets (I recommend this set from Williams, a Snap-On brand)
- 10mm socket - to remove the ABS sensor from the axle housing.
- 14mm deep socket - to remove nuts holding brake drum to axle housing.
- 24mm socket - to remove diff fill/drain plugs.
- 5/8" deep socket - to use in the press when pressing on various components.
- Ratchet, Extensions, and breaker bar as necessary.
- 14mm box end wrench (set) - to remove nuts holding brake drum to axle housing.
- 10mm flare nut wrench (set) - to remove brake line fittings from rear drum.
- Snap ring pliers - to remove/install the snap-ring for the outer retainer.
- 3mm, 4mm, 5mm Allen wrench (set) - to measure placement of the inner retainer on re-installation.
- Assortment of vacuum caps - to prevent brake fluid from leaking out of rear lines once disconnected.
- Brake cleaner - to clean the brake components, as well as axle, throughout the process.
- Grease - for installing new parts.
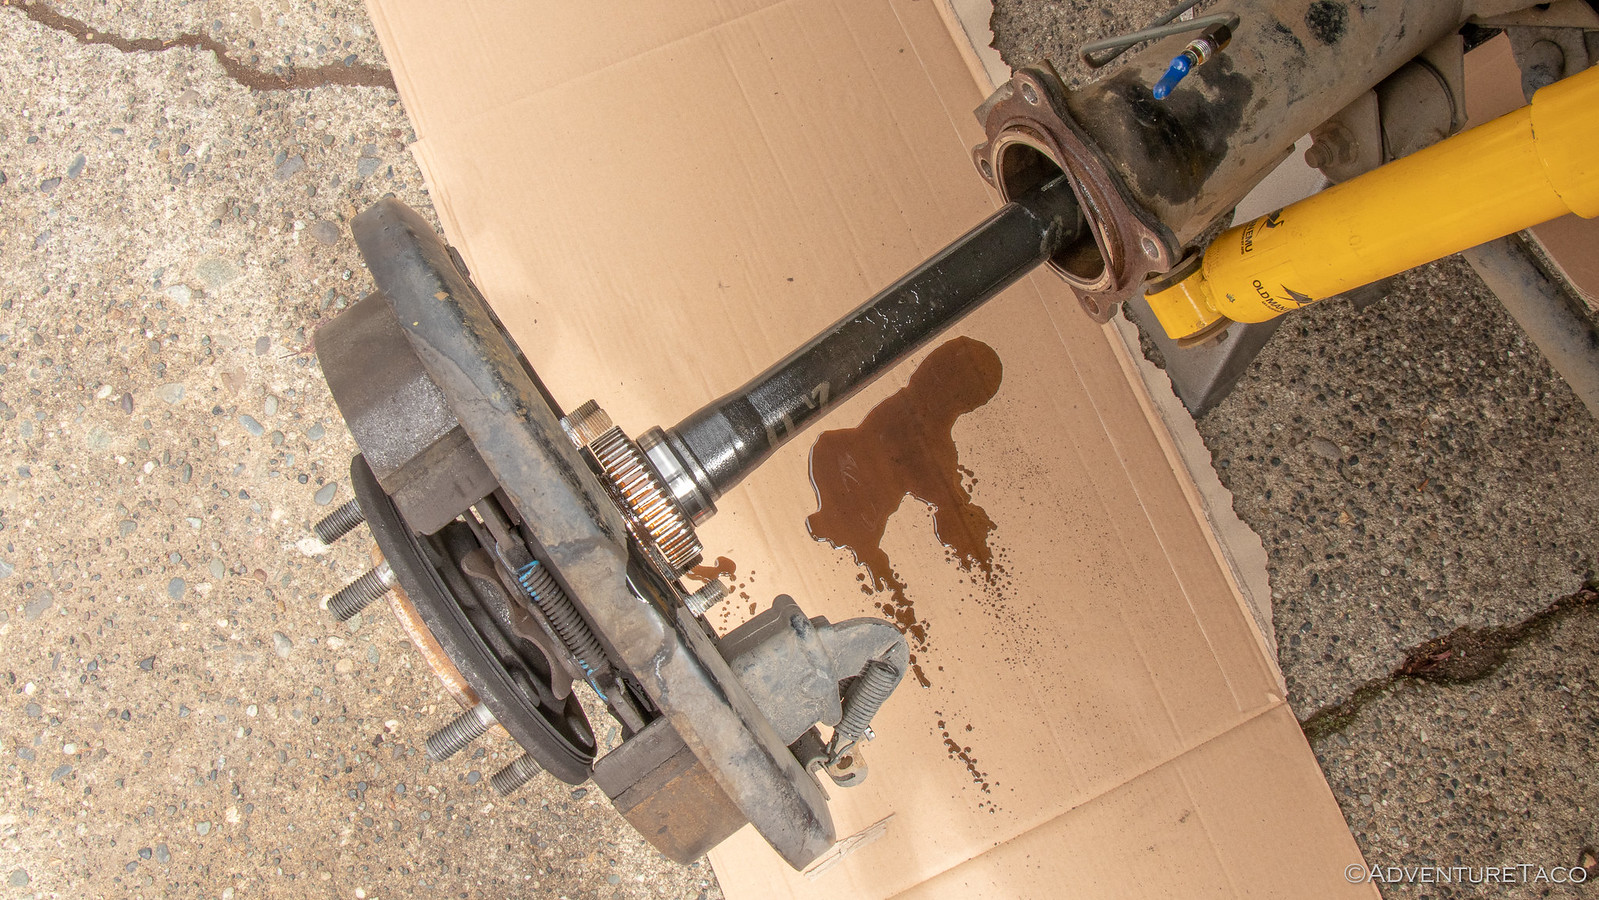
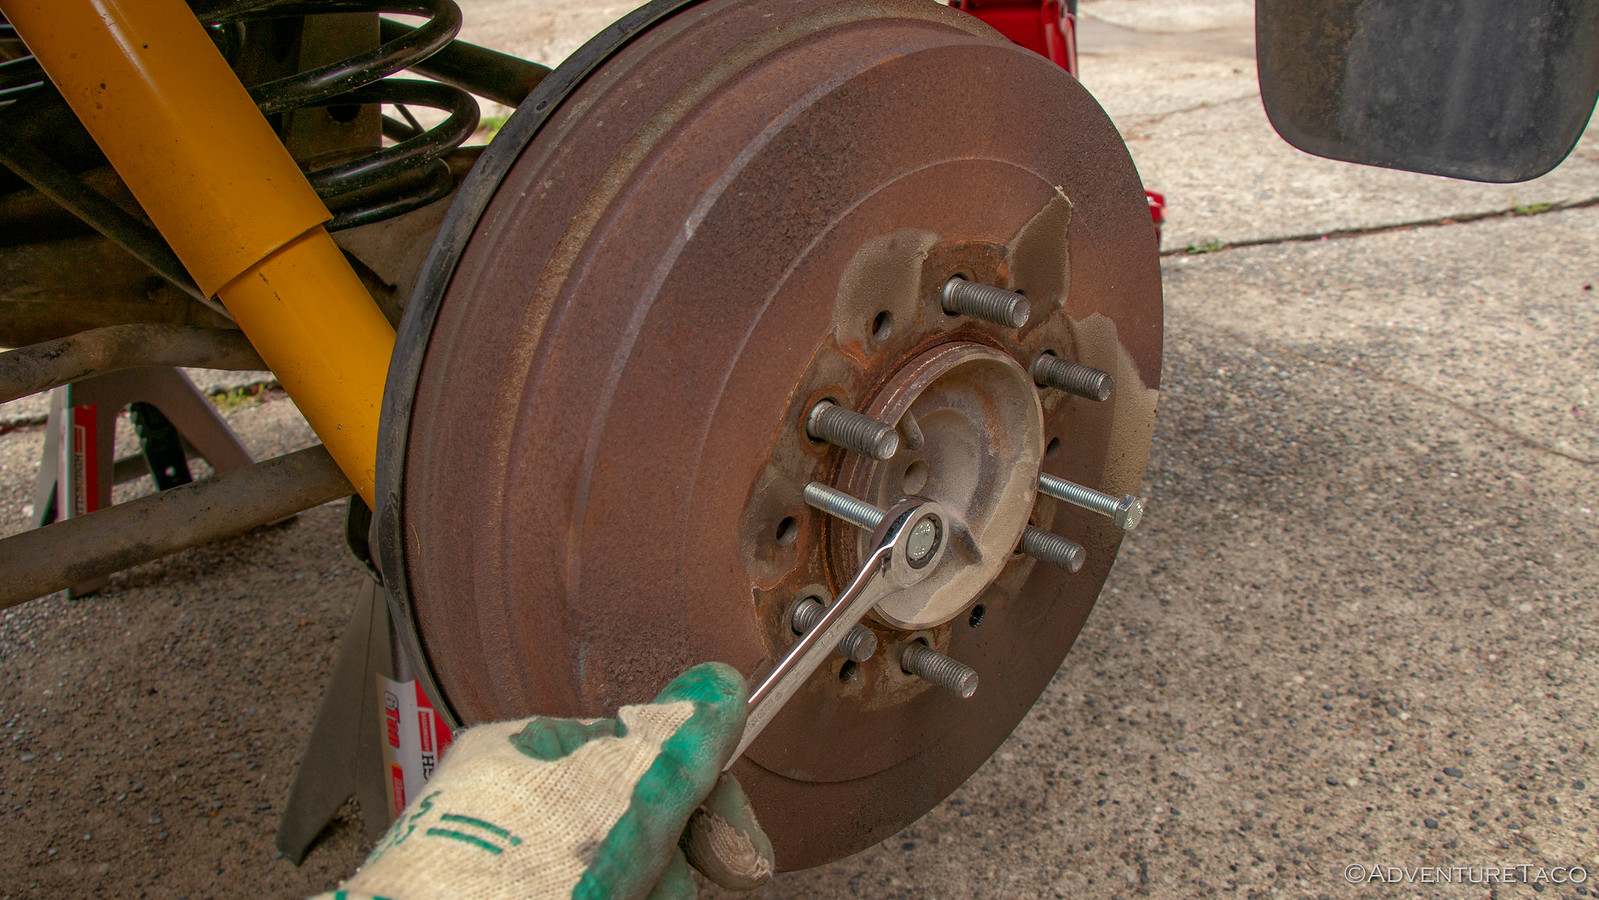
Logistics out of the way, I printed out the steps and after a leisurely breakfast of something that I'm sure was tasty, I got to work. My first order of business was getting the rear axle of the 4Runner up on jack stands so that I could remove the rear wheels, a step which quickly highlighted the problem for me - the stain of diff oil right there on the outside of the brake drum.

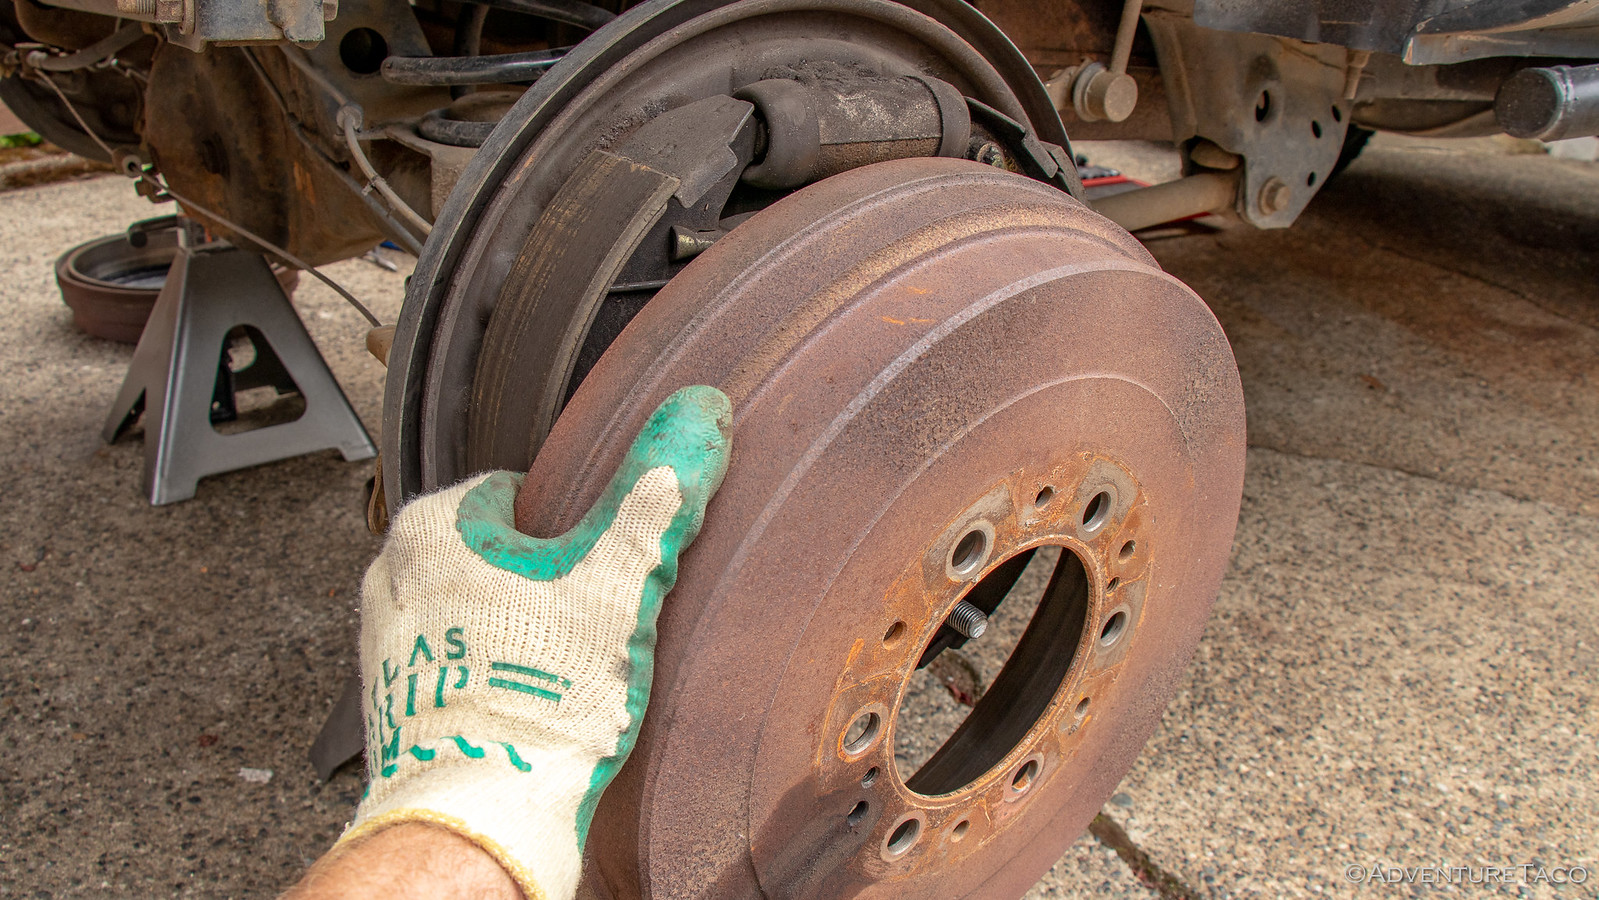
Next, it was time to remove various bits so that when I went to pull the axles out of the housing, it wouldn't be held up by anything. First up were the brake drums. Perhaps naively, I'd expected these to come off relatively easily. Ha, couldn't be further from the truth. Even after disconnecting the e-brake lines from them, they didn't budge one iota as I pulled on them and tried to pursuade them with my dead-blow mallet. Ultimately - after loosening the tensioners also failed - I resorted to using two, M8-1.25x50 bolts to coax them off, each one making a small popping noise as the rust that secured them to the axle released - now 45 minutes into the project.
Confidence waning already, I decided that my next move would be to drain the rear diff while I removed the other bits off the brakes - so it could drain out fully before I pulled the axles. Plus, it's easy - so no worries about further eroding my ego. :wink: You'll see here that I'm actually draining the diff oil into a milk jug rather than my normal oil drain pan. That's because I'm going to reuse this oil, despite the fact that it might break the Internet. But seriously, it'll be OK - it's got less than 1500 miles on it.
As the oil drained out - mostly into my jug - I took a few minutes to remove the rear brake lines using a 10mm flare nut wrench and some silicone caps that kept brake fluid from getting all over everything, and the ABS sensors - which were covered in diff oil, another indicator of axle seal failure.
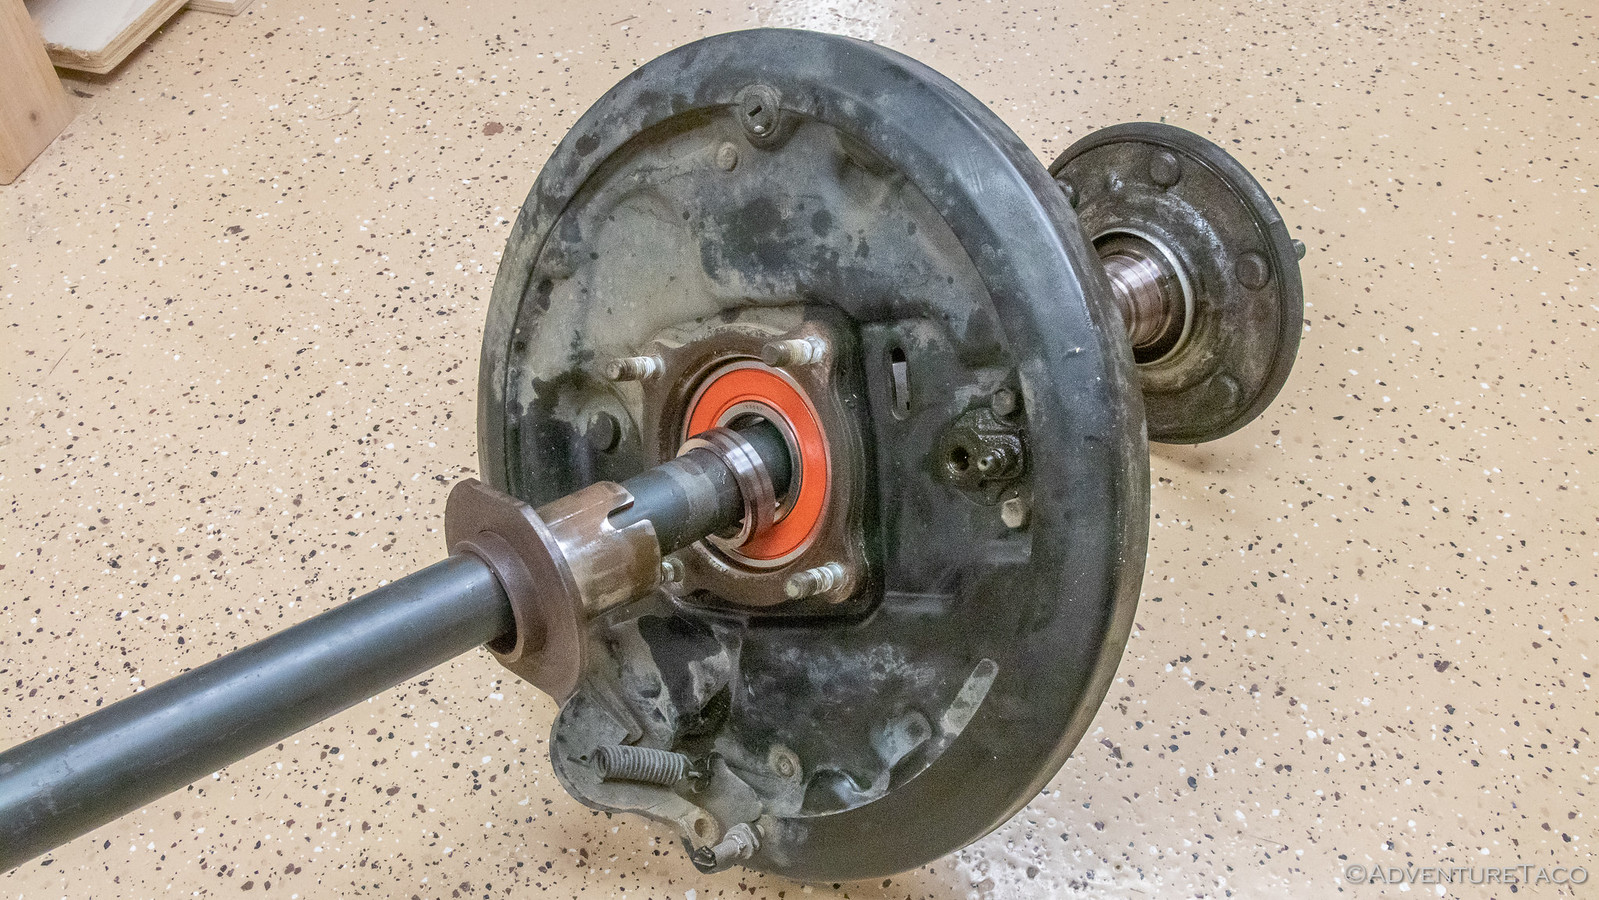
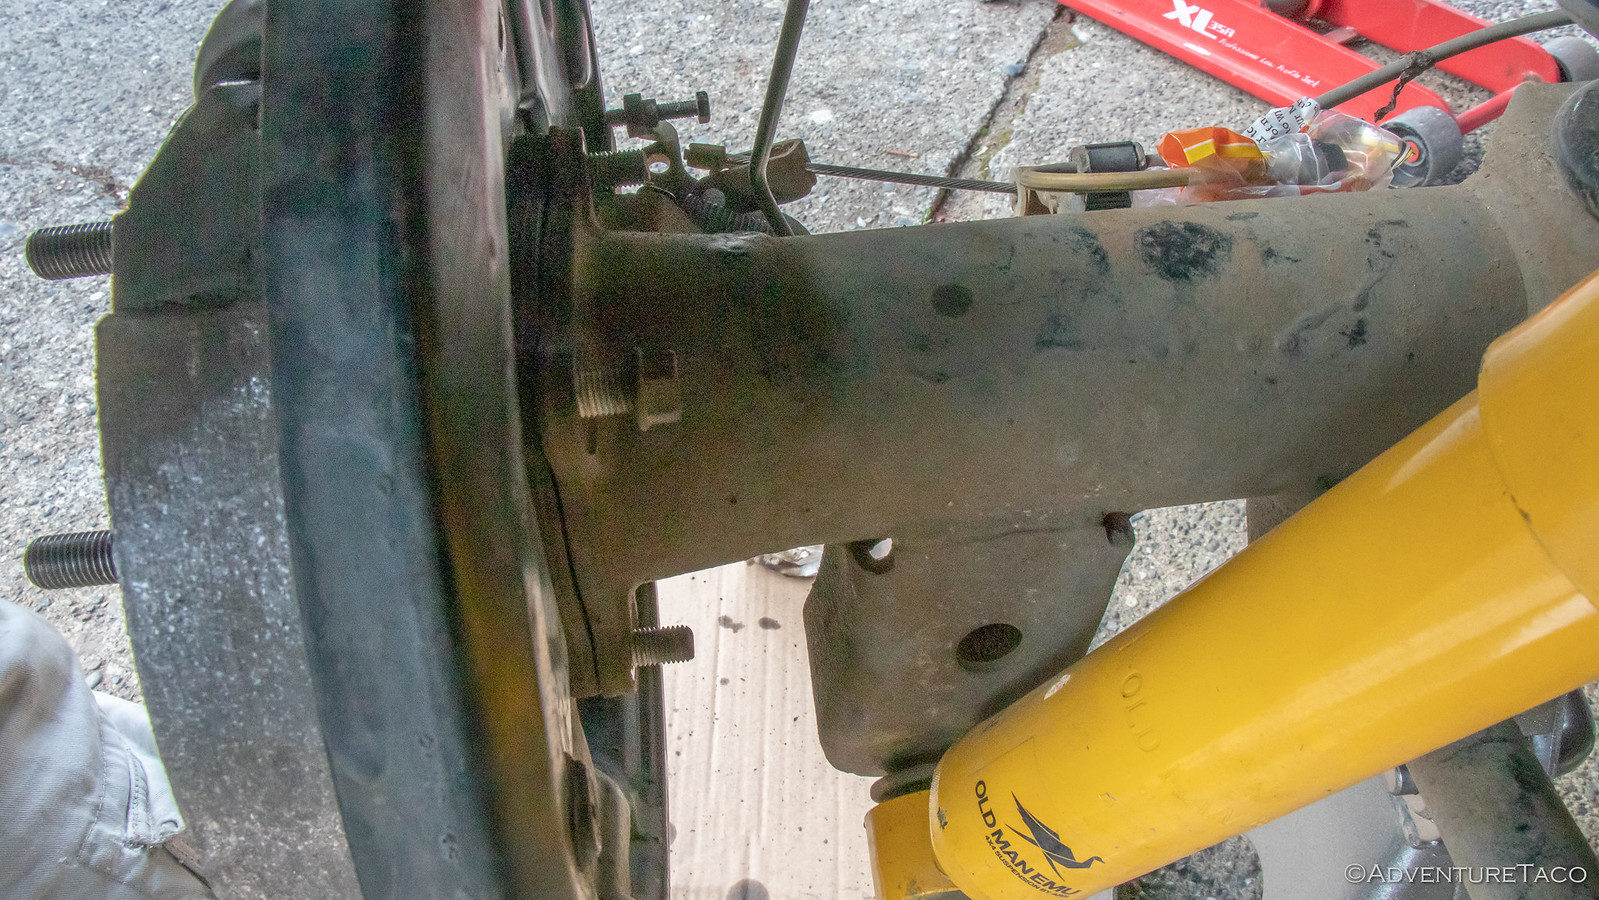
Now flush with confidence, and having learned when I changed the timing belt that a job like this benefits from a little organization - I was ready to remove the 4, 14mm nuts that secure the back plate to the axle housing... which I did.
Found my missing rear diff oil!
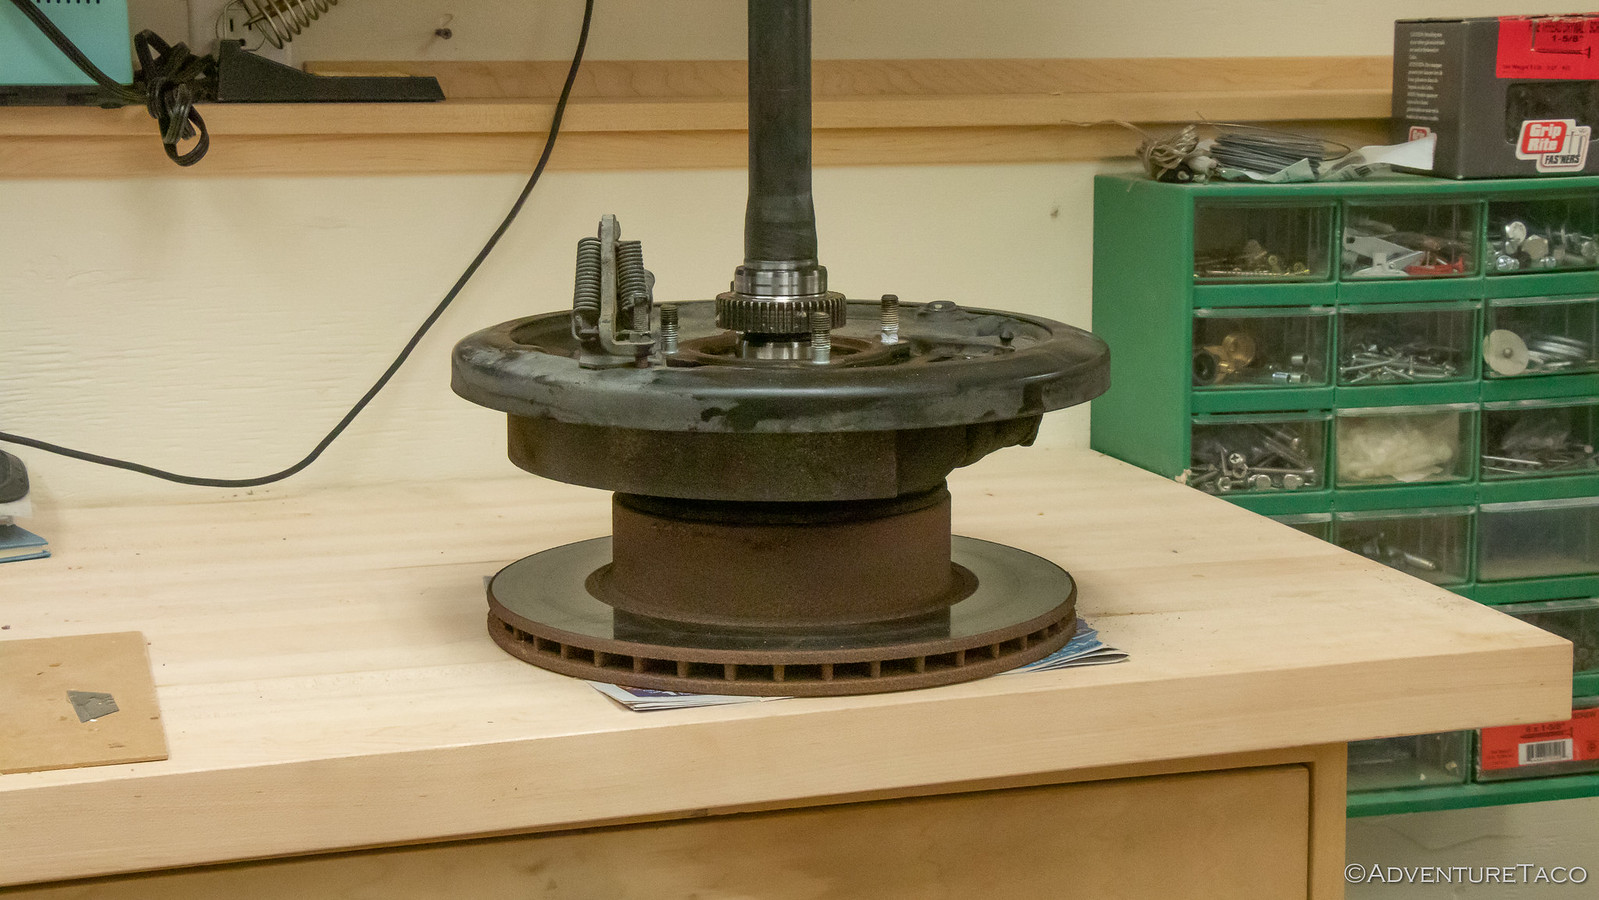
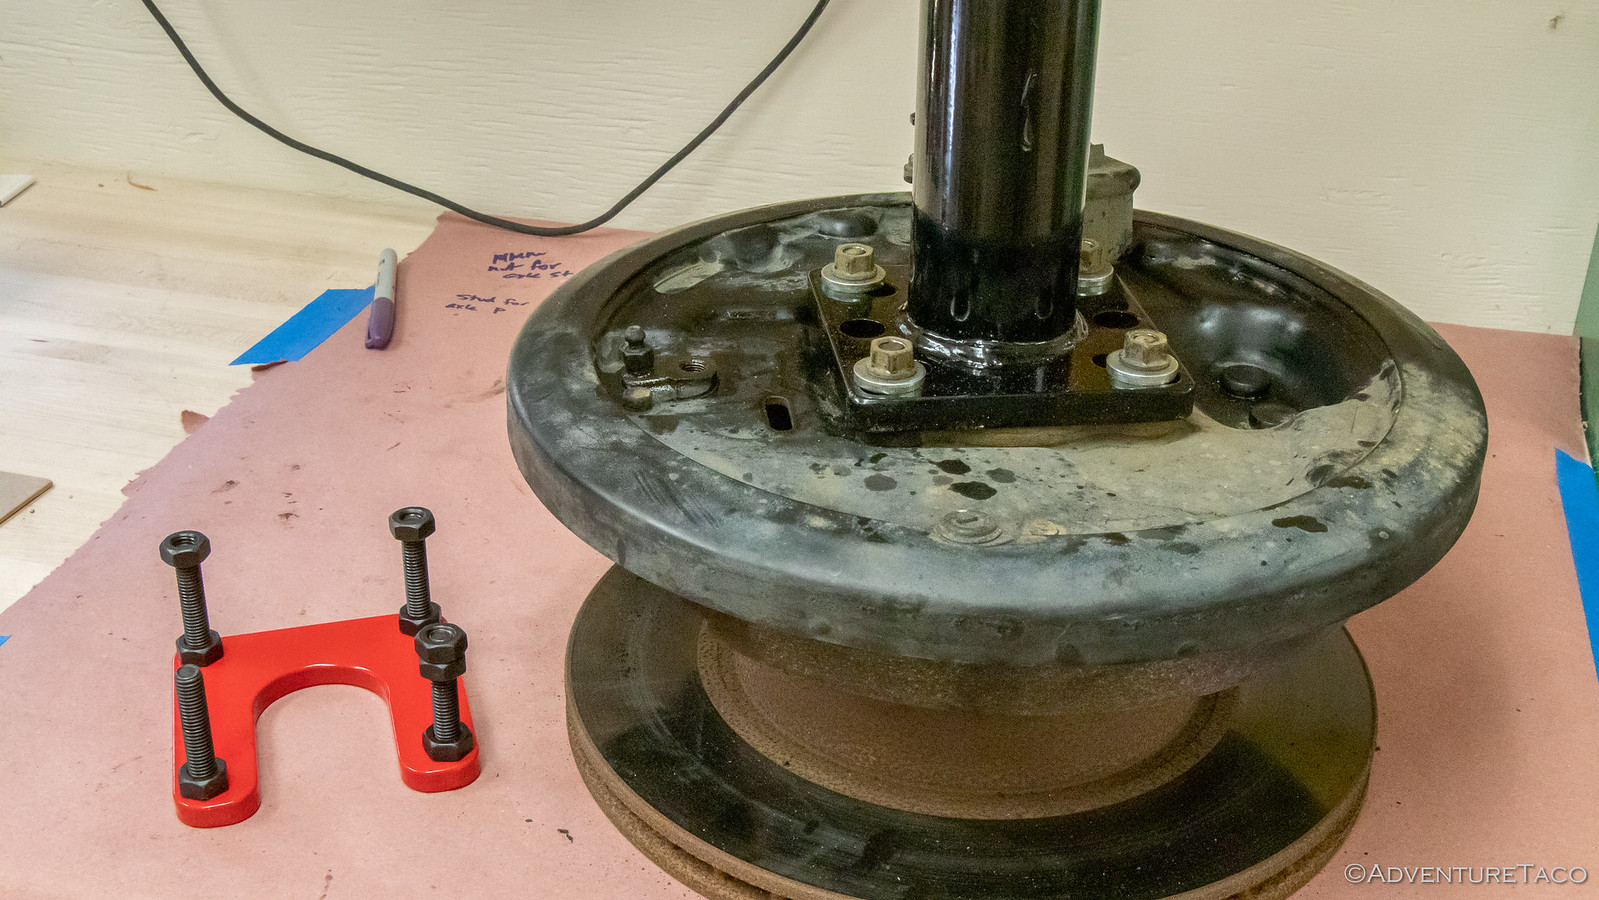
Axle now in hand, I cleaned it up a bit and set it on the workbench - or rather, on an old rotor I'd set on the workbench - so I could start the work of pressing various components off... and then new versions of those same parts - back on.
|
|
|
Reply With Quote
|
|
09-09-2019, 04:56 PM
|
#40
|
|
Member
|
|
Join Date: Jul 2017
Location: PNW
Posts: 58
|
|
|
Member
Join Date: Jul 2017
Location: PNW
Posts: 58
|
Now - this is probably a good place to mention that if you're replacing your axle seals as a preventative maintenance - and they weren't leaking - you may not need to do any of this. But, if your axle seals were leaking, and allowed diff oil into the axle bearing (and brake drums) - then you need to replace your bearing and drums as well. Diff oil in the bearing will "wash out" the bearing grease that keeps things moving smoothly, and will keep your brakes from working well - so it's a good idea to replace everything at the same time.
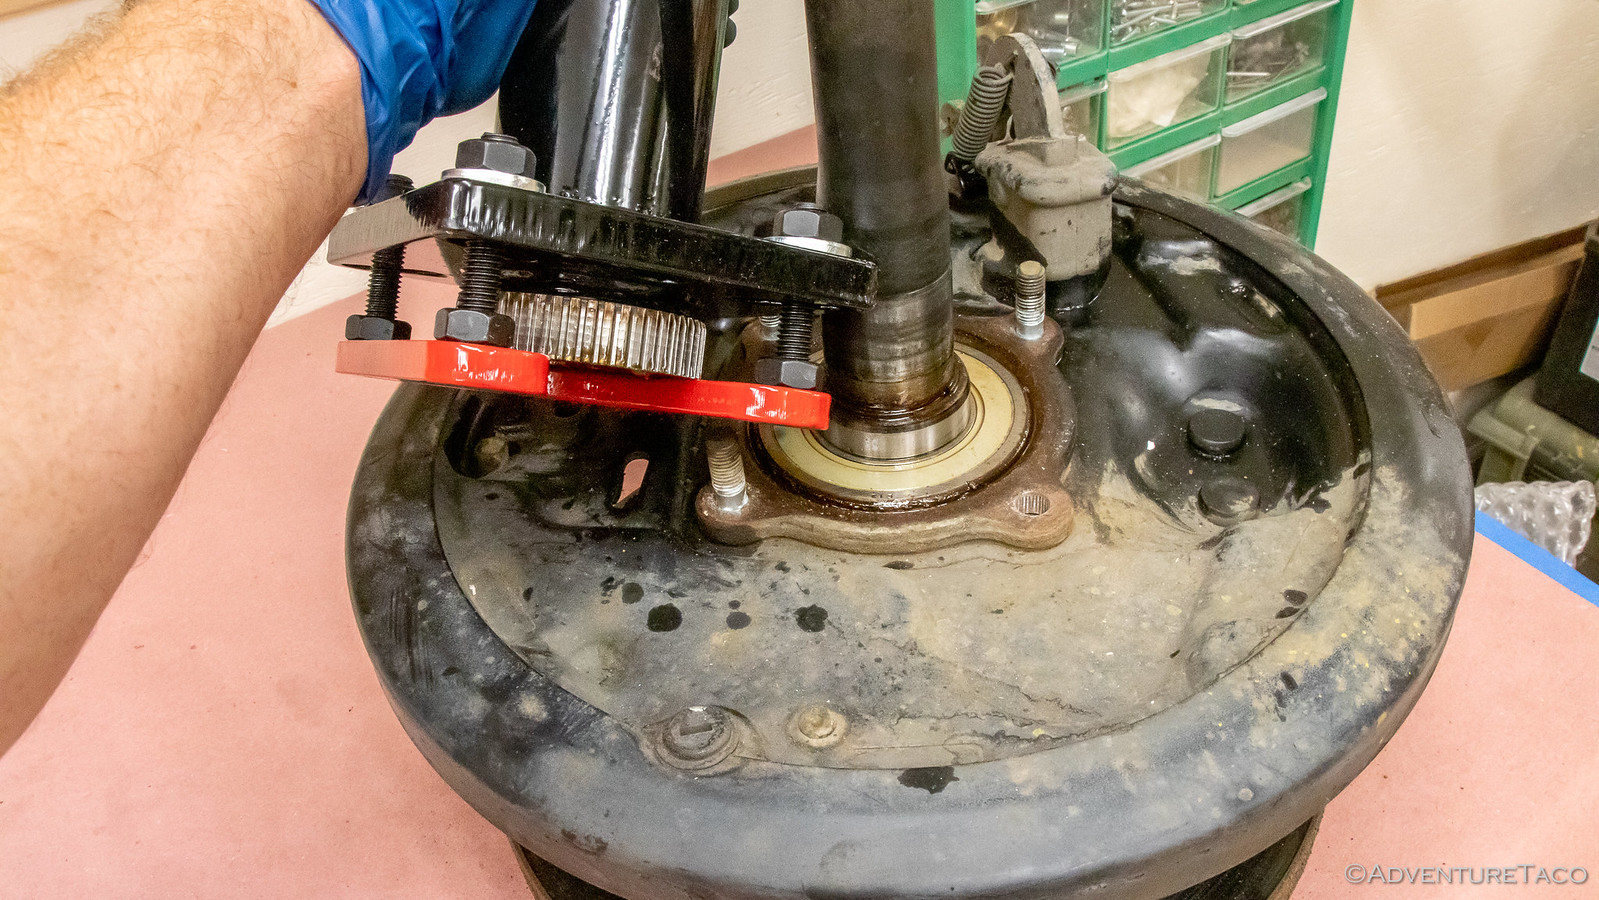
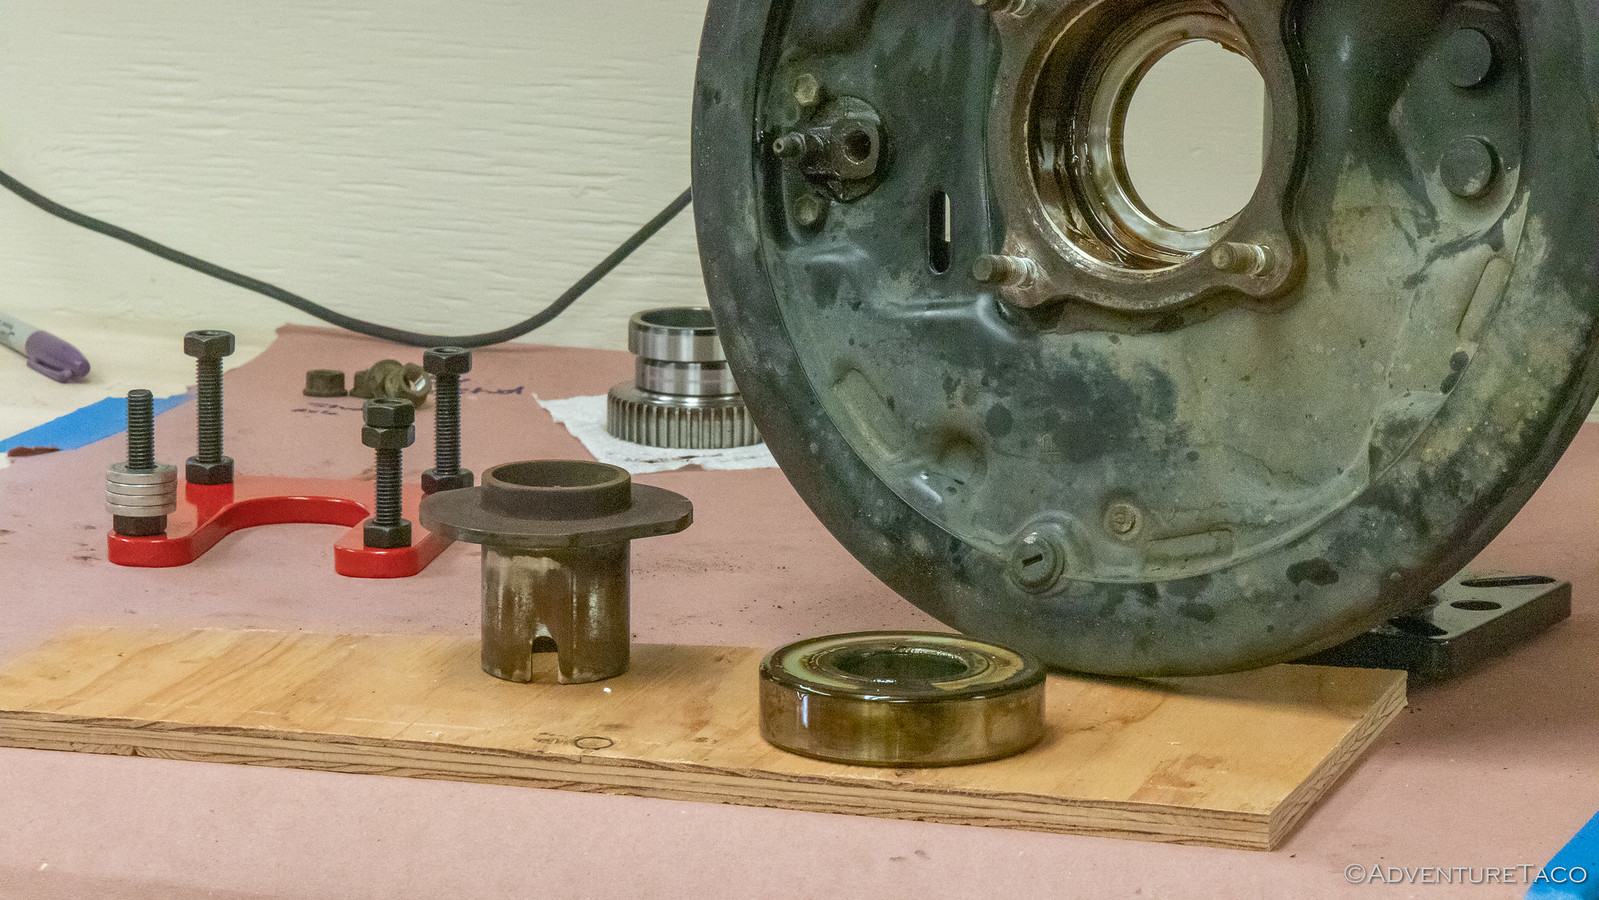
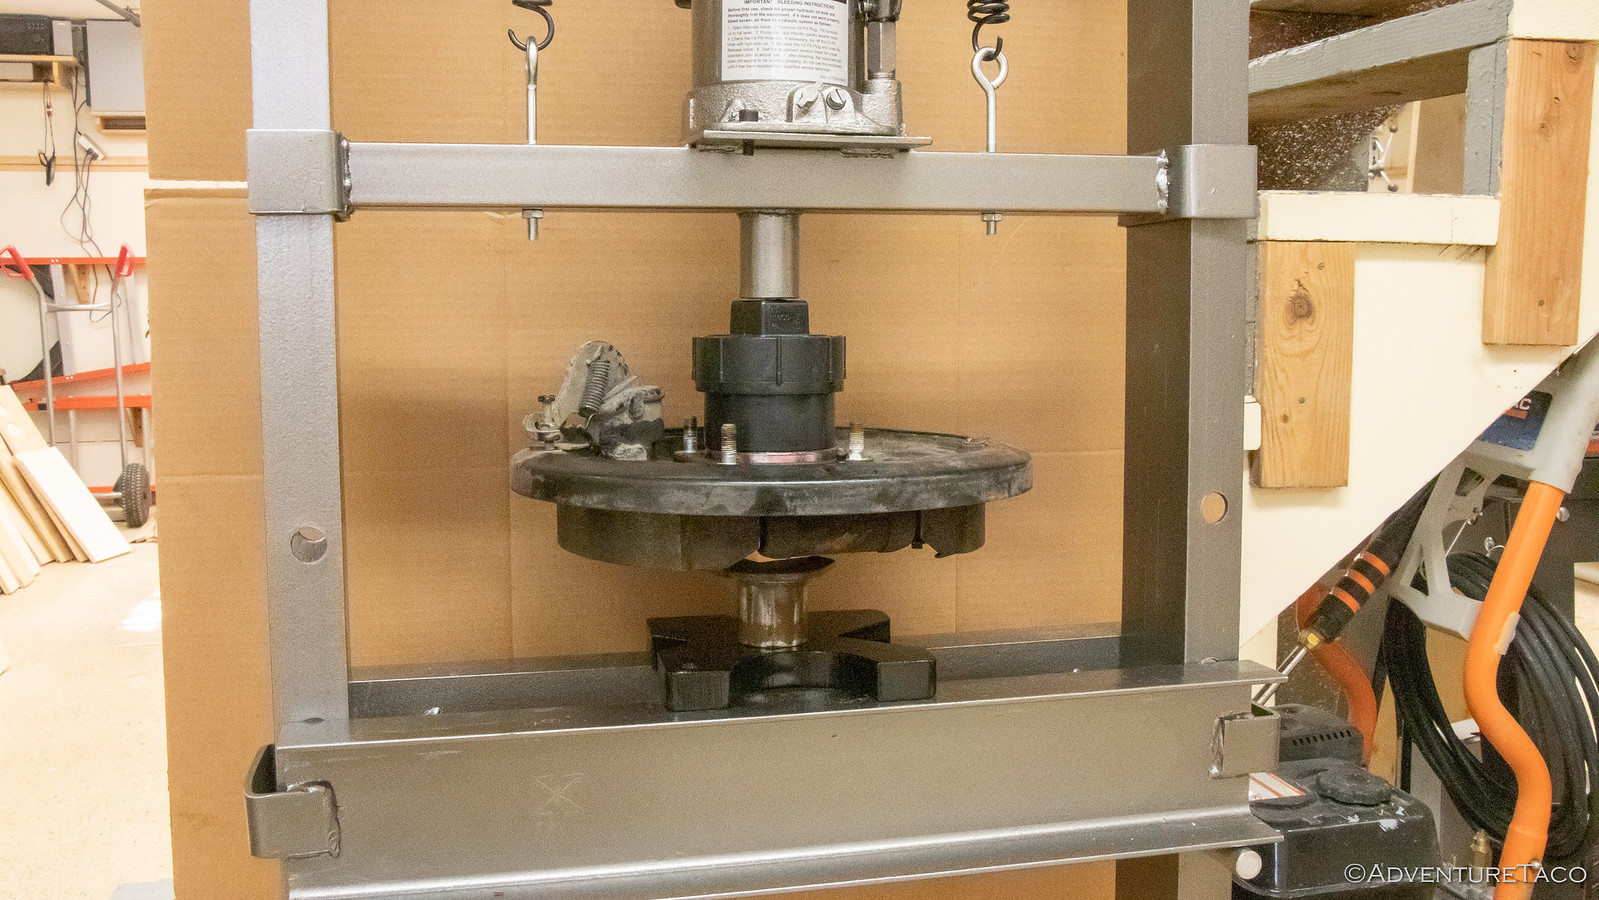
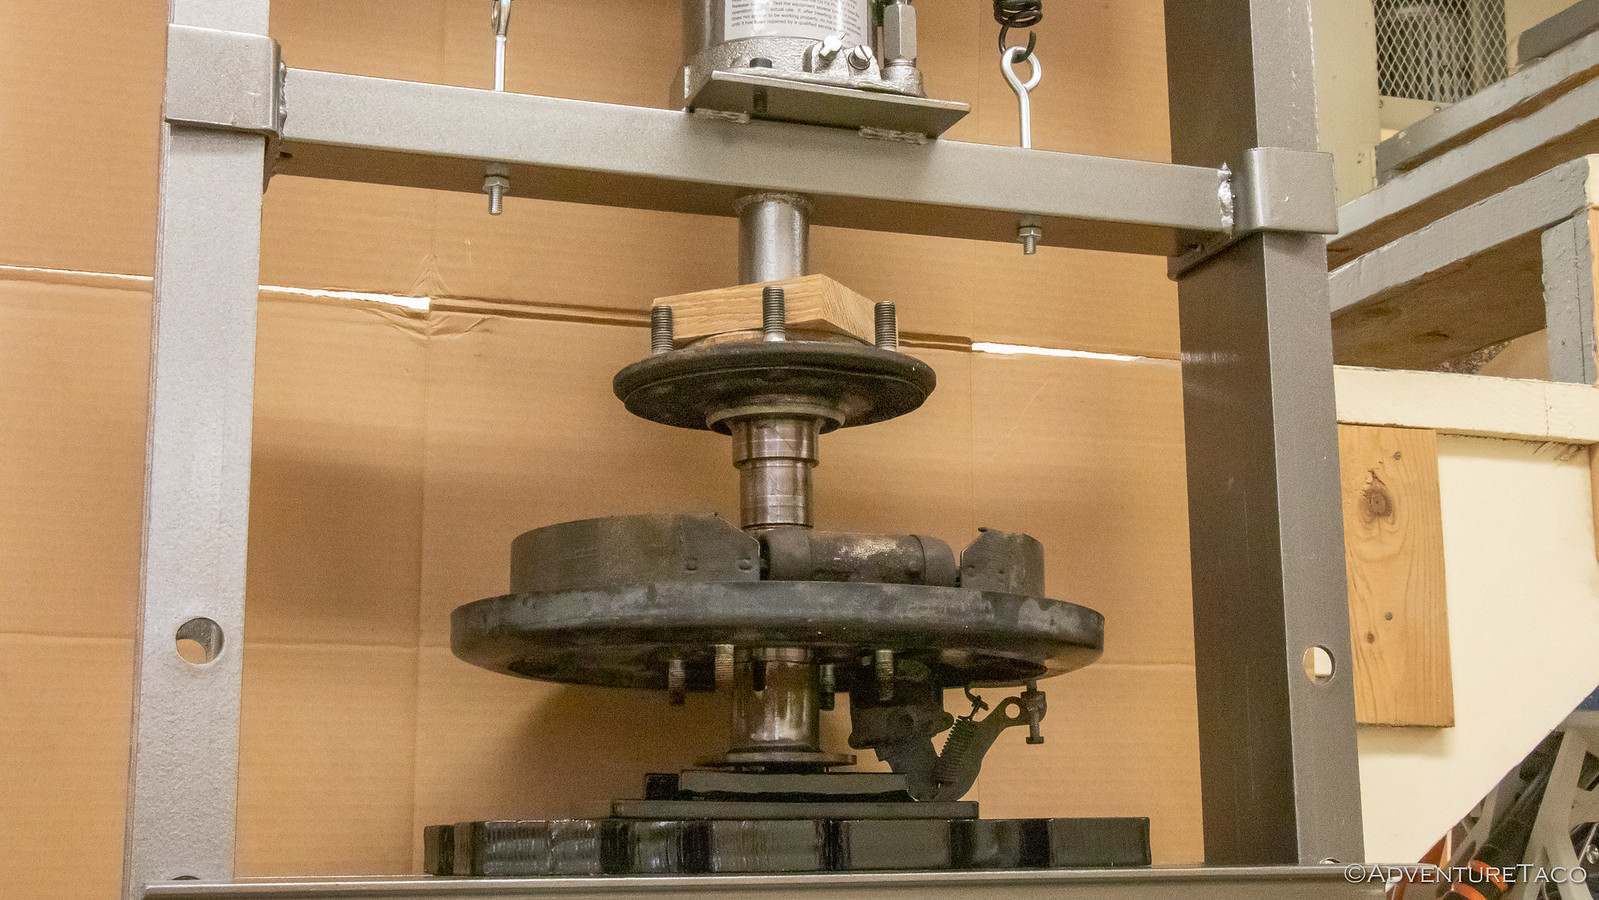
The first step is to use the 20-ton shop press and Rear Wheel Axle Bearing Puller & Tone Ring Tool/Installer SST to remove the ABS tone ring and inner retainer from the axle. And to use the SST, I had to pound out one of the studs that holds the backing plate to the axle housing. Using a nut to protect the threads and my trusty hammer, I was soon ready to go.
With the stud removed (from the assembly, not from me), I slid the red plate of the SST under the ABS tone ring and secured the puller over the axle with supplied washers and nuts and then put the entire assembly into the press. So far, so good.


As I started to press, I thought two things to myself. First - the design and build quality of the shop press is pretty "meh." I mean, it's Harbor Freight, and it seemed to work - if clumsily - for the entire project, but it is not a finely tuned machine. If I had more uses for it, I'd strongly consider a more expensive machine with a little better fit-and-finish. Second - I marvelled at the design and build quality of the Rear Wheel Axle Bearing Puller & Tone Ring Tool. This thing is awesome. Through the entire project, it couldn't have been more perfect - making all of the pulling and pressing operations simple - and safe. If you're doing this job and are considering making do with your own fixtures, my recommendation would be to do yourself a favor and pick one of these up. The time and frustration saved are worth it alone, even if you don't care about safety.
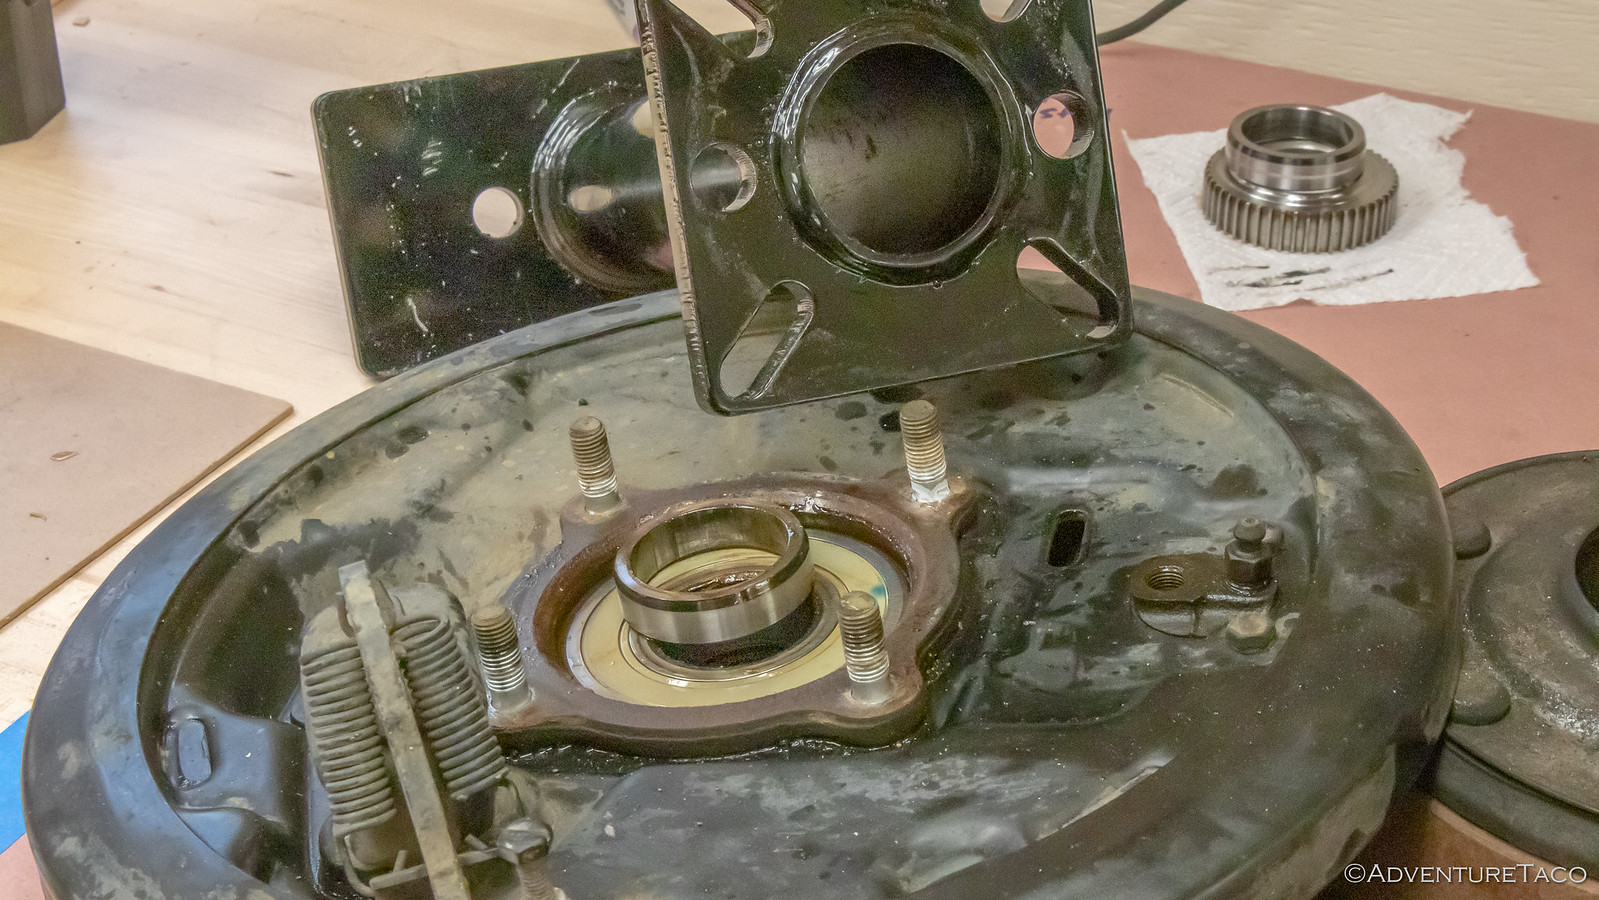
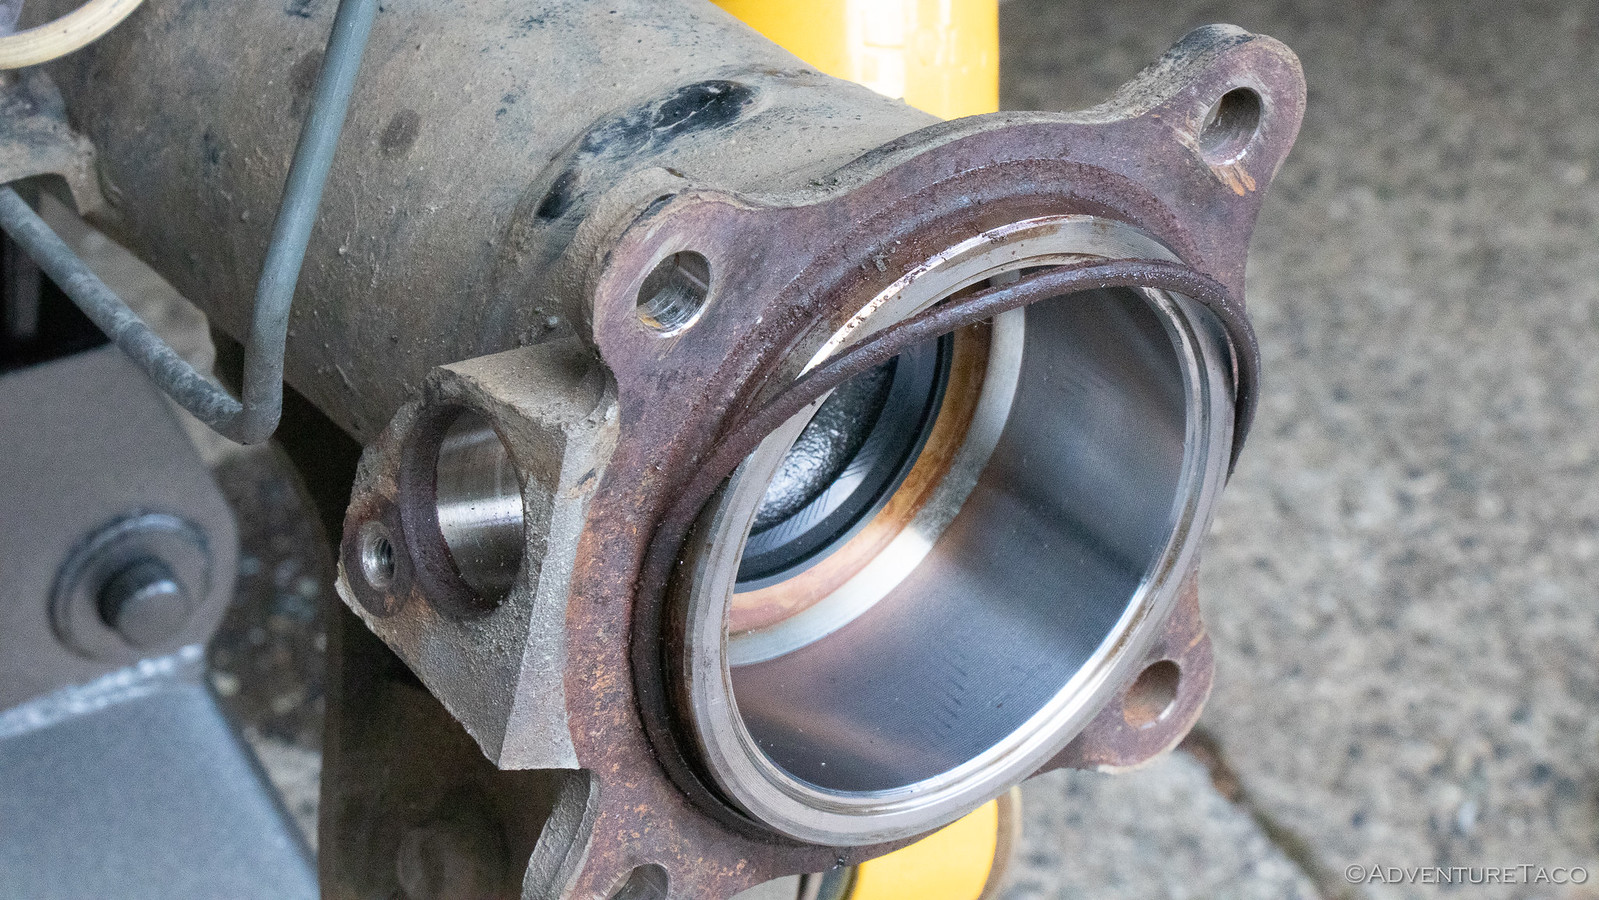
Pretty soon, I had the axle pressed out of the ABS tone ring and inner retainer. And, it's easy to see here where the axle seal rides on the inner retainer.
The next press operation was to remove the axle from the bearing and outer retainer, and to do that I had to draw the stud I'd removed from the backing plate back into place - an easy process with the washers supplied in the puller SST and a 14mm nut.
Oh, and I had to remove the snap ring that holds the bearing and retainer in place. I was prepared for this to take a bit of doing given how long other snap rings have taken to remove, but this time I guess I got lucky - it came right off, easy peasy.
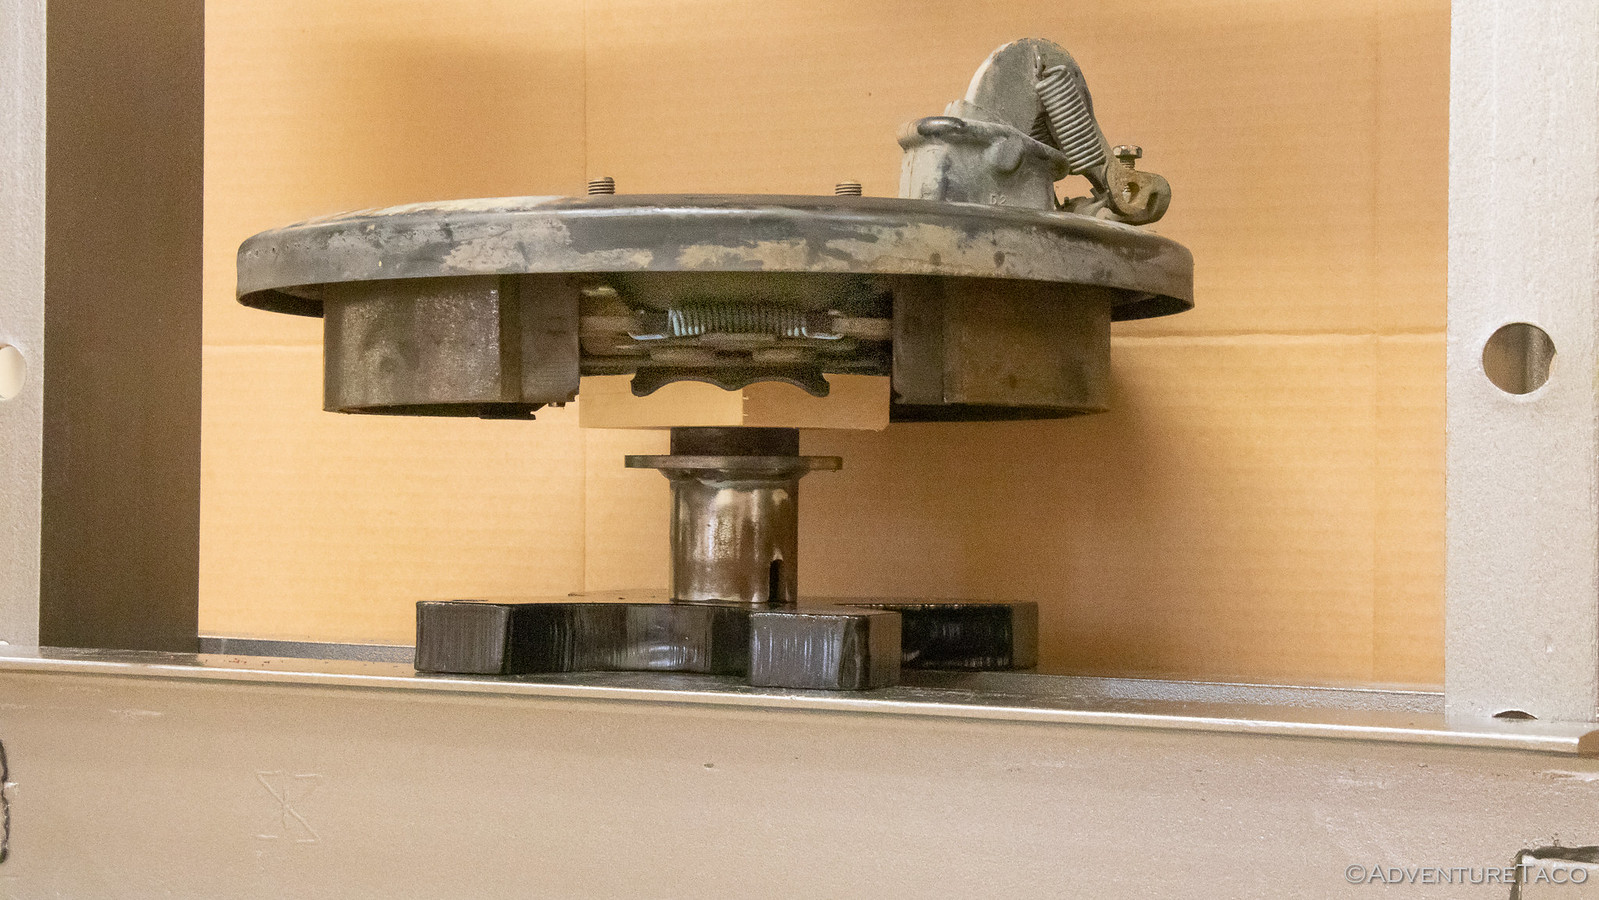
With the snap ring removed, I could secure the Rear Wheel Axle Bearing Puller to the backing plate with its heavy duty washers and nuts, and move back over to the press. This time, as I pressed the axle down through the SST, the bearing and outer retainer would be captured, leaving the axle bare at the end of the operation.
Boy! The bang when the axle bearing released was - how should I say this - a "pants changer." It was loud, the entire press shaking as the energy was released. But, everything worked as it should, and as I removed the SST from the backing plate, there was the outer retainer - clean as a whistle, and with no "wear line" like the inner retainer - since no seal rides on it.
The fact that there is no wear line on the outer retainer is what allows us to save that $150 that I mentioned at the beginning of the post - we can simply swap the positions of the retainers on installation, and have a nice clean surface for our new axle seal to ride on. But more on that later...
I had to more bits to remove at this point before I was ready to start re-installation. First up was the outer dust shield, which just pulled right off with a pair of pliers. With the dust shield out of the way, I could use the Bearing Driver that came with the same Rear Wheel Axle Bearing Puller & Tone Ring Tool SST (how awesome is that?) to knock the wheel bearing out of the brake backing plate and onto the workbench.
At this point, I think it was mid-afternoon. It'd taken me a good 4 hours or so to get this far. I'd blame it on photos, but the reality is that I was just being really careful to double check myself at every step, since this was the first time I'd done this. As Eric at
@ Relentless
Fab said to one of his guys when I was there - "Slower is faster." Truer words were never spoken .:thumbsup:
|
|
|
Reply With Quote
|
|
09-09-2019, 04:57 PM
|
#41
|
|
Member
|
|
Join Date: Jul 2017
Location: PNW
Posts: 58
|
|
|
Member
Join Date: Jul 2017
Location: PNW
Posts: 58
|
After lunch and some parts clean-up, I was ready to start pressing components back together. This is essentially a reverse of removal, so the axle bearing was up first. A bit of grease on it's outer race and the matching bore so things would slip past each other easily, I used the bearing driver SST to support the brake backing plate, and a 3" ABS cleanout to carefully press in the bearing. It's not a tight fit, so the ABS works well - both as a match for the outer diameter of the bearing, and also because if you're deforming the ABS, you know you're doing something wrong.
After the bearing is in the brake housing, it was time to press that - and the outer retainer (which used to be the inner and has a wear mark on it) onto the axle. With the bevel on the retainer facing away from the bearing, I got everything set up using the Bearing Driver (and the Rear Wheel Axle Bearing Puller) and into the press before easily pressing everything together.
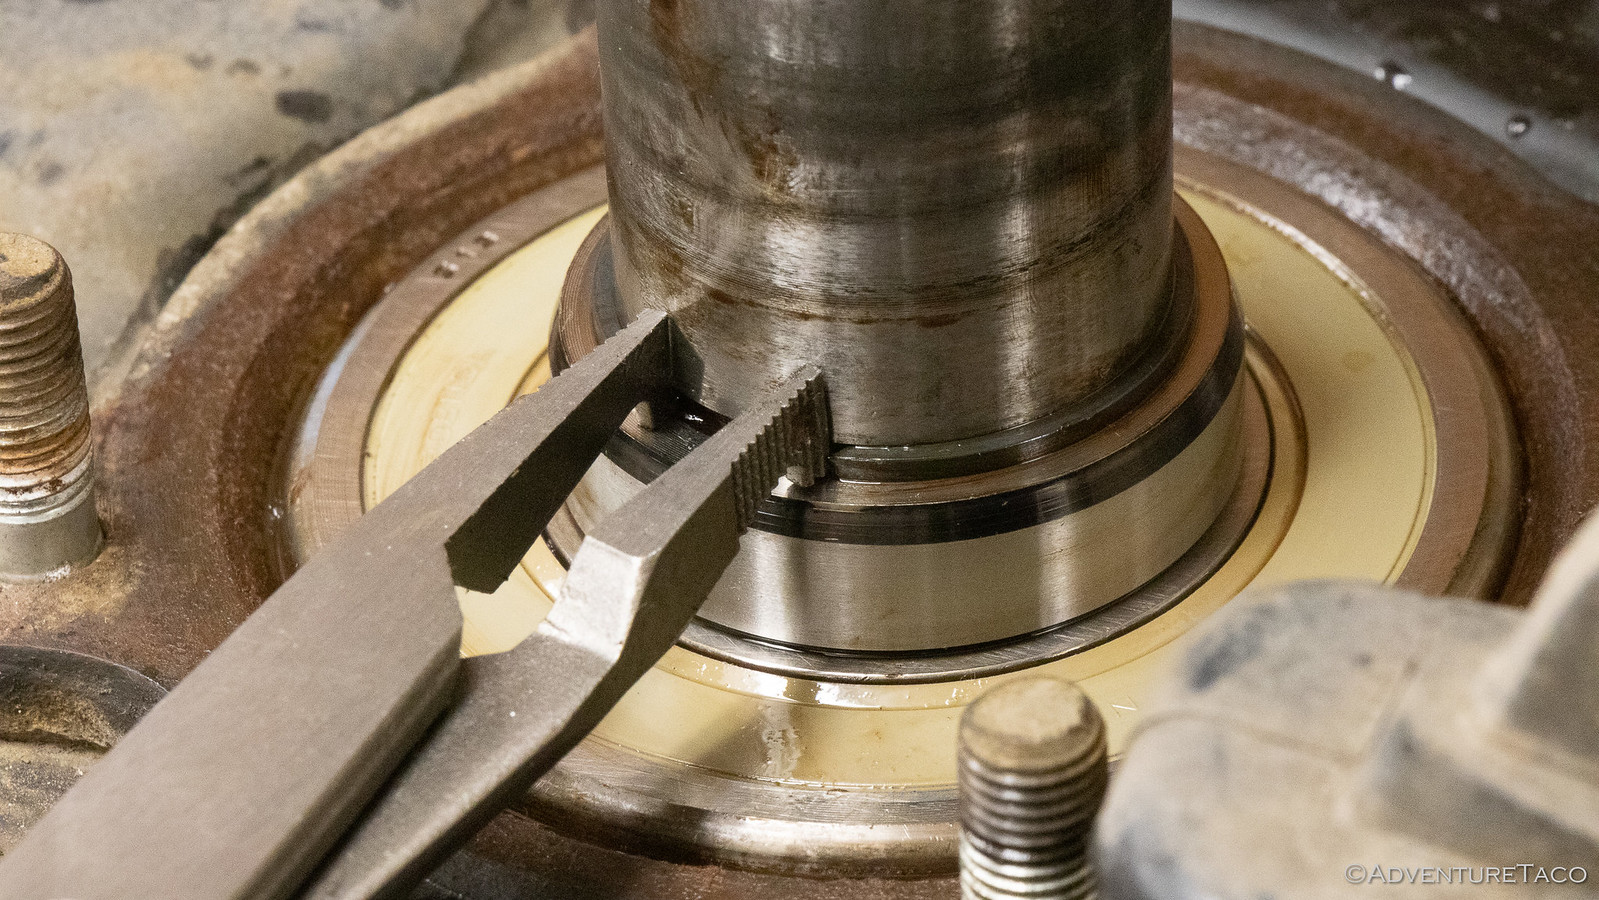
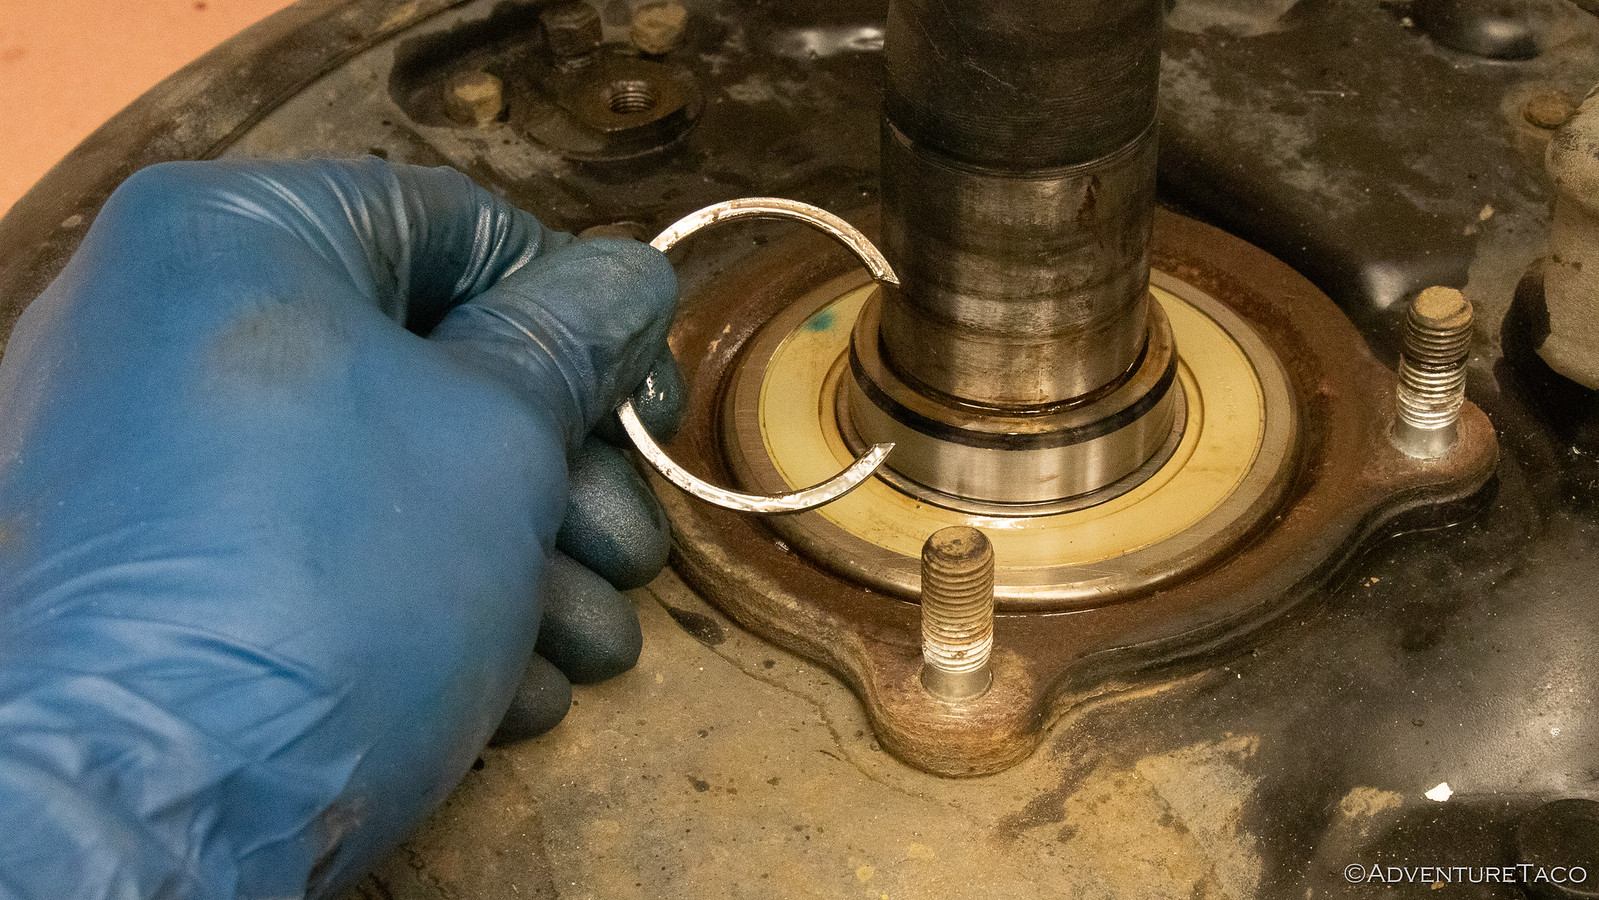
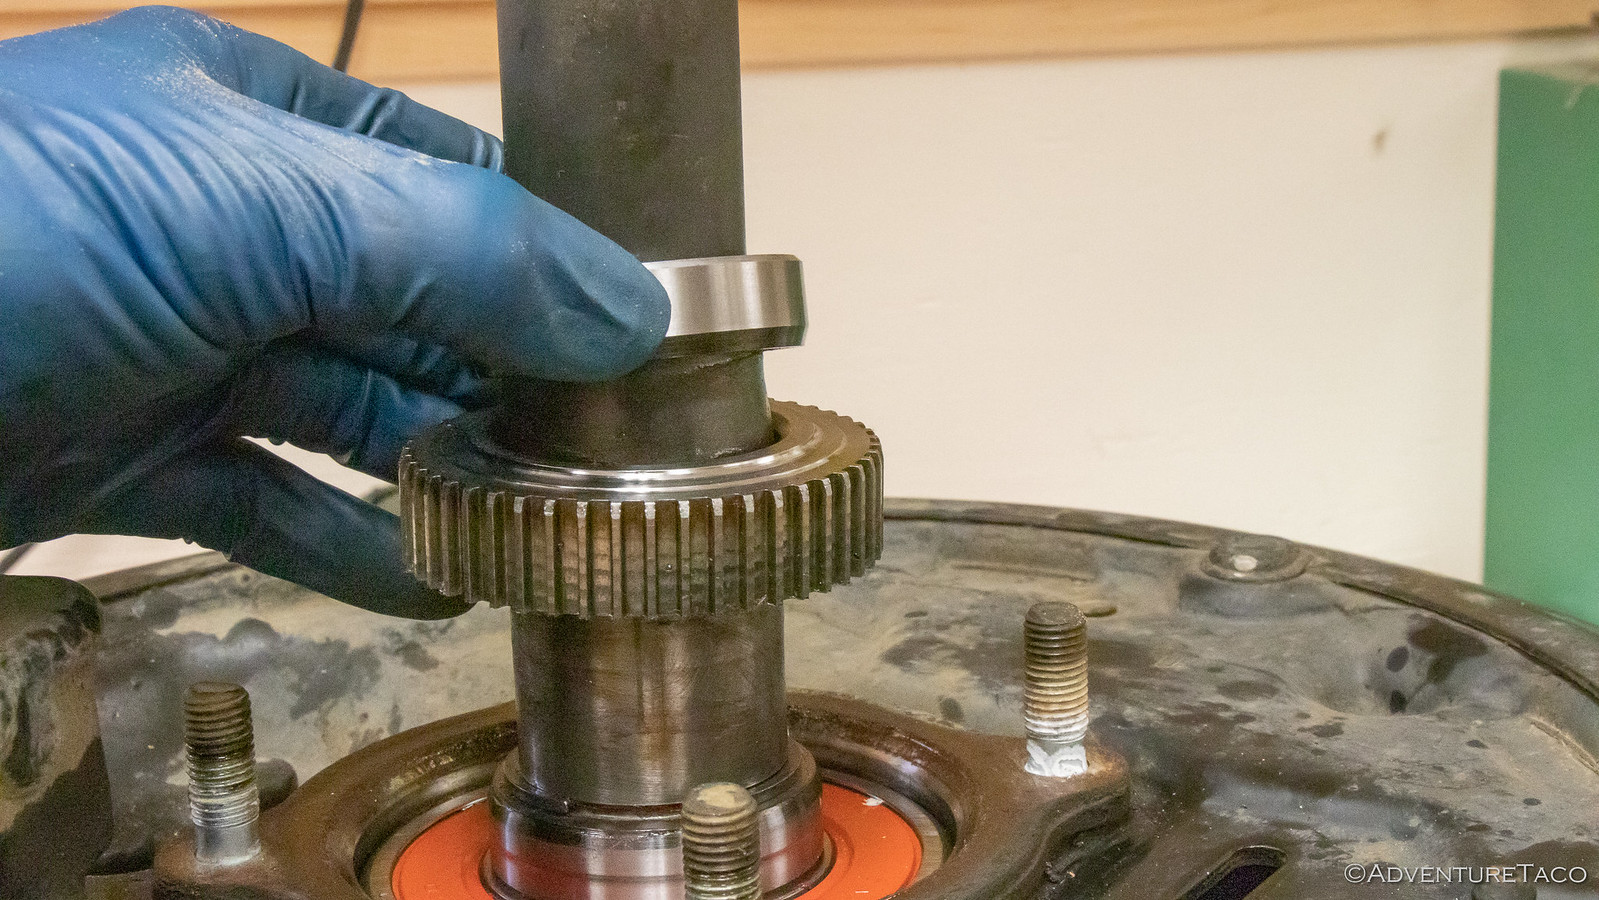
Then, continuing our reversal of the removal, a new snap ring before greasing and putting the ABS tone ring and inner (was outer) retainer in place to be pressed. Note: the tone ring is installed with the solid side toward the diff, and the retainer has the bevel away from the diff, to better mate with the axle seal that was redesigned by Toyota a few years ago.
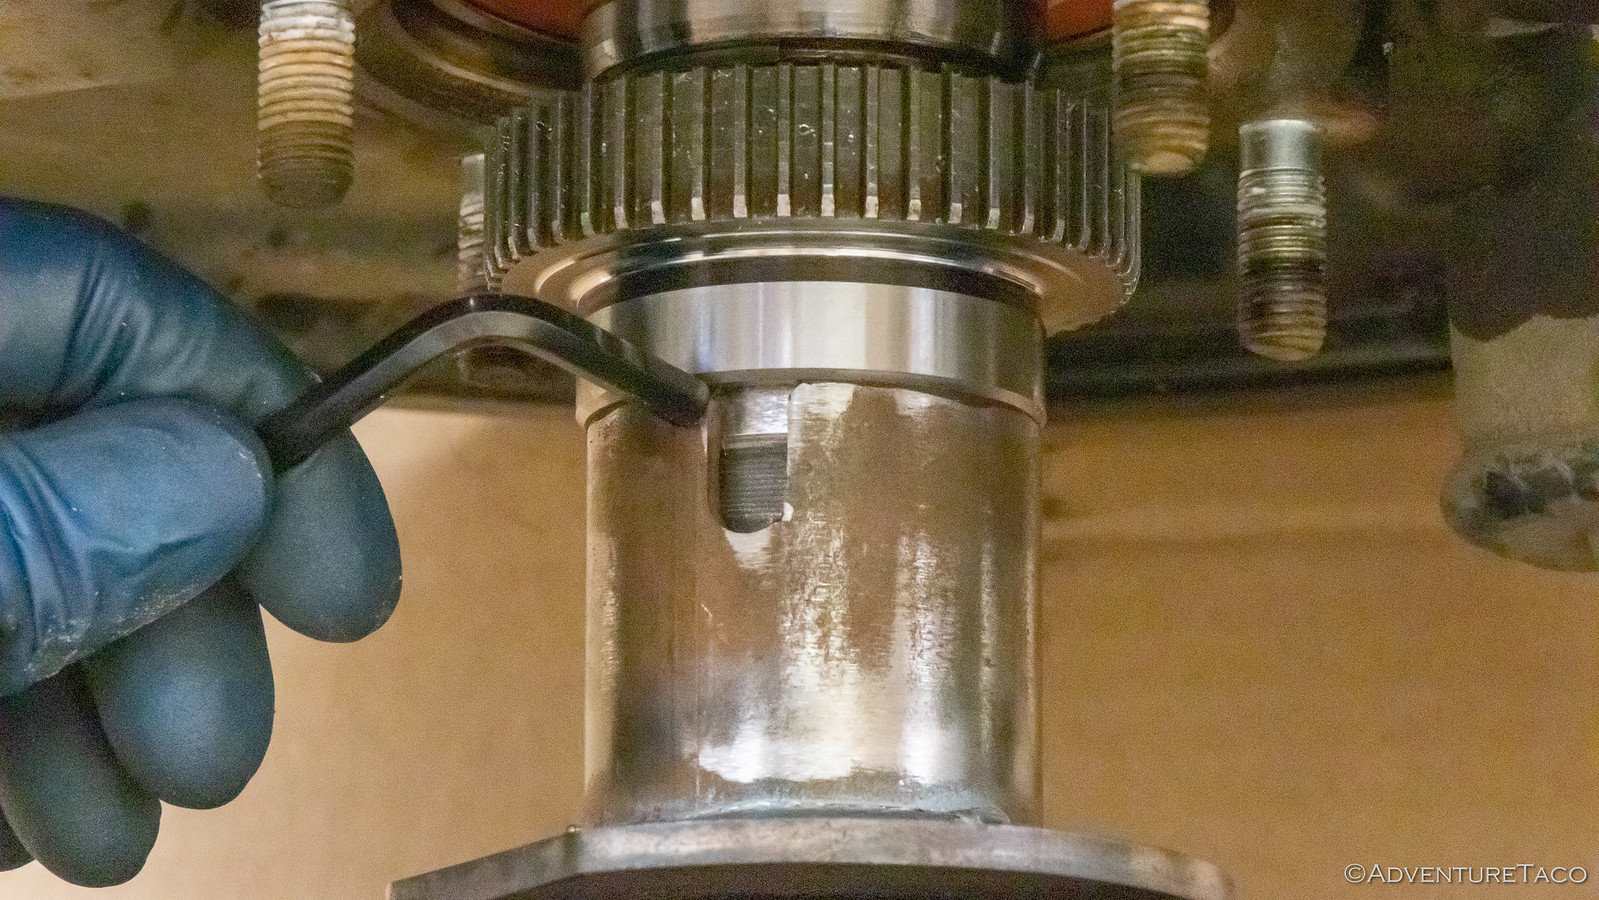
And then, it was back to the press, where I once again used the Bearing Driver and the Rear Wheel Axle Bearing Puller to drive the two rings onto the axle. The key at this point is to ensure that the inner retainer ends up in the perfect position - so that the axle seal rides right in the middle of the flat surface. To achieve this, press the two rings on and utilize the fabulous access hole in the Bearing Driver SST to monitor the progress.
When you start to see polished axle showing below the inner retainer, slow down. You will ultimately want 3- to 5mm of polished axle showing in order for everything to line up. So when you get to 3mm - which you can measure with a 3mm Allen wrench - stop. I went to 5mm initially, and it was too far! (an easy fix with the Bearing Puller and Tone Ring tool, but something I could have avoided).
To see if the inner retainer was in the right place, it was finally time for me to replace the axle seal. And it was nearly 4:00pm! I headed out to the truck and attempted to pull out the old seal using some pliers. No success - the seal was in there good, and despite mangling the seal (while being very careful to not mangle the race), it wasn't budging.
Dang! I'd heard that using the slide hammer in the OTC 4579 Seal Puller Kit made this super-easy, but I'd decided I could probably get it out another way and save the hundred bucks. Dummy. I quickly realized my folly, but it was too late - getting the kit was going to take four days - time I didn't have - and so I did the only thing I could do - panic.
No, I'm kidding. I actually futzed around for a bit after looking at the design of the OTC kit and came up with what I can only call a contraption that I hoped would solve my problem - fashioned to hook the seal in a couple of places, then allowing me to hit the maple block with a hammer to pull it out.
It worked, terribly. So if you're reading this - just buy the OTC 4579 kit and don't lose a few years of life due to stress.
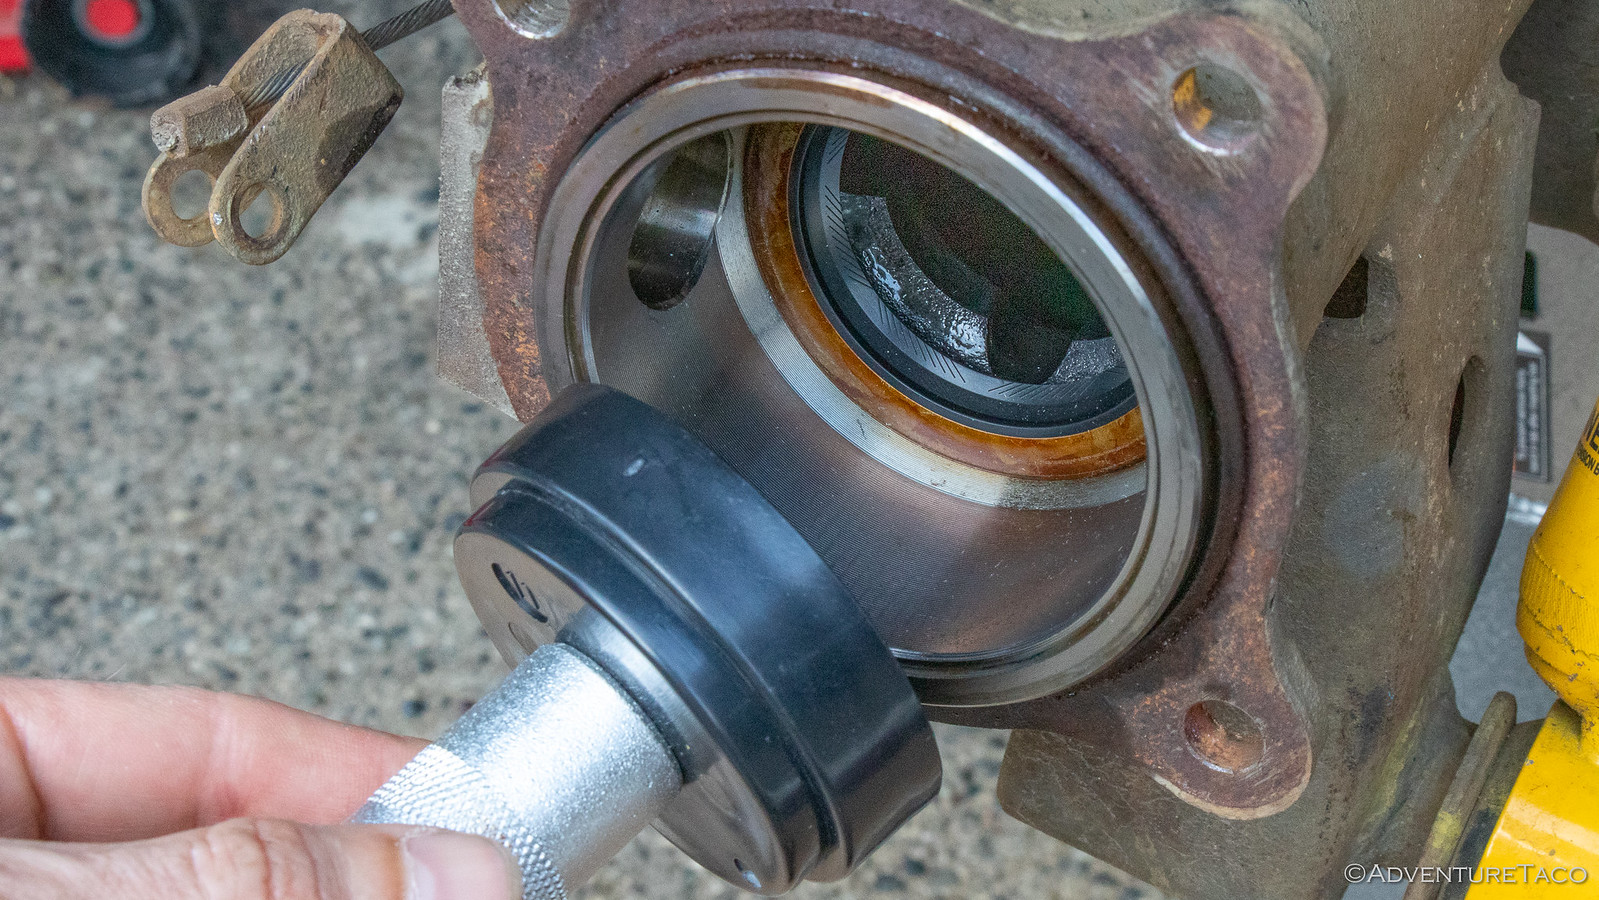
The seal might have been mangled, but it was out and I was relieved. I immediately set about installing the new seal - first heating the axle housing with a heat gun and freezing the new seal - just to give myself as much chance as possible to get it in easily.
It worked great, and seated just fine using the OTC 4507 Seal Driver Kit.
Having that done meant that I could test the position of my inner retainer on the axle, so I drew some lines with a marker and inserted the axle into the housing. A few turns to get the seal to rub off some of the marker, and I knew I had a problem.
I'd pushed the retainer on 5mm, but it was too far. It was back into the shop where I used the Rear Wheel Axle Tone Ring Puller (have I mentioned that this thing is awesome?) to quickly pull the retainer and tone ring 2mm up the axle. And the next test fit was perfect!
Now, it was just a matter of replacing the largest o-ring I've ever seen on the end of the axle housing, and then buttoning everything back up - torquing the nuts that hold the backing plate to the axle housing to 48 ft-lbs, and making sure the ABS sensor and brake line connections were "tight enough."
It was 5:30pm, and I'd finished the first side.
As one does, I figured it was the perfect time to start on the second side. 
It turns out of course, that I now had a better idea of what I was doing, and I didn't have to take any photos - so I was able to go a bit faster. And by a bit, I mean that I completed the entire process in about a quarter of the time - just under two hours - and with fewer mistakes.
By 7:45pm or so, I was buttoning everything up - the day a long one, but a successful one. I left refilling the rear diff with gear oil and bleeding the brakes for the following morning, but those things are easy enough to do that I wasn't at all worried.
It was dinner time, and I was famished.
- - - - -
Of course, now that I've addressed the axle seals, my next project is replacing the rear brake shoes. You know, because the current ones are saturated with diff oil from the previously leaky seals. 
|
|
|
Reply With Quote
|
|
09-11-2019, 10:27 AM
|
#42
|
|
Member
|
|
Join Date: Jul 2017
Location: PNW
Posts: 58
|
|
|
Member
Join Date: Jul 2017
Location: PNW
Posts: 58
|
Building a 5th Gen (2010+) 4Runner Storage Platform
August 25, 2019.
I've built a couple of storage platforms in the past - a slide-with-a-slide style platform for my 1st gen Tacoma, and a fridge-slide style for my 3rd Gen 4Runner - so when a buddy of mine asked for help building one for his 5th Gen 4Runner, I was happy to help.
The goal was relatively simple for this build - a simple platform with some L-track to secure loads, and a way to level out the back of the 4Runner to sleep at night. No fridge slide (yet), but the ability to add it in the future. And, lastly - two slide-out tables to provide room to make lunch, or set various items on when stopped.
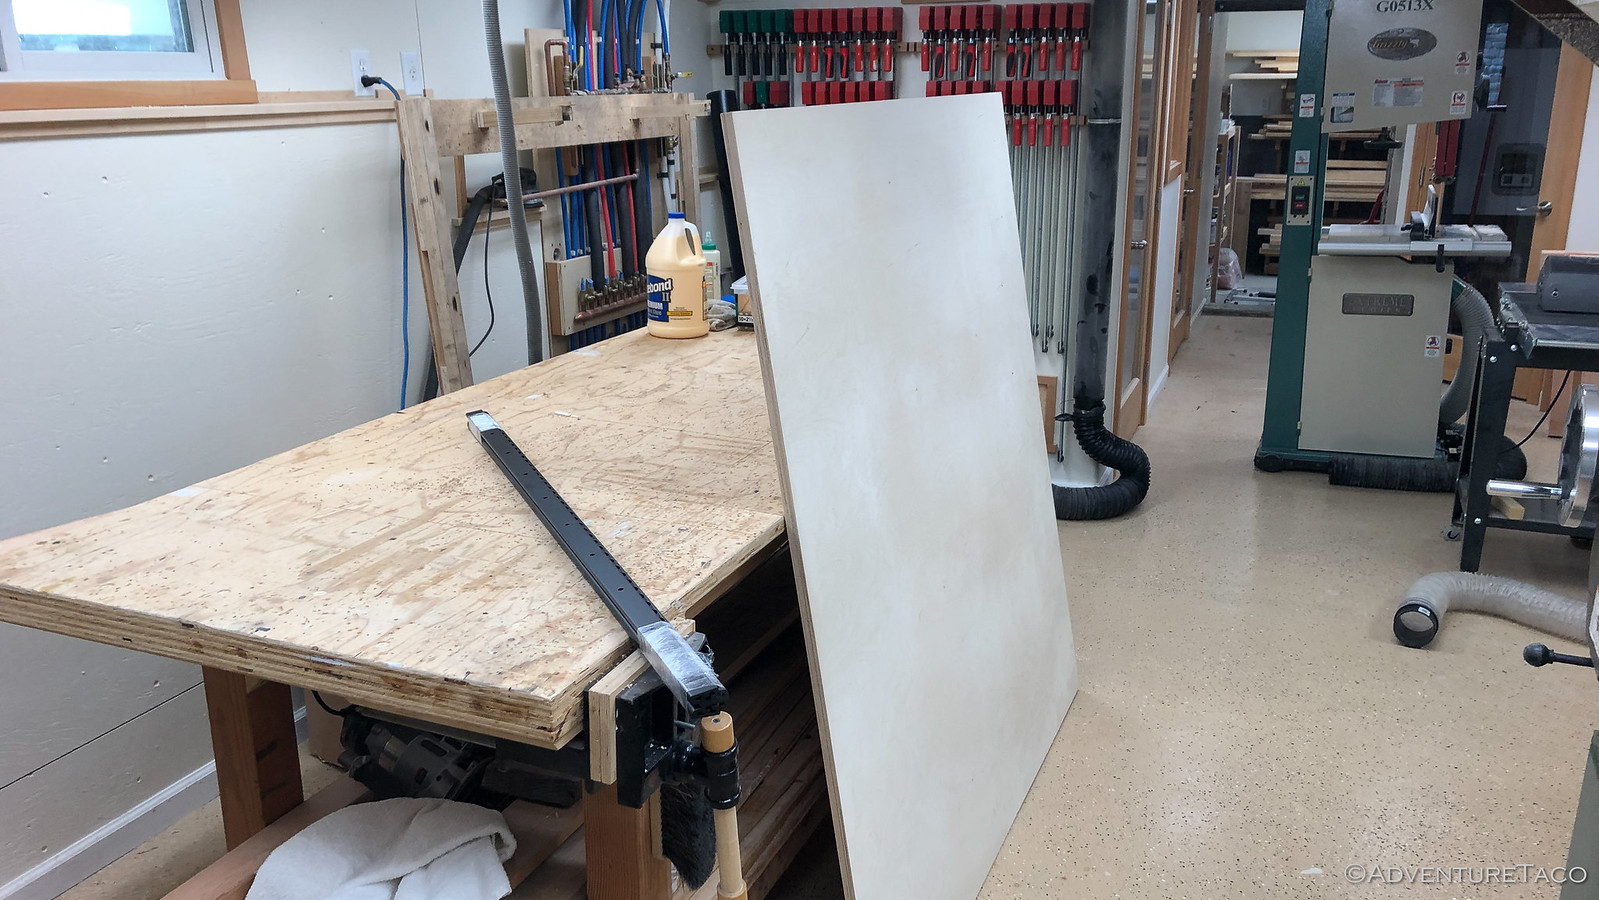
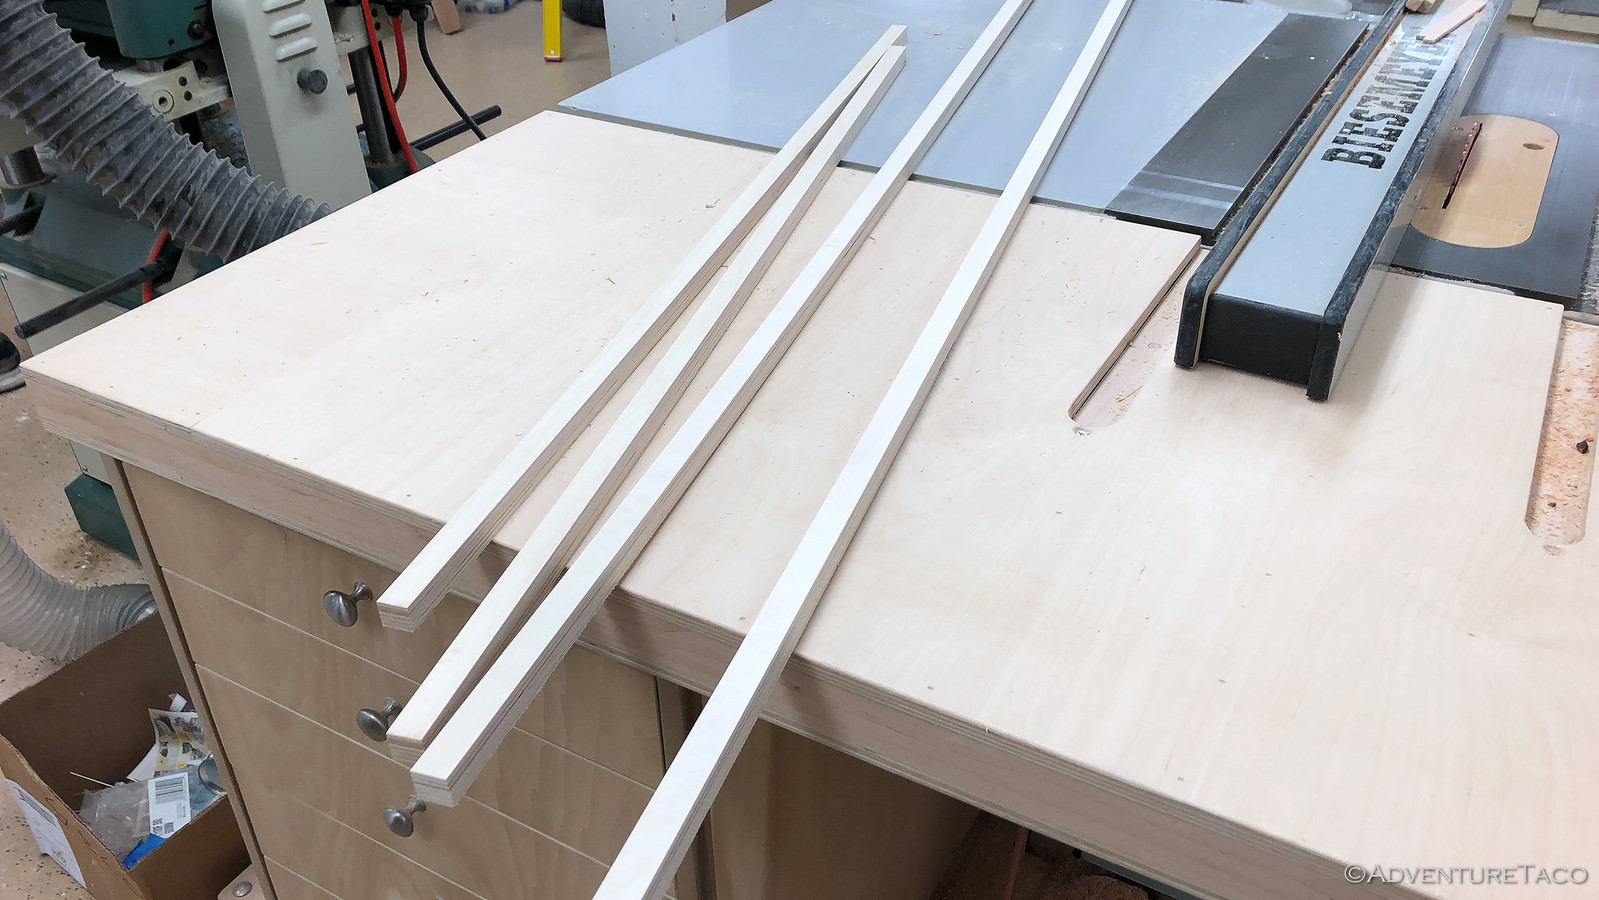
We got started as with any woodworking project - by purchasing the necessary materials. Not much needed for this project - just a single 5'x5' sheet of ¾" Baltic birch plywood, and three pieces of L-track. And of course some screws and glue to secure everything together.
Next was breaking down the plywood into the requisite components. We used a combination of the Makita Track Saw and table saw for this operation, quickly breaking the plywood down to the requisite dimensions, the main platform being 43" wide and 40" deep. We also took a couple minutes to glue up the bottom supports that would hold it 2¼" off the floor, so the glue would have a bit of time to set up before we attached them to the underside of the platform
From there, it was time to cut some dados and rabbits on the platform - the dados to accept the L-track that would be used to secure loads, and the rabbit along the leading edge of the underside to allowing it to sit further forward, for a flatter, more continuous sleeping platform.
Machining of the platform was nearly done at this point, the only thing left to do was drilling a couple holes and countersinks for the M6x1.0 70mm that will secure the platform into the existing tie-down locations. Then, a 1/8th inch roundover eased all the edges for a nicer feel when moving the platform around.
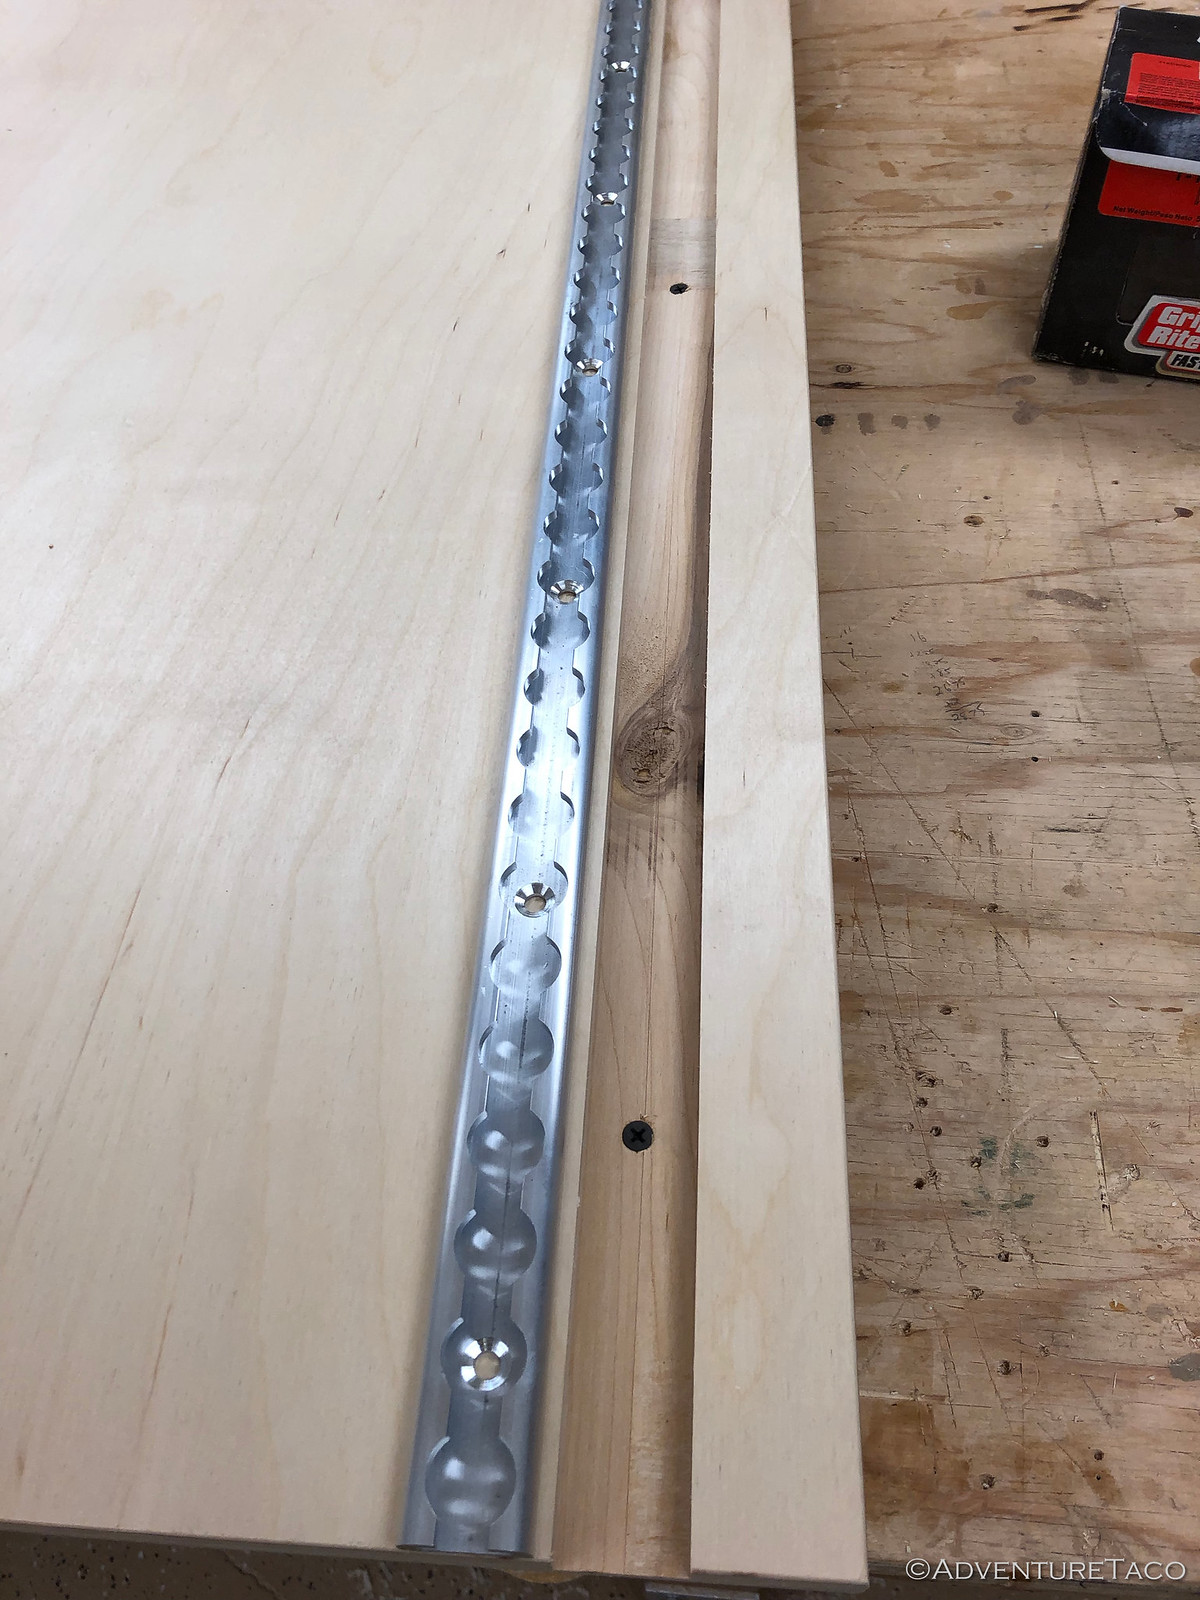
By this point, the glue on the three runners we'd glued up at the beginning was set up enough that we could attach them to the bottom of the platform. These runners raise the top of the platform up approximately 2", so that it's level with the rear seats when they are folded down.
To keep things clean, we secured them through the dados we'd cut for the L-track, making sure that the screws wouldn't interfere with the holes for the L-track itself, which we attached next - the alignment of the supports now adding extra meat for the L-track screws to bite into.
The platform at this point - if it was going to be used only for storage and sleeping - could be done, but we decided that a pull out shelf would be a nice addition, and would use some of the "wasted" space below the platform to boot!
So, we measured the width between the runners and whipped out a shelf on the table saw, as well as some runners that would keep it aligned as it was pulled in and out via a finger-sized recess routed into the bottom of the shelf.
And with that, construction was complete and it was time for a test fit. Platform and securing bolts in hand, we headed out to the 4Runner where we removed the two front cargo loops (and their associated bolts) so that our bolts could take their place.
It fit great! And it was functional to boot - much more so than the standard configuration of the storage area of a 5th gen 4Runner. The tie-down rails of course allow for many more ways to store bins and boxes in the back, and the fact that the area is now flat for sleeping is a huge plus.
Of course, not everyone may need a flat area for sleeping - a RTT or ground tent may fit that bill. In that case, the platform supports can easily be made taller, drawers added below the platform for even more storage. Or a simple drawer-slide system can be added to the top of the platform for a fridge, as I did for my 3rd gen 4Runner.
And the great thing is that it's all just wood - so it's easy to tweak over time should you ever decide to change things up a bit as your camping style evolves.
- - - - -
Interested in Your Own Storage Platform?
5th gen 4Runner Storage platforms are for sale! Made from 3/4" Baltic birch plywood, they are strong enough to support just about anything you throw at them, whether it be a full load of gear, a fridge, or even a couple of people sleeping in the back of the truck.
Several configurations are available to suit your own camping needs, and I'm happy to consider customization's at your request. More info available at adventuretaco.com/store/5th-gen-4Runner-Storage-Platform/.
Basic platform - $350 + shipping*- 3/4" baltic birch plywood platform 2¼" above the existing rear storage floor (aligned with folded down rear seats).
- Two (2) L-tracks, one along each side to secure loads.
- One pull-out shelf, approximately 18" wide.
* local pick-up available and recommended as shipping of this large platform is expensive. Shipped platforms require partial assembly and come with screws, detailed instructions, and all necessary holes pre-drilled. Only a screwdriver is required for assembly. Shipping can result in the scuffing of a platform, which is cosmetic only - it will still function perfectly (and it's going to get banged up in your truck if you use it anyway).
Additions- Second pull-out shelf. $50
- Third L-track in center of platform. $75
- Fridge drawer/slide to fit your fridge. $100 (Note: moves second (included) L-track to center of platform)
- Taller platform supports to allow gear storage below the platform. $35-$50
- Paint - clear polyurethane on the top and sides of the platform, as well as any pull-out shelves. $100
|
|
|
Reply With Quote
|
|
09-12-2019, 11:25 AM
|
#43
|
 |
Member
|
|
Join Date: May 2013
Location: Kentucky
Posts: 619
|
|
|
Member
Join Date: May 2013
Location: Kentucky
Posts: 619
|
Not sure how I overlooked this, but I am in awe of your craftsmanship. I admire your willingness to tackle a job yourself and figure it out. Not many folks these days put forth that effort.
__________________
02 Sport
Toytec Boss/LJ - TRD Pro & 255's - TBU - 4:30's - Elocker
4xI - AED - Savage
|
|
|
Reply With Quote
|
|
09-17-2019, 12:34 PM
|
#44
|
|
Member
|
|
Join Date: Sep 2019
Location: Spring Hill, FL
Posts: 55
|
|
|
Member
Join Date: Sep 2019
Location: Spring Hill, FL
Posts: 55
|
Completely in love with this thread! Looking into the 4Runner world for a "capable camping vehicle" for myself, the lady, and the four kiddos (4-legged kind). Dad's pushing for a Tacoma because I do need to tow a boat with whatever future vehicle we end up with, but that's just not practical with the dogs (honestly I think he just wants to be able to borrow it). Im still deciding between a 3rd gen and the better tow capacity of a V8 4th gen, but this thread is easily pushing in a certain direction!
Also, living vicariously through the AdventureTaco thread
|
|
|
Reply With Quote
|
|
03-09-2020, 11:39 AM
|
#45
|
|
Member
|
|
Join Date: Jul 2017
Location: PNW
Posts: 58
|
|
|
Member
Join Date: Jul 2017
Location: PNW
Posts: 58
|
4Runner Accident, and the Saga of Repair
If you own vehicles long enough, it's a safe bet that one will be in an accident. Luckily for us, when the 4Runner was hit, no one was in it. This is the story of what happened, and the saga that followed.
So, it was the first Friday in December when @mrs.turbodb drove the 4Runner a few miles to a school where she volunteers as a tutor, around 10:00am. I'd gone to help a buddy with some landscaping at his place.
He and I were eating lunch when @mrs.turbodb called to let me know that a 17-year old girl had plowed into the 4Runner when it was parked outside the school.
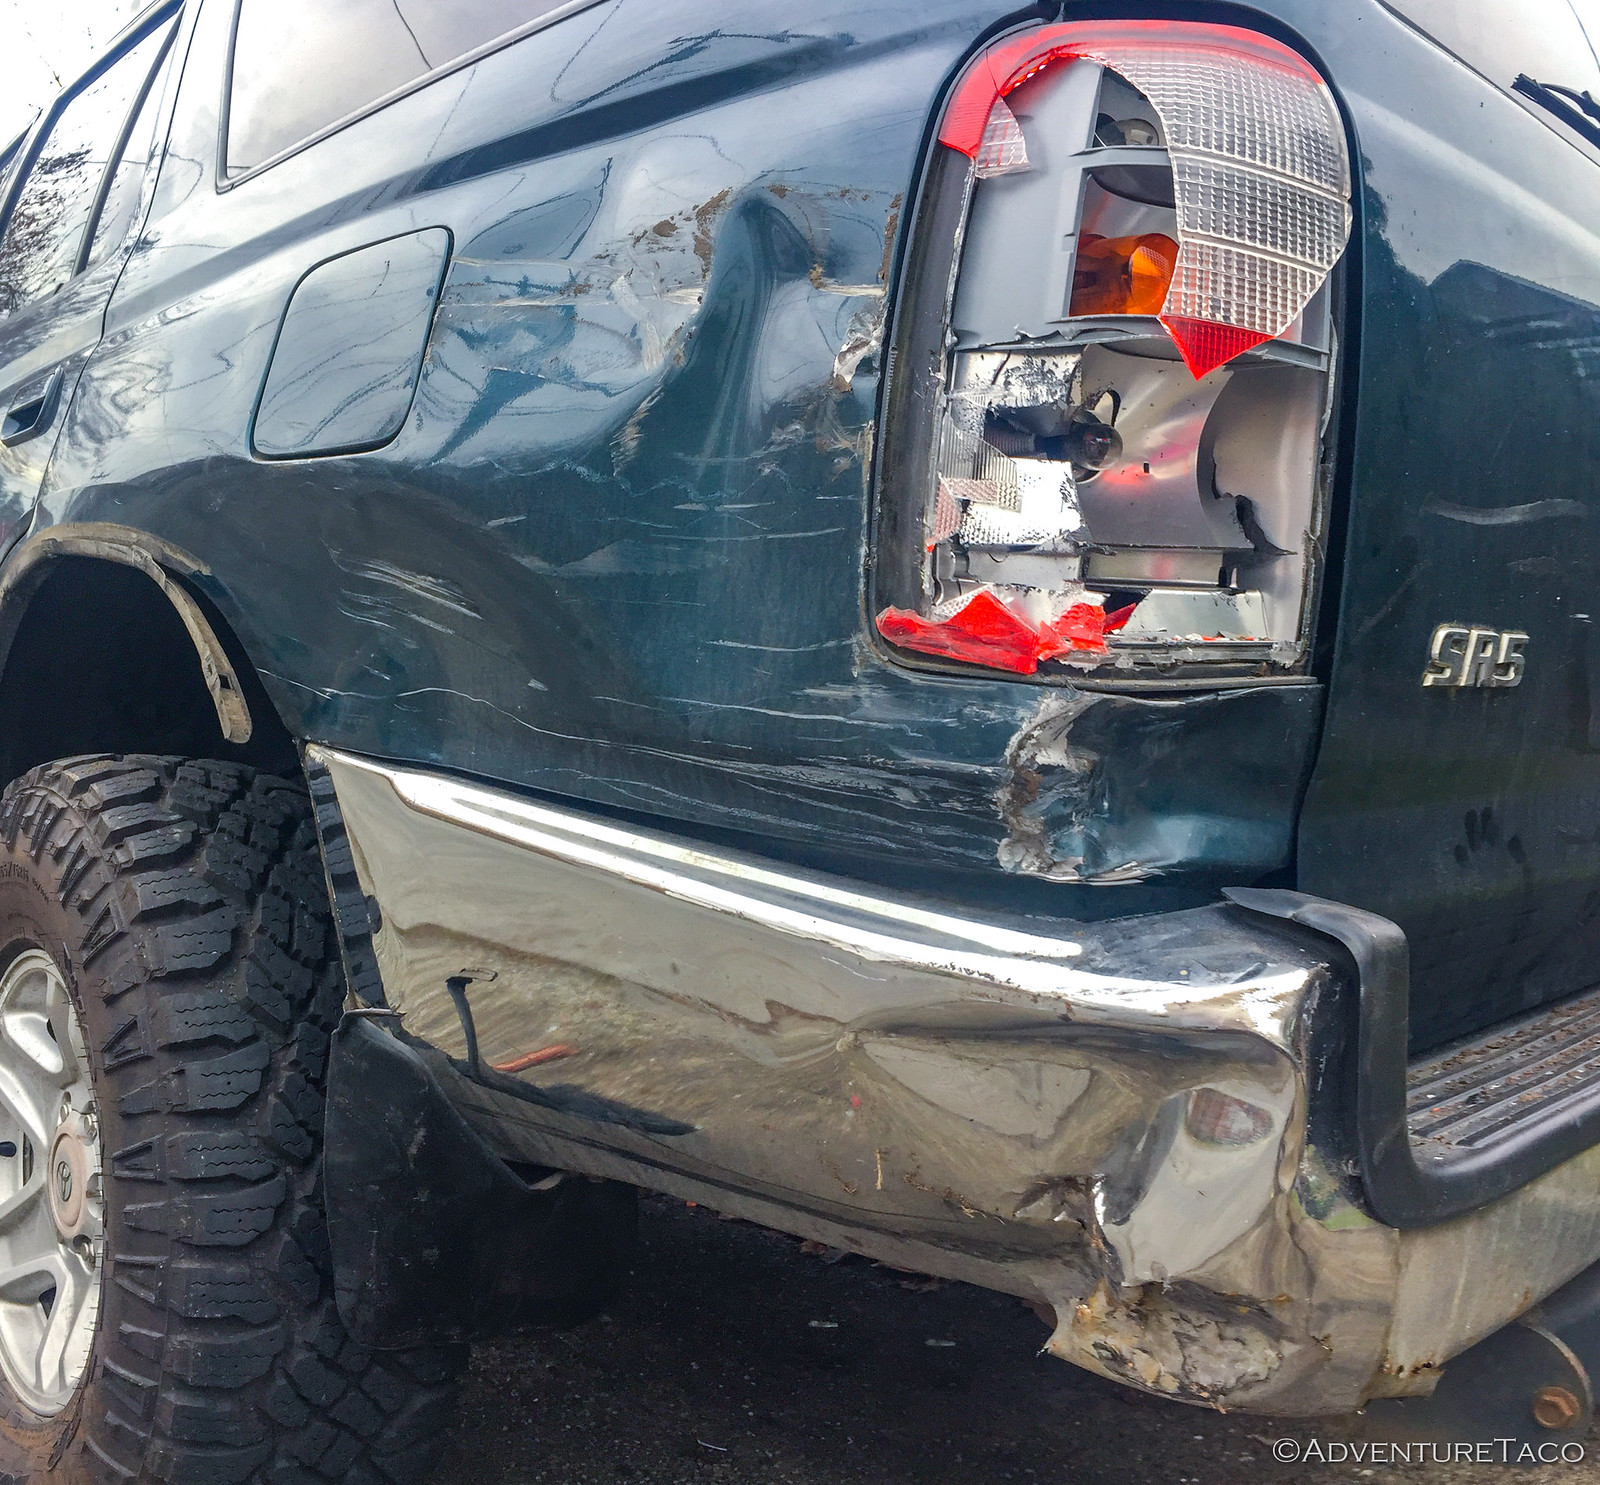
She'd made a left hand turn, and was accelerating down the street when she decided that she just had to turn around and reach into the back seat to grab something. Doing so caused her to turn the wheel, and before she knew it, she'd drifted right and crashed into the driver rear corner of the 4Runner, pushing it into the car in front of it.
Not. Awesome.
Luckily for us, the girl had called her mom - they apparently lived a block or so away - and they had the wherewithal to go into the school to ask if the 4Runner (and second vehicle) belonged to any of the staff. Not a fun call to get over the intercom, if you're @mrs.turbodb, who came out to find the 4Runner still entangled in the Suburban that had hit it.
After exchanging insurance info, and waiting for a tow truck to come untangle the vehicles, @mrs.turbodb headed home and set about finding shops where we could take the 4Runner for repair estimates. You see, we knew that because it was an old vehicle, that it wouldn't take much for it to be totaled - and we wanted to get all of our ducks in a row so we were just a bit more educated on what it would take to fix our family adventure-mobile.
Our first estimate was the next afternoon, and let me tell you - it wasn't pretty. I wasn't at the shop when they looked the truck over, but the estimate came back at a little over $7100, and the guy writing the estimate advised @mrs.turbodb to start looking for stock parts on Craigslist that we could swap in - for the nice aftermarket parts I'd installed, which we could sell for more than they'd pay - to the 4Runner when the insurance company totaled it.
Needless to say, I felt like $7100 was a little high for a rear quarter panel and trim, rear bumper, and a taillight assembly, and @mrs.turbodb had already arranged several other appointments for estimates, so I didn't worry all that much at this point.
Over the next several days as we got six more estimates that ranged from $2300 - $5300, I waited for Safeco - the other person's insurance - to contact me and let me know the next steps. Five days and several of my own calls later, I was still waiting.
Finally, Safeco got back to me and let me know that they were accepting 100% liability. "Well, that's good," I thought, and within five minutes, I'd emailed them to ask what the next steps were.
Two days later, I heard back. Unfortunately, by that time we were all out of town - we'd been planning a trip to Hawaii for over a year - and we weren't planning to return for 10 days, at which point @mrs.turbodb and I were heading to California and the Mojave Reserve to do a bit more exploring than we'd been able to during our trip along the Mojave Road the year before. I sent Safeco an email letting them know I'd get back to them in early January, and proceeded to have a great time in Hawaii and on our Mojave Redemption trip.
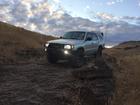
 Our first day in the Mojave National Preserve was a bit... unusual.
I returned in January to find out that the Safeco agent was now out of town - without a stand-in - for another week. I wasn't thrilled about that, but I figured it was no big deal - we'd gotten the ball rolling in December and now it was just a matter of finding out where Safeco wanted me to get a couple quotes so we could start the negotiation.
I called every day after the agent was supposed to be back in the office, and three days later I was able finally able to get in touch. They gave me a list of Safeco-approved repair shops, and I made appointments at two of them - Service King and Gerber Collision - over the next several days.
 Not the actual locations I would visit.
My first appointment was at Service King. When I arrived, the place seemed reasonably clean, the vehicles there were definitely nicer than ours, and the quote I got was right in the middle of the range of all the previous quotes at $4144. In fact, it was at the low end of the quotes that called for replacing the rear quarter panel - a $1200 part that would require cutting out and welding in a new panel - vs. the cheaper quotes which called for pulling out the dents as much as possible and then repairing the quarter panel.
The estimator at Service King let me know that the quote amount was likely right on the edge of what Safeco would deem a total loss, so they'd have to get approval before actually doing the work. That was fine with me, since I still needed to head over to Gerber for their estimate. I thanked the estimator and let him know I'd be in touch, and then waited five days for my final appointment.
My experience at Gerber was - to say the least - a bit different than the experience I had at Service King. Both @mrs.turbodb and I went to this appointment, and when we arrived, the receptionist asked us to wait in a couple of chairs for a few minutes until the estimator was free. The thing was, he was sitting right next to her - and we could see he was surfing the internet on his computer. Strange. After about 5 minutes, he was ready to see us, and asked that I pull the 4Runner into the shop. That was no problem - it was raining outside at the time - so I backed in and got out to show him the damage. Immediately he said, "Well, that's definitely totaled," to which I tried to explain that I didn't actually want the truck to be totaled - I wanted it to be fixed.
He was having none of that, letting me know that it didn't matter what I wanted - as he walked around the vehicle, snapping photos inside and out. This was a bit disconcerting, but I figured I might as well just get the estimate from him and then head over to Service King, so I bit my lip and followed him back into the office, where he told me, "It'll be about 10 minutes to write up the estimate." That was fine with me, so we waited.
After 10 minutes, he looked up from his computer and told us we should leave - he'd handle letting Safeco know that the 4Runner was totaled. Confused, I told him that I didn't want him communicating with Safeco at all - I was just here today to get a quote, and that I'd still like that quote so I could add it to the set of quotes I'd already gotten. "You're not getting a quote," he said.
Shocked, I asked why and got an answer that I don't even recall. But, I soon realized that he really wasn't going to give me a quote, and so I asked that they remove all of my personal information from their systems and not communicate anything to Safeco. "Not going to happen," was the response I got, "Once we enter your information in our system, we can't remove it." There wasn't much I could do at that point, so I left and texted Safeco with my experience.
The reaction I got from Safeco was pretty great at this point, I thought, and so I contacted Service King and setup an appointment for the first time they had available - 26 days later in February! Not ideal, but I figured that it was a good sign that they were busy, as it likely meant they did great work. It was 1:34pm, and I was happy - the 4Runner was going to get fixed!
:yay: :yes: :yay:
You can imagine my surprise when I looked at my phone the next morning and saw a text that Safeco had sent just two hours later - at 3:47pm. Needless to say, my heart skipped a beat.
 Wait, what?
I immediately got on the phone - though now with a new total loss adjuster - and discovered that the decision to total the vehicle was based on an estimate from (you guessed it) Gerber Collision! I was also running into a wall in trying to reason with Safeco that they'd already approved the work at Service King - that apparently didn't matter because the review of the vehicle value happens in parallel with arranging to get it fixed (to speed things along, I suppose, though I was never explicitly told this).
It was during this call that my new adjuster also sent me Safeco's total loss settlement statement, the relevant page of which below, highlighting, mine. You'll note that they'd valued the vehicle at approximately $4000 for salvage, and would give me a little over $1400 if I wanted to keep the 4Runner. Oh, and they were insistent that it all be done in two days - which was going to be tough for me given that I was in the middle of prepping to leave on my next trip to Death Valley.
I took some time to look everything over, and then sent my new adjuster an email stating that I'd like them to reconsider totaling the vehicle, along with reasoning for why I thought that two of the estimates - one at Service King, and one at a local shop (Jim's Body Shop), should be viable to get the 4Runner fixed, as they were both below the ~$4000 salvage value of the vehicle.
Less than an hour later, I received an email from Safeco, and I was relieved to hear that they were once again OK with me getting the 4Runner fixed - though I'd need to do it at my local shop, and they wouldn't guarantee the work for the lifetime of the vehicle.
Thinking that things were looking up, I also sent a few other things to the Safeco adjuster that she'd requested I send in order to get the most value for the vehicle - the idea being that if the value was higher, that it might be OK to fix it at Service King, where they'd replace the rear quarter panel rather than fix it. I sent: - 4 comparable (similar age, mileage, features) 4Runners that I found across Craigslist, eBay, and KSL showing sale values ranging between $5995 and $10,500
- All of the receipts for the aftermarket work and parts installed on the vehicle in the previous year, which totaled $6368. I knew that they'd pro-rate the value of these items, but I figured they were still worth including.
It wasn't long before the adjuster got back to me. Given the comparables and receipts I'd sent, they were willing to increase the value of the 4Runner by a ridiculously insignificant $300 - - an amount that wasn't enough to warrant fixing at Service King. Over the next few days, I questioned that $300 adjustment - were the $1000 tires and, not to mention the custom roof rack, sliders, and beefed up suspension really "worthless?" I never got any answers to my questions from Safeco - but ultimately didn't really worry about it because I figured was still getting the 4Runner fixed at Jim's Body Shop.
And with that, I left for my Death Valley Connections trip - figuring that I'd set up the appointment at Jim's upon my return. For a couple days, I had a splenditacular time in the California desert, and it was only as I was traveling over the heights of the Last Chance Range that I happened to get cell service for a few minutes. Long enough to download the emails, but not long enough for me to still have service when I noticed the following in my inbox:
 Wait, what, again?! Especially interesting, given that I made no such request.
This got my blood pressure up a bit - again. This was the second time that Safeco had told me that I could get the 4Runner fixed and then later changed their mind and called it a total loss. And this time, it seemed as though they'd already notified the DMV that this was what was happening - without even consulting with me that I wanted to retain the vehicle if they totaled it!
Determined not to let it affect the rest of my trip, I put it out of my mind and had two more great days exploring the northern reaches of Death Valley National park. That park really is a special place, with an endless number of destinations to see and explore.
And so, as I found myself driving home on Super Bowl Sunday, I sent a quick email to Safeco letting them know - again - that I did not agree with their previous email, and I reiterated that I wanted to get the vehicle fixed at Jim's Body Shop, as they'd previously agreed just a week prior. The response I got was disheartening to say the least.
Not knowing what to do at this point, I decided that I needed to speak with someone who knew more about all this than I did, and who would be more likely to be on my side because they didn't have skin in the game - so I decided to call my own insurance carrier - Geico. I'd hesitated to do this previously since I knew doing so could cause my rates to go up - even though the vehicle was parked, and the incident was in no way my fault, but at this point I really had no other choice.
The person I talked to at Geico was great. Her first inclination was to just have me file a claim through Geico, get the 4Runner fixed that way, and then Geico would go after Safeco on my behalf, since Safeco had assumed 100% liability for the accident. However, because I don't carry comprehensive coverage on the 4Runner, it turns out that this option wasn't available.
Side note about my insurance philosophy: I view insurance as something that should be used to offset the risk of catastrophic loss - loss that would cause significant financial hardship should it occur. As such, whenever possible, I self-insure. I choose my deductibles to be as high as possible, and I carry only the coverages that I couldn't bear the financial cost of myself. I do this because I know that insurance companies exist - in today's age - to make money. They are betting that their clients premiums will be more valuable than the amount they have to pay out in claims. Knowing that, I make the same bet - that if I keep and invest my premium, that it will be more valuable in the long run, assuming that any claims I have are not catastrophic. I recommend that everyone take this approach, though in doing so, it's important to be honest with yourself about what would be catastrophic financially - as it is a different amount for everyone.
Next, she offered to call Safeco on my behalf and try to get to the bottom of what was going on. With more knowledge in the industry, we both thought that was a reasonable idea, and she put me on hold while she spent a few minutes with the Safeco adjuster. Unfortunately, the Safeco adjuster was even less forthcoming with Geico - my agent remarking that the Safeco adjuster seemed "downright rude." Strike two.
The last option Geico gave me was to call the Washington State Insurance Commissioner. This it turns out is a consumer advocacy group that reviews cases like this where insurance companies jerk around consumers, to make sure that nothing untoward is going on. And, while it would likely mean a bunch more time and hoops to jump through, I realized that it was all my agent at Geico could do, and I thanked her profusely for her time - it'd been over an hour that she worked on this - that morning.
 A last resort?
Before opening a case with the Washington State Insurance Commissioner, I decided to give Safeco one last call and see if I could work things out with them one final time. All I really wanted was to get the 4Runner fixed (at no cost to me) so we could continue to use it as our family adventure vehicle. The current situation - with an owner retained value of $1451.72 and my cheapest estimate from Jim's Body Shop being $2603 - definitely wasn't that.
Mentioning the Insurance Commissioner to Safeco definitely brought out an entirely different approach to the conversation from their side. I'm sure that's because getting the commissioner involved increases both the time and risk to Safeco, and in their business, time and risk are costly. And so, after being placed on hold a few times while she talked to her management, the Safeco adjuster eventually came back to the call and let me know that they could increase the amount of the payout to the cost of the repair at Jim's Body Shop, but in doing so they would still need to record the 4Runner as being totaled.
That wasn't ideal for me, but it was definitely better than having a totaled 4Runner and only half the money needed to fix it, so I agreed. It was only later - as I researched my next steps to getting the 4Runner re-titled and fixed, that I discovered a cool little provision in the Washington state vehicle code: a title only gets branded rebuilt/totaled if the vehicle is less than 20 years old at the time of the accident. So, while I still had to go to my local title office to get a new title, it's essentially identical to the previous one.
#SmallWins
I've now got an appointment scheduled at Jim's Body Shop to get the 4Runner fixed and already, Jim's has impressed me - twice. The first time was when I went back just to verify that they thought the estimate was solid - since I'll be paying out of pocket, I didn't want to find out that it'd end up costing $5000 to fix the 4Runner when they got down to it. They very cheerfully took a look at the 4Runner again and validated their initial estimate - so that's good. Then, when I stopped in to actually schedule the work - I asked if they'd be OK with me supplying the replacement parts. By purchasing those myself, I could save a few hundred dollars over what they'd charged on the estimate, and they were totally cool with that.
So, at this point, my hope is that I'm getting what I wanted: We're keeping the 4Runner and not paying out-of-pocket for repairs. And, I guess I'm also happy that I'm done dealing with Safeco and their flip-flops. My hope - and we'll see if this pans out - is that Jim's will actually let me take a few photos as they do work to the truck. If they do, that'll be awesome, but regardless there's bound to be one more story to this saga!
|
|
|
Reply With Quote
|
| Thread Tools |
|
|
| Display Modes |
Rate This Thread |
 Linear Mode Linear Mode
|
|
 Posting Rules
|
You may not post new threads
You may not post replies
You may not post attachments
You may not edit your posts
HTML code is On
|
|
|
|