User Tag List

Reply
 
Thread Tools Rate Thread Display Modes
Old 11-03-2019, 04:20 PM #1
rickashay's Avatar
rickashay rickashay is offline
Senior Member
 
Join Date: Dec 2010
Location: Nelson, BC
Posts: 2,552
Real Name: Addison
rickashay is a splendid one to behold rickashay is a splendid one to behold rickashay is a splendid one to behold rickashay is a splendid one to behold rickashay is a splendid one to behold rickashay is a splendid one to behold rickashay is a splendid one to behold
rickashay rickashay is offline
Senior Member
rickashay's Avatar
 
Join Date: Dec 2010
Location: Nelson, BC
Posts: 2,552
Real Name: Addison
rickashay is a splendid one to behold rickashay is a splendid one to behold rickashay is a splendid one to behold rickashay is a splendid one to behold rickashay is a splendid one to behold rickashay is a splendid one to behold rickashay is a splendid one to behold
**Rickashay's Sleeping Platform V2**

Before I release the Colossal write up in the next week or two, I thought I'd share my sleeping platform configuration. Honestly copied a bunch of it from @Dirtco and his old design before his truck went under the knife. I've built a couple storage solutions now (the OG Dirt Duster, my 80-Series, the Tundra, and I had one being built for the 4th Gen) and this is definitely a cumulation of what I've learnt.

I am 6'6" tall so sleeping in the 3rd gen is not an easy task. Plus with a new baby (3 month old) it was a requirement to keep at least 3 seats in the truck (or at least make it modular to some extent). I also camp differently with my family vs. when I go wheelin' with the guys. So baby, wife and dogs for one configuration (I will sleep on the ground in a tent when this happens - until I build my trailer) and solo inside-the-truck sleeping when it's a guys trip. If it was my wife and I only, I probably would have deleted the rear seats altogether but this made some some interesting design challenges and honestly, there is not a lot I'd change about my current design if I had to do it all over again. Super happy with it overall. Additionally, I wanted to do a better job organizing my gear so I spend less time loading/unloading and shuffling things around when I get to camp. Organization is something that I've always tried to master but it seems there is no perfect formula.

Design Notes:

- I'm 6'6" tall and needed a LONG area to sleep in (even if I have to move one of the seats forward all the way to gain more legroom
- I decided to delete the rear driver's side seat and make the passenger rear seat interchangeable depending on my use configuration
- for the sleeping area, I wanted it as low as possible to retain as much sit-up room to be able to get changed etc in the morning
- wanted the sleeping area to be just wide enough for my Thermarest luxury mattress to fit, and then to maximize the rest of the space for cargo
- had to house my fridge and compressor and as much of my camping gear as possible.
- the area under the fridge is JUST tall enough to accept Front Runer Cub Pack bins without the lids on. I did this so I could try to keep wait down and NOT install drawer slides and make a drawer, but rather simply use the light weight plastic cub packs. TBD if I will install a drawer

Construction Notes:

- basically the entire unit is 3/4 baltic birch.
- wood tools required were a table saw, router, drill, and a skill saw (probably could of not had a table saw and just clapped a level for the skill saw to make the longer rip cuts)
- I did use my Everlast 110V welder to make the mounting brackets and to make the mount for the driver's side gear platform (as shown in pics)


BABY MODE CONFIGURATION:

3rd seat installed. My sub box is easily removed when I go camping (un-necessary weight) but I may opt for an under-seat sub down the road to eliminate that altogether.

_08I3642.jpg by Addison Rickaby, on Flickr

Same configuration in the cargo area. Notice the Front Runner Cub Packs under the fridge. Space for the dogs ontop of the lower section when camping with the family:

_08I3643.jpg by Addison Rickaby, on Flickr

Cargo deck lifts up for emergency supplies and spare parts storage. These are items I do not use all the time typically but still fine-tuning what goes in there:

_08I3646.jpg by Addison Rickaby, on Flickr


SOLO WHEELING CONFIGURATION:

Passenger rear seat bottom un-bolted with 2x 12mm bolts. Seat back folds down flat and you can see the "lip" to catch the sleeping extension that is later installed.

_08I3649.jpg by Addison Rickaby, on Flickr

Sleeping extension installed. Bolts into the rear cargo platform with the 2x 12mm bolts.

_08I3652.jpg by Addison Rickaby, on Flickr

Another angle. Lots of room for a giant like me when the passenger front seat is slid forward.

_08I3656.jpg by Addison Rickaby, on Flickr

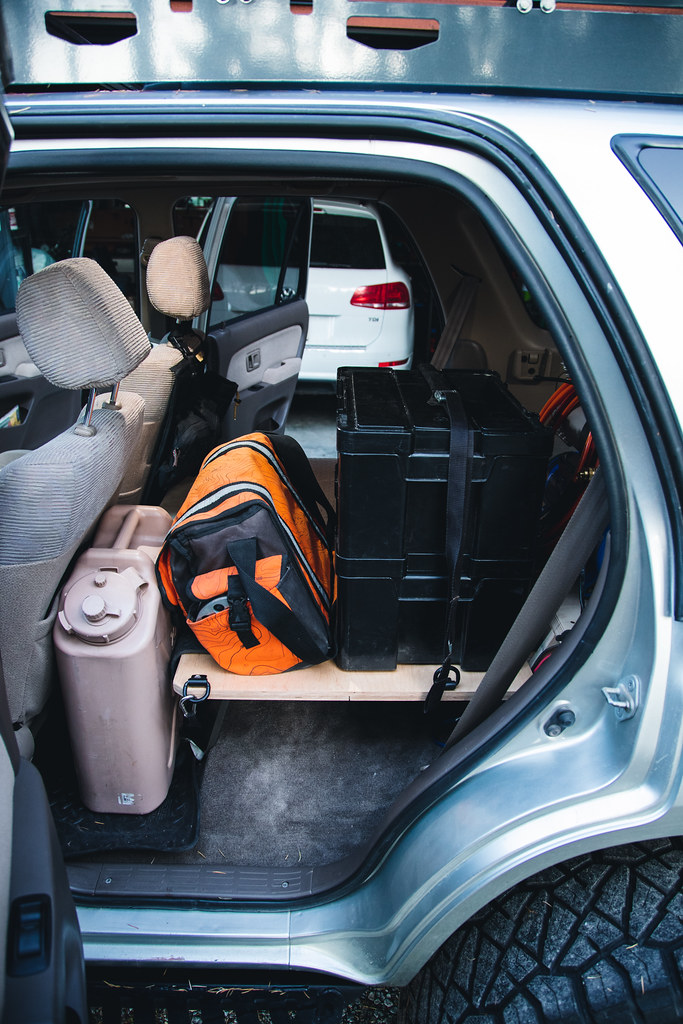
CARGO DECK / SEAT DELETE:

My thinking here is that I don't need to haul the weight of that extra seat around and the space could be better utilized for my regular camping gear. I removed the seat back by unbolting it and you actually have to cut along a single seam of fabric to actually get it to release, which I thought was strange but it is still reversible should i ever need to put the seat back in. the crgo extension mounts to the rear cargo area exactly like the sleeping extension but instead of just using a leg that reached to the floor, I fabricated a bracket to bolt into the factory seat bottom location as shown.

_08I3651.jpg by Addison Rickaby, on Flickr

I'm still figuring out the best optimization of this space but a couple configurations below.

_08I3663.jpg by Addison Rickaby, on Flickr


_08I3658.jpg by Addison Rickaby, on Flickr

This shot is to show the access when you roll down the rear window. Once I rig my Sceptor water jug up to be air pressurized, this would be great to reach in and fill up your water bottle while your on the trail, without having to remove anything.

_08I3660.jpg by Addison Rickaby, on Flickr

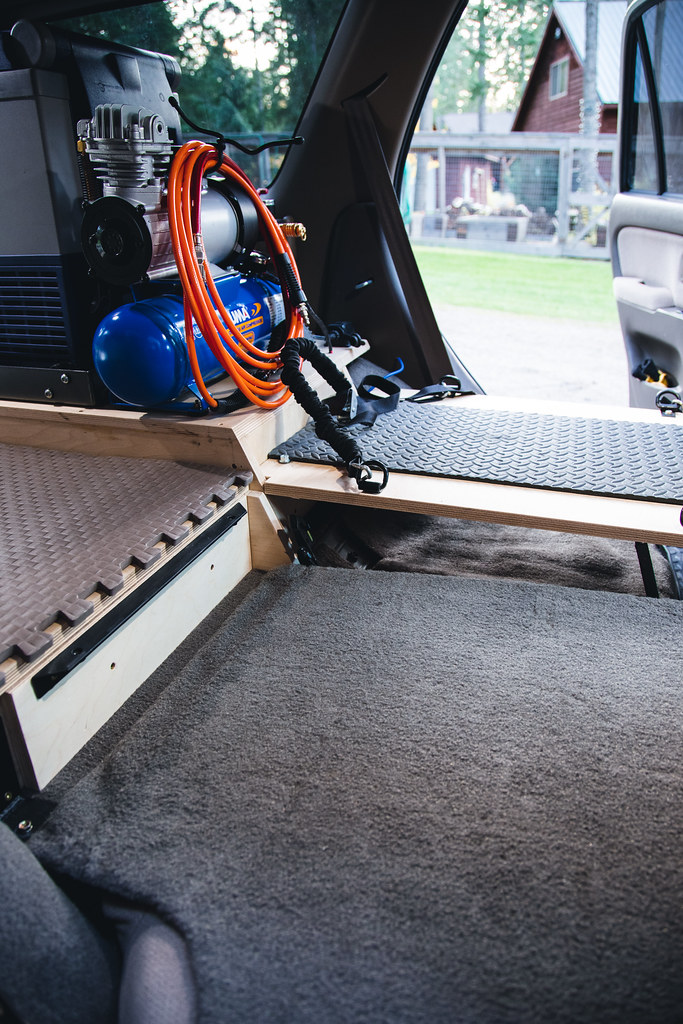
Finally, a shot showing where I mounted my PUMA PD1006 compressor. This compressor is widely used in the 80-Series LC community. I can't believe no one has caught wind of it here yet. It was $260 USD and is as quick as my old ARB twin with a built in tank and 100% duty cycle. It's even super quiet, the only downside I've seen so far is its size. But the tank can be split and re-located if you so choose. I'm absolutely loving this thing so far!

_08I3665.jpg by Addison Rickaby, on Flickr

I've actually slept in the truck now for 13 nights so my writing is with a decent amount of actual usage. A coupe finished touches to come as I install a latch for the lower cargo storage area and get stronger lift struts as the ones I have now are too weak to hold the lid up once my sleeping bag and Thermarest are installed ontop. I still may install a real drawer under the fridge but that is TBD.

Hope this helps as you plan your own storage solutions!

Last edited by rickashay; 11-03-2019 at 04:28 PM.
rickashay is offline   Reply With QuoteReply With Quote
Old 11-03-2019, 08:16 PM #2
Mighty Buffalo's Avatar
Mighty Buffalo Mighty Buffalo is offline
Member
 
Join Date: Feb 2015
Location: SF BA
Posts: 177
Real Name: Greg
Mighty Buffalo is on a distinguished road
Mighty Buffalo Mighty Buffalo is offline
Member
Mighty Buffalo's Avatar
 
Join Date: Feb 2015
Location: SF BA
Posts: 177
Real Name: Greg
Mighty Buffalo is on a distinguished road
That's very cool. I just went camping in Mojave and now trying to figure out the best way to take out the seats and maximize sleeping space while also figuring out a way to secure all the gear when traveling.
Mighty Buffalo is offline   Reply With QuoteReply With Quote
Old 11-03-2019, 08:28 PM #3
brookester's Avatar
brookester brookester is offline
Junior Member
 
Join Date: Dec 2018
Location: Chandler, Arizona
Posts: 26
brookester is on a distinguished road
brookester brookester is offline
Junior Member
brookester's Avatar
 
Join Date: Dec 2018
Location: Chandler, Arizona
Posts: 26
brookester is on a distinguished road
Nice set up. I'm working on a simpler version of that as well.
brookester is offline   Reply With QuoteReply With Quote
Old 11-03-2019, 08:32 PM #4
brookester's Avatar
brookester brookester is offline
Junior Member
 
Join Date: Dec 2018
Location: Chandler, Arizona
Posts: 26
brookester is on a distinguished road
brookester brookester is offline
Junior Member
brookester's Avatar
 
Join Date: Dec 2018
Location: Chandler, Arizona
Posts: 26
brookester is on a distinguished road
I decided to leave one seat in though.
brookester is offline   Reply With QuoteReply With Quote
Old 11-04-2019, 12:25 AM #5
rickashay's Avatar
rickashay rickashay is offline
Senior Member
 
Join Date: Dec 2010
Location: Nelson, BC
Posts: 2,552
Real Name: Addison
rickashay is a splendid one to behold rickashay is a splendid one to behold rickashay is a splendid one to behold rickashay is a splendid one to behold rickashay is a splendid one to behold rickashay is a splendid one to behold rickashay is a splendid one to behold
rickashay rickashay is offline
Senior Member
rickashay's Avatar
 
Join Date: Dec 2010
Location: Nelson, BC
Posts: 2,552
Real Name: Addison
rickashay is a splendid one to behold rickashay is a splendid one to behold rickashay is a splendid one to behold rickashay is a splendid one to behold rickashay is a splendid one to behold rickashay is a splendid one to behold rickashay is a splendid one to behold
Quote:
Originally Posted by Mighty Buffalo View Post
That's very cool. I just went camping in Mojave and now trying to figure out the best way to take out the seats and maximize sleeping space while also figuring out a way to secure all the gear when traveling.
Totally. It's literally a game changer. I'd regard these interior mods up there in functionality with an HID retrofit and a fridge!

Quote:
Originally Posted by brookester View Post
Nice set up. I'm working on a simpler version of that as well.
Awesome. Stoked to see what you come up with!
rickashay is offline   Reply With QuoteReply With Quote
Old 11-04-2019, 11:35 AM #6
infamousRNR's Avatar
infamousRNR infamousRNR is offline
Senior Member
 
Join Date: Dec 2013
Location: SF Bay Area California
Posts: 2,763
infamousRNR is a glorious beacon of light infamousRNR is a glorious beacon of light infamousRNR is a glorious beacon of light infamousRNR is a glorious beacon of light infamousRNR is a glorious beacon of light infamousRNR is a glorious beacon of light
infamousRNR infamousRNR is offline
Senior Member
infamousRNR's Avatar
 
Join Date: Dec 2013
Location: SF Bay Area California
Posts: 2,763
infamousRNR is a glorious beacon of light infamousRNR is a glorious beacon of light infamousRNR is a glorious beacon of light infamousRNR is a glorious beacon of light infamousRNR is a glorious beacon of light infamousRNR is a glorious beacon of light
Dang this is epic! Question: is the top of the fridge too high to see into when pulled out? I guess if your l it wouldn’t be an issue. But what about your GF/wife?
__________________
1998 Desert Dune Toyota 4runner Limited 4x4 w/ factory e-locker
2000 BLACK Toyota 4runner Limited 4x4 w/ factory e-locker Build Thread
2002 Thundercloud Metalic Toyota 4runner Limited 4x4
Build Thread
infamousRNR is offline   Reply With QuoteReply With Quote
Old 11-04-2019, 01:31 PM #7
Rancho5 Rancho5 is offline
Member
 
Join Date: Feb 2018
Location: Rio Rancho, New Mexico
Posts: 371
Rancho5 is on a distinguished road
Rancho5 Rancho5 is offline
Member
 
Join Date: Feb 2018
Location: Rio Rancho, New Mexico
Posts: 371
Rancho5 is on a distinguished road
Love it! Where'd you get the black "fanny pack" thing hanging from your passenger heard rest?
__________________
02 Thundercloud Sport, 155k.
Rancho5 is offline   Reply With QuoteReply With Quote
Old 11-04-2019, 01:45 PM #8
calnhob's Avatar
calnhob calnhob is offline
Member
 
Join Date: Jul 2017
Location: East Bay, CA
Posts: 205
calnhob is on a distinguished road
calnhob calnhob is offline
Member
calnhob's Avatar
 
Join Date: Jul 2017
Location: East Bay, CA
Posts: 205
calnhob is on a distinguished road
Clean build. I did a similar thing where I deleted the passenger rear seat but left the driver rear in case I have to take two passengers.

I would recommend using slides and remove the lift to get to your gear. I throw so much stuff on top of the bed that it would be a PITA to lift it to get gear.
__________________
97 SR5 w/ elocker, 250K | BS 5100 adjustable front 5th gen coils, 5100 rear LC springs | KO2 285/70R17 on '15 Trail Rims | TBU | X-Bull 12K Winch | TG Sliders | front & rear NWTI bumper kit
calnhob is offline   Reply With QuoteReply With Quote
Old 11-04-2019, 02:17 PM #9
Fishwerks's Avatar
Fishwerks Fishwerks is offline
Senior Member
 
Join Date: Jan 2012
Location: Southwest
Posts: 1,075
Real Name: Chris
Fishwerks will become famous soon enough Fishwerks will become famous soon enough
Fishwerks Fishwerks is offline
Senior Member
Fishwerks's Avatar
 
Join Date: Jan 2012
Location: Southwest
Posts: 1,075
Real Name: Chris
Fishwerks will become famous soon enough Fishwerks will become famous soon enough
Clean! I like the brackets that mount to the seat bottom holes. I've thought about doing something similar, nice to see an example of it.
__________________
Fishwerks' Photo/Build Thread 2000 SR5 l White on White l 35s l Supercharged
--
2010 Trail Edition l Salsa Red Pearl l Stock
--
Instagram
Fishwerks is offline   Reply With QuoteReply With Quote
Old 11-04-2019, 03:13 PM #10
Dirtco's Avatar
Dirtco Dirtco is offline
Senior Member
 
Join Date: Mar 2011
Location: Colorado
Posts: 1,758
Real Name: Jeremiah
Dirtco is a name known to all Dirtco is a name known to all Dirtco is a name known to all Dirtco is a name known to all Dirtco is a name known to all Dirtco is a name known to all
Dirtco Dirtco is offline
Senior Member
Dirtco's Avatar
 
Join Date: Mar 2011
Location: Colorado
Posts: 1,758
Real Name: Jeremiah
Dirtco is a name known to all Dirtco is a name known to all Dirtco is a name known to all Dirtco is a name known to all Dirtco is a name known to all Dirtco is a name known to all
Looks awesome Addison, and thanks for the mention! I'm glad my platform could be some inspiration for yours. My camping set up was probably my favorite part of my 4Runner, it was so nice to get to camp and not worry about setting anything up. I look forward to seeing it out getting used!
Dirtco is offline   Reply With QuoteReply With Quote
Old 11-05-2019, 02:18 PM #11
rickashay's Avatar
rickashay rickashay is offline
Senior Member
 
Join Date: Dec 2010
Location: Nelson, BC
Posts: 2,552
Real Name: Addison
rickashay is a splendid one to behold rickashay is a splendid one to behold rickashay is a splendid one to behold rickashay is a splendid one to behold rickashay is a splendid one to behold rickashay is a splendid one to behold rickashay is a splendid one to behold
rickashay rickashay is offline
Senior Member
rickashay's Avatar
 
Join Date: Dec 2010
Location: Nelson, BC
Posts: 2,552
Real Name: Addison
rickashay is a splendid one to behold rickashay is a splendid one to behold rickashay is a splendid one to behold rickashay is a splendid one to behold rickashay is a splendid one to behold rickashay is a splendid one to behold rickashay is a splendid one to behold
Quote:
Originally Posted by infamousRNR View Post
Dang this is epic! Question: is the top of the fridge too high to see into when pulled out? I guess if your l it wouldn’t be an issue. But what about your GF/wife?
Yes, it is definitely a little on the tall side. That being said I have no issues with it being so tall. A drop-slide for the fridge would solve this issue though.

Quote:
Originally Posted by Rancho5 View Post
Love it! Where'd you get the black "fanny pack" thing hanging from your passenger heard rest?
Thanks! They are BlueRidge Overland stuff. Handmade in the USA, they are pretty cool pieces and have been great for storing odds & ends.

Quote:
Originally Posted by calnhob View Post
Clean build. I did a similar thing where I deleted the passenger rear seat but left the driver rear in case I have to take two passengers.

I would recommend using slides and remove the lift to get to your gear. I throw so much stuff on top of the bed that it would be a PITA to lift it to get gear.
Thanks! I actually avoided that on purpose. The stuff in the cubby is emergency only equipment that I only access in an emergency. I just went to Moab and for example kept my first aid kit, spare CV axle, spare tie rods, tarp, tire repair kit, etc in that area. I think I only opened it once or twice in 10 days of living out of the truck! The idea here being to save weight by not having to run drawer slides.

Quote:
Originally Posted by Fishwerks View Post
Clean! I like the brackets that mount to the seat bottom holes. I've thought about doing something similar, nice to see an example of it.
Thanks dude! Yah they turned out pretty good (and strong). What you can't see is I actually used some heavy duty gate hinges to mount to the wood and then welded the hinges to my "legs" that tie into the factory seat holes. Made matching the angle a cinch.

Quote:
Originally Posted by Dirtco View Post
Looks awesome Addison, and thanks for the mention! I'm glad my platform could be some inspiration for yours. My camping set up was probably my favorite part of my 4Runner, it was so nice to get to camp and not worry about setting anything up. I look forward to seeing it out getting used!
Oh totally. That's the whole objective, roll into camp and be setup in no time! Thanks for the inspo, still stoked to see your "updated" 4R back on the road.
rickashay is offline   Reply With QuoteReply With Quote
Old 11-12-2019, 03:01 PM #12
Fishwerks's Avatar
Fishwerks Fishwerks is offline
Senior Member
 
Join Date: Jan 2012
Location: Southwest
Posts: 1,075
Real Name: Chris
Fishwerks will become famous soon enough Fishwerks will become famous soon enough
Fishwerks Fishwerks is offline
Senior Member
Fishwerks's Avatar
 
Join Date: Jan 2012
Location: Southwest
Posts: 1,075
Real Name: Chris
Fishwerks will become famous soon enough Fishwerks will become famous soon enough
Quote:
Originally Posted by rickashay View Post
Thanks dude! Yah they turned out pretty good (and strong). What you can't see is I actually used some heavy duty gate hinges to mount to the wood and then welded the hinges to my "legs" that tie into the factory seat holes. Made matching the angle a cinch.
Damn that's smart. I may have to steal that idea.
__________________
Fishwerks' Photo/Build Thread 2000 SR5 l White on White l 35s l Supercharged
--
2010 Trail Edition l Salsa Red Pearl l Stock
--
Instagram
Fishwerks is offline   Reply With QuoteReply With Quote
Old 11-23-2019, 08:38 PM #13
brookester's Avatar
brookester brookester is offline
Junior Member
 
Join Date: Dec 2018
Location: Chandler, Arizona
Posts: 26
brookester is on a distinguished road
brookester brookester is offline
Junior Member
brookester's Avatar
 
Join Date: Dec 2018
Location: Chandler, Arizona
Posts: 26
brookester is on a distinguished road
Here is my version.

Sent from my SM-G973U using Tapatalk
brookester is offline   Reply With QuoteReply With Quote
Old 11-23-2019, 10:58 PM #14
mountainthings's Avatar
mountainthings mountainthings is offline
Junior Member
 
Join Date: Nov 2018
Location: BC
Posts: 21
mountainthings is on a distinguished road
mountainthings mountainthings is offline
Junior Member
mountainthings's Avatar
 
Join Date: Nov 2018
Location: BC
Posts: 21
mountainthings is on a distinguished road
Nice platform! I really like your idea of using the rear seat bolt holes for the supports, I'm going to borrow that idea for mine.
Did you have any troubles removing the rear seat backrest? The carpet on the back of the seats seems to be attached to the trunk carpet in mine, guessing it will need to be cut.
__________________
2000 Limited - Bilstein 5100 - OME 906 - Falken WildPeak 265/75R16

Last edited by mountainthings; 11-23-2019 at 11:03 PM.
mountainthings is offline   Reply With QuoteReply With Quote
Old 12-04-2019, 02:10 AM #15
rickashay's Avatar
rickashay rickashay is offline
Senior Member
 
Join Date: Dec 2010
Location: Nelson, BC
Posts: 2,552
Real Name: Addison
rickashay is a splendid one to behold rickashay is a splendid one to behold rickashay is a splendid one to behold rickashay is a splendid one to behold rickashay is a splendid one to behold rickashay is a splendid one to behold rickashay is a splendid one to behold
rickashay rickashay is offline
Senior Member
rickashay's Avatar
 
Join Date: Dec 2010
Location: Nelson, BC
Posts: 2,552
Real Name: Addison
rickashay is a splendid one to behold rickashay is a splendid one to behold rickashay is a splendid one to behold rickashay is a splendid one to behold rickashay is a splendid one to behold rickashay is a splendid one to behold rickashay is a splendid one to behold
Quote:
Originally Posted by mountainthings View Post
Nice platform! I really like your idea of using the rear seat bolt holes for the supports, I'm going to borrow that idea for mine.
Did you have any troubles removing the rear seat backrest? The carpet on the back of the seats seems to be attached to the trunk carpet in mine, guessing it will need to be cut.
No problem, steal away...

You have to cut the stitching in that one spot. I'm not sure why Toyota decided to sew it there in the first place TBH. I am quite confident I will be able to re-install the seats and you will not be able to notice that I have to cut it.... there is a perfect seem where you can cut the stitching so no carpet it harmed.
rickashay is offline   Reply With QuoteReply With Quote
Reply

Tags
addison , flickr , rickaby , seat , sleeping

Thread Tools
Display Modes Rate This Thread
Rate This Thread:

Posting Rules
You may not post new threads
You may not post replies
You may not post attachments
You may not edit your posts

BB code is On
Smilies are On
[IMG] code is On
HTML code is On

Forum Jump

Similar Threads
Thread Thread Starter Forum Replies Last Post
Rickashay's Sleeping Platform rickashay 3rd gen T4Rs 46 08-21-2019 07:39 PM
FS: 4th gen storage platform + fold-out sleeping platform (Boston, MA) xxaarraa For Sale: T4R Items 18 05-15-2019 10:32 AM
Sleeping Platform in 4th gen rocketboy 4th Gen T4Rs 5 10-03-2018 05:48 PM
Yet Another Sleeping Platform daDrumpf 5th gen T4Rs 15 03-24-2016 10:00 PM
Sleeping Platform!! piperoo 3rd gen T4Rs 4 08-16-2010 09:40 PM

Powered by vBadvanced CMPS v3.2.2

All times are GMT -4. The time now is 02:53 PM.

Powered by vBulletin® Version 3.8.11
Copyright ©2000 - 2024, vBulletin Solutions Inc.
Search Engine Optimisation provided by DragonByte SEO (Pro) - vBulletin Mods & Addons Copyright © 2024 DragonByte Technologies Ltd.
Feedback Buttons provided by Advanced Post Thanks / Like (Lite) - vBulletin Mods & Addons Copyright © 2024 DragonByte Technologies Ltd.
User Alert System provided by Advanced User Tagging (Lite) - vBulletin Mods & Addons Copyright © 2024 DragonByte Technologies Ltd.
***This site is an unofficial Toyota site, and is not officially endorsed, supported, authorized by or affiliated with Toyota. All company, product, or service names references in this web site are used for identification purposes only and may be trademarks of their respective owners. The Toyota name, marks, designs and logos, as well as Toyota model names, are registered trademarks of Toyota Motor Corporation***Ad Management plugin by RedTyger
 
Copyright © 2020