For some insight on how easy it is to assemble these bumpers;
This is my second welding project. Ever..
The first project was the rear bumper, pictures will be included at the end of that one. Since it was my first project, I didn't document it. Anyhow;
Now that I have about 10 hours of fab experience and a couple hours behind the trigger of a welder I'm comfortable enough to post a D.I.Y. step by step thread on welding one of these bumpers together and what the process is like. (That's how easy it is.)
To be clear this is a High Clearance Front Bumper Kit made by Coastal Offroad and assembled by the consumer.
The equipment i'm using to weld this together is as follows:
- Titanium 120v Flux Core Welder
- Vulcan Brand Flux Core Wire .035
- Electric Grinder
- Flap Wheel
- Cut Off Disc
- Grind Disc
- Welding Gloves
- Welding Mask
- Dremel (Comes in handy for precision alignment)
- Wire Cutters
This welder cost me $160 from my local Harbor Freight. This is honestly one of the best tools I now own, and I have had zero issues with it. 3/16 is the max gauge recommended to weld with this unit and that is the thickness of these Coastal bumpers. So if you're new to welding, and looking for a cheap and reliable unit I would recommend.
You will also need two 1⁄2-13 x 4.5” OR M12-1.50x110mm Grade 8.8 bolts, nuts, and washers. The Coastal instructions say to purchase extra washers from your hardware store to place on the top and bottom of the frame rail to give wiggle room for re-installation.
Step One: Remove Front Bumper.
Mine already made my truck look like it was part crack head anyways (as you can surely see). I decided also to remove my front grille because I didn't want to be bothered with any obstruction once I got started. I finished this in three and a half hours from start to finish, not including any finish welding. It was my first time doing this bumper, and all I had to go off of was a well documented video on youtube.
I believe in giving credit where its due. I also believe on sharing experiences like he did so that others don't need to make the same mistakes. The instructions are lacking to say the least. However, for an actual fabricator i'm sure all they would look at is the picture in the plan anyways. So not dissing Coastal at all. Although, it would be worth the time for that organization to buy a quality camera and film their own installation / assembly videos in a high quality, well thought out format, this would almost surely help drive sales as well. (but that's my inner entrepreneur speaking) Lets get back to 4Runner stuff.

Step Two: Trim your frame rail ends. This isn't a surprise as almost all aftermarket bumpers require the customer to do this.
Simple, prepare angle grinder with cut off wheel, follow up with a flap wheel to make it all nice and smooth. It will look like this:

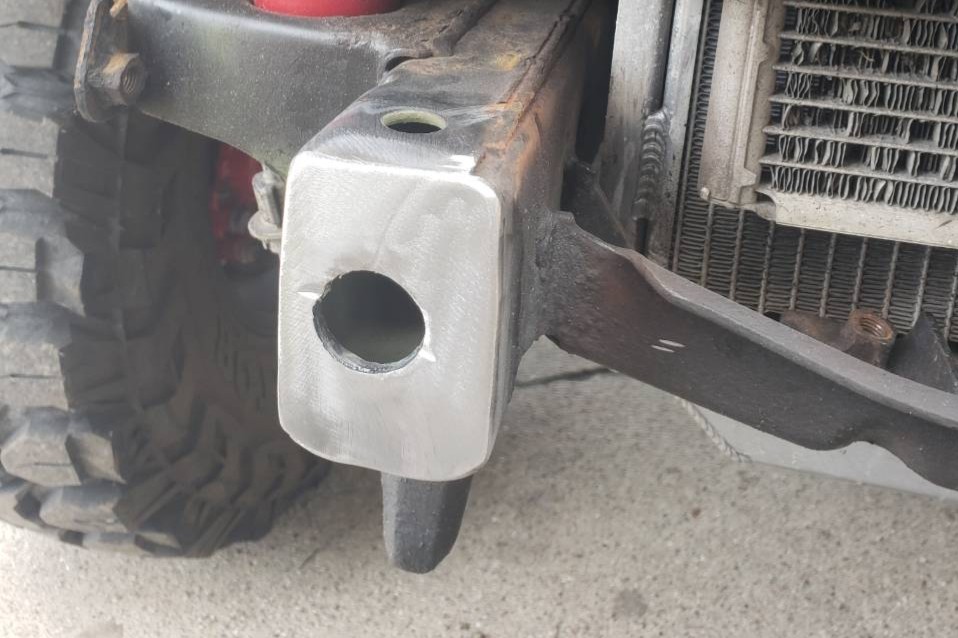
Step Three: Attach piece one on the bottom of the frame rails with the OEM bolts, keeping the factory tow hook, ditching the angle brackets.
You will use piece one as a template to drill a 1/2" hole into the frame for your two grade 8 bolts to slide through.
Step Four: Place piece two on the top of the frame, lightly thread your grade 8 bolts into your grade 8 nuts. Weld the nuts into place onto piece two. (Pictured Below)

This is helpful to keep the nuts from moving, kind of. However, this is more important to keep that nut from warping and risking a possible cross threading situation upon installation of bumper.
It will look like this:

It was quite funny, I go to Ace Hardware, grab the necessities, and drive home. I place said nuts on top of piece two and realize they're nylon lock nuts... Just in case you were wondering why the close up picture of that welded nut looks mutilated. Its just melted nylon. Smelled fantastic!
Step Five: Tack weld piece three, mated at a 90 degree angle with piece two.
As you can see in the picture below, I used 11 tacks for this plate. I also shored it up with a floor jack and a piece of wood that spanned the entire underside of the bumper. In doing this I placed ample pressure on piece number 1 preventing it from warping.

__________________
The dunes got boring because I couldn't jump. I'm not the type to enjoy someone else's vehicle. So i'm in the process of making making the dunes no longer boring. I guess that involves jumping.... A lot.


 Linear Mode


