 06-22-2020, 12:10 PM
|
#1
|
|
Member
|
|
Join Date: Jul 2014
Location: Gypsum, CO
Posts: 77
|
|
|
Member
Join Date: Jul 2014
Location: Gypsum, CO
Posts: 77
|
MountainBrew's 98 Build Thread
First I want to say how pleased I am to finally be able to post a real build thread. I've been a 4R fan for a while now, and previously had an 86 that I couldn't quite wrangle (a discussion for another time).
In any case, I traded for a 98 Limited Auto with a rear locker and just shy of 300k a few months back and decided to run with it. My better half and I were supposed to go on a 2 week vacation in April which didn't happen for obvious pandemicy reasons, so we decided to put that $ into an mild overland/camping build.
When I started this a few months ago, I had never welded and was a novice mechanic at best. I have also never worked on a 3rd gen before. Suffice it to say, you will undoubtedly find endless reasons to flame me in this thread. But in all reality, if you're on this forum you kinda taught me how to do all this stuff, so technically my poor craftsmanship is your fault. 
Throughout this process I did a heck of a lot of research on this fine forum, so thank you all. I also probably spent about 100 hours watching and rewatching mtbtim videos. Those are gold Jerry, gold! Although I will say watching him work on a rust free CA truck sure made me wish mine hadn't spent time in the rust belt. Very different experience.
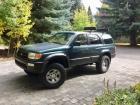
Anyway...here's a pic of the truck when I got it a few months ago. I'm thinking of calling her the Torpedo since it's green and my GF works for a brewery with a green-canned beer of the same name. Ill split up the following posts by project.

|

|
 Reply With Quote Reply With Quote
|
|
06-22-2020, 12:49 PM
|
#2
|
|
Member
|
|
Join Date: Jul 2014
Location: Gypsum, CO
Posts: 77
|
|
|
Member
Join Date: Jul 2014
Location: Gypsum, CO
Posts: 77
|
Armor
I knew I wanted my first investment (what I call spending too much money on toys) to be armor. I wasn't sure how far I wanted to go, but a winch front and tire carrier were certainly priorities. After seeing the price of tire carrier rear bumpers and nearly passing out, I stumbled onto a few "weld it yourself" kits. They're certainly not cheap by any means, but much more affordable than pre-made options especially after shipping.
I decided to go all in and order the entire "suite" of options from Coastal Offroad. This included front winch bumper, rear bumper with dual swing outs, rock sliders, drivetrain skids and gas tank skid. Brandon at Coastal was awesome to work with, and answered all my questions quickly. I even emailed him on Memorial Day and he got back to me in like 30 minutes. Pretty cool.
As I mentioned before, I had never welded in my life so if it looks like I welded these parts with my feet, cut me some slack.
I started with the skids since most of the weld beads will be hidden under the truck. If a passer-by can see all the skid plate welds, I have much bigger problems than aesthetics. 
Here's the skids, I really like how much of the truck they protect. I've already jacked it up a few times from the cross-member supports and it worked great.
Compared to the later pieces, the skids were easy enough to fabricate and let me practice my beads.


Next up was the front bumper. This was certainly a challenge. Again, my fabrication skills were not-existent starting this project, so it's far from perfect. One thing I like about the weld-together kits is that you can adjust for quirks in the body lines. After 300,000mi, it certainly isn't as straight as it was in 98. So I built it, threw in the winch and mounted it up.


So far, so good-ish. Next was the rear bumper. This one was the toughest yet but the instructions from Coastal made it clear what needed to happen. I still have to drill out two of the five frame mounting points on each side because I snapped the rusted bolts off, but even without them it's stout. This is before I painted it.

Last step was the rock sliders. You can see those in the pictures in later posts, I don't want to jump too far ahead. These were fairly easy to assemble and weld onto the frame, but welding onto the truck certainly made me a little nervous...
All in all now that I can look back on it, I enjoyed welding together the parts. Someone said in another thread it's like a jigsaw puzzle for a gear head. That being said, it was an absolutely insane amount of labor time building all five pieces. I did them all in about two weeks start to finish working every day after work and all day on the weekends. A second set of hands and more fabricating experience certainly would've made it quicker and easier, but I'm not going to lie the project almost broke my spirit by the time I got to the sliders. It was probably stupid to try and do all of them consecutively instead of tackling one at a time over a few months.
I still have a few small things to do. I need to weld on the quarter panel protection, weld on the hi-lift jack mounts to the rear, and I'm also going to weld the outside joints of a few load-bearing areas of the front bumper where I initially only welded the interior.
Before I started I bought a Hobart Handler 190 to do all the welding. Having never used another machine, I dont have anything to compare it to, but I really like the way it operates. The 230v gives it some serious power and operations were intuitive enough for a first-timer. I went through one and a half tanks of 25/75, and one and a half 10lb spools of .030 wire so it definitely got used.
Edit: Forgot to mention I watched a couple videos from a youtuber called JF Outdoors about building these pieces. It was incredibly helpful and gave me the confidence to try it myself. Really well made videos. I mean, not mtbtim well made, but thats a very high bar.
Last edited by MountainBrew; 06-22-2020 at 02:17 PM.
|
|
|
Reply With Quote
|
|
06-22-2020, 01:22 PM
|
#3
|
|
Member
|
|
Join Date: Jul 2014
Location: Gypsum, CO
Posts: 77
|
|
|
Member
Join Date: Jul 2014
Location: Gypsum, CO
Posts: 77
|
Suspension, steering, brakes and tires
I knew I wanted bigger tires, and when combined with all the armor weight I wanted to do the Tundra brake upgrade. I found a set of 5 FJ wheels on CL which are 17x7.5 so I drove down to Denver and grabbed them knowing they would fit the larger Tundra caliper.
I got a good deal on some Goodyear Duratrac's, so I pulled the trigger on 5 of the 285/70/17.
Old compared to new...

Clearly the new tires needed a little extra breathing room so in order to be a good host, I decided to lift. So I signed a couple paychecks over to Toytec and ordered their new Aluma lift kit and a 1" body lift. I also ordered the TC uniball UCAs and the front and rear durobumps.
After I placed the order, I was notified that the front coilovers would be back ordered for a while. I was bummed because I was really looking forward to the Elka coilovers but didn't want to lose any more of the good wheeling weather while the truck was up on jack stands.
I had to decide what to do, and initially considered having them send the Ultimate lift kit coilovers which I believe are made by Bilstein. In the end I paid a bit extra to have them send the King coilovers which were in stock and ready to go. Gabriella at Toytec was absolutely awesome to work with, can't say enough good things about her customer service.
I dont have many pictures of the suspension parts, but heres a side-by-side of old and new.

So I pulled everything out and found that the outer tie rods were a bit sloppy so I got some OEM replacements. The jam nut was seized on one of the tie rods and for the life of me I could break it loose with wrenches so I had to cut the dang thing off near the threads so I could get my impact on the jam nut while I held the ITR with a wrench. I ran into a lot of rust issues like that during this project.
I also picked up Tundra calipers and rotors from Napa but got the pads from Toyota since everything Napa offered was chamfered and I didnt want that. I also replaced the worn soft brake lines with ss once from stop tech.
So all in all I got new TC UCAs, Tundra brake upgrade, new Toyota LBJs and OTRs, brake lines, King coilovers, Durobumps and a few other things I'm probably forgetting. Picture is before the new brake lines...

After that it was time for the rear. I installed the 3" lift Toytec coils and Elka shocks. The kit also came with an extended rear brake line and the rear durobumps. Lastly, I bought the EimKeith panhard bar correction kit because his explaination of the geometry made a lot of sense. Not sure why you would need an extended panhard bar if you can just use the new mounts to compensate for the lift. Tip: I'm sure most of you know this, but disconnecting the sway links, panhard and brake lines made getting the bigger springs in a lot easier.
Here it is with the lift. Ended up 2" in front and 3" in the rear. I like the new stance and the alignment tech was able to get everything where it needed to be.

edit: Forgot to mention, I ran into one other fun little bit of rust wrenching. I've read all over about LBJ failures so I decided to replace mine while I was in there. I pressed the LBJ from the LCA arm, and successfully removed 7 of 8 bolts holding the LBJ to the knuckle. Of course, the 8th bolt rounded on me. I welded on a nut and was still unable to get it off so I had to pull the axle nut off and remove the entire knuckle so I could get it in a vice and took the angle grinder to it. What a PITA...
Last edited by MountainBrew; 06-22-2020 at 01:26 PM.
|
|
|
Reply With Quote
|
|
06-22-2020, 01:23 PM
|
#4
|
 |
Senior Member
|
|
Join Date: Mar 2010
Location: denver
Posts: 3,010
|
|
|
Senior Member
Join Date: Mar 2010
Location: denver
Posts: 3,010
|
Great start and good work. The welds look decent a little grinding and painting will make it look even better , + you are already a better welder then what you were intially. Truck looks great.
Last edited by spartacus; 06-22-2020 at 01:34 PM.
|
|
|
Reply With Quote
|
|
06-22-2020, 01:36 PM
|
#5
|
|
Member
|
|
Join Date: Jul 2014
Location: Gypsum, CO
Posts: 77
|
|
|
Member
Join Date: Jul 2014
Location: Gypsum, CO
Posts: 77
|
Roof tent
I've always wanted a roof tent and we found a good deal on one at Costco. Time will tell if it will hold up,and if it doesn't return policy...
Anyway, I initially mounted it to the stock cross bars (against my better judgement) so naturally when my fat @#$ climbed inside I immediately felt the plastic cross bar ends crack and the tent fell an inch down onto the top of the roof. Off came the tent and the stock bars...
I bought some Smittybilt mounts that slid right into the factory rails. BTW, I'm hoping the factory rails are stout enough to hold up.

My neighbor sold me a couple of steel Thule cross bars which I used front and rear, and then I bought some 1" square steel tube stock for the middle two positions. Much better than before. I mean, I'm a big guy, but if I can bend these I have a real problem. Anyways, a 5/16' drill bit and some grade 8 bolts later, and I have this.

And a few hours later we had this

|
|
|
Reply With Quote
|
|
06-22-2020, 01:45 PM
|
#6
|
|
Member
|
|
Join Date: Jul 2014
Location: Gypsum, CO
Posts: 77
|
|
|
Member
Join Date: Jul 2014
Location: Gypsum, CO
Posts: 77
|
Quote:
Originally Posted by spartacus

Great start and good work. The welds look decent a little grinding and painting will make it look even better , + you are already a better welder then what you were intially. Truck looks great.
|
Thanks, I plan on taking the flap disc and grinder to those welds at some point. After the hours of tacking and welding was done, I had no more effort to give and just went straight to paint...
|
|
|
Reply With Quote
|
|
06-22-2020, 02:14 PM
|
#7
|
|
Member
|
|
Join Date: Jul 2014
Location: Gypsum, CO
Posts: 77
|
|
|
Member
Join Date: Jul 2014
Location: Gypsum, CO
Posts: 77
|
Motor and first post(s) wrap up
My big concern with this rig is that the motor has almost 300k on it. It still starts and runs great, but thats a lot of miles. Coincidentally, I was talking to a mechanic buddy of mine who had a friend who accidentally ordered a JDM 5vz for his 94 Runner instead of the 3.0 he actually needed. Long story short I am now the proud owner of a 3.4 JDM with 45,000 miles on it (allegedly). My plan is to eventually put it on an engine stand and replace pretty much all the peripherals and put a super charger on it. Until then I feel obligated to run the stock motor as long as I can. I have never replaced a motor on my own so that one might be a job for the mechanic 
All in all it has been a ton of work but also a ton of fun. I have taken it out into the hills behind my house a few times now and the ride is night and day over stock. The washboard roads are totally soaked up. The durobumps are great as well, the big hits don't break my back anymore.
The brake upgrade is great, but I am not comparing apples to apples. The braking is better without a doubt, but when I did the upgrade I also added a quarter ton of armor and bigger tires and it is still noticeably better than before. Can't imagine how much better it would've been if I tried the brakes before doing tires or armor.
Now, for some opinion mining. I have done research on these but always like the collective thoughts...you all are just so dang smart 
- Anything I should do to store the 5VZ long term? It is still wrapped in plastic from JDM and is being stored in a climate controlled warehouse in the dry air of Colorado's mountains. All the info I've read says that should be enough, but nothing I read was specific to the 3.4
- I can't decide between quick disconnect sway bar links and standards. Im torn between the 4crawler QDC and the Overland Custom Design. I think Roger at 4C is brilliant but I really like the heim joints on the OCD ones.
- My parking brake doesn't work but I haven't dug into it much yet. I adjusted the lock nuts near the handle, and I see the bell housing assembly move on both sides when the brake is pulled, but it still doesn't have any braking effect. I think the auto adjuster might be seized up, so at this point I'm considering just replacing the entire rear brake set up because everything is pretty old and beat up. Napa has a "spend $250, get $75 on a visa gift card" deal through the end of June so I may do the rears too.
I'm sure Ill add more to this list soon...
Last edited by MountainBrew; 06-22-2020 at 06:28 PM.
|
|
|
Reply With Quote
|
|
06-22-2020, 03:17 PM
|
#8
|
|
Senior Member
|
|
Join Date: Mar 2010
Location: denver
Posts: 3,010
|
|
|
Senior Member
Join Date: Mar 2010
Location: denver
Posts: 3,010
|
Quote:
Originally Posted by MountainBrew
Thanks, I plan on taking the flap disc and grinder to those welds at some point. After the hours of tacking and welding was done, I had no more effort to give and just went straight to paint...
|
Your build is pretty darn awesome. The suspension and protection will make it a great rock crawler and the addition of roof top tent will make over landing more enjoyable. You've made good decisions on all of the mods. The jdm motor should be fine indoors wrapped. If you like a certain link go with it. I do disconnect the front links when off road but have them on for mountain driving feels more stable on long sweeping curves.
|
|
|
Reply With Quote
|
|
06-22-2020, 03:51 PM
|
#9
|
 |
Member
|
|
Join Date: Sep 2013
Location: Sun Valley, Idaho
Posts: 148
|
|
|
Member
Join Date: Sep 2013
Location: Sun Valley, Idaho
Posts: 148
|
Great job so far. You've made a lot of progress in not much time. You basically bought the same truck as me, rust issues and all. I've learned a few helpful things though along the way:
- Repeatedly soak everything in WD-40/PB Blaster before starting any work.
- Keep a mixture of bolts in every size/length so you can replace broken and rusted ones as you go.
- A torch and impact are worth their weight in gold.
Keep up the great work.
__________________
"Bettie" - 1998 4runner LTD E-Locker Evergreen Pearl 275K+, Alpine HU, Infinity Reference Speakers, Airraid MIT, B&M Cooler, Light Racing UCA, RCI skids, Bilstein Tundra 5100 and 4runner Eibach Coils in front/ Bilstein FJ 5100 and OME 890 rear, LC80 wheels wrapped with MT Baja ATZ 285/75/16, 99+ overhead console, 99+ center console, sound-deadening, Ditch lights
|
|
|
Reply With Quote
|
|
06-22-2020, 06:03 PM
|
#10
|
|
Elite Member
|
|
Join Date: Mar 2016
Location: Pasadena, CA
Posts: 5,409
|
|
|
Elite Member
Join Date: Mar 2016
Location: Pasadena, CA
Posts: 5,409
|
Quote:
Originally Posted by MountainBrew
My parking break doesn't work but I haven't dug into it much yet. I adjusted the lock nuts near the handle, and I see the bell housing assembly move on both sides when the brake is pulled, but it still doesn't have any braking effect. I think the auto adjuster might be seized up
|
Don't adjust the parking brake from inside first (though a little adjustment helps once everything else is fixed).
Lots of people don't use the parking brake... at which point the rear brakes (on the 4Runner) become useless (both hydraulic and parking) and out of adjustment.
Pull off those rear wheels and drums and see where you are at. I had to spin the adjuster a TON when I got my 4Runner. It would have been a few thousand pulls of the parking brake handle to get there. If you pull it, you might even be able to hear the ratchet mechanism doing its thing (it is very quiet, but still audible).
Once in adjustment, the brake pedal will feel much better AND the parking brake will work.
-Charlie
__________________
'99 4Runner SR5 Auto - 4WD swapped
'89 Camry Alltrac LE 3S-GTE 5spd
'17 Chevy Volt Premier
'16 Honda Odyssey Elite
Previous: '88 Camry Alltrac LE 3S-GE BEAMS, 90 Camry 3S-GTE, 90 Camry DX, '03 WRX wagon, '08 Outback XT
|
|
|
Reply With Quote
|
|
06-22-2020, 06:25 PM
|
#11
|
|
Member
|
|
Join Date: Jul 2014
Location: Gypsum, CO
Posts: 77
|
|
|
Member
Join Date: Jul 2014
Location: Gypsum, CO
Posts: 77
|
Quote:
Originally Posted by phattyduck
Don't adjust the parking brake from inside first (though a little adjustment helps once everything else is fixed).
Lots of people don't use the parking brake... at which point the rear brakes (on the 4Runner) become useless (both hydraulic and parking) and out of adjustment.
Pull off those rear wheels and drums and see where you are at. I had to spin the adjuster a TON when I got my 4Runner. It would have been a few thousand pulls of the parking brake handle to get there. If you pull it, you might even be able to hear the ratchet mechanism doing its thing (it is very quiet, but still audible).
Once in adjustment, the brake pedal will feel much better AND the parking brake will work.
-Charlie
|
Thanks for the tip, I will try that tonight
|
|
|
Reply With Quote
|
|
06-23-2020, 03:35 AM
|
#12
|
|
Member
|
|
Join Date: Oct 2019
Location: Tucson
Posts: 415
|
|
|
Member
Join Date: Oct 2019
Location: Tucson
Posts: 415
|
After spending all that money I would do all I could to protect that transmission especially with the additional weight and load. Add a transmission cooler and do good solid trans fluid changes maybe sooner than usual. How are your LBJ?
|
|
|
Reply With Quote
|
|
06-23-2020, 05:44 AM
|
#13
|
|
Member
|
|
Join Date: May 2020
Posts: 137
|
|
|
Member
Join Date: May 2020
Posts: 137
|
Subscribed
Sent from my iPhone using Tapatalk Pro
|
|
|
Reply With Quote
|
|
06-23-2020, 09:06 AM
|
#14
|
|
Member
|
|
Join Date: Jul 2014
Location: Gypsum, CO
Posts: 77
|
|
|
Member
Join Date: Jul 2014
Location: Gypsum, CO
Posts: 77
|
Quote:
Originally Posted by Thebeastlives
After spending all that money I would do all I could to protect that transmission especially with the additional weight and load. Add a transmission cooler and do good solid trans fluid changes maybe sooner than usual. How are your LBJ?
|
Good call, I planned on adding a trans cooler and replacing the radiator. I was going to follow the lead of mtbtim again (shocker) and add it inline with the oem radiator.
LBJs were both replaced with OEM Toyota parts. I figured that was not a part you want to roll the dice with aftermarket.
Im also planning to flush the steering system, again as documented by mtbtim. Did I mention I like his YouTube channel? I may also replace the rack bushings depending on what I find when I get in there.
Side note I took it up to a volcano crater near my house and it rode great. The new suspension really soaks up the dirt roads. I also stumbled onto a trail called Tie Rod Bender (we just walked it, did t drive). Intense. I wont be going down that road anytime soon but Ill sure watch someone else do it.
Sent from my iPhone using Tapatalk
|
|
|
Reply With Quote
|
|
06-23-2020, 09:11 AM
|
#15
|
|
Member
|
|
Join Date: Jun 2019
Location: NC
Posts: 103
|
|
|
Member
Join Date: Jun 2019
Location: NC
Posts: 103
|
nice, I put the same tires on mine last year and have really enjoyed them.
__________________
'98 Corolla LE 193k miles
'98 4Runner Limited 215k miles
|
|
|
Reply With Quote
|
 Posting Rules
|
You may not post new threads
You may not post replies
You may not post attachments
You may not edit your posts
HTML code is On
|
|
|
|


 Linear Mode


