 06-30-2021, 08:01 PM
|
#1
|
 |
Senior Member
|
|
Join Date: Jun 2017
Location: Minnesota
Posts: 1,488
Real Name: Andy ಠ_ಠ
|
|
|
Senior Member
Join Date: Jun 2017
Location: Minnesota
Posts: 1,488
Real Name: Andy ಠ_ಠ
|
Eimkieth bumper help with building it?
so I have the NBL (non body lift) version....
starting to put it together...
so far so good but as there is no real instruction or parts diagram or nothing really to follow... some phone vids from a different version of the bumper but anything helps.
for the people who have done it?
how do the wing mounts work? I did not get anything that looks like what Kieth has in his private vids? like an L bracket pre bent?
what Kieth showed

vs what I got? did you have to weld them together? I'm still thinking I got the wrong hardware packs and some parts for some other kit he makes? anybody?

|

|
 Reply With Quote Reply With Quote
|
|
06-30-2021, 08:55 PM
|
#2
|
 |
Member
|
|
Join Date: Sep 2018
Location: San Francisco Ca
Posts: 872
|
|
|
Member
Join Date: Sep 2018
Location: San Francisco Ca
Posts: 872
|
Quote:
Originally Posted by sleepydad

so I have the NBL (non body lift) version....
starting to put it together...
so far so good but as there is no real instruction or parts diagram or nothing really to follow... some phone vids from a different version of the bumper but anything helps.
for the people who have done it?
how do the wing mounts work? I did not get anything that looks like what Kieth has in his private vids? like an L bracket pre bent?
what Kieth showed
vs what I got? did you have to weld them together? I'm still thinking I got the wrong hardware packs and some parts for some other kit he makes? anybody?
|
The kit is somewhat confusing, you did get the correct brackets though. I have a bolt break down if you want me to post it as well. I got the non BL kit then decided I wanted a BL and sold the non BL brackets and bought the BL brackets lol.. I have it pretty much figured out, haven’t put it together yet though.. I’ll try to post some pics of where pieces go.
Last edited by T4topher; 06-30-2021 at 09:03 PM.
|
|
|
Reply With Quote
|
|
06-30-2021, 10:06 PM
|
#3
|
|
Member
|
|
Join Date: Sep 2018
Location: San Francisco Ca
Posts: 872
|
|
|
Member
Join Date: Sep 2018
Location: San Francisco Ca
Posts: 872
|
|
|
|
Reply With Quote
|
|
06-30-2021, 10:31 PM
|
#4
|
|
Senior Member
|
|
Join Date: Jun 2017
Location: Minnesota
Posts: 1,488
Real Name: Andy ಠ_ಠ
|
|
|
Senior Member
Join Date: Jun 2017
Location: Minnesota
Posts: 1,488
Real Name: Andy ಠ_ಠ
|
Quote:
Originally Posted by T4topher
The kit is somewhat confusing, you did get the correct brackets though. I have a bolt break down if you want me to post it as well. I got the non BL kit then decided I wanted a BL and sold the non BL brackets and bought the BL brackets lol.. I have it pretty much figured out, havent put it together yet though.. Ill try to post some pics of where pieces go.
|
I got an email back from Kieth and yes I have the correct brackets for the non body lift version.
I burnt the x-member in this evening

and the carcass fits perfect with a couple of encouraging taps from the dead blow

but that part is pretty easy.
so now how much stuff to cut off the body... it's the part I have been dreading the most. I hate sheet metal work and it sucks. did I mention sheet metal work sucks?
|
|
|
Reply With Quote
|
|
07-01-2021, 05:49 PM
|
#5
|
|
Member
|
|
Join Date: Oct 2018
Location: Williamsburg, VA
Posts: 183
|
|
|
Member
Join Date: Oct 2018
Location: Williamsburg, VA
Posts: 183
|
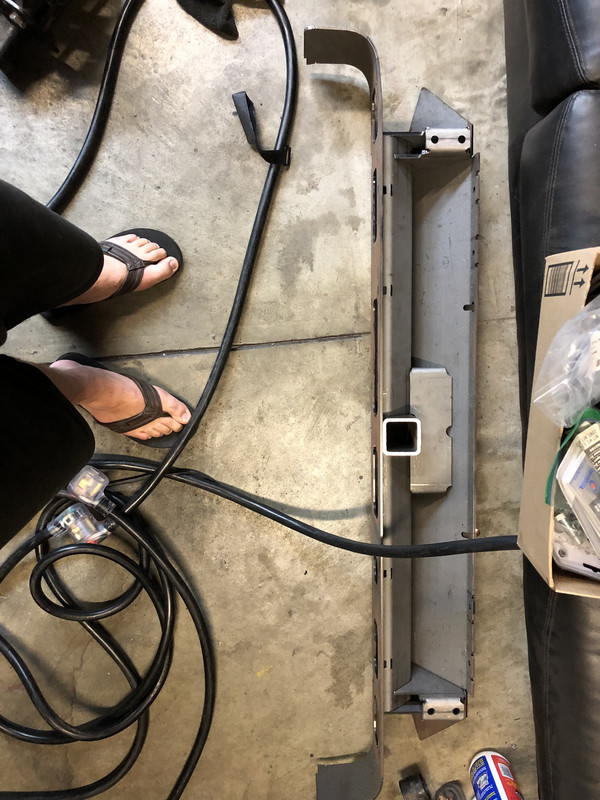
I did not see anything in the instructions about this, maybe I missed it...there is a small spot of frame material that needs to be cut out to make access to the main mounting bolts easier. You can use the bumper itself as a template. In the picture you can see the frame material behind the bumper thats partially blocking access. It made installing the lower bolts a real exercise in patience. Sorry the picture is upside down. If you have the tank installed before the bumper you basically can't get to it on the drivers side.

__________________
1996 4Runner with a 3rz-fe, e-locker and 5spd
2005 Passat TDI 5spd swapped
1997 E350 4x4 7.3 Powerstroke
|
|
|
Reply With Quote
|
|
07-10-2021, 05:43 PM
|
#6
|
|
Senior Member
|
|
Join Date: Jun 2017
Location: Minnesota
Posts: 1,488
Real Name: Andy ಠ_ಠ
|
|
|
Senior Member
Join Date: Jun 2017
Location: Minnesota
Posts: 1,488
Real Name: Andy ಠ_ಠ
|
I'm lighting up the bat light here
@ eimkeith
could you provide some information about the side wings and how the two bracket parts are used?
thank you

Last edited by sleepydad; 07-10-2021 at 07:47 PM.
|
|
|
Reply With Quote
|
|
07-11-2021, 02:21 PM
|
#7
|
 |
Official Vendor
|
|
Join Date: Aug 2008
Location: Charlotte, NC
Posts: 1,471
|
|
|
Official Vendor
Join Date: Aug 2008
Location: Charlotte, NC
Posts: 1,471
|
yep, just walked in the door from out of town; give me a few to find some images.
[I don't have any handy, so I'll head over to the shop and snap a few.]
__________________
keith
eimkeith.com
all product descriptions © eimkeith LLC 2016-2023
Last edited by eimkeith; 07-11-2021 at 02:45 PM.
|
|
|
Reply With Quote
|
|
07-11-2021, 03:11 PM
|
#8
|
|
Official Vendor
|
|
Join Date: Aug 2008
Location: Charlotte, NC
Posts: 1,471
|
|
|
Official Vendor
Join Date: Aug 2008
Location: Charlotte, NC
Posts: 1,471
|
Ok, hope these help:
First, the frame extension is tacked to the wing to allow it to be bolted temporarily to the frame. The extension and wing are tabbed & slotted. You will need to enlarge the holes in the bottom of the wing enough to get your tool through them, since now the bolts will attach the extension directly to the bottom of the frame and will be embedded up into the wing (does that make sense?)


__________________
keith
eimkeith.com
all product descriptions © eimkeith LLC 2016-2023
|
|
|
Reply With Quote
|
|
07-11-2021, 03:18 PM
|
#9
|
|
Official Vendor
|
|
Join Date: Aug 2008
Location: Charlotte, NC
Posts: 1,471
|
|
|
Official Vendor
Join Date: Aug 2008
Location: Charlotte, NC
Posts: 1,471
|
Then, the washer plate (thin one, no e) can be used as a template to locate the holes that will be drilled in the frame itself and through the frame extension. It has a tab on the bottom that will align with the tab on the frame extension for proper positioning:


The hole in the frame can be enlarged to use the included crush tube if desired. The bolt that goes through the lower drilled hole (through the frame extension) will not use a crush tube.
The washer plate can be moved to the other side to properly locate the corresponding holes.
__________________
keith
eimkeith.com
all product descriptions © eimkeith LLC 2016-2023
|
|
|
Reply With Quote
|
|
07-11-2021, 03:20 PM
|
#10
|
|
Official Vendor
|
|
Join Date: Aug 2008
Location: Charlotte, NC
Posts: 1,471
|
|
|
Official Vendor
Join Date: Aug 2008
Location: Charlotte, NC
Posts: 1,471
|
__________________
keith
eimkeith.com
all product descriptions © eimkeith LLC 2016-2023
|
|
|
Reply With Quote
|
|
07-11-2021, 04:02 PM
|
#11
|
|
Official Vendor
|
|
Join Date: Aug 2008
Location: Charlotte, NC
Posts: 1,471
|
|
|
Official Vendor
Join Date: Aug 2008
Location: Charlotte, NC
Posts: 1,471
|
Quote:
Originally Posted by D'arce
I did not see anything in the instructions about this, maybe I missed it...there is a small spot of frame material that needs to be cut out to make access to the main mounting bolts easier. You can use the bumper itself as a template. In the picture you can see the frame material behind the bumper thats partially blocking access. It made installing the lower bolts a real exercise in patience. Sorry the picture is upside down. If you have the tank installed before the bumper you basically can't get to it on the drivers side.
|
That's a great tip for the BL bumper - one that I keep forgetting to note. It doesn't apply to the NBL version, unfortunately - the frame extension doesn't have the corresponding notch (although I may look at adding it in the new run, possibly.)
__________________
keith
eimkeith.com
all product descriptions © eimkeith LLC 2016-2023
|
|
|
Reply With Quote
|
|
07-12-2021, 12:31 AM
|
#12
|
|
Senior Member
|
|
Join Date: Jun 2017
Location: Minnesota
Posts: 1,488
Real Name: Andy ಠ_ಠ
|
|
|
Senior Member
Join Date: Jun 2017
Location: Minnesota
Posts: 1,488
Real Name: Andy ಠ_ಠ
|
Quote:
Originally Posted by eimkeith
When assembled, it will be like this, through the frame:
|
I have the F2 bag so I think I have the 90 mil M10's that you spec'ed
what length is the crush tube?
I did not get anything that looked like that in my hardware? I have some DOM tube but I think it matches up with M12 so if that is for M10 bolts? I can source some tube locally, the frame is pretty thin I like to weld in a tube otherwise the frame crushes super easy.
do you have any pictures of how much body sheet metal needs to be removed? and the locations?
I have the x-member burnt in and I put a couple of coats of DTM epoxy on it then some chassis paint over it. My bent piece was messed up in shipping once I fitted it on the truck it was wayyyyy off. I have kind of got it bent back but I will have to see if the side wings help get it back into the correct shape.
it's going to be a ***** to paint this kind of setup.
|
|
|
Reply With Quote
|
|
07-12-2021, 12:45 PM
|
#13
|
|
Official Vendor
|
|
Join Date: Aug 2008
Location: Charlotte, NC
Posts: 1,471
|
|
|
Official Vendor
Join Date: Aug 2008
Location: Charlotte, NC
Posts: 1,471
|
Quote:
Originally Posted by sleepydad
I have the F2 bag so I think I have the 90 mil M10's that you spec'ed
what length is the crush tube?
I did not get anything that looked like that in my hardware? I have some DOM tube but I think it matches up with M12 so if that is for M10 bolts? I can source some tube locally, the frame is pretty thin I like to weld in a tube otherwise the frame crushes super easy.
|
60mm, trim to fit as needed.
Quote:
Originally Posted by sleepydad
do you have any pictures of how much body sheet metal needs to be removed? and the locations?
|
both on the website and in the v11 installation videos (you got those links, right? - that's where the screenshot up top comes from) I'll be updating those videos when I get to the final design/variations - takes me a few days worth of work to film & edit, since I'm DIY. In the interim, I'm working with installers via email, mostly.
Quote:
Originally Posted by sleepydad
I have the x-member burnt in and I put a couple of coats of DTM epoxy on it then some chassis paint over it. My bent piece was messed up in shipping once I fitted it on the truck it was wayyyyy off. I have kind of got it bent back but I will have to see if the side wings help get it back into the correct shape.
it's going to be a ***** to paint this kind of setup.
|
that's one of the reasons I recommend tacking everything first - if you realize that you didn't pre-paint the backside of a component (or if something is in the wrong position) it's much easier to back up a step than if it were fully welded.
we're also having email correspondence, yes? - I'm not good with who has what username on the forums, probably should start tracking that data for customer service reasons..
__________________
keith
eimkeith.com
all product descriptions © eimkeith LLC 2016-2023
Last edited by eimkeith; 07-12-2021 at 12:49 PM.
|
|
|
Reply With Quote
|
 Posting Rules
|
You may not post new threads
You may not post replies
You may not post attachments
You may not edit your posts
HTML code is On
|
|
|
|


 Linear Mode


