 08-15-2021, 03:56 PM
|
#1
|
|
Member
|
|
Join Date: Jun 2020
Location: NorCal
Posts: 136
|
|
|
Member
Join Date: Jun 2020
Location: NorCal
Posts: 136
|
2001 SR5 Wiring Mess
I know this is a long shot, but can anyone offer a preliminary prognosis on how much headache I'm in for?
I knew this car had wiring issues when I acquired it, but now is the first time I'm finally tackling it. I know next to nothing about electrical, but want to learn.
As far as symptoms, the alarm system is so screwy that I don't even use it (but would like to). I suspect a lot of this mess involved a home-done sound system, which I don't care about at all. The antenna was broken and I've already removed it. The speaker wiring was so messy that I've already cut all of them.
But a bunch of the interior lighting has never worked, and the door-ajar ding never worked.
If you were me, where would you start in trying to untangle this mess (besides taking it to a shop)?
Are there any components that are obviously for the sound system that I can safely remove to simplify figuring out the alarm and lighting issues?
Any advice/input greatly appreciated.
|

|
 Reply With Quote Reply With Quote
|
|
08-15-2021, 04:01 PM
|
#2
|
 |
Member
|
|
Join Date: Jun 2020
Location: UT
Age: 20
Posts: 488
|
|
|
Member
Join Date: Jun 2020
Location: UT
Age: 20
Posts: 488
|
Quote:
Originally Posted by Deej101

I know this is a long shot, but can anyone offer a preliminary prognosis on how much headache I'm in for?
I knew this car had wiring issues when I acquired it, but now is the first time I'm finally tackling it. I know next to nothing about electrical, but want to learn.
As far as symptoms, the alarm system is so screwy that I don't even use it (but would like to). I suspect a lot of this mess involved a home-done sound system, which I don't care about at all. The antenna was broken and I've already removed it. The speaker wiring was so messy that I've already cut all of them.
But a bunch of the interior lighting has never worked, and the door-ajar ding never worked.
If you were me, where would you start in trying to untangle this mess (besides taking it to a shop)?
Are there any components that are obviously for the sound system that I can safely remove to simplify figuring out the alarm and lighting issues?
Any advice/input greatly appreciated.
|
(little off topic i apologize) but how'd you get the antenna out? was it easy? i need to disable the motor in mine so it stops going up when i'm using usb.
Sent from my iPhone using Tapatalk
__________________
----------------
1998 4Runner Limited 4WD w/Rear Locker
281k Miles
Build Thread
----------------
|
|
|
Reply With Quote
|
|
08-15-2021, 04:09 PM
|
#3
|
|
Member
|
|
Join Date: Jun 2020
Location: NorCal
Posts: 136
|
|
|
Member
Join Date: Jun 2020
Location: NorCal
Posts: 136
|
Quote:
Originally Posted by RodrickHeffley
(little off topic i apologize) but how'd you get the antenna out? was it easy? i need to disable the motor in mine so it stops going up when i'm using usb.
Sent from my iPhone using Tapatalk
|
Getting the whole antenna out is not necessarily "easy" (my main difficulty was in getting the wire out), and I posted in this thread about it somewhat:
https://www.toyota-4runner.org/3662241-post14.html
Can't you just disconnect it to stop it?
|
|
|
Reply With Quote
|
|
08-15-2021, 04:32 PM
|
#4
|
|
Member
|
|
Join Date: Jun 2020
Location: UT
Age: 20
Posts: 488
|
|
|
Member
Join Date: Jun 2020
Location: UT
Age: 20
Posts: 488
|
Quote:
Originally Posted by Deej101
|
yeah, i just didn't know what to disconnect other than the motor itself.
Sent from my iPhone using Tapatalk
__________________
----------------
1998 4Runner Limited 4WD w/Rear Locker
281k Miles
Build Thread
----------------
|
|
|
Reply With Quote
|
|
08-15-2021, 04:41 PM
|
#5
|
|
Member
|
|
Join Date: Jun 2020
Location: NorCal
Posts: 136
|
|
|
Member
Join Date: Jun 2020
Location: NorCal
Posts: 136
|
Quote:
Originally Posted by RodrickHeffley
yeah, i just didn't know what to disconnect other than the motor itself.
Sent from my iPhone using Tapatalk
|
The connector is behind your passenger wheel well. It's easy to get to, just remove the plastic wheel well cover (one 10mm bolt and a bunch of plastic clips). It's even easier if you also remove a few fender bolts so you can move the fender a little.
|
|
|
Reply With Quote
|
|
08-15-2021, 06:20 PM
|
#6
|
|
Member
|
|
Join Date: Mar 2006
Location: Huntsville, Al
Posts: 687
|
|
|
Member
Join Date: Mar 2006
Location: Huntsville, Al
Posts: 687
|
good grief! Gotta admire the persistence there. Your previous owner seemed to think he had better ideas then Toyota and did it with a lot of wire. A couple of thoughts. Since adding aftermarket stereo is trivial with a proper harness I would trace anything that goes to the center dash and is connected to the new stereo and then pull it. Hoping the previous person left the exisitng plugs so you can fix that section pretty easily. Your reall issue is the alarm. Messing that up may kill the ability to start and you said you are not expereinced with electrical. I would look at paying a local alarm shop to undo it - that way you have some fallback if they screw it up. I would not touch that without a Toyota wiring diagram and a diagram for the alarm
|
|
|
Reply With Quote
|
|
08-15-2021, 06:41 PM
|
#7
|
|
Member
|
|
Join Date: Jun 2020
Location: NorCal
Posts: 136
|
|
|
Member
Join Date: Jun 2020
Location: NorCal
Posts: 136
|
Quote:
Originally Posted by Ghostrider
good grief! Gotta admire the persistence there. Your previous owner seemed to think he had better ideas then Toyota and did it with a lot of wire. A couple of thoughts. Since adding aftermarket stereo is trivial with a proper harness I would trace anything that goes to the center dash and is connected to the new stereo and then pull it. Hoping the previous person left the exisitng plugs so you can fix that section pretty easily. Your reall issue is the alarm. Messing that up may kill the ability to start and you said you are not expereinced with electrical. I would look at paying a local alarm shop to undo it - that way you have some fallback if they screw it up. I would not touch that without a Toyota wiring diagram and a diagram for the alarm
|
Thanks for the reply. Of course, that's sound advice re: the alarm system, will almost surely eventually happen. However, in the meantime, I'd like to understand what I'm looking at. I won't alter anything unless I'm certain of what I'm doing, so there shouldn't be much risk in just trying to figure out what this mess represents. Know what I mean? Compulsively curious, I guess.
|
|
|
Reply With Quote
|
|
08-15-2021, 07:00 PM
|
#8
|
 |
Senior Member
|
|
Join Date: Sep 2011
Location: Austin, Texas
Posts: 3,151
|
|
|
Senior Member
Join Date: Sep 2011
Location: Austin, Texas
Posts: 3,151
|
Unless you're really trying to repair some of the things mentioned amiss, I'd leave it alone.
Cut more than one wire and stuff goes worse can then become difficult to figure out what did what. But if you've got the cash and desire to clean it up, I don't really think its that far off toyota spec just on looks. Luck no matter what ya' do.
__________________
2001 Limited 4WD - 346+K - SunfireRed\Thunder Cloud; - 265/75/16 Michelin A/T2s - Fat Pat's 1.5" BL - StopTech ANGLED rotors - In series 699 trans cooler, New Yota1 transmission, All new OEM suspension front to rear.

|
|
|
Reply With Quote
|
|
08-15-2021, 10:59 PM
|
#9
|
 |
Member
|
|
Join Date: Jun 2021
Location: Eastern WA
Posts: 601
Real Name: N/A
|
|
|
Member
Join Date: Jun 2021
Location: Eastern WA
Posts: 601
Real Name: N/A
|
I have a bit of experience with messy wiring because the previous owner fitted at least 3 additional circuits throughout my car and didn't label any of them, and I removed 18 feet of wiring and installed a kill switch. Your probably in for a bit of a headache.
The best way to definitively figure out which wires go to the home done sound system is to take continuity of the wires leading out of the fuse box to see if they connect to the speakers so you know which ones can be removed. The other method is to pull up trim and follow the wires back, I did this too and it wasn't super difficult but it can be time consuming and you risk breaking trim or the clips that hold them in.
After market alarm systems seem to always be problematic, and I personally wouldn't keep it. But the best way to trouble shoot it is to find out where the wires to it go and if they are still connected properly, only after then would I start measuring voltages if nothing is found.
I wouldn't be surprised if the poorly done mods are also causing issues with the stock electrical circuits because poorly done electrical work has a way of also screwing up other stuff as well.
To fix the issues with lighting and door checkers (after checking the fuses) I would do the same thing as before. Take continuity from the known fuse location of that circuit and make sure it still is connected to the end. If it doesn't have continuity then follow the wire up until you find an issue. If it does have continuity then check the voltage values and investigate whether you have bulbs that are burned out.
|
|
|
Reply With Quote
|
|
08-16-2021, 02:16 PM
|
#10
|
|
Elite Member
|
|
Join Date: Mar 2016
Location: Pasadena, CA
Posts: 5,408
|
|
|
Elite Member
Join Date: Mar 2016
Location: Pasadena, CA
Posts: 5,408
|
Most wires for an alarm will just tap into something and should be fairly trivial to remove. Everywhere there is/was a t-tap should be inspected and repaired if the copper is damaged (cut, strip, solder and heat shrink if necessary). The only big one will be the starter interrupt. That should be easy to find, as it will be the thickest and the only 'cut' wire in the whole setup.
Just take it 1 wire at a time and you'll get there. Repair anything questionable with a good solder joint or a high quality crimp.
-Charlie
__________________
'99 4Runner SR5 Auto - 4WD swapped
'89 Camry Alltrac LE 3S-GTE 5spd
'17 Chevy Volt Premier
'16 Honda Odyssey Elite
Previous: '88 Camry Alltrac LE 3S-GE BEAMS, 90 Camry 3S-GTE, 90 Camry DX, '03 WRX wagon, '08 Outback XT
|
|
|
Reply With Quote
|
|
08-16-2021, 03:02 PM
|
#11
|
|
Member
|
|
Join Date: Jun 2020
Location: NorCal
Posts: 136
|
|
|
Member
Join Date: Jun 2020
Location: NorCal
Posts: 136
|
Quote:
Originally Posted by Pyral
I have a bit of experience with messy wiring because the previous owner fitted at least 3 additional circuits throughout my car and didn't label any of them, and I removed 18 feet of wiring and installed a kill switch. Your probably in for a bit of a headache.
The best way to definitively figure out which wires go to the home done sound system is to take continuity of the wires leading out of the fuse box to see if they connect to the speakers so you know which ones can be removed. The other method is to pull up trim and follow the wires back, I did this too and it wasn't super difficult but it can be time consuming and you risk breaking trim or the clips that hold them in.
After market alarm systems seem to always be problematic, and I personally wouldn't keep it. But the best way to trouble shoot it is to find out where the wires to it go and if they are still connected properly, only after then would I start measuring voltages if nothing is found.
I wouldn't be surprised if the poorly done mods are also causing issues with the stock electrical circuits because poorly done electrical work has a way of also screwing up other stuff as well.
To fix the issues with lighting and door checkers (after checking the fuses) I would do the same thing as before. Take continuity from the known fuse location of that circuit and make sure it still is connected to the end. If it doesn't have continuity then follow the wire up until you find an issue. If it does have continuity then check the voltage values and investigate whether you have bulbs that are burned out.
|
Thanks; good advice; I have no issues with removing any/all trim, lol--most of the truck interior is already in pieces. Today I will remove the door panels to get all the speaker wire removed. Plus, I'm deep cleaning as I go; the amount of dust and dirt I'm finding is incredible!
I'm very new to doing anything electrical, but have been YouTubeing quite a bit. I know basically how to test continuity, although knowing which places to touch and how, am still working out.
Here's a question: is this silver thing an amplifier, and can (should?) I remove it? I'm assuming the yellow box below it is part of the SRS system, yes? (pic shows behind center dash, below where radio goes)
|
|
|
Reply With Quote
|
|
08-16-2021, 03:17 PM
|
#12
|
|
Member
|
|
Join Date: Jun 2020
Location: NorCal
Posts: 136
|
|
|
Member
Join Date: Jun 2020
Location: NorCal
Posts: 136
|
Quote:
Originally Posted by phattyduck
Most wires for an alarm will just tap into something and should be fairly trivial to remove. Everywhere there is/was a t-tap should be inspected and repaired if the copper is damaged (cut, strip, solder and heat shrink if necessary). The only big one will be the starter interrupt. That should be easy to find, as it will be the thickest and the only 'cut' wire in the whole setup.
Just take it 1 wire at a time and you'll get there. Repair anything questionable with a good solder joint or a high quality crimp.
-Charlie
|
Yeah, seeing those "taps" everywhere. Not familiar--yet--with how they work or how to remove them. I did disconnect the "black box" (pic) to examine it. I found about a foot of a loose black wire that was probably the clipped starter wire. Lots of mess to untangle still. After I get all the sound system parts removed, I'll reconnect the battery and see if somehow the alarm system functions properly, before I commit to fully removing it, I suppose.
|
|
|
Reply With Quote
|
|
08-16-2021, 04:04 PM
|
#13
|
|
Elite Member
|
|
Join Date: Mar 2016
Location: Pasadena, CA
Posts: 5,408
|
|
|
Elite Member
Join Date: Mar 2016
Location: Pasadena, CA
Posts: 5,408
|
Quote:
Originally Posted by Deej101
Yeah, seeing those "taps" everywhere. Not familiar--yet--with how they work or how to remove them.
|
There are many types, but they all work (ideally) by cutting the insulation and crimping a small "Y" connector around the wire.
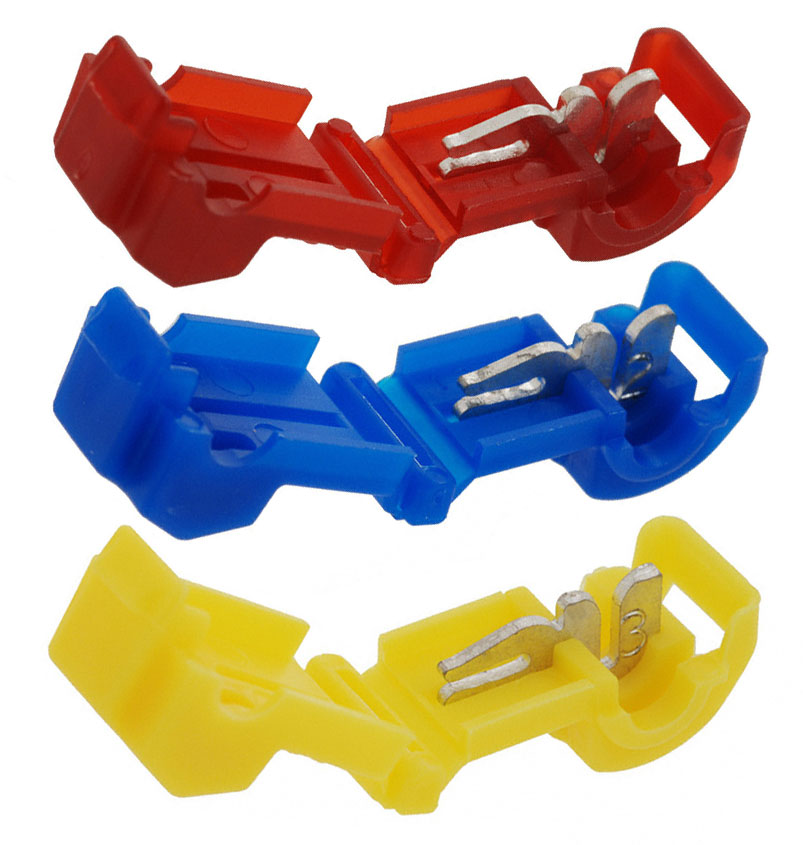
The main problem is that they can also cut the wire itself (the copper), then can be flakey (make bad contact), etc. They will also leave a weak spot in the wire if removed due to the cut insulation.
-Charlie
__________________
'99 4Runner SR5 Auto - 4WD swapped
'89 Camry Alltrac LE 3S-GTE 5spd
'17 Chevy Volt Premier
'16 Honda Odyssey Elite
Previous: '88 Camry Alltrac LE 3S-GE BEAMS, 90 Camry 3S-GTE, 90 Camry DX, '03 WRX wagon, '08 Outback XT
|
|
|
Reply With Quote
|
|
08-16-2021, 05:14 PM
|
#14
|
|
Member
|
|
Join Date: Jun 2020
Location: NorCal
Posts: 136
|
|
|
Member
Join Date: Jun 2020
Location: NorCal
Posts: 136
|
Quote:
Originally Posted by phattyduck
There are many types, but they all work (ideally) by cutting the insulation and crimping a small "Y" connector around the wire.
The main problem is that they can also cut the wire itself (the copper), then can be flakey (make bad contact), etc. They will also leave a weak spot in the wire if removed due to the cut insulation.
-Charlie |
Got it, thanks. Is there something like a glue (not glue, but is applied like it) that I could just drip onto the wire spot (after removing the Y connector) before rewrapping the wire? Reason is I don't trust myself with a soldering iron working in that tight space with all those wires around. I know such a product exists, does anyone know what I mean, and have used it?
|
|
|
Reply With Quote
|
|
08-16-2021, 05:45 PM
|
#15
|
|
Member
|
|
Join Date: Nov 2018
Location: San Jose, CA
Posts: 522
|
|
|
Member
Join Date: Nov 2018
Location: San Jose, CA
Posts: 522
|
Quote:
Originally Posted by Deej101
Got it, thanks. Is there something like a glue (not glue, but is applied like it) that I could just drip onto the wire spot (after removing the Y connector) before rewrapping the wire? Reason is I don't trust myself with a soldering iron working in that tight space with all those wires around. I know such a product exists, does anyone know what I mean, and have used it?
|
If you really don't want to deal with cutting and soldering the wire, you can just wrap it in electrical tape. Liquid electrical tape does also exist, but is messy. If you aren't comfortable soldering, but want something a little better than electrical tape, you can cut the wire fully in the location the tap was, strip both ends back and use a butt connector. The next best option would be using a self solder butt connector which is basically shrink wrap with a solder ring in the center and adhesive rings on on both ends. You cut and strip the wires, slide the connector over one end, give the wires a quick twist to hold them and slide the connector back so the solder covers the part where the wires are connected and use a heat gun to shrink the tube and melt the solder.
|
|
|
Reply With Quote
|
| Thread Tools |
|
|
| Display Modes |
Rate This Thread |
 Linear Mode Linear Mode
|
|
 Posting Rules
|
You may not post new threads
You may not post replies
You may not post attachments
You may not edit your posts
HTML code is On
|
|
|
|


