 03-17-2023, 08:01 PM
|
#271
|
 |
Senior Member
|
|
Join Date: Jul 2013
Location: NOVA
Posts: 1,457
|
|
|
Senior Member
Join Date: Jul 2013
Location: NOVA
Posts: 1,457
|
Greased front driveshaft today. Did not do the rear driveshaft, unable to get the coupler on the zerks on the double cardan joint and u-joint.
Date: 3/16/23
Mileage: 323,900
Sent from my SM-S908U using Tapatalk
Last edited by JoeT4R; 03-18-2023 at 10:42 AM.
|

|
 Reply With Quote Reply With Quote
|
|
03-17-2023, 08:04 PM
|
#272
|
|
Senior Member
|
|
Join Date: Jul 2013
Location: NOVA
Posts: 1,457
|
|
|
Senior Member
Join Date: Jul 2013
Location: NOVA
Posts: 1,457
|
Also got some goodies today!!! Can't wait to get these bad boys installed. 
Sent from my SM-S908U using Tapatalk
|
|
|
Reply With Quote
|
|
03-18-2023, 07:13 PM
|
#273
|
|
Senior Member
|
|
Join Date: Jul 2013
Location: NOVA
Posts: 1,457
|
|
|
Senior Member
Join Date: Jul 2013
Location: NOVA
Posts: 1,457
|
New MAF sensor came in today, but my original screws are stripped. So a trip to Harbor Freight in the morning is in line to retrieve a screw extractor set.  
Sent from my SM-S908U using Tapatalk
|
|
|
Reply With Quote
|
|
03-20-2023, 05:27 PM
|
#274
|
 |
Elite Member
|
|
Join Date: May 2013
Location: Los Angeles
Posts: 5,154
Real Name: C8H18 Mike
|
|
|
Elite Member
Join Date: May 2013
Location: Los Angeles
Posts: 5,154
Real Name: C8H18 Mike
|
What OME springs did you get?
Quote:
Originally Posted by JoeT4R

New MAF sensor came in today, but my original screws are stripped. So a trip to Harbor Freight in the morning is in line to retrieve a screw extractor set.
Sent from my SM-S908U using Tapatalk |
A left hand drill often makes easy work of that. If the drill alone doesn't pull them out and easy out hammered in will.
I replaced those with allen head screws.
Sent from my Pixel 4 XL using Tapatalk
__________________
.
1999 Toyota 4Runner SR5 Sport 4WD, V6 5-Speed e-Locker-> 4WD 4runner Journal Thread
1999 Toyota 4Runner SR5 Un-Sported 2WD, V6 Auto -> 2WD 4runner Journal Thread
1959 Chevy 3100 1/2 Ton Pickup EVERYTHING done 'cept paint and body
.
|
|
|
Reply With Quote
|
|
03-21-2023, 06:06 AM
|
#275
|
|
Senior Member
|
|
Join Date: Jul 2013
Location: NOVA
Posts: 1,457
|
|
|
Senior Member
Join Date: Jul 2013
Location: NOVA
Posts: 1,457
|
Quote:
Originally Posted by octanejunkie
What OME springs did you get?A left hand drill often makes easy work of that. If the drill alone doesn't pull them out and easy out hammered in will.
I replaced those with allen head screws.
Sent from my Pixel 4 XL using Tapatalk
|
861's, baby. Excited to see the rake. If they don't work out, I always have my LC80 springs to throw back in.
But thank you for the info on the stripped screws. Planning to knock them out today or tomorrow. Today my front diff is getting taken care of, so I really look forward to that. Will post pics later on.
|
|
|
Reply With Quote
|
|
03-22-2023, 06:46 AM
|
#276
|
|
Senior Member
|
|
Join Date: Jul 2013
Location: NOVA
Posts: 1,457
|
|
|
Senior Member
Join Date: Jul 2013
Location: NOVA
Posts: 1,457
|
Front differential fluid drain and fill, bolt replacement job.
After I stripped my hex drain bolt last year, it was determined that getting the Lexus fill and drain plugs were a must. Went to a buddies house yesterday and he welded the hex bit onto the drain plug.
Attached the wrench to the socket, went to turn it and crack, the welds broke. So another fat weld was made. Went to turn the wrench, crack, the socket started to come out again. At that point, a neighbor came to take a look. Ended up sanding down the welds that were made, chiseled a notch in the plug and used a hammer to knock the drain bolt loose. Off it came.
I did the math from the last time I did a drain and fill, and this fluid had 110K, yes, 110 thousand miles on it. I will say it was AMSOIL 75W-90 full synthetic. I was surprised to see it being in as good condition as it was, but there were definitely a lot of metal flakes on the drain plug. So new Lexus drain and fill plugs were installed along with new OEM gaskets.
I also didn't buy AMSOIL fluid because I can't really justify $44 for two quarts of gear oil, plus shipping and taxes. So I poured in some Valvoline 75W-90 full synthetic that I got from the local Walmart. And now that I have the Lexus plugs installed, I will be able to perform more regular drain and fills. I will still say that AMSOIL is definitely the king of fluids, in my opinion and experience. Here are some pictures from the job.
Date: 3/21/23
Mileage: 324,002
Here's my boy David putting in some welding work.

Hex socket welded on.

110K mile fluid draining out of the diff.
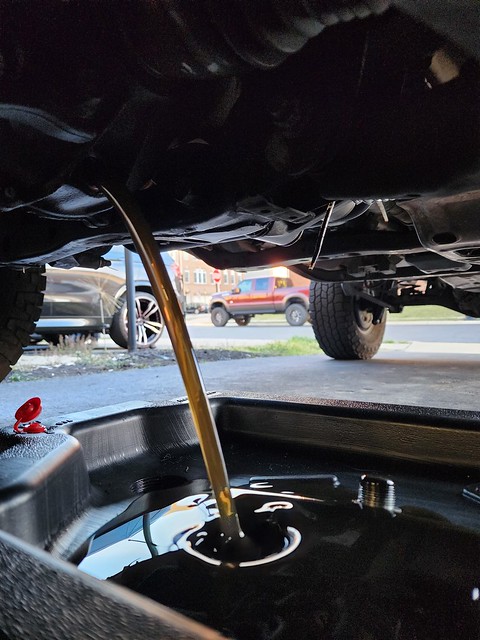
New Lexus plugs installed. SO PRETTY.

Sanded down and chiseled notch in the original drain bolt.

You can see the sludge/metallic flake buildup on the shop rag that I wiped off the drain bolt. That stuff was thick and dark, but again, the fluid itself remained pretty clean especially for the mileage.
Edit:
I wanted to add a picture of the stripped drain bolt and its state prior to welding the hex bit on. Photo was taken June 2022, but it still looked the same. Probably a bit dirtier though.

Last edited by JoeT4R; 03-22-2023 at 10:43 AM.
|
|
|
Reply With Quote
|
|
03-22-2023, 06:57 AM
|
#277
|
|
Senior Member
|
|
Join Date: Jul 2013
Location: NOVA
Posts: 1,457
|
|
|
Senior Member
Join Date: Jul 2013
Location: NOVA
Posts: 1,457
|
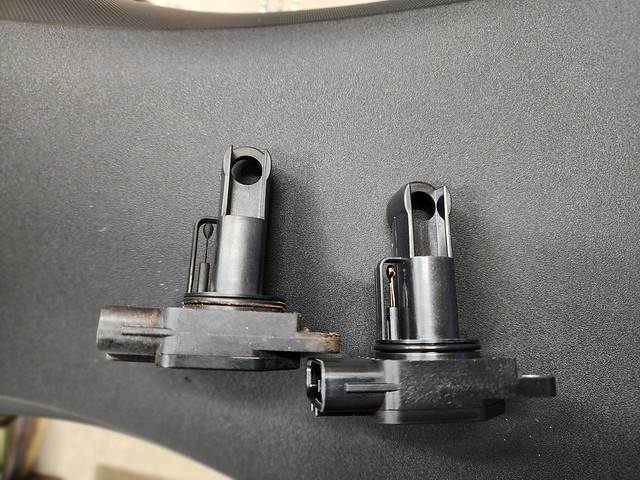
MAF Sensor replacement.
My engine threw a P0171. Code indicates a dirty or faulty mass air flow sensor, bad o2 sensor, or a vacuum leak. I've done my A/F ratio sensor and o2 sensor both within the past year and a half, both with Denso sensors, so I knew those weren't the problem. Checked under the hood, all hoses were connected properly, so no leaks there at first glance. So, in typical JoeT4R fashion, I ordered a new part and said ah, this will do just the trick.
The problem was, the screws on my sensor were rusted and kind of stripped. After doing some reading on here, I found two options that would help resolve the issue. 1. Order a screw extractor set. 2. Use a dremel to create a notch in the screws that would allow a flat head screwdriver to be used to remove the screws.
After attempting to use the screw extractor set and not having much luck with that, I resorted to the dremel. Immediately yielded positive results. Old sensor came out, new one went in. And so did the old screws, since they still work. 
I will get new screws, not to worry. I applied anti-seize to the old ones and reinstalled the new sensor. I also hit my throttle body with some cleaner while I had the air box and hoses out. It wasn't filthy, but it was dirty and cleaned up quite nicely. Bolted everything back together, cleared my code and the truck is back to normal. Not sure if I'll notice any increase in mileage or performance, but as long as the truck is operating normally, that's all that matters.
As you can see the OEM sensor on the left is definitely dirty. Could it have just been fixed by cleaning it? Perhaps, I'll never really know. I held onto the old sensor and will keep it in my parts bin. The new Denso unit is working as expected though.
Date: 3/21/23
Mileage: 324,002
|
|
|
Reply With Quote
|
|
03-23-2023, 07:08 AM
|
#278
|
|
Senior Member
|
|
Join Date: Jul 2013
Location: NOVA
Posts: 1,457
|
|
|
Senior Member
Join Date: Jul 2013
Location: NOVA
Posts: 1,457
|
OME 861's went in yesterday. The process was smooth and painless. I also added new metal washers to the upper shock mounts which eliminated the slight rattling noise it was making, so that was super nice.
The washers for the LC80 Tokicos are p/n 90948-02144. So if you're replacing your rear shocks with the LC80 Tokicos, make sure you get the above listed p/n for the washers. They are not included with the new shocks. The new shocks only come with 8 rubber bushings and two new top nuts. 4 bushings for the top shock mount and 4 bushings for the bottom mounts. They are massive. You can also find them online for roughly $12 a piece vs. what I paid for ordering them from a dealer. I'd rather not say, because I am not proud of it.
The LC80 springs came out with relative ease. Removed the wheels, disconnected the sway bar end links, removed the nut on the top of the shaft of the shock, moved the shock out of the way, lifted the opposite side of the axle and literally just reached in there and pulled it out.
Installation of the 861's required me to use a spring compressor. It was my first time using one. I was nervous for sure, but I had absolutely zero issues with using it. It truly made all the difference when putting the new springs in. So for anyone who is going to do the same to their rig, save yourself the headache and rent a spring compressor. I paid $58 to rent one from AutoZone and took it back a few hours later and got my money back.
What I really want to say is-- I DON'T UNDERSTAND WHY PEOPLE SAY DON'T GET 861's IF YOU DON'T HAVE EXTRA WEIGHT IN THE BACK. I don't have a rear swingout/tire carrier, armor, off road bumper, nothing in the back. These springs are a lot more firm than the LC80 springs, but they ride incredibly well. I feel like I have fallen in love with my truck all over again. The ride is so nice and smooth, but firm. As I absolutely love it. Going over bumps in the road, train tracks, dips in the road, whatever, is an absolute breeze. I think this combination of 861's with Tokico shocks is an awesome pairing and I would definitely suggest it to anyone who wants a firm but comfortable ride.
I will even say that the LC80 springs were far more bouncy and soft than the 861's. Here are some photos from the job.
Date: 3/22/23
Mileage: 324,052
861's side by side with the LC80 springs

Rear shocks and sway bar end links disconnected. New metal washers on the rear shock shaft

OME 861 with spring compressor attached

Metal washers for shock mount

Last edited by JoeT4R; 03-23-2023 at 08:07 AM.
|
|
|
Reply With Quote
|
|
03-23-2023, 10:57 AM
|
#279
|
|
Senior Member
|
|
Join Date: Feb 2019
Location: Hot Springs, AR
Posts: 4,410
Real Name: Patrick
|
|
|
Senior Member
Join Date: Feb 2019
Location: Hot Springs, AR
Posts: 4,410
Real Name: Patrick
|
Quote:
Originally Posted by JoeT4R
The washers for the LC80 Tokicos are p/n 90948-02144. So if you're replacing your rear shocks with the LC80 Tokicos, make sure you get the above listed p/n for the washers. They are not included with the new shocks. The new shocks only come with 8 rubber bushings and two new top nuts. 4 bushings for the top shock mount and 4 bushings for the bottom mounts. They are massive. You can also find them online for roughly $12 a piece vs. what I paid for ordering them from a dealer. I'd rather not say, because I am not proud of it.
|
the part number listed is for the metal washers on the top/bottom side of the upper bushings, correct? Quantity of 4? What did you do for the centering washer/cone that goes between the bottom bushing and the upper shock mount?
__________________
2000 SR5 V6 Manual 4WD https://www.toyota-4runner.org/3rd-g...biography.html
2000 Limited V6 Auto E-Locker Sold 3/2022
|
|
|
Reply With Quote
|
|
03-23-2023, 11:03 AM
|
#280
|
|
Senior Member
|
|
Join Date: Jul 2013
Location: NOVA
Posts: 1,457
|
|
|
Senior Member
Join Date: Jul 2013
Location: NOVA
Posts: 1,457
|
Quote:
Originally Posted by Bad Luck
the part number listed is for the metal washers on the top/bottom side of the upper bushings, correct? Quantity of 4? What did you do for the centering washer/cone that goes between the bottom bushing and the upper shock mount?
|
The part number is for the metal washers that go to the top of the shock. So in this order starting with the shock removed from the mounting hole: metal washer, bushing, insert shaft into shock mount hole, bushing, metal washer, top nut. You'll only use 2 metal washers per each side on top.
For the bottom shock mount where that bolt is that goes into the stud attached to the diff, I just reused the washers from my 5100's. Hopefully this makes sense. If you want I will be happy to take some close up pictures later on if you want/need me to. Just let me know. I remember you specifically asked me a few months ago about the washers and I wasn't 100% sure at that time.
|
|
|
Reply With Quote
|
|
03-23-2023, 11:35 AM
|
#281
|
|
Senior Member
|
|
Join Date: Feb 2019
Location: Hot Springs, AR
Posts: 4,410
Real Name: Patrick
|
|
|
Senior Member
Join Date: Feb 2019
Location: Hot Springs, AR
Posts: 4,410
Real Name: Patrick
|
Quote:
Originally Posted by JoeT4R
The part number is for the metal washers that go to the top of the shock. So in this order starting with the shock removed from the mounting hole: metal washer, bushing, insert shaft into shock mount hole, bushing, metal washer, top nut. You'll only use 2 metal washers per each side on top.
For the bottom shock mount where that bolt is that goes into the stud attached to the diff, I just reused the washers from my 5100's. Hopefully this makes sense. If you want I will be happy to take some close up pictures later on if you want/need me to. Just let me know. I remember you specifically asked me a few months ago about the washers and I wasn't 100% sure at that time.
|
So you didn't use a centering washer on the shock shaft where it mounts to the frame up top?
__________________
2000 SR5 V6 Manual 4WD https://www.toyota-4runner.org/3rd-g...biography.html
2000 Limited V6 Auto E-Locker Sold 3/2022
|
|
|
Reply With Quote
|
|
03-23-2023, 02:44 PM
|
#282
|
|
Senior Member
|
|
Join Date: Jul 2013
Location: NOVA
Posts: 1,457
|
|
|
Senior Member
Join Date: Jul 2013
Location: NOVA
Posts: 1,457
|
Quote:
Originally Posted by Bad Luck
So you didn't use a centering washer on the shock shaft where it mounts to the frame up top?
|
So I found this from another thread:
Quote:
Originally Posted by Unner
^ - nut
-- - washer (RETAINER, CUSHION, NO.2, 90948-02131)
[ ] - bushing
-- - mount
-- - centering washer (RETAINER, CUSHION, NO.1, 90948-02119)
[ ] - bushing
-- - washer (RETAINER, CUSHION, NO.2, 90948-02131)
|
According to this description, I did not. I did everything listed above minus the centering washer. I didn't even know that was a thing to be honest, nor did the 5100's that I removed have them. It's not making noise anymore from not having the washers on, since I put them on yesterday, but I think I'm good otherwise. I guess if you can acquire it easily then go for it, but I don't think I'm gonna remove them again just to put that in unless something weird starts to happen.
|
|
|
Reply With Quote
|
|
03-23-2023, 03:08 PM
|
#283
|
|
Senior Member
|
|
Join Date: Feb 2019
Location: Hot Springs, AR
Posts: 4,410
Real Name: Patrick
|
|
|
Senior Member
Join Date: Feb 2019
Location: Hot Springs, AR
Posts: 4,410
Real Name: Patrick
|
Quote:
Originally Posted by JoeT4R
So I found this from another thread:
According to this description, I did not. I did everything listed above minus the centering washer. I didn't even know that was a thing to be honest, nor did the 5100's that I removed have them. It's not making noise anymore from not having the washers on, since I put them on yesterday, but I think I'm good otherwise. I guess if you can acquire it easily then go for it, but I don't think I'm gonna remove them again just to put that in unless something weird starts to happen.
|
You are coming in clutch today! I appreciate it! I vaguely remember someone saying they had issues with the frame side hole that the shaft of the shock goes through wearing oblong, but I don't think it's a common issue. Thanks again!
__________________
2000 SR5 V6 Manual 4WD https://www.toyota-4runner.org/3rd-g...biography.html
2000 Limited V6 Auto E-Locker Sold 3/2022
|
|
|
Reply With Quote
|
|
03-23-2023, 06:14 PM
|
#284
|
|
Elite Member
|
|
Join Date: Mar 2016
Location: Pasadena, CA
Posts: 5,414
|
|
|
Elite Member
Join Date: Mar 2016
Location: Pasadena, CA
Posts: 5,414
|
Quote:
Originally Posted by JoeT4R
Installation of the 861's required me to use a spring compressor.
|
First, no reason to be nervous - you weren't compressing the springs all that much.
That said, you should probably loosen all the pivot bolts for you rear links to 'reset' all the bushings. If you do that while the truck is up in the air, the axle should droop farther and maybe even allow you to install the longer springs without the compressor. Re-tighten all the links at the new ride height so the bushings aren't stressed at ride height.
-Charlie
__________________
'99 4Runner SR5 Auto - 4WD swapped
'89 Camry Alltrac LE 3S-GTE 5spd
'17 Chevy Volt Premier
'16 Honda Odyssey Elite
Previous: '88 Camry Alltrac LE 3S-GE BEAMS, 90 Camry 3S-GTE, 90 Camry DX, '03 WRX wagon, '08 Outback XT
|
|
|
Reply With Quote
|
|
03-23-2023, 06:51 PM
|
#285
|
|
Elite Member
|
|
Join Date: May 2013
Location: Los Angeles
Posts: 5,154
Real Name: C8H18 Mike
|
|
|
Elite Member
Join Date: May 2013
Location: Los Angeles
Posts: 5,154
Real Name: C8H18 Mike
|
I will never use spring compressors again unless installing springs onto struts.
To install the rear springs, also 861s, on my 4Runner I Jack the 4Runner up as high as I could supporting the frame with Jack stands. Disconnected the shocks and drop the axle as far as I possibly could being mindful of the brake lines, disconnecting the hard line from the axle, and my LC Springs fell out. I did have to shove and maneuver the 861s in, but it was no problem.
Same exact exercise on my FZJ80, just raise the vehicle as high as possible, support the frame with Jack stands and drop the axle far enough after disconnecting the shocks to pull the old Springs out and shove the new Springs in.
If the lift is significant enough, resetting the tension on the trailing arm bushings once at ride height makes good sense.
__________________
.
1999 Toyota 4Runner SR5 Sport 4WD, V6 5-Speed e-Locker-> 4WD 4runner Journal Thread
1999 Toyota 4Runner SR5 Un-Sported 2WD, V6 Auto -> 2WD 4runner Journal Thread
1959 Chevy 3100 1/2 Ton Pickup EVERYTHING done 'cept paint and body
.
Last edited by octanejunkie; 03-23-2023 at 06:53 PM.
|
|
|
Reply With Quote
|
 Posting Rules
|
You may not post new threads
You may not post replies
You may not post attachments
You may not edit your posts
HTML code is On
|
|
|
|


 Linear Mode


