 09-05-2022, 03:10 PM
|
#1
|
 |
Member
|
|
Join Date: Mar 2019
Location: San Luis Obispo, California
Posts: 55
|
|
|
Member
Join Date: Mar 2019
Location: San Luis Obispo, California
Posts: 55
|
Connor's Long Travel '97 Build Thread
Hi everyone! After a long time of procrastinating I'm finally starting a build thread for my 4Runner. There's quite a bit to catch up on, but I'll do my best to make posts of any notable changes, and once I'm caught up I'll continue from there.
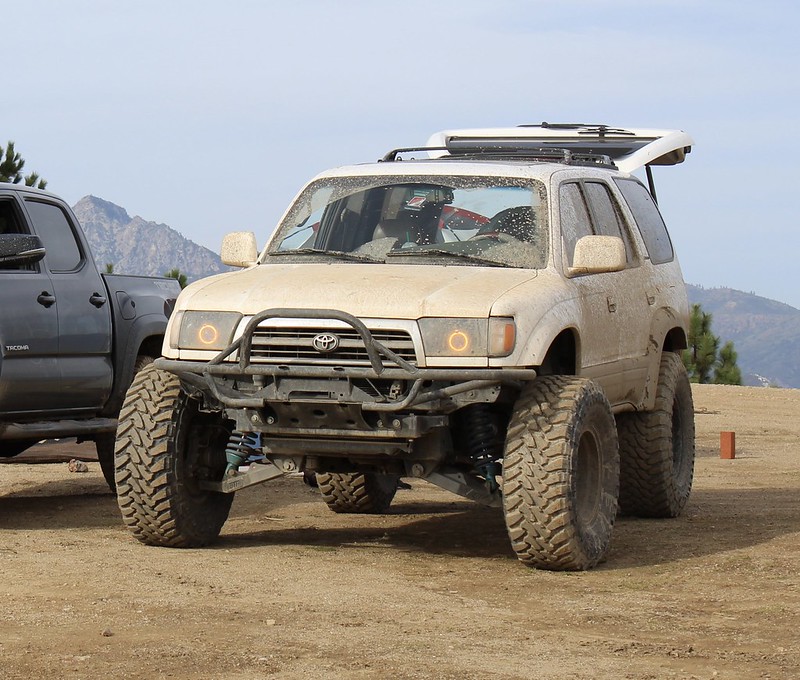
1997 Limited, 4x4 w/ factory e-locker. Currently at ~235k miles
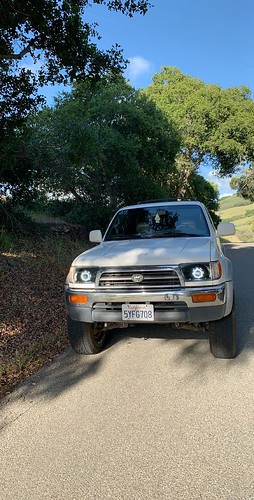
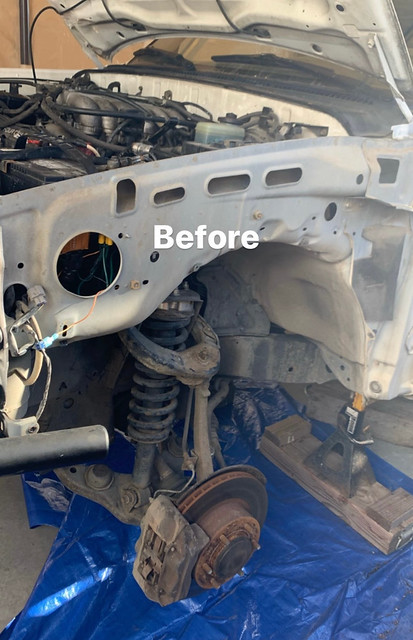
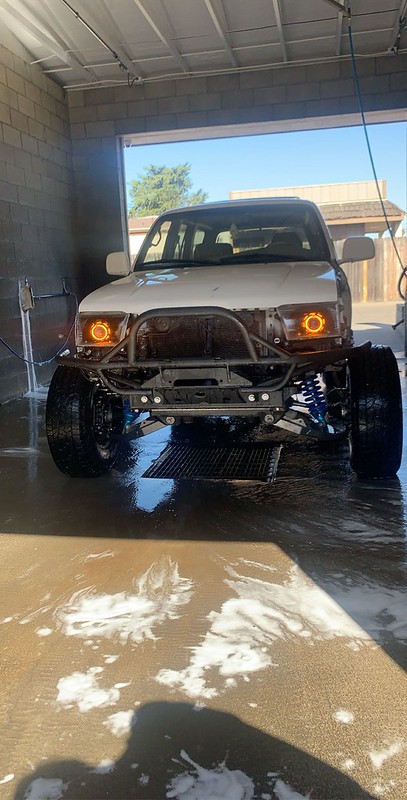
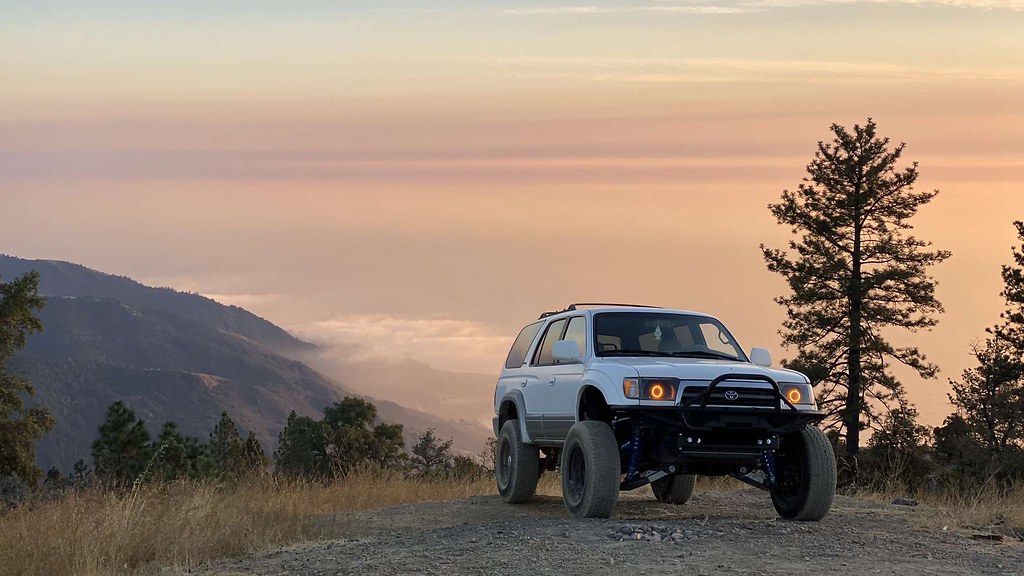
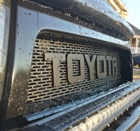
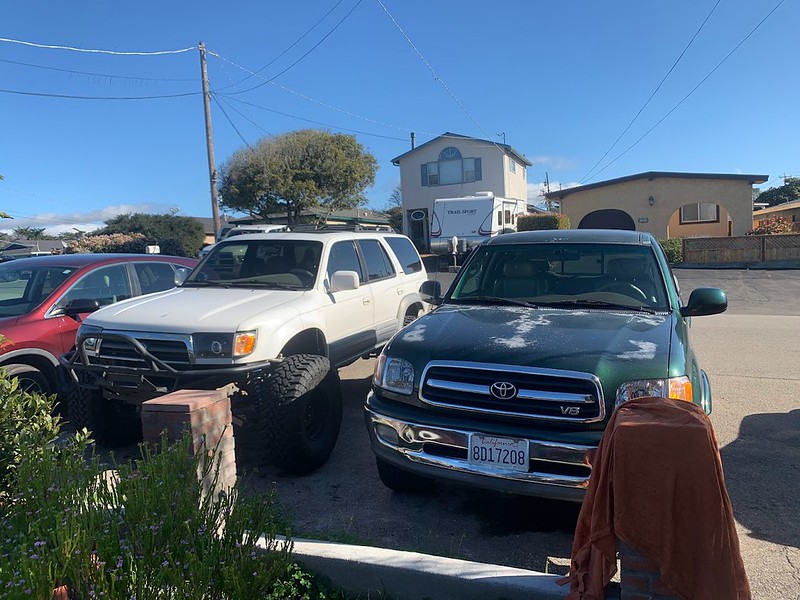
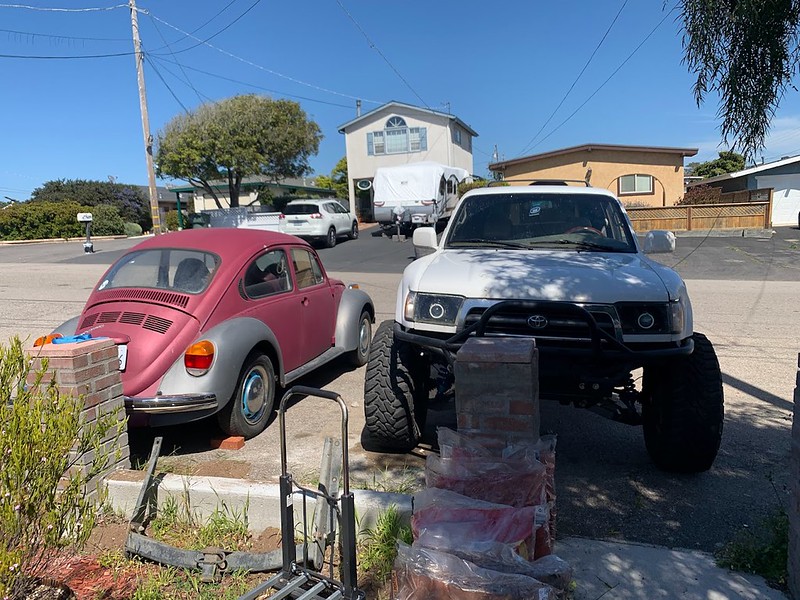
Here's how she currently sits:


And some older pictures:

 MODIFICATIONS:
Suspension:
MODIFICATIONS:
Suspension:
Front:
- BTF Fabrication Long Travel ( Post 6)
- Extended Chromoly axle shafts w/ rebuilt Tundra joints
- KING 2.0" x 8" Coilovers w/ Reservoir
Rear:
- ICON 2.0" x 10.5" shocks (from a 2nd gen Tundra) ( Post 29)
- LC80 7.5 wrap coils (double purple/blue/white), painted bronze ( Post 29)
- Custom outboard shock mount ( Post 29)
- 2nd gen 4runner sway bar end links ( Post 29)
- Eimkeith PCK ( Post 29)
- Spidertrax 1.25" wheel spacers ( Post 37)
- Custom made upper/lower control arms
-- 1.5" x .188" DOM for lowers
-- 1.25" x .120" DOM for uppers
-- Synergy dual durometer bushings
- Front Range Offroad adjustable panhard bar ( Post 44)
Wheels/Tires:
- 315/75r16 Toyo Open Country M/T
- Whatever wheels came on it originally, painted black bronze ( Post 15)
Armor:
- AddictedOffroad tube bumper
- Custom made rock sliders ( Post 11)
Exterior:
- McNeil +4" flare fiberglass fenders
- Custom made HID retrofit: (Post 3)
-- Apollo 3.0 shrouds
-- 80mm switchback LED halo as running lights
-- Morimoto D2S projectors
-- 110mm switchback LED halo as front turn signal
- BXBuilt Bi-LED DIY Kit ( Post 12)
-- 84mm switchback hexagon front halo
-- 110 switchback rear halo
-- Apollo 2.0 shrouds
-- B3 v2 projectors
-- '01+ headlight glass
-- Housings painted matte black bronze
- Black corner lights
- Rear bumper removed to fit 35s
- 30% Tint on front driver/passenger windows, 5% rear
Interior:
- Generic Kenwood single-DIN stereo
- 1200W amp/2 12" subs
Misc:
- CS144 Alternator ( Post 12)
- "Big 3" wiring upgrade ( Post 12)
- Magnaflow "Overland" series cat-back exhaust ( Post 26)
- Turn signal hyperflash relay
- Tundra 13WL rotors + calipers
- Polyurethane steering rack bushings
- Stainless steel extended break lines f/r
- Rear dif breather
MAINTENANCE:
- Replaced driver side rear axle seal, ABS gear, o-ring, etc @ 235,000 miles (January 2023) ( Post 26)
- Replaced driver side brake shoes, springs, and drum turned (done with axle seal)
- Rear dif drained, filled with Valvoline synthetic 75w90 gear oil (also done with axle seal)
The following was done @ 235,000 miles (September 2022): ( Post 12)
-- Mitsuboshi Timing Belt
-- NSK Idler Roller
-- Koyo Tensioner Roller
-- Front Crankshaft Seal
-- OEM Crankshaft Pulley Bolt
-- Both Front Camshaft Seals
-- Aisin Water Pump & Gasket
-- OEM Hydraulic Tensioner
-- OEM Thermostat / Aisin Gasket
-- All belts
-- CS144 Alternator
-- OEM Intake Manifold Gaskets
-- Denso Spark Plugs
-- OEM Spark Plug Tube Seals
-- OEM PCV Valve + Grommet
-- OEM Throttle Body Seal
-- OEM Half-moon Plugs (+ OEM FIPG)
-- OEM Cam Plug Seal
-- Valve Cover Gaskets
-- OEM Valve Cover Bolts
- Coolant temp sensor @ 232,000 miles (June 2021)
- Lower ball joints, inner/outer tie rods, new brake lines @ 224,000 miles (August 2020)
- Cyl 3 fuel injector @ ~220,000 miles (December 2019) (chasing P0303)
- New spark plugs @ ~220,000 miles (December 2019)
- Radiator, upper & lower radiator hoses, thermostat, & coolant flush @ 212,000 miles (March 2019)
A quick backstory:
So I got this as my first car in my senior year of high school. I built it out pretty quick (from bone stock to long travel on 35s within my first year of ownership), got it to where I was happy with it, and didn't really do much with it for the next few years. Between going to college, work, and other projects this thing got pretty neglected. I recently found my motivation to start working on and enjoying the 4runner, so once I get all the backlog caught up there should be pretty regular updates!
__________________
Long travel '97 Limited - build thread
Last edited by connorms; 08-15-2023 at 12:27 PM.
|

|
 Reply With Quote Reply With Quote
|
|
09-05-2022, 03:11 PM
|
#2
|
|
Member
|
|
Join Date: Mar 2019
Location: San Luis Obispo, California
Posts: 55
|
|
|
Member
Join Date: Mar 2019
Location: San Luis Obispo, California
Posts: 55
|
Connor's '97 Limited Build Thread
Some history: (Just a note, I'm attempting to back fill the last ~3 years of ownership just off of memory, so I might miss some stuff)
So I bought this back in my senior year of high school (February 2019), and it was my very first car! I had other cars to drive, but they were my parents and not really "mine" (my name on the title, able to do what I want to it, etc.) I didn't really know what I was looking for, but I had friends with Toyotas who would go out camping a lot, and thought that it would be fun to be able to join them in my own car. One day I checked craigslist and saw this thing posted, and figured I'd message the guy. I had no idea what it was, besides the fact that it was a Toyota I could go camping in. I had no idea that it was 4x4, or that it had a factory e-locker! Even if this thing was 2wd I probably would have still gotten it, I just MAJORLY lucked out. Here's how it sat when I first got it, about as stock as possible (running boards AND the original cargo cover!)

I still can't believe how much I lucked out getting this thing. I got it with ~210k miles on it, 4x4 Limited w/ factory e-locker, all for only $3100!
When I first got it, I had no idea how to work on cars or do anything, so it was a pretty big learning curve. Like I was clueless. When doing my first oil change I ended up draining the transmission fluid instead of oil... So I guess that starts things off with maintenance. I had it taken to a local shop for a pre-purchase inspection, and this is what it came out to:
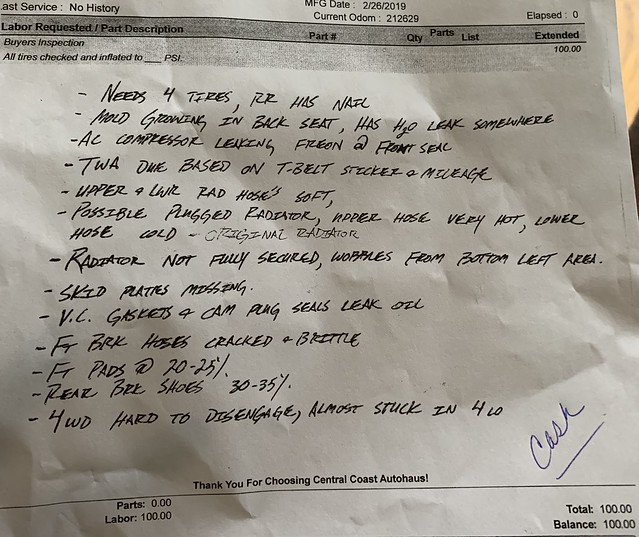
To a high schooler with no knowledge of cars, this list looked pretty intimidating, but slowly me and my dad took care of things off of that list. I think the very first thing I did was remove the running boards, then I started things off with replacing the tires with some cheap street tires, just going off of memory I think they were 265/60r16s, and I probably paid about $600 for the set, installed. I got tires slightly larger than stock, not really sure why as I had no lift or anything, so once they were installed they rubbed slightly. This led me to doing my next "mod", a $300 Rough Country spacer lift. (don't judge, I was on a high schooler's budget and didn't know what I was doing, just that I didn't want my tires to rub anymore...). At around this time I also took care of some general maintenance, such as a new radiator, new upper/lower rad hoses, thermostat, and a coolant flush. Most importantly, I also painted my wheels black, which added a minimum of 50hp.
  
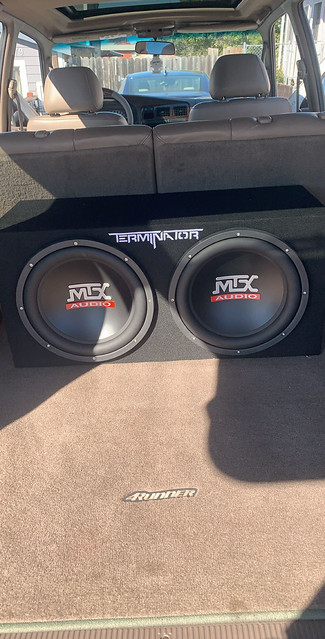
Since I was just a dumb high school kid, once I got the bare minimum checked off that list to make it road worthy (tires, radiator, etc), I decided the next best thing was to install a stereo and some massive subwoofers. Yeah I know, I was that guy... But my friend had subs in his car so I thought they were the coolest thing.
Now that I had the basics done, and now had a 3" lift I figured it was time to take it "offroading". There's a big hill that's in my area that everyone would go up at the time, and it really isn't much offroading as stock Subarus can get up there, but we went right after it rained so it was muddy, and my first time really being off pavement, so I was stoked and had a ton of fun. This is the only picture I have of the 4runner at this period, and this is how it sat:

__________________
Long travel '97 Limited - build thread
Last edited by connorms; 12-21-2022 at 06:54 PM.
|
|
|
Reply With Quote
|
|
09-05-2022, 03:11 PM
|
#3
|
|
Member
|
|
Join Date: Mar 2019
Location: San Luis Obispo, California
Posts: 55
|
|
|
Member
Join Date: Mar 2019
Location: San Luis Obispo, California
Posts: 55
|
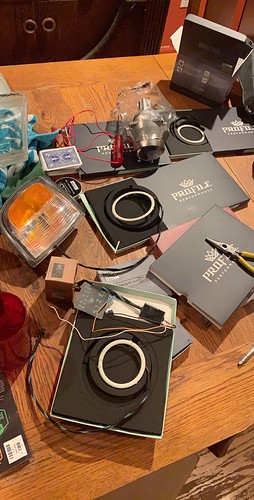
The next notable thing I did was the HID retrofit. I previously drove much newer cars that had WAY better headlights, so that was one of my biggest issues with the 4runner. The stock headlights were not up to par, so once I got the basics taken care of I decided to do an HID retrofit. This was before you could go online and buy a premade set of them, so I put together my order from TheRetrofitSource with the help of a few threads on here, and made them myself. There's a ton of threads on it here, so I'm not really going to go into much detail, but here are some pictures as I was doing it:
Parts list:
- Morimoto FX-R 3.0 Projectors
- Morimoto Bi-Xenon Mini D2S 5.0 Projectors
- Apollo 3.0 Shrouds
- 35w/D2S Morimoto XB Ballasts
- 35w/D2S Bulbs
- HD Relay for 9005/9006/9012/H10
- 1 Roll of RetroRubber (for resealing headlights after taking glass off)
- 2x 80mm switchback halos (front)
- 2x 110mm switchback halos (rear)
If I remember correctly, the FX-R 3.0's were too big or incompatible in some way, so I had to order the Mini D2S's instead. I also had to order an additional wiring harness to convert it from the stock headlights to the projectors, but that's on an old Amazon account and I can't find the order anymore.
Once I had them finished, I played around with the wiring a bit until I found a setup that I liked. At first I had them running white constantly, with the turn signal tapped so they would both blink. I wasn't a big fan of this, and eventually settled on having the rear halo stay amber constantly, and have the front be only wired to the turn signals, so it would be off unless I was turning:
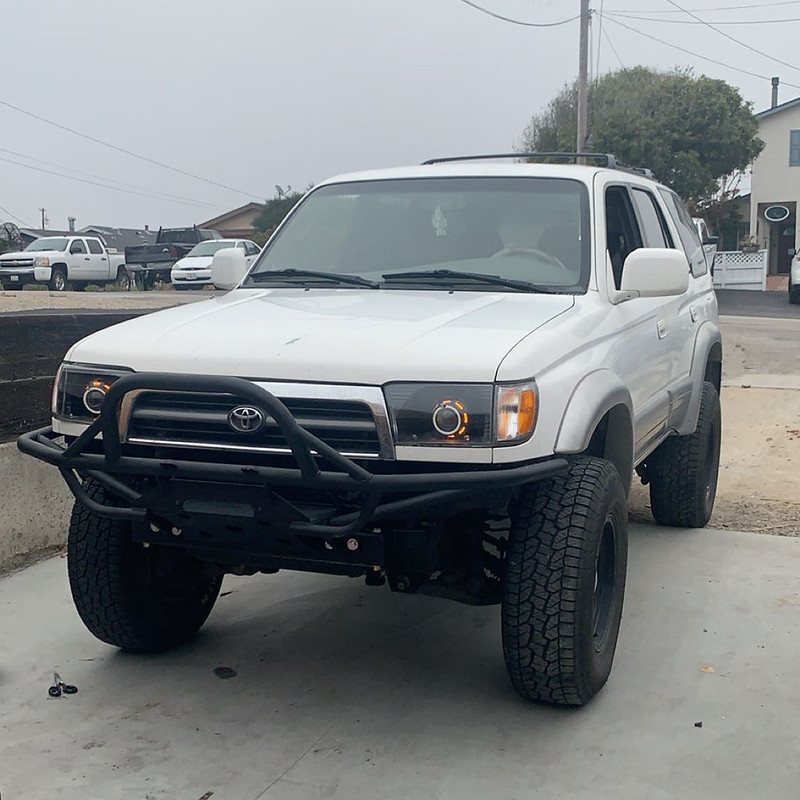
I drove it like this for a while, since I was waiting for my bumper from AddictedOffroad to come in. Once the bumper showed up I spray painted it black and bolted it up. Installation was straightforward and nothing special, so figured I'd just tack that along to this post:
How she sat with everything installed:
__________________
Long travel '97 Limited - build thread
Last edited by connorms; 09-05-2022 at 04:52 PM.
|
|
|
Reply With Quote
|
|
09-05-2022, 10:57 PM
|
#4
|
 |
Member
|
|
Join Date: Jun 2017
Location: Portland, OR
Posts: 116
|
|
|
Member
Join Date: Jun 2017
Location: Portland, OR
Posts: 116
|
Saw a picture of your rig a while back on another thread and was hoping you'd start a build on here, it looks like a beast with that long travel setup. I got my first 4Runner back in highschool and definitely learned alot working on that truck, ironically I did the same thing the first time I went to change my oil and drained the transmission fluid instead and was stumped as to why it won't move... :facepalm: Looking forward to seeing updates on your thread and watching your build progress
__________________
99' T4R Limited Build: https://www.toyota-4runner.org/3rd-g...-build-thread-[pic-heavy].html
|
|
|
Reply With Quote
|
|
09-06-2022, 10:41 PM
|
#5
|
 |
Member
|
|
Join Date: Nov 2020
Location: Savannah, Georgia
Posts: 227
|
|
|
Member
Join Date: Nov 2020
Location: Savannah, Georgia
Posts: 227
|
Awesome beginning to this thread! I'm so jealous of my fellow college friends with LT rigs! Sub'd
|
|
|
Reply With Quote
|
|
09-07-2022, 11:07 PM
|
#6
|
|
Member
|
|
Join Date: Mar 2019
Location: San Luis Obispo, California
Posts: 55
|
|
|
Member
Join Date: Mar 2019
Location: San Luis Obispo, California
Posts: 55
|
Quote:
Originally Posted by Silver.T4R

Saw a picture of your rig a while back on another thread and was hoping you'd start a build on here, it looks like a beast with that long travel setup. I got my first 4Runner back in highschool and definitely learned alot working on that truck, ironically I did the same thing the first time I went to change my oil and drained the transmission fluid instead and was stumped as to why it won't move... :facepalm: Looking forward to seeing updates on your thread and watching your build progress
|
Quote:
Originally Posted by Iron duke
Awesome beginning to this thread! I'm so jealous of my fellow college friends with LT rigs! Sub'd
|
Thanks guys! Yeah I was so confused when I drained what I thought was the oil, checked the dipstick and saw it was still full. Took me longer than I'd like to admit to realize what I did...
================================================== =======================================
Once I got the bumper installed I was really happy with how it was sitting, and left it how it was for a couple months. I got the bumper installed a couple weeks after graduating high school, so I wanted to put the 4runner to use over the summer and went on a few camping trips along with some light wheeling.

(sorry for the bad quality, this was a screenshot taken from a Snapchat video, but not bad flex for a Rough Country lift right?)
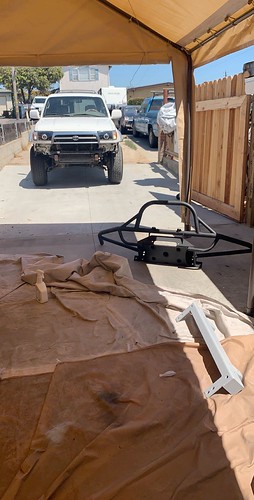
Then, in September my passenger side CV axle blew up, probably due to the shitty Rough Country hockey puck lift. A sensible person would just get a new axle and get a better lift, but in my mind this gave me an excuse to go all out and order a BTF Fabrication long travel kit. My thinking was that I was due for replacing all the bushings/ball joints/etc so might as well go big while I'm doing it.
According to Snapchat memories, I took the 4runner into the garage to start tearing into it on 9/22/19 and finished 10/19/19. The install of the long travel kit took quite a bit of time since I was working almost full time and was starting my first year at college at the same time. Whenever I had some time I would work on it, and slowly got it torn down over the next couple weeks.

Stock LCA vs BTF's LCA... Insane to see the two side by side!
I'm a firm believer in the mindset of "might as well take care of X while I'm doing Y", so this project kind of spiraled even more. Just going off of memory, while I had everything torn apart I also replaced my lower ball joints, inner and outer tie rods, steering rack boots, installed polyurethane steering rack bushings, replaced almost every brake line, and a whole lot more that I can't remember right now. I only used OEM parts for all of this (besides the steering rack bushings), and at one point I was probably at my local Toyota dealership daily. They would recognize me by name and I was getting the shop discount since I was spending so much money there on parts...
I also decided now would be a good time to do the Tundra brake upgrade (again, it spiraled pretty bad...). I used OEM rotors and pads, and got some remanned calipers from NAPA. I kind of regret going that route, as I had to return the calipers 3 times since they had some kind of defect each time. One set that I got was leaking brake fluid at the seam, which I've never seen happen before. Thankfully, they were super understanding and kept replacing them for me until I got a good set.
Installation was very straightforward, I just took all the old stuff out and the new stuff bolted up fine. The only issue I had was that one of the fittings for the reservoir on the coilovers came loose during shipping (or maybe from the factory?) so when I opened the box there was shock oil everywhere. I didn't think much of it as I thought it was some kind of anti-rust coating, but then I realized the shock was completely empty of oil. BTF was super cool about it, and he gave me the option of sending the shock back or he would just pay for the oil. I didn't want to have to wait even longer, as at this point everything was in and I was just waiting to install the shock, so I took him up on the latter offer. It was honestly kind of a cool experience, being able to tear down a shock and put it back together, and now I know how to do it in the future (which I'll probably be doing soon, as these are due for a rebuild).

I got the shock refilled, put it back together, and got it charged at Poly Performance, since they're about a 10 minute drive from me. They were super cool as well and recharged it for free, and overall I'm kind of glad it happened, since I learned a lot about how the shock works and now I know for the future.
Overall I finished without too many issues, and had pretty much the entire front end replaced. Here's a before and after:
And a few more pictures after everything was installed:
After I got the long travel installed and everything buttoned up, me and some friends took a celebratory camping trip up to Big Sur:
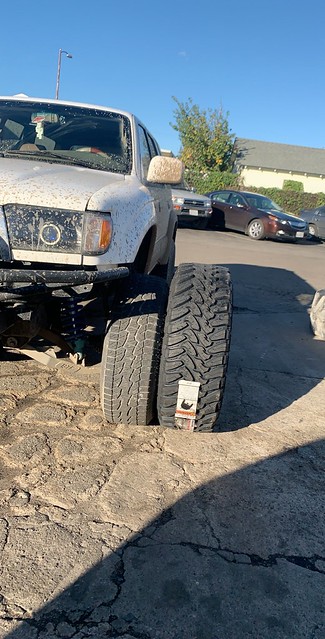
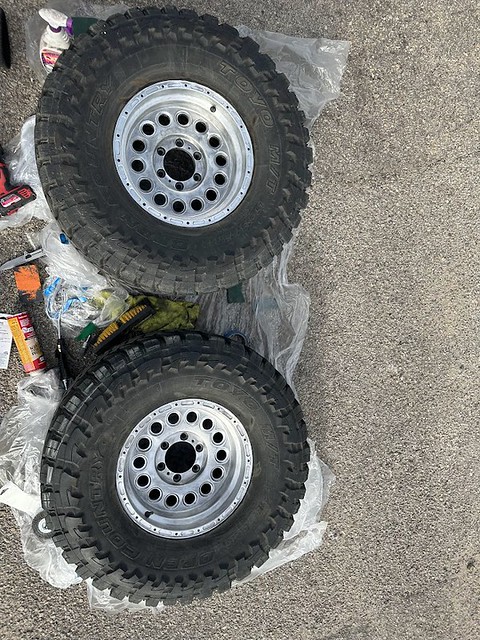
I still had those tiny tires on it that I originally got, and it looked pretty ridiculous. I think they were a bit over 31"... A little bit later (once my wallet recovered from all the suspension stuff) I got some 35s. I went with Toyo Open Country M/T's, as I've heard good things about them and (most importantly) my local tire store had a set of 4 in stock, so I didn't have to wait around for a set to come in.
After I got them installed, I went out and flexed everything out to see how everything fit with the 35s, and they fit surprisingly well. The long travel pushes the wheel forward a bit over 1", so I didn't have to worry about the wheels hitting the firewall. In the back, they rubbed pretty bad on the rear bumper, so I did the simplest thing possible and just removed it (along with the factory tow hitch). 2 years later I'm still running it with no rear bumper, but that's something I need to take care of since I've gotten pulled over probably 4 times now because of it (no tickets yet, though  ).
__________________
Long travel '97 Limited - build thread
|
|
|
Reply With Quote
|
|
09-08-2022, 12:27 AM
|
#7
|
 |
Senior Member
|
|
Join Date: Nov 2014
Location: Huntsville, AL
Posts: 3,929
|
|
|
Senior Member
Join Date: Nov 2014
Location: Huntsville, AL
Posts: 3,929
|
Sweet truck, I love the long travel!
I feel your pain the napa calipers. I've had to replace mine twice because of seizing. They seem to last about 3-4 years for me and then one of them seizes up. And I don't live near salt or anything like that. My truck doesn't have any rust on it...
Crazy that you get pulled over for not having a rear bumper out there. The stuff I see people drive with and without here in some places in Alabama really makes me question what they are thinking so a missing rear bumper is nothing 
__________________
2008 Toyota 4Runner Limited 4x4 - Salsa Red, DD, Mostly Stock, 89k miles
2001 Toyota 4Runner SR5 4x4 - Not Stock, Lifted, Armored, 291k miles
1987 Toyota Supra N/A - Stock, 2nd Owner, 92k miles
|
|
|
Reply With Quote
|
|
09-08-2022, 01:36 AM
|
#8
|
|
Member
|
|
Join Date: Mar 2019
Location: San Luis Obispo, California
Posts: 55
|
|
|
Member
Join Date: Mar 2019
Location: San Luis Obispo, California
Posts: 55
|
Quote:
Originally Posted by Unner
Sweet truck, I love the long travel!
I feel your pain the napa calipers. I've had to replace mine twice because of seizing. They seem to last about 3-4 years for me and then one of them seizes up. And I don't live near salt or anything like that. My truck doesn't have any rust on it...
Crazy that you get pulled over for not having a rear bumper out there. The stuff I see people drive with and without here in some places in Alabama really makes me question what they are thinking so a missing rear bumper is nothing |
Thanks man! Yeah cops around here are pretty strict. I was driving out to Pismo Dunes for a day trip and got pulled over on the main stretch right before the dunes. Took 2 cop cars just for them to give me a warning about my tint and no mud flaps/bumper. Lately I only drive this thing once every few weeks and Ive still gotten pulled over 3 times in the last year.
__________________
Long travel '97 Limited - build thread
|
|
|
Reply With Quote
|
|
09-08-2022, 12:43 PM
|
#9
|
 |
Senior Member
|
|
Join Date: Apr 2011
Location: Oceanside, CA
Posts: 1,892
Real Name: Evan
|
|
|
Senior Member
Join Date: Apr 2011
Location: Oceanside, CA
Posts: 1,892
Real Name: Evan
|
The trucks looking clean with the LT and 35s. I have the same fenders and havent bothered to put my headlight filler panels back on. I think they use some sort of clip to attach to the factory fenders. Did the factory clip fit on the fiberglass or did you use something else to fasten them? I know the side closest to the headlights has its own mounting spot on the headlight assembly, but thats not enough to mount securely.
__________________
2000 Black Sport 4WD 5spd -JD Fabrication long travel/ Fox 2.5 8 RR/ Anonymous Fab lower uniball McNeil Racing fenders Toytec Superflex/ 5th gen Bilstein 5100/ Wheelers Superbumps 315/70/17 BFG KO2 on Robby Gordon wheels 231mm TBU / Wheelers SS lines MStudt rear swaybar links Tom Woods driveshaft Satoshi K&N FIPK w/ AFE dry filter Borla Pro XS URD short throw shifter & Ellis Precision shift knobs Uniden PRO 520XL & 3' Firefly on custom mount Prinsu full rack Baja Designs Squadron Sport Sae & combo beam lights Paranoid Fab switch panel with Ram mounts Extended rear diff breather 01-02 tail lights Stubbs HD-SKO sliders Any 7 Offroad gas tank skid @Assburns custom tube front bumper Nguyen Works swing out bumper FROR rear links
|
|
|
Reply With Quote
|
|
09-08-2022, 08:12 PM
|
#10
|
|
Member
|
|
Join Date: Mar 2019
Location: San Luis Obispo, California
Posts: 55
|
|
|
Member
Join Date: Mar 2019
Location: San Luis Obispo, California
Posts: 55
|
Quote:
Originally Posted by Dezert4Runner
The trucks looking clean with the LT and 35s. I have the same fenders and havent bothered to put my headlight filler panels back on. I think they use some sort of clip to attach to the factory fenders. Did the factory clip fit on the fiberglass or did you use something else to fasten them? I know the side closest to the headlights has its own mounting spot on the headlight assembly, but thats not enough to mount securely.
|
Thanks man! At first I just used the original clip on the fender side and on the inner part of the headlight there's like a silicone pad that the filler panel can screw into. It worked for a while until I was driving spiritedly down a fire road and hit a bump pretty hard, which ended up breaking both of the clips. I've been using zip ties since then and haven't had any issues, but the OEM fender clips worked fine they're just pretty weak.
__________________
Long travel '97 Limited - build thread
|
|
|
Reply With Quote
|
|
12-20-2022, 06:25 PM
|
#11
|
|
Member
|
|
Join Date: Mar 2019
Location: San Luis Obispo, California
Posts: 55
|
|
|
Member
Join Date: Mar 2019
Location: San Luis Obispo, California
Posts: 55
|
After I got the long travel and 35s I was very happy with how everything sat. I didn't do much with it for a while besides strip my carpet out to have it professionally cleaned, as when I got it there was a leak in the firewall from a previous owner having a security system installed poorly. This caused some mold to grow under the carpet in the drivers footwell area. When I first got it, I attempted to clean it out and dry it up a little after fixing the leak, but that mildew smell never really left. I decided to try to fix it once and for all and tore the carpet out and had it professionally cleaned:
Since I was happy with the 4runner and figured it was good where it sat for a while, I started picking up some other projects. I was getting very into fabrication at this time, so I had picked up a welder and a tube bender with plans on going all out on a purpose built desert car, as I felt like I was kind of limited with the 4runner unless I started cutting it up like crazy, which I didn't want to do since I still wanted to be able to camp in it and drive it on the street. I ended up buying a Tundra off of my friend for pretty cheap, and was planning on going full back half, cage, etc:
I didn't do much with it for a couple months, and ended up selling it to my dad since he needed a new truck and we both decided that this was too nice to cut up. It doesn't really look like it with the fading clearcoat and everything, but the frame and interior were in perfect shape so it felt wrong tearing into a perfectly good truck like that. A little bit later I got super inspired by Blake Wilkey's baja bug, so I picked up a '73 Super Beetle with plans on building a tube chassis for it.
This turned out to be another dead end project once I realized building it how I really wanted to was WAY out of my budget, so I sold it shortly after.
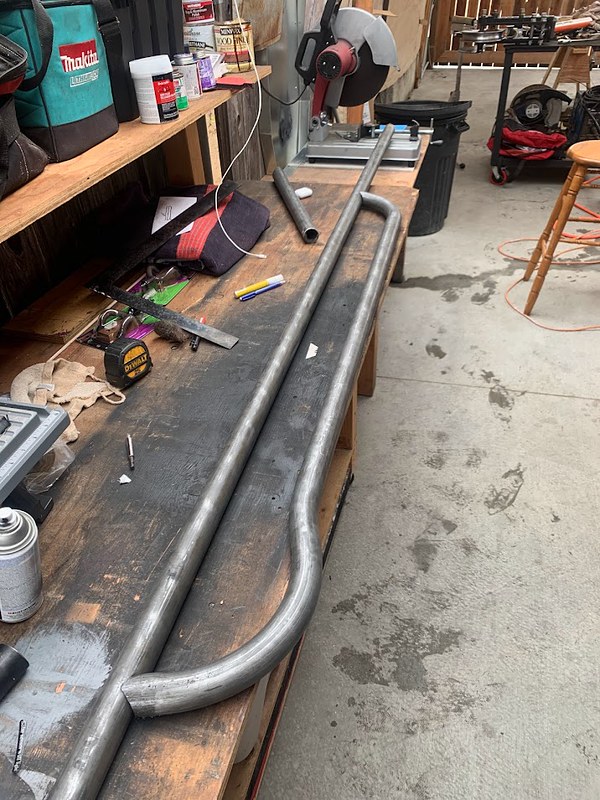
Back on topic to the 4runner now: Since I now had all the tools to do it, I ended up building a set of weld on rock sliders next. This was my first "real" project with the tube bender, and for my first attempt was very happy with how they turned out. I made them out of 1.75" .120 wall DOM tubing, welded straight to the frame:
I was still learning how to weld, but was pretty happy with how some of these welds turned out considering I only started learning a couple months prior:
 
I ended up making a couple sets of these for some friends, and was having a lot of fun with fabricating stuff. I really wanted to do a bigger project than making rock sliders and other small stuff, but didn't want to start cutting up the 4runner as I still wanted it to be streetable and not too molested. This was where the E46 came in. I'll keep it brief as this thread is supposed to be about the 4runner, but I'm still really proud with how it turned out and want to share it.
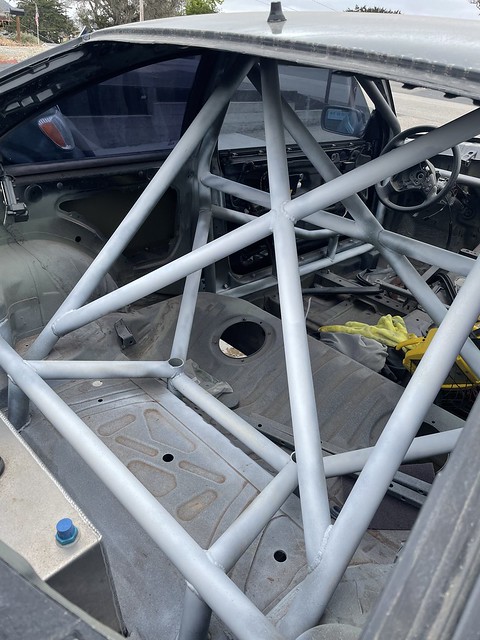
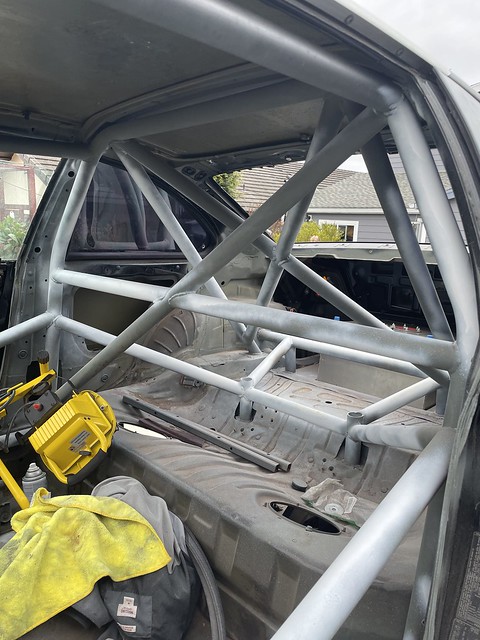
I picked it up on my 20th birthday bone stock, full interior, etc, just with a blown motor. I immediately started tearing into it, and stripped it down to the point where it was just a shell. At this point, it was light enough to be picked up by two people just using the frame rails... I then built a 12-point roll cage for it, and was planning on throwing a turboed LS in it and having a super lightweight, high horsepower death machine (don't judge the paint job, I was building this outside during a rainy season, so with no windows or doors everything would start rusting if it was bare metal):
Shortly after buying the E46 I bought my truck as well, because I needed something for towing the E46 and was tired of hauling 20ft sticks of metal through my back window in the 4runner. Unfortunately, this is kind of where the 4runner started getting neglected. Between building this out and de-grandpa-ifying my truck, I didn't have much time or money to put into the 4runner. At one point I was planning on selling it to further fund the E46, and even went as far as taking "for sale" pictures. Thankfully, before I sold it I started dating my current girlfriend, and she convinced me to keep it. But between those three the 4runner took a back seat, and I'd only take it out on occasion. Eventually I sold the E46, and my truck is now to a point where I'm happy with it, so I'm planning on putting a lot more work into the 4runner.
=================================================
So that covers pretty much all of the backlog. I'm sure I'm forgetting some stuff and may have to update it in the future, but from here on out everything will be current and more detailed with this thread in mind. Since I've started the build I've moved out on my own so I don't have as much time or money to work on it, but my current plan is going back over everything I've done previously and doing it "right", since I've become much more mechanically inclined compared to when I first started. I honestly lost all motivation to work on the 4runner for a year or so, but right around when I started this thread I got a ton of motivation to pick it back up, so I plan on updating things frequently (or as frequently as my wallet allows now  )
__________________
Long travel '97 Limited - build thread
Last edited by connorms; 12-21-2022 at 07:01 PM.
|
|
|
Reply With Quote
|
|
12-21-2022, 02:44 PM
|
#12
|
|
Member
|
|
Join Date: Mar 2019
Location: San Luis Obispo, California
Posts: 55
|
|
|
Member
Join Date: Mar 2019
Location: San Luis Obispo, California
Posts: 55
|
One thing I put off for far too long was doing some routine maintenance. I knew when I got it that the timing belt and water pump were due, and I also knew that my valve covers have been leaking since I got it as well. I even ordered replacement valve cover gaskets back in 2019, and just held onto them for 3ish years before finally getting around to doing it... Mods over maintenance I guess? My main goal for right now is getting caught up on all the stuff that high school me neglected, so it was kind of a no brainer to start with this.
My alternator had also been on its way out for a while, as the charge light would come on occasionally, but revving the engine up a little bit fixed it every time so I wasn't too worried about it. One day when driving home, about 10 minutes away from my house the charge light came on again but this time wouldn't go off. Turned out my alternator finally gave out, and my battery completely died down the street from my house. Thankfully I was able to just grab my truck and use a recovery strap to pull it up the street (I live on a hill so I couldn't just push it), so that kind of sparked the big maintenance plunge.
Parts list:
- Mitsuboshi Timing Belt
- NSK Idler Roller
- Koyo Tensioner Roller
- Front Crankshaft Seal
- OEM Crankshaft Pulley Bolt
- Both Front Camshaft Seals
- Aisin Water Pump & Gasket
- OEM Hydraulic Tensioner
- OEM Thermostat / Aisin Gasket
- All belts
- CS144 Alternator
- OEM Intake Manifold Gaskets
- Denso Spark Plugs
- OEM Spark Plug Tube Seals
- OEM PCV Valve + Grommet
- OEM Throttle Body Seal
- OEM Half-moon Plugs (+ OEM FIPG)
- OEM Cam Plug Seal
- Valve Cover Gaskets
- OEM Valve Cover Bolts
- & some engine gasket kit I ordered years ago that covered any other seals I'm forgetting
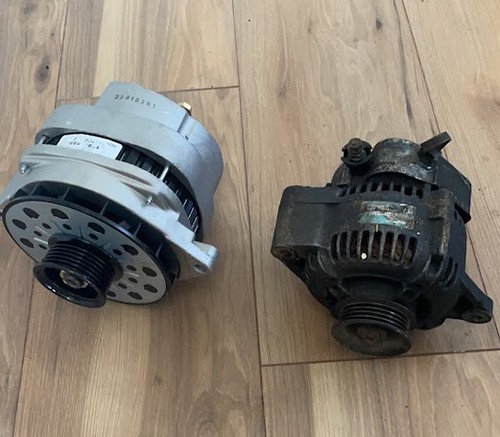
I'm sure there's a couple things I'm forgetting, but that should cover most of it. Since my alternator went out I also decided it was time to do the famous CS144 alternator + big 3 wiring upgrade. Comparing the new alternator to my old one is kind of insane:
I also finally got around to doing my valve cover gaskets. I was kind of excited to do these, as I was very curious (and kind of nervous) to find out what it would look like under the valve covers. I bought the 4runner with no maintenance history, so I honestly had no idea what to expect. What I found underneath was honestly a very big surprise:
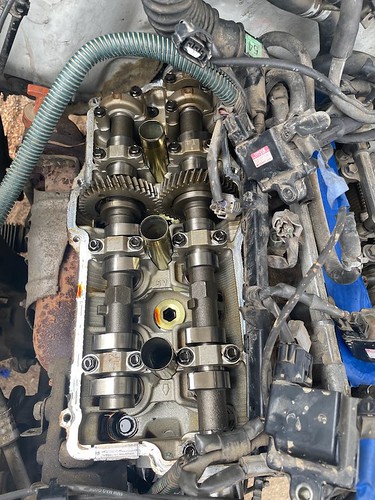 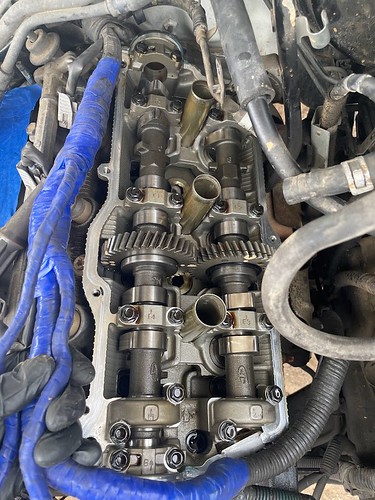
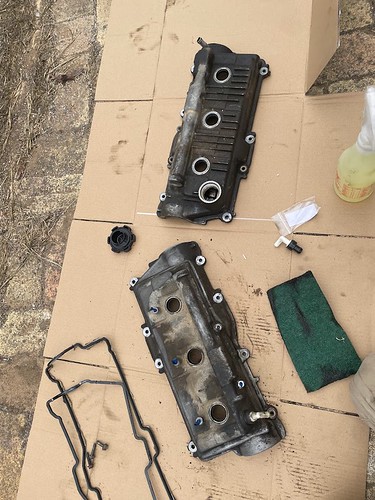
I'm sure these had to have been replaced pretty recently before I bought it, as they're in way too good of shape for a 230k mile motor. It was definitely a nice surprise to see, though. The plastic housing that goes around the wire loom was completely destroyed by someone previously removing it, so I decided to fully remove it and wrap it with some high temp wire loom. I didn't want to have to deal with that brittle piece for the next time I do this job, and I saw a thread on here where someone did the same. It took forever and was super boring, but I'm glad I did it as now it's not something I have to worry about in the future. I also painted my valve covers while they were out, but only took before pictures for some reason 
================================================== ===
While doing all of this maintenance, I also repainted my front bumper and redid my retrofit, using the following parts:
Retrofit parts list:
- BXBuilt DIY Bi-LED Projector Kit, includes:
--- Apollo 2.0 Shrouds
--- Rear Switchback Halos
--- B3 v2 Projectors
- Hexagon Switchback Halos
- New housings & Glass
I was very happy with my old retrofit, but at one point about a year ago one of my headlights went out. This was during a time when I wasn't driving the 4runner much, and didn't have much motivation to work on it, so I just left it with one working headlight. I'm kicking myself for doing this now, as I should have swapped parts from the working side to figure out what part failed. Unfortunately, I didn't do that, so a couple months ago my other headlight went out, too. Since both are no longer working it's a lot harder to troubleshoot what's causing it, so I opted to redo the whole thing. I went with BXBuilt's Bi-LED kit as they seem to be insanely bright, and you can't really beat the cost of the kit either. I also wanted to change up what halos I was using, and was inspired by some builds I've seen on Instagram using these hexagon halos with a cutout.

And the semi-final product (before it was wired in, so I had my friend holding the wires to the battery terminals):
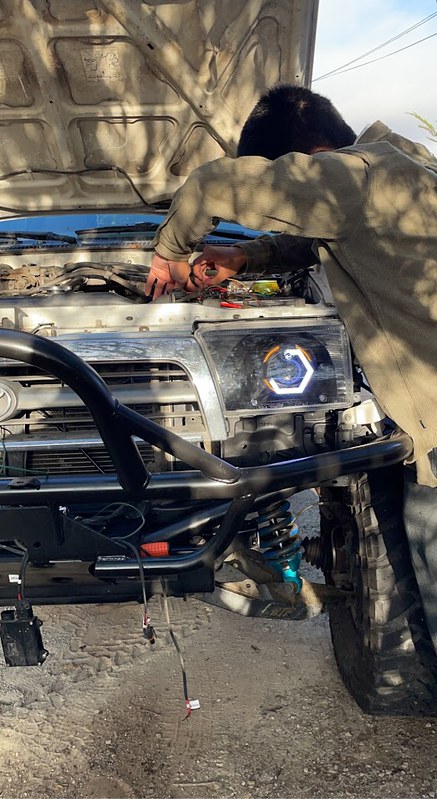
I plan on taking some better pictures once it starts staying light later (and isn't so cold), as right now I get off work at 5 and it's almost pitch black outside. I'm honestly not sure if I'm a fan of these or not, and almost want to go back to the round halos as they were much higher quality and not as bulky. I need to take at least one of the headlights apart again anyways to reinstall the halo, since the day I finished wiring these up I went out on a camping trip with some friends from work, and was driving very fast along some dirt roads and managed to knock one of the halos off of the housing. The double sided tape that came with it didn't hold up at all, and honestly I don't know why I thought it would, but I think for now I'll just reattach it with some JB Weld and hope the hexagons grow on me.
__________________
Long travel '97 Limited - build thread
|
|
|
Reply With Quote
|
|
12-21-2022, 02:52 PM
|
#13
|
|
Member
|
|
Join Date: Apr 2018
Location: Calorado
Posts: 441
|
|
|
Member
Join Date: Apr 2018
Location: Calorado
Posts: 441
|
beautiful build and work.... Before I read ur post I thought u must have had ur heads rebuilt, that is a nice surprise to find U didn't know anything about said.
Last edited by clearock; 12-21-2022 at 07:15 PM.
|
|
|
Reply With Quote
|
|
12-21-2022, 06:54 PM
|
#14
|
|
Junior Member
|
|
Join Date: Nov 2022
Location: USA
Posts: 8
|
|
|
Junior Member
Join Date: Nov 2022
Location: USA
Posts: 8
|
Thats a cool build, seems very clean too.
|
|
|
Reply With Quote
|
|
01-11-2023, 07:16 PM
|
#15
|
|
Member
|
|
Join Date: Mar 2019
Location: San Luis Obispo, California
Posts: 55
|
|
|
Member
Join Date: Mar 2019
Location: San Luis Obispo, California
Posts: 55
|
I had some time off from work due to the holidays, so I wanted to do something since it's not very often I don't have school or work taking up my time, so I decided to repaint my wheels. Painting my wheels black was one of the very first things I did, and I did a VERY bad job at it... I also didn't let the paint cure and immediately took it through mud the next day, which caused most of the paint to chip off. Between that and rock rash from trails over the years, my wheels have looked something like this for the past three years:

I never really cared too much, since I figured they would get scratched up on the trail anyways, and I also was planning on ordering new wheels so I never bothered doing anything about it. Since I had the time off, I figured it was worth a shot to see if I could salvage these wheels and hold off on buying a new set until later. I've always been a fan of bronze wheels, and after doing some research I came across Fiat 750 bronze and wanted to give it a shot. Prep was straightforward, I just hit it with some paint stripper and a wire wheel until it was down to bare aluminum:
I cleaned it up with some acetone, and did two coats of grey primer followed by a light coat of a black basecoat. Then I did 3 coats of the paint, followed by 2 coats of a 2K clear:
 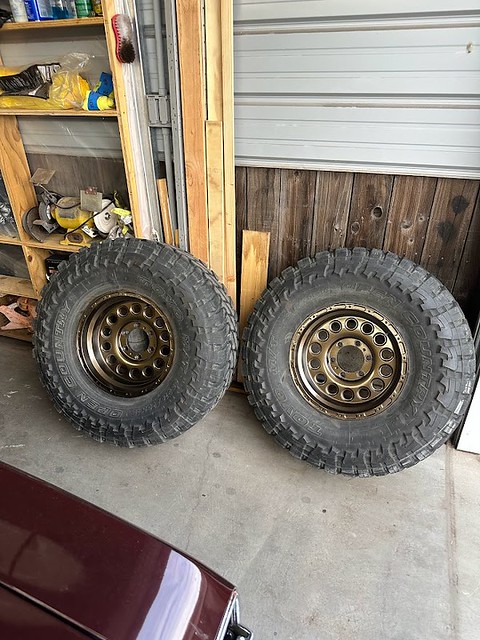
Really couldn't be happier with how they turned out. The color was pretty much exactly what I was looking for. In the shade it's almost brown, on a sunny day it's bronze, and if the sun hits it directly it's a really nice looking gold. Pictures don't quite do it justice, but I really couldn't be happier (especially comparing it to the before). I only managed to get two wheels done as it was raining almost the entire time I was off work, but I plan on doing the other two once the weather gets better.
While I had the wheels off I noticed some fluid on the rear drum. I figured it was either my axle seal had finally gone out, or my wheel cylinder was leaking. I was really hoping it was the wheel cylinder as I didn't have the same symptoms I've seen on other threads related to the axle seal, but I took my drum off to find everything coated in gear oil :/. I guess I caught it pretty early as the leak wasn't as bad as I've seen in some threads, but either way this will be the next thing I'll be taking care of (again, once the weather clears up)
__________________
Long travel '97 Limited - build thread
|
|
|
Reply With Quote
|
| Thread Tools |
|
|
| Display Modes |
Rate This Thread |
 Linear Mode Linear Mode
|
|
 Posting Rules
|
You may not post new threads
You may not post replies
You may not post attachments
You may not edit your posts
HTML code is On
|
|
|
|


