Home Menu

Site Navigation


User Tag List

Reply
 
Thread Tools Rate Thread Display Modes
Old 01-03-2024, 06:18 PM #1
Robb235's Avatar
Robb235 Robb235 is offline
Senior Member
 
Join Date: Jun 2011
Location: Chattanooga, TN
Age: 36
Posts: 1,013
Real Name: Robert
Robb235 is on a distinguished road
Robb235 Robb235 is offline
Senior Member
Robb235's Avatar
 
Join Date: Jun 2011
Location: Chattanooga, TN
Age: 36
Posts: 1,013
Real Name: Robert
Robb235 is on a distinguished road
Robb235's Cheapo DIY Projector Retrofit

I've owned my '99 4Runner since October of 2012, and the headlights have always been a part of this vehicle that seemed to underperform. In 2018, my my 4Runner was retired from daily driving duties, but I still keep it around. Now it's more of a camping vehicle that mainly sits next to my house, pulls my boat in the summer time, and occasionally pulls my little utility trailer whenever I need to haul something.

The past few months I've been on a bit of kick to restore and bring this thing into the 21st century, including adding a backup camera, reupholstering my front seats, replacing my rear axle bearings and seals, etc. Now it's on to the headlights. Since this isn't my daily driver anymore, I couldn't really justify spending the big bucks on a complete retrofitted headlight assembly, or the more expensive kits from vendors like The Retrofit Source. So I pieced together some of the cheaper...errr.... less expensive parts, mostly from Amazon. Parts list is below:

Parts List
'99+ Headlights $45.50 (Local Junkyard)
H4 Retrofit Projectors $30.58 YUFANYA 2.5"Mini Projector Lens
Cheap LED H1 Headlight Bulbs $14.65 360 H1 Led Canbus Car Headlights Bulbs (will replace with something better once they burn out)
Shrouds $34.69 Morimoto Apollo 3.0 Shrouds: (Black)
Rear Halos $23.35 Qasim 1-Pair 100MM White+Amber Switchback 132SMD 4014 LED Halo Ring Angel Eyes DRL Warning Lights 12V
Harness to control hi/low beams $10.91 Innovited HID Replacement Bi Xenon Relay Wiring Harness Hi Lo - H4 9003 HB2
Pigtail to adapt HID harness to LED headlights $8.73 HUIQIAODS H1 H3 Headlight Fog Light Bulb Extension Socket Wire Harness Connector Holder(Pack of 2)
Headlight Glue $13.10 ZXMOTO 13Ft Headlight Sealant Retrofit Refit Butyl Rope Rubber Glue
Foil Tape $6.54 1PCS Premium Silver Aluminum Tape, Foil Tape (2"x65 Feet,3.9mil)
Black Primer $10.48 Rust-Oleum Automotive Flat Black Automotive Sandable Primer Spray
Satin Black Paint (not flat black shown in picture) $16.38 Rust-Oleum Universal Satin Black Spray Paint

Total = $214.91

There's already a few YouTube videos out there describing how to retrofit these headlights, so I'm not going to get into the nitty gritty details of the retrofit. Instead, I'll just point out a few things I did along the way that could hopefully be helpful to someone else considering doing a retrofit.

I started out picking up a set of '99+ headlights from a junkyard. I could have used my '99 headlights already on my vehicle, except that one of my lenses had a small hole in it, almost like a kid had shot it with a bb gun at some point before I owned it.

I heated the headlight assemblies in the oven at 270°F for 10 minutes. Be sure to where something like Mechanix gloves when handling the headlights, because they will be hot when they come out of the oven. I pried my lenses off with a butter knife. Be very careful when prying the lenses off, as you can chip the glass very easily. I first practiced on my headlight that had the hole in the lens, and found out how easy it is to chip the glass. So use care, and start at a corner and slowly work your way around the headlight. Go slow and use care. Put the headlight back in the oven for a few minutes if the glue starts to harden back up on you.

When separating the lens from the assembly, it's easy to get the factory headlight glue everywhere. Even though I was careful, I still managed to get the grey glue onto the lenses. After wasting time trying to use cleaning chemicals and scrubbing, I finally just put both lenses into my dish washer on the hottest water setting, plus steam cycle, and they came out very clean. As you can see in the picture below, I managed to get some of the glue on the reflector housing as well. No biggie because that's going to get sanded.
Robb235's Cheapo DIY Projector Retrofit-6d353938-f4fd-4d87-8801-d3c176663658-jpg

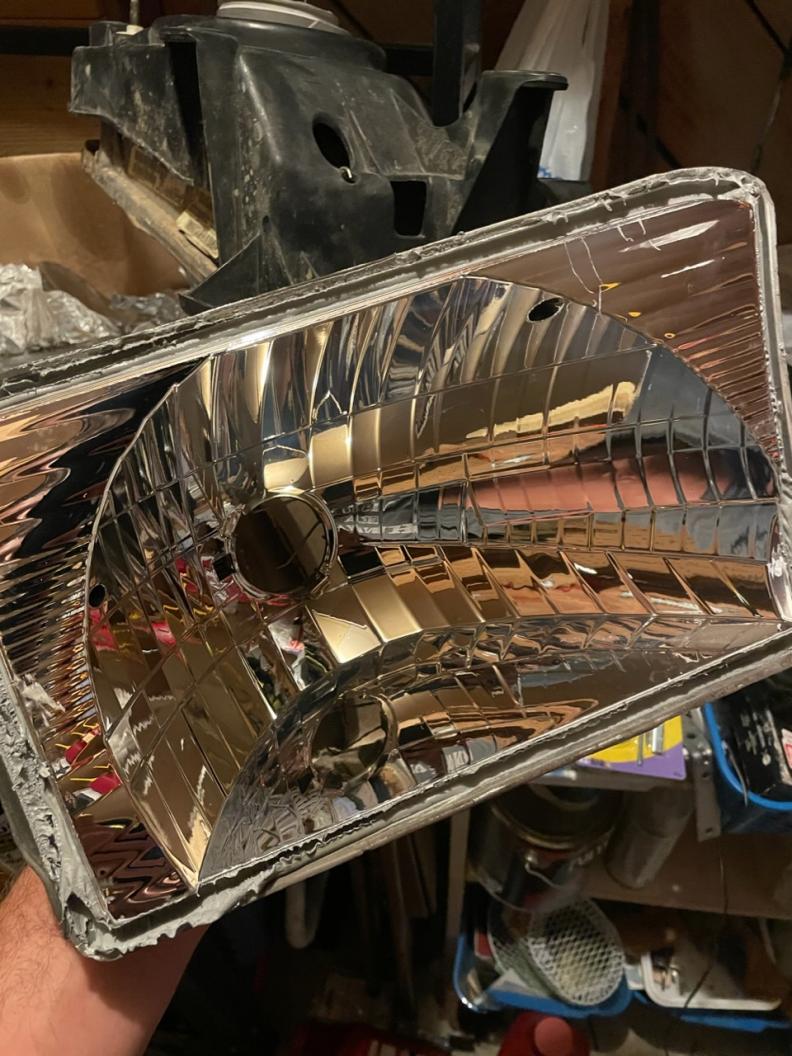
I sanded the chrome reflector inside the headlight with something like 150 grit sandpaper. Just enough to scuff it up and give the primer something to adhere to. After sanding, I flushed the assembly with water in the sink, and wiped it down with Windex.
Robb235's Cheapo DIY Projector Retrofit-b0da64cc-2479-4986-9d88-60eb1cb0611a-jpg

Next I taped off the "valley" of the headlights where the lens glue sits. Then I used the primer and paint pictured below to black out the headlights. Note that the picture shows Flat Black. I was advised by Matthew Berman with SRQ that a Satin finish would look better. So I swapped the Flat Black shown below with Satin Black instead.
Robb235's Cheapo DIY Projector Retrofit-a4addeec-da80-4138-8f4f-484c16f4df67-jpg

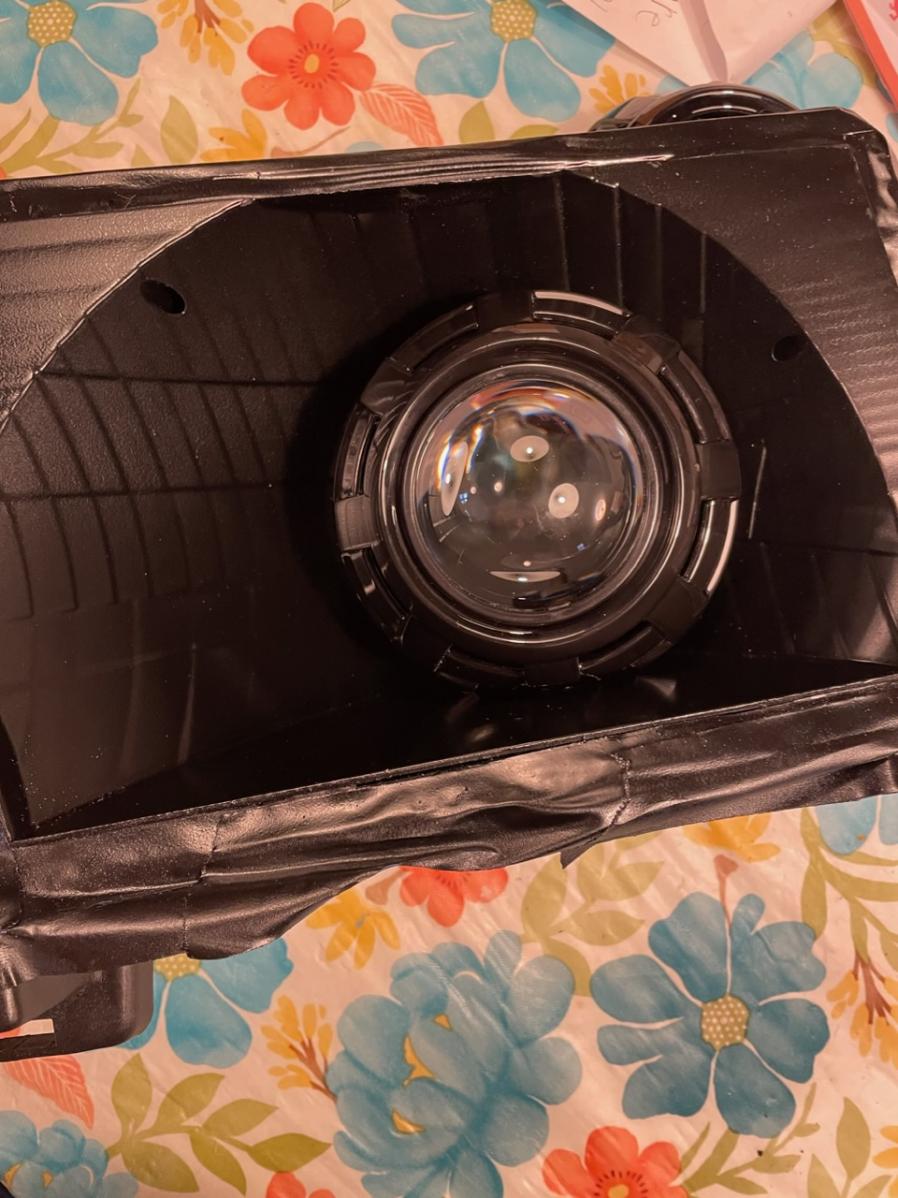
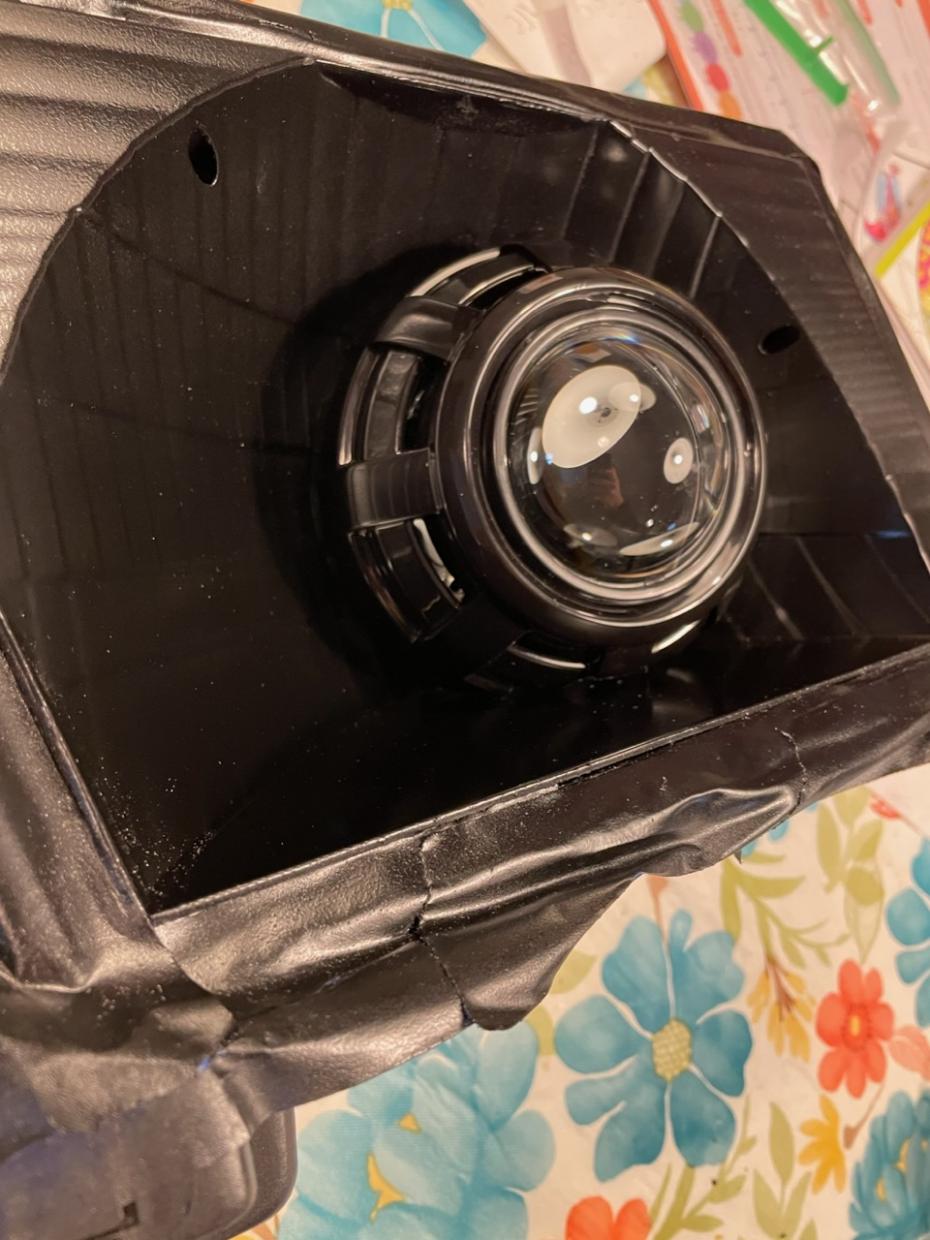
I didn't use the black shrouds that came with my Amazon retrofit projectors. Because the 4Runner headlight housings are so large, I decided to fill some of that space with larger shrouds. I opted for the Morimoto Apollo 3.0 shrouds. The problem with larger shrouds is that they will conflict with the bottom of the headlight housing. I solved this by trimming the bottom of the shroud off with a miter saw. Cut the bottom of the shroud flat, so that is lays flush with the bottom of the headlight housing.
Robb235's Cheapo DIY Projector Retrofit-242b2b56-0d60-4761-889c-a6b22d7cedcd-jpg
Robb235's Cheapo DIY Projector Retrofit-25a620f3-fd48-47a9-b0e1-71440c662159-jpg

Next I installed the projectors into the headlights using the supplied hardware. I didn't take any pictures of this part, so look at some YouTube videos for more info on how to put the projectors in. I opted to install halo rings inside the Apollo 3.0 shrouds. I didn't document this part of the install either. I simply centered the halos inside the shroud, and tacked it together with some JB Weld, and let it sit over night. The Apollo 3.0 shrouds simply slide into the projectors.
Robb235's Cheapo DIY Projector Retrofit-77befa3a-a800-45f1-b325-e5d33c6c88ca-jpg
Robb235's Cheapo DIY Projector Retrofit-3540c7ca-a5a0-415b-a67b-4db2dd948161-jpg
__________________
1999 Toyota 4Runner Limited 4x4 - Turbocharged Garrett 57-trim T3/T4 - URD AFR Sensor Calibrator - DW255 fuel pump - 7MGE Supra 315cc “lime green” fuel injectors - 231mm Tundra Brakes - B&M 70264 Transmission Cooler - Monitoring ATF Temps and AFRs With My iPhone - DIY Projector Headlight Retrofit - Cooper Discoverer AT3 - OME 906 Coils & Rancho 9000XL Shocks (Rear) - Airlift 1000 - RadioShack $5 Rear O2 Simulator
2000 Yamaha XR1800 Jet Boat - MR1 4-Stroke Engine Swap


Last edited by Robb235; 01-04-2024 at 10:46 AM.
Robb235 is offline   Reply With QuoteReply With Quote
Old 01-03-2024, 07:06 PM #2
Robb235's Avatar
Robb235 Robb235 is offline
Senior Member
 
Join Date: Jun 2011
Location: Chattanooga, TN
Age: 36
Posts: 1,013
Real Name: Robert
Robb235 is on a distinguished road
Robb235 Robb235 is offline
Senior Member
Robb235's Avatar
 
Join Date: Jun 2011
Location: Chattanooga, TN
Age: 36
Posts: 1,013
Real Name: Robert
Robb235 is on a distinguished road
Before you go sealing the lenses back onto the headlights, you'll first want to mount them to the vehicle so that you can level the projectors and aim the headlights. But first, you need to install the harness that connects into your H4 headlight plug, and powers the headlights, and controls hi/low beam operation. My harness had plugs to plug into HID ballasts. I decided I didn't want to go with HIDs. I wanted something where if the bulb failed, I could quickly replace with any H1 halogen bulb in a pinch. So I decided to go with H1 LED bulbs. So I cut off the ballast plugs from the harness and spliced in the H1 pigtail.

Here is where I connected the harness to battery power:
Robb235's Cheapo DIY Projector Retrofit-ee289aef-850e-46f4-ba59-bb4494d8650a-jpg

Each headlight needs it's own ground. I used the stock body ground location on the driver side:
Robb235's Cheapo DIY Projector Retrofit-71ce7442-6c62-43b2-9889-179b3abb4689-jpg

Where the harness travels from the driver side over to the passenger side, you can tuck it in front of the radiator:
Robb235's Cheapo DIY Projector Retrofit-512c070d-6078-4fd1-9837-fa1fdbff1dbe-jpg

For the passenger side ground, I used a pre-threaded hole that was already there, and added a bolt:
Robb235's Cheapo DIY Projector Retrofit-0041dd14-24ea-4f25-a354-d5884673ca19-jpg

For the halos, I powered and grounded them by tapping the wiring for the corner marker lights. Here is why it's important to test everything before sealing the headlights back up. As you can see in the two pictures below, the light from the halos was reflecting off the back of the headlight housing behind the shroud, which was undesirable.
Robb235's Cheapo DIY Projector Retrofit-968db4ef-5ddd-4ea8-9c29-5f09df9ef94f-jpg
Robb235's Cheapo DIY Projector Retrofit-ef42d3d4-26a1-44e8-804d-c9da1d8b0877-jpg

The solution was to wrap both the halos and projectors with foil tape so that no light is reflecting off the back of the headlight housing.
Robb235's Cheapo DIY Projector Retrofit-d109bf95-24f4-4411-a23e-01c0b78c286e-jpg
Robb235's Cheapo DIY Projector Retrofit-22615e60-1d8a-4a67-8cd5-9d1177dbefac-jpg
__________________
1999 Toyota 4Runner Limited 4x4 - Turbocharged Garrett 57-trim T3/T4 - URD AFR Sensor Calibrator - DW255 fuel pump - 7MGE Supra 315cc “lime green” fuel injectors - 231mm Tundra Brakes - B&M 70264 Transmission Cooler - Monitoring ATF Temps and AFRs With My iPhone - DIY Projector Headlight Retrofit - Cooper Discoverer AT3 - OME 906 Coils & Rancho 9000XL Shocks (Rear) - Airlift 1000 - RadioShack $5 Rear O2 Simulator
2000 Yamaha XR1800 Jet Boat - MR1 4-Stroke Engine Swap


Last edited by Robb235; 01-04-2024 at 12:15 PM.
Robb235 is offline   Reply With QuoteReply With Quote
Old 01-03-2024, 07:48 PM #3
Robb235's Avatar
Robb235 Robb235 is offline
Senior Member
 
Join Date: Jun 2011
Location: Chattanooga, TN
Age: 36
Posts: 1,013
Real Name: Robert
Robb235 is on a distinguished road
Robb235 Robb235 is offline
Senior Member
Robb235's Avatar
 
Join Date: Jun 2011
Location: Chattanooga, TN
Age: 36
Posts: 1,013
Real Name: Robert
Robb235 is on a distinguished road
Once you have everything finalized, and you've aimed and leveled the projectors, you can seal the lenses back onto the headlight assembly. I elected to dig out the factory grey glue, and put in strips of black headlight glue to match my blacked out headlight assemblies.

Place the headlight assembly facing up, put the lens in place, and put the assembly back in the oven for 10 minutes. Make sure you don't forget to remove the bulb when you put the headlights back into the oven. Take the assembly back out of the oven, and gently press the lens into the assembly. Put the metal clips that hold the lens to the assembly back into place.

Robb235's Cheapo DIY Projector Retrofit-224769e3-8427-4bd7-b0ff-fab0eedd700a-jpg

Robb235's Cheapo DIY Projector Retrofit-1f0b2994-d9db-47ba-8a69-4111b514242a-jpg

Robb235's Cheapo DIY Projector Retrofit-2285ff0f-9afe-49d2-993a-2a50ba52e1ed-jpg

Robb235's Cheapo DIY Projector Retrofit-4fabb7d2-11cd-4f90-ba27-59f865c2c1a4-jpg

Robb235's Cheapo DIY Projector Retrofit-d85d6dba-d515-4d4b-805c-833bee57c1a6-jpg

I really like the look of the blacked out headlight assembly. To me, it really helps to update the look over these older 3rd gens. I really need to pair this with a Satoshi grill mod to completely eliminate all of the chrome, and I think together that will really update the look of this truck.

Last edited by Robb235; 01-04-2024 at 12:35 PM.
Robb235 is offline   Reply With QuoteReply With Quote
Old 01-05-2024, 09:38 AM #4
1blink 1blink is offline
Member
 
Join Date: May 2012
Location: Drake, CO
Posts: 627
1blink is on a distinguished road
1blink 1blink is offline
Member
 
Join Date: May 2012
Location: Drake, CO
Posts: 627
1blink is on a distinguished road
Looks good. I'm thinking about redoing my 10 year old HID headlight retrofit for better light spread soon

Sent from my SM-S901U using Tapatalk
__________________
215k+ 1997 SR5 manual, e-locker, + stuff
1blink is offline   Reply With QuoteReply With Quote
Old 01-24-2024, 02:33 AM #5
JBurt's Avatar
JBurt JBurt is offline
Senior Member
 
Join Date: Jul 2012
Location: Imperial County, CA
Posts: 2,354
Real Name: Jeff
JBurt has a spectacular aura about JBurt has a spectacular aura about
JBurt JBurt is offline
Senior Member
JBurt's Avatar
 
Join Date: Jul 2012
Location: Imperial County, CA
Posts: 2,354
Real Name: Jeff
JBurt has a spectacular aura about JBurt has a spectacular aura about
It's been a couple weeks. How do you like your setup?
__________________
97 SR5 4runner: 2" OME Lift, rear E-Locker, 231mm Tundra Brakes, 203K, B&M 70264 Tranny Cooler, Duratracs

Build
JBurt is offline   Reply With QuoteReply With Quote
Old 01-24-2024, 10:03 AM #6
Robb235's Avatar
Robb235 Robb235 is offline
Senior Member
 
Join Date: Jun 2011
Location: Chattanooga, TN
Age: 36
Posts: 1,013
Real Name: Robert
Robb235 is on a distinguished road
Robb235 Robb235 is offline
Senior Member
Robb235's Avatar
 
Join Date: Jun 2011
Location: Chattanooga, TN
Age: 36
Posts: 1,013
Real Name: Robert
Robb235 is on a distinguished road
To be completely honest, my 4Runner hasn’t left the garage since I did the projector retrofit. After I completed that project I jumped straight into my turbo build. Got part way into the install and then temperatures plummeted. Waiting on temps to come back up.Robb235's Cheapo DIY Projector Retrofit-3da009a0-292f-4118-81b1-79e4694bfe98-jpg

Robb235's Cheapo DIY Projector Retrofit-ded60c54-c3a6-4cd9-8b7f-be1c21614ad0-jpg
__________________
1999 Toyota 4Runner Limited 4x4 - Turbocharged Garrett 57-trim T3/T4 - URD AFR Sensor Calibrator - DW255 fuel pump - 7MGE Supra 315cc “lime green” fuel injectors - 231mm Tundra Brakes - B&M 70264 Transmission Cooler - Monitoring ATF Temps and AFRs With My iPhone - DIY Projector Headlight Retrofit - Cooper Discoverer AT3 - OME 906 Coils & Rancho 9000XL Shocks (Rear) - Airlift 1000 - RadioShack $5 Rear O2 Simulator
2000 Yamaha XR1800 Jet Boat - MR1 4-Stroke Engine Swap


Last edited by Robb235; 01-24-2024 at 10:17 AM.
Robb235 is offline   Reply With QuoteReply With Quote
Old 01-30-2024, 07:24 PM #7
JBurt's Avatar
JBurt JBurt is offline
Senior Member
 
Join Date: Jul 2012
Location: Imperial County, CA
Posts: 2,354
Real Name: Jeff
JBurt has a spectacular aura about JBurt has a spectacular aura about
JBurt JBurt is offline
Senior Member
JBurt's Avatar
 
Join Date: Jul 2012
Location: Imperial County, CA
Posts: 2,354
Real Name: Jeff
JBurt has a spectacular aura about JBurt has a spectacular aura about
Are you using the cxracing kit?
__________________
97 SR5 4runner: 2" OME Lift, rear E-Locker, 231mm Tundra Brakes, 203K, B&M 70264 Tranny Cooler, Duratracs

Build
JBurt is offline   Reply With QuoteReply With Quote
Old 01-30-2024, 11:06 PM #8
Robb235's Avatar
Robb235 Robb235 is offline
Senior Member
 
Join Date: Jun 2011
Location: Chattanooga, TN
Age: 36
Posts: 1,013
Real Name: Robert
Robb235 is on a distinguished road
Robb235 Robb235 is offline
Senior Member
Robb235's Avatar
 
Join Date: Jun 2011
Location: Chattanooga, TN
Age: 36
Posts: 1,013
Real Name: Robert
Robb235 is on a distinguished road
Quote:
Originally Posted by JBurt View Post
Are you using the cxracing kit?

Yes. Got my manifolds and crossover pipe wrapped and sealed. Got my passenger side manifold installed. Driver side is giving me some trouble.


Sent from my iPhone using Tapatalk
__________________
1999 Toyota 4Runner Limited 4x4 - Turbocharged Garrett 57-trim T3/T4 - URD AFR Sensor Calibrator - DW255 fuel pump - 7MGE Supra 315cc “lime green” fuel injectors - 231mm Tundra Brakes - B&M 70264 Transmission Cooler - Monitoring ATF Temps and AFRs With My iPhone - DIY Projector Headlight Retrofit - Cooper Discoverer AT3 - OME 906 Coils & Rancho 9000XL Shocks (Rear) - Airlift 1000 - RadioShack $5 Rear O2 Simulator
2000 Yamaha XR1800 Jet Boat - MR1 4-Stroke Engine Swap

Robb235 is offline   Reply With QuoteReply With Quote
Reply

Tags
black , headlight , led , retrofit , tape


Posting Rules
You may not post new threads
You may not post replies
You may not post attachments
You may not edit your posts

BB code is On
Smilies are On
[IMG] code is On
HTML code is On

Forum Jump

Similar Threads
Thread Thread Starter Forum Replies Last Post
Projector retrofit? 42s on u 3rd gen T4Rs 8 08-06-2013 03:09 PM
projector retrofit JamesDean91 3rd gen T4Rs 2 11-25-2012 11:37 AM
FX-R projector retrofit DIY Hbryanlopez 5th gen T4Rs 9 07-07-2012 11:04 AM
Get a projector retrofit for your 3rd gen! so_LED 3rd gen T4Rs 23 02-21-2012 03:17 PM
HID Projector for retrofit... beirish 4th Gen T4Rs 1 04-10-2007 01:00 PM

Powered by vBadvanced CMPS v3.2.2

All times are GMT -4. The time now is 08:56 PM.

Powered by vBulletin® Version 3.8.11
Copyright ©2000 - 2024, vBulletin Solutions Inc.
Search Engine Optimisation provided by DragonByte SEO (Pro) - vBulletin Mods & Addons Copyright © 2024 DragonByte Technologies Ltd.
Feedback Buttons provided by Advanced Post Thanks / Like (Lite) - vBulletin Mods & Addons Copyright © 2024 DragonByte Technologies Ltd.
User Alert System provided by Advanced User Tagging (Lite) - vBulletin Mods & Addons Copyright © 2024 DragonByte Technologies Ltd.
***This site is an unofficial Toyota site, and is not officially endorsed, supported, authorized by or affiliated with Toyota. All company, product, or service names references in this web site are used for identification purposes only and may be trademarks of their respective owners. The Toyota name, marks, designs and logos, as well as Toyota model names, are registered trademarks of Toyota Motor Corporation***Ad Management plugin by RedTyger
 
Copyright © 2020