Home Menu

Site Navigation


User Tag List

Reply
 
Thread Tools Rating: Thread Rating: 2 votes, 5.00 average. Display Modes
Old 06-08-2014, 07:57 PM #1
hour's Avatar
hour hour is offline
Member
 
Join Date: Nov 2013
Location: Denver, CO
Posts: 394
Real Name: Brandon
hour is on a distinguished road
hour hour is offline
Member
hour's Avatar
 
Join Date: Nov 2013
Location: Denver, CO
Posts: 394
Real Name: Brandon
hour is on a distinguished road
Guide: Radiator and Thermostat Replacement for Noobs

I wrote this up because I was taking pictures along the way and most of the referenced links are more text than picture. It really wasn't that bad following the text directions but hey, what's the harm in having another write up?

I replaced my radiator because after doing a flush it was running hotter than ever, and I was certain that there was no more trapped air in the radiator. I / others on here suggested thermostat was bad or radiator was clogged... In any event, had I done all of this from the start I would have saved a lot of time.

Parts used:

ToughOne/Ready-Rad radiator from AAP (#431402) - $114
ToughOne 13psi Radiator Cap (#10241) - $8
OEM Thermostat (#90916-03075) - $21
OEM Thermostat Gasket (#16325-62010) - $7
3 gal Zerex Asian Formula Coolant (#675130) - $14/gal
Total: $192

Edit: Including some alternate radiator part #'s and comments
I can't comment on these entirely since I only used the radiator specified and haven't tried any others.

OEM radiator: #16400‑75180 - have to assume it'd fit like a glove
Koyo/TYC 1998 - I don't know how to comment, research indicates people say these are interchangeable (as in you order Koyo, get TYC) and some people claim it fits exceptionally or not well at all, such as post #4 in this thread. SEE BRIAN'S COMMENT ON KOYO/TYC IN THIS POST
Spectra (Autozone): #C1998 - didn't have any reviews on Autozone.com so I kept looking
End edit

You can also replace the upper and lower radiator hoses (and clamps) if you want. I didn't, but probably should have. Really wanted to get this wrapped up over the weekend, so maybe order those in advance if you can. I'd stick with OEM hoses to eliminate any possible variables. Camelback Toyota has the hoses and thermostat + gasket for way cheaper than my local dealership, wish I had planned a little better.

Tools used:
12mm socket (12pt), 12mm deep socket (6pt)
10mm socket
Socket extensions - one roughly 1.5", one about 3"... can improvise
Needle nose pliers
Bucket and drain pan, funnel

First thing to do is remove your front skid plate. I figure mine may not have all the bolts, or they're in different locations, but it's a few 12mm that you'll need to remove.


With the skid plate off you'll have good access to the petcock at the bottom of the radiator. Loosen/remove the fill cap, position bucket, and start the draining process. It'll flow from the circled hole, don't remove it entirely or you'll spill.


Draining can take a while so you may as well work on the stupid grill at this point. This is the second time removing mine and I'm pretty sure all my clips are toast. In my opinion, this was the most difficult part of the task - and I had already done it once before.


After the draining is complete, pull the lower radiator hose and expect a little more coolant to come out at this point.


You can go ahead and remove the upper radiator hose too at this point to get that out of the way.


Disconnect your transmission cooler lines at this point, I photographed where they connected to the hard lines, but you'll be looking for the two on the bottom of the radiator. Yank one at a time and catch the little bit of transmission fluid in a proper drain pan. If you have an external cooler you may as well remove your zip ties from old radiator (or do nothing if you installed with brackets)


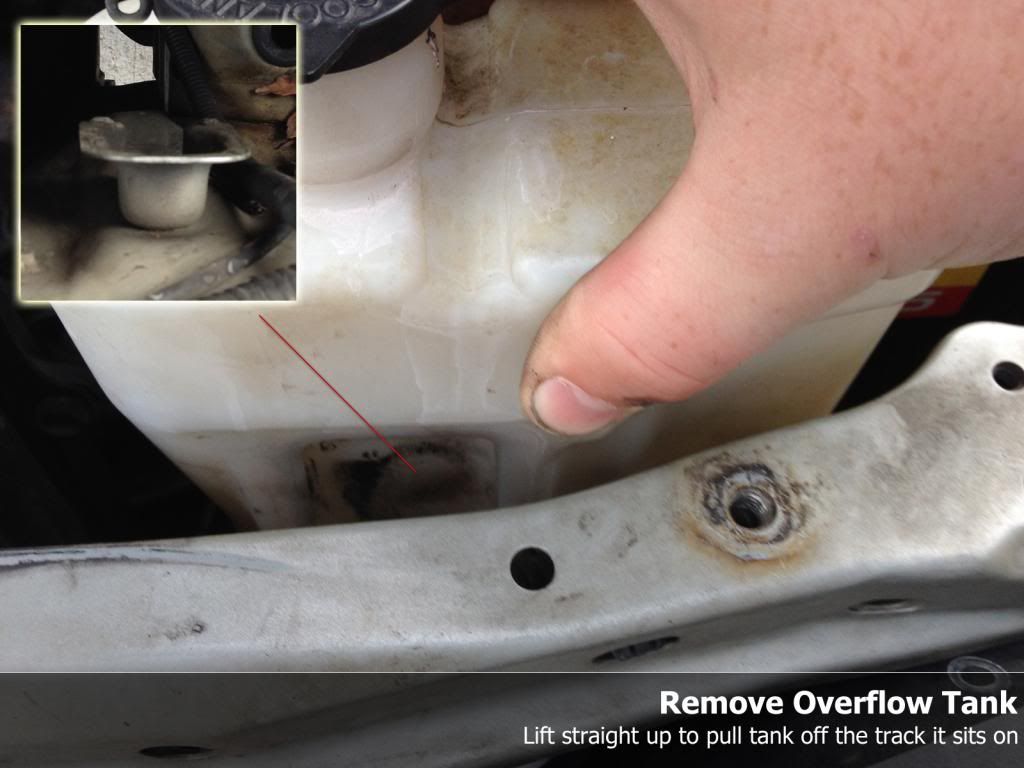
Remove battery bracket while the transmission cooler lines are dribbling. This will allow you to yank the overflow tank out and clean it.


You'll also want to disconnect the line to the overflow tank from the upper radiator neck. This will be the last tube running to the radiator, so have a beer if you weren't already... the messy part is nearing an end.


Lift the overflow tank straight up, it slides in on a track. I photographed this because mine was being a PITA to yank up, and I questioned whether that was the correct procedure. I didn't want to manhandle it and end up cracking the tank, so yeah... here's how it attaches.


You'll then want to remove the 4 10mm bolts that hold on the fan shroud. The passenger side bottom one was difficult to access because of the transmission cooler lines, but once I got it loosened with socket wrench I just undid it with my fingers. Two of em are down low, maybe use a flash light. Move it towards the windshield after you free it, to allow some wiggle room for the radiator.


Use a 12mm socket to remove the four bolts now holding the radiator in. You'll be able to remove it next.


This bolt is in a terrible location, but having the grill off and attacking it from the underside made it doable.


With the fan shroud off and moved back, all lines disconnected, and the 4 bolts out that hold the radiator on, yank it straight up like you did the overflow tank. It shouldn't weigh too much now that it's empty, and you get a good deal of satisfaction throwing it in to your yard. Once the radiator is out you can then remove the fan shroud entirely to free up some room for thermostat removal.


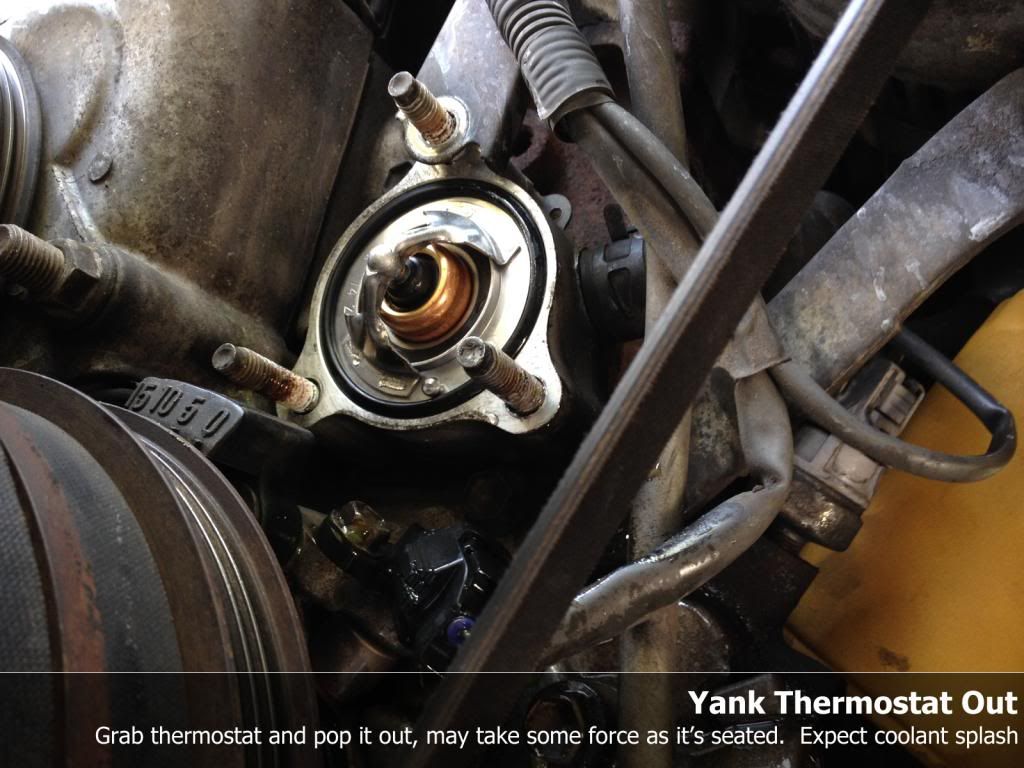
Now for the thermostat, if you're doing it. I stress using the 6 point socket on these nuts because one of mine started to round. Maybe hit them with PB blaster the night before. You may need a deep 12mm socket, as you're just removing a nut and the bolt/pin itself might be too long for a regular socket. I also disconnected the top of the hose that connects to the thermostat housing just to get everything out of the way. You'll do that anyway if you're replacing the hoses.


Here's the thermostat, grab it by whatever you can and give it a wiggle to unseal. You'll get another coolant splash doing this, so be prepared with your bucket or get your face out of the way.


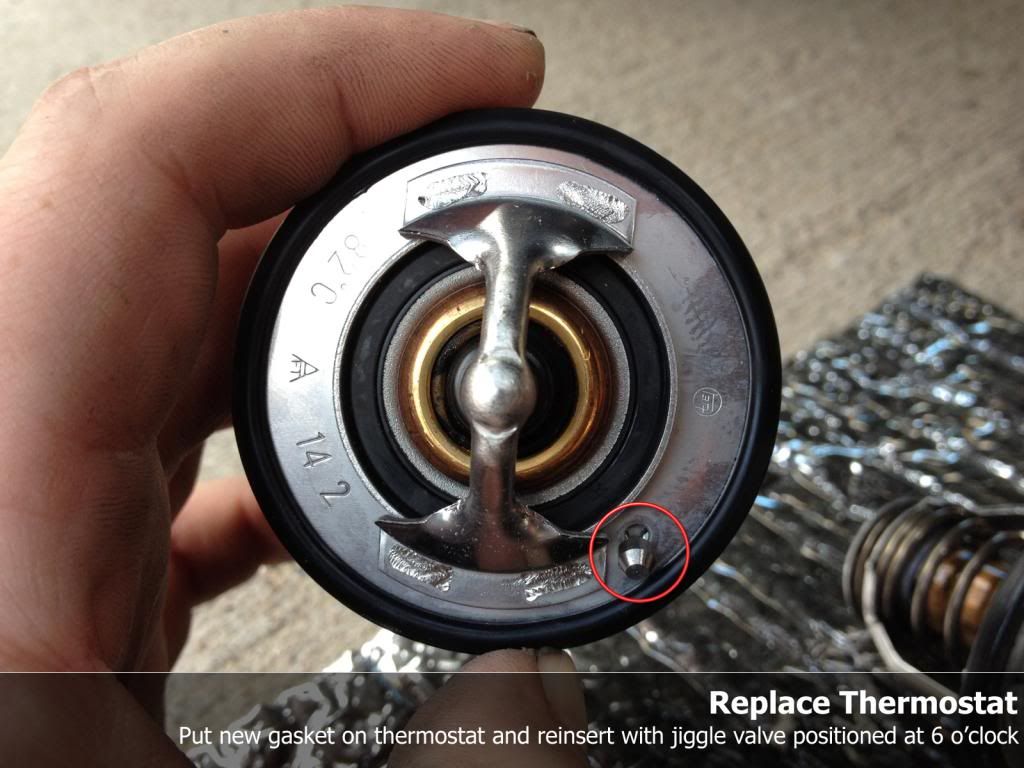
Prepare your new thermostat by putting your new gasket on. Orient it so the circled jiggle valve is facing the ground. Pop it in. It might not stay too well inside the hole at this point, so orient it and try not to bump it as it will easily fall out.


Have another beer because the next several steps are reassembly. Put the thermostat housing back over the three bolts, gentle to not bump the thermostat. Screw on the three 12mm nuts you took off, and using a socket, get them all finger tight equally. I may have not done this the first attempt as I had a leak, so... do this. Once they're all finger tight you can torque them to 14 ft lbs. Don't overdo it.

I installed the new radiator at this point, very easy. Just slid it down the reverse of how I removed the old one, and waited for the 4 bolt holes to line up. The fit was perfect with the mentioned radiator, and I simply put in my old 4 bolts.

Reconnect the bottom hose to the thermostat housing and the radiator, the transmission cooler lines (if using radiator's cooler), and move clamps in to position. I've read that people prefer to use new transmission cooler clamps when reattaching, I didn't since I have an external cooler. Connect the top hose and clamps, and then move the fan shroud in to position and put bolts in. Reconnect the overflow tank hose to the radiator fill neck.

Alright, almost done. Your thermostat is in and all hoses are reconnected to the radiator. Make sure your new radiator's drain valve is closed tightly, and start your filling process. After adding a little over a gallon, peek under the truck and make sure nothing is dribbling. It took right around a gallon for my thermostat housing to start dripping the first time around, hopefully you won't have this issue.

You should be able to get right around 2 gallons in before the radiator acts like it doesn't want to take anymore. Flip the temp control to full heat and fan to full blast. Also turn on the rear heater to full hot / high fan. Turn on the car.

You may see a little coolant accepted through the radiator shortly after turning on, maybe coincidence, but the level in the radiator will drop a good bit after the thermostat opens. This happened for me at about 181* displayed on my Torque app on phone. Add more coolant through the funnel and periodically give the upper radiator hose a squeeze. After about 15 minutes of total idle time I was pretty convinced that it had taken all it could. I capped the radiator, turned off the car, and filled the overflow tank to the F mark (it was still empty).

Take for a test drive with the heater control to COLD, ac blasting if you're like me (torture testing). My temperatures had consistently been 212*F after dogging it and hitting a stop, now I'm at 190*. If your temps are high, try pulling up on a curb or getting the nose high and adding more coolant. Be sure to let things cool down a bit before popping open the cap if you pull over to do this. I plan on carrying some extra coolant and a funnel around for the next several days just to be sure, but all seems A-OK.


Again, this is really detailed for a seemingly simple task, but I managed to bork it yesterday by not installing a new thermostat, and again by having the thermostat leaking a bit. I've read of ridiculous dealership prices for this work, it's really not that bad!
__________________

Last edited by hour; 06-11-2014 at 12:20 PM.
hour is offline   Reply With QuoteReply With Quote
Old 06-09-2014, 01:12 AM #2
Scirocco84's Avatar
Scirocco84 Scirocco84 is offline
Member
 
Join Date: Nov 2013
Location: San Diego
Posts: 95
Scirocco84 is on a distinguished road
Scirocco84 Scirocco84 is offline
Member
Scirocco84's Avatar
 
Join Date: Nov 2013
Location: San Diego
Posts: 95
Scirocco84 is on a distinguished road
Cool write up, thanks for all the pics. Btw, what did you used to edit/comment on/ draw on your pics?
__________________
1999 E-locked, 5 speed Highlander
Scirocco84 is offline   Reply With QuoteReply With Quote
Old 06-09-2014, 01:23 AM #3
0xfded's Avatar
0xfded 0xfded is offline
Member
 
Join Date: May 2013
Location: Seattle
Posts: 401
0xfded is on a distinguished road
0xfded 0xfded is offline
Member
0xfded's Avatar
 
Join Date: May 2013
Location: Seattle
Posts: 401
0xfded is on a distinguished road
This is an excellent write-up. Thanks for taking the time to do this.
0xfded is offline   Reply With QuoteReply With Quote
Old 06-09-2014, 09:55 AM #4
bandman659 bandman659 is offline
Member
 
Join Date: Feb 2011
Location: Atlanta, GA
Posts: 36
bandman659 is on a distinguished road
bandman659 bandman659 is offline
Member
 
Join Date: Feb 2011
Location: Atlanta, GA
Posts: 36
bandman659 is on a distinguished road
Glad your radiator seemed to drop in with no issue. I got the TYC 1998 from Amazon and of the 4 bolt holes on the brackets, only one would line up enough to thread a bolt in at any given time. I tried swapping the brackets from my old radiator, but the mounts on the radiator were spaced further out, so the factory brackets were too wide. I ended up jamming two bolts on, filed a third hole out enough to put the bolt in and left it at that. Something that should have taken 5 minutes took me two hours of swearing, swapping stuff around, and head scratching.

The radiator works just fine, but those damn brackets made me want to fly to China and punch the guy that made the brackets in the face. How do you get something that wrong and (more importantly) how does that junk get past QC?
__________________
2000 4Runner SR5, 2WD, 230k miles and still going.
bandman659 is offline   Reply With QuoteReply With Quote
Old 06-09-2014, 10:18 AM #5
busmup808's Avatar
busmup808 busmup808 is offline
Senior Member
 
Join Date: Jan 2014
Location: From HI 2 WA
Posts: 1,684
busmup808 is a jewel in the rough busmup808 is a jewel in the rough busmup808 is a jewel in the rough busmup808 is a jewel in the rough
busmup808 busmup808 is offline
Senior Member
busmup808's Avatar
 
Join Date: Jan 2014
Location: From HI 2 WA
Posts: 1,684
busmup808 is a jewel in the rough busmup808 is a jewel in the rough busmup808 is a jewel in the rough busmup808 is a jewel in the rough
Quote:
Originally Posted by bandman659 View Post
Glad your radiator seemed to drop in with no issue. I got the TYC 1998 from Amazon and of the 4 bolt holes on the brackets, only one would line up enough to thread a bolt in at any given time. I tried swapping the brackets from my old radiator, but the mounts on the radiator were spaced further out, so the factory brackets were too wide. I ended up jamming two bolts on, filed a third hole out enough to put the bolt in and left it at that. Something that should have taken 5 minutes took me two hours of swearing, swapping stuff around, and head scratching.

The radiator works just fine, but those damn brackets made me want to fly to China and punch the guy that made the brackets in the face. How do you get something that wrong and (more importantly) how does that junk get past QC?
Lol on the last paragraph!
__________________
Busmup808 all day, all night!
busmup808 is offline   Reply With QuoteReply With Quote
Old 06-09-2014, 10:58 AM #6
BrianSD_42's Avatar
BrianSD_42 BrianSD_42 is offline
Elite Member
 
Join Date: Jan 2011
Location: San Diego
Age: 42
Posts: 11,435
Real Name: Instagram: briansd_97r
BrianSD_42 is just really nice BrianSD_42 is just really nice BrianSD_42 is just really nice BrianSD_42 is just really nice BrianSD_42 is just really nice
BrianSD_42 BrianSD_42 is offline
Elite Member
BrianSD_42's Avatar
 
Join Date: Jan 2011
Location: San Diego
Age: 42
Posts: 11,435
Real Name: Instagram: briansd_97r
BrianSD_42 is just really nice BrianSD_42 is just really nice BrianSD_42 is just really nice BrianSD_42 is just really nice BrianSD_42 is just really nice
Cool write up although can you include the OEM part number for the radiator? Or least also mention the Koyo.

If that cheap aftermarket radiator fails you could be at risk of a pink milkshake. OEM rads are well proven to last 15 years. Aftermarket is like Russian roulette.
__________________
Those he commands move only in command, Nothing in love. Now does he feel his title, Hang loose about him, like a giant’s robe, Upon a dwarfish treasonous thief.
BrianSD_42 is offline   Reply With QuoteReply With Quote
Old 06-09-2014, 11:37 AM #7
LittleCaesar's Avatar
LittleCaesar LittleCaesar is offline
Elite Member
 
Join Date: May 2011
Location: OBX, NC and Obamaville
Posts: 6,801
LittleCaesar is just really nice LittleCaesar is just really nice LittleCaesar is just really nice LittleCaesar is just really nice
LittleCaesar LittleCaesar is offline
Elite Member
LittleCaesar's Avatar
 
Join Date: May 2011
Location: OBX, NC and Obamaville
Posts: 6,801
LittleCaesar is just really nice LittleCaesar is just really nice LittleCaesar is just really nice LittleCaesar is just really nice
Nice job. The old radiator had seen better days for sure.

What app is that?
LittleCaesar is offline   Reply With QuoteReply With Quote
Old 06-09-2014, 11:56 AM #8
amalik amalik is offline
Senior Member
 
Join Date: Sep 2013
Location: Denver
Posts: 2,350
amalik is on a distinguished road
amalik amalik is offline
Senior Member
 
Join Date: Sep 2013
Location: Denver
Posts: 2,350
amalik is on a distinguished road
Quote:
Originally Posted by LittleCaesar View Post
Nice job. The old radiator had seen better days for sure.

What app is that?
Torque Pro. It's only on Android.
amalik is offline   Reply With QuoteReply With Quote
Old 06-09-2014, 12:42 PM #9
hour's Avatar
hour hour is offline
Member
 
Join Date: Nov 2013
Location: Denver, CO
Posts: 394
Real Name: Brandon
hour is on a distinguished road
hour hour is offline
Member
hour's Avatar
 
Join Date: Nov 2013
Location: Denver, CO
Posts: 394
Real Name: Brandon
hour is on a distinguished road
Correct, it's Torque Pro. We have a bunch of old android phones at work so I just donated one of my development phones and took a ghetto one (er I guess it was top of the line 3 years ago).

For anyone interested in that, you can buy a 'burner' phone from Best Buy or a million other places for cheap. I have a $65 LG Optimus Exceed II that I bought last week for work, and it also works with Torque exceptionally well. No contract, didn't activate (skipped activation once using a trick I found on youtube, never prompted again), money!

Brian, I don't know the part numbers of anything else. I just posted what I used. A mod can edit my post if it makes it in to any list of guides, or if others want to post up their experiences (direct fit only, lets skip the questionable mounting TYC1998) I'll edit first post. Pink milkshake is null issue for me with an external cooler, but ReadyRad has enough reviews for me to personally trust. Starting off with a new radiator and new fluid should curb corrosion for a very long time and make the pink milkshake a null issue, unless it was constructed improperly (in which case I'd assume you'd have fluids mixing from the get go)
__________________
hour is offline   Reply With QuoteReply With Quote
Old 06-09-2014, 01:18 PM #10
donkeyhoatie donkeyhoatie is offline
Member
 
Join Date: Jun 2011
Location: Glenview, IL
Posts: 124
donkeyhoatie is on a distinguished road
donkeyhoatie donkeyhoatie is offline
Member
 
Join Date: Jun 2011
Location: Glenview, IL
Posts: 124
donkeyhoatie is on a distinguished road
Very nice write-up with quality pictures throughout. Congrats on a job well done on both the write-up and the replacement.
__________________
98 4Runner SR5 83K miles. Lost to frame rot in November of 2012.
donkeyhoatie is offline   Reply With QuoteReply With Quote
Old 06-09-2014, 05:23 PM #11
SCRunner12's Avatar
SCRunner12 SCRunner12 is offline
Senior Member
 
Join Date: May 2010
Location: Santa Cruz, CA
Age: 37
Posts: 4,989
Real Name: Robert
SCRunner12 will become famous soon enough
SCRunner12 SCRunner12 is offline
Senior Member
SCRunner12's Avatar
 
Join Date: May 2010
Location: Santa Cruz, CA
Age: 37
Posts: 4,989
Real Name: Robert
SCRunner12 will become famous soon enough
Are you able to replace the thermostat without draining the radiator? Just wondering because I need to replace my thermostat after installing a SC and would rather not refill the entire system.
__________________
My 4runner Build Thread 2000 Limited 4runner SOLD

My Tundra Build Thread 2006 Double Cab Tundra SOLD

My Humpty Dumpty 4runner Build Thread 1999 Highlander 4runner
SCRunner12 is offline   Reply With QuoteReply With Quote
Old 06-09-2014, 05:29 PM #12
BrianSD_42's Avatar
BrianSD_42 BrianSD_42 is offline
Elite Member
 
Join Date: Jan 2011
Location: San Diego
Age: 42
Posts: 11,435
Real Name: Instagram: briansd_97r
BrianSD_42 is just really nice BrianSD_42 is just really nice BrianSD_42 is just really nice BrianSD_42 is just really nice BrianSD_42 is just really nice
BrianSD_42 BrianSD_42 is offline
Elite Member
BrianSD_42's Avatar
 
Join Date: Jan 2011
Location: San Diego
Age: 42
Posts: 11,435
Real Name: Instagram: briansd_97r
BrianSD_42 is just really nice BrianSD_42 is just really nice BrianSD_42 is just really nice BrianSD_42 is just really nice BrianSD_42 is just really nice
I'll find the part number and post it.

I think you should be master of you own post so if you want to include it thats cool.

It's nice to see a write up like this with some pictures.
__________________
Those he commands move only in command, Nothing in love. Now does he feel his title, Hang loose about him, like a giant’s robe, Upon a dwarfish treasonous thief.

Last edited by BrianSD_42; 06-09-2014 at 05:34 PM.
BrianSD_42 is offline   Reply With QuoteReply With Quote
Old 06-09-2014, 05:30 PM #13
Arnezie's Avatar
Arnezie Arnezie is offline
Member
 
Join Date: May 2014
Location: Michigan
Posts: 590
Arnezie will become famous soon enough
Arnezie Arnezie is offline
Member
Arnezie's Avatar
 
Join Date: May 2014
Location: Michigan
Posts: 590
Arnezie will become famous soon enough
thanks OP this is on my list of things to do, along with timing belt WP ect.
Arnezie is offline   Reply With QuoteReply With Quote
Old 06-09-2014, 06:15 PM #14
hour's Avatar
hour hour is offline
Member
 
Join Date: Nov 2013
Location: Denver, CO
Posts: 394
Real Name: Brandon
hour is on a distinguished road
hour hour is offline
Member
hour's Avatar
 
Join Date: Nov 2013
Location: Denver, CO
Posts: 394
Real Name: Brandon
hour is on a distinguished road
Quote:
Originally Posted by Scirocco84 View Post
Cool write up, thanks for all the pics. Btw, what did you used to edit/comment on/ draw on your pics?
I saved a layer group in Photoshop with the tinted section and two text fields, then moved it to each picture I was saving and recaptioned. Yeah, it kind of sucked - not the easiest way.

Quote:
Originally Posted by SCRunner12 View Post
Are you able to replace the thermostat without draining the radiator? Just wondering because I need to replace my thermostat after installing a SC and would rather not refill the entire system.
I've read about people replacing thermostats with the lower radiator hose attached (to radiator and thermostat housing) but you'll have much less room to work with. Also, my thermostat (even with everything drained) still shot out coolant once I yanked it. I'd imagine with it undrained you'll get an even more significant splash, though it may not be that much of your total coolant volume.

Quote:
Originally Posted by BrianSD_42 View Post
I'll find the part number and post it.

I think you should be master of you own post so if you want to include it thats cool.

It's nice to see a write up like this with some pictures.
I added OEM, Koyo/TYC, and an Autozone part number. OEM is clearly a solid choice but I don't want to give people any reassurance with TYC, since people get TYC or Koyo when ordering one or the other, and some (including post #4 of this thread) had bad fitment. Also included Autozone radiator part number, people seem okay with the 'Spectra' brand radiators in general, but without any specific reviews for 4runners - beats me. I encourage anyone trying a radiator other than the one I used to do some additional searching on the board to ensure fitment and quality.
__________________
hour is offline   Reply With QuoteReply With Quote
Old 06-10-2014, 05:41 AM #15
RussToy's Avatar
RussToy RussToy is offline
Member
 
Join Date: Jul 2011
Location: Granville Ohio
Posts: 866
Real Name: Russel
RussToy is an unknown quantity at this point
RussToy RussToy is offline
Member
RussToy's Avatar
 
Join Date: Jul 2011
Location: Granville Ohio
Posts: 866
Real Name: Russel
RussToy is an unknown quantity at this point
Quote:
Originally Posted by bandman659 View Post
Glad your radiator seemed to drop in with no issue. I got the TYC 1998 from Amazon and of the 4 bolt holes on the brackets, only one would line up enough to thread a bolt in at any given time. I tried swapping the brackets from my old radiator, but the mounts on the radiator were spaced further out, so the factory brackets were too wide. I ended up jamming two bolts on, filed a third hole out enough to put the bolt in and left it at that. Something that should have taken 5 minutes took me two hours of swearing, swapping stuff around, and head scratching.

The radiator works just fine, but those damn brackets made me want to fly to China and punch the guy that made the brackets in the face. How do you get something that wrong and (more importantly) how does that junk get past QC?
I feel you Bandman...I had the same problem. Two of my bolt holes lined up, but the other two weren't even close! I hate crap made in China!!!

OP...hats off to you!! One of the nicest and easiest DIY write ups I've seen!! Please don't stop at this one...please continue.
RussToy is offline   Reply With QuoteReply With Quote
Reply


Posting Rules
You may not post new threads
You may not post replies
You may not post attachments
You may not edit your posts

BB code is On
Smilies are On
[IMG] code is On
HTML code is On

Forum Jump

Similar Threads
Thread Thread Starter Forum Replies Last Post
Full Replacement Guide for SR5 V8 with JBL (Just BLows) gshadow325 4th Gen T4Rs 24 11-21-2015 01:30 AM
Thermostat replacement guide - & TIMING BELT/WATER PUMP dnath28 3rd gen T4Rs 10 04-21-2015 02:58 PM
Strange temp and heater behavior after thermostat replacement giro Classic T4Rs 5 11-21-2013 09:16 AM
Doing steering guide replacement in a few days.... Kung 3rd gen T4Rs 9 12-08-2012 12:18 AM
1987 4runner SR5 Rear Differential Gasket Replacement DIY Guide (with Pics!) Philbert Classic T4Rs 3 08-25-2009 12:13 PM

Powered by vBadvanced CMPS v3.2.2

All times are GMT -4. The time now is 11:44 PM.

Powered by vBulletin® Version 3.8.11
Copyright ©2000 - 2024, vBulletin Solutions Inc.
Search Engine Optimisation provided by DragonByte SEO (Pro) - vBulletin Mods & Addons Copyright © 2024 DragonByte Technologies Ltd.
Feedback Buttons provided by Advanced Post Thanks / Like (Lite) - vBulletin Mods & Addons Copyright © 2024 DragonByte Technologies Ltd.
User Alert System provided by Advanced User Tagging (Lite) - vBulletin Mods & Addons Copyright © 2024 DragonByte Technologies Ltd.
***This site is an unofficial Toyota site, and is not officially endorsed, supported, authorized by or affiliated with Toyota. All company, product, or service names references in this web site are used for identification purposes only and may be trademarks of their respective owners. The Toyota name, marks, designs and logos, as well as Toyota model names, are registered trademarks of Toyota Motor Corporation***Ad Management plugin by RedTyger
 
Copyright © 2020