 03-16-2010, 08:26 AM
|
#1
|
 |
Member
|
|
Join Date: Jul 2008
Location: Colorado
Posts: 478
|
|
|
Member
Join Date: Jul 2008
Location: Colorado
Posts: 478
|
dual battery set up
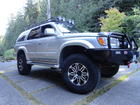
For those of you that want a dual battery setup under the hood of a V6 3rd gen, it is possible. Hopefully you can get some ideas from what I have done.
Thanks to this thread for the Ruff Stuff battery box and other ideas. Problem for was that this thread is for a 4 cyclinder and I have a V6:
3rd Gen gets updated dual battery tray and National Luna Solenoid - YotaTech Forums
Here are the products I used:
battery box: Optima Battery Box, Dual, Widthwise [OPTWIDE] - $78.00
Battery Isolator and meter: National Luna DIY - Split Charge System
Fuse Block: ST*Blade Fuse Block With Cover - 6 Circuit with Negative Bus
Here is what I did:
1) I had to remove the radiator overflow reservoir
2) I loosened the fuse block completely them hammered over the bracket on the battery side. I drilled out the holes larger and then install the fuse block pushed over as far as I could. I had to cut out the corner of the radiator fan housing. I bought the isolator and the meter individually, as opposed to National Luna's DIY kit. I bought prepackaged lengths of battery cable from the parts store. They worked perfect and I didn’t have to crimp my own ends or by fittings.
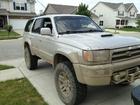
Here are the pics.
Here is the engine as a whole

The reservoir is strapped to the air intake for now. I guess I’ll have to do a custom intake to accommodate an appropriate bracket for the reservoir…too bad…

Here are the two batteries squeezed in. I built a bracket and a hinged support to hold the new fuse block on top of the stock fuse block. This was the only place I could find to fit the new fuse block. I am a little worried about how close the positive pole is to the metal on the body at the bottom left of the battery block. I might grind it back or cover it in rubber? I don’t want arcing.

Here it is with the hinged fuse block open for access to the fuses below.


The isolater is squeezed in toward the back of the hood area by the hinges.

Inside there is a meter to show you the power in the batteries. There is also an alarm and an over ride to link both batteries together when winching.

I would have to say…I am pretty happy about this one.
__________________
Current Rig: 1999 5Runner (customized 100 series LC)
==============
Past Rig: 2000 Sport Edition -- Debadged -- Flares Removed -- 5 BFG AT's 265/75/R16 -- OME 882 & LC Coils -- SS Diff. Drop -- Dual Optima Batteries -- Tundra 199mm brakes
Custom Kitchen -- Cargo Door Light -- Enlarged Storage Compartment
Last edited by CSL; 03-16-2010 at 08:49 AM.
|

|
 Reply With Quote Reply With Quote
|
|
03-16-2010, 10:41 AM
|
#2
|
 |
Member
|
|
Join Date: Dec 2009
Location: Dallas, TX
Age: 43
Posts: 774
|
|
|
Member
Join Date: Dec 2009
Location: Dallas, TX
Age: 43
Posts: 774
|
Very cool setup, I never thought you could get two batteries under the hood. I had stared at my engine bay many times before trying to figure out how to get two batteries in there and decided it couldn't be done. Well I guess I was wrong! Very nice job!
And I think I would grind down that metal so it doesn't arc.
|
|
|
Reply With Quote
|
|
03-16-2010, 12:19 PM
|
#3
|
 |
Senior Member
|
|
Join Date: Jul 2009
Location: wenatchee
Age: 42
Posts: 3,982
|
|
|
Senior Member
Join Date: Jul 2009
Location: wenatchee
Age: 42
Posts: 3,982
|
might be over kill, but if you do grind the metal down use some sound deadening paint to recover it, the sound deading paint is a rubberized paint product and should work well for insulating, meh just a thought most likely not even worth it....
sweet set-up though, might be using this as a template in the future
|
|
|
Reply With Quote
|
|
03-16-2010, 12:38 PM
|
#4
|
 |
Member
|
|
Join Date: May 2009
Location: southern california
Age: 50
Posts: 665
|
|
|
Member
Join Date: May 2009
Location: southern california
Age: 50
Posts: 665
|
Nice setup! This is one of many mods I would be doing. I have seen this over at yotatech done on a taco, love that you have done this on a 3rd gen.
__________________
2002 4runner limited 4wd Thunder Cloud
Interior:Eclipse 6620,focal utopia,pdx-5,Bazooka EL-10. Headrest dvd,cobra 19 DX IV,edgestar fp430,
Exterior:Safari snorkle,viper 5901,285/75/16 T/A KO2
Lights:Fx projector retrofit 4300k & lightforce 170striker.
Suspension&Armor:Toytech CO,Rear lexus coils&LC shocks,1" bl,TJM-15,ODL rear bumper,all pro sliders,F&R ARB,skid row,lil skip.
|
|
|
Reply With Quote
|
|
03-20-2010, 12:25 PM
|
#5
|
|
Member
|
|
Join Date: Jul 2008
Location: Colorado
Posts: 478
|
|
|
Member
Join Date: Jul 2008
Location: Colorado
Posts: 478
|
Thanks for the compliments! It was a long and though out process to finally get this to work. The last big thing to do is find a more permanent way to mount that radiator overflow.
I will look into the sound deadening paint. I definetely don't want to take any chances with arcing.
__________________
Current Rig: 1999 5Runner (customized 100 series LC)
==============
Past Rig: 2000 Sport Edition -- Debadged -- Flares Removed -- 5 BFG AT's 265/75/R16 -- OME 882 & LC Coils -- SS Diff. Drop -- Dual Optima Batteries -- Tundra 199mm brakes
Custom Kitchen -- Cargo Door Light -- Enlarged Storage Compartment
|
|
|
Reply With Quote
|
|
03-20-2010, 01:35 PM
|
#6
|
 |
Senior Member
|
|
Join Date: Nov 2005
Location: Bama
Posts: 1,190
|
|
|
Senior Member
Join Date: Nov 2005
Location: Bama
Posts: 1,190
|
Quote:
Originally Posted by CSL

I am a little worried about how close the positive pole is to the metal on the body at the bottom left of the battery block. I might grind it back or cover it in rubber? I dont want arcing.
|
Nice work on the dual battery setup CSL.
BTW, this may be a stupid question, but I'll ask anyway - if you're worried about arcing from the positive pole to the metal on the body, can you not just flip that battery around so the positive pole is next to the fuse block like the other batter is facing?
__________________
2002 4Runner Sport 4WD
Headlight Adjustment
"Live life w/o Limits. Your imagination is not limited by time or distance, by logic or by scarcity. You can fill your imagination with whatever you choose."
|
|
|
Reply With Quote
|
|
03-20-2010, 01:39 PM
|
#7
|
 |
Senior Member
|
|
Join Date: Feb 2010
Location: San Antonio, TX
Posts: 1,732
|
|
|
Senior Member
Join Date: Feb 2010
Location: San Antonio, TX
Posts: 1,732
|
nice job CSL... i want to do this but this seems to be time and money consuming. I have been looking for a fuse block like the one u bought so i can properly hook up my aux accessories but $50 seems kinda high for that.
__________________
| G3 Projectors | OME/LC | 315/75 Kelly Safari TSR | Custom LC Rims | Rola Vortex Roof Rack | Gobi Ladder |
|
|
|
Reply With Quote
|
|
03-20-2010, 02:04 PM
|
#8
|
|
Senior Member
|
|
Join Date: Feb 2010
Location: San Antonio, TX
Posts: 1,732
|
|
|
Senior Member
Join Date: Feb 2010
Location: San Antonio, TX
Posts: 1,732
|
did u pick up the fuse block with the negative bus or without?
__________________
| G3 Projectors | OME/LC | 315/75 Kelly Safari TSR | Custom LC Rims | Rola Vortex Roof Rack | Gobi Ladder |
|
|
|
Reply With Quote
|
|
03-20-2010, 02:50 PM
|
#9
|
|
Member
|
|
Join Date: Jul 2008
Location: Colorado
Posts: 478
|
|
|
Member
Join Date: Jul 2008
Location: Colorado
Posts: 478
|
Quote:
Originally Posted by xskydivingdudex
did u pick up the fuse block with the negative bus or without?
|
It has a negative fuse block. I doub't it will really get used though. Yeah, the fuse block was expensive, but I have already rusted out and trashed a cheaper one, so I went ahead it spent a little more this time.
Quote:
|
Originally Posted by Rock Slide
Nice work on the dual battery setup CSL.
BTW, this may be a stupid question, but I'll ask anyway - if you're worried about arcing from the positive pole to the metal on the body, can you not just flip that battery around so the positive pole is next to the fuse block like the other batter is facing?
|
Yeah, I thought about that, but if I flip it, I be just as close to another part of the body...one that will be harder to grind back.
__________________
Current Rig: 1999 5Runner (customized 100 series LC)
==============
Past Rig: 2000 Sport Edition -- Debadged -- Flares Removed -- 5 BFG AT's 265/75/R16 -- OME 882 & LC Coils -- SS Diff. Drop -- Dual Optima Batteries -- Tundra 199mm brakes
Custom Kitchen -- Cargo Door Light -- Enlarged Storage Compartment
|
|
|
Reply With Quote
|
|
03-20-2010, 05:52 PM
|
#10
|
 |
Junior Member
|
|
Join Date: Feb 2010
Location: cville
Age: 31
Posts: 25
|
|
|
Junior Member
Join Date: Feb 2010
Location: cville
Age: 31
Posts: 25
|
wouldn't it be easier to get like a rubber hose cut a slit in it and put it over that part of tht body and glue it down grinding seems like itd be a pain to undo everything and take it out jus tryin to keep it kis
__________________
1995 2wd Power Acoustik Stax 4000/1D 3 12s in a custom box coming soon
|
|
|
Reply With Quote
|
|
03-20-2010, 06:20 PM
|
#11
|
|
Senior Member
|
|
Join Date: Nov 2005
Location: Bama
Posts: 1,190
|
|
|
Senior Member
Join Date: Nov 2005
Location: Bama
Posts: 1,190
|
Quote:
Originally Posted by CSL
I thought about that, but if I flip it, I be just as close to another part of the body...one that will be harder to grind back.
|
Gotcha. That makes sense.
__________________
2002 4Runner Sport 4WD
Headlight Adjustment
"Live life w/o Limits. Your imagination is not limited by time or distance, by logic or by scarcity. You can fill your imagination with whatever you choose."
Last edited by Rock Slide; 03-20-2010 at 06:22 PM.
|
|
|
Reply With Quote
|
|
03-21-2010, 12:33 AM
|
#12
|
 |
Senior Member
|
|
Join Date: Mar 2007
Location: Denver metro area-CO
Posts: 2,130
Real Name: Uhhh this is my real name
|
|
|
Senior Member
Join Date: Mar 2007
Location: Denver metro area-CO
Posts: 2,130
Real Name: Uhhh this is my real name
|
rubber dip maybe would work fine?
great job CSL thanks for sharing.
My suggestion to your idea of protecting the frame from the battery post so nearby would be that rubber dip product. I have seen it at Harbor Freight for not all that much $$.
fairly easy to apply and you can do so in multiple stages to achieve the thickness desired. Worked great to cushion my shackles hanging off my ARB bumper from clanging against it all the time.
That is a piece of work that hinged access unit custom built. So simple yet so professional looking.
That battery meter photo I am not sure what I am seeing-that is running up the A pillar on drivers side? just tucked in against the dash?
amazing solution to the winch issue. Nicely done just like your other very custom mods.
__________________
06 4th gen V8 4WD of course...
08 Honda Ridgeline RT
05 Scion xB-the toaster-daily driver
my Yota Fanatic photos are on Facebook- here is link:
http://www.facebook.com/album.php?ai...5&l=5795132731
|
|
|
Reply With Quote
|
|
03-21-2010, 12:44 AM
|
#13
|
 |
Member
|
|
Join Date: Jan 2008
Location: Nevada Co. CA
Posts: 406
|
|
|
Member
Join Date: Jan 2008
Location: Nevada Co. CA
Posts: 406
|
this one is going into my "mods to be done " file!
|
|
|
Reply With Quote
|
|
03-24-2010, 11:48 PM
|
#14
|
|
Member
|
|
Join Date: Jul 2008
Location: Colorado
Posts: 478
|
|
|
Member
Join Date: Jul 2008
Location: Colorado
Posts: 478
|
Quote:
Originally Posted by 15boomin
wouldn't it be easier to get like a rubber hose cut a slit in it and put it over that part of tht body and glue it down grinding seems like itd be a pain to undo everything and take it out jus tryin to keep it kis
|
Good idea, thanks. Your right, why grind parts off if I don't have to.
Quote:
Originally Posted by Ron Helmuth
great job CSL thanks for sharing.
My suggestion to your idea of protecting the frame from the battery post so nearby would be that rubber dip product. I have seen it at Harbor Freight for not all that much $$.
fairly easy to apply and you can do so in multiple stages to achieve the thickness desired. Worked great to cushion my shackles hanging off my ARB bumper from clanging against it all the time.
That is a piece of work that hinged access unit custom built. So simple yet so professional looking.
That battery meter photo I am not sure what I am seeing-that is running up the A pillar on drivers side? just tucked in against the dash?
amazing solution to the winch issue. Nicely done just like your other very custom mods.
|
Thanks, Ron. I also like the spray idea. It would have a cleaner finished look, but it would be harder to do. For now the hose is a simple fix.
Thanks for the compliments. I have been thinking and planning this out for a while. Not only for winching power, but now I have a fridge for camping. Also, it will be harder to get stuck with a dead battery, like I did last summer!
Quote:
Originally Posted by rubbman
this one is going into my "mods to be done " file!
|
Cool! glad I can help you find ways to spend money on your runner! Ha!
I swear I think every time I get something off my "wish" list or "mods to be done" file, another one goes in. Now I want to get it hooked up to a solar trickle charger!
__________________
Current Rig: 1999 5Runner (customized 100 series LC)
==============
Past Rig: 2000 Sport Edition -- Debadged -- Flares Removed -- 5 BFG AT's 265/75/R16 -- OME 882 & LC Coils -- SS Diff. Drop -- Dual Optima Batteries -- Tundra 199mm brakes
Custom Kitchen -- Cargo Door Light -- Enlarged Storage Compartment
Last edited by CSL; 03-24-2010 at 11:51 PM.
|
|
|
Reply With Quote
|
|
11-28-2012, 08:47 AM
|
#15
|
 |
Senior Member
|
|
Join Date: Jul 2012
Location: South of Indianapolis,IN
Posts: 1,176
|
|
|
Senior Member
Join Date: Jul 2012
Location: South of Indianapolis,IN
Posts: 1,176
|
Thanks for sharing this!
__________________
E-Locker, Bilstein 5100,LX 450 Coils, Tundra Wheels Graphite, 33'' Duratracs, 1.5" wheel Spacers, Energy Suspension Sway Bar Links and bushings,Roll Bar, LED's, Sport Hood! XRC 9.5k Comp Winch Custom Mounted, 3rd Row Rumble Seat, B&M Tranny Cooler, Tundra Brakes, 4XInnovations Sliders, Uniden 520XL Pro CB, 4' Firestik.
My Build Thread!!
http://www.toyota-4runner.org/3rd-ge...8-limited.html
|
|
|
Reply With Quote
|
 Posting Rules
|
You may not post new threads
You may not post replies
You may not post attachments
You may not edit your posts
HTML code is On
|
|
|
|


 Linear Mode


