 07-18-2021, 09:29 PM
|
#35551
|
|
Junior Member
|
|
Join Date: Jul 2021
Location: East Coast
Posts: 5
|
|
|
Junior Member
Join Date: Jul 2021
Location: East Coast
Posts: 5
|
Changed the oil in the diffs and transfer case. Thought the oil from the rear smelled a bit burnt. I took a whiff from the new bottle to compare, and nope that's just what gear oil smells like 
|

|
 Reply With Quote Reply With Quote
|
|
07-18-2021, 09:40 PM
|
#35552
|
 |
Member
|
|
Join Date: Jun 2021
Location: North Carolina
Posts: 38
|
|
|
Member
Join Date: Jun 2021
Location: North Carolina
Posts: 38
|
Quote:
Originally Posted by RangerT4R

Changed the oil in the diffs and transfer case. Thought the oil from the rear smelled a bit burnt. I took a whiff from the new bottle to compare, and nope that's just what gear oil smells like |
Yea, those and ATF are not pleasant. Definitely smell 'burnt' even brand new.
|
|
|
Reply With Quote
|
|
07-19-2021, 03:19 PM
|
#35553
|
 |
Member
|
|
Join Date: Jul 2012
Location: Pittsburg,CA. Bay area.
Posts: 487
|
|
|
Member
Join Date: Jul 2012
Location: Pittsburg,CA. Bay area.
Posts: 487
|
Parts list?
Quote:
Originally Posted by Bagels
I could not find one but once you get started you see what needs to be done. Basically just trim out the inner portion of the stock grill and then slowly remove portions of the Tacoma grill until it fits snug in place.
Then I drilled holes in the grill insert and stock grill to zip tie them together. Two on each side where the two grills touch. Covered the zip ties up with two part plastic epoxy and then put epoxy on all other contact surfaces. A little black paint on places the epoxy is viable and reinstall!
Sent from my iPhone using Tapatalk
|
Do you mind posting what parts are needed for this grill swap? Thanks for posting. 
Could you post some pics of the back side of the grill?
|
|
|
Reply With Quote
|
|
07-20-2021, 08:26 PM
|
#35554
|
 |
Senior Member
|
|
Join Date: Sep 2014
Location: Cherokee Co., GA
Posts: 2,754
Real Name: Russell (OB #9908)
|
|
|
Senior Member
Join Date: Sep 2014
Location: Cherokee Co., GA
Posts: 2,754
Real Name: Russell (OB #9908)
|
Today I replaced the 11 fasteners like the ones circled in the pic. They hold the black plastic cover just forward of the radiator. Most of mine were loose or missing, and these from Amazon are a perfect fit. They’re also used elsewhere on the 4R so having some spares will be handy.
Tip: the 2 holes these fit in at the bottom left & right of the piece seem smaller than the others and I found the easiest thing to do was back the screw-like part out all the way, insert the receptacle into the holes, then put the screw thing in.

I also followed up on our recent Outer Banks trip by removing the skids and doing a complete underbody wash with Simple Green (through a soap nozzle) and pressure-washer rinse. Found we had brought a little bit of the South Core Banks home with us. ;-)

Finally, I wire-brushed some surface rust off the skids and painted them with Rust Reformer.
Last edited by Bluesky 07; 07-21-2021 at 06:41 AM.
|
|
|
Reply With Quote
|
|
07-23-2021, 03:26 PM
|
#35555
|
|
Junior Member
|
|
Join Date: Apr 2021
Location: Las Vegas, Nevada
Posts: 2
|
|
|
Junior Member
Join Date: Apr 2021
Location: Las Vegas, Nevada
Posts: 2
|
Quote:
Originally Posted by eleven14
Installed this backup camera yesterday in anticipation of replacing the OEM head unit when I replace the evaporator core. No idea on longevity, but install was straight-forward and it looks OEM.
While waiting on Denso/Sony parts, I wanted to get the pain of routing wires around the back window and into the cabin out of the way and it didn't disappoint. I also proactively ran wiring for LED hatch lights once I get around to it, will captured details when I do.
 Some install notes:
- Since the replacement head unit hasn't shipped yet (bought this just-released Sony unit), I verified camera operation and placement using a 9V battery and spare TV. Worked like a charm.
- For running the wires from the hatch to the cabin via the rubber grommet, liquid dish soap and water was a game-changer.
- This seems obvious but check rear-window clearance before you button it all back up.
- I noticed evidence of water infiltration into the hatch and will be replacing the hatch window weatherstripping to help prevent a larger issue.
I was gonna document the backup camera install process for a how-to but found that it's been covered fairly thoroughly. That said, if anyone is interested, happy to pull one together for this camera. |
@ eleven14
, would you be willing to document your hatch trim removal and replacement if you havent already done it. Mine has gone bad as well and needs replacing.
__________________
2006 V8 Sport Edition
|
|
|
Reply With Quote
|
|
07-24-2021, 11:29 AM
|
#35556
|
|
Member
|
|
Join Date: Sep 2017
Location: KC
Posts: 390
|
|
|
Member
Join Date: Sep 2017
Location: KC
Posts: 390
|
Quote:
Originally Posted by LasVegasRunner
@ eleven14
, would you be willing to document your hatch trim removal and replacement if you havent already done it. Mine has gone bad as well and needs replacing. |
I definitely can, but you may not need documentation (assuming this is what you're referring to). This post has the procedure from the FSM (I'm only replacing the OUTER).
Seems simple - the steps as I understand them: - Roll down back window
- Pop clips on old outer weatherstripping
- Install new weatherstripping
Will snap a few pics when I get around to it.
|
|
|
Reply With Quote
|
|
07-25-2021, 02:52 PM
|
#35557
|
 |
Member
|
|
Join Date: Aug 2020
Location: Bellevue
Posts: 53
|
|
|
Member
Join Date: Aug 2020
Location: Bellevue
Posts: 53
|
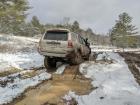
I installed my Diff drop, boots were Dead right after the lift of course'..and a New Radiator-,in the last cupple weeks'..I hardly drive it but No milkshake here, I got a Compressor installed and Welded me up a Scrap Metal Bike Rack,
__________________
 Hot Rodder Car Nutt- Enthusiast for over 35 years! Biker -Builder ..Amateur GunSmith-Amateur Explosives Expert-Expert P%ssy LicQer  ... E-Lock Grey Wire Mod. Rough Cunt' 3'Lift' Dick Cepek DC2s- 16x8' -12 offset" 285 75 16' IRONMAN MUD COUNTRY's ' ,On-Board Air,"EngineStand Tire Carrier" 12,000lb'winch'-DualBatterys
|
|
|
Reply With Quote
|
|
07-25-2021, 03:15 PM
|
#35558
|
|
Junior Member
|
|
Join Date: Jul 2021
Location: Coppell
Posts: 9
|
|
|
Junior Member
Join Date: Jul 2021
Location: Coppell
Posts: 9
|
Got the new rack installed. Need to find a home for the old one.
|
|
|
Reply With Quote
|
|
07-25-2021, 09:28 PM
|
#35559
|
 |
Member
|
|
Join Date: Jan 2021
Posts: 41
|
|
|
Member
Join Date: Jan 2021
Posts: 41
|
Quote:
Originally Posted by vipergrhd
Do you mind posting what parts are needed for this grill swap? Thanks for posting.
Could you post some pics of the back side of the grill? |


More pictures as requested.
Sent from my iPhone using Tapatalk
__________________
2008 4Runner Mod List: Daystar 2.5"/1.5" Lift, BF Goodrich KO2 275/70r17, TRD Pro Rims, Spidertrax 1.25" in front and All Pro 1.5" in rear, Katzkins Seat Leathers, 15% ceramic tint, Joying 10.1" Head Unit, Remote Start, DRL Mod, Map Light Mod, Dash Cluster LED Upgrade, Area Camp Lights.
|
|
|
Reply With Quote
|
|
07-25-2021, 11:31 PM
|
#35560
|
 |
Member
|
|
Join Date: Sep 2007
Location: Chicago,IL
Posts: 50
Real Name: Franqui
|
|
|
Member
Join Date: Sep 2007
Location: Chicago,IL
Posts: 50
Real Name: Franqui
|
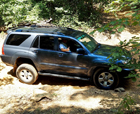
 I'm back with 2 more 4th generations
Feels good to be back.
Last edited by maelo; 07-25-2021 at 11:37 PM.
|
|
|
Reply With Quote
|
|
07-25-2021, 11:40 PM
|
#35561
|
|
Member
|
|
Join Date: Sep 2007
Location: Chicago,IL
Posts: 50
Real Name: Franqui
|
|
|
Member
Join Date: Sep 2007
Location: Chicago,IL
Posts: 50
Real Name: Franqui
|
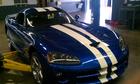
 More of my 4th gens
I want them all.💰💵💸🔩⚙
|
|
|
Reply With Quote
|
|
07-26-2021, 12:20 AM
|
#35562
|
|
Junior Member
|
|
Join Date: Apr 2021
Location: Laramie, Wyoming
Posts: 9
|
|
|
Junior Member
Join Date: Apr 2021
Location: Laramie, Wyoming
Posts: 9
|
I pulled apart the front door panels and tightened the retaining bolts for the window. The passenger side would rattle, especially when closing the door. Turns out, the forward bolt was unthreaded to the point of nearly falling out. Tightened that up and greased the tracks.
Continuing work on tracking down a P0430 code..
The fun never ends!
|
|
|
Reply With Quote
|
|
07-26-2021, 11:28 PM
|
#35563
|
|
Member
|
|
Join Date: May 2021
Location: West Oregon
Posts: 39
Real Name: Jeff N.
|
|
|
Member
Join Date: May 2021
Location: West Oregon
Posts: 39
Real Name: Jeff N.
|
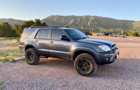
Some goodies have come in for my 2004! I have a list of things I want to take care of over the coming months, but up first on the list is the air filter, and second is changing the transmission fluid and filter. Thankfully, Toyota made it super fast and easy to change the air filter. I happen to know that the Afe cloth drop-in filter is 11 or so years old, and hasn't ever been cleaned or changed. It was filthy. I changed it with a Bosch paper filter. I kind of wish I spent the extra $3 on a Wix, but all in all, I'm very happy to have it changed. I don't really feel a difference with the butt dyno, however the ear dyno says that it doesn't sound as cool. Slightly less of an exhaust note almost.
I'm still waiting on the transmission filter and pan gasket to arrive. However the Aisin OEM transmission fluid HAS arrived. I'll be very happy to have that changed. I don't think it has been serviced in 100/120k. Oh well. No time like the present!
__________________
2004 Limited 4WD | FJ Coil Swap | Bilstein 5100 | 265/70/17 Cooper all-terrains | Chinese Bull Bar | APF Trail lights
Last edited by Vinyl303; 07-26-2021 at 11:31 PM.
|
|
|
Reply With Quote
|
|
07-27-2021, 09:21 AM
|
#35564
|
|
Member
|
|
Join Date: May 2012
Location: Raleigh, NC
Posts: 165
|
|
|
Member
Join Date: May 2012
Location: Raleigh, NC
Posts: 165
|
Did the front maplight mod so they come on when you open the doors, and installed an awning.
__________________
1998 T4R Limited 4x4- Sold
2005 T4R Limited 4x4 V8
|
|
|
Reply With Quote
|
|
07-27-2021, 10:09 AM
|
#35565
|
 |
Senior Member
|
|
Join Date: Sep 2019
Location: Lafayette, IN
Posts: 1,032
|
|
|
Senior Member
Join Date: Sep 2019
Location: Lafayette, IN
Posts: 1,032
|
Quote:
Originally Posted by Vinyl303
Some goodies have come in for my 2004! I have a list of things I want to take care of over the coming months, but up first on the list is the air filter, and second is changing the transmission fluid and filter. Thankfully, Toyota made it super fast and easy to change the air filter. I happen to know that the Afe cloth drop-in filter is 11 or so years old, and hasn't ever been cleaned or changed. It was filthy. I changed it with a Bosch paper filter. I kind of wish I spent the extra $3 on a Wix, but all in all, I'm very happy to have it changed. I don't really feel a difference with the butt dyno, however the ear dyno says that it doesn't sound as cool. Slightly less of an exhaust note almost.
I'm still waiting on the transmission filter and pan gasket to arrive. However the Aisin OEM transmission fluid HAS arrived. I'll be very happy to have that changed. I don't think it has been serviced in 100/120k. Oh well. No time like the present!
|
I did a transmission drain and fill this weekend. I found this tacomaworld article to be helpful: How to Drain/Refill Automatic Transmission | Tacoma World
As well as this video from Tacomaholic on the Procedure to get it into transmission temp check mode: Toyota Tacoma Automatic Transmission Temp Check Mode Tutorial - YouTube. I followed his shifts in the video exactly side by side with my shifter, and it went right into temp check mode
|
|
|
Reply With Quote
|
| Thread Tools |
|
|
| Display Modes |
Rate This Thread |
 Linear Mode Linear Mode
|
|
 Posting Rules
|
You may not post new threads
You may not post replies
You may not post attachments
You may not edit your posts
HTML code is On
|
|
|
|


