 03-06-2014, 11:08 AM
|
#31
|
|
Member
|
|
Join Date: Jan 2007
Location: VA
Posts: 56
|
|
|
Member
Join Date: Jan 2007
Location: VA
Posts: 56
|
I'll let you know once I get the retrofit in and running how it is -- the install is really simple 
I hope I can find some used Six Shooters -- would love to have them in gloss black.
|

|
 Reply With Quote Reply With Quote
|
|
03-09-2014, 07:13 PM
|
#32
|
|
Member
|
|
Join Date: Mar 2014
Posts: 537
|
|
|
Member
Join Date: Mar 2014
Posts: 537
|
Quote:
Originally Posted by HokieRunner

Thanks for all the positive comments! It is greatly appreciated and so many folks on this board have been incredibly helpful. Without this board and toyota120, a lot of my researching and subsequent build would have been infinitely more difficult.
Over the upcoming months I hope to post a lot more details on the why/how of products and methods used so as to 'pay it back' and to add a little explanation as to the thought process behind the build.
The electrical and cargo box projects are the ones I'm tackling over the winter and they'll be covered ad nauseum and probably in their own threads for other folks ease of use.
|
did you need to take the headlights out to install the shrockworks bumper? I want to add this a a summer project but I don't want to have to take five things off to add 1 new one. Also have you seen anyone but a shorckworks bumper on an 06-09 I feel like my front chrome center grill hangs down too low and would need to be trimmed to fit
|
|
|
Reply With Quote
|
|
03-09-2014, 10:54 PM
|
#33
|
 |
Senior Member
|
|
Join Date: Sep 2009
Location: Gainesville, Virginia
Age: 41
Posts: 1,057
Real Name: Matt
|
|
|
Senior Member
Join Date: Sep 2009
Location: Gainesville, Virginia
Age: 41
Posts: 1,057
Real Name: Matt
|
Quote:
Originally Posted by philskeeter
did you need to take the headlights out to install the shrockworks bumper? I want to add this a a summer project but I don't want to have to take five things off to add 1 new one. Also have you seen anyone but a shorckworks bumper on an 06-09 I feel like my front chrome center grill hangs down too low and would need to be trimmed to fit
|
Headlights stay in during the install. No need to remove although it takes all of two mins to remove the headlights anyways. I'd actually suggest leaving them in with the trim piece so you can properly gap the bumper for frame flex.
And yes - there are a lot of 06-09 runners with the shrockworks and the grill is not an issue as the bumper is cutout there. I'll actually be putting my 06 grill in soon.
__________________
HokieRunner 2005 4Runner Sport Edition V8 4x4 Silver Build Thread
Radflo 2.5 F 700#/R 220# / Desert Racing Uniball UCA / 285/70/17 Duratrac on 17x8 Konig Six Shooter / RCI Full Skids / BAMF LCA Skid / Shrockworks 3 Hoop Bumper / Custom WhiteKnuckle Sliders / Custom WMW Roof rack / CVJ Reman'd Axles / 06+ Facelift / Custom sound system / AIP Bypass / LED Gauges,Dash,Interior / Wiring, aux. lighting, dual battery, custom cargo box in progress...
|
|
|
Reply With Quote
|
|
03-09-2014, 11:59 PM
|
#34
|
|
Member
|
|
Join Date: Mar 2014
Posts: 537
|
|
|
Member
Join Date: Mar 2014
Posts: 537
|
Quote:
Originally Posted by HokieRunner
Headlights stay in during the install. No need to remove although it takes all of two mins to remove the headlights anyways. I'd actually suggest leaving them in with the trim piece so you can properly gap the bumper for frame flex.
And yes - there are a lot of 06-09 runners with the shrockworks and the grill is not an issue as the bumper is cutout there. I'll actually be putting my 06 grill in soon.
|
dang I wish we lived closer! and thanks for the help
|
|
|
Reply With Quote
|
|
03-10-2014, 02:30 AM
|
#35
|
|
Junior Member
|
|
Join Date: Mar 2013
Location: Ontario, CA
Posts: 29
Real Name: James
|
|
|
Junior Member
Join Date: Mar 2013
Location: Ontario, CA
Posts: 29
Real Name: James
|
I love you attention to detail and organization of the custom wiring harness for this rig. Cant wait to see more!
|
|
|
Reply With Quote
|
|
03-10-2014, 01:13 PM
|
#36
|
|
Senior Member
|
|
Join Date: Sep 2009
Location: Gainesville, Virginia
Age: 41
Posts: 1,057
Real Name: Matt
|
|
|
Senior Member
Join Date: Sep 2009
Location: Gainesville, Virginia
Age: 41
Posts: 1,057
Real Name: Matt
|
Quote:
Originally Posted by philskeeter
dang I wish we lived closer! and thanks for the help
|
No problem! Glad to help. I know
@ zopperman
and at least two others are going to be installing their bumpers up here in a few months. you should get yours delivered up here and road trip it up for the install party! Think I'm going to tag along and help (drink beers haha).
Quote:
Originally Posted by TracyGray
I love you attention to detail and organization of the custom wiring harness for this rig. Cant wait to see more!
|
Thanks! It's a bit overkill but I've seen the other end of the 'custom' wiring spectrum and this will make life so easy for future modifications and add ons.
The switch harness turned out to be the biggest PITA to keep it all compact and orderly. Going to have about 10 hours in that panel between wiring and switch fitment/finishing by the time it's said and done.
__________________
HokieRunner 2005 4Runner Sport Edition V8 4x4 Silver Build Thread
Radflo 2.5 F 700#/R 220# / Desert Racing Uniball UCA / 285/70/17 Duratrac on 17x8 Konig Six Shooter / RCI Full Skids / BAMF LCA Skid / Shrockworks 3 Hoop Bumper / Custom WhiteKnuckle Sliders / Custom WMW Roof rack / CVJ Reman'd Axles / 06+ Facelift / Custom sound system / AIP Bypass / LED Gauges,Dash,Interior / Wiring, aux. lighting, dual battery, custom cargo box in progress...
|
|
|
Reply With Quote
|
|
03-10-2014, 03:47 PM
|
#37
|
|
Senior Member
|
|
Join Date: Sep 2009
Location: Gainesville, Virginia
Age: 41
Posts: 1,057
Real Name: Matt
|
|
|
Senior Member
Join Date: Sep 2009
Location: Gainesville, Virginia
Age: 41
Posts: 1,057
Real Name: Matt
|
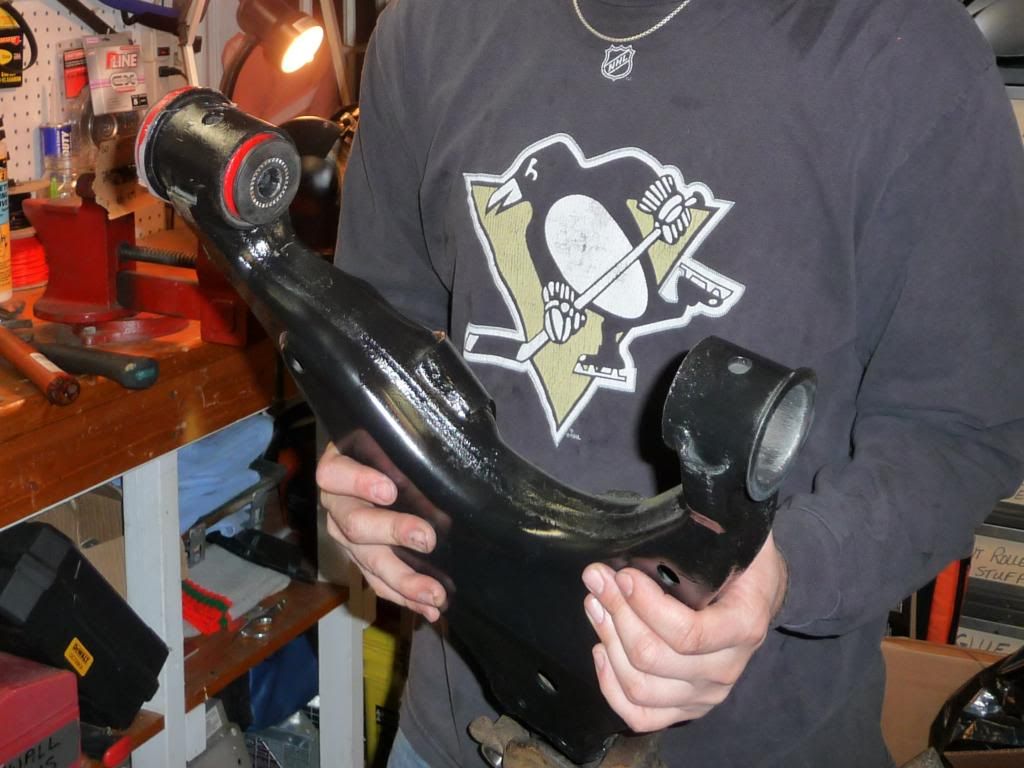
Lower Control Arm bushing replacement/ upgrade to Energy Suspension Poly
I replaced my LCA bushings about a year ago with Energy Suspension Poly bushings. The rubber OEM ones were shot after about 125k miles and were causing an annoying vibration in the steering wheel at highway speeds.
This is not a hard job but it is time consuming and a PITA. I was in no rush and worked at it on and off for about 8 hours which included wire brushing, priming and repainting the LCAs as well as dealing with 2 seized cam alignment bolts. Without those issues/complications, the bushing swap can probably be done in a few hours a side.
Energy Suspension poly bushing P/N: 8.3128R (for black bushings use 'G' instead of 'R': 8.3128G)
Thanks to
@ NuclearN8
for the heads up on the black poly part coding.
Helpful tools:
-Dremel with sharp, carbide metal cutting bit
-Steel wire brush/sandpaper
-Torch
-Bench vise (some ppl will opt for the bottle jack method)
Without further adieu, here's the process:
1. Remove the LCAs from the truck. Be prepared to deal with seized cam alignment bolts. If you're lucky they won't be seized. If they are seized, you may be lucky and heat and an air hammer will knock them loose. If that doesn't work, break out the sawzall like I did and be prepared to pony over some $$ for new bushing/sleeve assembly.
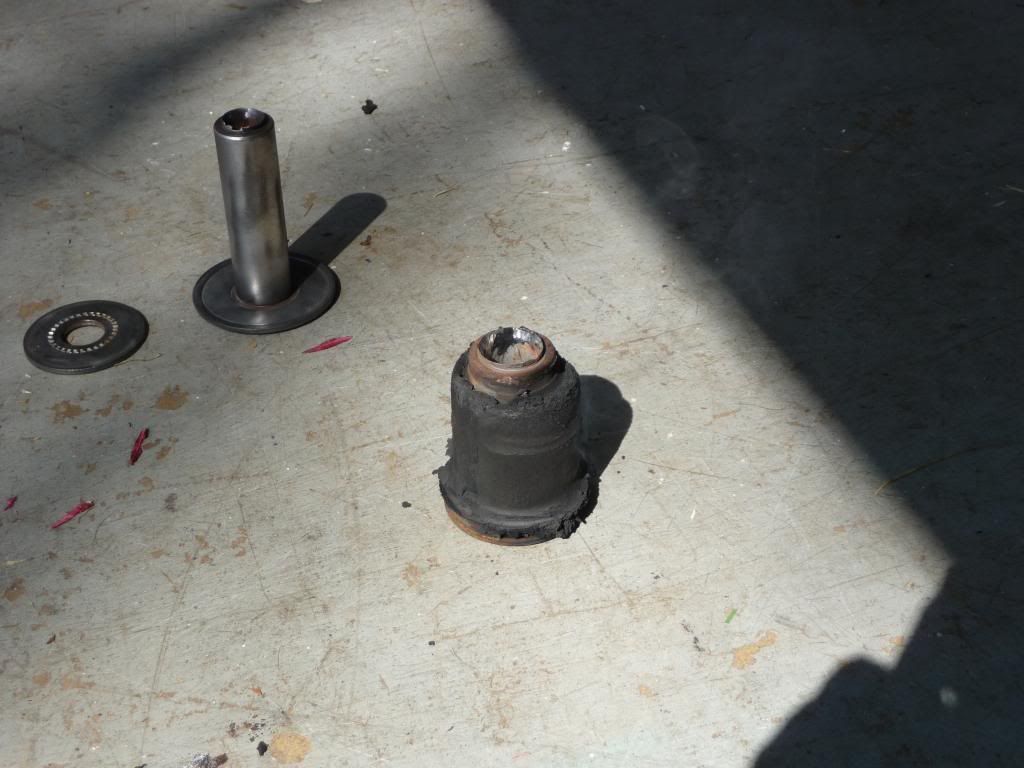
2. Sleeve/bushing removal: Throw the LCA in a bench vise. Using the dremel and metal cutting bit, remove enough metal from the end of the sleeve that you can pull off the inner washers.
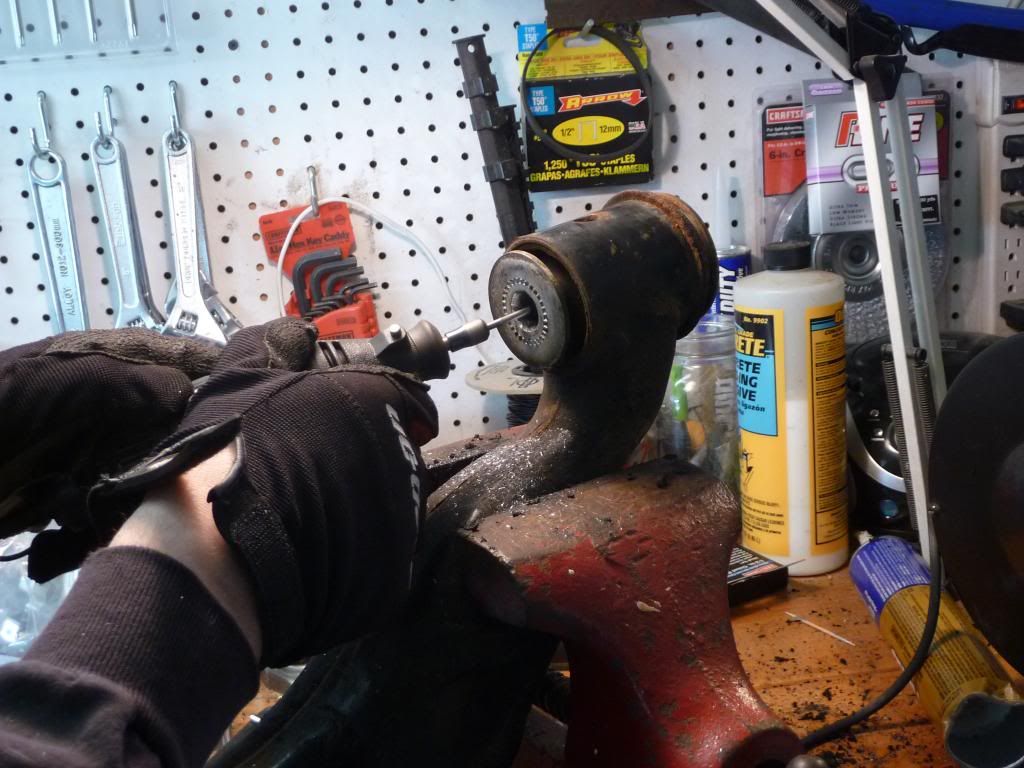
Remove washer:
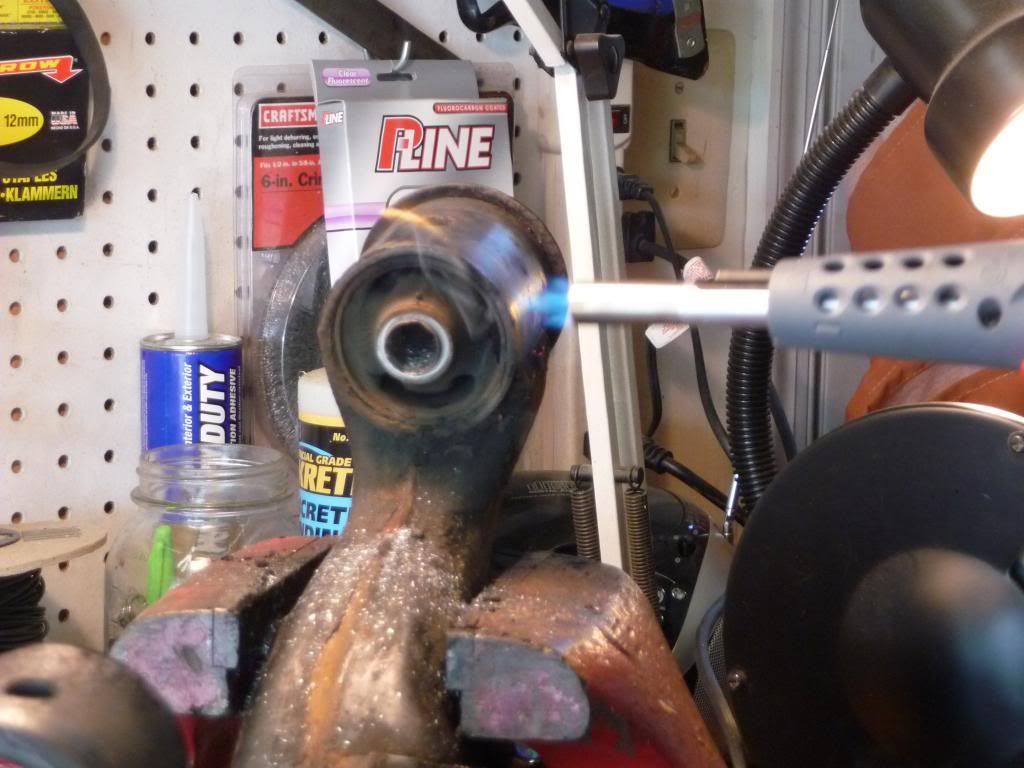
Apply even heat all around the LCA outer sleeve. It will make a 'pop' sound as the rubber detaches from metal. Yes - you can use the bottle jack method but I'd be concerned that the jack pushing on the inner sleeve may deform the metal you will eventually fold back around the inner washer. I'm sure it works - just to each their own. I just heated it until the bushing simply pushed out with a screwdriver. A bit of smoke off the bushing is fine but don't light it on fire.
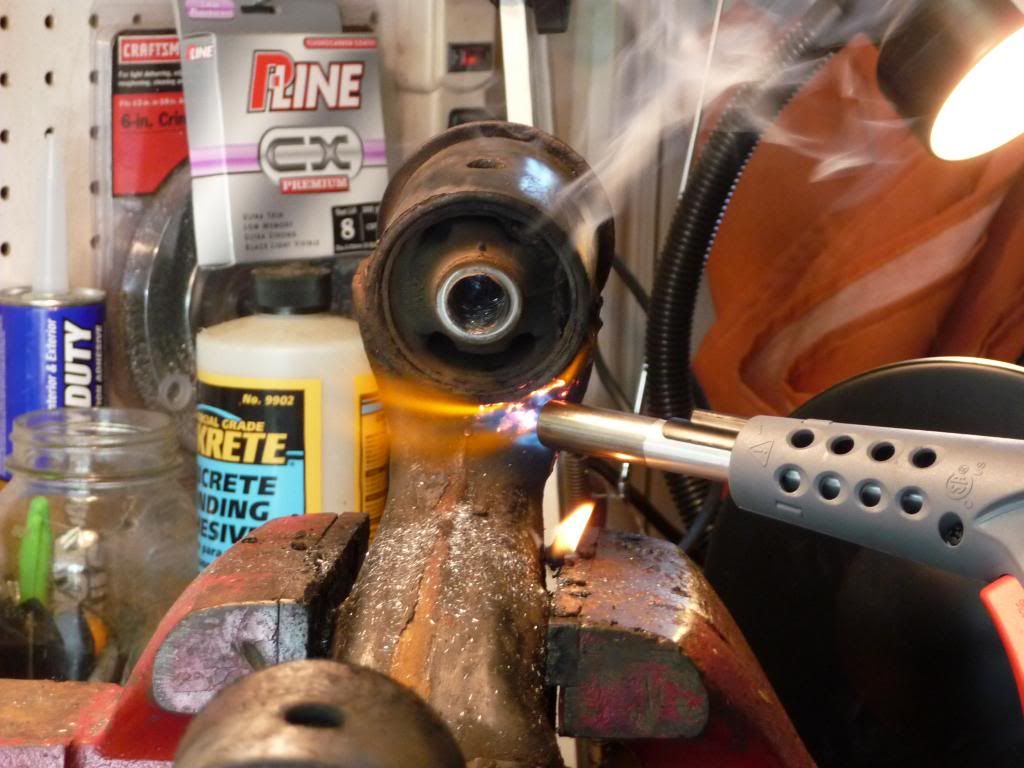
Push/pull out the bushing (and yes - be careful because it's freaking hot)
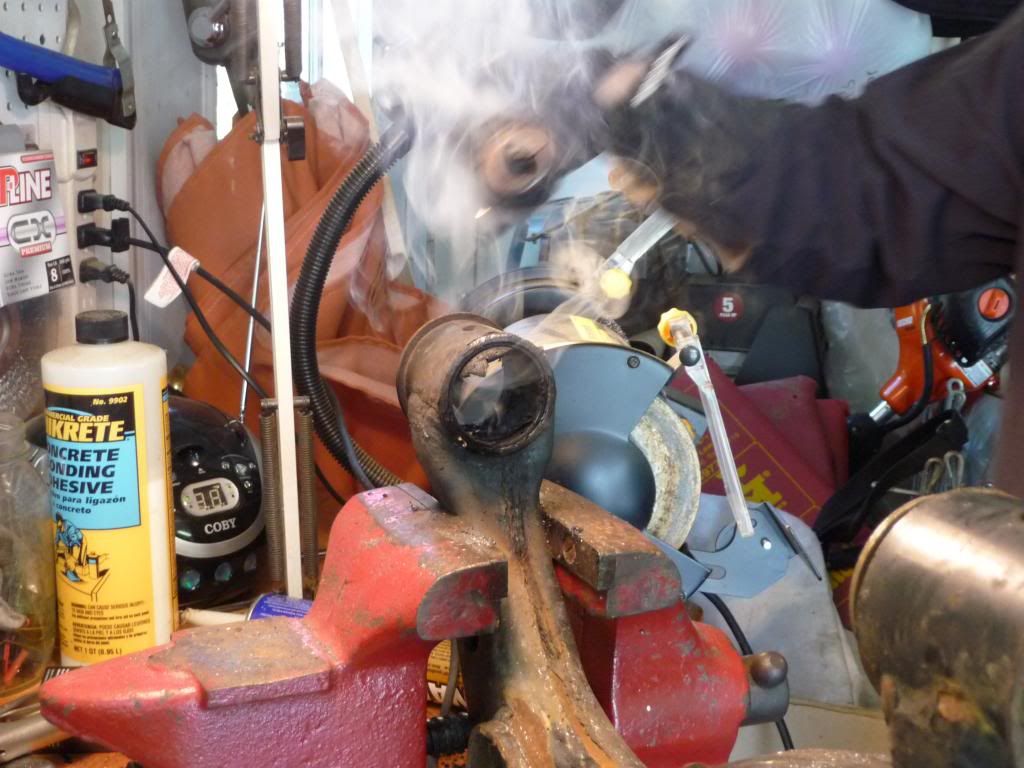

Place the bushing/inner sleeve in the bench vice. Using a sharp blade, cut a slit down the bushing. Heat the inside of the sleeve and again - after the rubber has 'popped' and separated, use pliers to peel off the old bushing.

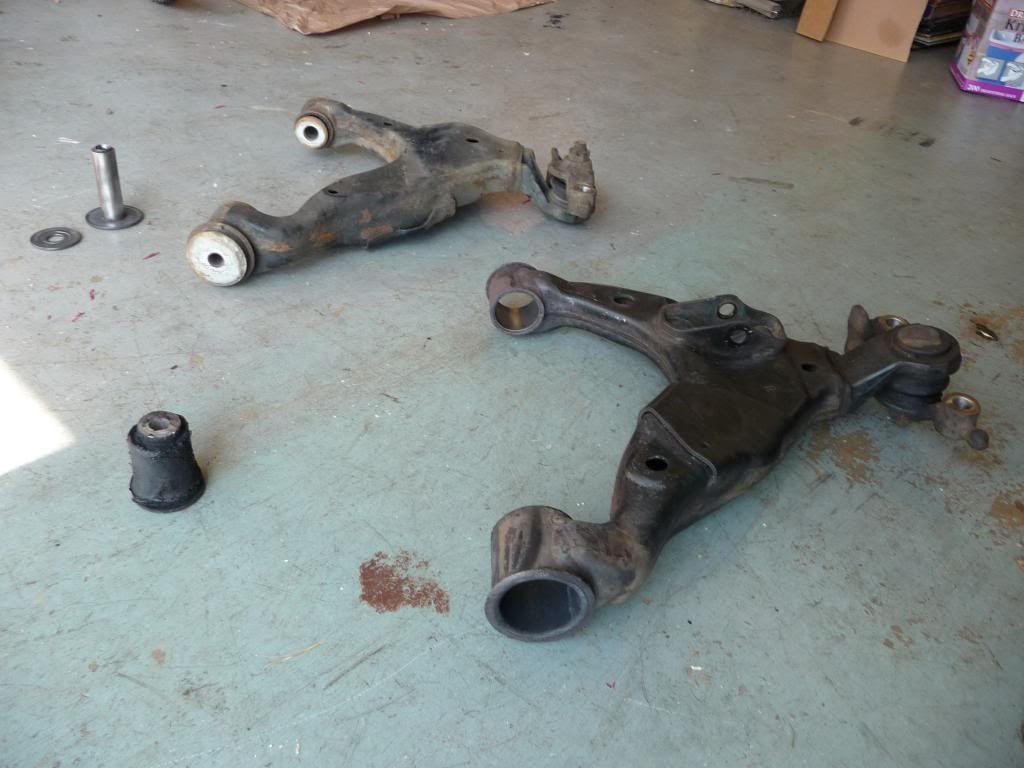
Clean up all the metal surfaces with a wire brush/sand paper. Good time to refinish the LCAs too.
Original vs. halfway there:
3. New bushing assembly. Using the provided white grease - coat all the mating surfaces. It's better to use more than less as this is the only time you get to grease these. Once they're on - they're on. First press in the inner sleeve. Then place the LCA in a bench vise and press in the new assembly. *Other presses will work just fine - I just happened to have a bench vise.
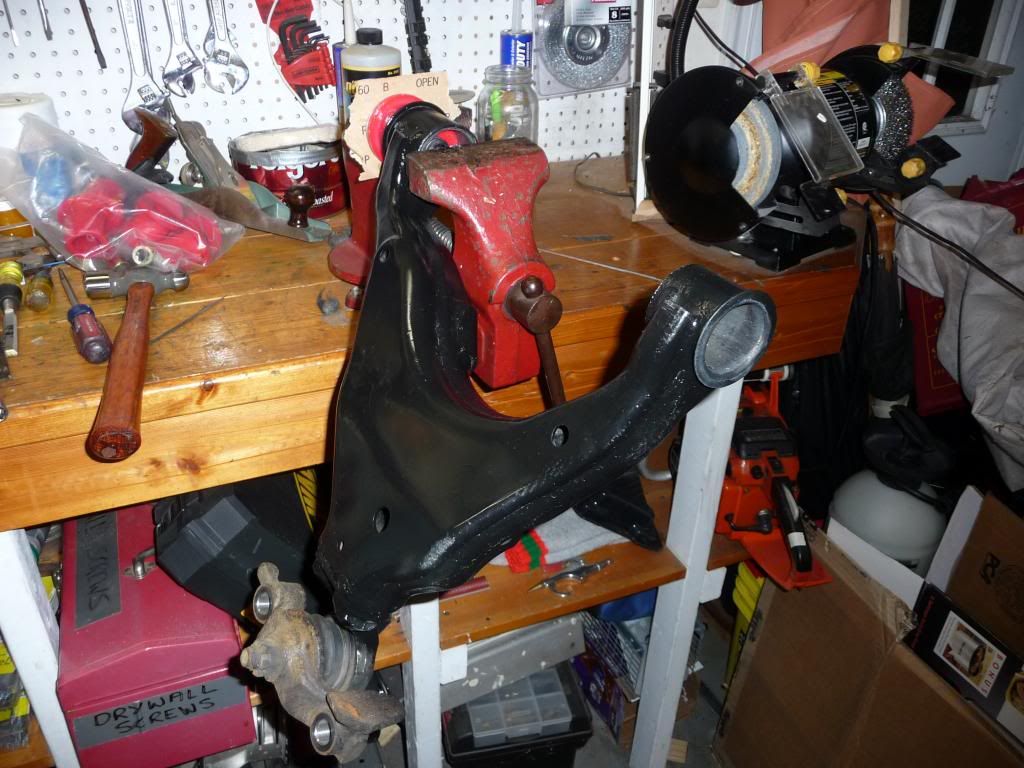
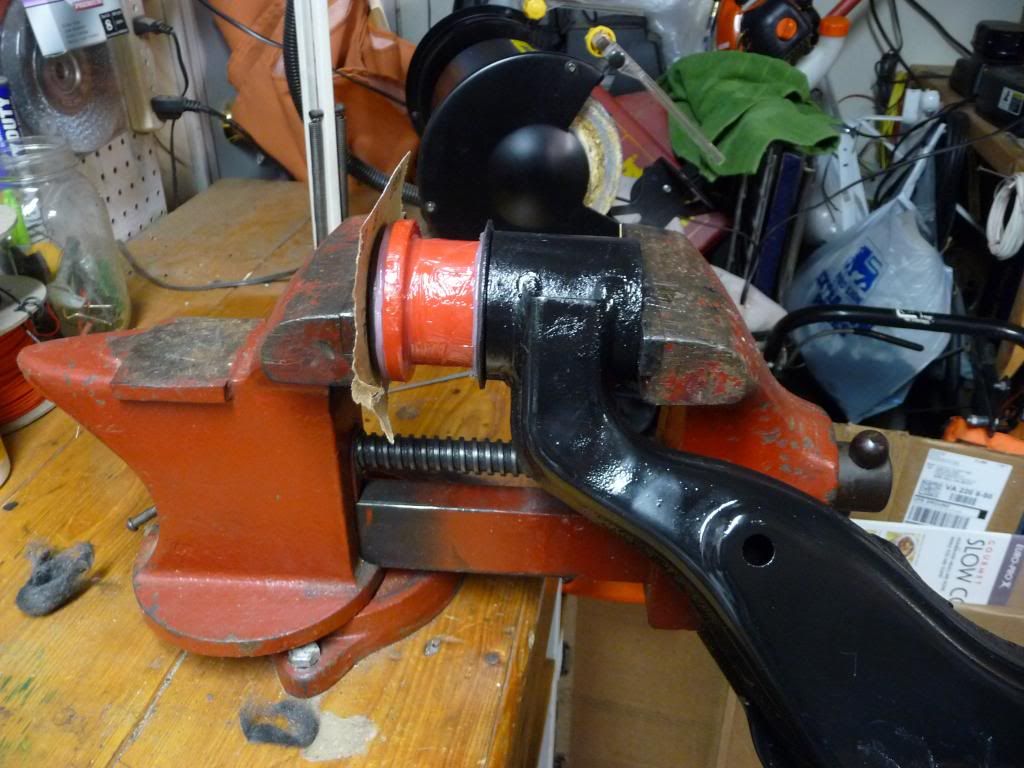
Once the bushing is properly seated - push the inner washer back on. Using a ball hammer or large ball bearing, re-seat the inner sleeve around the washer. That completes the bushing replacement.
4. Re-install the LCA on the truck and get an alignment. Enjoy the smooth and solid steering wheel feel!
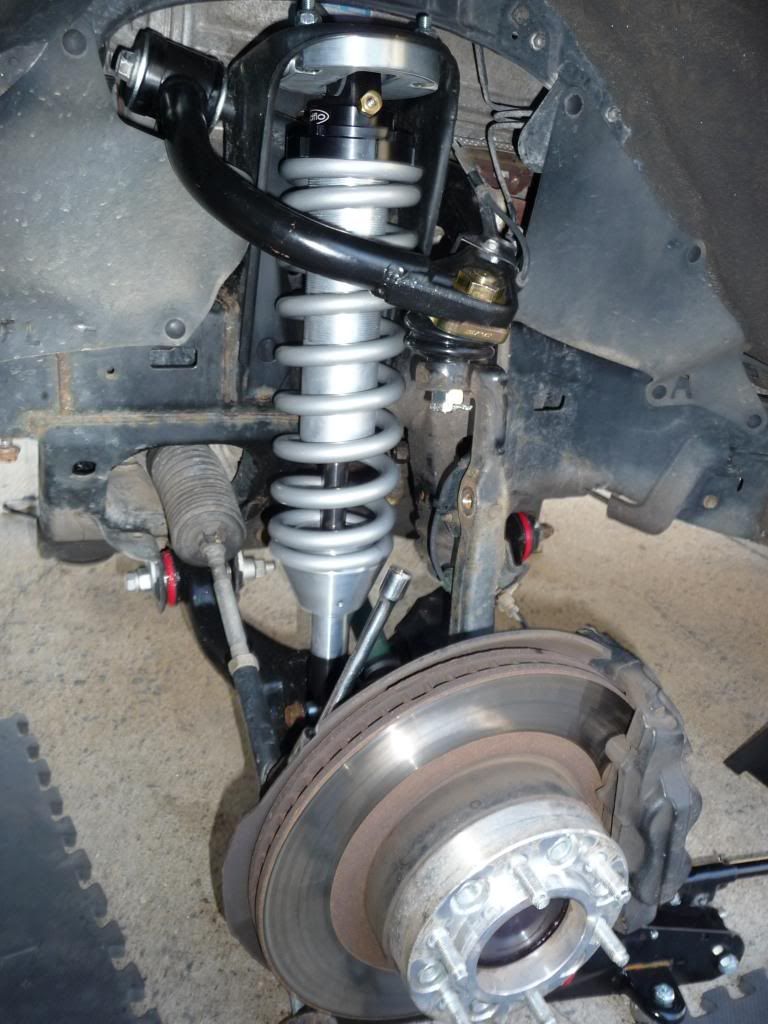
Let me know if you have any questions. While having the LCA off or while doing this work - it's a great time to replace the Lower ball joint as well. Of course - some folks would probably just opt to throw on a new LCA at that point.
__________________
HokieRunner 2005 4Runner Sport Edition V8 4x4 Silver Build Thread
Radflo 2.5 F 700#/R 220# / Desert Racing Uniball UCA / 285/70/17 Duratrac on 17x8 Konig Six Shooter / RCI Full Skids / BAMF LCA Skid / Shrockworks 3 Hoop Bumper / Custom WhiteKnuckle Sliders / Custom WMW Roof rack / CVJ Reman'd Axles / 06+ Facelift / Custom sound system / AIP Bypass / LED Gauges,Dash,Interior / Wiring, aux. lighting, dual battery, custom cargo box in progress...
|
|
|
Reply With Quote
|
|
03-10-2014, 03:47 PM
|
#38
|
|
Member
|
|
Join Date: Mar 2014
Posts: 537
|
|
|
Member
Join Date: Mar 2014
Posts: 537
|
Quote:
Originally Posted by HokieRunner
No problem! Glad to help. I know
@ zopperman
and at least two others are going to be installing their bumpers up here in a few months. you should get yours delivered up here and road trip it up for the install party! Think I'm going to tag along and help (drink beers haha).
Thanks! It's a bit overkill but I've seen the other end of the 'custom' wiring spectrum and this will make life so easy for future modifications and add ons.
The switch harness turned out to be the biggest PITA to keep it all compact and orderly. Going to have about 10 hours in that panel between wiring and switch fitment/finishing by the time it's said and done. |
I wish I could but if I buy the bumper I won't be able to afford anything for awhile hahaha plus with their shipping times who knows when it would get there
|
|
|
Reply With Quote
|
|
03-17-2014, 12:27 PM
|
#39
|
|
Senior Member
|
|
Join Date: Sep 2009
Location: Gainesville, Virginia
Age: 41
Posts: 1,057
Real Name: Matt
|
|
|
Senior Member
Join Date: Sep 2009
Location: Gainesville, Virginia
Age: 41
Posts: 1,057
Real Name: Matt
|
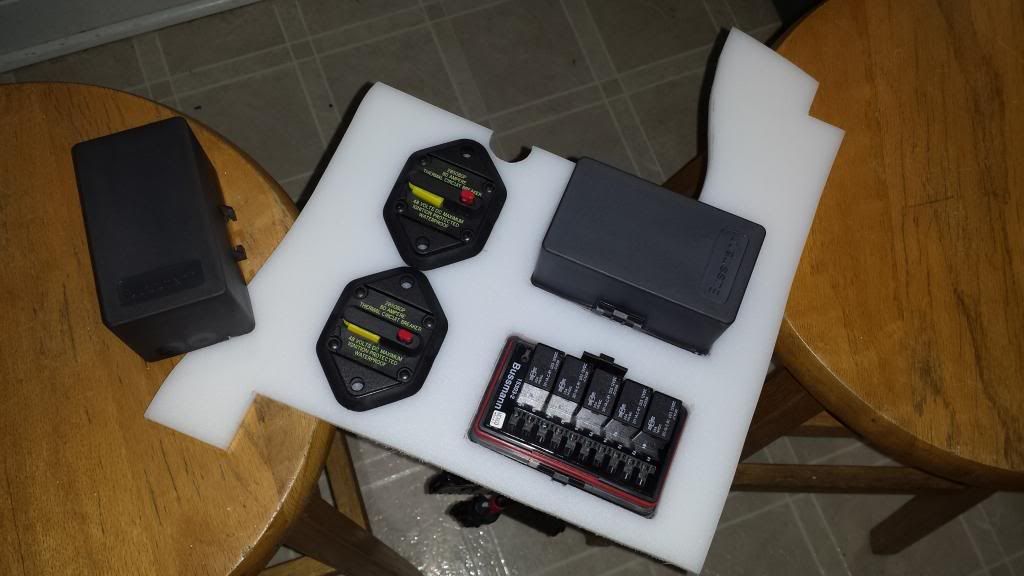
Dual Battery and Bussmann Relay Box Installation
I'll keep updating this post as things progress but this will cover all the under hood wiring, dual battery, etc. At the point of just waiting for the snow to end so I can start running the wires.
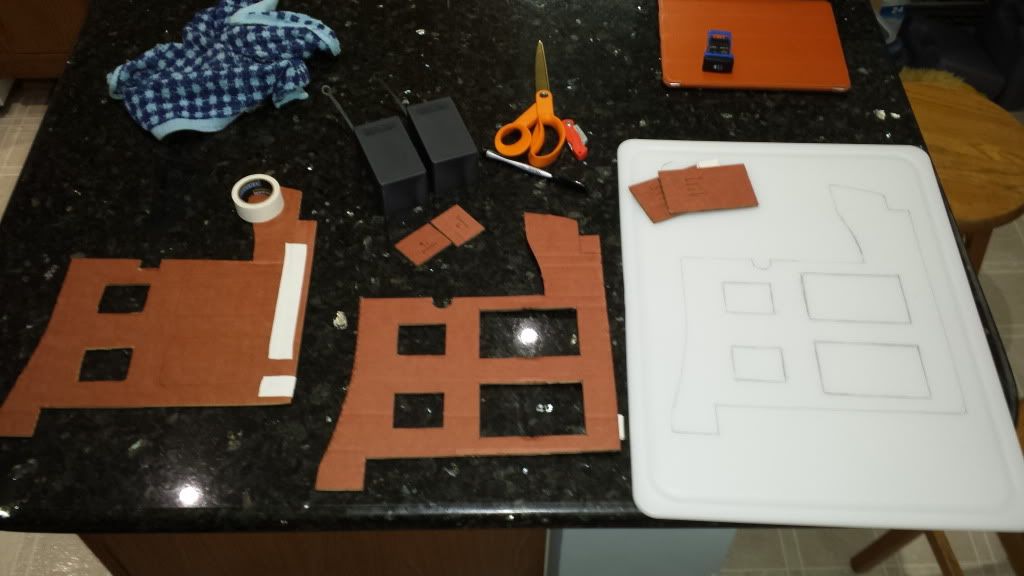
I needed a place to mount the 80 amp circuit breakers for each relay/fuse box. In an effort to keep thing clean and easily accessible, I decided to do a hinged panel that would sit in between the master cylinder and OEM fuse box. It will be hinged on the side nearest the engine so I can flip up the panel from the fender and have full access to the wiring underneath.
I made a few templates with cardboard and then using a jigsaw, cut the final panel out of a 12"x18" cutting board I picked up at Walmart. Everything fits snugly and I'm going to plastidip the panel black once I get the mounting brackets fab'd up. Lucky for me, there are already some threaded holes in both the fender and the wheel well so I shouldn't have to do any drilling to the body.
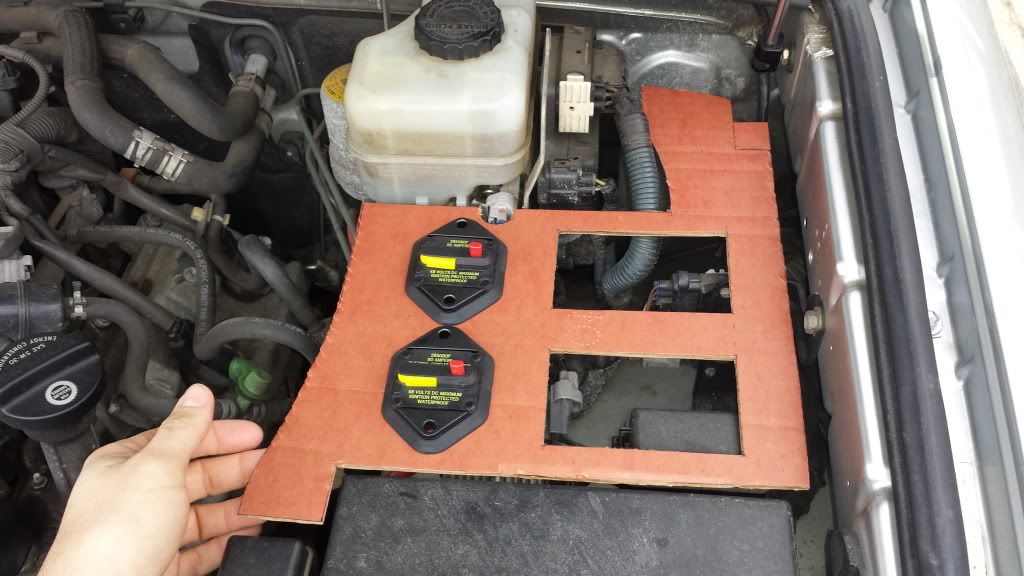
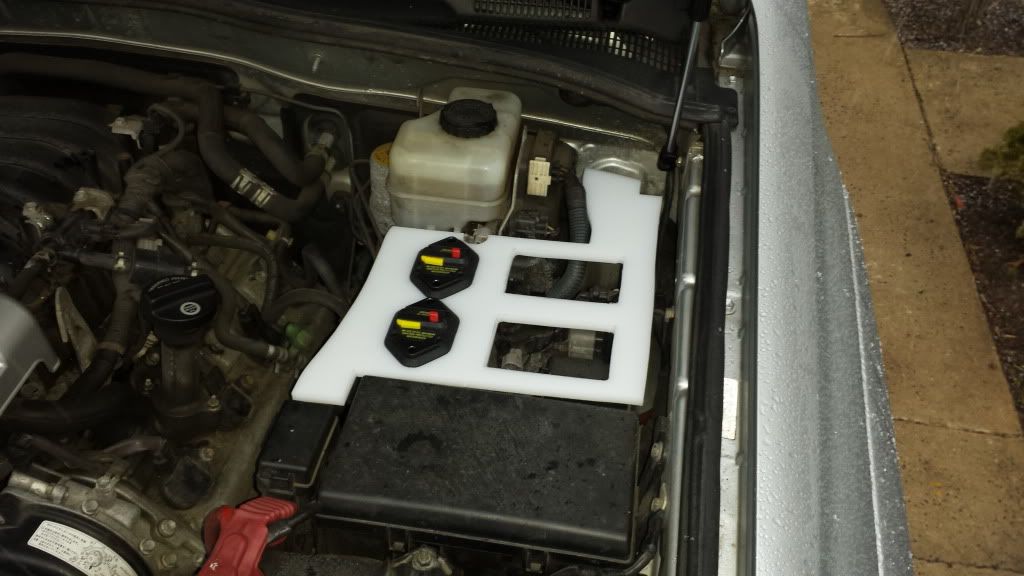
More to come once it warms up a bit....hopefully today was the last snowfall of the year......

__________________
HokieRunner 2005 4Runner Sport Edition V8 4x4 Silver Build Thread
Radflo 2.5 F 700#/R 220# / Desert Racing Uniball UCA / 285/70/17 Duratrac on 17x8 Konig Six Shooter / RCI Full Skids / BAMF LCA Skid / Shrockworks 3 Hoop Bumper / Custom WhiteKnuckle Sliders / Custom WMW Roof rack / CVJ Reman'd Axles / 06+ Facelift / Custom sound system / AIP Bypass / LED Gauges,Dash,Interior / Wiring, aux. lighting, dual battery, custom cargo box in progress...
|
|
|
Reply With Quote
|
|
03-18-2014, 10:03 PM
|
#40
|
|
Member
|
|
Join Date: Dec 2013
Location: Sterling, VA
Posts: 473
|
|
|
Member
Join Date: Dec 2013
Location: Sterling, VA
Posts: 473
|
Quote:
Originally Posted by HokieRunner
No problem! Glad to help. I know
@ zopperman
and at least two others are going to be installing their bumpers up here in a few months. you should get yours delivered up here and road trip it up for the install party! Think I'm going to tag along and help (drink beers haha).
Thanks! It's a bit overkill but I've seen the other end of the 'custom' wiring spectrum and this will make life so easy for future modifications and add ons.
The switch harness turned out to be the biggest PITA to keep it all compact and orderly. Going to have about 10 hours in that panel between wiring and switch fitment/finishing by the time it's said and done. |
I'm one of the ones that's gonna be installing the bumper as well. I'm very interested in how you wired up your electronic system. I like to keep my stuff as clean as possible, and you seem to have it put together. PM sent your way!
|
|
|
Reply With Quote
|
|
03-18-2014, 11:24 PM
|
#41
|
|
Member
|
|
Join Date: Sep 2012
Location: Portsmouth, VA
Posts: 150
Real Name: Ryan
|
|
|
Member
Join Date: Sep 2012
Location: Portsmouth, VA
Posts: 150
Real Name: Ryan
|
This is one hell of a build, my friend. I've never been good at electricity and that wiring job sent shivers down my spine. Can't wait to see how everything looks once finished. Good luck!
__________________

Daystar 2.5/1.5 (New lift ordered), Nitto TerraGrapplers, HIDs, LEDs, Plasti Dip here and there. More to come
|
|
|
Reply With Quote
|
|
03-19-2014, 11:33 AM
|
#42
|
|
Senior Member
|
|
Join Date: Sep 2009
Location: Gainesville, Virginia
Age: 41
Posts: 1,057
Real Name: Matt
|
|
|
Senior Member
Join Date: Sep 2009
Location: Gainesville, Virginia
Age: 41
Posts: 1,057
Real Name: Matt
|
Cargo Drawer Build
In the spirit of constantly having 'in progress' projects, figured I'd better add this up to the build thread. This is most likely the last major project for 2014. The build has come a long ways in just a year so I'm just trying to enjoy the truck this wheeling/camping season after the wiring and cargo box are finalized.
Here's the final design (I hope as this is V.5829....).
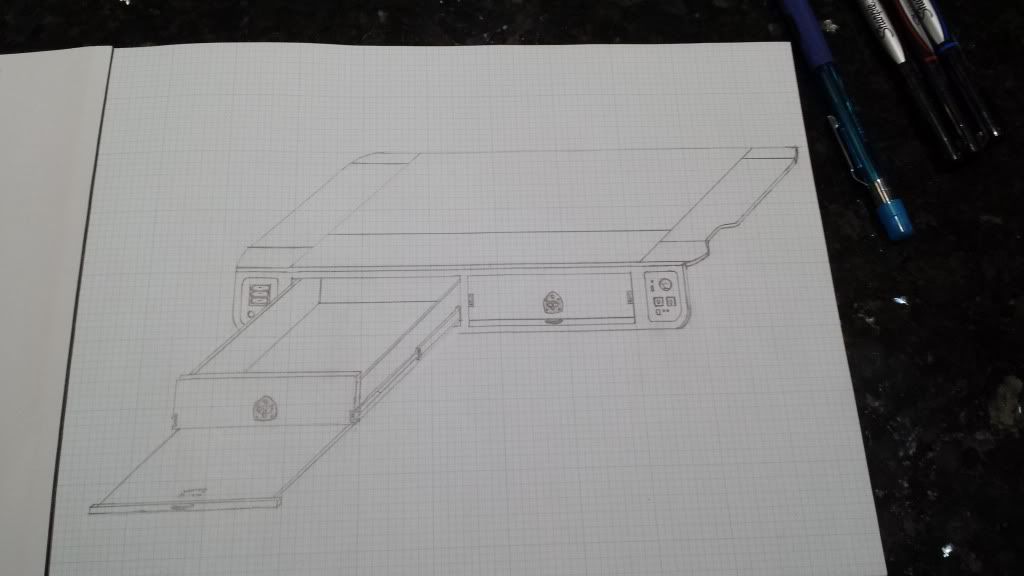
Design items: - Dual sliding drawers
- Slide out shelves affixed to the bottom of each drawer (can be used with drawers extended or closed)
- Flip up wings to access side storage
- Flip up front edge for drawer access through rear window
- Built in switch panel with USB and 12V plugs on driver side
- Built in inverter with voltmeter on passenger side
I have all the hardware on hand minus the wood. Still going back and forth on 1/2" appleply/baltic birch or 3/4" birch plywood. The weight and space savings of the 1/2" are appealling but you definitely pay more for the higher quality 'void free' wood. I have a good bit of woodworking experience so I'm hoping this project will go quickly once started. The box will be finished out in Monstaliner, most likely.
Anyone who has built a cargo box or has some wood working background - feel free to chime in on 1/2" vs. 3/4". Leaning towards the 1/2" if I can source it locally at a good price.
Thanks to
@ Dusty Driftwood
for his help on the cargo drawer. I certainly nabbed a few design elements from his really nice setup.
Stage 1: - Remove double decker tray
- Cut out plastic wheel well covers**
- Build in cargo box using factory mounting points
- Install inverter/switches/USB/voltmeter etc
**I've gone back and forth on this a million times and I just can't get around the waste of space under the wheel well covers. Yes - it's not a huge space but to me it's valuable real estate. I want the box to sit as low as possible since our dogs will be riding on top of the box on all our trips and to integrate the box into the stock wheel well covers will force the box to sit potentially higher than I need it. This will also help with center of gravity. If I ever need to replace the panels I can source them pretty cheap through parts yards.
Stage 2: - Fold down steel cargo barrier. just need to find a local welder to piece it together. Still in design phase but it will most likely be a framed wire mesh that will fold down onto the cargo box surface allowing me to haul larger items in the cabin. Will mount onto the box and onto brackets at the top seat belt bolts.
The major pieces:
-28" Accuride HD locking slides.
-Locking, compression T handle latches. These actually pull the drawers snug when closed.
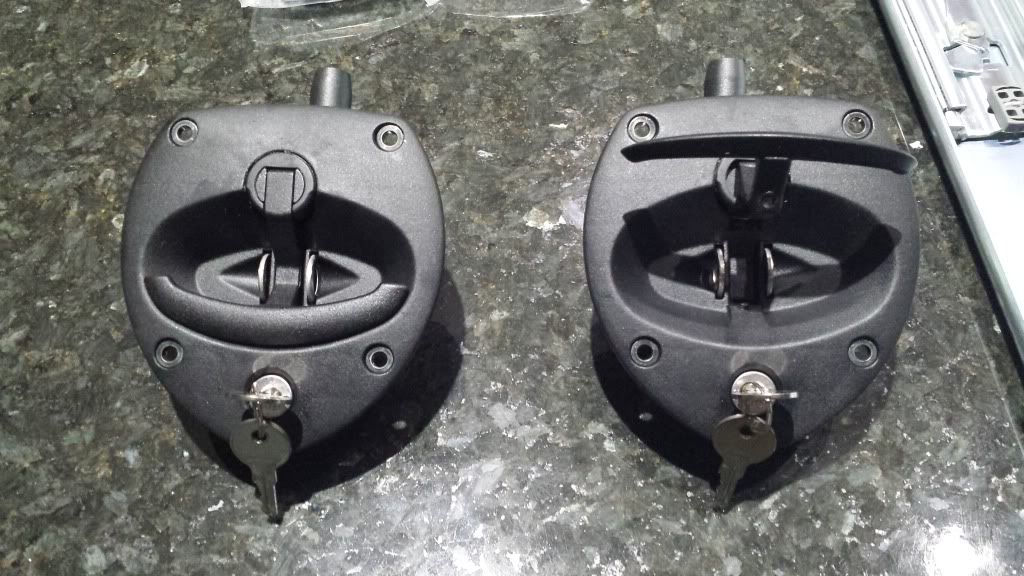

Both of these items are hard to find and/or ridiculously expensive stateside. I shopped around and managed to get them to my door from England at half the cost of US prices a few months back.
Feel free to toss out other ideas!
__________________
HokieRunner 2005 4Runner Sport Edition V8 4x4 Silver Build Thread
Radflo 2.5 F 700#/R 220# / Desert Racing Uniball UCA / 285/70/17 Duratrac on 17x8 Konig Six Shooter / RCI Full Skids / BAMF LCA Skid / Shrockworks 3 Hoop Bumper / Custom WhiteKnuckle Sliders / Custom WMW Roof rack / CVJ Reman'd Axles / 06+ Facelift / Custom sound system / AIP Bypass / LED Gauges,Dash,Interior / Wiring, aux. lighting, dual battery, custom cargo box in progress...
Last edited by HokieRunner; 03-19-2014 at 11:40 AM.
|
|
|
Reply With Quote
|
|
03-19-2014, 01:34 PM
|
#43
|
 |
Senior Member
|
|
Join Date: Aug 2011
Location: St. Louis
Age: 44
Posts: 1,048
Real Name: Jeff
|
|
|
Senior Member
Join Date: Aug 2011
Location: St. Louis
Age: 44
Posts: 1,048
Real Name: Jeff
|
Quote:
Originally Posted by HokieRunner
In the spirit of constantly having 'in progress' projects, figured I'd better add this up to the build thread.
|
Matt,
The drawing looks great, I'm glad I could help you talk through some of the issues you were having. It is always better to do that ahead of time/on paper, instead of when you're standing there in the garage with the saw.
I think the design with the flip up/down wings on the sides is great and could avoid the "need" to cut the wheel wells. Alright, that's the last time I'm going to tell you not to cut the wheel wells, I promise. 
I love those handles and think they're a great addition. One thing to note: I wasn't crazy about my open/routed drawer pulls at first. But, I've actually found them to be convenient for slipping my wallet, phone or other small items into the box w/o having to open the lid. The flip up front lid is nice, but restricted at times when the cargo area is full.
Lastly, I would stick to the baltic birch. 1/2" is fine for a number of parts, but I think you'll appreciate 3/4" when you go to anchor the 1/2" parts down. Again, my box is a combination of 1/2" & 3/4". Feel free to shoot me a PM or mention if I can help with any more questions, or ideas.
__________________
2013 Knight's Armor Pearl GX460 Premium "Grace"
2007 Nautical Blue Metalic SR5 4X4 V6 "Carl"
SOLD: 2008 Driftwood Pearl SR5 4X4 V6 "Dusty"
Dusty's Cargo Drawers
|
|
|
Reply With Quote
|
|
03-19-2014, 02:05 PM
|
#44
|
|
Senior Member
|
|
Join Date: Sep 2009
Location: Gainesville, Virginia
Age: 41
Posts: 1,057
Real Name: Matt
|
|
|
Senior Member
Join Date: Sep 2009
Location: Gainesville, Virginia
Age: 41
Posts: 1,057
Real Name: Matt
|
Quote:
Originally Posted by Dusty Driftwood
Matt,
The drawing looks great, I'm glad I could help you talk through some of the issues you were having. It is always better to do that ahead of time/on paper, instead of when you're standing there in the garage with the saw.
I think the design with the flip up/down wings on the sides is great and could avoid the "need" to cut the wheel wells. Alright, that's the last time I'm going to tell you not to cut the wheel wells, I promise.
I love those handles and think they're a great addition. One thing to note: I wasn't crazy about my open/routed drawer pulls at first. But, I've actually found them to be convenient for slipping my wallet, phone or other small items into the box w/o having to open the lid. The flip up front lid is nice, but restricted at times when the cargo area is full.
Lastly, I would stick to the baltic birch. 1/2" is fine for a number of parts, but I think you'll appreciate 3/4" when you go to anchor the 1/2" parts down. Again, my box is a combination of 1/2" & 3/4". Feel free to shoot me a PM or mention if I can help with any more questions, or ideas. |
Thanks Dusty! You've been a tremendous help on conceptializing the box so much kudos for your insight.
Wheel wells - how did I know I wasn't gonna get by that totally unscathed?!  haha
The slots as an open access slot is brilliant  ...just learned something else. I see Version.5830 coming on....
Where did you use the 1/2" versus the 3/4"?
Thanks!
__________________
HokieRunner 2005 4Runner Sport Edition V8 4x4 Silver Build Thread
Radflo 2.5 F 700#/R 220# / Desert Racing Uniball UCA / 285/70/17 Duratrac on 17x8 Konig Six Shooter / RCI Full Skids / BAMF LCA Skid / Shrockworks 3 Hoop Bumper / Custom WhiteKnuckle Sliders / Custom WMW Roof rack / CVJ Reman'd Axles / 06+ Facelift / Custom sound system / AIP Bypass / LED Gauges,Dash,Interior / Wiring, aux. lighting, dual battery, custom cargo box in progress...
|
|
|
Reply With Quote
|
|
03-19-2014, 04:03 PM
|
#45
|
 |
Senior Member
|
|
Join Date: Mar 2010
Location: San Antonio, TX
Age: 39
Posts: 3,908
Real Name: Matt
|
|
|
Senior Member
Join Date: Mar 2010
Location: San Antonio, TX
Age: 39
Posts: 3,908
Real Name: Matt
|
That's a sweet box! I've been tossing around the idea of a new cargo box (especially after seeing Jeff's latest rendition) for mine so I thought I'd throw some of my ideas your way.
Didn't see any mention (may have glossed over it) of the carpet. It might not be a bad idea to remove the carpet if you want to gain all possible space and keep it as low as possible. There is 3/4-1" of padding/carpet under there. Since you're already soundproofed, the box should absorb most of the other road noise the carpet and padding are stopping.
Also possibly use a thinner or almost baseless (just strips where the floor is lower and where it bolts down) base board. The base doesn't really support a lot weight since it's just sandwiched between the box frame and the cargo floor, and mostly acts to keep the vertical boards parallel.
You may not like those ideas, but they are things I've had in my mind based on my needs and previous experience with 2 other boxes I built before going to my current minimalist setup. SO I thought I'd mention em.
The main reason I couldn't make a box work was that it was the height. Dogs hated it; their heads were almost touching the roof, this hatred was multiplied on uneven terrain like trails or dirt roads. The raised floor also makes the "wall" separating the cargo box from the rear seat lower which seemed to make them uneasy. Especially since they couldn't 'hang on' to the stiff wood top as well as padded carpet.
Also, I used 5/8" BC sanded Pine for my entire box and was happy with it but planned replace several pieces with 1/2" and possibly some 1/4" in spots. Mostly the bottom and drawers, I'd rather keep 5/8" for the uprights and the top so that I don't have to worry about their strength under heavy-ish loads.
Last edited by gaterose; 03-19-2014 at 04:10 PM.
|
|
|
Reply With Quote
|
 Posting Rules
|
You may not post new threads
You may not post replies
You may not post attachments
You may not edit your posts
HTML code is On
|
|
|
|


 Linear Mode


