User Tag List

Reply
 
Thread Tools Rate Thread Display Modes
Old 06-22-2014, 10:16 PM #1
HokieRunner's Avatar
HokieRunner HokieRunner is offline
Senior Member
 
Join Date: Sep 2009
Location: Gainesville, Virginia
Age: 41
Posts: 1,057
Real Name: Matt
HokieRunner will become famous soon enough
HokieRunner HokieRunner is offline
Senior Member
HokieRunner's Avatar
 
Join Date: Sep 2009
Location: Gainesville, Virginia
Age: 41
Posts: 1,057
Real Name: Matt
HokieRunner will become famous soon enough
4th Gen 4Runner 2003-2009 Power Steering Rack Replacement How-to / DIY

This is just the initial version while it's somewhat fresh in my head. Some editing to come in the next week or two when we do another swap on Zak's truck. @zopperman

----------------------------------------------

DIY 4th Gen Power Steering Rack Replacement How to:

NOTE: This is just the writeup. I'll add pics in the coming week or two. There are some very good youtube videos on this swap. After installing mine this weekend, I felt like the below steps were the most efficient order.

The following DIY is a step by step guide to replacing your power steering rack for a 2003-2009 4Runner. There may be minor variations between the V6 and V8 models in terms of obstructions underneath (ie. the oil filter on the V8 will need to be removed whereas I believe the V6 oil filter is in a different location and probably wouldn't need to be touched). Most other steps should be identical between models.

As always, I'm not liable for anything bad that happens if you follow this DIY and you follow it at your own risk blah blah blah....

1. Why replace the steering rack? This will vary from vehicle to vehicle but after 140k miles, my rack ends each had a minor leak, the bushings were deteriorated and the steering had some play in it. Last year I replaced the inner and outer tie rods and flushed the power steering about a month ago so the problems were definitely stemming from the rack.
How to test rack bushings: With the truck running and in park, have someone turn the wheel lock to lock while you watch the steering rack mounting points. The rack should have little to no deflection - if the rack is moving on the mounting points, chances are the bushings are shot.

2. Choices for replacement: Your options come down to OEM new (cheapest price I found was around $1000), new aftermarket (generally very poor quality), and remanufactured. I did some research and after emailing back and forth with Steve at CVJ axles, bought a remanufactured OEM rack from CVJ axles in Colorado. Cost was just over $300. I will be doing a separate review on the CVJ rack but in a nutshell, they were priced competitively and do a much higher quality rebuild than most reman companies. The fact that I have been running reman'd OEM CV axles from CVJ for the past year with no issues also made the choice easier.

3. Necessary tools:
assortment of wrenches/ratchets
air hammer/chisel or a hammer and long punch (12"+)
jack/jackstands
plumbers wrench
tie rod joint seperator
flare socket (11/16" or metric equivalent)
pliers
impact wrench or breaker bar
crescent wrenches

4. Replacement Procedure:


Jack up the truck and get it safely on jack stands. Remove the wheels. If you have a lift, you may want to unscrew the speed sensor bracket from the UCA so that you don't risk tweaking the wire. Remove the front skid plate.
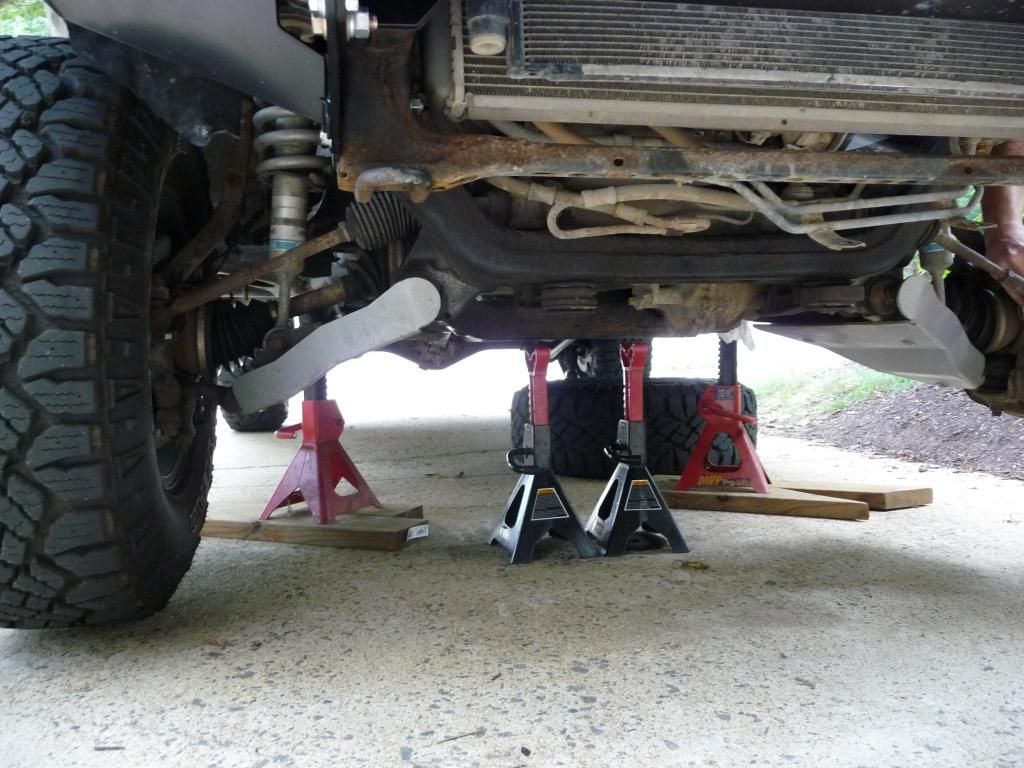


Remove the cotter pin from the outer tie rod on each side and remove the castle nuts. Using the tie rod separator, pop the outer tie rods off the steering knuckle. Or use the BFH method which some folks prefer.

Castle Nut is 19MM.
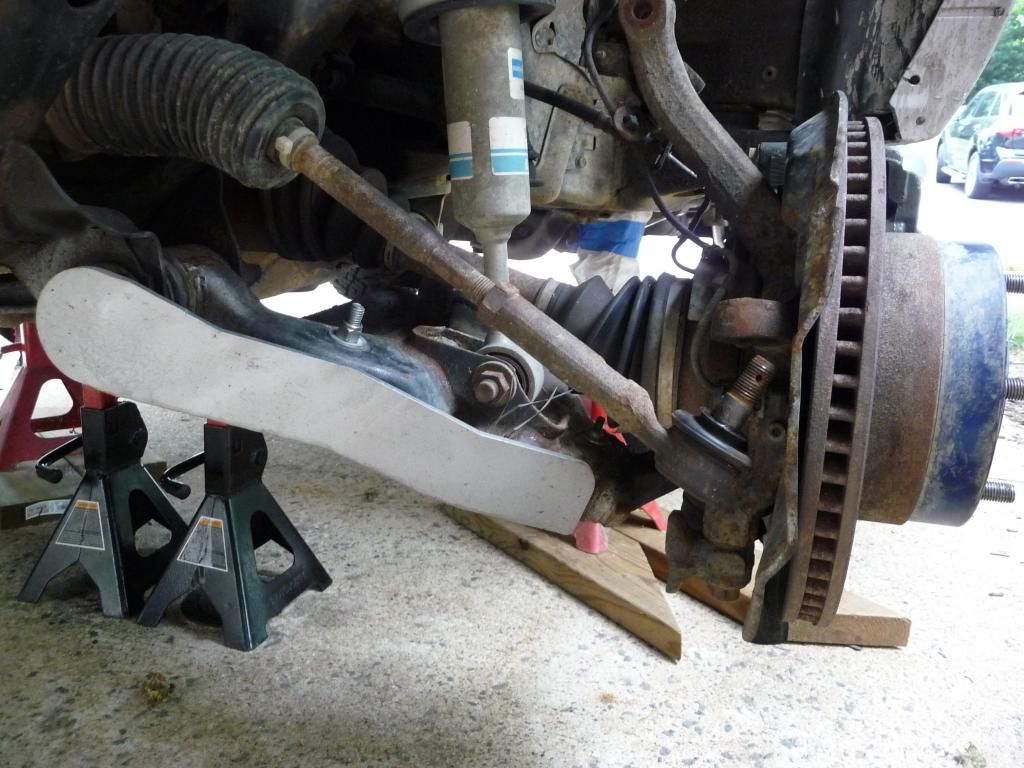


NOTE!! When replacing the rack is it important that both the lower steering shaft (where it connects to the rack) and the tie rods are centered and put back as close to their original position as possible. This will ensure that your steering wheel is correctly orientated and the alignment (toe) is very close to proper spec. Before you undo the outer tie rod from the inner tie rod, count the threads on each side and write it down. Regardless of how well you align everything, you will need an alignment after the new rack is in.
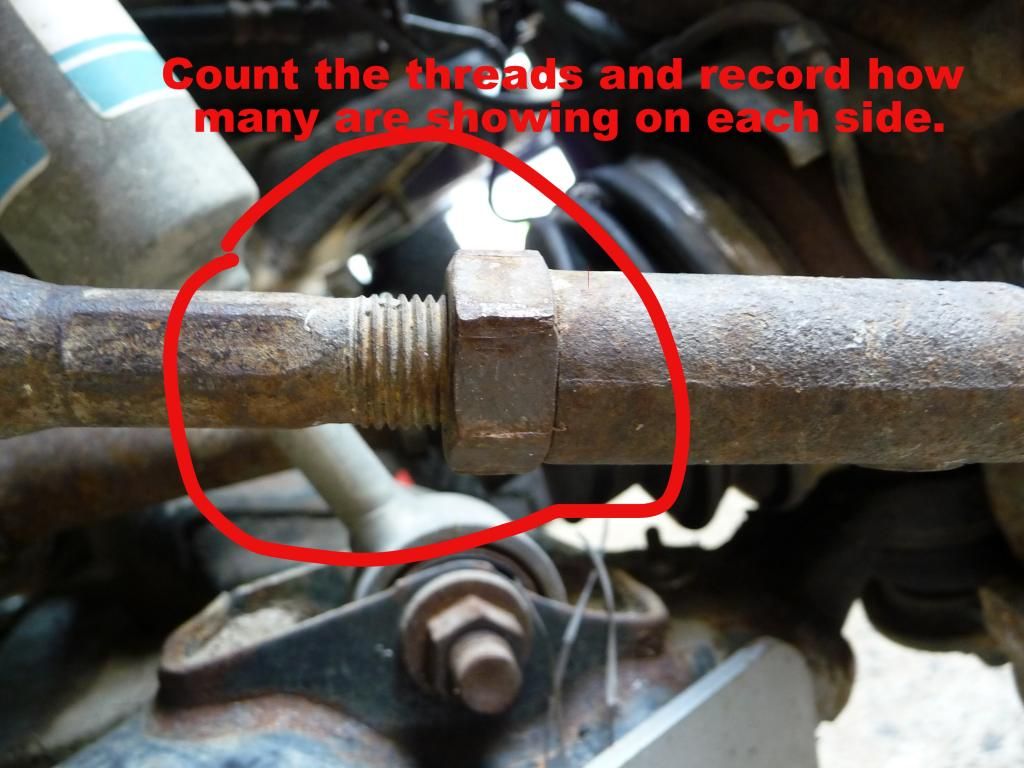


Now that you've written down the thread count for each side, you can unscrew the outer tie rods. Loosen the lock nut that's on the threaded portion of the inner tie rod and unscrew the outer tie rod. If you're not putting new ones on, mark right and left so they go back on the proper sides.

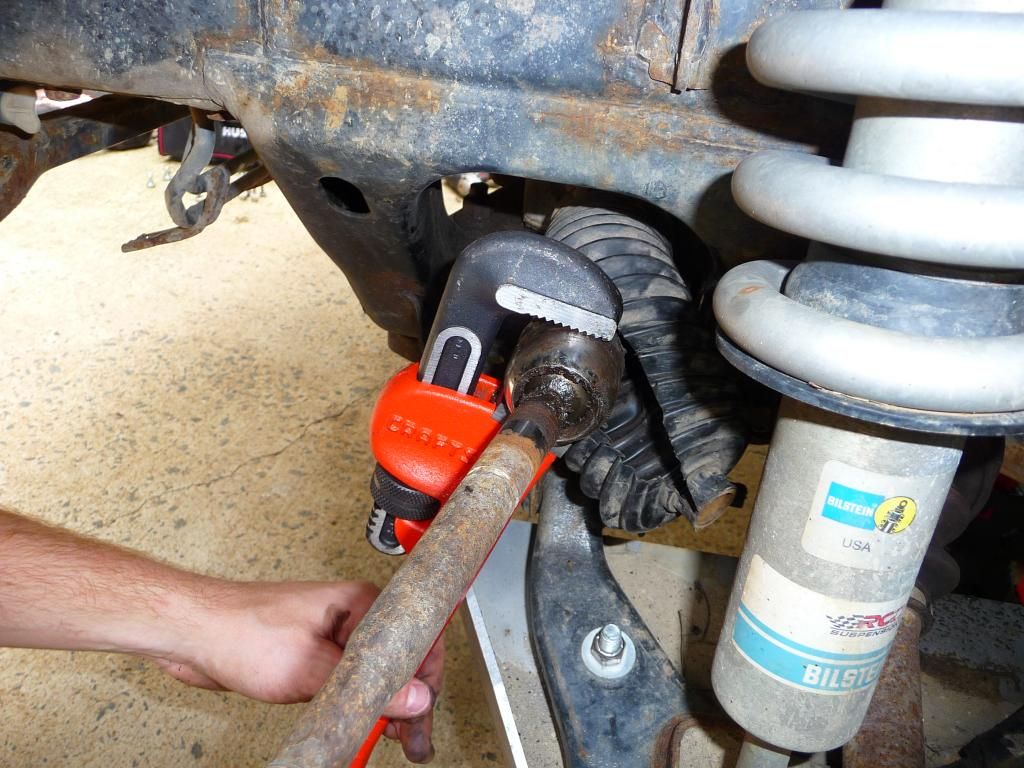
Now it's time to remove the DRIVER SIDE inner tie rod. First remove the boot by breaking the inner boot clip and sliding off the small clip with pliers. To make the process easier, you can crank the wheel all the way to the left. The flattened down tabs on the inner tie rod washer will need to be hammered flat with a screwdriver or the punch. Now use the plumbers wrench and loosen the tie rod. **Through the course of the swap, I figured out that you can actually leave the passenger side inner tie rod on. This will save time on both removal and install as most new/reman'd racks come with new inners.
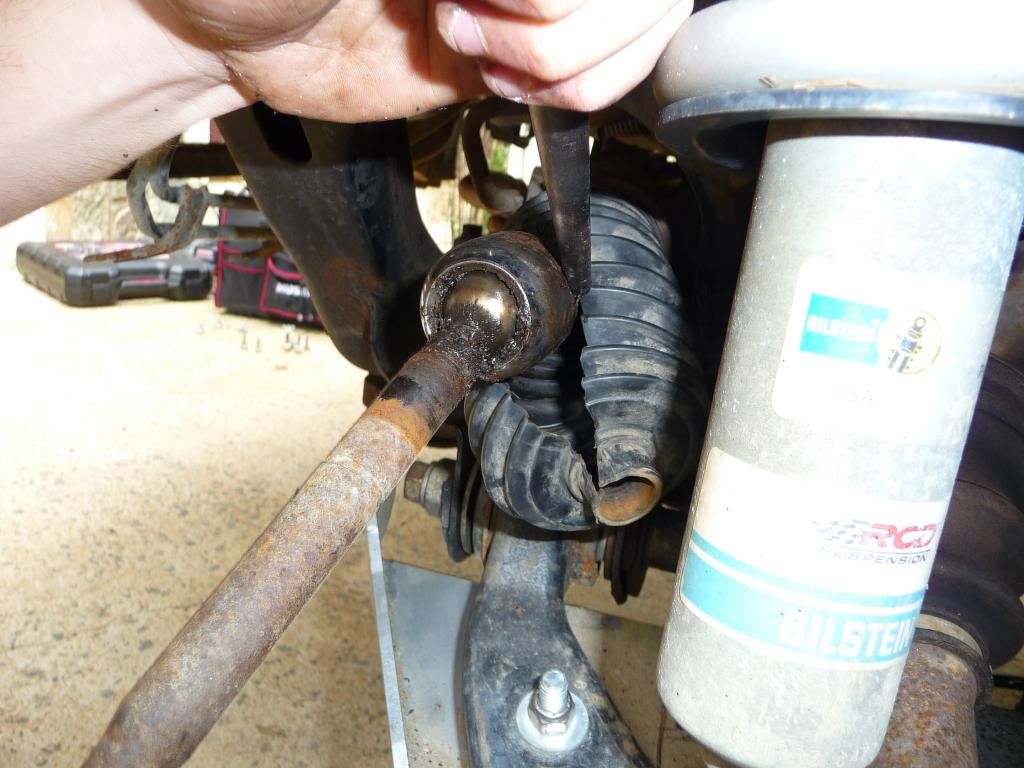


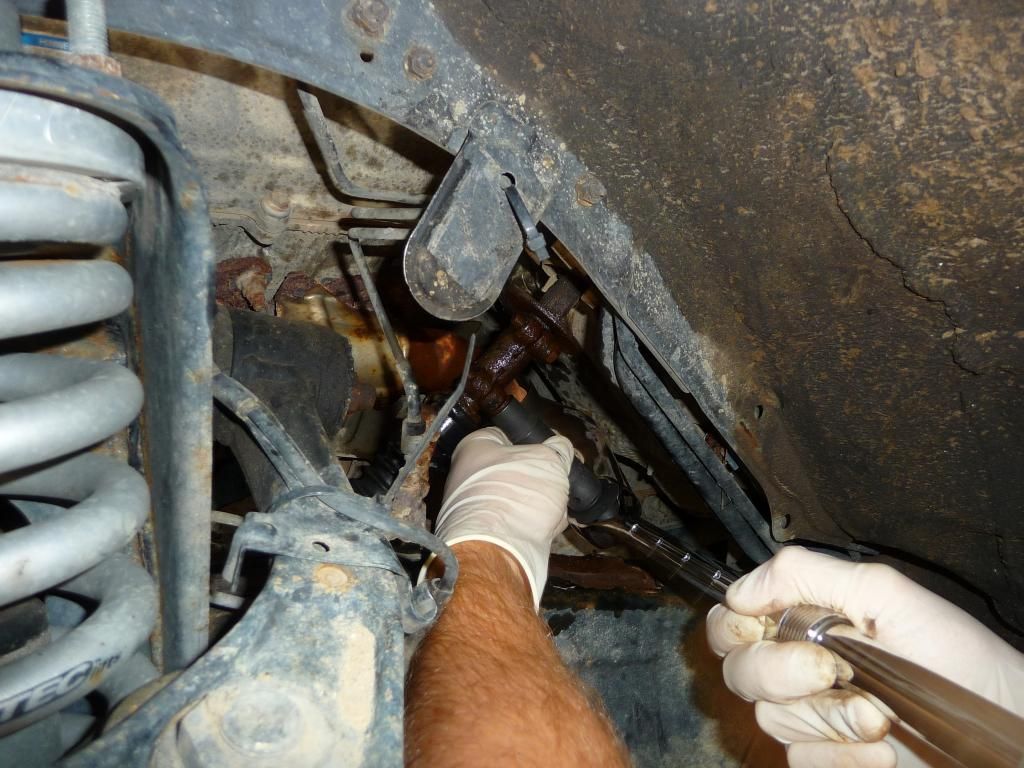
Next up is the lower steering shaft disconnect. If you remove the Driverside inner fender splashshield, you'll see a collar with two bolts that connects the steering shaft to the lower steering shaft. Remove these two bolts. The 3rd and lower bolt will need to be reached with a u-joint, socket, and extension. You can rotate the steering wheel to get the proper orientation. Loosen and remove that bolt.
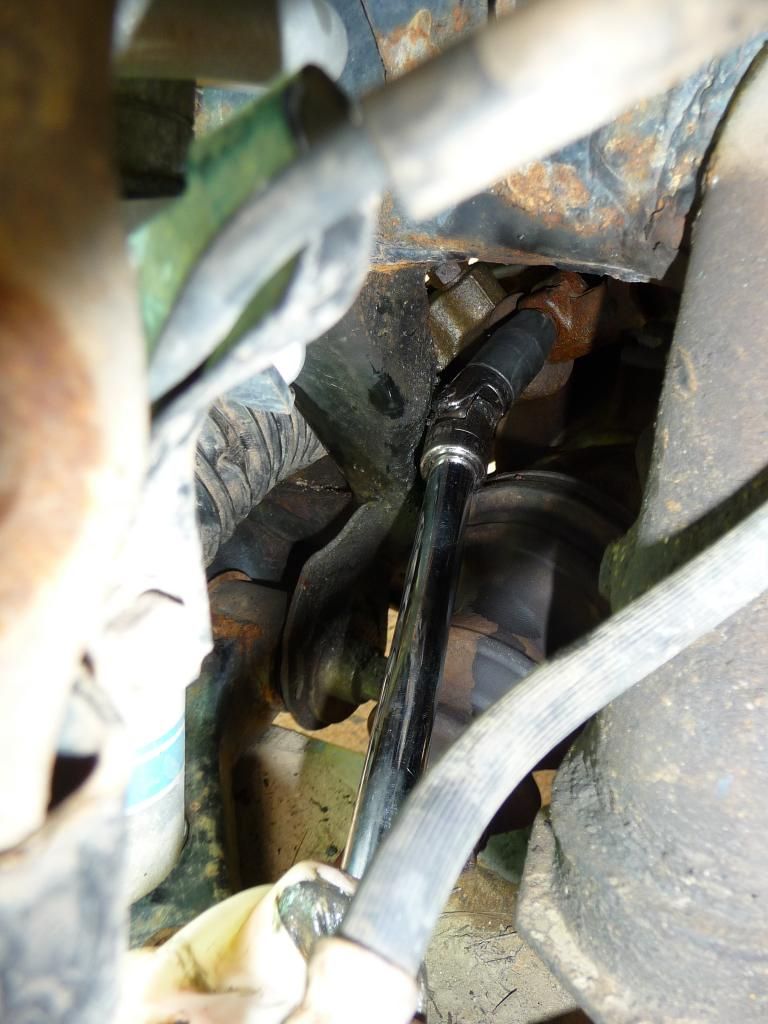


IMPORTANT: The next step will have you removing the lower steering shaft. NOW is the time to center the steering wheel and lock it in place so it doesn't turn. Tie it with rope, have someone hold it, etc.

Grab the air hammer or the long punch and a hammer. Whack at the lower steering shaft near the u-joint to drive it towards the rear of the truck and off the steering rack splined gear.
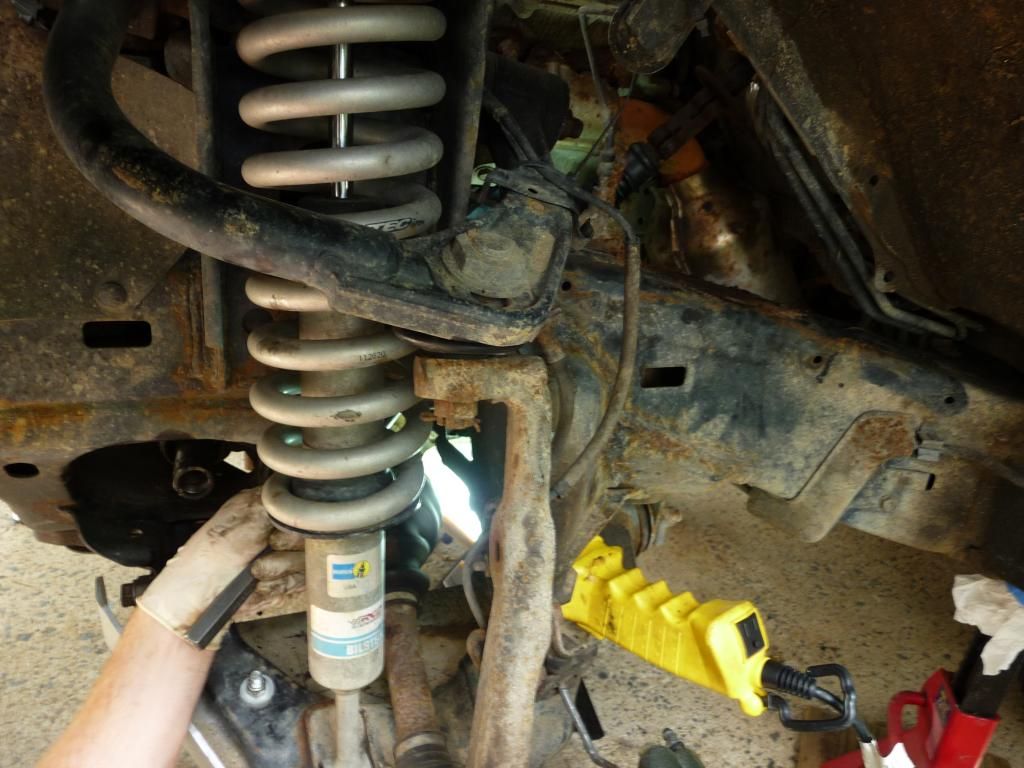


Next up are the high pressure line and low pressure hose. Get your drain pan ready! Using the flare wrench, loosen the high pressure fitting. PB Blast and some extra muscle should do the trick. Now loosen the 2 bolts holding the high pressure hose run to the front crossmember and rack. Let the line drain and move it out of the way. **NOTE: depending where you live, take extra care with these lines as they're very expensive. If they're rusty, don't try to force them too much or you'll be buying new lines from the dealer!

The lower pressure hose just has a hose clamp. Slide it off and the hose as well. The hose slides over a fitting that will need to be unscrewed. Now is a good time to remove it as it will afford extra clearance for the rack removal. Again, let the low pressure hose drain.

You're getting close! All that's left are 4 bolts. Grab the breaker bar or impact and undo the 2 bolts holding the rack in place.

Grab 2 jacks stands and place under the front diff housing. You'll need to drop the two stabilizer arms for the front diff. Undo the two bolts and let the housings hang.

FOR V8 owners. You will need to remove the oil filter. Do this now.
Remove the rack. If there are children in the viscinity, they may need ear muffs. With some choice words and a bit of sweat, yank out the old rack.
Now stand over your kill and enjoy a beer

__________________
HokieRunner 2005 4Runner Sport Edition V8 4x4 Silver Build Thread
Radflo 2.5 F 700#/R 220# / Desert Racing Uniball UCA / 285/70/17 Duratrac on 17x8 Konig Six Shooter / RCI Full Skids / BAMF LCA Skid / Shrockworks 3 Hoop Bumper / Custom WhiteKnuckle Sliders / Custom WMW Roof rack / CVJ Reman'd Axles / 06+ Facelift / Custom sound system / AIP Bypass / LED Gauges,Dash,Interior / Wiring, aux. lighting, dual battery, custom cargo box in progress...

Last edited by HokieRunner; 07-27-2014 at 07:50 PM.
HokieRunner is offline   Reply With QuoteReply With Quote
Old 06-22-2014, 10:17 PM #2
HokieRunner's Avatar
HokieRunner HokieRunner is offline
Senior Member
 
Join Date: Sep 2009
Location: Gainesville, Virginia
Age: 41
Posts: 1,057
Real Name: Matt
HokieRunner will become famous soon enough
HokieRunner HokieRunner is offline
Senior Member
HokieRunner's Avatar
 
Join Date: Sep 2009
Location: Gainesville, Virginia
Age: 41
Posts: 1,057
Real Name: Matt
HokieRunner will become famous soon enough
4th Gen 4Runner 2003-2009 Power Steering Rack Replacement How-to / DIY Part 2

5. New Rack Installation:

Prep the new rack. Most racks come with new inner tie rods from what I've seen. Remove the driverside inner tie rod. You'll probably need to use a bench vise or similar to mount the rack in while you use the plumbers wrench to get it off.

Set it next to the old rack. You want to make sure the new rack is centered. The method I used was to measure the amount of the steering shaft sticking out each side. With the rack centered, it was 2" at either end on both my OEM and the reman'd OEM. If it isn't centered, grab the steering gear spline and twist it. We were able to do this with gloved hands. You DO NOT want to marr the splines. Once this is done, you're ready to install the new rack.

Get the rack in. Loosely bolt it in place. Install the low pressure hose fitting and snug it down.

Install the low pressure hose and clip as well as the high pressure hose.
Bolt the front diff housing back on. Torque to spec. Also torque the steering rack to spec.

Install the 2 bolts for the high pressure hose brackets and tighten them down.

Time to slide the lower steering shaft onto the steering gear splines. Make sure your steering wheel is still aligned and that it hasn't moved. This is the most PITA step but take your time. If you mess up the splines or get the alignment wrong and you'll have to fix it. Once the lower steering shaft is completely on, re-install the 3 bolts (1 lower and 2 upper on the collar)

Good time to put the oil filter back on and top up the oil so you don't forget. Not a bad time to do an oil change either if the timing works out as such!

Re-install the inner tie rod on the drivers side. Snug it down with the plumbers wrench and then flatten the washer down on the 2 flat sides. Slide on the inner tie rod boot and re-clamp it.

Remember that paper you wrote the thread count down on? Get it out. Time to re-install the outer tie rods. Smear a bit of anti-seize on the threads and match the count. Snug down the locking nut.

Pop the outer tie rods into the steering knuckle, torque down the castle nut and install the cotter pins

6. Power steering flush and final check.


Kinda self explanatory but it's time to flush the power steering fluid. You SHOULD be able to do this without the engine turned on. I had to crank the engine over for 1 second to get the fluid moving and then shut it off right away.

Here's Zak's writeup for the flush. Just follow it.

After the flush, get the fluid to the proper level.

Re-install the tires. Pop the inner splash shield back in place, and if you removed the upper speed sensor brackets, hook them back on the UCA.
Pop the skid plate back on.

Fire the truck up and check for leaks. If no leaks, take it for a test drive.

You'll immediately know how good a job you did with keeping the alignment close or the wheel straight.

Hopefully it all checks out and you now have much crisper, more effortless steering!
__________________
HokieRunner 2005 4Runner Sport Edition V8 4x4 Silver Build Thread
Radflo 2.5 F 700#/R 220# / Desert Racing Uniball UCA / 285/70/17 Duratrac on 17x8 Konig Six Shooter / RCI Full Skids / BAMF LCA Skid / Shrockworks 3 Hoop Bumper / Custom WhiteKnuckle Sliders / Custom WMW Roof rack / CVJ Reman'd Axles / 06+ Facelift / Custom sound system / AIP Bypass / LED Gauges,Dash,Interior / Wiring, aux. lighting, dual battery, custom cargo box in progress...

Last edited by HokieRunner; 06-22-2014 at 10:19 PM.
HokieRunner is offline   Reply With QuoteReply With Quote
Old 06-23-2014, 04:15 PM #3
chmura's Avatar
chmura chmura is offline
Senior Member
 
Join Date: Sep 2009
Location: Orange County, California
Posts: 1,250
chmura is on a distinguished road
chmura chmura is offline
Senior Member
chmura's Avatar
 
Join Date: Sep 2009
Location: Orange County, California
Posts: 1,250
chmura is on a distinguished road
Waiting to see some pictures.
__________________
2009 Trail Edition - ICON lift, Total Chaos UCA, BF Goodrich Mud Terrain KM2 285/70/17's, SCS Stealth 6 Matte Gunmetal finish, K9 2.2m Roof Rack.
chmura is offline   Reply With QuoteReply With Quote
Old 07-27-2014, 07:53 PM #4
HokieRunner's Avatar
HokieRunner HokieRunner is offline
Senior Member
 
Join Date: Sep 2009
Location: Gainesville, Virginia
Age: 41
Posts: 1,057
Real Name: Matt
HokieRunner will become famous soon enough
HokieRunner HokieRunner is offline
Senior Member
HokieRunner's Avatar
 
Join Date: Sep 2009
Location: Gainesville, Virginia
Age: 41
Posts: 1,057
Real Name: Matt
HokieRunner will become famous soon enough
updated first post with pics. unfortunately the pictures stop where we stopped on Zak's swap. We tried heat, hammers, pry bars, you name it....and still couldn't get the steering shaft to budge. So I'll get some more detailed pictures next time I'm under the truck to finish the DIY.
__________________
HokieRunner 2005 4Runner Sport Edition V8 4x4 Silver Build Thread
Radflo 2.5 F 700#/R 220# / Desert Racing Uniball UCA / 285/70/17 Duratrac on 17x8 Konig Six Shooter / RCI Full Skids / BAMF LCA Skid / Shrockworks 3 Hoop Bumper / Custom WhiteKnuckle Sliders / Custom WMW Roof rack / CVJ Reman'd Axles / 06+ Facelift / Custom sound system / AIP Bypass / LED Gauges,Dash,Interior / Wiring, aux. lighting, dual battery, custom cargo box in progress...
HokieRunner is offline   Reply With QuoteReply With Quote
Old 09-18-2015, 07:29 AM #5
fjohn624 fjohn624 is offline
Junior Member
 
Join Date: Aug 2015
Location: Orlando, FL
Posts: 21
fjohn624 is on a distinguished road
fjohn624 fjohn624 is offline
Junior Member
 
Join Date: Aug 2015
Location: Orlando, FL
Posts: 21
fjohn624 is on a distinguished road
Thanks for this guide. So far its been a really great help. I have an 04 V6 4wd and I think I have a problem that the V8s don't run into. I can't get the driverside rack mounting bolt out. It's so long it runs into the AC compressor before it clears the frame. I would pull the compressor to get more clearance but I don't think it's going to move easily because of the long hardline attached to it. Has anyone run into this yet?
fjohn624 is offline   Reply With QuoteReply With Quote
Old 09-27-2015, 08:30 PM #6
fjohn624 fjohn624 is offline
Junior Member
 
Join Date: Aug 2015
Location: Orlando, FL
Posts: 21
fjohn624 is on a distinguished road
fjohn624 fjohn624 is offline
Junior Member
 
Join Date: Aug 2015
Location: Orlando, FL
Posts: 21
fjohn624 is on a distinguished road
So the only way I could get that bolt out was to remove the AC compressor and tie it up out of the way. The only way to get to that is to remove the alternator which of course means removing the battery. It sucks but none of that is difficult, just adds time and frustration.

Anyway new rack is in. No more leaks either! Thanks for this guide.

Now to figure out where the AC is leaking refrigerant....
fjohn624 is offline   Reply With QuoteReply With Quote
Old 09-28-2015, 07:22 PM #7
fjohn624 fjohn624 is offline
Junior Member
 
Join Date: Aug 2015
Location: Orlando, FL
Posts: 21
fjohn624 is on a distinguished road
fjohn624 fjohn624 is offline
Junior Member
 
Join Date: Aug 2015
Location: Orlando, FL
Posts: 21
fjohn624 is on a distinguished road
This truck is a roller coaster of emotions. I was pissed off while changing the rack, then thrilled to get it back together and aligned and driving well, then annoyed with an AC leak but still happy to be driving it.

Today it all went to crap. On my way home from work my check engine light turned on and then VSC lights came on. Went to scan it, scanner is broken. Then I noticed fluid dripping under the truck! The power steering return fitting is leaking at the threads. Thinking back to installing it, I may have stripped the threads when reinstalling the fitting. It was getting late and I was very tired and since it took so much force to get it off I think I applied way more than the 30 ft/lbs the manual states. I must have stripped the threads. Now I am just feeling sick. I can't even begin to think about taking that rack out again.

Anyone have any advice? I am thinking its going to be hard to use a helicoil on it without taking the rack back out. Maybe I can run a flat bottom tap into it and chase the threads, then use a pipe sealant and thread it back in? Anyone know what size that thread is? I don't have a tap that big but it looks like it might be M16x1.5 but I don't know.

Last edited by fjohn624; 09-28-2015 at 08:00 PM. Reason: Added details
fjohn624 is offline   Reply With QuoteReply With Quote
Old 10-16-2015, 01:41 PM #8
LTDSC's Avatar
LTDSC LTDSC is offline
Senior Member
 
Join Date: Oct 2012
Location: NorCal
Age: 37
Posts: 3,412
Real Name: Sam
LTDSC will become famous soon enough LTDSC will become famous soon enough
LTDSC LTDSC is offline
Senior Member
LTDSC's Avatar
 
Join Date: Oct 2012
Location: NorCal
Age: 37
Posts: 3,412
Real Name: Sam
LTDSC will become famous soon enough LTDSC will become famous soon enough
im thinking of replacing just the bushings on my rack. Anyone know the level of difficulty? Im not finding too many DIY tutorials.
__________________
LTDSC is offline   Reply With QuoteReply With Quote
Old 10-16-2015, 01:55 PM #9
BlackWorksInc's Avatar
BlackWorksInc BlackWorksInc is offline
Elite Member
 
Join Date: Feb 2011
Location: Bend, OR
Posts: 9,902
BlackWorksInc is a splendid one to behold BlackWorksInc is a splendid one to behold BlackWorksInc is a splendid one to behold BlackWorksInc is a splendid one to behold BlackWorksInc is a splendid one to behold BlackWorksInc is a splendid one to behold BlackWorksInc is a splendid one to behold BlackWorksInc is a splendid one to behold
BlackWorksInc BlackWorksInc is offline
Elite Member
BlackWorksInc's Avatar
 
Join Date: Feb 2011
Location: Bend, OR
Posts: 9,902
BlackWorksInc is a splendid one to behold BlackWorksInc is a splendid one to behold BlackWorksInc is a splendid one to behold BlackWorksInc is a splendid one to behold BlackWorksInc is a splendid one to behold BlackWorksInc is a splendid one to behold BlackWorksInc is a splendid one to behold BlackWorksInc is a splendid one to behold
I don't understand why you need to remove the inner tie rod end?
BlackWorksInc is offline   Reply With QuoteReply With Quote
Old 10-16-2015, 02:06 PM #10
av8ter av8ter is offline
Member
 
Join Date: Feb 2015
Location: GA
Posts: 195
av8ter is on a distinguished road
av8ter av8ter is offline
Member
 
Join Date: Feb 2015
Location: GA
Posts: 195
av8ter is on a distinguished road
Quote:
Originally Posted by fjohn624 View Post
This truck is a roller coaster of emotions. I was pissed off while changing the rack, then thrilled to get it back together and aligned and driving well, then annoyed with an AC leak but still happy to be driving it.

Today it all went to crap. On my way home from work my check engine light turned on and then VSC lights came on. Went to scan it, scanner is broken. Then I noticed fluid dripping under the truck! The power steering return fitting is leaking at the threads. Thinking back to installing it, I may have stripped the threads when reinstalling the fitting. It was getting late and I was very tired and since it took so much force to get it off I think I applied way more than the 30 ft/lbs the manual states. I must have stripped the threads. Now I am just feeling sick. I can't even begin to think about taking that rack out again.

Anyone have any advice? I am thinking its going to be hard to use a helicoil on it without taking the rack back out. Maybe I can run a flat bottom tap into it and chase the threads, then use a pipe sealant and thread it back in? Anyone know what size that thread is? I don't have a tap that big but it looks like it might be M16x1.5 but I don't know.


Did you install a new o-ring on the line-ends before re-installing? I find it most likely that a o-ring is just the cause of your leak, the lines are pretty hard to strip.
av8ter is offline   Reply With QuoteReply With Quote
Old 10-16-2015, 02:47 PM #11
BlackWorksInc's Avatar
BlackWorksInc BlackWorksInc is offline
Elite Member
 
Join Date: Feb 2011
Location: Bend, OR
Posts: 9,902
BlackWorksInc is a splendid one to behold BlackWorksInc is a splendid one to behold BlackWorksInc is a splendid one to behold BlackWorksInc is a splendid one to behold BlackWorksInc is a splendid one to behold BlackWorksInc is a splendid one to behold BlackWorksInc is a splendid one to behold BlackWorksInc is a splendid one to behold
BlackWorksInc BlackWorksInc is offline
Elite Member
BlackWorksInc's Avatar
 
Join Date: Feb 2011
Location: Bend, OR
Posts: 9,902
BlackWorksInc is a splendid one to behold BlackWorksInc is a splendid one to behold BlackWorksInc is a splendid one to behold BlackWorksInc is a splendid one to behold BlackWorksInc is a splendid one to behold BlackWorksInc is a splendid one to behold BlackWorksInc is a splendid one to behold BlackWorksInc is a splendid one to behold
Quote:
Originally Posted by av8ter View Post
Did you install a new o-ring on the line-ends before re-installing? I find it most likely that a o-ring is just the cause of your leak, the lines are pretty hard to strip.
Not unless you started them slightly cross threaded, which is very easy to do on some of the racks. I've seen that before one or two vehicles where another dealer or shop has installed a new rack but crossthreaded a fitting.
BlackWorksInc is offline   Reply With QuoteReply With Quote
Old 10-16-2015, 03:20 PM #12
LTDSC's Avatar
LTDSC LTDSC is offline
Senior Member
 
Join Date: Oct 2012
Location: NorCal
Age: 37
Posts: 3,412
Real Name: Sam
LTDSC will become famous soon enough LTDSC will become famous soon enough
LTDSC LTDSC is offline
Senior Member
LTDSC's Avatar
 
Join Date: Oct 2012
Location: NorCal
Age: 37
Posts: 3,412
Real Name: Sam
LTDSC will become famous soon enough LTDSC will become famous soon enough
Quote:
Originally Posted by BlackWorksInc View Post
Not unless you started them slightly cross threaded, which is very easy to do on some of the racks. I've seen that before one or two vehicles where another dealer or shop has installed a new rack but crossthreaded a fitting.
in your professional opinion, if my rack bushings are shot. at 139k would it be best to just replace the rack instead?

I dont want to go through the work to replace the rack at an undisclosed soon timeframe.
__________________
LTDSC is offline   Reply With QuoteReply With Quote
Old 10-16-2015, 04:24 PM #13
BlackWorksInc's Avatar
BlackWorksInc BlackWorksInc is offline
Elite Member
 
Join Date: Feb 2011
Location: Bend, OR
Posts: 9,902
BlackWorksInc is a splendid one to behold BlackWorksInc is a splendid one to behold BlackWorksInc is a splendid one to behold BlackWorksInc is a splendid one to behold BlackWorksInc is a splendid one to behold BlackWorksInc is a splendid one to behold BlackWorksInc is a splendid one to behold BlackWorksInc is a splendid one to behold
BlackWorksInc BlackWorksInc is offline
Elite Member
BlackWorksInc's Avatar
 
Join Date: Feb 2011
Location: Bend, OR
Posts: 9,902
BlackWorksInc is a splendid one to behold BlackWorksInc is a splendid one to behold BlackWorksInc is a splendid one to behold BlackWorksInc is a splendid one to behold BlackWorksInc is a splendid one to behold BlackWorksInc is a splendid one to behold BlackWorksInc is a splendid one to behold BlackWorksInc is a splendid one to behold
Quote:
Originally Posted by LTDSC View Post
in your professional opinion, if my rack bushings are shot. at 139k would it be best to just replace the rack instead?

I dont want to go through the work to replace the rack at an undisclosed soon timeframe.
From what I understand, the rack has to come out anyway if your replacing bushings, so if youcan afford it and the rack is seeping a bit... It couldn't hurt.
BlackWorksInc is offline   Reply With QuoteReply With Quote
Old 10-16-2015, 04:25 PM #14
jonb2 jonb2 is offline
Member
 
Join Date: Aug 2015
Location: North Hollywood, CA
Posts: 162
jonb2 is on a distinguished road
jonb2 jonb2 is offline
Member
 
Join Date: Aug 2015
Location: North Hollywood, CA
Posts: 162
jonb2 is on a distinguished road
Quote:
Originally Posted by LTDSC View Post
in your professional opinion, if my rack bushings are shot. at 139k would it be best to just replace the rack instead?

I dont want to go through the work to replace the rack at an undisclosed soon timeframe.
I'm in the same situation as you. My steering rack bushings are starting to go out and I get a "clunking" noise when turning the steering wheel. Mechanic said that the whole rack is shifting ever so slightly when I turn the steering wheel and you can hear/feel the movement. It's not real bad right now.

I checked out numerous threads on just replacing the bushings and the overall thought is that's it's the same amount of work as just replacing the whole rack. Replacing just the bushings is very labor intensive.

At your mileage (and I will probably do the same in the next year), I would replace the entire rack. Yes it will be more expensive in parts but you get new bushings, new rack, new inner tie rods, etc. Get some new outer tie rods at the same time. There are numerous options for replacing OEM and aftermarket.

good luck.
jonb2 is offline   Reply With QuoteReply With Quote
Old 10-16-2015, 04:26 PM #15
av8ter av8ter is offline
Member
 
Join Date: Feb 2015
Location: GA
Posts: 195
av8ter is on a distinguished road
av8ter av8ter is offline
Member
 
Join Date: Feb 2015
Location: GA
Posts: 195
av8ter is on a distinguished road
Quote:
Originally Posted by LTDSC View Post
in your professional opinion, if my rack bushings are shot. at 139k would it be best to just replace the rack instead?

I dont want to go through the work to replace the rack at an undisclosed soon timeframe.
I wouldn't go changing out an OEM rack for a reman(even a toyota reman) if yours isn't leaking.
av8ter is offline   Reply With QuoteReply With Quote
Reply

Thread Tools
Display Modes Rate This Thread
Rate This Thread:

Posting Rules
You may not post new threads
You may not post replies
You may not post attachments
You may not edit your posts

BB code is On
Smilies are On
[IMG] code is On
HTML code is On

Forum Jump

Similar Threads
Thread Thread Starter Forum Replies Last Post
Power Steering rack replacement.... info needed! fightman80 3rd gen T4Rs 76 03-24-2023 04:24 PM
Replacement power steering rack bushings DerJaeger 3rd gen T4Rs 124 01-29-2022 12:13 AM
Steering Rack and Power Steering Pump Replacement thebrandon 3rd gen T4Rs 5 07-02-2013 10:07 AM
2003 4Runner Roof Rack Cover Replacement kbj713 4th Gen T4Rs 7 12-08-2011 11:27 AM
Power steering/steering rack question (need help fast) alex bland 3rd gen T4Rs 9 01-09-2010 07:37 PM

Powered by vBadvanced CMPS v3.2.2

All times are GMT -4. The time now is 09:49 PM.

Powered by vBulletin® Version 3.8.11
Copyright ©2000 - 2024, vBulletin Solutions Inc.
Search Engine Optimisation provided by DragonByte SEO (Pro) - vBulletin Mods & Addons Copyright © 2024 DragonByte Technologies Ltd.
Feedback Buttons provided by Advanced Post Thanks / Like (Lite) - vBulletin Mods & Addons Copyright © 2024 DragonByte Technologies Ltd.
User Alert System provided by Advanced User Tagging (Lite) - vBulletin Mods & Addons Copyright © 2024 DragonByte Technologies Ltd.
***This site is an unofficial Toyota site, and is not officially endorsed, supported, authorized by or affiliated with Toyota. All company, product, or service names references in this web site are used for identification purposes only and may be trademarks of their respective owners. The Toyota name, marks, designs and logos, as well as Toyota model names, are registered trademarks of Toyota Motor Corporation***Ad Management plugin by RedTyger
 
Copyright © 2020