 03-30-2017, 10:01 PM
|
#61
|
 |
Senior Member
|
|
Join Date: Jul 2012
Location: Iowa
Posts: 3,146
|
|
|
Senior Member
Join Date: Jul 2012
Location: Iowa
Posts: 3,146
|
Quote:
Originally Posted by Fantasyridge

Sorry to revive old thread but wanting couple questions answered. Is there any rubber under a 4runner which fluid film could cause problems with? Where not to spray to not affect brakes or exhaust. I'm thinking i can spray directly on muffler and my fancy exhaust tip which is already showing a little surface rust. Most videos i have watched peeps just leave the tires on and spray right up behind them (not seeming to be to careful they dont get it in the brakes) others pull all wheels off and mask around them. Just curious what most 4runner owners do
|
Brake lines, abs lines, bushingins, etc. Not too many and you pretty much can shoot around them, I just kept a towell handy to wipe of any overspray on rubber. My neighbor who is a master tech at the local dealership looked under mine and said comparatively mine is amazing clean and surface rust only, so I can vouch for fluid film. I just do it before winter and after winter. usually take a commercial de-greaser prior to applying. Also personal preference I don't think it smells that bad, or I just got used to it..or its the fumes. But comparatively to other car products/fluids its tolerable.
__________________
-2013 T4R SR5-MYSALSA-KO2's
-(SOLD)2006 T4R SR5. Nautical Blue Metallic. 255/70/17 General AT2. LED Interior Swap. Toytec Ultimate 3inch lift/Icon 2.0s Rear, SHROCKWORKS Front Bumper, OEM FJ wheels, WM Roofrack, slowly working it up. My Build thread HERE
-(SOLD)2005 Subaru Impreza WRX STi. BMW Mica Blue paint job. Cobb stage 2 tuning. Other modifications.

|

|
 Reply With Quote Reply With Quote
|
|
03-30-2017, 10:07 PM
|
#62
|
|
Member
|
|
Join Date: Dec 2015
Location: St. Thomas, ON. Canada
Posts: 351
|
|
|
Member
Join Date: Dec 2015
Location: St. Thomas, ON. Canada
Posts: 351
|
Quote:
Originally Posted by dgmorr
What oil spray product did you use for the Jimmy? What is in that sprayer pic you've posted?
|
From Earlier Post:
The old spray gun (pictured above), is one I made up for spot undercoating & spraying steel brake lines.
Jimmy was a purchase off a flipper friend, from the original owner.
- senior 70 y/o guy, bought 2005 GMC new and had oil sprayed, every fall.
- why the exterior body plus frame & floor, was still solid
- former undercoat brand is unknown
While I use a wax-oil (Fluid Film or similar), and have it applied using a 2 post lift.
- proper spray equipment system (w/wands) costs, approx. $3,000
- using a hydraulic pump, to keep oil mist/fog at a minimum, less product waste & better oil yield
- commercial undercoat gun (as pictured), are around $500
Last edited by Beaumont67; 03-30-2017 at 10:35 PM.
|
|
|
Reply With Quote
|
|
03-30-2017, 10:26 PM
|
#63
|
|
Member
|
|
Join Date: Dec 2008
Location: Burnaby, BC
Age: 38
Posts: 408
|
|
|
Member
Join Date: Dec 2008
Location: Burnaby, BC
Age: 38
Posts: 408
|
Been doing some research on what I'm going to do about my undercarriage rust. Here's what I've turned up by asking the internet.
Apologies for the roughness of the format, this is straight from my notes file:
Mentions product called chassis saver
Rust on lower parts 07 4runner should use POR15?
Ok my stats report told me someone here was talking about me. I'm the manufacturer of Chassis Saver. I'm glad to hear good things being said. If anyone has any questions I'll be happy to help. Just to address the multi step POR-15 process:
Much of the multi-product hype is marketing. POR & Chassis Saver are chemically alike. They are moisture cure urethanes. Urethanes in general DO NOT have very good adhesion to smooth surfaces. The cleaner and metal prep sold by POR are a valid but worthless attempt to solve the deficiency that urethane exhibits on smooth steel. I've tested the method of degreasing and etching smooth steel a few times and never had any success improving adhesion. You can still get a sharp knife to peel the material. When steel is rough as with tight rust or a blast profile, adhesion is completely different. We only promote our product to be used in this manner. If you must coat smooth steel we recommend that you grind or sand with 60 grit paper and create a profile in the metal. Epoxies are the only type of coatings that will adhere to smooth steel with no more prep than degreasing. Self etch primer is not even necessary when using a 2K epoxy primer.
Eric Rosenthal
VP - Magnet Paints
[email protected]
https://www.thesamba.com/vw/forum/vi...r=asc&start=80
bead blaster
SpeedBlaster | Zendex Tool
Thread on TTORA where lots of people have come out saying their POR15 flaked off. Many are jumping to Rust Bullet
frame painting with rust bullet(many pics) - Page 2 - TTORA Forum
Rust bullet is an awesome product. I work in the metal finishing industry, and I can tell you that the more prep work you do, the better the results. ALWAYS. If you skimp on prep work, you might as well not even do it. If you miss one area, the rust will creep under the coatings.
Rust is caused by basic electrolysis. All it needs is air, metal and moisture. The metal is trying to revert back to its natural state. If you've got an unsealed portion (ie you missed a spot) it will begin to pit there and spread underneath your coatings. The whole point of a coating is to seal the base metal from air and moisture. Anytime you have an entry point, it will corrode its way through. Sometimes it'll be slow, sometimes it will be fast, but it will always happen. Also, having an abrasive finish on the metal will help prevent the spread. It gives the coating an anchor tooth pattern to hold on to.
Think of it like this:
smooth metal gives you a profile like this
---------------------
Roughened metal gives you a surface profile like this
^^^^^^^^^^^^^^
That anchor tooth pattern will give you a couple of benefits. For starters when you damage your coating, if you didn't prep it properly, you will get chunks coming up rather than scratches or chips. It reduces the amount of damage done by impacts and helps to localize them. It also makes the spread of rust slower. It has to corrode the unprotected portion of metal to a deeper depth before it can begin spreading.
You want your metal to have a finish of SSPC SP-10, or NACE No. 2. Basically that means that its a near white metal finish and 95% of your surface is contaminent free. You also want to leave about a 200 Ra profile. I know what the directions say, but in both our and our customers experience that typically gives the best results.
If you really are concerned with the longevity of the finish, thats the way to go. Just be sure to keep it up and repair any damage before driving on salted roads or letting it sit too long. Just remember that of you drive on salted roads or on the beach, that salt increases the conductive capability of water, meaning you stuff will corrode exponentially faster. It makes it that much more crucial that the prep work and upkeep be done properly. There is no substitution for a sand blasted finish.
More Rust bullet support and POR15 disdain
por 15 vs. rust bullet - Hot Rod Forum : Hotrodders Bulletin Board
-------
I've read all the threads linked above in detail. My conclusion is repainting with rust bullet after 150 grit sandpapering any remaining paint, removing any rust scale, and surface prep as per Rust Bullet's instruction, is the best way to go... if one wants to repaint.
|
|
|
Reply With Quote
|
|
03-31-2017, 12:33 AM
|
#64
|
|
Member
|
|
Join Date: Sep 2016
Location: Virginia Beach,VA
Posts: 218
|
|
|
Member
Join Date: Sep 2016
Location: Virginia Beach,VA
Posts: 218
|
Quote:
Originally Posted by Keros
Been doing some research on what I'm going to do about my undercarriage rust. Here's what I've turned up by asking the internet.
Apologies for the roughness of the format, this is straight from my notes file:
Mentions product called chassis saver
Rust on lower parts 07 4runner should use POR15?
Ok my stats report told me someone here was talking about me. I'm the manufacturer of Chassis Saver. I'm glad to hear good things being said. If anyone has any questions I'll be happy to help. Just to address the multi step POR-15 process:
Much of the multi-product hype is marketing. POR & Chassis Saver are chemically alike. They are moisture cure urethanes. Urethanes in general DO NOT have very good adhesion to smooth surfaces. The cleaner and metal prep sold by POR are a valid but worthless attempt to solve the deficiency that urethane exhibits on smooth steel. I've tested the method of degreasing and etching smooth steel a few times and never had any success improving adhesion. You can still get a sharp knife to peel the material. When steel is rough as with tight rust or a blast profile, adhesion is completely different. We only promote our product to be used in this manner. If you must coat smooth steel we recommend that you grind or sand with 60 grit paper and create a profile in the metal. Epoxies are the only type of coatings that will adhere to smooth steel with no more prep than degreasing. Self etch primer is not even necessary when using a 2K epoxy primer.
Eric Rosenthal
VP - Magnet Paints
[email protected]
https://www.thesamba.com/vw/forum/vi...r=asc&start=80
bead blaster
SpeedBlaster | Zendex Tool
Thread on TTORA where lots of people have come out saying their POR15 flaked off. Many are jumping to Rust Bullet
frame painting with rust bullet(many pics) - Page 2 - TTORA Forum
Rust bullet is an awesome product. I work in the metal finishing industry, and I can tell you that the more prep work you do, the better the results. ALWAYS. If you skimp on prep work, you might as well not even do it. If you miss one area, the rust will creep under the coatings.
Rust is caused by basic electrolysis. All it needs is air, metal and moisture. The metal is trying to revert back to its natural state. If you've got an unsealed portion (ie you missed a spot) it will begin to pit there and spread underneath your coatings. The whole point of a coating is to seal the base metal from air and moisture. Anytime you have an entry point, it will corrode its way through. Sometimes it'll be slow, sometimes it will be fast, but it will always happen. Also, having an abrasive finish on the metal will help prevent the spread. It gives the coating an anchor tooth pattern to hold on to.
Think of it like this:
smooth metal gives you a profile like this
---------------------
Roughened metal gives you a surface profile like this
^^^^^^^^^^^^^^
That anchor tooth pattern will give you a couple of benefits. For starters when you damage your coating, if you didn't prep it properly, you will get chunks coming up rather than scratches or chips. It reduces the amount of damage done by impacts and helps to localize them. It also makes the spread of rust slower. It has to corrode the unprotected portion of metal to a deeper depth before it can begin spreading.
You want your metal to have a finish of SSPC SP-10, or NACE No. 2. Basically that means that its a near white metal finish and 95% of your surface is contaminent free. You also want to leave about a 200 Ra profile. I know what the directions say, but in both our and our customers experience that typically gives the best results.
If you really are concerned with the longevity of the finish, thats the way to go. Just be sure to keep it up and repair any damage before driving on salted roads or letting it sit too long. Just remember that of you drive on salted roads or on the beach, that salt increases the conductive capability of water, meaning you stuff will corrode exponentially faster. It makes it that much more crucial that the prep work and upkeep be done properly. There is no substitution for a sand blasted finish.
More Rust bullet support and POR15 disdain
por 15 vs. rust bullet - Hot Rod Forum : Hotrodders Bulletin Board
-------
I've read all the threads linked above in detail. My conclusion is repainting with rust bullet after 150 grit sandpapering any remaining paint, removing any rust scale, and surface prep as per Rust Bullet's instruction, is the best way to go... if one wants to repaint. |
I have used por15 on my frame and rust bullet on my rock sliders/ skid plate . I like rust bullet because of less prep. Have to pour out the rust bullet to a different container. It harden fast. Also rust bullet drys faster then por15. I will some day go back and do rust bullet to my frame.
__________________
07 limited
285/70/17 | falken at3w |OME 884 with Tec Toy spacer |OME 895e with ome spacers|OME Shocks | SPC UCA| LED interior lights | 30 in Totron light bar | Rola roof rack | Gobi ladder
|
|
|
Reply With Quote
|
|
04-03-2017, 01:21 AM
|
#65
|
 |
Elite Member
|
|
Join Date: Mar 2006
Location: Monroe, NY
Posts: 5,706
Real Name: Scramble
|
|
|
Elite Member
Join Date: Mar 2006
Location: Monroe, NY
Posts: 5,706
Real Name: Scramble
|
Quote:
Originally Posted by BOSMECH
Do like I did and just move from the northeast, that is the best rust protection you can get.
|
Easier said than done when you have a great job that you love & a nice house that you had built in 2006.
__________________
____________
'99 4Runner - 2.7L 3RZ, 5 Speed, 4.56 Gears - Lifted, Locked & Loaded - 166k Original owner - http://www.toyota-4runner.org/3rd-ge...ld-thread.html
'99 Limited - E-Locker- Stock (for now) - 233k 2nd Owner http://www.toyota-4runner.org/3rd-ge...ted-build.html
|
|
|
Reply With Quote
|
|
04-19-2017, 11:00 AM
|
#66
|
 |
Member
|
|
Join Date: Feb 2012
Location: Stockbridge GA. ( formerly Kent WA. ) & ( formerly Grafton MA. )
Posts: 521
|
|
|
Member
Join Date: Feb 2012
Location: Stockbridge GA. ( formerly Kent WA. ) & ( formerly Grafton MA. )
Posts: 521
|
Quote:
Originally Posted by Scramble
Easier said than done when you have a great job that you love & a nice house that you had built in 2006.
|
That's true there are certain things I do miss back east.
__________________
2003 SR5 V6 4WD Stock (totaled) 
2005 Sport Edition SR5 V6 4WD
|
|
|
Reply With Quote
|
|
04-19-2017, 11:53 AM
|
#67
|
|
Elite Member
|
|
Join Date: Mar 2006
Location: Monroe, NY
Posts: 5,706
Real Name: Scramble
|
|
|
Elite Member
Join Date: Mar 2006
Location: Monroe, NY
Posts: 5,706
Real Name: Scramble
|
Quote:
Originally Posted by BOSMECH
That's true there are certain things I do miss back east.
|
I'd love to move out west. There's a lot more wheelin' in other parts of the country. Rust prevention is a pain in the ass & takes up too much of my time during the warm months. But at least I have one of the cleanest 3rd Gens in the NE! 
__________________
____________
'99 4Runner - 2.7L 3RZ, 5 Speed, 4.56 Gears - Lifted, Locked & Loaded - 166k Original owner - http://www.toyota-4runner.org/3rd-ge...ld-thread.html
'99 Limited - E-Locker- Stock (for now) - 233k 2nd Owner http://www.toyota-4runner.org/3rd-ge...ted-build.html
|
|
|
Reply With Quote
|
|
06-28-2017, 06:03 PM
|
#68
|
 |
Member
|
|
Join Date: Jun 2017
Location: North Carolina
Posts: 131
|
|
|
Member
Join Date: Jun 2017
Location: North Carolina
Posts: 131
|

Quote:
Originally Posted by redbull9944
Just wanted to share a product that has amazed me.
A little background. I live in Pennsylvania and have owned 3 4runners. It has not been easy to keep the underside clean and free of rust. I bought all of them used, and thoroughly inspected each of them before purchase. My newest 4Runner, a 2006 Sport that I just picked up 3 weeks ago, suffers from surface rust on the undercarriage, just like nearly every other vehicle on the road where I live. I'm a person who loves his vehicles and takes care of them, so I needed to find a solution for the rust.
After days of research, and learning from my past mistakes (undercoating), I settled on this product: Amazon.com: Permatex 81773 Rust Treatment , 16 oz.: Automotive
So far I have most of my rear axle done, and have just started on my gas tank skid plate and rear frame rails. I can tell you this product is awesome. We first used it on my friend's 3rd gen, and painted over it with Rustoleum metal primer and paint. His underside looks new. About 1 bottle is all it takes to convert the entire underside of your vehicle.
All you have to do is simply wire wheel and scrape off loose rust, clean with soapy water, let dry and coat with the Permatex Rust Converter. So far I've used 3-4 coats on my rear axle.
Here are some crappy cell phone pictures that do not do the product justice:
One side of the axle done with 2 coats.
The product goes on white and foamy and dries HARD black as it converts the rust and makes it stable.
More pictures to follow... |
@ redbull9944
I didn't see where you posted those additional pictures. Interested in seeing how this stuff turns out once completed and been exposed to the air some time. Can you post some rough pics if you have any or the time to get some?
I have been going through here to see what I can do to handle the rust that I have on my 2004 T4R SE 4x4. I know there are tons of options out there and lots of opinions. I am in the information gathering mode and will comply it all and then make my decision based of an educated guess.
I would like to make a thread on the process which i probably will do but for now, the help and knowledge of redbull9944, Inv4drZm, willbgood, and others I am hopeful that I will figure it out in time before mid-October (just a deadline for myself before the fall/winter/holidays hit)
Redbull9944 thanks for the post and the pics in advance!
|
|
|
Reply With Quote
|
|
06-28-2017, 06:26 PM
|
#69
|
|
Junior Member
|
|
Join Date: Dec 2016
Location: Hurricane, WV
Posts: 2
|
|
|
Junior Member
Join Date: Dec 2016
Location: Hurricane, WV
Posts: 2
|
How do you apply it?
Sent from my SAMSUNG-SM-G930A using Tapatalk
|
|
|
Reply With Quote
|
|
06-29-2017, 09:33 AM
|
#70
|
 |
Member
|
|
Join Date: Jun 2017
Location: Missouri
Posts: 87
|
|
|
Member
Join Date: Jun 2017
Location: Missouri
Posts: 87
|
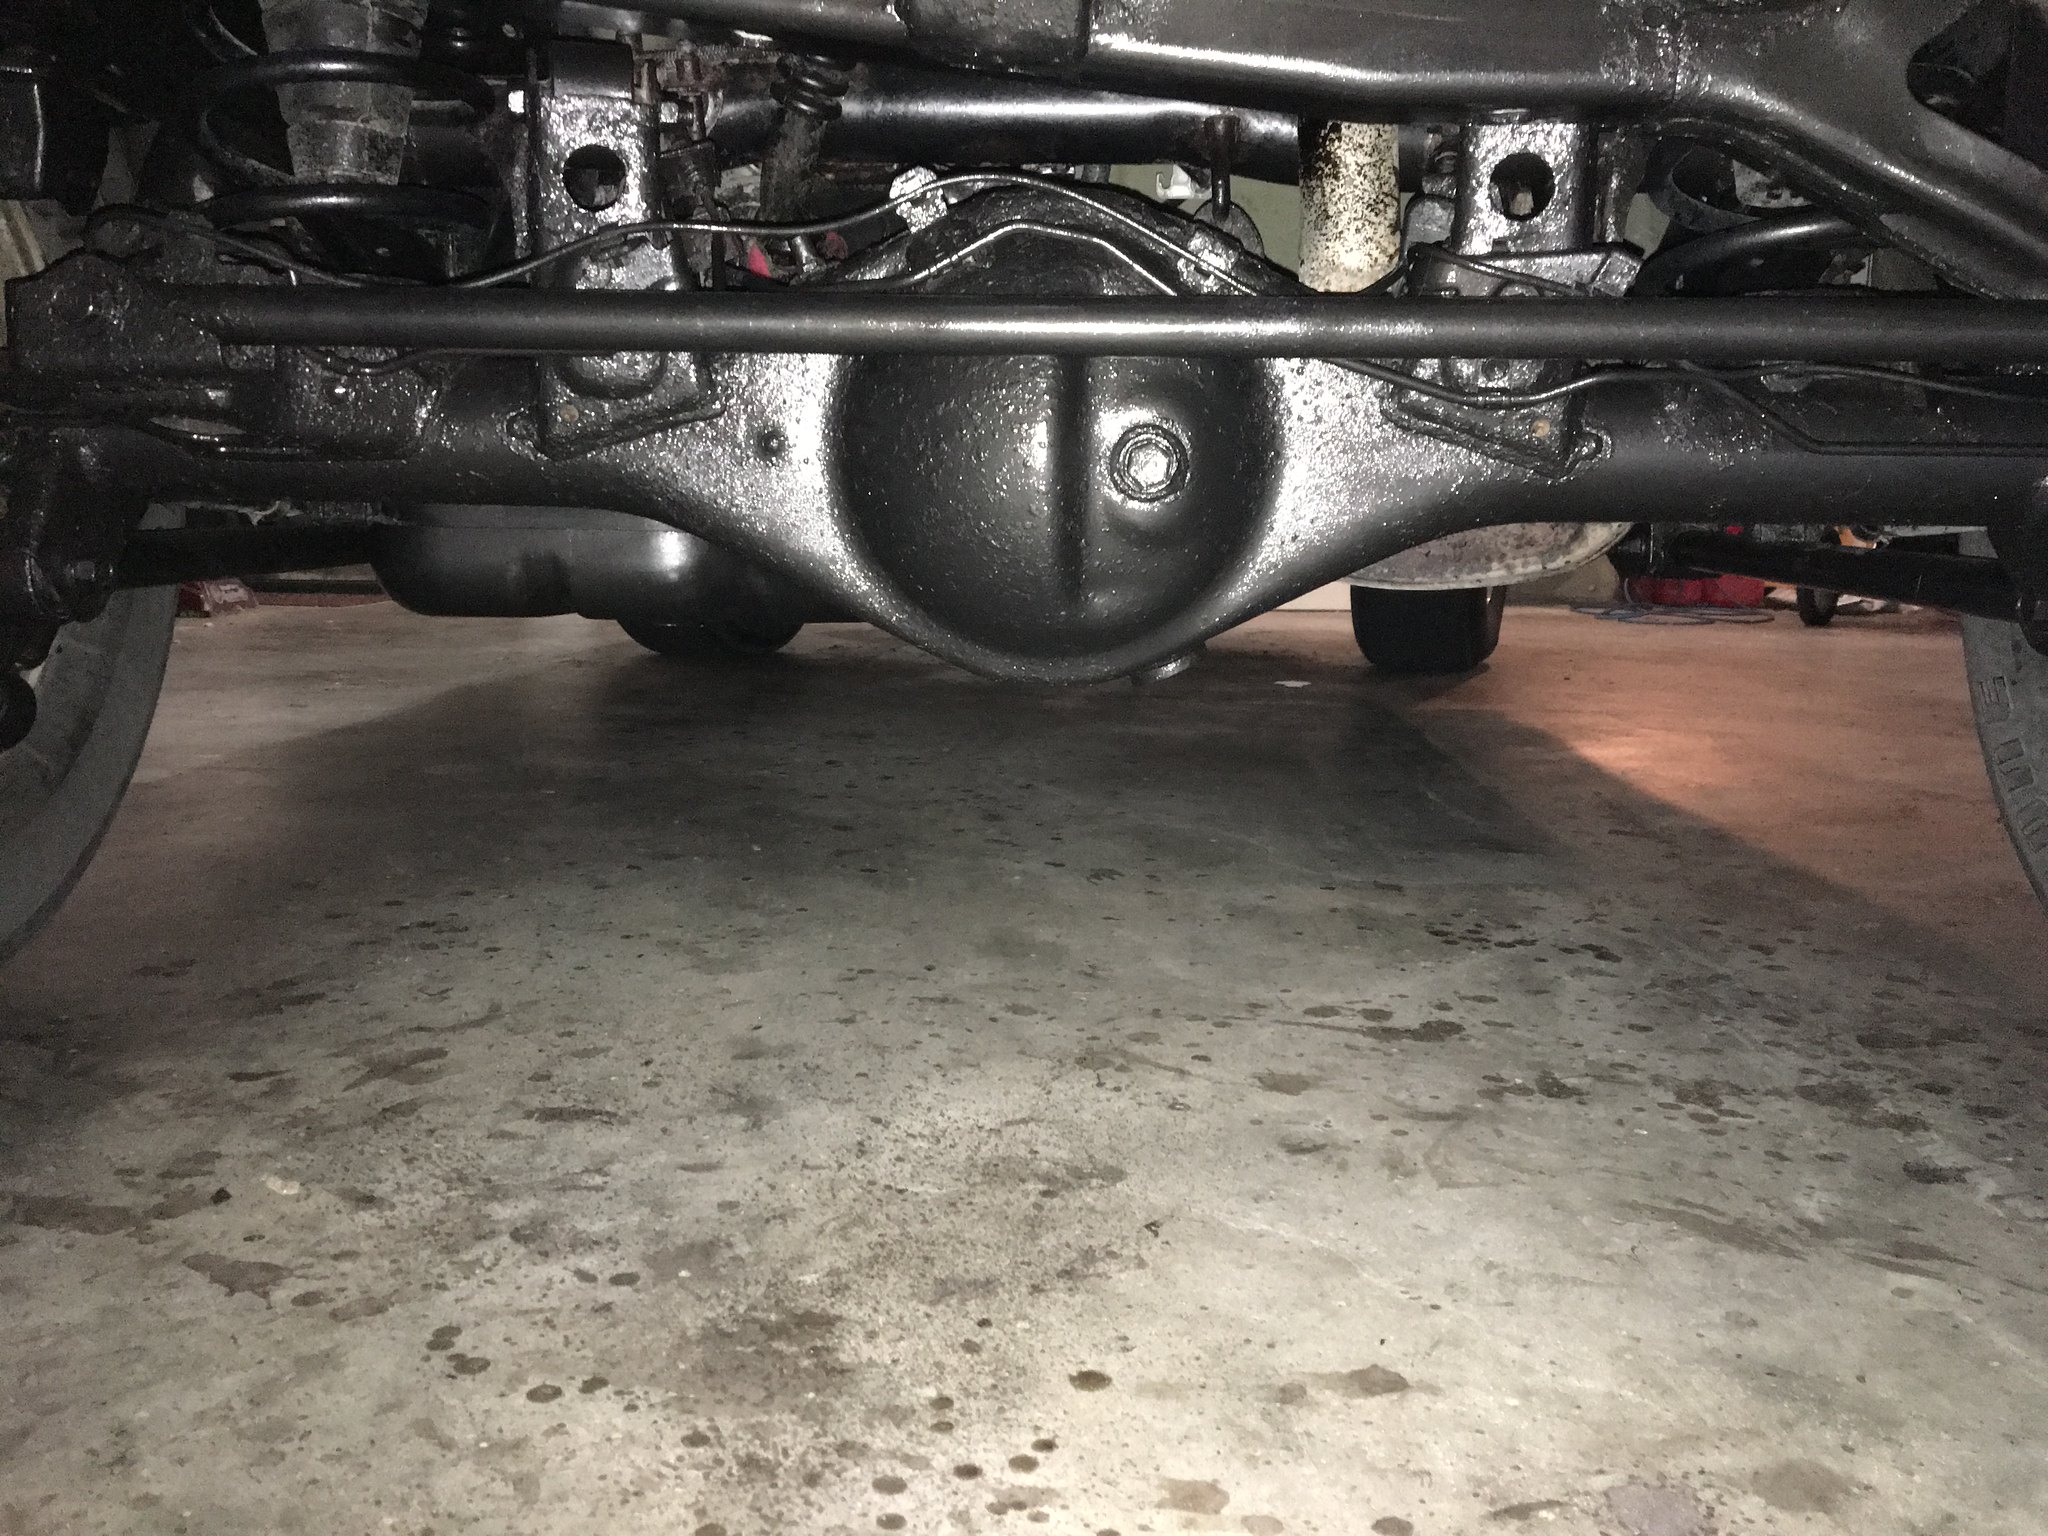
I recently purchased a 2004 SR5 4WD from an individual in the Midwest. Upon inspection I noted a good bit of surface rust on the underside, but no structural issues. Looking over this board for resources (as well as others) I opted to do the following:
1. Remove any loose flakes and surface rust using a wire brush, drill brush etc.
2. Apply a rust converter. There are lots of products out there but I opted to use Corroseal, due to the low cost and apparent effectiveness. I bought a gallon of this stuff but I probably have a half gallon left after doing multiple coats. This stuff goes on like Elmer glue and is very easy to work with. I used a brush.
3. After the rust was converted, I considered applying POR-15 but decided the cost was a little more than I wanted to go initially, so instead I opted for an oil based rustoleum paint (numerous coats). I also decided not to use a rubberized undercoat because I would rather be able to monitor the rust overtime.
4. After the paint, I then applied Fluid Film (can get this stuff at Lowes or most auto stores) and man was this stuff greasy.
Still need to do some touchups here and there and will keep a close eye on it over the next few months but I'm happy with the results (see below).
Rust
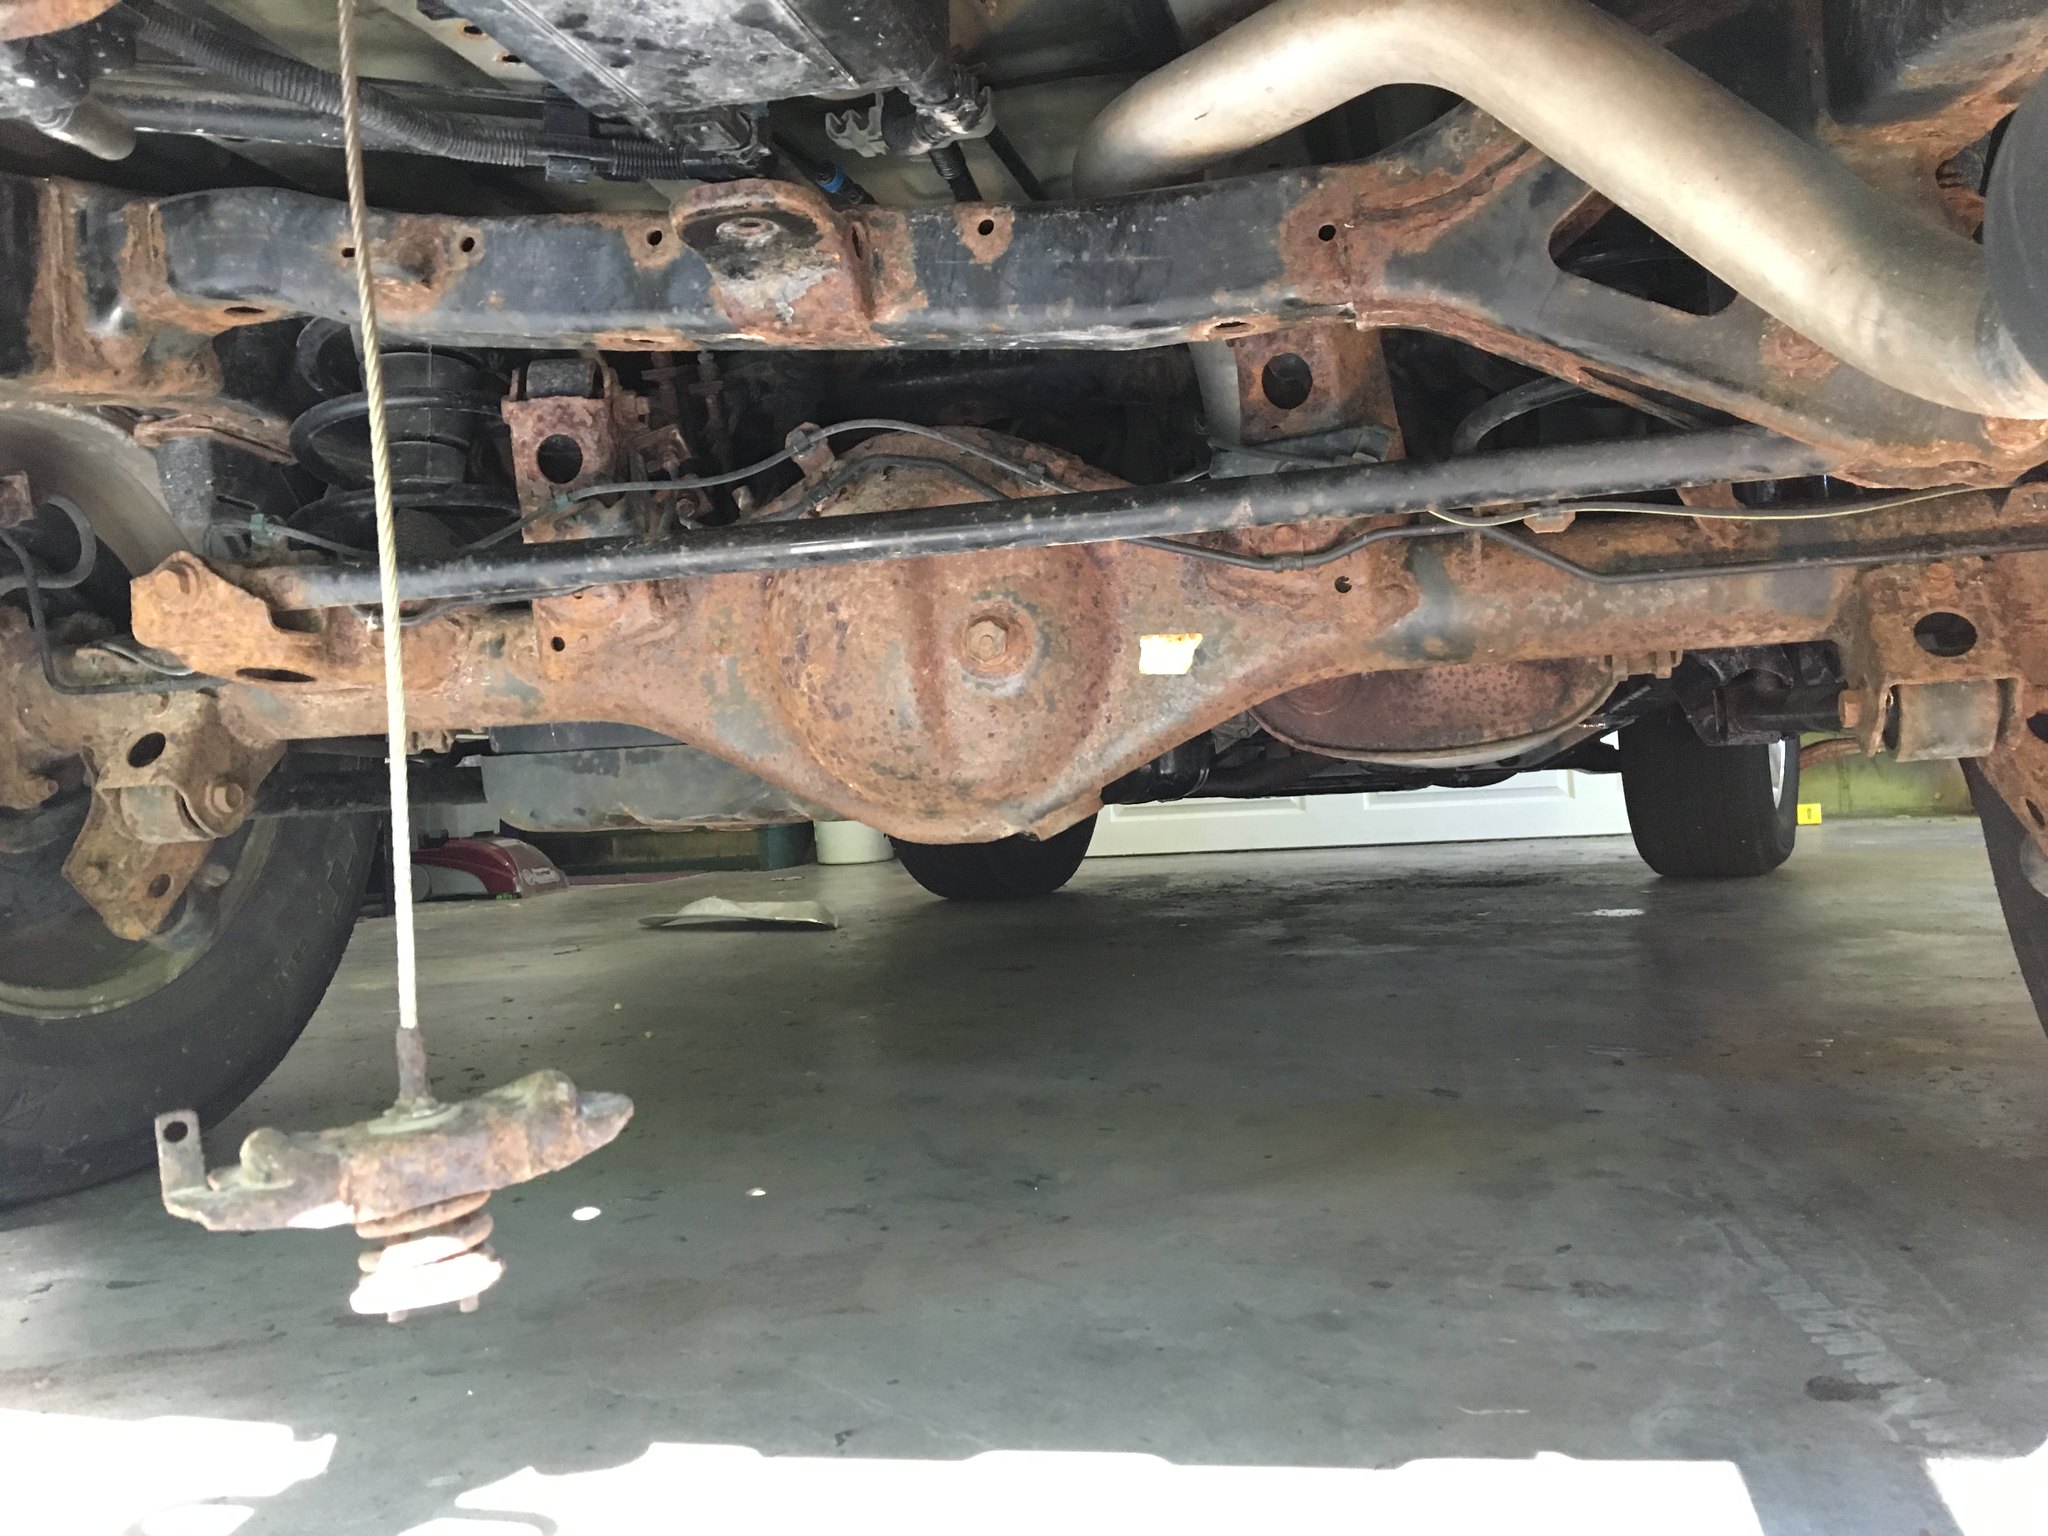 After 1 coat of Corroseal (ultimately did 2-3 coats where necessary)
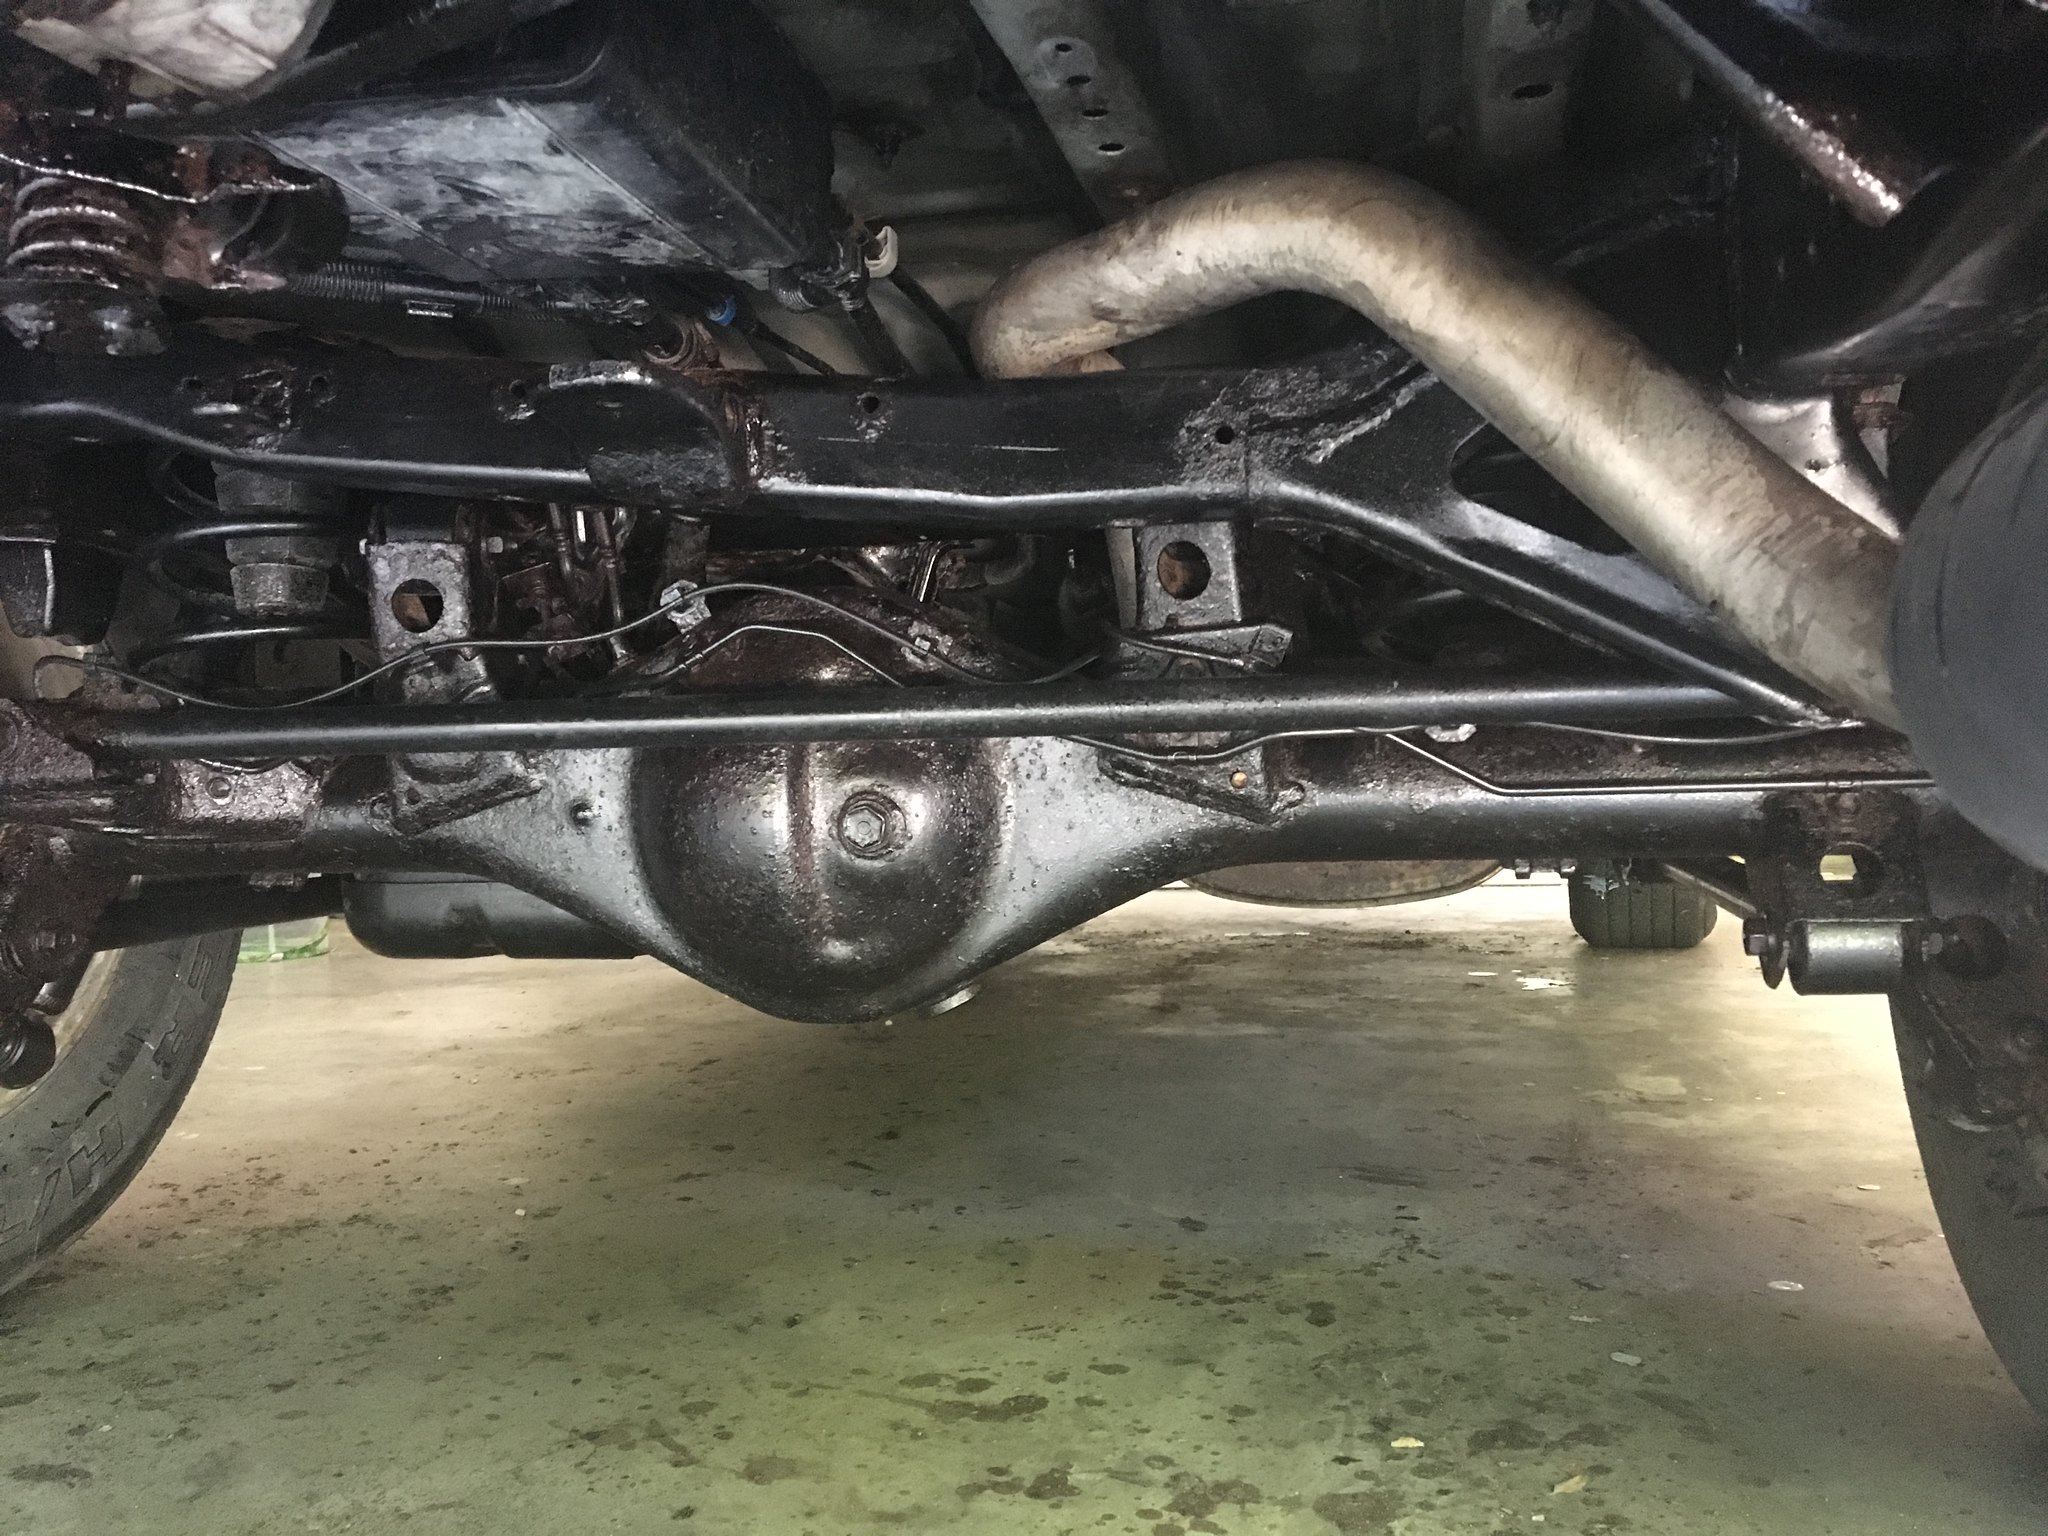 After paint and Fluid Film added

|
|
|
Reply With Quote
|
|
11-08-2018, 03:03 PM
|
#71
|
|
Junior Member
|
|
Join Date: Nov 2018
Location: New Hampshire, USA
Posts: 7
|
|
|
Junior Member
Join Date: Nov 2018
Location: New Hampshire, USA
Posts: 7
|
Thanks for the detailed instructions. This is now on my to-do list.
|
|
|
Reply With Quote
|
|
11-08-2018, 06:19 PM
|
#72
|
 |
Member
|
|
Join Date: Jun 2017
Location: Columbus, OH
Posts: 357
Real Name: Blake
|
|
|
Member
Join Date: Jun 2017
Location: Columbus, OH
Posts: 357
Real Name: Blake
|
Quote:
Originally Posted by OliviasDad
1. Remove any loose flakes and surface rust using a wire brush, drill brush etc.
2. Apply a rust converter. There are lots of products out there but I opted to use Corroseal, due to the low cost and apparent effectiveness. I bought a gallon of this stuff but I probably have a half gallon left after doing multiple coats. This stuff goes on like Elmer glue and is very easy to work with. I used a brush.
3. After the rust was converted, I considered applying POR-15 but decided the cost was a little more than I wanted to go initially, so instead I opted for an oil based rustoleum paint (numerous coats). I also decided not to use a rubberized undercoat because I would rather be able to monitor the rust overtime.
4. After the paint, I then applied Fluid Film (can get this stuff at Lowes or most auto stores) and man was this stuff greasy. |
Well, this is something I've ignored long enough (I know, SHAME!). Luckily after it being a decade in the NE, and now in the south, it seems like its mostly surface rust (bar a few worse spots, I'll need to think of how to address, but not on the frame).
@ OliviasDad
(lol funny handle) gave a great list that I was looking for. Would anyone add anything to it or change it? I'm thinking using something like PB Blaster to prime the rusty areas for the Wire wheel/brush to remove it?
The Before and After pics definitely puts me at ease doing this as it seems similar to mine.
Also, is everyone doing this on their backs with the rig up on stands? Or would it be worth it to see if I can rent a bay in a shop for a day to lift this up.
EDIT: Anything to avoid when painting (besides exhaust)? I'm normally a "mask-off-perfectionist" when painting anything, so It seems weird to just spray and not worry about getting the underbody behind the frame, etc..
TIA
__________________
22 SR5 Prem 4X4- Magnetic Gray
07 V8 Limited 4X4 - Natural White (SOLD)--> "Moby Dick" Build Thread
Last edited by Flash Runner; 11-08-2018 at 06:25 PM.
|
|
|
Reply With Quote
|
|
11-09-2018, 05:27 PM
|
#73
|
|
Member
|
|
Join Date: Jun 2017
Location: Missouri
Posts: 87
|
|
|
Member
Join Date: Jun 2017
Location: Missouri
Posts: 87
|
Quote:
Originally Posted by Flash Runner
Well, this is something I've ignored long enough (I know, SHAME!). Luckily after it being a decade in the NE, and now in the south, it seems like its mostly surface rust (bar a few worse spots, I'll need to think of how to address, but not on the frame).
@ OliviasDad
(lol funny handle) gave a great list that I was looking for. Would anyone add anything to it or change it? I'm thinking using something like PB Blaster to prime the rusty areas for the Wire wheel/brush to remove it?
The Before and After pics definitely puts me at ease doing this as it seems similar to mine.
Also, is everyone doing this on their backs with the rig up on stands? Or would it be worth it to see if I can rent a bay in a shop for a day to lift this up.
EDIT: Anything to avoid when painting (besides exhaust)? I'm normally a "mask-off-perfectionist" when painting anything, so It seems weird to just spray and not worry about getting the underbody behind the frame, etc..
TIA |
Thanks. I've been pleasantly surprised how well its held up over a years time. I get under it for inspection every couple of months and touch up places that need it. I also apply Fluid Film every couple of months and I think this is what helps the most, I'm a believer in FF. Good luck!
|
|
|
Reply With Quote
|
|
11-09-2018, 07:53 PM
|
#74
|
|
Member
|
|
Join Date: Jan 2005
Location: The Woodlands, TX
Age: 40
Posts: 891
|
|
|
Member
Join Date: Jan 2005
Location: The Woodlands, TX
Age: 40
Posts: 891
|
Quote:
Originally Posted by OliviasDad
I recently purchased a 2004 SR5 4WD from an individual in the Midwest. Upon inspection I noted a good bit of surface rust on the underside, but no structural issues. Looking over this board for resources (as well as others) I opted to do the following:
2. Apply a rust converter. There are lots of products out there but I opted to use Corroseal, due to the low cost and apparent effectiveness. I bought a gallon of this stuff but I probably have a half gallon left after doing multiple coats. This stuff goes on like Elmer glue and is very easy to work with. I used a brush.
Still need to do some touchups here and there and will keep a close eye on it over the next few months but I'm happy with the results (see below).
Rust
|
Looks exactly like how mine looks right now. Were you able to get into all the nooks and crannies or did you just hit whatever you could that was visible?
__________________
1999 2.7 5MT - SOLD // 2007 V8 4WD - Gone
2011 FJ 4WD - to new beginnings

// 4G V8 // 3G 2.7 5MT // Model 3 // IS300 5MT // FD RX7 //
|
|
|
Reply With Quote
|
|
11-09-2018, 10:50 PM
|
#75
|
|
Member
|
|
Join Date: Jun 2017
Location: Missouri
Posts: 87
|
|
|
Member
Join Date: Jun 2017
Location: Missouri
Posts: 87
|
Quote:
Originally Posted by tv4184
Looks exactly like how mine looks right now. Were you able to get into all the nooks and crannies or did you just hit whatever you could that was visible?
|
Hit whatever I could with a wire brush, scraped off the loose particles. Then hit everything I could with the rust converter, FF etc. Just work in sections, a little at a time.
|
|
|
Reply With Quote
|
 Posting Rules
|
You may not post new threads
You may not post replies
You may not post attachments
You may not edit your posts
HTML code is On
|
|
|
|


 Linear Mode


