 08-08-2015, 09:18 PM
|
#1
|
 |
Member
|
|
Join Date: Jul 2015
Location: CT
Posts: 933
Real Name: Jake
|
|
|
Member
Join Date: Jul 2015
Location: CT
Posts: 933
Real Name: Jake
|
How to do the 03->06 Headlight Swap.
MAJOR IMPORTANT UPDATE 8/14/15 - It is extremely important that everyone who does this mod reads this. I suggest you read the guide and then come back here and read this important update.
So the original way I wired it was the only way I really saw how to wire it, and that is still (in my mind) the correct way to wire it. Unfortunately, the DRL flasher is only meant to handle 4 bulbs total (2 front, 2 back), @ 27 Watts each. This means that using the stock 03 DRLs, with the newly added 06 DRLs (assuming you use a standard bulb) is WAYYYYYYY over the Watt allowance. This causes the DRLs to turn off about every 3-4 minutes, cause the flasher unit will automatically cut power to prevent overheating and overvolting.
This means that if you do this mod, it is almost a requirement to use LED bulbs, as most of them have lower wattage than standard bulbs.
As most of you know, most LED bulbs will hyperflash if you just put them in without a resistor. That is what happens in my standard 03 DRLs/Turn signal when I just put the bulbs in. They seemed to not overload the DRL flasher, which is what was expected, but I do not want hyperflash. So my next thought was, what happens when the 03s are filled with LEDs and the new 06s are filled with a standard 11W bulb. Well, I put them in, and ran them for at least 15 minutes, but I think closer to 20. They did not go out AND they did not hyperflash. This means that the current draw is likely the problem,. Unfortunately I am extremely busy over the next week, so I won't be able to test my next theory, but I am pretty sure that having two LEDs per side (4 LEDs in the front total) will work. They should draw enough current together to not hyperflash since they are wired together, but it should be below the wattage allowance in the flasher.
I know
@gaterose
was having a problem similar to this, but there was never really a clear answer to this. He seemed to accidentally solve it by replacing all of them with LEDs. I think this should work, but I just want everyone to know that this is JUST A THEORY. It seems like it will work, but until I can get everything I need to test it and confirm, I will leave that warning. Hope this helps everyone.
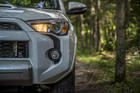
Hey everyone. So I just did the 03->06 Headlight swap on my 2003 Limited 4Runner. I couldn’t find a ton of fantastic guides or literature specifically on this, so I figured I would post a guide with my experience and what I did. I hope this helps someone in the future if they ever want to do this or if they are having issues with their installation.
Also, keep in mind I am a hardcore newbie at automotive stuff, showing how easy this really is. My install my not have been perfect in the eyes of some people, but it works for me 
Here is a sample video of how the lights work: https://vid.me/hajw
So here goes. Here is what you are going to need:
-06 Headlight Housings (I bought mine from RockAuto)
-06 Headlight Trim Pieces (Also bought from RockAuto. Go to 2006 4Runners and look under the “Body” tab)
-DRL/Parking Light Wiring Harness (Part #81125-35440) Amazon
-9006 to H11 Adapter (I bought a pair off eBay) eBay
-Wire Cutters
-Soldering Iron
-Heatshrink
-Electrical Tape
-Scissors
-Extra Wire (Probably 16-18 Gauge. Stock Wiring is very thin)
-10mm Socket/Wrench
-Flathead Screwdriver
-Needlenose pliers
-Razor Blade
-Appropriate Bulbs (Should be 9005, H11, 1156, 194A if you want to fill all four slots)
So that should be everything you need to get you started. Now we can get on with the install! So if you have an older 4runner, your headlights might start to look yellowish or fogged. If so, then do this upgrade because it looks awesome!

1. Open your hood
2. Remove the splash guard at the front of the hood. It is held on by a number of plastic retaining clips. I can almost guarantee that a number of these will break. I highly recommend replacing them with something sturdier. I found that ¼” nylon push rivets from Home Depot worked very well and fit the hole perfectly. You can also find very similar retaining clips at AutoZone.


3. Now pull the splash guard and place it off to the side.
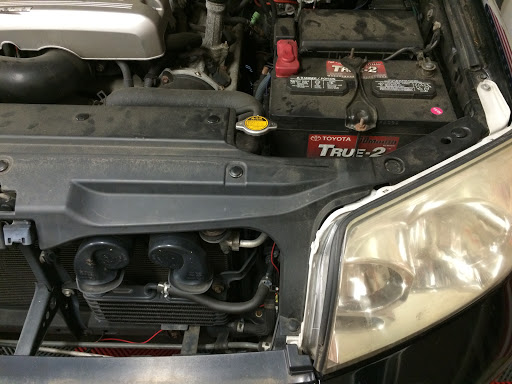
4. Next, you will see the headlight bolts. There are four in total. Two are at the top, one is on the side near the hood latch, and one is under in the front bumper in a very hard to reach place. If you have bigger tires and have trimmed your wheel well lining, then it is very easy to see and reach. If not, you may have to Houdini your way to finding it and unbolting it. I would say it is easiest to go in from the bottom.


5. Once you have the 4 bolts undone, the headlight housing should be free BUT DO NOT MOVE IT YET. There is a trim piece attached to the headlight. There is a bolt on one side of the trim piece, and a clip/tab on the other. You must REUSE this tab in the new trim piece if you want it to be flush and fit perfectly. It is very easy to snap a tab.
6. In order to make this easier, I suggest you lift up the front bumper guard thingy. In order to do this, take your flat head screwdriver and look behind this piece. There are some small rectangle openings that your screwdriver can fit in. Push your screwdriver in while lightly pulling up, and you should hear a pop and feel it move a bit. We are NOT removing this piece, only pulling it up slightly. It can take some abuse, but do not use too much force.

7. Next up, pull the housing out, making sure to disconnect all the bulbs/sockets. It will take some jimmy-ing, so be patient and do not force anything. It will eventually come out. Before you do anything else, there are two things that have to happen or you may forget and kick yourself. First, take the tab out of the current trim piece and put it in the new trim piece. Second, you should see a little yellow (color may vary) rivet holder thingy where the trim piece is bolted to the housing. Under the bolt, and use your needlenose pliers to take that piece out of the old headlights and put it in the new one. Now you can move on and won’t have to redo a bunch of shit like me
8. With the headlight out, you should be staring at some wires you just pulled out. IMPORTANT NOTE: The way I did my install may be different from the way you want to do yours. I have DRLs in my 2003. In the 2006s, they moved the DRL up to the headlights. I decided to wire it in a way so that I have DRLs in the stock 2003 bumper, and the new 2006 headlights. They also BOTH double as turn signals. Not a huge deal but I want everyone to be fully aware that this is how I did it and this is how the rest of the guide will be presented.
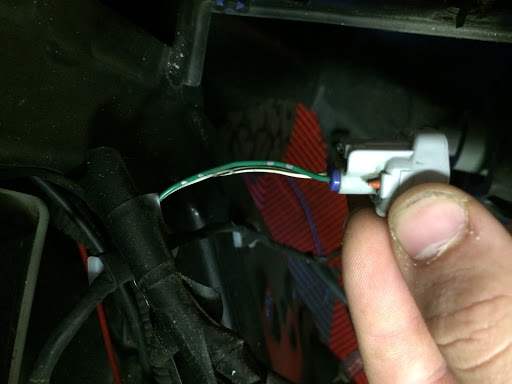
9. This is the wiring harness from above. This has the socket for the turn signal/DRL (1156A) and the parking light (194A). Undo the tape in the middle. Both of these lights share a ground, but the green wire is power for the parking light, and the red wire is power for the DRL/Turn signal. We will wire them the same way.

__________________
"Po" - '18 Super White TRDORP - Build Thread Here
"Sirius Black" - '03 Limited V8 Build (Sold) - Build Thread Here l 03->06 Headlight Swap Guide
My Photography // My Videography
Last edited by Krayziekid; 08-14-2015 at 11:07 PM.
Reason: Update
|

|
 Reply With Quote Reply With Quote
|
|
08-08-2015, 09:18 PM
|
#2
|
|
Member
|
|
Join Date: Jul 2015
Location: CT
Posts: 933
Real Name: Jake
|
|
|
Member
Join Date: Jul 2015
Location: CT
Posts: 933
Real Name: Jake
|
10. First we will tackle the parking light. Look at your stock wiring and you should see a small socket with a green and black/white wire. Green is power. Black/White is ground. We will be using both of these. You will need to cut the stock socket/connector (This means cutting both the green wire and the black/white wire). I HIGHLY recommend cutting a couple of inches down the wire so you can re-solder it if you mess up! This rule applies to every cut you make!!!!!!!
11. Next, we will do the same thing on to the new wiring harness. You will not be cutting off either of the new sockets. You will be cutting the connector with all three (Red, Green, Black/White) wires going in to it. Again, follow the above rule.
12. Now strip a bit of each wire and match the colors. Green to green. Black/White to Black/White. PUT ON SOME HEATSHRINK BEFORE YOU SOLDER THEM TOGETHER. You can heatshrink them separately or together. I decided to put them together, put insulate them separately with plenty of electrical tape and such.
13. Solder the wires together and heat the heatshrink. Your parking light is done. I highly recommend throwing a bulb in and making sure it works.
14. Next we will do the DRL/Turn signal. Look down the opening and you will see your DRL/Turn signal socket. There would be a red wire and a black/white wire. We will only be touching the red wire as the harness shares a ground.

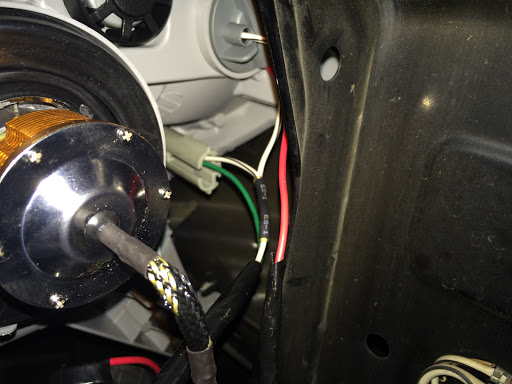
15. Grab your razor blade and very carefully open the red wire. DO NOT CUT IT. I REPEAT. DO NOT. CUT. IT. Once you expose some of the wire, strip the end of your extra wire.

16. Solder the two wires together, and then wrap them with electrical tape.
17. Now the top DRL/Turn Signal is done. Again, I highly suggest you put a bulb in and test it. Your wiring should look similar to my pictures if you have followed all of the steps.

18. Congrats! You are at the home stretch! Now all you have to do is get the light in. First and foremost, connect all of you sockets. Plug the parking light, DRL/Turn Signal, High Beam, and Low Beam (remember the adapter) in to the connectors on the car and TEST THEM before doing anything. When its all good, plug them in to the assembly and make sure they are snug.
19. With the trim piece installed, carefully wiggle the light in to place. Do not get discouraged here. It can be tough. Take your time, and slowly shimmy it in. Do not force it because things can break. Just pull the front bumper guard piece up a little, slip the trim piece into the clip, and then get everything else in. The bolt hole on the side near the latch may not line up perfectly, but it will be fine. Finger tighten the other two screws, and then put that one in.
20. Many people have said the fourth bottom bolt is optional, but I like a sense of completeness, so I put it in. Remember to snug all bolts down relatively tight, but do not over torque them.
21. Now repeat these steps for the other side and voila, you are done. The driver side can be a bit more difficult to complete since the battery is in the way, but take your time and you will get it. Once in, test them and enjoy.
Last edited by Krayziekid; 08-08-2015 at 09:21 PM.
|
|
|
Reply With Quote
|
|
08-08-2015, 09:58 PM
|
#4
|
 |
Member
|
|
Join Date: Oct 2013
Location: VA Beach
Posts: 308
Real Name: Jeremy
|
|
|
Member
Join Date: Oct 2013
Location: VA Beach
Posts: 308
Real Name: Jeremy
|
Thanks for the very informative post!
__________________
Previous: 2013 and 2007 JKU/JK....1970 FJ40 w/ Cummins 4bt.
Current:
'03 Titanium Metallic (Need to sell) SR5 4X4 V8 4Runner; DO bumper. King 2.5 Adjustable C/Os. JBA UCAs. MetalTech LT rear setup. MetalTech OPOR sliders. BFG KM2 35/70/17. Prinsuroof rack. Smitybilt X20 winch. OrangeBoxxFab PSD.
'12 Limited 4Runner; OME 3 in. lift. JBA UCAs. BFG KM2 285/70/17. Some other stuff...
|
|
|
Reply With Quote
|
|
08-09-2015, 10:28 AM
|
#6
|
 |
Member
|
|
Join Date: Sep 2012
Location: In the Mountains
Posts: 133
|
|
|
Member
Join Date: Sep 2012
Location: In the Mountains
Posts: 133
|
Nice job. I see this in my future. Thanks for making an easy guide!!!
__________________
2004 V6 4Runner 4x4 Limited
Daystar lift 2.5/1.5, FJ Springs, RCI Full Skids, CBI Hidden front Hitch, ARB on-board Air, Rear Dif Breather Mod, Swaybar Links and Swaybar Bushing Upgrade, Compustar 2-way Autostart, Window Visors, Bug Deflector, Husky Mats, 265/70R17 General Grabber AT2/Goodyear Wrangler Duratrac, Black Oak LED's...
|
|
|
Reply With Quote
|
|
08-09-2015, 10:29 AM
|
#7
|
|
Member
|
|
Join Date: Sep 2012
Location: In the Mountains
Posts: 133
|
|
|
Member
Join Date: Sep 2012
Location: In the Mountains
Posts: 133
|
did you buy your tail lights from the same source. Any catches to note with their install you would recommend?
__________________
2004 V6 4Runner 4x4 Limited
Daystar lift 2.5/1.5, FJ Springs, RCI Full Skids, CBI Hidden front Hitch, ARB on-board Air, Rear Dif Breather Mod, Swaybar Links and Swaybar Bushing Upgrade, Compustar 2-way Autostart, Window Visors, Bug Deflector, Husky Mats, 265/70R17 General Grabber AT2/Goodyear Wrangler Duratrac, Black Oak LED's...
|
|
|
Reply With Quote
|
|
08-09-2015, 12:25 PM
|
#8
|
 |
Senior Member
|
|
Join Date: Apr 2007
Location: Sacramento CA
Age: 35
Posts: 1,045
Real Name: Taylor
|
|
|
Senior Member
Join Date: Apr 2007
Location: Sacramento CA
Age: 35
Posts: 1,045
Real Name: Taylor
|
Any chance we can get some photos of the entire front of the runner with the parking lights on, possibly a video of the turn signals activated?
Awesome write up btw. About to pick up an 05 v8 sport 4wd soon and this is the first thing I'm going to do!
__________________
'05 Galactic Grey Mica sport 4.7 4WD
|
|
|
Reply With Quote
|
|
08-09-2015, 01:15 PM
|
#9
|
|
Member
|
|
Join Date: Jul 2015
Location: CT
Posts: 933
Real Name: Jake
|
|
|
Member
Join Date: Jul 2015
Location: CT
Posts: 933
Real Name: Jake
|
Quote:
Originally Posted by 4Runrrun'n

did you buy your tail lights from the same source. Any catches to note with their install you would recommend?
|
Yes I did. I bought the 2006 Taillight assemblies from RockAuto under the 2006 section. The 2006 taillight swap is SO easy. I highly recommend it because it is easy, looks fantastic, and makes early 4th gens just a bit more modern.
There are two bolts that hold on the rear tail lights. That's it. You need to pop the little side cover off in the trunk, pull all of the bulbs/sockets out, and then undo the bolts. Use a 10mm socket wrench I believe. Once you get the bolts off, it definitely takes some wiggling to get it out, but take your time and you'll get it. If I remember correctly, you reuse the sockets and nuts from your old taillights. It really is easy and hard to mess up.
Important note. The 2006 taillights have the brake lights built in, so you just need a new bulb for the turn signal (not sure what number it is but easy to find out) and a new reverse bulb (194). Sure, you could reuse your old bulbs since they should be the same, but what's the fun in that?
Edit: Also, when you pull your old taillights off, I highly recommend taking a few paper towels and windex to clean the area under it off. There is bound to be dirt and crap in there, so you might as well clean it while it's open.
__________________
"Po" - '18 Super White TRDORP - Build Thread Here
"Sirius Black" - '03 Limited V8 Build (Sold) - Build Thread Here l 03->06 Headlight Swap Guide
My Photography // My Videography
|
|
|
Reply With Quote
|
|
08-09-2015, 01:19 PM
|
#10
|
|
Member
|
|
Join Date: Jul 2015
Location: CT
Posts: 933
Real Name: Jake
|
|
|
Member
Join Date: Jul 2015
Location: CT
Posts: 933
Real Name: Jake
|
Quote:
Originally Posted by SilverBullet01
Any chance we can get some photos of the entire front of the runner with the parking lights on, possibly a video of the turn signals activated?
Awesome write up btw. About to pick up an 05 v8 sport 4wd soon and this is the first thing I'm going to do!
|
Absolutely. I am still trying to figure out where I can aim my headlights, as my driveway is about the furthest thing from flat and I don't have a ton of room to backup and aim against the garage. But I will try to get out later today and get some shots of everything. I'll show all the lights coming on, turn signals, hazards, projector cut off, etc etc etc. If I don't do it tonight, keep an eye out for it early this week, but I promise I will do it.
__________________
"Po" - '18 Super White TRDORP - Build Thread Here
"Sirius Black" - '03 Limited V8 Build (Sold) - Build Thread Here l 03->06 Headlight Swap Guide
My Photography // My Videography
|
|
|
Reply With Quote
|
|
08-09-2015, 02:29 PM
|
#11
|
|
Member
|
|
Join Date: Jul 2015
Location: CT
Posts: 933
Real Name: Jake
|
|
|
Member
Join Date: Jul 2015
Location: CT
Posts: 933
Real Name: Jake
|
Video Demonstration!
Quote:
Originally Posted by SilverBullet01
Any chance we can get some photos of the entire front of the runner with the parking lights on, possibly a video of the turn signals activated?
Awesome write up btw. About to pick up an 05 v8 sport 4wd soon and this is the first thing I'm going to do!
|
Hey dude. So I actually found some free time just now and filmed a short little clip on my camera for you. Hopefully this is what you were looking for. I just uploading to Vid.Me cause it's easy and I don't have a youtube account to put this on, so hopefully this embeds and works lol.
https://vid.me/hajw
It's pretty straight forward. Showed all of the different lighting modes with blinkers and hazards on each one. I underexposed it a bit so everything wouldn't be blown out when the high beams came on. I think it worked pretty well. It starts with the DRLs on, and then I go through the motions. Sorry about the glare when the headlights came on. Just the way the light happened to hit my camera. Let me know if you need anything else.
In case anyone is wondering, I am using TRS LEDs in the high and low beam and they look fantastic. I haven't driven in the dead of night yet, but I drove it the other day when it was fairly dark out. They through a ton of light and it looks great.
Edit: For some reason, the video isn't working as intended. Give me like 10 minutes to figure it out and I'll put a new link up.
Edit2: Now the video is working and correct. Hope this helps.
__________________
"Po" - '18 Super White TRDORP - Build Thread Here
"Sirius Black" - '03 Limited V8 Build (Sold) - Build Thread Here l 03->06 Headlight Swap Guide
My Photography // My Videography
Last edited by Krayziekid; 08-09-2015 at 02:47 PM.
|
|
|
Reply With Quote
|
|
08-09-2015, 02:49 PM
|
#12
|
 |
Senior Member
|
|
Join Date: Mar 2010
Location: Chester County, PA
Age: 48
Posts: 3,804
Real Name: Ed
|
|
|
Senior Member
Join Date: Mar 2010
Location: Chester County, PA
Age: 48
Posts: 3,804
Real Name: Ed
|
Pretty sure this is the most complete thread on how to upgrade the (factory) headlights.
Nice job!
__________________
Current: 2005 V6 Limited 4x4. SOLD: 2000 HiLux Surf SSR-G, 1997 HiLux Surf SSR-X Limited

|
|
|
Reply With Quote
|
|
08-09-2015, 02:53 PM
|
#13
|
|
Member
|
|
Join Date: Jul 2015
Location: CT
Posts: 933
Real Name: Jake
|
|
|
Member
Join Date: Jul 2015
Location: CT
Posts: 933
Real Name: Jake
|
Quote:
Originally Posted by CookieRoe
Pretty sure this is the most complete thread on how to upgrade the (factory) headlights.
Nice job!
|
Thanks dude! Yea, when I took on this project, I couldn't find a full-fledged guide or how-to on it. So I went in blind, had a little trial and error, and then I completed it. I figured other people would run in to similar problems or be scared to even try it, so I made this guide! Hopefully it helps someone in the future!
__________________
"Po" - '18 Super White TRDORP - Build Thread Here
"Sirius Black" - '03 Limited V8 Build (Sold) - Build Thread Here l 03->06 Headlight Swap Guide
My Photography // My Videography
|
|
|
Reply With Quote
|
|
08-09-2015, 02:58 PM
|
#14
|
|
Senior Member
|
|
Join Date: Mar 2010
Location: Chester County, PA
Age: 48
Posts: 3,804
Real Name: Ed
|
|
|
Senior Member
Join Date: Mar 2010
Location: Chester County, PA
Age: 48
Posts: 3,804
Real Name: Ed
|
Quote:
Originally Posted by Krayziekid
Thanks dude! Yea, when I took on this project, I couldn't find a full-fledged guide or how-to on it. So I went in blind, had a little trial and error, and then I completed it. I figured other people would run in to similar problems or be scared to even try it, so I made this guide! Hopefully it helps someone in the future!
|
I was totally going to do this until I decided to take the plunge on my retros. Realize this was a little more than 4 years ago, but yeah, no real detailed DIY on how to do this. I was confused on the electronic side of it. Thanks for contributing!
__________________
Current: 2005 V6 Limited 4x4. SOLD: 2000 HiLux Surf SSR-G, 1997 HiLux Surf SSR-X Limited
|
|
|
Reply With Quote
|
|
08-10-2015, 12:40 AM
|
#15
|
|
Senior Member
|
|
Join Date: Apr 2007
Location: Sacramento CA
Age: 35
Posts: 1,045
Real Name: Taylor
|
|
|
Senior Member
Join Date: Apr 2007
Location: Sacramento CA
Age: 35
Posts: 1,045
Real Name: Taylor
|
Quote:
Originally Posted by Krayziekid
Hey dude. So I actually found some free time just now and filmed a short little clip on my camera for you. Hopefully this is what you were looking for. I just uploading to Vid.Me cause it's easy and I don't have a youtube account to put this on, so hopefully this embeds and works lol.
https://vid.me/hajw
It's pretty straight forward. Showed all of the different lighting modes with blinkers and hazards on each one. I underexposed it a bit so everything wouldn't be blown out when the high beams came on. I think it worked pretty well. It starts with the DRLs on, and then I go through the motions. Sorry about the glare when the headlights came on. Just the way the light happened to hit my camera. Let me know if you need anything else.
In case anyone is wondering, I am using TRS LEDs in the high and low beam and they look fantastic. I haven't driven in the dead of night yet, but I drove it the other day when it was fairly dark out. They through a ton of light and it looks great.
Edit: For some reason, the video isn't working as intended. Give me like 10 minutes to figure it out and I'll put a new link up.
Edit2: Now the video is working and correct. Hope this helps. |
That looks incredible! Thinking of doing this as well as adding a bulb to the rear bumper reflectors. May bite the bullet and install the retrofit kit from the retrofit source to run hid's and so I can use the projectors for the high and low beam function. Thanks for the awesome write up!
__________________
'05 Galactic Grey Mica sport 4.7 4WD
|
|
|
Reply With Quote
|
 Posting Rules
|
You may not post new threads
You may not post replies
You may not post attachments
You may not edit your posts
HTML code is On
|
|
|
|


 Linear Mode


