 08-26-2020, 12:22 PM
|
#31
|
|
Member
|
|
Join Date: Feb 2020
Location: Irvine
Posts: 68
|
|
|
Member
Join Date: Feb 2020
Location: Irvine
Posts: 68
|
I ordered a set of LCA bushings and ball joints through O'Reilly, Moog parts for all. The total parts cost was around $150. I paid a local machine shop $150 to press out the old parts, and press in the new. I did all of the work myself. Alignment was $95, which needs to be done after this work, so tha total was $400 to do the whole job. Another option to spending hours yourself trying to press out the old junk. $150 was way worth it to me to avoid that hassle!
|

|
 Reply With Quote Reply With Quote
|
|
08-26-2020, 08:24 PM
|
#32
|
|
Member
|
|
Join Date: Jun 2020
Location: Charlotte, NC
Posts: 37
Real Name: Tristan
|
|
|
Member
Join Date: Jun 2020
Location: Charlotte, NC
Posts: 37
Real Name: Tristan
|
Thanks for the heads up, will give it a shot. Does penetrating oil or pb blaster help in this case?
__________________
2005 SR5 4WD: V8 - Doug Thorley headers, Bilstein 5100s, Slee offroad steel brake lines, Tundra brake swap, JBA upper control arms, 33s on RockTrix wheels, etc.
|
|
|
Reply With Quote
|
|
08-26-2020, 08:30 PM
|
#33
|
|
Member
|
|
Join Date: Jun 2020
Location: Charlotte, NC
Posts: 37
Real Name: Tristan
|
|
|
Member
Join Date: Jun 2020
Location: Charlotte, NC
Posts: 37
Real Name: Tristan
|
Thanks for the suggestion on the c-clamp kit. Wasn't sure which one would work as I have read there are plenty that don't fit correctly. So based on your experience sounds like I should leave the control arms in, but disconnect the tie rod and knuckle to do the ball joint first, thendrop it to replace the bushings?
__________________
2005 SR5 4WD: V8 - Doug Thorley headers, Bilstein 5100s, Slee offroad steel brake lines, Tundra brake swap, JBA upper control arms, 33s on RockTrix wheels, etc.
|
|
|
Reply With Quote
|
|
08-26-2020, 09:16 PM
|
#34
|
 |
Senior Member
|
|
Join Date: Sep 2019
Location: Lafayette, IN
Posts: 1,032
|
|
|
Senior Member
Join Date: Sep 2019
Location: Lafayette, IN
Posts: 1,032
|
Quote:
Originally Posted by Clarkson!

Thanks for the suggestion on the c-clamp kit. Wasn't sure which one would work as I have read there are plenty that don't fit correctly. So based on your experience sounds like I should leave the control arms in, but disconnect the tie rod and knuckle to do the ball joint first, thendrop it to replace the bushings?
|
You won't have to remove the tie rod to get the LCA out. Yes, it would be definitely easier to crank on the ball joint while its in the vehicle since it would be attached. If you have a big impact, you can do it outside. I did one by hand and bought the Bauer electric impact from HF for the other one lol.
From there, you can remove the LCA and do the bushings.
Also if the ball joint gets stuck in that knuckle plate, you can cut it in half and then press each part out. I had to do that on my second LCA. I need to update that thread with these pics, but it slipped my mind.
   
|
|
|
Reply With Quote
|
|
09-09-2020, 03:51 PM
|
#35
|
|
Junior Member
|
|
Join Date: Oct 2017
Location: None of your buisness, USA.
Posts: 11
|
|
|
Junior Member
Join Date: Oct 2017
Location: None of your buisness, USA.
Posts: 11
|
Quote:
Originally Posted by Clarkson!
Thanks for sharing. I need to do the same thing in the next couple of weeks. I did not see the photo you posted of how you had it setup to hammer out the ball joints - could you please upload a pic if you have one? Also, when you were pounding them out with a hammer did you need to use a bolt or some other device to drive them out or just hit directly on the back of the ball joint? Any insight you can provide is greatly appreciated.
|
Clarkson! - the first picture I posted is the setup I used. The floor jack is holding up the coil spacer. The ball joint is already 1/2 way out in that picture.
I just hammered straight onto the ball joint head. Once it got out about half way, I just used the ball peen side of the 3 lb hammer so as to not damage the LCA.
I've used the C-clamp ball joint press many times. The one I rented didn't have cups that fit the lower control arm. Another store may have it for rent, but O'Reilly didn't work for mine.
|
|
|
Reply With Quote
|
|
11-01-2020, 07:30 PM
|
#36
|
|
Member
|
|
Join Date: Jun 2020
Location: Charlotte, NC
Posts: 37
Real Name: Tristan
|
|
|
Member
Join Date: Jun 2020
Location: Charlotte, NC
Posts: 37
Real Name: Tristan
|
 Thanks!
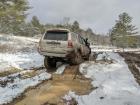
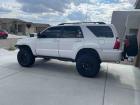
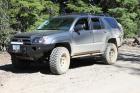
Just wanted to say thank you to everyone on here who has provided me with guidance the last few weeks. This weekend I rebuilt my lcas, upgraded my suspension and added a lift. Couldn't have done it without you all!
__________________
2005 SR5 4WD: V8 - Doug Thorley headers, Bilstein 5100s, Slee offroad steel brake lines, Tundra brake swap, JBA upper control arms, 33s on RockTrix wheels, etc.
|
|
|
Reply With Quote
|
|
11-01-2020, 08:13 PM
|
#37
|
|
Member
|
|
Join Date: Jun 2020
Location: Charlotte, NC
Posts: 37
Real Name: Tristan
|
|
|
Member
Join Date: Jun 2020
Location: Charlotte, NC
Posts: 37
Real Name: Tristan
|
 Freeze ball joints and bushings to make reinstall easy!
Forgot to mention, I took a page out of ChrisFix's book and froze my bushings and ball joints prior to pressing and was able to get them more than 80% of the way in just pushing by hand. Used the 23 piece press kit from advance auto parts to fully seat them in the lcas.
__________________
2005 SR5 4WD: V8 - Doug Thorley headers, Bilstein 5100s, Slee offroad steel brake lines, Tundra brake swap, JBA upper control arms, 33s on RockTrix wheels, etc.
|
|
|
Reply With Quote
|
|
11-01-2020, 08:41 PM
|
#38
|
|
Senior Member
|
|
Join Date: Sep 2019
Location: Lafayette, IN
Posts: 1,032
|
|
|
Senior Member
Join Date: Sep 2019
Location: Lafayette, IN
Posts: 1,032
|
Quote:
Originally Posted by Clarkson!
Forgot to mention, I took a page out of ChrisFix's book and froze my bushings and ball joints prior to pressing and was able to get them more than 80% of the way in just pushing by hand. Used the 23 piece press kit from advance auto parts to fully seat them in the lcas.
|
Thats awesome man! I do enjoy ChrisFix too! I also froze mine, here they are next to some ice cream and on top of some frozen veggies haha

|
|
|
Reply With Quote
|
|
11-01-2020, 08:46 PM
|
#39
|
 |
Senior Member
|
|
Join Date: Jan 2012
Location: Somewhere, yet nowhere
Posts: 1,739
|
|
|
Senior Member
Join Date: Jan 2012
Location: Somewhere, yet nowhere
Posts: 1,739
|
If you just want to replace the LBJs its really not too bad. I did it on my old FJC ‘07 and again last week on my 07 T4R. Leave the LCA on the truck so you can apply max torque on the C-clamp tool (get the big kit, not the small kit. It can be rented from AutoZone, advance auto parts, etc)
1) lift front end so both wheels are off ground and remove wheels
1a) remove CV from knuckle (either have assistant press brakes, or use impact
2) leave caliper and rotor on the knuckle
3) disconnect the sway bar link from knuckle
4) remove 2 bolts from LBJ to knuckle
5) swing the knuckle forward and secure out of the way, careful not to stretch brake hose and ABS cord
6) remove LBJ stud nut, pickle fork the stud out of mount
7) the knuckle is still held on by tie rod and UBJ. Remove LBJ C-clip and spray with penetrating oil. The LBJ will not want to budge.
8) setup C-clamp press with screw pointing upward.
8a) using. 1/2” breaker bar and pipe at least 2’ long, start compressing the LBJ out. You will get to a point where it wont move and you cant tighten any more. Perfect!
8b) with a BFH 3-5# hammer, hit the head of the screw towards LBJ. The shock will break the LBJ FREE. Tighten, hammer, tighten, hammer, tighten hammer, repeat until it moves without the hammer.
9) clean up the LBJ hole and press in the new LBJ “straight.” If you have a zirk, point it towards the transmission (45* inward). I needed a 45* zirk) Grease joint until you see rubber boot start to change shape. Dont over fill.
10) start the LBJ stud on the LBJ mount with nut, dont torque yet.
11) Reinstall the CV axle back in the knuckle and spin on the 32mm nut tight, but Torque later
12) bolt the 2 LBJ mount bolts onto knuckle, torque to spec. Use red loctite
13) lift the LCA so you can Install the sway bar link into knuckle and torque to spec
14) torque the LBJ stud nut to spec
15) have assistant hold brakes tight and torque axle nut to spec (175# IIRC)
Double check your work and button it up.
I found USA made Pro forge LBJs on rockauto for $25 each. Million mile warranty. Both case and stud are forged high strength and high quality.
Start to finish 90 minutes per side and you wont have to rebuild the LCA unless you want to.
How I replaced lower ball joints on FJ | Toyota FJ Cruiser Forum

__________________
2007 4Runner Sport 4WD 4.0L 228,000 miles
The real stats on gun murders in America compared to the world (link)
Good riddance to the Clinton Crime Family--> I Voted TRUMP
hows it going for you now Trump is gone? Be careful what you ask for. You may just get it.
Last edited by Drcoffee; 11-01-2020 at 10:27 PM.
|
|
|
Reply With Quote
|
|
11-01-2020, 10:14 PM
|
#40
|
|
Member
|
|
Join Date: Jun 2020
Location: Charlotte, NC
Posts: 37
Real Name: Tristan
|
|
|
Member
Join Date: Jun 2020
Location: Charlotte, NC
Posts: 37
Real Name: Tristan
|
Quote:
Originally Posted by y=mx+b
Thats awesome man! I do enjoy ChrisFix too! I also froze mine, here they are next to some ice cream and on top of some frozen veggies haha
|
Nice! My wife's look was priceless when I told her I needed to put some car parts in the freezer 😅😅😅
__________________
2005 SR5 4WD: V8 - Doug Thorley headers, Bilstein 5100s, Slee offroad steel brake lines, Tundra brake swap, JBA upper control arms, 33s on RockTrix wheels, etc.
|
|
|
Reply With Quote
|
|
11-01-2020, 10:19 PM
|
#41
|
|
Member
|
|
Join Date: Jun 2020
Location: Charlotte, NC
Posts: 37
Real Name: Tristan
|
|
|
Member
Join Date: Jun 2020
Location: Charlotte, NC
Posts: 37
Real Name: Tristan
|
Quote:
Originally Posted by Drcoffee
If you just want to replace the LBJs its really not too bad. I did it on my old FJC 07 and again last week on my 07 T4R. Leave the LCA on the truck so you can apply max torque on the C-clamp tool (get the big kit, not the small kit. It can be rented from AutoZone, advance auto parts, etc)
1) lift front end so both wheels are off ground and remove wheels
1a) remove CV from knuckle (either have assistant press brakes, or use impact
2) leave caliper and rotor on the knuckle
3) disconnect the sway bar link from knuckle
4) remove 2 bolts from LBJ to knuckle
5) swing the knuckle forward and secure out of the way, careful not to stretch brake hose and ABS cord
6) remove LBJ stud nut, pickle fork the stud out of mount
7) the knuckle is still held on by tie rod and UBJ. Remove LBJ C-clip and spray with penetrating oil. The LBJ will not want to budge.
8) setup C-clamp press with screw pointing upward.
8a) using. 1/2 breaker bar and pipe at least 2 long, start compressing the LBJ out. You will get to a point where it wont move and you cant tighten any more. Perfect!
8b) with a BFH 3-5# hammer, hit the head of the screw towards LBJ. The shock will break the LBJ FREE. Tighten, hammer, tighten, hammer, tighten hammer, repeat until it moves without the hammer.
9) clean up the LBJ hole and press in the new LBJ straight. If you have a zirk, point it towards the transmission (45* inward). I needed a 45* zirk) Grease joint until you see rubber boot start to change shape. Dont over fill.
10) start the LBJ stud on the LBJ mount with nut, dont torque yet.
11) Reinstall the CV axle back in the knuckle and spin on the 32mm nut tight, but Torque later
12) bolt the 2 LBJ mount bolts onto knuckle, torque to spec. Use red loctite
13) lift the LCA so you can Install the sway bar link into knuckle and torque to spec
14) torque the LBJ stud nut to spec
15) have assistant hold brakes tight and toque axle nut to spec 175# IIRC)
Double check your work and button it up.
I found USA made Pro forge LBJs on rockauto for $25 each. Million mile warranty. Both case and stud are forged high strength and high quality.
Start to finish 90 minutes per side and you wont have to rebuild the LCA unless you want to.
How I replaced lower ball joints on FJ | Toyota FJ Cruiser Forum
|
How long have you been running those ball joints? I opted for Senkei three 5, but these look promising.
__________________
2005 SR5 4WD: V8 - Doug Thorley headers, Bilstein 5100s, Slee offroad steel brake lines, Tundra brake swap, JBA upper control arms, 33s on RockTrix wheels, etc.
|
|
|
Reply With Quote
|
|
11-01-2020, 10:19 PM
|
#42
|
 |
Senior Member
|
|
Join Date: May 2014
Location: Rio Rancho, New Mexico
Posts: 2,052
|
|
|
Senior Member
Join Date: May 2014
Location: Rio Rancho, New Mexico
Posts: 2,052
|
Quote:
Originally Posted by Clarkson!
|
You know, I froze mine and sanded off the crud in the LCA opening and had to press them in the whole way, could barely get them started by hand, like barely.
Sent from my SM-G986U using Tapatalk
|
|
|
Reply With Quote
|
|
11-01-2020, 10:26 PM
|
#43
|
|
Member
|
|
Join Date: Jun 2020
Location: Charlotte, NC
Posts: 37
Real Name: Tristan
|
|
|
Member
Join Date: Jun 2020
Location: Charlotte, NC
Posts: 37
Real Name: Tristan
|
Quote:
Originally Posted by montijo505
You know, I froze mine and sanded off the crud in the LCA opening and had to press them in the whole way, could barely get them started by hand, like barely.
Sent from my SM-G986U using Tapatalk
|
By
Guess I just got lucky... Think I was due though considering the fight all the old hardware put up! 😅
__________________
2005 SR5 4WD: V8 - Doug Thorley headers, Bilstein 5100s, Slee offroad steel brake lines, Tundra brake swap, JBA upper control arms, 33s on RockTrix wheels, etc.
|
|
|
Reply With Quote
|
|
11-01-2020, 10:32 PM
|
#44
|
|
Senior Member
|
|
Join Date: Jan 2012
Location: Somewhere, yet nowhere
Posts: 1,739
|
|
|
Senior Member
Join Date: Jan 2012
Location: Somewhere, yet nowhere
Posts: 1,739
|
Quote:
Originally Posted by Clarkson!
How long have you been running those ball joints? I opted for Senkei three 5, but these look promising.
|
2 weeks on the 4runner, but 2 years on the FJC before I sold it. I tried a lesser brand and it went in cockeyed and deformed. I have used pro forged tie rods on my lexus is300. Solid built parts. I dont think you can find any negative comments on the internet. I couldnt before buying them.
__________________
2007 4Runner Sport 4WD 4.0L 228,000 miles
The real stats on gun murders in America compared to the world (link)
Good riddance to the Clinton Crime Family--> I Voted TRUMP
hows it going for you now Trump is gone? Be careful what you ask for. You may just get it.
|
|
|
Reply With Quote
|
|
11-02-2020, 01:24 AM
|
#45
|
 |
Senior Member
|
|
Join Date: Dec 2012
Location: Earth, Central Oregun
Age: 53
Posts: 1,196
Real Name: Derek
|
|
|
Senior Member
Join Date: Dec 2012
Location: Earth, Central Oregun
Age: 53
Posts: 1,196
Real Name: Derek
|
Quote:
Originally Posted by Drcoffee
2 weeks on the 4runner, but 2 years on the FJC before I sold it. I tried a lesser brand and it went in cockeyed and deformed. I have used pro forged tie rods on my lexus is300. Solid built parts. I dont think you can find any negative comments on the internet. I couldnt before buying them.
|
Just an observation.
Out of 6 BallJoints i have, 2 oem t4r, 2 of the three555 and 2 budget randos that i dont know the brands. Only 1 of the randos has that gap between the C-clip and UCA. Like your picture. Maybe its fine, it is pressed in there real good.
__________________
2004 T4R 4x4 SR5 v6
Some modifications.
Black-N-Blue
|
|
|
Reply With Quote
|
 Posting Rules
|
You may not post new threads
You may not post replies
You may not post attachments
You may not edit your posts
HTML code is On
|
|
|
|


 Linear Mode


