Home Menu

Site Navigation


User Tag List

Reply
 
Thread Tools Rating: Thread Rating: 5 votes, 5.00 average. Display Modes
Old 11-21-2016, 02:01 AM #151
rickashay's Avatar
rickashay rickashay is offline
Senior Member
 
Join Date: Dec 2010
Location: Nelson, BC
Posts: 2,552
Real Name: Addison
rickashay is a splendid one to behold rickashay is a splendid one to behold rickashay is a splendid one to behold rickashay is a splendid one to behold rickashay is a splendid one to behold rickashay is a splendid one to behold rickashay is a splendid one to behold
rickashay rickashay is offline
Senior Member
rickashay's Avatar
 
Join Date: Dec 2010
Location: Nelson, BC
Posts: 2,552
Real Name: Addison
rickashay is a splendid one to behold rickashay is a splendid one to behold rickashay is a splendid one to behold rickashay is a splendid one to behold rickashay is a splendid one to behold rickashay is a splendid one to behold rickashay is a splendid one to behold
Nice mod list incoming... I just picked up a pro dry AFE filter and some synthetic PS fluid. Samies.
rickashay is offline   Reply With QuoteReply With Quote
Old 11-25-2016, 02:54 AM #152
gaara46 gaara46 is offline
Member
 
Join Date: Oct 2015
Location: SF bay area
Posts: 119
gaara46 is on a distinguished road
gaara46 gaara46 is offline
Member
 
Join Date: Oct 2015
Location: SF bay area
Posts: 119
gaara46 is on a distinguished road
could u tell me what (and where) i need to buy to make sure my rci skidplate doesnt rub against the differential after a diff drop kit?
__________________
'06 limited 4x4
gaara46 is offline   Reply With QuoteReply With Quote
Old 11-25-2016, 03:42 PM #153
Inv4drZm's Avatar
Inv4drZm Inv4drZm is offline
Senior Member
 
Join Date: Sep 2015
Location: Kansas
Age: 28
Posts: 4,305
Inv4drZm has a reputation beyond repute Inv4drZm has a reputation beyond repute Inv4drZm has a reputation beyond repute Inv4drZm has a reputation beyond repute Inv4drZm has a reputation beyond repute Inv4drZm has a reputation beyond repute Inv4drZm has a reputation beyond repute Inv4drZm has a reputation beyond repute Inv4drZm has a reputation beyond repute Inv4drZm has a reputation beyond repute Inv4drZm has a reputation beyond repute
Inv4drZm Inv4drZm is offline
Senior Member
Inv4drZm's Avatar
 
Join Date: Sep 2015
Location: Kansas
Age: 28
Posts: 4,305
Inv4drZm has a reputation beyond repute Inv4drZm has a reputation beyond repute Inv4drZm has a reputation beyond repute Inv4drZm has a reputation beyond repute Inv4drZm has a reputation beyond repute Inv4drZm has a reputation beyond repute Inv4drZm has a reputation beyond repute Inv4drZm has a reputation beyond repute Inv4drZm has a reputation beyond repute Inv4drZm has a reputation beyond repute Inv4drZm has a reputation beyond repute
Quote:
Originally Posted by gaara46 View Post
could u tell me what (and where) i need to buy to make sure my rci skidplate doesnt rub against the differential after a diff drop kit?
Your CV angles in your other thread look completely fine, mine are quite a bit higher, even with the diff drop. (Are you sure you're at 3" lift? Maybe mine is more like 3.5"?)

The RCI skid plate should have came with 1/4" spacers for the back bolts and the Wheeler's diff drop kit I used came with 4 similiar spacers for the skid plates. I actually had to add a couple washers for each bolt to space it even further down. I couldn't have a Toyota tech take my skid plate off and expect it to go back on the same way with all those spacers stacked on there.

It has held up alright but I'm still seeking a more permanent solution. (I would take pictures but the skid plate isn't on my truck currently) I might need to machine a single solid spacer for each of the bolts .5" long. Or two solid bars .5" thick that run across the skid plate along each crossmember for more strength. Maybe machine down the diff spacers to .5" and find a compromise between skid plate spacing and CV angles.

Sorry for the paragraph, I just don't like spacing my skid plate down. I've actually though about selling my RCI skid and making my own skid plate .5" lower so at least I don't have to worry about stacking spacers.
__________________
2005 4R Sport 4WD "The last of the V8s!" - Custom TIG'd SS Dual Exhaust - King 2.5" +2 LT. - ARB Front & Rear - 37's - Dana 60 - Build Thread
2005 Tundra 2WD Regular Cab V8 - Chopped Frame - Short Bed Swap
1977 Celica Liftback - LFX Swap - Build Thread
Inv4drZm is offline   Reply With QuoteReply With Quote
Old 11-25-2016, 04:57 PM #154
t-man t-man is offline
Senior Member
 
Join Date: Nov 2013
Location: Traverse City, Michigan
Age: 43
Posts: 3,202
Real Name: Tony
t-man is on a distinguished road
t-man t-man is offline
Senior Member
 
Join Date: Nov 2013
Location: Traverse City, Michigan
Age: 43
Posts: 3,202
Real Name: Tony
t-man is on a distinguished road
Quote:
Originally Posted by Inv4drZm View Post
Your CV angles in your other thread look completely fine, mine are quite a bit higher, even with the diff drop. (Are you sure you're at 3" lift? Maybe mine is more like 3.5"?)

The RCI skid plate should have came with 1/4" spacers for the back bolts and the Wheeler's diff drop kit I used came with 4 similiar spacers for the skid plates. I actually had to add a couple washers for each bolt to space it even further down. I couldn't have a Toyota tech take my skid plate off and expect it to go back on the same way with all those spacers stacked on there.

It has held up alright but I'm still seeking a more permanent solution. (I would take pictures but the skid plate isn't on my truck currently) I might need to machine a single solid spacer for each of the bolts .5" long. Or two solid bars .5" thick that run across the skid plate along each crossmember for more strength. Maybe machine down the diff spacers to .5" and find a compromise between skid plate spacing and CV angles.

Sorry for the paragraph, I just don't like spacing my skid plate down. I've actually though about selling my RCI skid and making my own skid plate .5" lower so at least I don't have to worry about stacking spacers.
I think I'd add a bar across the bolt holes, weld it on for strength and so it isn't falling when you remove the plate for any reason. It would stronger, no parts to loosen and fall out, and generally better overall. Making one would work, but why? All that extra time and material when you already have a plate that just needs a small modification.

Sent from the drivers seat of my 05 4runner.
__________________
2005 Toyota 4Runner, Sport Edition, V8, K&N filter, Doug Thorley headers, custom dual exhaust, Bilstein 5100 W/ Tacoma TRD coils in front, FJ Cruiser coils, Daystar 1.5" spacer W/ Doetsch Tech 8000 10" shocks in rear, 2.5" 4crawler Body Lift, removed Sway-Bars, removed mud flaps, removed running boards, chopped body mount, 315/70-R17 Hankook Dynapro MT
Build thread: http://www.toyota-4runner.org/4th-ge...ld-thread.html
t-man is offline   Reply With QuoteReply With Quote
Old 11-28-2016, 01:16 AM #155
Inv4drZm's Avatar
Inv4drZm Inv4drZm is offline
Senior Member
 
Join Date: Sep 2015
Location: Kansas
Age: 28
Posts: 4,305
Inv4drZm has a reputation beyond repute Inv4drZm has a reputation beyond repute Inv4drZm has a reputation beyond repute Inv4drZm has a reputation beyond repute Inv4drZm has a reputation beyond repute Inv4drZm has a reputation beyond repute Inv4drZm has a reputation beyond repute Inv4drZm has a reputation beyond repute Inv4drZm has a reputation beyond repute Inv4drZm has a reputation beyond repute Inv4drZm has a reputation beyond repute
Inv4drZm Inv4drZm is offline
Senior Member
Inv4drZm's Avatar
 
Join Date: Sep 2015
Location: Kansas
Age: 28
Posts: 4,305
Inv4drZm has a reputation beyond repute Inv4drZm has a reputation beyond repute Inv4drZm has a reputation beyond repute Inv4drZm has a reputation beyond repute Inv4drZm has a reputation beyond repute Inv4drZm has a reputation beyond repute Inv4drZm has a reputation beyond repute Inv4drZm has a reputation beyond repute Inv4drZm has a reputation beyond repute Inv4drZm has a reputation beyond repute Inv4drZm has a reputation beyond repute
Instead of doing my Calc. 2 hw I decided to work on the 4Runner.
  • Changed out the PS fluid and swapped that leaky lower line. I only used 2qts before it started looking clean. I bought 4qts so I guess we can do the FJ with the leftovers.
  • Changed out the transfer and rear diff fluids.
  • Installed the AIP bypass kit. Full set of instructions with color pictures made it super easy. Hopefully I don't get another code from the pump again.
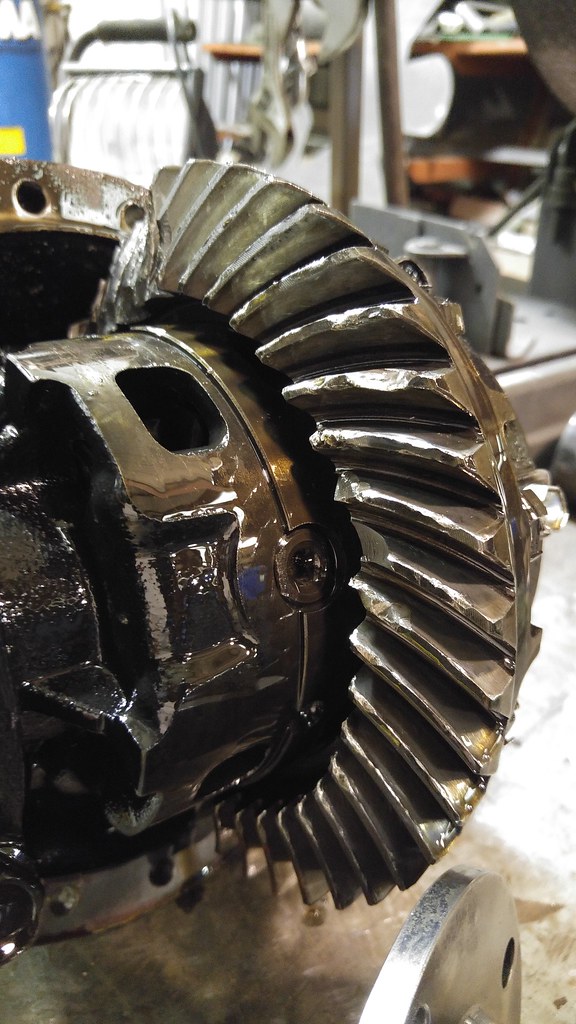
The FJ got fixed as well finally. ECGS's 3rd member came in:


The old gears look horrible. They drug the FJ halfway across the park to get it to the parking lot on a trailer. Every tooth had at least a chip in it. You can even see where it chewed up right below the ring gear. ("I think we found your problem!"):


Hooray for the internet! Without it I would have no idea how to do this stuff.
__________________
2005 4R Sport 4WD "The last of the V8s!" - Custom TIG'd SS Dual Exhaust - King 2.5" +2 LT. - ARB Front & Rear - 37's - Dana 60 - Build Thread
2005 Tundra 2WD Regular Cab V8 - Chopped Frame - Short Bed Swap
1977 Celica Liftback - LFX Swap - Build Thread

Last edited by Inv4drZm; 08-10-2017 at 09:50 PM.
Inv4drZm is offline   Reply With QuoteReply With Quote
Old 11-29-2016, 11:18 AM #156
4thgenblake's Avatar
4thgenblake 4thgenblake is offline
Member
 
Join Date: Sep 2015
Location: WEST PALM BEACH, FLORIDA
Posts: 384
Real Name: Blake Salce
4thgenblake is on a distinguished road
4thgenblake 4thgenblake is offline
Member
4thgenblake's Avatar
 
Join Date: Sep 2015
Location: WEST PALM BEACH, FLORIDA
Posts: 384
Real Name: Blake Salce
4thgenblake is on a distinguished road
Damn. Writeup for flushing/refilling power steering fluid PLEASE

Heard something that it's tied in with the power stop brakes or something.

And how about a transmission fluid flush/refill write up. I want to change all my fluids so lemme know what I should do. Don't think they have ever been swapped Inv4drZm's Build Thread
__________________
_MURDERED_OUT_'06_
4thgenblake is offline   Reply With QuoteReply With Quote
Old 11-29-2016, 11:45 AM #157
07V8's Avatar
07V8 07V8 is offline
Member
 
Join Date: Jun 2015
Location: ALASKA
Posts: 920
07V8 is on a distinguished road
07V8 07V8 is offline
Member
07V8's Avatar
 
Join Date: Jun 2015
Location: ALASKA
Posts: 920
07V8 is on a distinguished road
What PS fluid do you use?
__________________
2007 V8 Sport Edition: Definitely Not Stock

2014 LX 570: Stock
07V8 is offline   Reply With QuoteReply With Quote
Old 11-29-2016, 11:49 AM #158
Inv4drZm's Avatar
Inv4drZm Inv4drZm is offline
Senior Member
 
Join Date: Sep 2015
Location: Kansas
Age: 28
Posts: 4,305
Inv4drZm has a reputation beyond repute Inv4drZm has a reputation beyond repute Inv4drZm has a reputation beyond repute Inv4drZm has a reputation beyond repute Inv4drZm has a reputation beyond repute Inv4drZm has a reputation beyond repute Inv4drZm has a reputation beyond repute Inv4drZm has a reputation beyond repute Inv4drZm has a reputation beyond repute Inv4drZm has a reputation beyond repute Inv4drZm has a reputation beyond repute
Inv4drZm Inv4drZm is offline
Senior Member
Inv4drZm's Avatar
 
Join Date: Sep 2015
Location: Kansas
Age: 28
Posts: 4,305
Inv4drZm has a reputation beyond repute Inv4drZm has a reputation beyond repute Inv4drZm has a reputation beyond repute Inv4drZm has a reputation beyond repute Inv4drZm has a reputation beyond repute Inv4drZm has a reputation beyond repute Inv4drZm has a reputation beyond repute Inv4drZm has a reputation beyond repute Inv4drZm has a reputation beyond repute Inv4drZm has a reputation beyond repute Inv4drZm has a reputation beyond repute
Quote:
Originally Posted by 07V8 View Post
What PS fluid do you use?
Mobil 1 synthetic ATF.
__________________
2005 4R Sport 4WD "The last of the V8s!" - Custom TIG'd SS Dual Exhaust - King 2.5" +2 LT. - ARB Front & Rear - 37's - Dana 60 - Build Thread
2005 Tundra 2WD Regular Cab V8 - Chopped Frame - Short Bed Swap
1977 Celica Liftback - LFX Swap - Build Thread
Inv4drZm is offline   Reply With QuoteReply With Quote
Old 11-29-2016, 01:01 PM #159
ewewisis ewewisis is offline
Junior Member
 
Join Date: Nov 2016
Location: uk
Posts: 4
ewewisis is on a distinguished road
ewewisis ewewisis is offline
Junior Member
 
Join Date: Nov 2016
Location: uk
Posts: 4
ewewisis is on a distinguished road
Congrats on your purchase. Welcome to the 4runner family. I bought my '04 new, have had it and modded it the past 11 years,and never regretted the purchase a day yet. Have fun with your build.


ewewisis is offline   Reply With QuoteReply With Quote
Old 12-01-2016, 02:37 PM #160
Inv4drZm's Avatar
Inv4drZm Inv4drZm is offline
Senior Member
 
Join Date: Sep 2015
Location: Kansas
Age: 28
Posts: 4,305
Inv4drZm has a reputation beyond repute Inv4drZm has a reputation beyond repute Inv4drZm has a reputation beyond repute Inv4drZm has a reputation beyond repute Inv4drZm has a reputation beyond repute Inv4drZm has a reputation beyond repute Inv4drZm has a reputation beyond repute Inv4drZm has a reputation beyond repute Inv4drZm has a reputation beyond repute Inv4drZm has a reputation beyond repute Inv4drZm has a reputation beyond repute
Inv4drZm Inv4drZm is offline
Senior Member
Inv4drZm's Avatar
 
Join Date: Sep 2015
Location: Kansas
Age: 28
Posts: 4,305
Inv4drZm has a reputation beyond repute Inv4drZm has a reputation beyond repute Inv4drZm has a reputation beyond repute Inv4drZm has a reputation beyond repute Inv4drZm has a reputation beyond repute Inv4drZm has a reputation beyond repute Inv4drZm has a reputation beyond repute Inv4drZm has a reputation beyond repute Inv4drZm has a reputation beyond repute Inv4drZm has a reputation beyond repute Inv4drZm has a reputation beyond repute
Quote:
Originally Posted by 4thgenblake View Post
Damn. Writeup for flushing/refilling power steering fluid PLEASE

Heard something that it's tied in with the power stop brakes or something.

And how about a transmission fluid flush/refill write up. I want to change all my fluids so lemme know what I should do. Don't think they have ever been swapped Inv4drZm's Build Thread
It was easy except I had to replace a leaky lower hose and those barb fittings are so annoying! Maybe the hose I used was smaller.

As for writeups, I just followed the ones on the forums:

Writeup to replace PS pump, but a flush is after step 11:
https://www.4runners.com/threads/how...luid-flush.18/

3rd Gen but same process:
DIY: Power Steering Flush

1 more just in case:
Power Steering flush? - Toyota 120 Platforms Forum
__________________
2005 4R Sport 4WD "The last of the V8s!" - Custom TIG'd SS Dual Exhaust - King 2.5" +2 LT. - ARB Front & Rear - 37's - Dana 60 - Build Thread
2005 Tundra 2WD Regular Cab V8 - Chopped Frame - Short Bed Swap
1977 Celica Liftback - LFX Swap - Build Thread
Inv4drZm is offline   Reply With QuoteReply With Quote
Old 12-06-2016, 12:34 AM #161
Codys 2004 4runner Codys 2004 4runner is offline
Junior Member
 
Join Date: Dec 2016
Location: California
Age: 26
Posts: 2
Real Name: Cody
Codys 2004 4runner is on a distinguished road
Codys 2004 4runner Codys 2004 4runner is offline
Junior Member
 
Join Date: Dec 2016
Location: California
Age: 26
Posts: 2
Real Name: Cody
Codys 2004 4runner is on a distinguished road
Quote:
Originally Posted by Inv4drZm View Post
Got the spindle in and will be finalizing the design. It can hold x2 2 gallon Rotopax. Will hopefully have a buddy at work cut this out along with my skids on the plasma table once I get those designed.


Please let me know asap if you could send me exact plans for this tire holder.... i can pay... i can build it.... but if you could send me the exact plans id absolutely love it!! You can pm me or whatever... but seriously... in love with this...
Codys 2004 4runner is offline   Reply With QuoteReply With Quote
Old 12-06-2016, 12:39 AM #162
Codys 2004 4runner Codys 2004 4runner is offline
Junior Member
 
Join Date: Dec 2016
Location: California
Age: 26
Posts: 2
Real Name: Cody
Codys 2004 4runner is on a distinguished road
Codys 2004 4runner Codys 2004 4runner is offline
Junior Member
 
Join Date: Dec 2016
Location: California
Age: 26
Posts: 2
Real Name: Cody
Codys 2004 4runner is on a distinguished road
Quote:
Originally Posted by Inv4drZm View Post
Alright! The moment you've all been waiting for people! My how-to on my rear tire carrier swing-out! Time to break out your reading glasses.


Steel Materials:
  • 41" 2" square tubing for main arm.
  • 20" 2" square tubing for vertical tire support.
  • 6" 2" square tubing for wheel mount standoff.
  • 1/4" plate gussets for upright tire support.
  • Steel unthreaded spacer McMaster-Carr # 92415A159 for inside the swing arm to locate the latch pin.
  • 3 studs to mount spare tire.
  • T-Handle Push-button Pin McMaster-Carr # 93750A713

Latch system:

I used the same 2" square tubing and cut off 3 of the sides most of the way down a 3" section. I then welded on the CNC-cut top and bottom plates of the latch with 1/2" bushings from McMaster Carr. I went with a pin because I knew I would be paranoid of it swinging out while driving if I used a bolt with a welded on handle or a red-handled latch and I only wanted to use 1 hand to open it. These other two options would be easier to keep from rattling though. I had a perfect fit with my latch system; it slid in so smooth and hardly had any play. But the way it's designed (metal on metal) if there was half a millimeter of play, it would rattle when you drove it. I temporarily placed a small rubber strand which gets pinched when the swing-out locks in place and that little guy has solved my rattling problem (pictured below). If I were to redesign the latch, I would add some rubber bushings around the pin to reduce metal on metal rattling.


Hinge System:

I used the 4Xinnovations hinge and it has worked great except for the two holes they use to locate the spring-loaded pin. The first hole the pin locks into doesn't allow the tire to swing far enough away and hits the hatch when it opens. I welded in a steel spacer plate in the stainless steel plate that comes with the kit so the spring-loaded pin slides overtop the hole and into the next one. This all depends on where you weld the spring-loaded pin in relation to the spindle so don't just weld it anywhere! Unfortunately the steel I welded in of course caused some rust issues in the stainless plate.


Other Design Considerations:

The most important thing with a swing-out on our trucks- make sure when the hatch door opens it clears the tire!! Mine does by 2-3" with a 33" tire so I'm pretty sure a 35 would fit. This is a function of the length of the swing arm aka the distance the tire is mounted from the spindle and where the spindle gets welded to the frame. My spindle plate from the 4Xinnovations kit is welded hanging off the right side of my frame an inch or so to get the arm distance as long as possible shown in the below picture. You probably don't want your tire to cover up your rear tailight so it involves a bit of math. (Or guess and check)

I welded the latch to the truck with the tire mounted on the swing arm. Without the tire mounted, I have to push down on the arm to get it to latch.

You will need to relocate your license plate.

I had to remove the factory towing accessory because of how close I wanted the swing arm to the frame and the accessory has a plate that bolts to the center of the rear crossmember and sticks out. I didn't really mind losing it because I wanted as large of departure angle as possible.

I can see the rear tire in the rearview mirror bounce front to back a bit even on the interstate, but it survived a 2000mi wheeling trip to Moab and Colorado so I'm not too concerned. I think most of this comes from the torsional stress (twisting) of the swing arm and less from the vertical tire support tube. I would make sure to use some thick-walled tubing for the swing arm unlike me where I could only find like .1" wall at work.

I obviously trimmed the rear bumper with a dremel, the pictures are pretty self-explanatory. There is a gap below the grey tread plate from my body lift and if I would have welded the tire carrier a bit higher it would have covered this up. But since I trimmed the rear bumper this tread plate basically has no support underneath so I will need to add a spacer like the factory foam piece that fits under there if I plan on using the tread plate.


For more pictures- they are a couple pages back in this build thread.


Resources:

Spare tire carrier - Toyota 120 Platforms Forum

Rear Tire Carrier

t4rman's build - Page 11 - Toyota 120 Platforms Forum

chiplee's LTD '04 V8 - Page 2 - Toyota 120 Platforms Forum

What did you do with your 4runner today?

Show me your homemade bumper swing outs! - Page 3 - Expedition Portal

Now go and build your own! Don't bother me about selling one to you.

Update

This whole time I thought it was my latch that was the weak point allowing the tire to continuously rock front to back an inch on certain parts of the interstate, making me nervous watching it in the rearview mirror. As you can see I've continued to weld scrap metal on to try and stop this. I bought a destaco 334 latch clamp and welded it on this weekend to find out it really didn't help either. My end conclusion is that the main tube is simply too weak to support the tire's torsional stress; it just twists even though the two ends are solidly anchored. I could only find this thin wall 2" tube at work at the time. Wish I used 1/4 wall.

I learned a lot about making swing-outs, and this one will still hold me over until I make a full rear bumper, I know how I would improve the tire carrier for next time.

Some of my welds turned out crappy because I was in a hurry and it was breezy outside which of course blew away all the shielding gas.


Nvm.... kept reading!! Thanks!

I do have one question tho... i need my hitch for small trailors and dirt bike carriers... how could you change this to still allow a hitch? Im assuming it would just have to be out a coupple inches extra right?

Last edited by Codys 2004 4runner; 12-06-2016 at 02:25 PM. Reason: More questions
Codys 2004 4runner is offline   Reply With QuoteReply With Quote
Old 12-06-2016, 12:54 AM #163
BlackWorksInc's Avatar
BlackWorksInc BlackWorksInc is offline
Elite Member
 
Join Date: Feb 2011
Location: Bend, OR
Posts: 9,902
BlackWorksInc is a splendid one to behold BlackWorksInc is a splendid one to behold BlackWorksInc is a splendid one to behold BlackWorksInc is a splendid one to behold BlackWorksInc is a splendid one to behold BlackWorksInc is a splendid one to behold BlackWorksInc is a splendid one to behold BlackWorksInc is a splendid one to behold
BlackWorksInc BlackWorksInc is offline
Elite Member
BlackWorksInc's Avatar
 
Join Date: Feb 2011
Location: Bend, OR
Posts: 9,902
BlackWorksInc is a splendid one to behold BlackWorksInc is a splendid one to behold BlackWorksInc is a splendid one to behold BlackWorksInc is a splendid one to behold BlackWorksInc is a splendid one to behold BlackWorksInc is a splendid one to behold BlackWorksInc is a splendid one to behold BlackWorksInc is a splendid one to behold
@Inv4drZm

Do you remember the angle from edge of the frame to the crossmember? I'm finally getting around to doodling the design up and I can't for the life of me seem to figure that angle out (I'd go and take the bumper skin off and make more measurements; but at the moment I'm not supposed to do much hard work since I got a cortisone shot in my shoulder).

Was referencing this diagram and looking at my old notes from when I measured the frame a while back:


Between your measurements and mine there's an uncomfortable discrepancy that I need to account for before buying stock. (i.e. you got 4" for the height of the frame rail and I got 110mm, which is roughly 4.3")

I'm thinking I'll go with a bracket that bolts around frame ends and then use dual heim joints for the hinge (saw it online looking for hinges and I really liked the simplicity of the idea) so I can utilize a 4x2"section of tubing for the main swing out arm to provide better rigidity.
BlackWorksInc is offline   Reply With QuoteReply With Quote
Old 12-06-2016, 01:53 PM #164
Inv4drZm's Avatar
Inv4drZm Inv4drZm is offline
Senior Member
 
Join Date: Sep 2015
Location: Kansas
Age: 28
Posts: 4,305
Inv4drZm has a reputation beyond repute Inv4drZm has a reputation beyond repute Inv4drZm has a reputation beyond repute Inv4drZm has a reputation beyond repute Inv4drZm has a reputation beyond repute Inv4drZm has a reputation beyond repute Inv4drZm has a reputation beyond repute Inv4drZm has a reputation beyond repute Inv4drZm has a reputation beyond repute Inv4drZm has a reputation beyond repute Inv4drZm has a reputation beyond repute
Inv4drZm Inv4drZm is offline
Senior Member
Inv4drZm's Avatar
 
Join Date: Sep 2015
Location: Kansas
Age: 28
Posts: 4,305
Inv4drZm has a reputation beyond repute Inv4drZm has a reputation beyond repute Inv4drZm has a reputation beyond repute Inv4drZm has a reputation beyond repute Inv4drZm has a reputation beyond repute Inv4drZm has a reputation beyond repute Inv4drZm has a reputation beyond repute Inv4drZm has a reputation beyond repute Inv4drZm has a reputation beyond repute Inv4drZm has a reputation beyond repute Inv4drZm has a reputation beyond repute
Quote:
Originally Posted by BlackWorksInc View Post
@Inv4drZm

Do you remember the angle from edge of the frame to the crossmember? I'm finally getting around to doodling the design up and I can't for the life of me seem to figure that angle out (I'd go and take the bumper skin off and make more measurements; but at the moment I'm not supposed to do much hard work since I got a cortisone shot in my shoulder).

Was referencing this diagram and looking at my old notes from when I measured the frame a while back:


Between your measurements and mine there's an uncomfortable discrepancy that I need to account for before buying stock. (i.e. you got 4" for the height of the frame rail and I got 110mm, which is roughly 4.3")

I'm thinking I'll go with a bracket that bolts around frame ends and then use dual heim joints for the hinge (saw it online looking for hinges and I really liked the simplicity of the idea) so I can utilize a 4x2"section of tubing for the main swing out arm to provide better rigidity.
From my drawing, 86° or 4° for each of the angles. The 4" height discrepancy is because I measured the frame rail from the backside where the spare tire mounts. I missed the weld seam underneath the crossmember.

The larger swing arm tubing will be good. At least make the hinge and latch taller than my 2"; that should add some strength. I would like to do a revision 2.0 on mine but I'm probably going to make a full bumper anyway, so at least I've learned a thing or two (or so I feel) about the swing-out portion of the bumper.
__________________
2005 4R Sport 4WD "The last of the V8s!" - Custom TIG'd SS Dual Exhaust - King 2.5" +2 LT. - ARB Front & Rear - 37's - Dana 60 - Build Thread
2005 Tundra 2WD Regular Cab V8 - Chopped Frame - Short Bed Swap
1977 Celica Liftback - LFX Swap - Build Thread

Last edited by Inv4drZm; 08-10-2017 at 11:42 PM.
Inv4drZm is offline   Reply With QuoteReply With Quote
Old 12-06-2016, 02:03 PM #165
BlackWorksInc's Avatar
BlackWorksInc BlackWorksInc is offline
Elite Member
 
Join Date: Feb 2011
Location: Bend, OR
Posts: 9,902
BlackWorksInc is a splendid one to behold BlackWorksInc is a splendid one to behold BlackWorksInc is a splendid one to behold BlackWorksInc is a splendid one to behold BlackWorksInc is a splendid one to behold BlackWorksInc is a splendid one to behold BlackWorksInc is a splendid one to behold BlackWorksInc is a splendid one to behold
BlackWorksInc BlackWorksInc is offline
Elite Member
BlackWorksInc's Avatar
 
Join Date: Feb 2011
Location: Bend, OR
Posts: 9,902
BlackWorksInc is a splendid one to behold BlackWorksInc is a splendid one to behold BlackWorksInc is a splendid one to behold BlackWorksInc is a splendid one to behold BlackWorksInc is a splendid one to behold BlackWorksInc is a splendid one to behold BlackWorksInc is a splendid one to behold BlackWorksInc is a splendid one to behold
Quote:
Originally Posted by Inv4drZm View Post
From my drawing, 86° or 4° for each of the angles. The 4" height discrepancy is because I measured the frame rail from the backside where the spare tire mounts. I missed the weld seam underneath the crossmember.

The larger swing arm tubing will be good. At least make the hinge and latch taller than my 2"; that should add some strength. I would like to do a revision 2.0 on mine but I'm probably going to make a full bumper anyway, so at least I've learned a thing or two (or so I feel) about the swing-out portion of the bumper.
Yeah that's why I am thinking of a double heim joint, so I can just go 4" Tall like the cross member and make the swingout arm a 4x2" square stock.
BlackWorksInc is offline   Reply With QuoteReply With Quote
Reply


Posting Rules
You may not post new threads
You may not post replies
You may not post attachments
You may not edit your posts

BB code is On
Smilies are On
[IMG] code is On
HTML code is On

Forum Jump

Similar Threads
Thread Thread Starter Forum Replies Last Post
DHPham's 1997 4runner Build Thread (also 4wd swap thread) dhphamqc 3rd gen T4Rs 15 03-02-2019 03:08 PM
>BUILD THREAD< The4kbeast's 3rd-Gen 2000 T4R SR5 (Highlander Edition) 4x4 Build The4kbeast 3rd gen T4Rs 285 07-25-2018 09:37 PM
STRRAYNGE Build Thread! Or, I should say, After Build Thread?! Pic Heavy STRRAYNGE 3rd gen T4Rs 24 02-11-2016 10:46 AM
1998 T4R Build Thread/Rear bumper build 4running11191 4running11191 3rd gen T4Rs 3 09-19-2014 07:07 PM

Powered by vBadvanced CMPS v3.2.2

All times are GMT -4. The time now is 02:22 AM.

Powered by vBulletin® Version 3.8.11
Copyright ©2000 - 2024, vBulletin Solutions Inc.
Search Engine Optimisation provided by DragonByte SEO (Pro) - vBulletin Mods & Addons Copyright © 2024 DragonByte Technologies Ltd.
Feedback Buttons provided by Advanced Post Thanks / Like (Lite) - vBulletin Mods & Addons Copyright © 2024 DragonByte Technologies Ltd.
User Alert System provided by Advanced User Tagging (Lite) - vBulletin Mods & Addons Copyright © 2024 DragonByte Technologies Ltd.
***This site is an unofficial Toyota site, and is not officially endorsed, supported, authorized by or affiliated with Toyota. All company, product, or service names references in this web site are used for identification purposes only and may be trademarks of their respective owners. The Toyota name, marks, designs and logos, as well as Toyota model names, are registered trademarks of Toyota Motor Corporation***Ad Management plugin by RedTyger
 
Copyright © 2020