 08-05-2016, 07:36 AM
|
#1
|
 |
Senior Member
|
|
Join Date: Sep 2014
Location: Cherokee Co., GA
Posts: 2,754
Real Name: Russell (OB #9908)
|
|
|
Senior Member
Join Date: Sep 2014
Location: Cherokee Co., GA
Posts: 2,754
Real Name: Russell (OB #9908)
|
12 Steps to a "Deep" Satoshi Grill
My goal here is to provide enough guidance to give anyone who wants a Satoshi grill the confidence to create one, either the deep kind I prefer or the flush version, which still looks awesome and is much easier.
@ Mytoy4
was my guru, with much patient kindness, otherwise I don't think I would ever have tried this mod. Feel free to ask any questions and I'll do my best to answer or refer you to a good source.
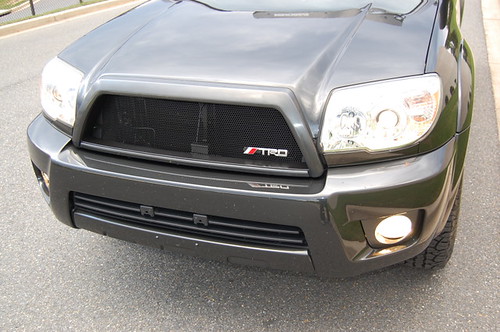
So, what's the difference between deep and flush? The deep version has the mesh at the rear so the inside "walls" of the grill are visible; the flush type has the mesh even with the front of the grill.
Deep (Truck belongs to
@intrepidagent
)
 Flush (Mytoy4's former rig)

The flush version is much easier to make but I just like the deep look better so I went for it. If you're happy with the flush type, Mytoy4 has by far the best write-up I found during my extensive research.
I created mine by mounting the 2006-09 Toyota 4Runner DIY Mesh Insert from customcargrills.com to the rear of the grill. I highly recommend this company. For full disclosure, we eventually struck a deal in which I wrote a version of this tutorial for their website in return for a refund of the cost of my mesh. I would still refer you to Matt without hesitation one way or the other because he answered many questions I had before I spent a penny at his site, promptly shipped my order in protective packaging, and has been great to deal with through the entire process.
My truck is a 2007 4Runner Sport Edition. It was a difficult project but I got great results despite having no experience with similar mods. In my opinion, patience and determination are more important to success than experience or skills with body work. This took me about 12 hours total, much of which could have been saved had I known then what I (and now you) know now. :-D
You’ll need a table or other flat area to work on that’s large enough to hold the grill as you cut, tape, etc. Lay cardboard or something similar to protect the surface.
Tools and Supplies:
• 10mm socket and ratchet (power tool optional)
• Phillips screwdrivers
• Sandpaper
• Paint, primer, and surface prep products (I’ve had good results w/ Duplicolor’s line)
• Tool(s) to cut and grind plastic (I used a Dremel w/ cutting bit & grinding wheel)
• Bondo or similar product
• Glazing & Spot Putty (critical to getting good results)
• Painter's tape
• A respirator-type mask is recommended due to the fine dust produced by sanding
And probably a couple of things I've forgotten. If so, my apologies. :-)
Choosing an Emblem
There are several options. A Google image search for 4Runner Satoshi grill should help you pick one you like. Or, leave it off – some like a plain mesh grill. I chose the old school pale yellow w/ chrome outline and picked one up for around $55 on eBay. Search Land Cruiser emblem FJ40 FJ55 BJ40 HJ45 to find one like this.
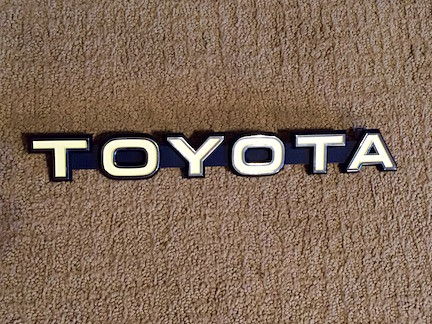
The yellow wasn't my thing so I painted the inside of the letters Testors Dark Red. It’s is a good match for Toyota & TRD red.
For painting, it’s tough to mask the chrome so I gave up on that. EDIT 11Aug21: I needed to repaint the emblem and figured out how to mask it. Get blue painter's tape wide enough to cover the lettering, rub it with your finger or a toothpick to be sure it's tight, then cut along the inside edges with an X-Acto knife. Use as little of the blade tip as possible for a neat cut. Note that overlapping doesn't work well because it's tough to cut through multiple layers cleanly.
This method also has the huge advantage of not having to remove and reinstall the emblem. In fact, having the hood half open is the perfect working height.


My brush painting didn't look good at all so I masked all around the emblem and used a can of Testor's Dark Red I spray paint I had left over from another project.

The outcome:

Whichever way you paint the lettering, you can use a wooden toothpick to gently scrape away any stray paint. Do not use a solvent to clean it off because it will strip the chrome. These pics are from the first paint job. The spray method left only a couple of tiny areas to scrape.


Last edited by Bluesky 07; 08-11-2021 at 10:50 PM.
|

|
 Reply With Quote Reply With Quote
|
|
08-05-2016, 07:47 AM
|
#2
|
|
Senior Member
|
|
Join Date: Sep 2014
Location: Cherokee Co., GA
Posts: 2,754
Real Name: Russell (OB #9908)
|
|
|
Senior Member
Join Date: Sep 2014
Location: Cherokee Co., GA
Posts: 2,754
Real Name: Russell (OB #9908)
|
The 12 Steps
I made several errors along the way and will point them out so as to save you some time and trouble.
1. Remove the grill - Open the hood and drape the (cool) engine with something to catch the bolts if you drop one. Break/slightly loosen the eight 10mm bolts holding the grill to the hood before using any kind of power method to remove them, otherwise you risk damaging the plastic receptors they screw into (my first error, repaired with Automotive Goop). Remove the bolts, pull gently to separate the grill from the hood, then rotate the grill as needed to disengage the rod from the hood release latch.
2. Disassembly – Remove the chrome horizontal front center piece (has the oval Toyota logo on it) and the lower black metal inside framework. Both are attached by Phillips-head screws. There’s also a small black plastic piece that overlaps the edge of the grill (at right in pic). Save the black metal piece frame, small plastic piece, and the mounting screws for each as all will be needed later.
 3. Tape grill
 – It’s a good idea to go ahead and mask the part of the grill that’s either chrome (SR5 & Sport models) or painted to match the body color (Limited) to protect it during the subsequent steps. Didn’t do this until later and it didn’t cost me, but I realized that was pretty much dumb luck.
Last edited by Bluesky 07; 10-15-2019 at 09:03 PM.
|
|
|
Reply With Quote
|
|
08-05-2016, 09:36 AM
|
#3
|
|
Senior Member
|
|
Join Date: Sep 2014
Location: Cherokee Co., GA
Posts: 2,754
Real Name: Russell (OB #9908)
|
|
|
Senior Member
Join Date: Sep 2014
Location: Cherokee Co., GA
Posts: 2,754
Real Name: Russell (OB #9908)
|
4. Cut plastic from inside of grill The first cut is the point of no return - after, you're committed to finishing (or finding a new grill). The goal while cutting is to come as close as possible to the side without gouging into it. Trust me, it is much easier to grind and sand away a bit of excess than to fill the gouge and sand it. I used a Dremel with a cutting bit as shown. If you go this route, I strongly suggest earplugs as it makes a very high-pitched, piercing noise that just may cleave your skull in half if you hear it long enough. :-O
The patient, front and back views:


First cut, of many:

Success. You can trash this piece, then brush off all the little specks of black plastic from your arms. :-)

Here's what you should end up with:

5. Sand the inside smooth - Each of the black spots is an attach point thats been cut away. Here you can see what I mean about not gouging those spots. I had to fill and sand several, which added an unwelcome and unnecessary layer of time and aggravation. Note gap on side where the large middle piece shown in the pic above was attached. Theres a similar gap on top. Well take care of those next.
Note the chrome isn't taped yet but definitely should be.

Last edited by Bluesky 07; 10-15-2019 at 09:14 PM.
|
|
|
Reply With Quote
|
|
08-05-2016, 09:52 AM
|
#4
|
|
Senior Member
|
|
Join Date: Sep 2014
Location: Cherokee Co., GA
Posts: 2,754
Real Name: Russell (OB #9908)
|
|
|
Senior Member
Join Date: Sep 2014
Location: Cherokee Co., GA
Posts: 2,754
Real Name: Russell (OB #9908)
|
6. Cover gaps - You need something to span the large gaps so you can apply filler. Many people use fiberglass and such, but I was determined to find an alternative, and I found two. The one I used, which didn't work too well, and the one you can use that will be much easier.
I wondered why none of the Satoshi information I found online suggested using this metal mesh backing material. Seemed perfect for the job.

Yeah, no. I was able to make it work but its too flexible to make a solid backing for the body filler. The part at the top in the pic wants to bend out as pressure is applied.

As things often go, I figured out afterwards what would work perfectly: sheet styrene plastic, which is available at hobby supply stores.

My best guess as to thickness is around .030 to .040 but youll be able to judge it for yourself. It must be solid enough for a good base surface to fill over, but flexible enough to wrap around curves. Cut it (scissors usually work) to fit the openings with a couple of inches of overlap on each side. Apply Automotive Goop according to the directions, clamp in place, and allow to dry before proceeding.
Moving on, heres what it should look like with the gaps covered and ready for filler:

7. Fill and sand - The next step is the toughest and most time-consuming (sand, sand, sand...). Use your choice of body filler to cover the backing material in the gaps and any other imperfections on the inside surface. I didnt get many pics of this because of time constraints, the mess made by sanding the filler, and the urgency of starting to lose the daylight.
This is also where inexperience caused a lot of undue frustration. One of my biggest lessons was that this is a two-product process: first the filler, then the Glazing and Spot Putty. I couldnt figure out why all my sanding, even using the finest paper, wasn't leaving a good, smooth paintable surface. Some Google time and a trip to buy the putty solved the problem. It fills the small imperfections and sands down smooth.
Heres the result, ready for (more) paint. The black areas are from painting then realizing the surface wasnt smooth enough to look right.

Remember it doesn't have to be perfect; if it looks good from 3 or 4 feet, you're good to go. Few people are going to stick their faces in there and really examine it. Which is funny for me to say because I'm usually a perfectionist about this stuff. But a colleague who noticed that trait gave me some wise advice that came in handy here: sometimes done is better than perfect. Not that it looks crappy, not at all. It's just not factory-quality smooth, which would normally be my goal.
Last edited by Bluesky 07; 10-15-2019 at 09:28 PM.
|
|
|
Reply With Quote
|
|
08-05-2016, 12:05 PM
|
#5
|
|
Senior Member
|
|
Join Date: Sep 2014
Location: Cherokee Co., GA
Posts: 2,754
Real Name: Russell (OB #9908)
|
|
|
Senior Member
Join Date: Sep 2014
Location: Cherokee Co., GA
Posts: 2,754
Real Name: Russell (OB #9908)
|
8. Paint - Once its smooth, its time to paint the inner surface. I also painted the metal bracket for rust prevention and so it looks consistent, but its not really necessary. I used DupliColor Trim and Bumper paint because Ive found it to be tough and durable in other projects.

9. Attach anchors - There are numerous ways to attach the mesh. I chose an anchor/zip tie method found during online research.

It worked very well, but a few lessons became clear:
1) You don't need anchors all the way around (explained below).
2) Thoroughly wipe down the inside of the grill frame where the anchors are placed, using mineral spirits or something similar, to get a clean surface for the adhesive.
3) Supplement the adhesive on the anchors with Automotive Goop or something similar around the edges (not underneath).
4) Let the adhesive dry thoroughly before you start zip-tying lest you pull the anchors off (see more on that below).
Again, dont put the Goop over the self-adhesive bottoms of the anchors; stick the anchors on, then go around each anchors edges and use a plastic butterknife or something similar to spread it so it goes up onto the anchor and out onto the inner grill frame maybe ¼ from the edges as shown. Then slide the zip ties through with the buckle end out.

I first put anchors all around the edges, like this. Do not do this!

Just put the top row of anchors in because the metal grill bracket can anchor the zip ties and/or mesh along most of the sides and all of the bottom.
Now go away. Read a book, watch a movie, take a hike, or best of all, time this step for bedtime and go to sleep. Whatever, but be patient and let the anchors and Goop set for at least a few hours. Otherwise, you'll yank them free when you tighten up the zip ties.
10. Fit and trim mesh - Read all of this step before starting! The Custom Car Grills pre-cut mesh needs minimal trimming and cuts easily with tin snips. First, lay it out and loosely attach it with the upper row of zip ties, keeping in mind that you'll be folding over the edges as explained below. This will affect where you put the zip ties through the top.

I trimmed it off very close along the sides and bottom edge. Do not do this. Leave the side and bottom edges as long as you can so you can fold the overlap down flat against the outer surface of the inside walls. On the bottom, definitely do that and sandwich it under the metal grill bracket like this.

The best way is to cut a slit straight in from the meshs edge at each corner, and as needed to allow for obstructions all around. This turns each edge of the mesh into one or more flaps you can fold down around the edges of the grill.
Fortunately, it still worked out for me, I just bent as much of the short edge as I could to get it under the grill frame.
11. Finish attaching mesh & reassemble - Heres what I mean about the metal bracket serving as the anchor for zip ties. Install them every few inches as needed and be sure to put one as close to each corner as possible. You may not need many, or any, here if you left the mesh "flaps" long and folded down the overlap. Same for the bottom you won't need ties if you did the foldover thing and the bracket secures the mesh.

Pull the zip ties tight enough so the mesh is solid, then stop. Overtightening anything is never good, and here it can mess up the mesh or pull anchors free.
Reinstall the bracket and the oddly-shaped little plastic piece on each side.
12.A. Add emblem & reinstall - Again there are numerous options; I chose to use some nylon spacers and small screws so I could realign it if it was off-center or remove it if it needs repainting someday. The big takeaway is measuring and remeasuring to mark dead center on the grill before attaching your emblem. Use a small piece of painter's tape or whatever else works. Matt at customcargrills.com has a very helpful video about this.
Remove the painter's tape and behold the finished product:

12.B. Install your new deep Satoshi grill, take a pic to post on the forum, then crack open a cold one and toast a tough mod well done. 

Last edited by Bluesky 07; 10-15-2019 at 10:24 PM.
|
|
|
Reply With Quote
|
|
08-05-2016, 12:36 PM
|
#6
|
|
Junior Member
|
|
Join Date: Aug 2016
Posts: 29
|
|
|
Junior Member
Join Date: Aug 2016
Posts: 29
|
Yea, umm when you gonna do mine just like this and whom should I make the check out to?!
... Great work, great writeup.
Sent from my Nexus 5X using Tapatalk
|
|
|
Reply With Quote
|
|
08-05-2016, 12:46 PM
|
#7
|
 |
Senior Member
|
|
Join Date: Jul 2011
Location: Nebraska
Age: 47
Posts: 2,546
Real Name: Name's not dude!
|
|
|
Senior Member
Join Date: Jul 2011
Location: Nebraska
Age: 47
Posts: 2,546
Real Name: Name's not dude!
|
Hey Russell! Thanks for the 'mention'! Hope you're doing well  Still love the work you did!
__________________
Terri
 My Satoshi Grille Mod
2008 Sport - TOYOTA Raptor Grill - Toytec 3" Suspension Lift with Coilovers - Bilstein 5100 - Cooper Discover STT Pro -
Fuel Beast Wheels - 20% Tint - LED Interior - Remote Start
|
|
|
Reply With Quote
|
|
08-05-2016, 02:50 PM
|
#8
|
|
Senior Member
|
|
Join Date: Sep 2014
Location: Cherokee Co., GA
Posts: 2,754
Real Name: Russell (OB #9908)
|
|
|
Senior Member
Join Date: Sep 2014
Location: Cherokee Co., GA
Posts: 2,754
Real Name: Russell (OB #9908)
|
I'm doing great, thanks, and hope you are as well. I'm so glad you replied. As soon as you did, I realized I was in such a hurry to post all the info quickly that I totally neglected to give you the credit you deserve as my muse for this mod. My apologies. I have edited the opening as follows:
"My goal here is to provide enough guidance to give anyone who wants a Satoshi grill the confidence to create one, either the deep kind I prefer or the flush version, which still looks awesome and is much easier. @Mytoy4 did this for me with much patient kindness, otherwise I don't think I would ever have tried this mod. Feel free to ask any questions and I'll do my best to answer or refer you to a good source."
That's exactly how I feel and I can't thank you enough for your support and guidance as I, someone with no relevant experience, tried to figure out how the heck to do this. 
Quote:
Originally Posted by Mytoy4

Hey Russell! Thanks for the 'mention'! Hope you're doing well Still love the work you did! |
|
|
|
Reply With Quote
|
|
08-05-2016, 04:55 PM
|
#9
|
|
Member
|
|
Join Date: Oct 2015
Location: Palm Beach Gardens
Posts: 498
|
|
|
Member
Join Date: Oct 2015
Location: Palm Beach Gardens
Posts: 498
|
Grille looks great.. great write up..
I don't see this often but if you keep the stock bumper you should looking into meshing the black piece behind your license plate.. I like the satoshi grille on trucks with the heavy duty bumpers bc its only mesh on the front. But with stock to make it look right you need to have the whole front mesh, not mesh and then plastic bumper insert IMO..
|
|
|
Reply With Quote
|
|
08-05-2016, 04:56 PM
|
#10
|
|
Member
|
|
Join Date: Mar 2016
Location: GA
Posts: 202
|
|
|
Member
Join Date: Mar 2016
Location: GA
Posts: 202
|
looks really good, but is there a mesh that has bigger holes/less mesh?
|
|
|
Reply With Quote
|
|
08-05-2016, 10:29 PM
|
#11
|
|
Senior Member
|
|
Join Date: Sep 2014
Location: Cherokee Co., GA
Posts: 2,754
Real Name: Russell (OB #9908)
|
|
|
Senior Member
Join Date: Sep 2014
Location: Cherokee Co., GA
Posts: 2,754
Real Name: Russell (OB #9908)
|
Quote:
Originally Posted by aquilon
looks really good, but is there a mesh that has bigger holes/less mesh?
|
Sure. Send Matt an email at [email protected]. I'm pretty sure they can cut whichever one you want into the '06 to '09 template shape.
@ mizak82
, I agree and plan to do both my lower grille and hood scoop screen with the same mesh. It's not high on the list but I'll post pics when they're done.
|
|
|
Reply With Quote
|
|
08-05-2016, 10:35 PM
|
#12
|
|
Senior Member
|
|
Join Date: Jul 2011
Location: Nebraska
Age: 47
Posts: 2,546
Real Name: Name's not dude!
|
|
|
Senior Member
Join Date: Jul 2011
Location: Nebraska
Age: 47
Posts: 2,546
Real Name: Name's not dude!
|
Oh goodness, what you posted was fine I was happy you decided to do it; proud of you! Always feels much better accomplishing it ourselves! Glad to hear you're doing well and you're so very welcome. I was glad to help... and chat 
Quote:
Originally Posted by Bluesky 07
I'm doing great, thanks, and hope you are as well. I'm so glad you replied. As soon as you did, I realized I was in such a hurry to post all the info quickly that I totally neglected to give you the credit you deserve as amy muse for this mod. My apologies. I have edited the opening as follows:
"My goal here is to provide enough guidance to give anyone who wants a Satoshi grill the confidence to create one, either the deep kind I prefer or the flush version, which still looks awesome and is much easier. @Mytoy4 did this for me with much patient kindness, otherwise I don't think I would ever have tried this mod. Feel free to ask any questions and I'll do my best to answer or refer you to a good source."
That's exactly how I feel and I can't thank you enough for your support and guidance as I, someone with no relevant experience, tried to figure out how the heck to do this. |
__________________
Terri
My Satoshi Grille Mod
2008 Sport - TOYOTA Raptor Grill - Toytec 3" Suspension Lift with Coilovers - Bilstein 5100 - Cooper Discover STT Pro -
Fuel Beast Wheels - 20% Tint - LED Interior - Remote Start
|
|
|
Reply With Quote
|
|
08-06-2016, 08:13 AM
|
#13
|
 |
Senior Member
|
|
Join Date: Dec 2011
Location: Glen Allen/Richmond VA
Age: 32
Posts: 2,378
|
|
|
Senior Member
Join Date: Dec 2011
Location: Glen Allen/Richmond VA
Age: 32
Posts: 2,378
|
this will help a lot. im still working on my deep style in the little time i have every few weeks and i might try to get a lot done in the next few days because of this help
__________________
Budget Build,5100's with tacoma/fj coils, CBI Offroad Front mount hitch, MY MAP LIGHT MOD How to: A/C in console
09 limited Titanium Metallic ,stock, color matched emblems, LED interior lights, winjet fog lights, LED foot well lights,HCF mod, fumoto f-103 oil valve, anytime backup-camera mod.
|
|
|
Reply With Quote
|
|
08-06-2016, 11:05 AM
|
#14
|
|
Senior Member
|
|
Join Date: Sep 2014
Location: Cherokee Co., GA
Posts: 2,754
Real Name: Russell (OB #9908)
|
|
|
Senior Member
Join Date: Sep 2014
Location: Cherokee Co., GA
Posts: 2,754
Real Name: Russell (OB #9908)
|
PM me with any questions and I'll get back to you asap.
Quote:
Originally Posted by kevinpt
this will help a lot. im still working on my deep style in the little time i have every few weeks and i might try to get a lot done in the next few days because of this help
|
|
|
|
Reply With Quote
|
|
08-12-2016, 05:41 AM
|
#15
|
|
Senior Member
|
|
Join Date: Sep 2014
Location: Cherokee Co., GA
Posts: 2,754
Real Name: Russell (OB #9908)
|
|
|
Senior Member
Join Date: Sep 2014
Location: Cherokee Co., GA
Posts: 2,754
Real Name: Russell (OB #9908)
|
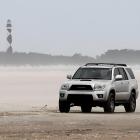
Crossed paths with a beautifully kept old FJ Cruiser on my drive home the other day. It was pretty cool seeing the original grill to which mine pays homage. This is similar to the FJ I saw:

|
|
|
Reply With Quote
|
| Thread Tools |
|
|
| Display Modes |
Rate This Thread |
 Linear Mode Linear Mode
|
|
 Posting Rules
|
You may not post new threads
You may not post replies
You may not post attachments
You may not edit your posts
HTML code is On
|
|
|
|


