 08-22-2016, 04:21 PM
|
#1
|
 |
Member
|
|
Join Date: Jul 2015
Location: SF, CA
Posts: 631
|
|
|
Member
Join Date: Jul 2015
Location: SF, CA
Posts: 631
|
Daystar 2.5/1.5 Lift Kit: Installation Questions
Hi guys, I will be tackling the Daystar 2.5/1.5 kit this weekend on my 2006 4Runner. I read the Daystar directions linked below and it seems they are making things far more complicated than they need to be by specifying spring compressors, strut disassembly steps, etc... I don't recall any of these steps being needed for the install.
http://daystarweb.com/attachments/in.../P10667-01.pdf
The rears sound straight forward, but I have some questions regarding the fronts:
1.) I can either disconnect the upper ball-joint from the spindle with a few hard whacks of a mini-sledge hammer OR I can disconnect the lower ball joint by unbolting it from the control arm. Does anyone have a recommendation that will make the procedure as easy as possible? The thread linked here argues that it's the lower balljoint that should be disconnnected: Leveled her this weekend
Also, if I disconnect the lower ball joint from the control arm, will a ball joint separator be needed, like the top?
2.) Does the lower engine scrape plate need to be removed?
3.) Does the sway bar need to be removed?
Thanks guys! Any recommendations are appreciated given that this will be my first time attempting to install this kit. And after that, it's getting All Terrain tires 32", woot!
Luke
__________________
2006 4-Runner XSP V6
SCS Ray10 17x8.5 (Matte Black)
Falken ATW3 Wildpeak 265/70/17
Daystar 2.5/1.5
Last edited by luke87gt; 08-22-2016 at 04:28 PM.
|

|
 Reply With Quote Reply With Quote
|
|
08-22-2016, 04:30 PM
|
#2
|
 |
Elite Member
|
|
Join Date: May 2013
Location: Los Angeles
Posts: 5,154
Real Name: C8H18 Mike
|
|
|
Elite Member
Join Date: May 2013
Location: Los Angeles
Posts: 5,154
Real Name: C8H18 Mike
|
Quote:
Originally Posted by luke87gt

Hi guys, I will be tackling the Daystar 2.5/1.5 kit this weekend on my 2006 4Runner. I read the Daystar directions linked below and it seems they are making things far more complicated than they need to be by specifying spring compressors, strut disassembly steps, etc... I don't recall any of these steps being needed for the install.
http://daystarweb.com/attachments/in.../P10667-01.pdf
The rears sound straight forward, but I have some questions regarding the fronts:
1.) I can either disconnect the upper ball-joint from the spindle with a few hard whacks of a mini-sledge hammer OR I can disconnect the lower ball joint by unbolting it from the control arm. Does anyone have a recommendation that will make the procedure as easy as possible? The thread linked here argues that it's the lower balljoint that should be disconnnected: Leveled her this weekend
2.) Does the lower engine scrape plate need to be removed?
3.) Does the sway bar need to be removed?
Thanks guys! Any recommendations are appreciated given that this will be my first time attempting to install this kit. And after that, it's getting All Terrain tires 32", woot!
Luke |
I installed the rear daystar kit and removed them, opting for longer springs and shocks and a longer rear brake hose. I wanted to restore stance due to sagging rear springs and this didn't do it well. Yes, she sway bar needs to be disconnected for the install and SB end links should be replaced with longer ones too, but I haven't done that yet.
I used the OME aluminum spacers up front vs. the rubber ones, because as hard as the rubber may be now, once it sags your front suspension goes soft.
I don't recall which ball joint I removed but a spring compressor was definitely needed. The removal of the entire disc, brake, spindle is involved so make sure you have plenty of time to do this and an experienced helper helps a lot.
Did this on my '99 so I can't comment on your year-model-specific questions.
Good luck!
__________________
.
1999 Toyota 4Runner SR5 Sport 4WD, V6 5-Speed e-Locker-> 4WD 4runner Journal Thread
1999 Toyota 4Runner SR5 Un-Sported 2WD, V6 Auto -> 2WD 4runner Journal Thread
1959 Chevy 3100 1/2 Ton Pickup EVERYTHING done 'cept paint and body
.
|
|
|
Reply With Quote
|
|
08-22-2016, 05:57 PM
|
#3
|
|
Senior Member
|
|
Join Date: Dec 2015
Location: Colorado
Posts: 1,181
Real Name: Ron
|
|
|
Senior Member
Join Date: Dec 2015
Location: Colorado
Posts: 1,181
Real Name: Ron
|
If it's the top hat spacer from Daystar (and I assume it is), then the previous poster is in error re: the '06 installation. He may have been referencing a preload spacer, which does require spring compressors. The top hat spacer does not.
I just did my '06 and it was pretty straight forward. There is no need to touch the brakes, tie rod ends (except to fix the toe-in after you're done - it will change quite a bit), or either ball joint. I don't think the skid plate absolutely needs to be removed, but it will be easier to get the sway bar out of the way if you do remove the skid plate.
I did not remove the upper ball joint, as Daystar suggests. Rather, I removed the two lower bolts holding the LCA to the lower spindle, so it would drop away from the spindle and give room for the shock to drop. I also removed the sway bar completely to get it out of the way.
Then you can loosen the lower LCA cam bolts to allow the bushings to flex more. Loosen the upper LCA pivot bolt for the same reason. Take off the 3 nuts holding the strut to the upper frame mount. Take out the lower shock bolt. Do NOT remove the center shock nut on the top. That's what holds the spring in compression.
At that point you can pry down on the LCA and wiggle the strut out far enough to install the three stud extenders on top of it, and place the spacer over them. Push the whole works back up into place, install the 3 top nuts, reassemble everything else, and you're done.
You may need to jack up the LCA a bit to reattach it to the spindle.
It works best if you have both front wheels off the ground at the same time. That way the sway bar isn't in tension and is much easier to work with. Also, don't try to attach either end until you've installed the spacers on both sides. Otherwise the sway bar will be unhappy with the unequal axle droop.
If you have the Sport, just be mindful of the XREAS tubing going to the shock, and don't over stress it.
__________________
2006 Sport Edition, V8, 206K miles, 2.5/1.5" OME lift, SPC adjustable UCA's, 255/75/17 BFG KO2's load range C @ 40psi. Regeared diffs to 4.30, with TrueTrac in rear.
1994 SR5, V6, 5-spd, Aussie locker front, Aisin manual hubs, Truetrac rear, 33/10.50/15 BFG KO's, stock suspension, OBA (Viair 400C), Front Range Offroad twin stick, 225K miles. Dual 2.28 transfer cases, for a 90:1 crawl ratio.
Last edited by RonJR; 08-22-2016 at 06:05 PM.
|
|
|
Reply With Quote
|
|
08-22-2016, 07:05 PM
|
#4
|
|
Member
|
|
Join Date: Jul 2015
Location: SF, CA
Posts: 631
|
|
|
Member
Join Date: Jul 2015
Location: SF, CA
Posts: 631
|
Hi Ron, excellent summary and it’s pretty much totally clear in my mind so I should be ready to take this on.
Quote:
Originally Posted by RonJR
Then you can loosen the lower LCA cam bolts to allow the bushings to flex more. Loosen the upper LCA pivot bolt for the same reason. .
|
One question: LCA cam bolt and pivot bolt… Any images showing where these two are? And what function does each serve?
Thanks!
__________________
2006 4-Runner XSP V6
SCS Ray10 17x8.5 (Matte Black)
Falken ATW3 Wildpeak 265/70/17
Daystar 2.5/1.5
|
|
|
Reply With Quote
|
|
08-22-2016, 07:56 PM
|
#5
|
|
Senior Member
|
|
Join Date: Dec 2015
Location: Colorado
Posts: 1,181
Real Name: Ron
|
|
|
Senior Member
Join Date: Dec 2015
Location: Colorado
Posts: 1,181
Real Name: Ron
|
The LCA cam bolts (two per each LCA) are the bolts that hold the bushings on which the LCA pivots as the suspension moves up and down. The cams adjust alignment (although it's likely they're seized if no one's touched the alignment for some time). Mark their rotation position before you loosen them, although you'll need an alignment anyway after you're done.
The pivot bolt I mentioned for the UCA is the same thing - it holds the bushing on which the UCA pivots as the suspension cycles.
It's best to leave the LCA and UCA bolts somewhat loose until you load the suspension again. That way the bushings can rotate and settle into their new positions - it helps reduce popping and squeaking after the lift. Just don't forget to torque them to spec before you head out for a test drive.
__________________
2006 Sport Edition, V8, 206K miles, 2.5/1.5" OME lift, SPC adjustable UCA's, 255/75/17 BFG KO2's load range C @ 40psi. Regeared diffs to 4.30, with TrueTrac in rear.
1994 SR5, V6, 5-spd, Aussie locker front, Aisin manual hubs, Truetrac rear, 33/10.50/15 BFG KO's, stock suspension, OBA (Viair 400C), Front Range Offroad twin stick, 225K miles. Dual 2.28 transfer cases, for a 90:1 crawl ratio.
|
|
|
Reply With Quote
|
|
08-23-2016, 06:21 PM
|
#6
|
 |
Junior Member
|
|
Join Date: Aug 2016
Location: Murfreesboro
Posts: 3
Real Name: Greg
|
|
|
Junior Member
Join Date: Aug 2016
Location: Murfreesboro
Posts: 3
Real Name: Greg
|
i find that lowering the lower control arm is the easiest way to drop the shock. I unbolted one of the sway bar links just so it would move a little bit. I've done this for when I replaced the springs with the no spring compressor method and just yesterday when I installed my budget boost spacer from Daystar. You figure you're going to get an alignment anyways so why not go with the path of least resistance. I will say it's a pain to get the LCA back in place without a floor jack, although But you can probably try using your bottle jack to hold it up to get it lined back up with the hub/spindle or whatever it is.
|
|
|
Reply With Quote
|
|
08-24-2016, 10:35 AM
|
#7
|
|
Member
|
|
Join Date: Jul 2015
Location: SF, CA
Posts: 631
|
|
|
Member
Join Date: Jul 2015
Location: SF, CA
Posts: 631
|
Thanks again to everyone, I look forward to starting the job on Saturday morning.
One side note, it sounds like people have really struggled with pushing the lower control arm down. That's interesting because I've never had much problem with this on other cars but I guess it depends on the bushing/sleeve designs and how they compress between the control arm and the cross-member/frame.
I'll report back with my impressions.
__________________
2006 4-Runner XSP V6
SCS Ray10 17x8.5 (Matte Black)
Falken ATW3 Wildpeak 265/70/17
Daystar 2.5/1.5
|
|
|
Reply With Quote
|
|
08-24-2016, 02:05 PM
|
#8
|
|
Senior Member
|
|
Join Date: Dec 2015
Location: Colorado
Posts: 1,181
Real Name: Ron
|
|
|
Senior Member
Join Date: Dec 2015
Location: Colorado
Posts: 1,181
Real Name: Ron
|
The LCA bushings on the 4runner are pretty stout, and they don't like to move. A long lever, like the handle on your floor jack, or any long piece of metal pipe, makes a good persuader to help things along. Loosening the cam bolts helps, but it will still be stiff. A strategically placed bottle jack can also be effective, and give you both hands free to maneuver the strut in/out.
Good luck on your Saturday project. Let us know how it comes out.
__________________
2006 Sport Edition, V8, 206K miles, 2.5/1.5" OME lift, SPC adjustable UCA's, 255/75/17 BFG KO2's load range C @ 40psi. Regeared diffs to 4.30, with TrueTrac in rear.
1994 SR5, V6, 5-spd, Aussie locker front, Aisin manual hubs, Truetrac rear, 33/10.50/15 BFG KO's, stock suspension, OBA (Viair 400C), Front Range Offroad twin stick, 225K miles. Dual 2.28 transfer cases, for a 90:1 crawl ratio.
|
|
|
Reply With Quote
|
|
08-24-2016, 02:10 PM
|
#9
|
|
Member
|
|
Join Date: Jul 2015
Location: SF, CA
Posts: 631
|
|
|
Member
Join Date: Jul 2015
Location: SF, CA
Posts: 631
|
Thanks Ron, last thing:
Where do you recommend the bottle back be positioned (top and bottom)?
__________________
2006 4-Runner XSP V6
SCS Ray10 17x8.5 (Matte Black)
Falken ATW3 Wildpeak 265/70/17
Daystar 2.5/1.5
|
|
|
Reply With Quote
|
|
08-24-2016, 04:17 PM
|
#10
|
 |
Member
|
|
Join Date: Aug 2016
Posts: 63
|
|
|
Member
Join Date: Aug 2016
Posts: 63
|
I am thinking about doing this to my 2008 is it worth it to just pay a mechanic to do this since he has all lifts and tools? Does anyone have a general idea how much they would charge? Similar experience.
Sent from my iPhone using Tapatalk
|
|
|
Reply With Quote
|
|
08-24-2016, 04:55 PM
|
#11
|
|
Senior Member
|
|
Join Date: Dec 2015
Location: Colorado
Posts: 1,181
Real Name: Ron
|
|
|
Senior Member
Join Date: Dec 2015
Location: Colorado
Posts: 1,181
Real Name: Ron
|
Quote:
Originally Posted by luke87gt
Thanks Ron, last thing:
Where do you recommend the bottle back be positioned (top and bottom)?
|
The more I think about it, I don't think I used a bottle jack on the front. I did for sure on the rear, to force the axle down far enough to remove the springs and install the spacer. I think in front I just pried the LCA down with a lever.
In any case, watch the brake lines and ABS wiring anytime you push the suspension out of its normal operating range. If you have a Sport, you'll also have to unbolt the bracket holding the XREAS line to get enough slack to install the front spacers.
__________________
2006 Sport Edition, V8, 206K miles, 2.5/1.5" OME lift, SPC adjustable UCA's, 255/75/17 BFG KO2's load range C @ 40psi. Regeared diffs to 4.30, with TrueTrac in rear.
1994 SR5, V6, 5-spd, Aussie locker front, Aisin manual hubs, Truetrac rear, 33/10.50/15 BFG KO's, stock suspension, OBA (Viair 400C), Front Range Offroad twin stick, 225K miles. Dual 2.28 transfer cases, for a 90:1 crawl ratio.
|
|
|
Reply With Quote
|
|
08-24-2016, 05:03 PM
|
#12
|
|
Senior Member
|
|
Join Date: Dec 2015
Location: Colorado
Posts: 1,181
Real Name: Ron
|
|
|
Senior Member
Join Date: Dec 2015
Location: Colorado
Posts: 1,181
Real Name: Ron
|
Quote:
Originally Posted by redbirds5
I am thinking about doing this to my 2008 is it worth it to just pay a mechanic to do this since he has all lifts and tools? Does anyone have a general idea how much they would charge? Similar experience.
Sent from my iPhone using Tapatalk
|
I would think a mechanic experienced at this would want 2-2.5 hours of labor to do the fronts, and maybe another hour for the rears, at whatever the going rate is. If all goes well, a good experienced mechanic should be able to do the fronts in < 2 hours, but they'd probably want to pad it a bit.
It took me 5 hours to do front + rear, but I spent a good hour re-machining the front spacers and standoffs because I didn't like the fit. I don't have a full lift, but I have a good air-lift frame jack that will pick up the whole front or rear of the vehicle about two feet and hold it rock solid.
__________________
2006 Sport Edition, V8, 206K miles, 2.5/1.5" OME lift, SPC adjustable UCA's, 255/75/17 BFG KO2's load range C @ 40psi. Regeared diffs to 4.30, with TrueTrac in rear.
1994 SR5, V6, 5-spd, Aussie locker front, Aisin manual hubs, Truetrac rear, 33/10.50/15 BFG KO's, stock suspension, OBA (Viair 400C), Front Range Offroad twin stick, 225K miles. Dual 2.28 transfer cases, for a 90:1 crawl ratio.
|
|
|
Reply With Quote
|
|
08-29-2016, 07:16 PM
|
#13
|
|
Member
|
|
Join Date: Jul 2015
Location: SF, CA
Posts: 631
|
|
|
Member
Join Date: Jul 2015
Location: SF, CA
Posts: 631
|
Update:
Thank you all again for the help.
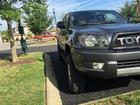
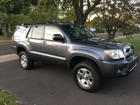
I managed to get the 2.5/1.5 Daystar kit installed on Saturday and here are some impressions:
First, the install took longer than I expected because it was my first time doing this job and it was also my first time working on the suspension of this 2006 4Runner as we've only owned it for about a year. It took me about 8hrs working with jackstands + hand tools with a couple breaks taken in between along with an oil change in the middle too. However, if I were doing it again I'm confidence that I can get the kit installed in 4hrs or less now that I'm familiar with everything. It is more or less a 4hr job...
Rear: I have heard some guys say that they got the rear kit in by just disconnecting the lower shock mounts, lowering the rear, and prying the spring in and out. I was able to get the springs out in that way but no way I could get them back in with the 1.5 spacer in there. I finally had to disconnect the driver's side panhard mount and the driver side sway bar link. Once I had those disconnected, I could lower the rear enough to allow the springs to slide back in without too much fuss.
Front: I ended up using the advice on this forum and rather than disconnecting the upper balljoint from the spindle (like the Daystar directions say), I just unbolted the lower balljoint from the spindle (2 bolts). I found that easier than fussing around with trying to break the upper ball joint free from the spindle.
Removing the strut/spring combo was fairly easy except for that back upper nut. Because of limited room, I had to use a box wrench turning small increments until I got it out.
For reinstall with the spacer bolted to the top of the strut assembly, there was absolutely no way I could push the lower control arm down enough to get the lower strut mount to line up with the mounting hole, I wasn't even close (even when I put all my weight on the lower control arm it hardly moved - I weigh 215lbs).
So I had to loosen the two big lower control arm bolts making sure not to move the position of the camber bolts. I marked them, but luckily the camber bolts never moved at all. Once those lower control arm bolts were loosened a few turns, the lower control arm could be pushed far enough downward to get the strut assembly bolted back with the spacer in place. Once I bolted the strut assembly back in, I made sure to jack up the lower control arm before I torqued the lower control arm bolts.
Oh, and I did remove the front lower engine plate and sway bar to gain more room.
Once I dropped the car and backed it out of the driveway, here are the numbers I recorded measuring from the ground to the center of the wheel arch (I expect the fronts to settle a little more after some miles):
Front Driver Before (After): 32 7/8 (35 15/16)
Front Passenger Before (After): 33 3/16 (36 1/4)
Rear Driver Before/ (After): 35 5/8 (37 1/8)
Rear Passenger Before (After): 35 3/4 (37 1/4)
You can see that the rear raised exactly 1.5" as I expected. The fronts raised a little more than I expected at 3 1/16", but again I expect that to settle down to 3" or so.
Lastly, you can visually see that the wheels have more positive camber and toe in, as expected. An alignment is in order...
Overall I'm happy with the results as the kit did what I expected and it was relatively cheap at only $125 or so. Hopefully this thread helps some of you guys who plan to tackle the job.
Next I'll work on getting a nice set of all-terrain wheels & tires!
Here is a pic attached
__________________
2006 4-Runner XSP V6
SCS Ray10 17x8.5 (Matte Black)
Falken ATW3 Wildpeak 265/70/17
Daystar 2.5/1.5
Last edited by luke87gt; 08-30-2016 at 01:02 PM.
|
|
|
Reply With Quote
|
|
09-13-2016, 04:35 PM
|
#14
|
|
Member
|
|
Join Date: Jul 2015
Location: SF, CA
Posts: 631
|
|
|
Member
Join Date: Jul 2015
Location: SF, CA
Posts: 631
|
Last point for those doing the install.
If you install a Daystar 2.5/1.5, you will be able to align the camber and toe to well within spec. However, you will not be able to get the caster within spec without getting adjustable upper control arms. With the stock upper control arms, you'll only be able to get about +2deg (my 4runner maxed at +1.9deg).
Some people report that the lesser caster will mean more sensitive steering on the highway. I haven't noticed any difference personally compared to stock, but many people argue that steering feel improves once you dial in closer to +4deg or so.
For now I'm happy and have no plans to get aftermarket upper control arms.
Just something to think about for those planning the lift.
__________________
2006 4-Runner XSP V6
SCS Ray10 17x8.5 (Matte Black)
Falken ATW3 Wildpeak 265/70/17
Daystar 2.5/1.5
|
|
|
Reply With Quote
|
|
09-13-2016, 05:18 PM
|
#15
|
|
Member
|
|
Join Date: Aug 2016
Posts: 63
|
|
|
Member
Join Date: Aug 2016
Posts: 63
|
I think I have come full circle and going to have my mechanic put this on for me. Any advice or pointers I should pre warn him about?
Sent from my iPhone using Tapatalk
|
|
|
Reply With Quote
|
 Posting Rules
|
You may not post new threads
You may not post replies
You may not post attachments
You may not edit your posts
HTML code is On
|
|
|
|


 Linear Mode


