 06-22-2017, 11:20 AM
|
#16
|
|
Junior Member
|
|
Join Date: Jun 2016
Location: Syracuse Ny
Posts: 15
|
|
|
Junior Member
Join Date: Jun 2016
Location: Syracuse Ny
Posts: 15
|
Great great write up. Really appreciate you taking the time to do this. I've read good things about the JBA's, I'll be going with them also.
|

|
 Reply With Quote Reply With Quote
|
|
06-23-2017, 04:56 PM
|
#17
|
 |
Senior Member
|
|
Join Date: Aug 2012
Location: longisland ny
Age: 36
Posts: 1,252
|
|
|
Senior Member
Join Date: Aug 2012
Location: longisland ny
Age: 36
Posts: 1,252
|
This should be sticky or linked into a sticky for sure.
Excellent, clear write up for a DIY how to.
I have the JBA high caster std arms for a little over a year.. they aligned great, they hold up great, they flex as good as I need on extended travel coil overs and parts replacements look easy. Eyeing the new JBA balljoint.
I also Painted them silver because Red isnt for everyone and thats the only way they come.
Last edited by Billynath1988; 06-23-2017 at 09:31 PM.
|
|
|
Reply With Quote
|
|
10-15-2017, 12:07 PM
|
#18
|
 |
Member
|
|
Join Date: Mar 2017
Posts: 46
|
|
|
Member
Join Date: Mar 2017
Posts: 46
|
Awesome write up. Thanks for taking the time to do this. Will be knocking this out when i do my lift.
Sent from my SM-G930P using Tapatalk
|
|
|
Reply With Quote
|
|
10-23-2017, 04:57 PM
|
#19
|
 |
Member
|
|
Join Date: Aug 2015
Location: NJ
Posts: 264
|
|
|
Member
Join Date: Aug 2015
Location: NJ
Posts: 264
|
Quote:
Originally Posted by Slowgoat

Also, make sure the Lower Control Arm is supported by a jack. The weight of the vehicle needs to be on the UCA for the bushings to seat properly. If you tighten the UCA through bolt without weight on the suspension, the bushings will be destroyed quickly.
|
Only true for stock type rubber bushings, not true for poly.
__________________
no more T4R...
|
|
|
Reply With Quote
|
|
10-24-2017, 11:39 PM
|
#20
|
|
Member
|
|
Join Date: Aug 2015
Location: NJ
Posts: 264
|
|
|
Member
Join Date: Aug 2015
Location: NJ
Posts: 264
|
I just did mine. I did not remove the battery or anything around it. I had to remove the bolts holding the brake hardline brackets to the frame so that I can push them aside to make enough space to put a socket on the UCA nut. Same applied to one small bolt holding the AC lines on the pass side, blocking the long bolt.
My Camburg UCAs use poly bushings so it didn't matter how I torque them down. I could fairly easily move the UCA by hand after torquing the nut to spec. Looking at OP's photos it appears his UCA has rubber bushings like stock so I guess those need to be tightened in the proper position.
I must say it took me a lot longer than I thought but not because I had any trouble - I was just really taking my time. If I was doing it on a weekend it would have been even pleasant but in this case it was evening after work so there was a bit of time pressure at the end, I do need my regular full 8 hours of sleep.
__________________
no more T4R...
|
|
|
Reply With Quote
|
|
12-04-2017, 01:05 AM
|
#21
|
|
Member
|
|
Join Date: Jun 2010
Location: Jacksonville, FL
Posts: 130
|
|
|
Member
Join Date: Jun 2010
Location: Jacksonville, FL
Posts: 130
|
Thank you very much for this write-up. It's been years since I did my lift & I've forgotten a lot of it; your write-up will be very helpful.
I'm confused about one part:
"Also, make sure the Lower Control Arm is supported by a jack. The weight of the vehicle needs to be on the UCA for the bushings to seat properly. If you tighten the UCA through bolt without weight on the suspension, the bushings will be destroyed quickly. You can torque the through bolt with the wheel on the ground, and the weight on the tire."
Does this mean that you only partially tighten the through bolt until you've got the wheel(s) back on & jack stands removed? I didn't see that as part of the last step.
If you support the LCA's with a jack are you raising them up or just keeping them at the level they were before the old UCA's were removed?
Thanks again for taking the extra time to post the pics & write-up.
__________________
2010 Mag Gray LE; Overland Warehouse 2.5" kit; LR UCA's; hard-wired radar detector; 17x8.5 MB Torque Wheels; 285/70/17 Duratracs (all 5); Bud-Built Bump-out Sliders 1/3 plating; WeatherTech Digiliners
|
|
|
Reply With Quote
|
|
12-04-2017, 01:36 AM
|
#22
|
 |
Member
|
|
Join Date: Jan 2014
Location: Sister Bay, WI
Posts: 986
|
|
|
Member
Join Date: Jan 2014
Location: Sister Bay, WI
Posts: 986
|
Quote:
Originally Posted by ArcticEd
Thank you very much for this write-up. It's been years since I did my lift & I've forgotten a lot of it; your write-up will be very helpful.
I'm confused about one part:
"Also, make sure the Lower Control Arm is supported by a jack. The weight of the vehicle needs to be on the UCA for the bushings to seat properly. If you tighten the UCA through bolt without weight on the suspension, the bushings will be destroyed quickly. You can torque the through bolt with the wheel on the ground, and the weight on the tire."
Does this mean that you only partially tighten the through bolt until you've got the wheel(s) back on & jack stands removed? I didn't see that as part of the last step.
If you support the LCA's with a jack are you raising them up or just keeping them at the level they were before the old UCA's were removed?
Thanks again for taking the extra time to post the pics & write-up.
|
You’re so welcome! I get such a kick out of helping you guys. I have had so many write ups help me, I just wanted to give back to our special forum. We are lucky.
Yes, you just don’t want to do what some did, torquing everything at full droop, unsupported.
It’s been a while, but a couple of the instructions and write ups I went through emphasized this. Without support or weight, the bushings must get pinched and shredded when weight is put on the suspension.
Some say it’s no big deal but I didn’t want to chance it (there were pics of the shredded bushings somewhere).
__________________
2022 LUNAR ROCK TRAIL SPECIAL EDITION
2010 MAGNETIC GREY SR5 PREMIUM
2004 V6 WHITE 4RUNNER SPORT
1995 V6 3.0 BLACK 4RUNNER 4X4 (Retired)
4th & 5th Gen UCA Install Thread
|
|
|
Reply With Quote
|
|
02-07-2018, 07:14 PM
|
#23
|
 |
Member
|
|
Join Date: Jul 2014
Location: Lake Charles, LA
Posts: 78
|
|
|
Member
Join Date: Jul 2014
Location: Lake Charles, LA
Posts: 78
|
I have the same JBA UCAs and they work great! Used this write up to help my install so thanks big time!
Only issue I had was that after my alignment the driver side UCA creaks pretty bad... Anyone else have this issue? Saw in another thread to uninstall and reinstall UCA but was curious if I've missed lubing something correctly. Ugh idk.
__________________
2015 Trail Edition Magnetic Gray
Magnaflow 12256, exhaust cutout behind y pipe, plastidipped emblems and valences, nfab nurf bars, hidden light mount in grille, engine silencer delete mod, 285/70r17 Nitto Ridge Grapplers, spider traxx wheel spacers, toytec Boss lift with superflex rear coils and FJ trim spacers in rear, high caster JBA UCAs
|
|
|
Reply With Quote
|
|
04-05-2018, 06:08 PM
|
#24
|
|
Member
|
|
Join Date: Dec 2016
Location: Las Vegas, NV
Posts: 94
|
|
|
Member
Join Date: Dec 2016
Location: Las Vegas, NV
Posts: 94
|
Is anyone running TRD pro wheels and 285/70r17 tires with these UCAs? Just want to be sure Id have enough clearance.
|
|
|
Reply With Quote
|
|
10-06-2018, 05:46 PM
|
#25
|
|
Member
|
|
Join Date: Sep 2016
Location: Central Florida, US
Posts: 167
|
|
|
Member
Join Date: Sep 2016
Location: Central Florida, US
Posts: 167
|
Missing a washer?
Great write up. I just finished installing mine. The JBA instructions differ slightly from yours in step 16. When the pin goes through there should be a thick outer washer, then the UCA, thin inner washer, then tube, thin inner washer, UCA, thick out washer. It seemed impossible to get it all together with one person (I borrowed my neighbor for that part). It takes someone pushing on the bolt while the other wiggles all the pieces into alignment.
Other than though, not a bad job.
__________________
2011 SR5 4wd
2004 SR5 4wd
1994 SR5 4wd (SOLD)
|
|
|
Reply With Quote
|
|
10-06-2018, 06:05 PM
|
#26
|
|
Member
|
|
Join Date: Jan 2014
Location: Sister Bay, WI
Posts: 986
|
|
|
Member
Join Date: Jan 2014
Location: Sister Bay, WI
Posts: 986
|
Quote:
Originally Posted by chester4Run
Great write up. I just finished installing mine. The JBA instructions differ slightly from yours in step 16. When the pin goes through there should be a thick outer washer, then the UCA, thin inner washer, then tube, thin inner washer, UCA, thick out washer. It seemed impossible to get it all together with one person (I borrowed my neighbor for that part). It takes someone pushing on the bolt while the other wiggles all the pieces into alignment.
Other than though, not a bad job.
|
Interesting does it look like they updated/changed it?
__________________
2022 LUNAR ROCK TRAIL SPECIAL EDITION
2010 MAGNETIC GREY SR5 PREMIUM
2004 V6 WHITE 4RUNNER SPORT
1995 V6 3.0 BLACK 4RUNNER 4X4 (Retired)
4th & 5th Gen UCA Install Thread
|
|
|
Reply With Quote
|
|
10-06-2018, 09:33 PM
|
#27
|
|
Member
|
|
Join Date: Jul 2018
Location: Humboldt County, CA
Age: 34
Posts: 136
|
|
|
Member
Join Date: Jul 2018
Location: Humboldt County, CA
Age: 34
Posts: 136
|
Man, I had never seen that Total Chaos video. Super good. And now I know that I should only be willing to pay for 14 minutes of labor for each side of a lift install! 
__________________
2004 Limited V8
|
|
|
Reply With Quote
|
|
10-07-2018, 10:46 AM
|
#28
|
|
Member
|
|
Join Date: Sep 2016
Location: Central Florida, US
Posts: 167
|
|
|
Member
Join Date: Sep 2016
Location: Central Florida, US
Posts: 167
|
Quote:
Originally Posted by Slowgoat
Interesting does it look like they updated/changed it?
|

Here's a pic. The instructions are not clear which washer goes in which place, but it's really tight, so this is the way I put it together. It took two people to get the UCA in place, one holding one of it, the other putting the inner washer at about 45 degree angle and using it to ramp the other end in place so that both inner washers are there.
Prior to getting help, I was considering using a bottle jack to stretch the UCA slightly...probably not a good idea.
__________________
2011 SR5 4wd
2004 SR5 4wd
1994 SR5 4wd (SOLD)
|
|
|
Reply With Quote
|
|
11-05-2018, 12:07 AM
|
#29
|
|
Member
|
|
Join Date: Aug 2017
Location: Michigan
Posts: 45
|
|
|
Member
Join Date: Aug 2017
Location: Michigan
Posts: 45
|
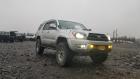
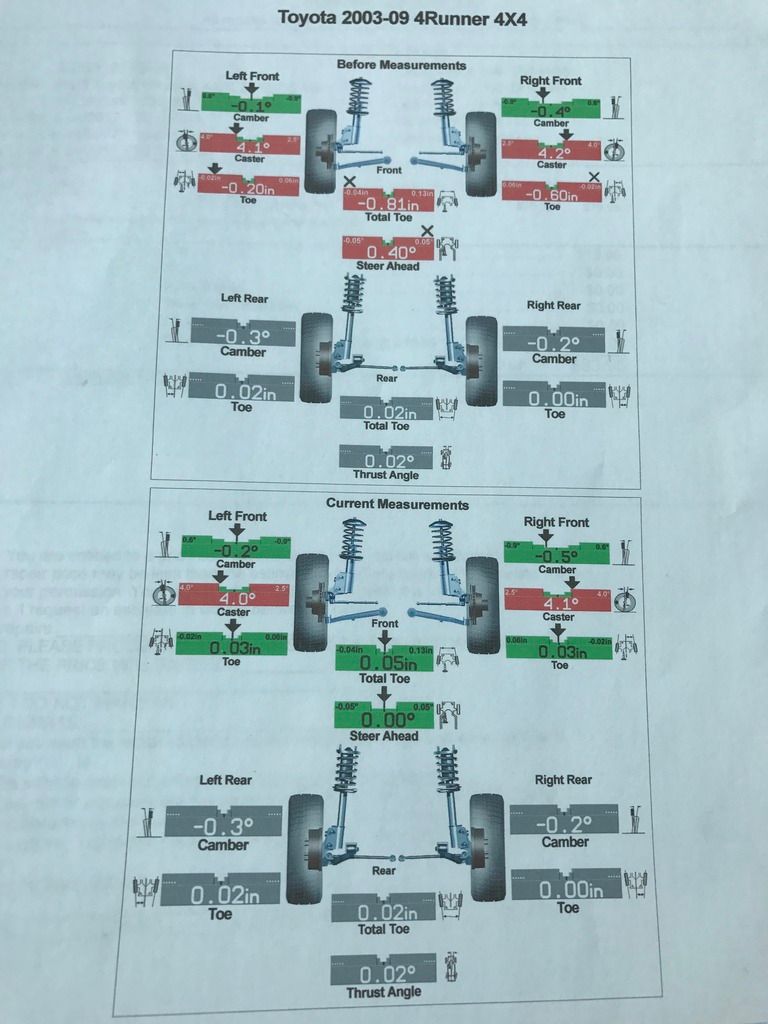
Caster
Your caster still on negative after the alignment, why is that? Its supposed to fixed it right?
One last thing, here is my alignment printout:
 [/QUOTE]
__________________
2006 SE V8
|
|
|
Reply With Quote
|
|
11-23-2018, 09:50 PM
|
#30
|
|
Member
|
|
Join Date: May 2015
Location: Philly, PA
Posts: 424
Real Name: George
|
|
|
Member
Join Date: May 2015
Location: Philly, PA
Posts: 424
Real Name: George
|
spectacular writeup. changing it up from camburg to JBA.
question: i'm doing a full suspension replace at 165k, still undecided between 5100's and 6112's. i'm looking for ride quality mostly dont care much about lift, but anticipate getting probably 2" anyway between new struts and springs. you guys recommend going with stock or the STD high caster? any reason not to get STD high caster? am i forced into at least 2" of lift in that case?
|
|
|
Reply With Quote
|
 Posting Rules
|
You may not post new threads
You may not post replies
You may not post attachments
You may not edit your posts
HTML code is On
|
|
|
|


 Linear Mode


