 08-23-2020, 02:18 PM
|
#16
|
 |
Senior Member
|
|
Join Date: Oct 2013
Location: illinois
Posts: 1,608
Real Name: Ron
|
|
|
Senior Member
Join Date: Oct 2013
Location: illinois
Posts: 1,608
Real Name: Ron
|
Quote:
Originally Posted by jgmx893

I never understood this chart exactly, can anyone explain it?
By my logic, with an offset of 0mm, the hub mating face should be exactly in the center of the wheel, no? Which should then mean a backspacing of exactly half the wheel width. This chart(among others I've seen), contradicts that. Anyone able to explain?
|
I agree and that is what the picture seems to show in opposition to what the chart says.
|

|
 Reply With Quote Reply With Quote
|
|
08-23-2020, 03:47 PM
|
#17
|
|
Member
|
|
Join Date: Jan 2018
Location: Long Island, NY
Age: 26
Posts: 94
|
|
|
Member
Join Date: Jan 2018
Location: Long Island, NY
Age: 26
Posts: 94
|
Quote:
Originally Posted by montijo505
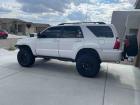
They are awesome. The finish and quality are great. I didnt have a hard time getting them to fit, but I had a 3 toytec coilover lift, body mount chop and SPC UCAs already. That being said, I did install a 1 body lift to help and also set my UCAs to the farthest position forward to help clearing the body mount. I did have to trim the lower front bumper quite a bit as well. Well worth it.
Attachment 338052Attachment 338053Attachment 338054
Sent from my iPhone using Tapatalk |
Sorry to chime in so late.. looks awesome by the way!! I just ordered a set of 285/55/r20 and ordering a set of 20x12 hard rock crusher H704s on a -44 offset. Little less offset then your wheels and Im planning on going the 3 suspension lift and 1 inch body lift along with any trimming needed, body chop and flattening the pinch welds. My only question is how did you move the UCAs forward more to help clearance and also how did you pick the bumper up off the frame to mount and compensate for the 1 gap that it would have had?
Sent from my iPhone using Tapatalk
__________________
2003 SR5 Sport Edition
|
|
|
Reply With Quote
|
|
08-23-2020, 04:11 PM
|
#18
|
 |
Senior Member
|
|
Join Date: May 2014
Location: Rio Rancho, New Mexico
Posts: 2,052
|
|
|
Senior Member
Join Date: May 2014
Location: Rio Rancho, New Mexico
Posts: 2,052
|
Quote:
Originally Posted by Parkss1181
Sorry to chime in so late.. looks awesome by the way!! I just ordered a set of 285/55/r20 and ordering a set of 20x12 hard rock crusher H704s on a -44 offset. Little less offset then your wheels and Im planning on going the 3 suspension lift and 1 inch body lift along with any trimming needed, body chop and flattening the pinch welds. My only question is how did you move the UCAs forward more to help clearance and also how did you pick the bumper up off the frame to mount and compensate for the 1 gap that it would have had?
Sent from my iPhone using Tapatalk
|
You will have more offset than me. The more negative, the wider if that makes sense. I commented on your thread the other day. I'll be interested to see if you can fit them.
I have SPC adjustable upper control arms that are meant for this very thing. The bumper stretches. You just loosen the bottom screws, install body lift and tighten them back down. No modification required.
Sent from my SM-G986U using Tapatalk
|
|
|
Reply With Quote
|
|
08-23-2020, 04:36 PM
|
#19
|
|
Member
|
|
Join Date: Jan 2018
Location: Long Island, NY
Age: 26
Posts: 94
|
|
|
Member
Join Date: Jan 2018
Location: Long Island, NY
Age: 26
Posts: 94
|
Quote:
Originally Posted by montijo505
You will have more offset than me. The more negative, the wider if that makes sense. I commented on your thread the other day. I'll be interested to see if you can fit them.
I have SPC adjustable upper control arms that are meant for this very thing. The bumper stretches. You just loosen the bottom screws, install body lift and tighten them back down. No modification required.
Sent from my SM-G986U using Tapatalk
|
Gotcha, was lookin for a 4 suspension lift but I guess they dont make them.. And yes a little bit wider, and lol now I remember! I didnt even realize but yes Ill be updating my tread when I get those wheels and test fit!
Sent from my iPhone using Tapatalk
__________________
2003 SR5 Sport Edition
|
|
|
Reply With Quote
|
|
08-23-2020, 05:07 PM
|
#20
|
|
Senior Member
|
|
Join Date: May 2014
Location: Rio Rancho, New Mexico
Posts: 2,052
|
|
|
Senior Member
Join Date: May 2014
Location: Rio Rancho, New Mexico
Posts: 2,052
|
Quote:
Originally Posted by Parkss1181
Gotcha, was lookin for a 4 suspension lift but I guess they dont make them.. And yes a little bit wider, and lol now I remember! I didnt even realize but yes Ill be updating my tread when I get those wheels and test fit!
Sent from my iPhone using Tapatalk
|
The max is about 3" suspension. IFS only allows so much because of the CV axles. Even at 3" the angles get weird and the boots just can't handle it. Make sure you do the "boot slide mod" after your lift.
Sent from my SM-G986U using Tapatalk
|
|
|
Reply With Quote
|
|
08-23-2020, 05:21 PM
|
#21
|
|
Member
|
|
Join Date: Jan 2018
Location: Long Island, NY
Age: 26
Posts: 94
|
|
|
Member
Join Date: Jan 2018
Location: Long Island, NY
Age: 26
Posts: 94
|
Quote:
Originally Posted by montijo505
The max is about 3" suspension. IFS only allows so much because of the CV axles. Even at 3" the angles get weird and the boots just can't handle it. Make sure you do the "boot slide mod" after your lift.
Sent from my SM-G986U using Tapatalk
|
Noted. Ill have to look into that and get into the subject on the forms and search around, also how hard was it to stretch to mount the bumpers back on ?
Sent from my iPhone using Tapatalk
__________________
2003 SR5 Sport Edition
|
|
|
Reply With Quote
|
|
08-23-2020, 06:37 PM
|
#22
|
|
Senior Member
|
|
Join Date: May 2014
Location: Rio Rancho, New Mexico
Posts: 2,052
|
|
|
Senior Member
Join Date: May 2014
Location: Rio Rancho, New Mexico
Posts: 2,052
|
Quote:
Originally Posted by Parkss1181
Noted. Ill have to look into that and get into the subject on the forms and search around, also how hard was it to stretch to mount the bumpers back on ?
Sent from my iPhone using Tapatalk
|
You don't remove them, literally like three or four screws on the bottom that attach to the radiator support. Loosen them don't remove, install body lift, then tighten screws.
Sent from my SM-G986U using Tapatalk
|
|
|
Reply With Quote
|
|
08-23-2020, 07:46 PM
|
#23
|
|
Senior Member
|
|
Join Date: May 2014
Location: Rio Rancho, New Mexico
Posts: 2,052
|
|
|
Senior Member
Join Date: May 2014
Location: Rio Rancho, New Mexico
Posts: 2,052
|
I followed this write up, don't forget to remove the spare as I did and then had to remove the rear bumper to bend that guide tab.
4Runner Body Lift Installation - Toyota 120 Platforms Forum
Sent from my SM-G986U using Tapatalk
|
|
|
Reply With Quote
|
|
08-23-2020, 07:50 PM
|
#24
|
|
Member
|
|
Join Date: Jan 2018
Location: Long Island, NY
Age: 26
Posts: 94
|
|
|
Member
Join Date: Jan 2018
Location: Long Island, NY
Age: 26
Posts: 94
|
Quote:
Originally Posted by montijo505
|
Thank you!! Will definitely be following. Awesome
Sent from my iPhone using Tapatalk
__________________
2003 SR5 Sport Edition
|
|
|
Reply With Quote
|
|
08-23-2020, 08:47 PM
|
#25
|
|
Member
|
|
Join Date: Jan 2018
Location: Long Island, NY
Age: 26
Posts: 94
|
|
|
Member
Join Date: Jan 2018
Location: Long Island, NY
Age: 26
Posts: 94
|
Quote:
Originally Posted by montijo505
The max is about 3" suspension. IFS only allows so much because of the CV axles. Even at 3" the angles get weird and the boots just can't handle it. Make sure you do the "boot slide mod" after your lift.
Sent from my SM-G986U using Tapatalk
|
Whats entailed in the boot slide mod? Im sorry Ive been searching but I cant find any material on it. Unless if you can redirect me to a thread.
Sent from my iPhone using Tapatalk
__________________
2003 SR5 Sport Edition
|
|
|
Reply With Quote
|
|
08-23-2020, 08:52 PM
|
#26
|
|
Senior Member
|
|
Join Date: May 2014
Location: Rio Rancho, New Mexico
Posts: 2,052
|
|
|
Senior Member
Join Date: May 2014
Location: Rio Rancho, New Mexico
Posts: 2,052
|
Quote:
Originally Posted by Parkss1181
Whats entailed in the boot slide mod? Im sorry Ive been searching but I cant find any material on it. Unless if you can redirect me to a thread.
Sent from my iPhone using Tapatalk
|
Look at
@ y=mx+b
history for his CV axle reboot write up, it's one of the steps he included.
Sent from my SM-G986U using Tapatalk
|
|
|
Reply With Quote
|
|
08-23-2020, 09:28 PM
|
#27
|
|
Member
|
|
Join Date: Jan 2018
Location: Long Island, NY
Age: 26
Posts: 94
|
|
|
Member
Join Date: Jan 2018
Location: Long Island, NY
Age: 26
Posts: 94
|
Quote:
Originally Posted by montijo505
Look at
@ y=mx+b
history for his CV axle reboot write up, it's one of the steps he included.
Sent from my SM-G986U using Tapatalk |
I took a look at his write up, being that my cv boots look to be in good shape, can I just loosen the small hose clamp end and stretch and retighten?
Sent from my iPhone using Tapatalk
__________________
2003 SR5 Sport Edition
|
|
|
Reply With Quote
|
|
08-23-2020, 10:04 PM
|
#28
|
|
Senior Member
|
|
Join Date: May 2014
Location: Rio Rancho, New Mexico
Posts: 2,052
|
|
|
Senior Member
Join Date: May 2014
Location: Rio Rancho, New Mexico
Posts: 2,052
|
Quote:
Originally Posted by Parkss1181
I took a look at his write up, being that my cv boots look to be in good shape, can I just loosen the small hose clamp end and stretch and retighten?
Sent from my iPhone using Tapatalk
|
Yes that's what I meant by it being one of the steps he included. Probably need a new clamp I don't think you can reuse
Sent from my SM-G986U using Tapatalk
|
|
|
Reply With Quote
|
|
08-23-2020, 10:06 PM
|
#29
|
 |
Senior Member
|
|
Join Date: Sep 2019
Location: Lafayette, IN
Posts: 1,032
|
|
|
Senior Member
Join Date: Sep 2019
Location: Lafayette, IN
Posts: 1,032
|
Quote:
Originally Posted by Parkss1181
I took a look at his write up, being that my cv boots look to be in good shape, can I just loosen the small hose clamp end and stretch and retighten?
|
Yes, but use worm drive hose clamps because the OEM clamps are pretty much 1 time use. You can really use whatever clamps, but I think HD or Lowe's worm drive hose clamps clamps are zinc. Stainless is ideal because no rust.
|
|
|
Reply With Quote
|
 Posting Rules
|
You may not post new threads
You may not post replies
You may not post attachments
You may not edit your posts
HTML code is On
|
|
|
|


 Linear Mode


