 07-15-2020, 12:42 PM
|
#16
|
|
Member
|
|
Join Date: Oct 2018
Location: Bend, OR
Posts: 246
|
|
|
Member
Join Date: Oct 2018
Location: Bend, OR
Posts: 246
|
Quote:
Originally Posted by TheHennDoggg

I found it at LKQ in Greenville, NC. I bought it and the sway bar without calipers or brake lines for $212 out the door.
|
$212..... for the whole rear axle and elocker?!
|

|
 Reply With Quote Reply With Quote
|
|
07-15-2020, 01:08 PM
|
#17
|
 |
Member
|
|
Join Date: Jun 2017
Location: Clemmons, NC
Posts: 55
Real Name: Henry
|
|
|
Member
Join Date: Jun 2017
Location: Clemmons, NC
Posts: 55
Real Name: Henry
|
Quote:
Originally Posted by BendRunner
$212..... for the whole rear axle and elocker?!
|
Yes! At LKQ as long as you pick the part off the vehicle yourself, a rear axle drum to drum (which includes the diff) is $200. A locker doesnt add to that, fortunately. I think the sway bar made it a little more than the online price.
Now, if you go to the already picked stuff on the LKQ website those axles and lockers will be up in the $1000 - $2000 range!
Heres some pics of us tearing it out of the FJ. Oddly enough, it was a 2wd automatic with a locker, which I didnt even know existed. Got lucky because if it was a manual I would have had to regear it.


Sent from my iPhone using Tapatalk
__________________
Ask me about my frame rust! 
Major Parts List:
Energy Suspension, full front end rebuild, 885& Toytec, SPC upper arms, dual-amped 7 speaker stereo, 5100's, rear swaybar delete courtesy of rust, v6 junkyard skidplates and a lot of elbow grease  |
|
|
Reply With Quote
|
|
07-15-2020, 01:18 PM
|
#18
|
|
Member
|
|
Join Date: Oct 2018
Location: Bend, OR
Posts: 246
|
|
|
Member
Join Date: Oct 2018
Location: Bend, OR
Posts: 246
|
I have a LKQ pick a part in my town, I am going to call. That is a steal.
|
|
|
Reply With Quote
|
|
07-15-2020, 01:27 PM
|
#19
|
|
Member
|
|
Join Date: Jun 2017
Location: Clemmons, NC
Posts: 55
Real Name: Henry
|
|
|
Member
Join Date: Jun 2017
Location: Clemmons, NC
Posts: 55
Real Name: Henry
|
Quote:
Originally Posted by BendRunner
I have a LKQ pick a part in my town, I am going to call. That is a steal.
|
Definitely do that, its probably the cheapest way to get these axles. Heres the price list (for at least the one near Greenville, NC)
Auto Parts Prices | LKQ Pick Your Part | LKQ Pick Your Part - East NC
Sent from my iPhone using Tapatalk
__________________
Ask me about my frame rust!
Major Parts List:
Energy Suspension, full front end rebuild, 885& Toytec, SPC upper arms, dual-amped 7 speaker stereo, 5100's, rear swaybar delete courtesy of rust, v6 junkyard skidplates and a lot of elbow grease |
|
|
Reply With Quote
|
|
07-15-2020, 02:08 PM
|
#20
|
|
Member
|
|
Join Date: Jun 2017
Location: Clemmons, NC
Posts: 55
Real Name: Henry
|
|
|
Member
Join Date: Jun 2017
Location: Clemmons, NC
Posts: 55
Real Name: Henry
|
I havent been updating this build thread as much as I really should been, so Im gonna post some projects Ive done in the past and havent really documented on here!
I created a swing out tire carrier for around $250. I made it out of:
2 inch square tubing 1/8in thick
A Destaco 344 Latch: DE-STA-CO 344 Pull Action Latch Clamp DE-STA-CO 344 Pull Action Latch Clamp: Toggle Clamps: Amazon.com: Industrial & Scientific
4x Innovations Locking Hinge: Swing Out Tire Carrier Hinge Assembly
4x Innovations tire carrier hub: Tire Carrier Wheel Mount Plate and Support Gusset
I first had to replace my rear crossmember due to rust. I found a 4th gen in the junkyard and cut the crossmember off for $30. I painted it silver with the intention of having it exposed later, and welded it on. This was challenging because Im a novice welder and the metal seemed so thin, but two nights of welding and grinding had some great results!


I was in my final year of college studying engineering, so I had access to SolidWorks to help design the swing before putting it together. Two things I looked out for were that the tire wouldnt block the brake light if I had 35s and the hatch could open even with 0 offset wheels. I modeled the rear crossmember so that I would know exactly how long the swing arm could possibly be


This model really sped up the process of figuring out what angles to cut all the square tubes at. It also helped me realize I couldnt have a Jerry can holder because the swing was too short; it would have hit the hatch.
Next, me and my buddy welded it together over a few nights during school.


I havent updated it since we built it, but next I plan to bedline it and slightly alter the angle of the tire so that it clears the hatch better when I get big tires. I tested it with a 33 and it didnt hit, but I fear a 35 will not be the same story

__________________
Ask me about my frame rust!
Major Parts List:
Energy Suspension, full front end rebuild, 885& Toytec, SPC upper arms, dual-amped 7 speaker stereo, 5100's, rear swaybar delete courtesy of rust, v6 junkyard skidplates and a lot of elbow grease |
|
|
Reply With Quote
|
|
07-16-2020, 04:31 AM
|
#21
|
|
Member
|
|
Join Date: Sep 2018
Location: Bahamas
Posts: 430
|
|
|
Member
Join Date: Sep 2018
Location: Bahamas
Posts: 430
|
Nice work. No more eye sore. 
|
|
|
Reply With Quote
|
|
07-16-2020, 09:40 AM
|
#22
|
|
Member
|
|
Join Date: Jun 2017
Location: Clemmons, NC
Posts: 55
Real Name: Henry
|
|
|
Member
Join Date: Jun 2017
Location: Clemmons, NC
Posts: 55
Real Name: Henry
|
Quote:
Originally Posted by Captsolo
Nice work. No more eye sore. |
Thanks man! You just wait and see when I post pics of the rest of the frame, some parts are bad lol
Sent from my iPhone using Tapatalk
__________________
Ask me about my frame rust!
Major Parts List:
Energy Suspension, full front end rebuild, 885& Toytec, SPC upper arms, dual-amped 7 speaker stereo, 5100's, rear swaybar delete courtesy of rust, v6 junkyard skidplates and a lot of elbow grease |
|
|
Reply With Quote
|
|
07-16-2020, 03:41 PM
|
#23
|
 |
Senior Member
|
|
Join Date: May 2014
Location: Rio Rancho, New Mexico
Posts: 2,052
|
|
|
Senior Member
Join Date: May 2014
Location: Rio Rancho, New Mexico
Posts: 2,052
|
Quote:
Originally Posted by TheHennDoggg
Thanks man! You just wait and see when I post pics of the rest of the frame, some parts are bad lol
Sent from my iPhone using Tapatalk
|
Name of the build fits apparently......
Sent from my SM-G986U using Tapatalk
|
|
|
Reply With Quote
|
|
07-17-2020, 07:27 AM
|
#24
|
|
Member
|
|
Join Date: Jun 2017
Location: Clemmons, NC
Posts: 55
Real Name: Henry
|
|
|
Member
Join Date: Jun 2017
Location: Clemmons, NC
Posts: 55
Real Name: Henry
|
__________________
Ask me about my frame rust!
Major Parts List:
Energy Suspension, full front end rebuild, 885& Toytec, SPC upper arms, dual-amped 7 speaker stereo, 5100's, rear swaybar delete courtesy of rust, v6 junkyard skidplates and a lot of elbow grease |
|
|
Reply With Quote
|
|
07-17-2020, 02:31 PM
|
#25
|
|
Senior Member
|
|
Join Date: May 2014
Location: Rio Rancho, New Mexico
Posts: 2,052
|
|
|
Senior Member
Join Date: May 2014
Location: Rio Rancho, New Mexico
Posts: 2,052
|
Quote:
Originally Posted by TheHennDoggg
|
I had nightmares, thanks a lot.
I kid but not the worst I've seen. Some patching should remedy most of it!
Sent from my SM-G986U using Tapatalk
|
|
|
Reply With Quote
|
|
07-17-2020, 02:35 PM
|
#26
|
|
Junior Member
|
|
Join Date: Apr 2020
Location: oregon
Posts: 18
|
|
|
Junior Member
Join Date: Apr 2020
Location: oregon
Posts: 18
|
Looks great 
|
|
|
Reply With Quote
|
|
07-17-2020, 03:12 PM
|
#27
|
 |
Member
|
|
Join Date: Dec 2018
Location: NC
Posts: 759
Real Name: Michael
|
|
|
Member
Join Date: Dec 2018
Location: NC
Posts: 759
Real Name: Michael
|
Quote:
Originally Posted by TheHennDoggg
|
Hey.....there I am lol
__________________
Titanium Metallic 2006 Limited 4WD V8 | Doug Thorley "Premium" Long Tubes/Modded Ypipe | Magnaflow dual in/dual out | True Dual Exhaust | Fr: 5100/885/SPC R: Icon 2"/2nd gen links | 285/75R17 G003s | Sherpa Princeton | Baja Designs | 5th Gen Brakes | Everything else is in the Build Thread
|
|
|
Reply With Quote
|
|
07-19-2020, 04:56 PM
|
#28
|
|
Member
|
|
Join Date: Jun 2017
Location: Clemmons, NC
Posts: 55
Real Name: Henry
|
|
|
Member
Join Date: Jun 2017
Location: Clemmons, NC
Posts: 55
Real Name: Henry
|
Quote:
Originally Posted by That_Titanium_4RNR
Hey.....there I am lol
|
The people almost got a crotch shot, but the sexy impact gun in the background stole the show. That reminds me:
@ That_Titanium_4RNR
helped my ass through the whole axle swapping project from start to finish, all while cursing himself that he didn't get to the axle first. Eyes peeled on LKQ's from here on out
Quote:
Originally Posted by juanlien
Looks great |
Thanks man!
__________________
Ask me about my frame rust!
Major Parts List:
Energy Suspension, full front end rebuild, 885& Toytec, SPC upper arms, dual-amped 7 speaker stereo, 5100's, rear swaybar delete courtesy of rust, v6 junkyard skidplates and a lot of elbow grease |
|
|
Reply With Quote
|
|
07-19-2020, 05:15 PM
|
#29
|
|
Member
|
|
Join Date: Jun 2017
Location: Clemmons, NC
Posts: 55
Real Name: Henry
|
|
|
Member
Join Date: Jun 2017
Location: Clemmons, NC
Posts: 55
Real Name: Henry
|
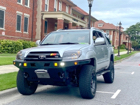
I welded a Coastal Offroad steel front bumper together this last semester at school. Convinced myself for a long time I didn’t need it since I would have to save up forever to get a winch to actually use it, but I wanted another challenging welding project and this fit the bill. 90% of the bumper was done with my little stick welder, which took a very long time for me to learn how to use correctly! Here are my progress pics.
Day before I started ripping it apart and the cleanest my 4runner has ever looked:

The goods:

Bumper delete:

Night 1 of progress, felt like grown- up legos

Got it structural enough to drive around town and to home (200 miles away). It stayed like this for longer than I want to admit because of school ramping up

Painted it black to make it more presentable knowing I’d have to keep it unfinished for awhile

Professional high-tier workspace with extra ventilation

I used Raptor Liner to coat it, which is just as easy to spray on and use as everyone says. However, it rained the night I painted it and I moved it hastily to get it out of said storm, ruining a few spots on the outside of the bumper. I will need to repaint it in the future.

Took the bumper back off to chassis saver the back of it. Chassis saver only takes a few hours to dry vs the 3 days raptor liner takes to cure, so it was easier to fit into my schedule.

I painted the apron, radiator support and everything behind the bumper so nothing stood out. The high gloss looks really sharp imo

My buddy gave me a fairlead so I can be a major winch poser. Besides the repaint, I think it still looks good. I thought the panel gaps were reasonable for my first time and am still glad I pulled the trigger on it!

Sent from my iPhone using Tapatalk
__________________
Ask me about my frame rust!
Major Parts List:
Energy Suspension, full front end rebuild, 885& Toytec, SPC upper arms, dual-amped 7 speaker stereo, 5100's, rear swaybar delete courtesy of rust, v6 junkyard skidplates and a lot of elbow grease
Last edited by TheHennDoggg; 07-19-2020 at 05:23 PM.
|
|
|
Reply With Quote
|
|
07-20-2020, 03:17 PM
|
#30
|
|
Member
|
|
Join Date: Jun 2017
Location: Clemmons, NC
Posts: 55
Real Name: Henry
|
|
|
Member
Join Date: Jun 2017
Location: Clemmons, NC
Posts: 55
Real Name: Henry
|
Patched a little more of my frame and added a 90 degree turnout to the exhaust. Cant wait to find a job and move out once the covid stuff is over so I can have some space!


Sent from my iPhone using Tapatalk
__________________
Ask me about my frame rust!
Major Parts List:
Energy Suspension, full front end rebuild, 885& Toytec, SPC upper arms, dual-amped 7 speaker stereo, 5100's, rear swaybar delete courtesy of rust, v6 junkyard skidplates and a lot of elbow grease |
|
|
Reply With Quote
|
 Posting Rules
|
You may not post new threads
You may not post replies
You may not post attachments
You may not edit your posts
HTML code is On
|
|
|
|


 Linear Mode


